Pine cones are a natural material that makes very beautiful New Year's decorations. It is possible to make such products yourself without much effort. Decorations made from pine cones can be added to a variety of bases, from shelves to door panels. Today we will take a closer look at what types of pine cone decorations are and how you can make them yourself.
Selection of materials
Decorations made from cones have long been popular. Their relevance has not yet faded, since they have a very interesting and attractive appearance. The pine cones make charming New Year's wreaths, small owls and dogs, and many other attractive figures. When making spectacular decor, you can use not only whole cones, but also their individual scales.
The latter make original ones flower arrangements different shades.


Jewelry made from cones is most often made using such materials, such as PVA glue, multi-colored ribbons, tape, old newspapers, wire, nylon threads, paints different colors. Often old ones are used in the manufacture of such decor. soft toys small sizes. Of course, the list of required materials primarily depends on the specific craft you plan to make.


How to do it?
Decorations from pine cones are usually made closer to the New Year. It is at this time that such decor is especially relevant. With the help of decorations made from pine cones, you can complement the decor both inside and outside the house. They are installed in a variety of places. Make these spectacular decorations quite possible with your own hands. Let's look at a few step by step instructions for the production of such decorations.

Garlands
The pine cones make wonderful New Year's garlands. Such decorations can transform any environment, making them more comfortable and, of course, festive. This decor can be hung on a variety of bases – it looks harmonious everywhere.


If you decide to make such an interesting New Year’s item yourself, then you should stock up on the following components:
- the cones themselves (the amount of these natural materials depends on how long the garland you plan to make);
- rope or twine (instead of these parts it is permissible to use a narrow ribbon);
- acrylic paints for gold or silver (instead of paints, it is permissible to purchase glitter and regular PVA glue);
- hooks (you can buy them at craft stores);
- brush;
- pliers;
- brush.


First you need to clean the workpieces. Remove all dirt and dust from them. It is very convenient to carry out such procedures using a small brush. You can also rinse the cones under a small stream of water. After this, the natural materials must dry.
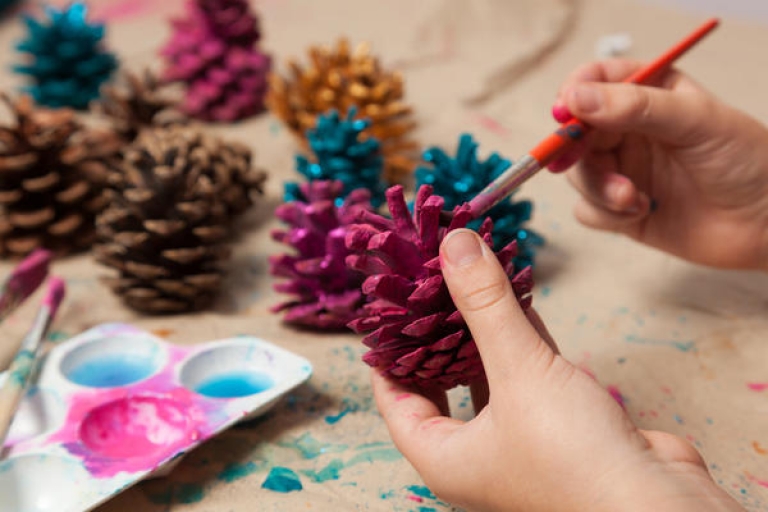
Using quality acrylic paints and a brush, tint the ends of the pine cones with a silver or gold mixture. It is very important to let each painted part dry completely. You can also use another method - apply PVA glue to the tips of the cones, and then generously sprinkle glitter on top of the laid adhesive layer. When the glue dries, you will need to sweep away any excess shiny particles.
All prepared natural materials are designed in a similar way.


Now take the hooks. They can be purchased both in craft stores and in many construction outlets. Insert them into the top of the pine cones using pliers. After that, take the twine, cut a piece of the desired length and thread it through each hole. Be sure to make knots on the hooks so that the cones are held on the base as securely and stable as possible; they should not dangle along the twine. It is advisable to wait between separate elements not less than 15 cm.
The top part of the cones can also be decorated with cute ribbon bows. The result will be a very beautiful New Year's decoration. As you can see, its production is very simple and takes a minimum of free time.


Wreaths
The pine cones make spectacular New Year's wreaths. Such decor is usually hung on door panels or walls. It is also possible to make Christmas wreaths from natural materials yourself. This process will take very little free time.
To make a beautiful decoration you will need the following components:
- pine cones (any size);
- colored wire;
- thick wire for making a frame base;
- wire cutters;
- pliers.


Now let’s take a step-by-step look at how these decorative items are made:
- first you need to weave a frame for the future wreath using thick wire;
- then the cones should be attached to the resulting frame using colored wire;
- filling the frame must begin with the inner ring;


- then you can move on to the outer ring;
- fix natural materials between frame rings;
- It is permissible to further decorate the manufactured part based on your own preferences, turning to paints, tinsel and other similar elements.
You can decorate such a wreath with a variety of details. From beautiful sparkly ribbons in different colors to candies, big red bows and sparkly sprinkles. In addition, such decorations are made from old iron hangers or newspaper frames.


Gnomes
Not only various wreaths and garlands are made from cones, but also various figures. Such natural materials make very cute owls. Cones are often used to make a symbol of the coming year. There are other interesting figures that many craftsmen resort to creating.
Making little gnomes from pine cones is not difficult.

To carry out such creative works you need to stock up on the following components:
- a large pine cone;
- multi-colored felt;
- silicone glue;
- eyes (preferably plastic);
- terry wire;
- peppercorns;
- thread and needle;
- a white sheet of A4 size office paper;
- cotton balls;
- scissors.


First you need to build the head of the future gnome. If you have a styrofoam ball or a large wooden bead lying around, you can use these parts. Usually they are glued or placed on the top of the cone, which will play the role of the base of the figurine, that is, its body.
If you do not have the mentioned components, then you can turn to this manufacturing option:
- wet A4 sheet with water;
- then you need to squeeze it and roll it into a small but dense ball;
- while the resulting part is still wet, it will need to be placed on top of the natural material;
- Next, you need to leave the ball on the cone until it is completely dry, and while the head of the future gnome is drying, you need to prepare the elements that will play the role of clothing for the felt figurine;
- to make a cap, you first need to make the correct pattern, after that we put the pattern on felt, trace all its contours, and then cut out the part;
- the next stage is processing along the edges with a loop-type seam;
- We sew or glue a small decorative ball of cotton wool onto the top of the resulting cap.


Next, you can move on to making the gnome’s handles. They are made from special terry wire. To do this, it is necessary to secure this element between flakes of natural material. The ends of the wire must be twisted, and the handles will be ready. Next we make the mittens. To do this, we draw patterns and make 4 identical parts on felt material. Each element must be cut out. Then they are stitched together. When the small mittens are ready, they can be placed on the looming figure.


Socks for the gnome also need to be made from felt fabric. They are glued to the bottom of the cone. After this, there will be very little left, and the gnome will be ready. You need to put a cap on it using silicone glue.
Now we design the face of the decorative figurine. You need to glue on the eyes and nose made of pepper, and also draw a mouth for the gnome.
To prevent the Christmas gnome from appearing too pale, his cheeks can be further reddened using dry blush or pink eye shadow.


It is necessary to complement the figurine with a miniature scarf. It should also be made of felt 20 cm long and 2.5-3 cm wide. Cut the fringe at the ends of the scarf. The result will be a very cute little gnome. You can make several similar figures and put them into one New Year's composition.


New Year's compositions
The pine cones make very beautiful holiday compositions, which are often used not only to decorate the home, but also to decorate gifts.
Let's consider several interesting combinations using natural materials.
- On a flat surface, for example, a shelf or window sill, you can lay out the cones and complement them with LED garlands. Such a tandem will look bright and attractive if you complement it with artificial snow and tinsel. Such decoration may contain both regular and sparkly cones.

- Cones look very attractive if they are placed in the same composition with tangerines, pine needles and other similar New Year-themed accessories.

- Often, to decorate a table or the interior in general, you take beautiful dishes (it can be either a glass or a wicker vessel), and then put many different cones into it. You can add it to this simple composition several small branches (not necessarily coniferous ones).

- Interesting and small compositions are obtained if the edges of the feathers of the cones are covered with snow-white paint with discreet sparkles, and the remaining surfaces of the natural material are painted with green paint. The result is a kind of mini-Christmas tree. It will become more original if you put it in a small clay pot and add a large golden star on the top.


- From the cones you can make a kind of frame for tall elegant candles white, inserted into elegant transparent candlesticks that look like neat vases. Such decorations will be a wonderful addition to the festive table.


There are a great many options for creating beautiful compositions with pine cones.
It all depends on the taste and preferences of the owners who want to decorate their home.


The long-standing Russian tradition of making New Year's toys with your own hands practically died out by the end of the twentieth century. Of course! There are so many magnificent balls, stars, animals and fairy-tale characters made in factories in stores! How could simple crafts—or a bronze-painted walnut—compete with them?
Today, fortunately, the tradition is returning, because the point is not what to hang on New Year trees, but to engage in exciting creative work with children, to instill in your sons and daughters the skills of handling scissors, glue, and paints. Among the most popular materials from which Christmas tree decorations can be made are ordinary pine and spruce cones.
Choosing cones
Cones are not sold in stores, except in those where you can buy a variety of unexpected materials for creativity. However, this is not particularly necessary. By spending time with children in nature, you can create required stock cones of any size and shape, while simultaneously collecting other natural materials that will be useful for your New Year's workshop: acorns with “caps”, beautifully curved twigs, moss, maple and ash seeds, hazelnuts.
The cones are closed, dense or with “ruffled” scales. In order to make New Year's crafts, you will need both, depending on what you plan to make. However, it can be a shame if the toy begins to open up under the influence of home heat - and your finished crafts become deformed.

To prevent this from happening, the cones must be pre-treated:
- so that the cones always remain closed, they are kept in a jar of wood glue for a minute;
- to open, cook for half an hour, and then dry on a radiator;
- You can open the cones by keeping them in the oven for a couple of hours (temperature 250 degrees);
- You can slightly change the shape of the cone by holding it in water, and then tying it tightly with thread and drying it.
Heat treatment, by the way, will destroy microbes on the cones and make the natural material safe, which is very important when it comes to children's creativity.

Materials, tools
In addition to the cones, you will need:
- paints,
- tassels,
- cardboard,
- scissors,
- threads and ribbons,
- pieces of fabric and felt,
- PVA glue,
- beads,
- sparkles.

Depending on what toys you are going to make and using what technologies, this list may expand. For example, you may need plasticine and papier-mâché paste, nail polish and wire in beautiful plastic insulation.
Operating procedure
Cones are a very beautiful natural material. To decorate a Christmas tree with them, sometimes it’s enough to simply paint each one in any color (red, yellow, purple) and add glitter. According to the experience of those who have been making crafts from pine cones for a long time and conduct a master class on the Internet, it is better to use enamel for painting pine cones rather than acrylic paints, which do not lie smoothly enough.

As sparkles, it is convenient to use multi-colored Christmas tree tinsel, the so-called rain, which must be cut very finely with scissors. The cones are dipped for a couple of seconds in a container of varnish used for woodworking, and then sprinkled with shiny multi-colored pieces of tinsel.
The New Year's toy is almost ready. All that remains is to make a loop so that it can be hung on the tree. For this purpose, self-tapping screws with a ring are used.

Now try to take on more difficult work. Make Santa Claus out of pine cones.
- step: paint the pine cone red, dry it.
- step: make a head out of a small ball, covering it with beige fabric.
- step: build a thick beard from cotton wool and glue it to your head.
- step: from a piece of red felt or some other dense fabric, make a cap for Santa Claus, in the upper part of it, provide a loop so that the toy can be hung on the Christmas tree.
- step: draw eyes or glue small black beads or beads as eyes.
- step: glue the head to the bump body using hot glue (this will make it more secure).
Your Santa Claus is ready. Now, using the same technology, you can make his constant companion - the Snow Maiden.
A separate master class includes making toys using plasticine. This material, however, has one drawback - its fragility, it can become deformed due to too high a temperature in the room or if the craft is carelessly picked up or dropped.
And the advantage of plasticine is that children who have already acquired skills in handling this material can be actively involved in this work.

Try making a hedgehog. The cone will make a body, and plasticine (lighter in color than the cone) will make a muzzle. You will also need to make paws, a traditional apple or a mushroom, which are placed on the hedgehog’s back. Using the same technique (using plasticine) you can make a swan, owl, penguin, squirrel, crocodile, hare - all those that your child wants to make.
An original effect is achieved by bleaching the cones: to achieve this, the cones are kept in ordinary bleach, used for washing and cleaning, for five hours. The ratio of the drug and water is 1:1.

You can get the illusion of a frosty day by covering the cone with silver (not multi-colored) sparkles: coat the cone with glue, roll in the sparkles, dry so that they have time to “grab” with the glue, and then brush off the excess.
Very cute toys, which, by the way, will look very professional, can be made using old broken and unnecessary plastic dolls and various animals. Taking a pine cone as a basis, you can glue a doll’s head, palms, and legs to it. In this way you can make Santa Claus, Snow Maiden, hedgehog, deer, dog, kitten, mouse, and various birds.

You don't have to hang all your crafts on the tree. To make your room truly New Year's, toys can be hung, for example, from a chandelier. By the way, this way you will be able to examine the toy in all its glory, from absolutely all angles.
As I promised in the article about wreaths, I’m telling you how to paint pine cones for the New Year. I'm sure you'll love it! And also, this is a way to keep your kids busy with “socially useful work,” that is, to use their energy for a good cause!
There are working rules:
- Be sure to wash the natural material! Pour water into a bowl and add a drop of detergent.
- Fully opened fir cones look better. You can even bake them in the oven for 1-2 hours until they open.
- It is worth working with gloves. And if sprays are used, then in a respirator and in the fresh air.
It remains to figure out what and how to paint it.
What and how to paint
How can you color pine cones?
There are many tools and methods that are suitable for this purpose:
- Sprays. Any aerosol enamels will do. We put newspaper under it and paint at a distance of 15-20 cm. It is better to paint on the balcony or street, aerosols have a very strong unpleasant odor.

- Sponge. If you plan to decorate a lot of material, this method is completely justified. It's best to put the sponge in a container. Saturate it with paint. Dip the cones, press and twist on the sponge on all sides.

- Glitter and hairspray. To keep the glitter in place, you can use a strong-hold hairspray. Spray the cone and immediately sprinkle it with glitter. It's too much to chicken out. You can do this several times until you achieve an even (or desired) coating.
- Glitter on PVA glue. Glue and water are mixed in a deep container. Pine cones are lowered and dipped several times. Then let the glue drip and leave to dry. You can apply glue with a brush and apply glitter on top.

- Acrylic paint or gouache. Apply with a brush or sponge. Just keep in mind that the sponge will only touch the edges. The brush will reach much deeper.
- White. Fill the cones with white. Close the container tightly and place in a dark place. After 18 hours the material will noticeably turn white. Don't be alarmed, the cones will close; This is their reaction to moisture. But then they will open again. And one more thing I’ll warn you about. Often in the photo you can see completely white shoots. But don't expect to get these results quickly. To do this, it is worth doing the procedure several times. And each time the cones should dry well.
- Can of paint. Yes, yes, this is the simplest, but most expensive method in terms of paint. We dip the lid on a string into a can of paint, take it out, and hang it so that the excess paint can drain off.

- Palm, stearin wax or candles. But this is a special tool. I'll show you a master class on how to work with it. They look unusual and pretend to be Christmas tree decorations. Another advantage is that they can be flavored.

How to work with polyethylene wax
Will need:
- You can buy wax (flakes) at a craft store or buy cheap candles;
- Dye (oil or liquid food coloring works well);
- Fragrance oil;
- 2 bowls for a water bath;
- Wooden spoon.
Making an original decoration step by step:


A couple of tips:
- The wax should be neither hot nor cold. Just keep it warm, then it will lie in an even layer. When we lower the cone for the penultimate time, it is already thicker.
- To achieve shine, dip into hot wax one last time.
But there are other decorating ideas.
How to decorate pine cones for the New Year
Interestingly, escapes are possible not only with the help of paints. There are other means:

Color combinations
Yes, and you shouldn’t forget about color combinations, so that your composition of pine cones does not look like a cheap handicraft. I don’t know my way around the color wheel myself, but I refer to the useful sign below as a guide:

Well, a few combinations of the cones themselves. 
I think that with the decor that we prepared today, the holiday will become especially beautiful and elegant! Did you like the ideas? Share them with your friends and subscribe to other articles.
You can create a huge number of crafts from cones. The cones are natural material, and also have a pleasant pine aroma. In this article we will look at how to make crafts from pine cones with your own hands.
You can convey the New Year's mood to your guests right from the doorstep. To design the New Year's wreath we will use:
- Cardboard
- Spruce or pine branches
- Cones
- Satin ribbon
- Not real snow
- Dye
- Glue gun
- Decorations for decoration, optional.
Many materials are used to make the base.

Christmas tree made of pine cones
One of the most popular crafts on the eve of the holidays is a Christmas tree. It's quite easy to do. Let's consider 2 options.
For work we will need:
- cones;
- cardboard;
- glue;
- pine branches or tinsel.
Step-by-step instructions for making a Christmas tree:
- Make a cone-shaped base out of cardboard.
- Attach the cones to the cone with glue at intervals.
- Attach pine branches or tinsel between the cones.
- The Christmas tree is ready. All that remains is to decorate the New Year's beauty.

Materials for making a Christmas tree craft from pine cones:
- cones;
- cardboard;
- stand;
- newspaper or paper;
- super glue.
Step by step instructions:
- Use cardboard to make a base for our Christmas tree in the shape of a cone.
- For good stability of the structure, insert newspaper or paper inside the structure.
- Cut a circle out of cardboard or use a wooden stand and attach a cone to it.
- Glue the cones to the cone from top to bottom. To avoid large gaps, turn the cones of each subsequent row in the opposite direction.
- If you have glued all the cones, then the main part of the craft is finished.

Pine cone decorations
Increasingly, in homes you can find decorations from pine cones, made with your own hands for the New Year or Christmas holidays. These are mainly pine or spruce garlands, or trees in pots.
When working with cones, it is very important to note their advantages:
- natural material without chemical impurities;
- pleasant pine smell;
- saving money by making decorations from pine cones.
If you wish, you can make almost any toy out of cones; you just need to use a little imagination and sometimes patience. Making Christmas tree ornaments is a great craft idea. After all, you not only make these decorations with your children, but also then dress up the New Year’s beauty or decorate interior items with the products. From the most basic crafts, you can make a gnome.
Step-by-step instructions for making a gnome:
- Leave the bump unchanged and use it as the basis for the gnome's body.
- Take a chestnut as the base of your head. Then glue on the beard.
- The legs and arms are made of fabric and stuffed with padding polyester or cotton wool.
- Clothes are made from felt.
- For girls' gnomes, they should braid their hair using threads.

Elongated cones can serve as decorations in the house or become a wonderful Christmas tree decoration. To make exclusive curtain tiebacks, take velvet fabric and secure a pine cone at the ends.
Hedgehog made from cones

You will need: cones, gray and black plasticine.
Master class
- Make a hedgehog's body from gray plasticine.
- Form an elongated muzzle.
- Make eyes and nose from black plasticine.
- Attach to the muzzle.
- Attach the cones to the hedgehog's body tightly to each other.
Garland of cones

You will need: pine cones, rope, glue gun or superglue, spray paint and glitter if desired.
Master class

Snowflake made of cones

You will need: long pine cones, glue gun or superglue, small paper snowflake or lace, decorative elements.
- Glue the bottom sides of the cones together.
- Attach lace to the center of the snowflake.
- Decorate to your taste.
How to make a beautiful ball of pine cones
You can diversify your interior decor by making an unusual ball of pine cones and acorns. It is quite difficult to do, but if you follow our instructions, you will cope with the task.
For the base of the ball, make a circle of paper, crumpling it as if making a snowball. Another base option could be trash bag. You can make a ball shape by filling the bag with cotton wool, padding polyester or newspaper. The opening of the bag should be closed or sealed. The base for the craft is ready.

We proceed to the main composition and glue the cones, evenly distributing them around the perimeter. After the product has naturally dried, the composition is ready.
The final stage is to cover the ball with varnish or snow. The finished product can be placed in a pot or vase, or simply attached to the ceiling with a thread.

Topiary made of pine cones
A good idea for creating an unusual interior is topiary trees. Sometimes they are called trees of happiness and good luck.

To implement the idea you will need:
- cones;
- plaster or sponge;
- clay or plastic pot;
- tree branch;
- a ball of newspaper or a flower sponge;
- threads;
- spray paint.
Step by step instructions:
- Form a ball out of newspaper and wrap it with thread.
- Apply glue to the base of the cone and glue it onto the ball as tightly as possible.
- Glue the remaining pine cones onto the ball. Try to choose buds of a similar size.
- Point the end of a pine branch and make a hole in the bottom of the ball.
- Secure the branch in the ball with glue.
- Paint the resulting ball with paint. The ball is decorated with dried leaves, branches, beads, and colored ribbons.
- Prepare the plaster for work: spread it in a pot, making an indent of 3-5 cm from the edge.
- Insert the branch with the ball into the plaster solution and fix until dry.
- Disguise the plaster with small pine cones or moss.
Making a candlestick from pine cones
For adding romance and creating New Year's composition for festive table answers a lit candle in a beautiful candlestick. The glow of festive lights will not only add coziness, but also diversify the interior. Even a child can make this accessory with his own hands. The main decorative material is cones, and other materials are selected depending on availability.

To create a holiday candle you will need:
- cones, acorns, chestnuts;
- glue;
- cardboard circle;
- aerosol paint.
Place all decorative elements on a substrate and paint. Painting should be done with open windows or outside. Glue a candle and prepared decorations to the center of the cardboard circle. A coniferous tree branch will look original in the composition.

Another option for creating a candle is to decorate ready-made candlesticks with pine cones and twigs. Unusual candles are made from glass jars. To do this, pour sugar or artificial snow into the bottom of the jar. Decorate the top with lace and attach a few cones. Treat the composition with an aerosol containing snow.

Santa Claus made of pine cones
You will need: cones, polymer clay, PVA glue, brush, superglue, hairspray, glitter, thin wire, ribbon.

Master class

Ideas for crafts made from pine cones


The ideal option for creating New Year's toys are cones of spruce and pine trees. Their advantage is that they have different shapes, color, texture, perfectly emphasize the New Year's atmosphere, look elegant. Therefore, it won’t be difficult to figure out what the future toy will look like.
The whole family can work on creating toys, and this will bring children and parents closer together. An additional advantage would be to use the gifts of nature for decoration - all kinds of twigs, needles, acorns, leaves, etc. From all this you can make a whole collection of New Year's toys.
DIY New Year's toys
 Everyone knows that decorating pine cones is a creative and inexpensive process. It does not require any special equipment, and all the material can be found in any park where pine trees grow.
It is best to use fallen cones, because those that are still growing on the trees remain juicy and may not dry out and become moldy. In addition, the collection process is very exciting and useful.
Preparing for work
For work we need:
- Glue gun, scissors, wire cutters and pliers, paint brushes, varnishes, paints.
- The raw materials themselves (cones, twigs, acorns, and so on).
- Scraps of fabric, leather (natural and artificial can be used).
- Buttons, beads, beads, satin ribbon - in general, everything that can be used for small decoration.
Before you start working, the cones need to be prepared. First, they need to be cleared of debris and soil, washed and dried if necessary (this is done away from heating appliances, in a well-ventilated area). If they turn out to be unripe and have not fully opened, they are placed in a low-heat oven with the door ajar. This is done so that moisture comes out of them and they open completely.
 The blanks can be left as they are, or you can resort to partial or complete coloring. Can also be decorated with decorative elements such as glitter or artificial snow. Everything will depend on your imagination.
Cones in natural form they are beautiful in themselves, but if you need to make any color accent in the decor, you will have to resort to painting. Their structure allows them to perfectly absorb and retain paint. You can even paint the pine cones with gouache, but it is short-lived and can soon peel off and get dirty. Therefore, acrylic paints are best suited for decorating a toy.
So that you get the perfect New Year's toy, you must have the following components:
- A set of acrylic paints, both in jars and tubes, so that you can apply individual strokes or create textures;
- Aerosol paints (car enamels are also suitable for this - they apply beautifully, tightly and evenly and dry very well);
- Aerosol paints in metallic shades. Their peculiarity lies in their expressive special effects.
- Finishing varnish in aerosol packaging. For easier, faster and more even application.
- Varnishes and dyes with the effect of a frosty coating, with sparkles, artificial snow and the like.
With their help you will decorate your cone in a very short time.
Since varnishes and paints have a very specific, pungent odor, work with them must be carried out in very well-ventilated areas or in outdoors. It is expected that several coats of application will be required. It must be taken into account that each layer must be dry. Work with painted material continues only if all layers are dry, otherwise the design or coating may be damaged.
So, let's figure out how you can make a simple Christmas tree decoration with your own hands..
Master class on Christmas tree decorations made from pine cones
The big advantage of this master class is that it can be done by the whole family and it will be an exciting event for all its members. Be sure to involve your children, because creating crafts is very useful and interesting activity. It develops hand motor skills, improves imagination, and teaches accuracy.
In order to make Christmas tree decorations from pine cones with our own hands, we will need:
- Cones of different sizes;
- Glue "Moment";
- Small size beads, any color;
- Gouache, brushes;
- Wire and satin ribbon.
 We paint the cones in green and wait for them to dry. Using a thin brush and white paint, we imitate snow along the edges of the cone. Using glue, glue the beads or cover the scales with glitter. We got miniature decorative Christmas trees covered with snow. We make a loop from a piece of wire and glue it to the top of the pine cone. The wire can be wrapped satin ribbon or rain.
New Year's ball
Surely, when you were in the club, everyone saw a large luminous ball that rotates under the ceiling. But you can make a similar ball with your own hands from pine cones for an atmospheric party on New Year’s Eve.
For this we need:
- Balloon;
- Toilet paper;
- PVA glue;
- Brown paint;
- Lots of bumps;
- Ribbon.
You can, of course, buy a ball blank at a specialized craft store, but you can also make it yourself. On the pout balloon the right size wind up toilet paper, soaked in a mixture of water and PVA glue (2 to 1). We give it a day to dry. Then we paint it in brown and wait again until the paint dries. You need to make sure that everything is well painted and gray the paper will not show through between the cones. Avoiding large indents, glue them one at a time.
To make the ball look festive, you can paint it over with sparkles or wrap it in a garland. We hang it from the ceiling or attach it to a chandelier.
New Year's gnomes
 If you wish, you can make absolutely any toy from pine cones, for example, gnomes, which kids really like, especially since it is not at all difficult. A fir cone is used as the gnome's body, and it is best to leave it in in kind and do not paint with anything.
In order to make the head of the figurine, use a plastic or foam ball. Using a marker or paints, you can draw his face. The arms and legs are made of wire, which is then covered with fabric. Clothes can be sewn by hand or sewing machine, and make shoes from leather or thick felt. If you also use your imagination, you can make girl gnomes with funny braids from threads.
Attention, TODAY only!


