What is the most important thing in preparation for the holiday?
Mood! How to create it?
Simple, quick and easy to make a crown for your little girl to make her feel like a princess or queen.
If you have a lot of time to prepare, then we make a kokoshnik on a frame, or using cardboard, we cut out a template, according to which we will make a crown for the Snow Maiden or a snowflake.
Unfortunately or fortunately, our kids are designed in such a way that they need a crown instantly, literally in a few hours, or even better in a few minutes.
Notice the crowns above. Each of them is done quite quickly, which cannot be said about these crowns in the next photo.
 The first one is made using the kanzashi technique. A fairly well-known technique that has gained popularity is when a product is made step by step from ribbons. This first photo, you see, is beautiful and exclusive, but very fragile and not suitable for children.
The second photo is a creation made from beads; it can be either on a wire frame or without it. Look how sequins and large stones fit in here.
The rest of the beads complement and add charm. You will find all these details in any bead store, there will also be wire, stones and everything else that is required for such a creation.
Photo 3 is a kokoshnik embroidered with threads with beaded elements and made on a frame. Such beauty requires a lot of patience, attention and perseverance from needlewomen.
These crowns are very beautiful, but they are not suitable for little girls, since the time required and the amount of labor exceed the few minutes that little girls are willing to endure.
Therefore, we will consider quick ways to create crowns, at the same time they are very impressive and beautiful, not at all inferior to kokoshniks, having the main advantage - they are light!
- from foil;
- from a plastic bottle;
- from a peat pot;
- from a cardboard roll;
- frame decorated with tinsel;
- from lace;
- from paper.

We chose exactly 7, since hundreds of thousands of variants are made using these templates; they will differ only in details in execution or decoration.
Having begun to master the creation of a crown, we invite you to remember that it also requires. Lots of ideas and tips from slippers, tights to finishing touches on accessories and crowns.
How to make a suit from what you have at home or decorate a dress to create an exclusive outfit.And the crown will look perfect on the hairstyles specially selected in this article. They are suitable for snowflakes and queens, Christmas trees, Cinderellas and princesses. Many photos and videos available will show how to repeat them on your girl’s head, which will make it easy to recreate them.
It's time to practice and make one of the suggested ones or your own version based on photo ideas.Have you already chosen a hairstyle for your princess?
Foil crown
 To create such a crown, you need a roll of baking foil, tear it off and make voluminous rolls, creating a ring, then attach the top to it.
The foil bends well and maintains its shape. In addition to the crown, you can make other signs of royalty.
It’s very easy to add new parts or entire units, the only disadvantage of this material is that if it’s compressed too much, it’s very difficult to straighten it out, but we recommend using everything you have at home and decorating it in 2 layers, giving it a “silver” look.
Crown made from a plastic bottle
We immediately found 3 options, they differ in the method of adding color and decoration, but the basis is the same - these are familiar and familiar plastic bottles that are found in every home.
Golden
 The gold crown is a plastic bottle painted with varnish, its main advantage is that it is not closed in a ring, it covers ¾ of the head, which allows anyone to wear it, a decoration according to their own opinion and taste.
Pay attention to the photo, painted plastic is well decorated with stones and other decorations.
You can buy them in the store or look for them from the needlewoman’s mother in her “hamster” supplies. Often purchased just in case. Choose sew-on stones or ones with a flat inner side.
What is the crown decorated with?
The stones are glued using a hot gun or superglue. Sequins are glued around them; one bag will be enough to decorate the entire surface. Beads are also suitable, but we recommend choosing small ones, they weigh less.
Diadem


To create a tiara, you need a 2 liter bottle and a template, according to which we will draw a design with sparkles. Then we carefully cut it out and it is ready, if there is still time, then we paint it and glue rhinestones and stones, so it looks more valuable.
Lilac
 The base is a plastic bottle wrapped in glitter paper, and the front is decorated with rhinestones in the shape of shells or sequins.
- Prepare a 5 liter bottle and draw the outline of the top part on it, first measure the baby’s head. The head volume should be equal to length the resulting shape and bottle.
- To make it look beautiful and without alterations, draw the outline for the first time not with a permanent marker, but with a proofreader or pencil, and only after correcting mistakes with a marker. We want to reassure you, even if it didn’t work out the first time, it’s okay, because the front part will be decorated and the flaws will be hidden.
- We cut out the edges and make sure that they are 1-2 mm larger than the outline, because By running a lighter along the edge, we will make the edges less sharp and dangerous for the child.
- We paste over inner part shiny paper, this can be wrapping paper or from gift bags. We do this with tape, a hot gun, or whatever superglue we have on hand. Remember about double-sided tape, it will stick perfectly to the plastic and hold the paper.
- We glue the sequins using a hot gun or superglue, applying from bottom to top so that the bottom layer overlaps the top.
- We decorate the lower part with matching tinsel. For better fixation, use a stapler; it will speed up the fastening process and the staples will not be visible, because she's brilliant. Double-sided tape will also work.
- To make sure the structure is strong, turn it upside down before trying it on, let it dry for several hours so that the glue sets everywhere, if you used it.
This crown is suitable for a queen or a mermaid, or maybe a butterfly or a queen. It all depends on the chosen color of the suit and the mood of your beauty.
Crown made from peat pot and cardboard roll
And these materials are definitely available in every home.
You will need: a cardboard roll of foil or a baking sleeve or film, possibly toilet paper, paint, washcloth, stones and sequins for decoration, a mustache clip, hot gun or superglue, paint brush and pen.  Its production is very similar, with a crown made from a cardboard roll, so we will not give the second description.
- We draw peaks on the crown so that we can see the necessary cutouts.
- We paint with white paint, it’s better to take acrylic, we need to paint our future crown inside and out;
- We cover it with golden paint so that our crown looks like a real one, we use a sponge for this.
- We decorate with rhinestones, beads, sequins, then glue a hairpin for fastening.
When making from a cardboard roll, you need to make a bottom. Leftover rolls are perfect. 
- Place the crown on cardboard or any thick paper. Draw a circle according to the shape, but you should get 2 circles. One is equal to the diameter of the crown, and the second is 2-3 cm larger.
- We cut out in a larger circle and make cuts, right up to the second circle, we bend these sections, we glue them inside so that the bottom holds tightly.
- It is extremely important to glue inside, because... the outside will look less aesthetically pleasing, so make sure that you don’t get confused and that all the tails of the bottom are inside.
- The remaining points are similar.
Frame decorated with tinsel
 Tinsel or rain is wrapped very tightly on the finished frame, preferably with glue or 2-sided tape; if possible, add beads to the peaks of the peaks.
It is important to check and remove any sharp or scratched parts using tape or other means. If there are sharp ends, drop them on them using a hot gun or dip them in PVA glue and let them dry.
Talk to your child what shape of crown she wants, show her different variants, but choose not the most complex ones.
Tinsel with a steel vein has appeared in stores; if you find it in a store, you will speed up the manufacturing process several times. There is no need to wrap anything, you just need to connect the individual parts.
We make a beaded crown on the frame, but such a crown cannot be called simple and quick, so it was left out of the top, but crowns sometimes turn out simply breathtaking. To make it you will need: pliers, round nose pliers, wire, beads and beads, a lot of time and patience.
Lace crown
 We starch any lace you like or grease it with PVA glue (or rubber glue), let it dry, paint it with acrylic paint and give it the desired size (put it on a jar or bottle).
What to do if you don't have lace?
Take a closer look, perhaps there are some lace curtains or an unnecessary blouse with openwork elements. This will do too. You just need to cut out the desired openwork element of the required length and then everything follows the algorithm, so don’t worry, even if this piece is stained or stained.
The advantages of this crown are its simplicity and accessibility, the disadvantage is the time it takes to dry.
The video will teach you how to make a lace crown:
Paper crown
Paper is a material that is found in every home, so it is the easiest way to make a crown in a matter of minutes. Naturally, it will be far from festive and will be simple, but if you spend a little more time decorating it, you will see that it will surprise and delight many guests of the holiday party.
Which crown options are the simplest:
- according to a paper template;
- origami;
- diadem;
- kokoshnik;
- from a paper plate.

Nowadays, many templates have appeared on the Internet; if you print them out and place them on a hard base, you will get a crown; an alternative option is to glue them to cardboard.
Pay attention to the 5th and 6th crowns, just cardboard or paper decorated with sequins, and in the second case lace and some beads are glued on.
Before you start cutting out the crown, measure the child's head to determine whether it will have an elastic band or fit tightly.
How to make a work of art from a simple crown?
- Choose a suitable simple template, the simpler the better. Apply it to whatman paper, print it out and transfer it in a pencil, or immediately draw peaks on whatman paper.
- Cut according to the template to the required length. If the Whatman paper is not very dense, then glue the inside into another layer or with colored silver paper.
- Purchase from a craft store: silver-colored snowflakes, braid with rectangular or pointed, silver-colored rectangular parts, glitter glue or glitter (gel glitter), simply replace it with PVA glue and glitter.
- On the cut out template we apply a pattern in shape reminiscent of drawing frost on the windows only in a very simplified version, leave room for snowflakes - they are the main accent of the crown, glue them using a hot gun or super glue. Lay a braid along the edge so that each bend has a border of them. If you don’t want to draw, then choose a piece of fabric with such a pattern in white or transparent.
- Try on the finished crown and sew on an elastic band if you have planned one, but pre-treat the edges with tape or glue wide elastic band, if you did not glue the 2nd layer of whatman paper.
It is important to choose everything in silver color, then white + silver will look elegant and in the style of snow.
This crown is suitable for both a snowflake and the Snow Queen, as well as a princess or other fairy-tale characters.
For a crown using a template you need: a crown template, cardboard from the box, silicate and super glues, beads, beads, sequins, a hoop, rhinestone stickers, a container for glue, brushes for glue and a tool for laying out beads.
How this can be done at home is shown step by step in the video:
Crown for the Snow Queen
A kokoshnik is made from paper in the same way, as is a tiara, for decoration, tinsel or rain is often used, but the braid looks more advantageous, as do snowflakes instead of sequins.
Kokoshnik
Using origami technique
 You will need: a sheet of paper and strictly follow the folding instructions, decorate it with rhinestones, sparkles, snowflakes, beads and seed beads to match your princess’s costume.
But that's not all to make a high crown using the origami technique. It is enough to bend the required sides correctly.
Please note that there are 2 instructions in the photo, so choose the version of crowns that you like best.
Our top is all closed, but one more type of crown is left out. The reason for this is that they are easy if you master the crochet technique.
Note for needlewomen
Simple crowns or kokoshniks, with and without beads
If you know the beading technique, you can make crowns like these for your pet. We recommend making crowns on a wire frame, then the problem of maintaining the shape will not worry you.
Crochet crown

To crochet a crown, we use non-cotton threads; remember, threads with lurex will make sequins and small rhinestones invisible.

Delicate crowns for snowflakes


We suggest right now to knit a crown in 30-40 minutes, even for a beginner!
You will definitely know the answer to the question of where to get it with video lessons for beginners.
Here is a crown on a headband, a hair clip, ideas for creating a crown for any head size. Just take 30 minutes and grab a hook and thread, and then the magic of transformation will follow.Tie any of the crowns the right size and volume, all special calculations are given.
A few more secrets about tying beads, pay attention to the photo.
What to do if the threads are the wrong color?
When making a crown from threads of the wrong color, you shouldn’t be upset, you can paint it, but then you shouldn’t tie in beads, it’s better to sew them on later.

If you are knitting along the edge, another option is to put the beads on a loop, but if you want them to be on top of the product, then it is better to string them on a thread before knitting and knit them through a double crochet, so all the beads will lie on top. Single crochet, we show 2 knitting methods in the photo. 1 is an option on the Russian-language Internet, and 2 is an English-language option.
Now you have a lot of ideas and ready-made instructions for implementation, if you found our review useful, click on the buttons on social networks.
If you have a boy, then we offer you variations of crowns. So which crown will suit your knight? It's time to choose and make a crown with your own hands according to his order. Moreover, master classes with photo and video instructions.
And also New Year's costumes: squirrels, hedgehogs, bunny, for everyone who wants to look original and surprise their friends and those invited to the holiday.
And if you need more creative ideas and tips, then pay attention to this link l. Many will receive a prize for the original costume! It's time to start right now and create your own version New Year's costume, because you are limited only by your fantasies.
Step-by-step master class on making a universal crown

This crown is ideal because it has no size and is simple, suitable for both a very young snowflake and an older one.
You will need: a thick elastic band or stretchable bandage, plastic cup, snowflakes, lace and all the beautiful sequins and half-beads for decoration.
- Cut out a shape similar to a tiara from a glass.
- Sew the elastic band to the plastic form on both sides.
- We cut off the bottom of the glass, where there is a curved sill, and decorate it with lace, sew it to the bottom with stitches using a needle and thread. We glue half beads on top of the lace to create the desired accents.
- We lay out a tiara from snowflakes and glue it using a hot gun or superglue.
How to make a universal crown for any size head for a snowflake, video master class:
Tiara crown
We will need: an old tiara, mesh with sequins, tulle of 2 densities blue and white, snowflake, scissors and threads, sewing machine.
- In order for our snowflake to be fixed and stay on the tiara, it is necessary to make a hard backing from tulle.
- To do this, measure the size of the snowflake, applying it to the tulle and make a cut with a margin. From the resulting piece we make a dense, dense assembly either with a needle or with a machine. The denser the base, the better, so we make assemblies frequently.
- The resulting volumetric part will not suit us; we need to make it flatter and evener using an iron with the tulle or guipure mode.
- We adjust the blue tulle onto white.
- The third layer is a thin white tulle, it will be the background for the snowflake. Therefore, we lay it in an uneven fold and then attach it.
- We cut off the lower uneven edge of the tulle, then glue the tiara to it on top, thereby covering the seam. Glue using a hot gun.
- Similarly, glue a snowflake in the center.
- We cut off all 3 layers giving the crown a shape similar to a diadem. We move from the sides to the center, where our snowflake is located. Check that it is symmetrical.
- Then use an iron to add volume and fluffiness to the back layer.
- The fairytale princess's crown is ready, it's time to try it on and go to a ball or matinee at school or kindergarten.
Video on creating a crown from an old tiara:
Beaded crown
Beaded crown with bezel
Crown of Autumn
Autumn crowns are another type of individual beautiful jewelry, which is the perfect time to please your girls in the fall, when there are especially many autumn leaves.
How is a crown made from leaves?
There are many options for creating autumn crowns:
- we weave a wreath from maple leaves;
- from maple leaves by darning the tips of adjacent leaves;
- we glue or screw the leaves onto a finished frame made of paper or wire;
- We cut out leaves from paper or other materials and glue or sew them in the desired sequence.
On a rim of leaves
Secure the leaves with tape
Another option with threads for attaching to the rim
Autumn paper crown
Leaf darning method
forest crown
A chic crown made of: hoop, wire, beads and roses.
Detailed video on creating a crown:
Have a great mood and inspiration for creating a costume with a crown.
In this section we will teach you how to make crowns with your own hands. Why might you need such an accessory as a crown? First of all, for children's party, in particular for New Year's party in kindergarten or school. Of course, the easiest way is to buy a ready-made crown in a store. But, you must agree that it will be much more interesting and useful for a child to make a crown with his own hands together with mom or dad. On our website you will find crowns for both boys and girls. You will learn that you can make a crown with your own hands not only from paper or cardboard. The crown can also be sewn from felt, made from wire and beads, for example. A very beautiful crown for a princess can be made from lace. Even you can make a crown with your own hands from a paper plate. Small child . A suitable crown will complement a festive costume, giving its owner a sophisticated look and individuality. In addition, children can use homemade crowns in everyday life.
role playing games
, and not just on special occasions. 1. How to make a crown. DIY paper crown A large number of all kinds of crowns can be made from paper. A very simple technique for making a paper crown with your own hands is described on this site.


Made from thick paper golden color, glue them together as shown in the photo. All you need to make your own paper crown is a set of stickers. No glue, no scissors, or any other additional materials or devices are required.

2. DIY crown. How to make a paper crown
How else can you make a paper crown? It's very quick and easy to make a crown from a paper plate. The finished crown will need to be decorated: with sparkles, purchased pom-poms, sequins, beads, tinsel, rain, etc. Entrust this part of the work of making the crown with your own hands to the child.


Good idea- use a ready-made paper crown template.

On many sites you can find, download and print such templates.

For example, on the well-known Creative Park website from Canon you can download a template and instructions for making such a paper crown.
But what an original paper crown can be made from paper strips twisted at the ends. Either a paper wig, or a DIY crown. A great option for a fun children's party. 3. DIY cardboard crown. How to make a crown out of cardboard You can make a crown with your own hands not only from paper, but also from cardboard. A cardboard crown is more durable and holds its shape better. Good in making


New Year's crown
use corrugated cardboard. Below we provide examples of crowns made from cardboard. The cardboard crown is decorated with artificial stones, which can be purchased at a jewelry store.
In the second photo, the crown is made of ordinary cardboard, which is used for packaging. To obtain corrugated cardboard, the top layer was removed from ordinary cardboard.
You can remove this layer in this way:
1. First glue the parts to each other. This is important, since the glue will prevent the experimental part from curling due to water.
2. Prepare an awl or thin screwdriver, a sponge and a container of water.
3. Using a sponge, wet the part and wait two to three minutes.

You can also make a crown with your own hands from a cardboard roll of toilet paper. To do this, you just need to cut triangular teeth on top of it. You can decorate the crown with your own hands using colored tape; stickers, sparkles, sequins, feathers, etc. are also suitable for decoration. You can wear such a homemade crown with an elastic band or attach it to a hairband. The crown for the princess is ready!


4. DIY crown for a boy. DIY King's Crown
On this site you will find detailed master class on how to make a king's crown with your own hands. To make a crown for a boy you will need a regular and a corrugated one. colored paper. Be sure to decorate the king's crown with artificial plastic pebbles or glass beads at the end.

You will also find a template for another crown for a boy. Print the crown template on yellow colored double-sided paper, decorate it, and glue the parts of the crown together with your own hands.

If you know how to sew, then it will not be difficult for you special labor sew a felt crown for the king. Sew an elastic band at the back that will secure the finished product to the head.

5. DIY crown for a girl. DIY princess crown
We can advise you to make a crown for a girl from lace. This is a very simple and original way to make a crown for a princess with your own hands. For this craft you will need lace and a special fabric hardener.


First, decide on the size of the future crown. After this, make a cylinder of a suitable size from cardboard or a piece of whatman paper, wrap it with cling film. Now take the lace and wrap it around the cylinder. Treat the lace with fabric hardener and leave to dry.

When the lace has dried and acquired the required hardness, remove it from the cardboard cylinder. All you have to do is decorate the crown for the princess with your own hands. First paint it, then glue or sew on decorations.
It should be noted that the method described above on how to make a crown for a girl with your own hands is quite lengthy, because... you have to wait a long time for the lace to dry. There are more quick way make a crown for the princess. To do this, instead of fabric hardener, you will need spray paint in a can. Everything is done the same way as we described above, only the lace is treated not with fabric hardener, but with spray paint. The paint dries much faster and, most importantly, gives the lace the necessary strength. This way you "kill two birds with one stone."
A crown made of paper, beads, and autumn leaves is quickly crafted. From the article you will learn what icing is and how to make a sweet tiara from cake mastic.
DIY beaded crown
Choose any of the options presented and go for it. See how easy it is to make a princess crown.
Here's what you'll need to get started:
- 2 types of wire: a thick section for the base and a thin one, on which we will string decorative elements;
- pliers;
- beads;
- pearls;
- beads.

Attach it with thin wire to the base. This is the kind of princess or queen crown you should get at this stage.

Next, string beads onto a thin wire. Attach these decorations to the base by placing a pearl or large bead inside.

This is such a cute queen crown.

If you don’t have beads, but have other materials, you can quickly make a decoration for a girl’s head.

For this we use the following:
- various beads with large hole diameters;
- cleaning tubes - 5 pcs.;
- wire cutters

Now you need to cut the remaining 3 tubes as follows:
- the first - in half;
- the second - into 3 identical parts;
- from thirds - cut off 2/3 of its length.

Fold each piece in half and secure them to the crown as shown in the photo. In this case, the longest tube will be in the center.

String beads onto the decoration and the princess crown is ready.
How to make a keychain with your own hands?
If you need a crown for a girl but want to practice making a small piece of jewelry, then start by making a keychain. This thing will also certainly come in handy. You will be able to take out your keys and admire the keychain, which will be made in a single copy.
Here is a list of what you need for this craft:
- beads of three colors;
- fishing line;
- wire;
- pliers or round nose pliers.
Before purchasing beads, check to see if they have a hole large enough to allow 2 turns of wire to pass through them without obstruction.

Cut the wire to the required length and string 18 red beads onto it. Then pass the end through their holes and tighten the loop.

Place another 18 beads of the same color on this wire, also pass its free end through their holes, as a result, you will get a figure eight like this.
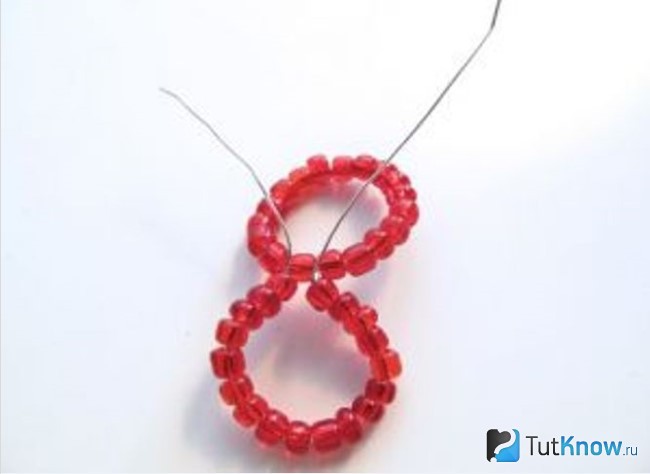
Place one circle of these small beads on top of another. Tie them together with the ends of the wire, trim off the excess edge.

On the remaining one, string 7 white beads, then one red one, then again 7 white beads. Fold this piece over to the opposite side of the ring and secure it.

Now, to the place where one red bead is located at the top, tie 2 more identical pieces of wire crosswise. Since it is bent in half, you will get 4 more fragments of the crown, string 7 white beads onto each of them, and secure with wire.

Wind another piece of wire to the top of the crown and place 12 blue beads on it. If it's a keychain, then thread the key ring through first and then secure the wire.
Here's how to make a crown so that it can become a small decoration or also a keychain.

Read how to literally make a brilliant head decoration in half an hour.
Paper crown - master class

It's amazing how this simple material It turned out to be such an elegant product. Of course, in addition to this basics, you will need something else, namely:
- gold wrapping paper;
- necklace made of artificial pearls;
- glue;
- decorative large stones in the shape of hearts, diamonds and small ones;
- glue gun;
- scissors;
- and, of course, thick white cardboard for the base.
You can first measure the child's head with a flexible measuring tape, and then transfer the measurement to cardboard. Cut with an allowance so that the edges can be joined and glued.
But don't seal them yet. Place the cardboard blank on the work surface, apply a design that will be inside the crown and on top of it. Cut along these lines. If you want your work to be perfectly neat, then first apply the design to the template, then attach it to the cardboard and cut it out.
The same template will help you create the desired curls from gold wrapping paper. Lubricate it from the inside with glue, attach it to the cardboard blank, and connect it. Glue the 2 parts of the crown together and at the back.
Now apply melted silicone from a hot glue gun to the bottom edge of the crown and place the bead necklace on this spot. If you don't have one, then use individual beads, gluing them at the same distance.
A glue gun will also help to attach large and small pebbles. When the work dries, you can put it on the head of a girl or boy. After all, this product can be created not only for a young lady. The king's crown is also made for the holiday.
The templates below will help you make the top cutouts on your headdress so that they are neat and even.

Choose the shapes that you like best and make a template based on them.

Jewelry made from mastic
Housewives know that this sweet mass helps to decorate confectionery products so that they turn into works of culinary art.

At first glance, it seems that making such a cake is very difficult, but it is not so. The cakes are baked from biscuit dough in round shape. If you don't have one, a suitably sized oven-safe frying pan will do the trick. You can even bake it in a slow cooker, in a bowl.
Then the sponge cake is cooled slightly, removed from the mold, and cut into 3-4 layers with a sharp long knife. When they have cooled completely, coat them with butter cream and put them in the refrigerator. You can buy mastic or make it yourself from marshmallow candies or powdered sugar. Food coloring will help achieve the desired shade.
To make the mastic stick better, grease the cake layers with butter cream not only to connect them together, but also on the top and sides of the cake. Cool it down.
After you have placed the mastic on the baked goods, you need to roll it out with a silicone rolling pin so that it lies flat and tight on the cake, and trim off the excess at the bottom. This confectionery product is decorated with pink fondant in the shape of diamonds. Their reverse side is moistened with water and glued to the main layer, and then decorated with sugar pearls.
Making a magic wand from mastic is just as easy as making a crown. Such children's mastic cakes will become a bright and unforgettable moment of the holiday. Let's take a closer look at how to decorate a homemade cake in the form of a crown. There are several ways to make it.
You can get a mastic crown like the one in the photo if you stick to this method. For it you will need:
- plastic bottle;
- cling film;
- brush;
- kandurin;
- mastic.

Now sprinkle the board or table with powdered sugar, roll it into thin “sausages” and immediately place them on the bottle. Place the first one as the rim of the tiara, the rest form and decorate it.

When the plan is realized, you need to leave the crown to dry for 1-2 days, then cover it with kandurin and place it on the cake.

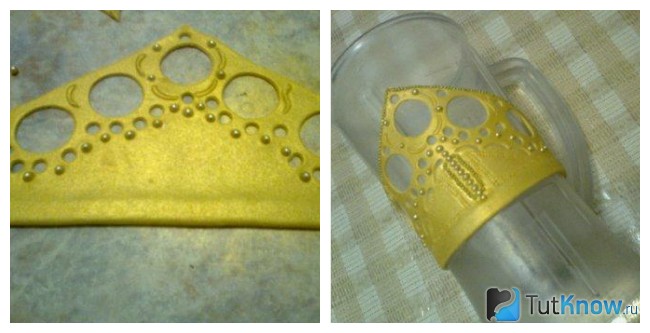
Decorations from mastic on this theme can be made a little differently. For the second one you will need gold food coloring. Roll out the mastic into a triangular layer. We cut it with a knife so that the workpiece is of this shape and is even.

Now, applying the glass, cut out identical round holes along the upper edge of the crown, and using a small stencil, cut out small circles. Decorate the crown with sugar pearls and leave it to dry well. plastic bottle or a jug.
What are icing and molds?
Very soon you will find out the answers to these questions and learn how to make incredible cake decorations from mastic. This is the product you will get if you use icing. For it, you need to draw a crown yourself or download your favorite image from the Internet.

After which it is put into a transparent file, and then the real magic begins. We roll up sweet strings from white mastic and apply each fragment to the corresponding drawing in the file.

Now you need to carefully transfer the still straight crown to a rounded surface, give it this shape and dry it for 1-2 days.

You can leave the tiara white or cover it with food paint, then you will get a golden crown.

You can get acquainted with molds - special forms - right now. They will help you make a crown from mastic, which will turn out to be very elegant; a cake with such decoration will look expensive, as if it was made by great professionals.

Here is a list of what is needed for this creative work:
- silicone mold;
- glass wine bottle;
- glassine;
- food glue;
- mastic.
Place pieces of mastic in those mold elements that are most suitable for the crown. On in this example I used a mold to create a rose, you can take another one.
Start laying out the elements of the tiara on glassine paper, fastening them with edible glue.

After the crown is ready, all that remains is to cover it with kandurin using a brush and dry it.
DIY leaf wreath
If you are walking with your children through an autumn park or in the yard, invite them to make a crown. Such creativity will help children develop their imagination, learn to love the surrounding nature, and grow into creative people.

You will need very few materials and equipment, here's what:
- Maple leaves;
- scissors or pliers.
Place the leaves in front of you. Use scissors or pliers to cut off the thick ends.

Now fold the sheet almost in half, leaving 1-2 cm from the central core.
With the second sheet, pierce this folded edge in several places, as if stitching it.
You can also make a more magnificent head decoration.

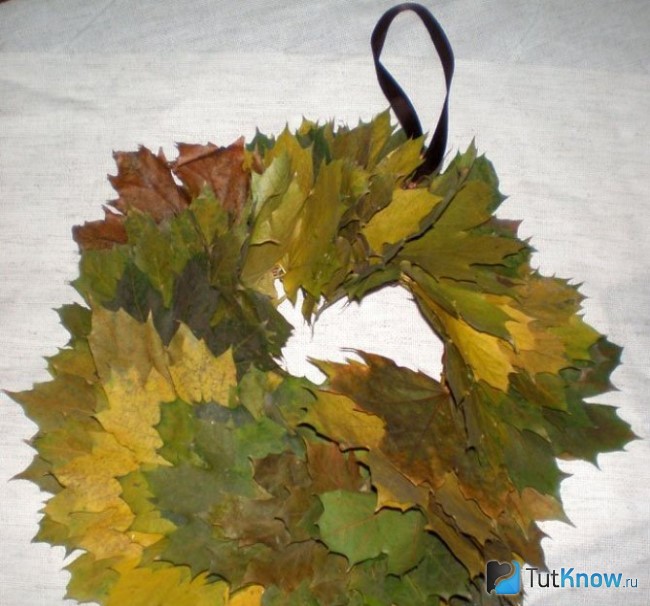
Here's how to make a fall maple leaf wreath. In addition to them, you will need:
- thin willow twigs;
- wire;
- ribbons.

Fold the willow branches into a ring. Secure with wire.

This wreath of leaves is woven in the same way as of flowers - the first petiole bends around the base, then the second one is woven in, and so on.

When all the branches are covered, you need to connect the petioles of the first and second leaves with wire or thread and secure. This wreath of autumn leaves can be worn on your head or hung on your door as a decoration. Then you need to make a loop.
Here's how to make a leaf wreath or home decoration. With others interesting ideas right now you will be introduced to the following videos:
There are many people who make tiaras, but they all make them the same way - they use wire to fasten absolutely everything together, including the base itself. I’ve seen and touched such products and it’s...it’s not good). My way of making such things is the golden mean between hand-sculpting and professional factory execution.
So, we will make a crown like this:

We will need the following things: a soldering iron, two medical clamps, a wooden board, flux and soldering fat, rosin, lead-free solder, a sponge for cleaning the soldering iron tip, hot glue, instant glue 


Crystals of two sizes, emerald colors, pink opal, champagne and dacs (can be found in different price categories - Swarovski, Preciosa, on the Chinese website), beads of different sizes and shades (China, Zlatka from Leonardo specifically in my case, as well as met. elements, or disassemble purchased ones), metal decorative elements - openwork leaves, flowers, main elements - metal ovals - in in this case everything is in gold/bronze, filigree - I buy it at a local store, you can also order other parts from China, which can be seen in the photo below. By and large, there is no point in describing the entire decor in detail, because everyone will have their own design, the main thing here is the basis. 


The main components of the crown are the rim, filigree, and metal ovals. 
Let's begin. We insert the soldering iron into the socket. We work carefully, the solder is very fluid, it can fall from the tip onto your lap or burst, and then hot drops will fly everywhere. For example, into the eyes, as it happened to me. 
The clamps are needed to avoid getting burned, since the entire surface will become very hot. 
Apply flux to the surface of the rim. 
We collect solder by leaning the tip against it. 
If the solder is without rosin, then first moisten it in rosin so that it is more fluid, otherwise it will be too thick and will not lie on the surface. 
We begin to apply solder to the rim treated with flux. We lean the tip with solder against the rim and apply the solder. We simply move the tip like a brush, making sure that the solder lies down. 


So, we have tinned the surface of the rim on which we will solder filigree elements. 
We are preparing the filigree for soldering. We will solder it in three places - places of adhesion to the rim. We estimate the filigree to the rim in advance and mark these points. We apply fat to these places 
We collect solder and apply it to the fat with a touch of the tip. 

This is how we prepare all the filigree. 
We mark the center of the rim, take the filigree and lean it against the rim, secure the position with a clamp. Firmly so that the filigree does not move during the soldering process. Otherwise it will be crooked. 
We collect solder, lean the tip against the places where the solder was previously applied to the filigree in the places of planned contact, hold the tip a little, the solder between the filigree and the rim should warm up, melt and flow, fastening them together 


Along the circumference of the rim we solder the rest of the filigree in the same way, the only difference is that on the sides they will also be attached to each other. 
We fasten the second filigree with two clamps to secure the position. 
We press the contact points of the filigree with a clamp, apply grease to the place where they are fastened and apply solder. 

We lay the rest of the filigree around the circumference of the rim in the same way. Remember to let the solder cool before removing the clamps. At least 15 seconds. 
We attach the combs to the rim. We tin them in the same way as the rim at the beginning. 
We press it tightly to the rim. We warm the surface with the tip with the collected solder, so that the solder previously applied to the ridge melts and creates adhesion. 
Now it's the turn of the metal ovals. We need to solder one oval to one free filigree. The selected contact points are in the photo. 
We press the filigree to the back side of the oval, apply grease to the contact points and apply solder. 
Result 

We take the finished filigree and oval element and press it with clamps. Apply fat to the contact points and use the tip with the collected solder. 


We fasten all the parts in this way along the circumference of the rim. We adjust the height of each part as desired. 

The base is ready. Wash thoroughly with dishwashing detergent and dry immediately with a towel. 
We take wire and beads, rhinestones, decorative elements and twist branches from this. 


We glue the crystals with hot glue. 

We take thin threads of beads, glue the crystals around the perimeter with gold, and black glue the twisted edges of the ovals. Glue it on with glue.  >
>
These are former earrings. Bought specifically for disassembly. I tore out some stones from them. Glue them (all the rest of the decor, twigs, etc. with hot glue) 
Slowly fill the entire surface of the base with decor.  >
>

And we get this result) 
All crowns are made according to the same principle, the difference depends on the decorative filling, which is often very difficult to solder, especially for small elements on the tops of the crowns, such as here. 
A lot of people are engaged in making tiaras, but they all make them the same way (badly) - they bind absolutely everything together with wire, including the base itself. I’ve seen and touched such products and this... this is not good). My way of making such things is the golden mean between hand-sculpting and professional factory execution. To be honest, this is especially difficult to do because of the constant fumes from solder in large quantities, so you need to do this in a well-ventilated area, keeping animals and children out of there.
But in general, a woman and a soldering iron hand in hand - very romantic!) Videos with soldering processes periodically appear on my NastyaNoyabr instagram, so if anyone is interested, welcome). By the way, there will soon be a giveaway with several prizes (decorations + materials for creativity;) In the meantime, I’ll add a few crowns while there is room left).
Thank you for your attention! 
Mrs Russia 2016 


First Vice-Miss "Beauty of Russia 2015"  >
>


It is very important to use accessories in children's games. They give the game a realistic touch, and are appreciated even more if they are made by hand. A paper crown can be used not only for entertainment, but also for theatrical performances held in kindergartens and schools. Hurry to please your child, and we will tell you how to make a paper crown at home.
Paper crown
To get started, prepare:

Now you can get down to business. We perform the following actions:

Paper crown: option 2
Let's make the crown in a different way. For work take:
- cardboard with low density;
- elastic band;
- hot glue gun;
- elements for decoration (can be replaced with felt-tip pens, paints or pencils).
Let's do the following:

Color the crown with whatever you want: paints, felt-tip pens, pencils.

Volumetric crown with golden shimmer
This crown will be a little more difficult to make than the previous ones.
Prepare for work:
- paper;
- glue;
- scissors.
We do the work:

Smooth the finished crown with your hand and you can put it on!

Crown for a girl

Prepare the following materials:
- high-density colored paper (30 cm wide and 30 cm long);
- cardboard;
- scissors;
- compass;
- glue.
We make a crown for a girl as follows:

Snow Queen/Princess Crown (with snowflake)
To make a beautiful crown, prepare a sheet of paper, scissors, and glue.
We perform the following actions:
- Draw the outlines of the crown (you can use templates).
- We cut strips of colored paper, 25 cm long and 7 cm wide.
- For the base of the craft, we make circles in the amount of 20 pieces, diamonds in the amount of 2 pieces. We connect the circles with glue to get the 1st row.
- Glue diamonds in the gaps between the circles. This will be the 2nd row. We repeat the procedure, alternating circles and diamonds.
- To make a snowflake, glue together multi-colored rhombuses and circles and fix them in the center of the crown.
Advice! To make the crown look more magnificent, make each subsequent row a little larger than the previous one.
A crown made using the quilling technique looks very beautiful.

Monarch headdress for boy
Any boy will be happy with the chic crown of a real king.
You will need:
- a sheet of high-density paper;
- scissors;
- glue;
- rhinestones and beads for decoration.
How to do?
- Make a strip for the base of the crown and glue its ends together.
- Take paper of a different color and cut out 2 more strips, which should be wider than the previous one. Glue them to the base with the letter X. Measure it on your head and see if anything is in the way.
- Cut out 6 stripes to decorate the crown. Trim one end of the strips to create a semicircular oblong border line. Glue the opposite side of the strip to the base of the craft from the inside. It turned out something like the sun with rays.
- Study the photo of the crown and give the stripes the appropriate shape. Attach the decoration to the top. Decorate the craft with the prepared decorative elements.

Cutting templates


Video instructions
The training videos selected for you will help you understand the subject and working methods in detail, and choose the appropriate option.
Origami crown:
Royal Crown:
Foamiran crown:
Crown of the forest fairy:


