Here I decided to create a series of master classes on designing and sewing hats. Here's the promised pussy.
For such a hat, you can use fleece or Polartek +++ any insulation you like. I have 2 different fleeces and 100ka Thinsulate (insulation.)
First, let's draw a pattern. You will need three measurements: head circumference, face circumference, and the distance from the eyebrow line, across the top of the head to the base of the skull.
For example, you got OG-48, OL-52, and 34 
Now we build a drawing grid: a rectangle with a width equal to the half-circumference of the head + 2 cm, a height equal to the half-circumference of the face + 2 cm, since the hat is with insulation, if you sew without insulation, you don’t have to make an increase!
And so our rectangle is 25 by 27 cm.
For convenience, I marked the main points in the drawing with letters, then from point A (in the upper left corner) we set aside 6 cm (in sizes up to 50th) and 8-9 cm (in sizes over 50th). and draw a horizontal line.
Next, we find point C, from the point we set aside a distance equal to half the distance from the eyebrows to the base of the turtle. For us it is 34/2 = 17 cm. Draw another horizontal line.
Then we divide the rectangle vertically exactly in half, at the intersection with the horizontal lines we get points A1, B1, C1, D1
The drawing grid is ready. 
Next, we divide segment AA1 exactly in half and draw vertical lines, and do the same with the adjacent segment. 
Now all that remains is to draw the hat. We decorate our pieces with planned, rounded lines—these are darts so that the hat fits squarely on the head. We lower the back of the cap by 2 cm (Point 3) and draw out the front and back of the head with smooth lines, at the same time outlining the ear - arbitrarily. The drawing is ready. 
We cut out the pattern, take a piece of fabric - fold it in half, place the pattern with the front part towards the fold, trace it and cut it out with an allowance of 0.7. The details of the lining and insulation are cut in analogue, but 1.5-2 mm smaller than the top. ++ We cut out the ears of the shape and size that seems acceptable to you. 
We sew the details. Starting with the front dart. Don't forget to iron each seam to ensure the finished product looks perfect. 
We randomly outline and draw out the antennae. 
We sew the nape seam and ears. Then we put the ears into the side darts, chop off the middle of the parts and grind them with one line. 
Then we take a piece of usually knitted elastic, literally 5 cm. And pin it at a distance of 3-4 cm to the back seam, while stretching the elastic as far as possible. 
Sew on the elastic band using a three-foot zigzag. On my car this is line number 10. For those who don’t have such a line, you can simply use zig-zag. 

This rubber band is needed to ensure that the cap fits snugly to the back of the head. The top part is ready. 
We do the same with the lining, having previously connected it along the contour with the insulation. 
All that remains is to assemble the cap. 
To do this, turn the lining right side out, the top inside out, and place the top over the lining. In no case is it the other way around!!! Otherwise, the lining will turn out on your face! We chop and stitch along the contour. 
We make a small hole along the back seam of the lining and turn the cap inside out.
It's almost ready, all that's left is to sew on the stitching. 
I also decided to attach a bow to the ear. I cut out 2 pieces of multi-colored fleece, decorated it with Swarovski rhinestones and formed a bow. 
This is what came out of it :))) 
My clever husband also drew such a magnificent design for embroidery, and the pussy became a set with a scarf scarf for the lovely little Sonechka. 
Like this. Happy crafting to everyone :)
We sew a children's hat (pattern and master class)
 This is the kind of children’s hat I sewed for a baby for autumn-spring; if you take woolen fabric, you can also sew a hat for the winter using this style. The main thing you need to know is the circumference of the child’s head. I sewed for a head circumference of 44-46 cm, age 6-12 months.
The pattern is given in the original (we print it on an A4 sheet).
For older children, you don’t have to make ears, then you don’t need a pattern, just cut out a rectangle to fit the head.

Can be sewn from fleece, thick knitwear, knitted fabric. I took fabric - fleece. We cut out one main part and inner part(half main). We sew them together along the wrong side, turn them inside out and sew them with a decorative stitch or a zigzag stitch; you can use contrasting threads. If desired, the hat can be decorated with a patch, embroidery, applique, and beautiful colored buttons. I sewed on the stripes.

We make the middle seam. I like to sew fleece seam to seam (or with a very slight overlap) not with a regular stitch, but with a finishing stitch. This way the seams are not rough and beautifully finished.

Then we sew up the top of the hat along the wrong side and fold the edges of the top of the hat towards the center and lay a second line. Thus, we get the top of the hat, which will “sit” well on the child’s head.


Turn it inside out.

If you need ties on the “ears”, then it is better to sew them between the outer and inner parts of the hat. For ties, you can use decorative lace, finishing braid, or sew them from the main fabric.
And here are the hats I got! The sewing process itself will take you only 20-30 minutes and your baby will have new outfit!

Best regards, Admin Kotya.
SEWING A HAT FOR A GIRL WITH YOUR OWN HANDS
- July 1, 2013


In any family there will always be some kind of knitted T-shirt or T-shirt that is pretty tired or has lost its original appearance, but was once loved and therefore not thrown away, gathering dust somewhere in the bins and awaiting its fate. Is this about you? Well, you can try to rehabilitate an old thing.
For example, decorating it with buttons, rhinestones, embroidery, painting with special paints, fabric flowers, etc., anyone has enough imagination for what. You can use old unwanted T-shirts to make absolutely wonderful rugs. Or create knitted bowls from T-shirts cut into strips. Or you can spend a minimum of effort and sew these charming children's hats from them for little fashionistas... And maybe for fashionistas?
Look how bright, unusual and new that boring T-shirt looks!

You can make several hats at once.

Well, let's get started.
First, the fabric needs to be washed and ironed. Instead of a template, we will use a ready-made baby hat that fits well on the head. So, fold the fabric in half and trace the outline of our hat, not forgetting about the allowances (about 6 mm), as shown in the photo:

Cut out the outlined cap:

The next step is to cut out a rectangle from the same fabric as the hat (watch the lobe!), 13 cm high and 36 cm wide.

We sew together the two parts of the hat, first folding them right sides to each other and basting them. Or you can just pin it with needles. You can stitch the edges using an overlocker, or if you don’t have an overlocker, you can sew them on a machine, choosing the appropriate stitch. At worst, you can do it with a simple line. I have seen more than once how some craftswomen, having neither an overlocker nor a stitching machine, using only one machine, created such beautiful and neat little things that they could give a head start to some store-bought goods.
Also, don’t forget about the rectangle. We grind it down on one side.

Fold the rectangle in half, wrong side inward, as shown in the photo.

Now we do this: insert the resulting ring into the hat, still turned inside out; align the edges and secure with pins

This is what should happen

We sew the edges with what we have.

Now we turn the cap right side out and all the seams are inside.

Iron the seams on the cap, turn the flap of the cap outward by 2.5-3 cm and iron again.

To keep the lapel in place, we make these fastenings, matching the threads to the same color.

And now, if you wish, you can decorate the hat with a pretty flower. From a suitable fabric, cut out 5 circles with a diameter of your choice and 4 circles with a smaller diameter.

Take large circles and fold them in half and in half again

So fold three more large circles and put them on the 5th

Now we fix it in the very center like this:

Now we fold the remaining four small circles in the same way and place them in the center of the flower, closing the folds.

Again we secure it with stitches by hand in the very center, stitching all the layers.

And we sew the resulting flower onto the side of our hat.

Here's a new update for the little fashionista!
Friday, December 23, 2011 08:22 + to quote book


Children's hat with ears (fleece).
Winter children's hat with ears, made of fleece. Double hat. The lining of the hat is also made of fleece.
Size: head circumference 48 cm.
How to sew a fleece hat (with ears):
Cut:
1. cap wedges 8 parts (4 wedges - top of the hat, 4 wedges - lining of the hat)
2. lapel 1 piece
3. lower ears 4 parts
4. upper ears 4 parts
5. ties 2 parts.
When cutting, it is necessary to take into account the fraction. On the pattern, the direction of the lobe is shown by an arrow. On the lapel, the lobe goes along the fold.
The lobe is located along the edge of the fabric. How to determine the share if there is no edge: because fleece - knitted fabric with a brushed surface, to determine the grain, you need to try to pull the fabric in different directions - in the direction of the grain, fleece stretches the least (almost no stretch). Fleece may have a pile direction, which must also be taken into account when cutting.
Pattern of a double children's hat with ears.
Sewing:
1. Fold the bottom ones with the right side inward and stitch, not forgetting to insert the ties. Turn out.
2. Fold the top ears right side inward and stitch. Turn out.
3. Fold the lining wedges right side in and stitch. Press seam allowances to different sides. If desired, unstitch the seams.
4. Fold the wedges of the top of the hat with the right side inward and stitch, not forgetting to put in the top ears (stepping back 3.5 - 4 cm from the top of the hat. Press the seam allowances in different directions.
5. Fold the lapel in half with the right side facing inward and stitch along the short side. Press the seam allowances in different directions. If desired, unstitch the seam.
6. Place the lining in the hat with the internal seams facing each other, aligning the cuts. Baste the bottom ears to the lining of the hat, aligning the center of the ears with the seam. Fold the lapel in half lengthwise and align the seams and cuts to the lining of the hat. Sew. To reduce the thickness of the seam, overcast the seam.
Photo: View of the hat from the inside out.
Photo: Double children's hat with ears (made of fleece):
Children's fleece hat
This autumn children's hat with ears is made of fleece. Very simple model hats - even novice seamstresses can handle it.
Fleece is a light, soft, elastic material. Fleece is machine washable and dries quickly. Despite the fact that the fleece is based on a knitted fabric, the sections do not need to be overcast, because... Due to the brushed surface, they do not crumble. You can sew fleece with a regular machine stitch - convenient for those who do not have knitted stitches on their machine.
How to sew a hat for a child:
Size: head circumference 46 cm. For larger or smaller sizes, explanations on construction are given.
Cut:
1. main part of the cap 1 piece
2. lapel 1 piece
3. ears 4 parts
4. ties 2 parts.
When cutting, it is necessary to take into account the fraction. On the pattern, the direction of the lobe is shown by an arrow. The lobe is located along the edge of the fabric. How to determine the share if there is no edge: because fleece is a knitted fabric with a brushed surface; to determine the grain, you need to try to pull the fabric in different directions - in the direction of the grain, fleece stretches the least (almost no stretch). Fleece may have a pile direction, which must also be taken into account when cutting.
The pattern is given without seam allowances. Seam allowances: at seams - 1 cm, along the arched part of the ears - 0.5-0.7 cm.
Pattern for a children's hat made of fleece.
If you need to sew a hat of a different size: The length of the main part of the hat is the circumference of the child’s head + seam allowances. The length of the lapel is the circumference of the child’s head + 2 cm + seam allowances. The ties and ears can be left the same. Lapel height is optional. Depending on the size, slightly reduce or increase the height of the main part.
Sewing:
1. Fold the ears right side inward and stitch, not forgetting to insert the ties. Turn out.
2. Fold the lapel in half with the right side facing inward and stitch along the short side. Press the seam allowances in different directions. If desired, unstitch the seam.
Unstitching - placing stitches on parts to secure seam allowances. It is used to secure seams on fabrics that are difficult to wet-heat treatment. The seam allowances are laid out on both sides and secured with two parallel lines.
3. Fold the main part of the hat in half with the right side inward and stitch along the short side. Press the seam allowances in different directions. If desired, unstitch the seam.
4. Baste the ears to the wrong side of the main part of the hat, retreating 7.5 cm from the seam. Fold the flap in half lengthwise and baste the seams and cuts to the wrong side of the main part of the hat. Sew. To reduce the thickness of the seam, overcast the seam.
5. Turn the hat inside out, fold it in half (so that the seam is in the middle), and stitch.
Table of contents
A series of New Year's parties are coming, to which you want to send your children in beautiful, carnival costumes. It's no secret that a finished image is not cheap. Therefore, mothers, even those who have never imagined themselves as a home couturier, are increasingly choosing handmade outfits for their children. We have prepared several suitable different ages options for New Year's costumes for boys that you can sew with your own hands quickly and beautifully.
Costumes for the little ones
2-year-old kids don’t necessarily need to dress up as superheroes or cartoon characters for New Year. As a rule, at this age children do not yet participate in kindergarten performances and matinees, but parents, nevertheless, try to dress them up in some kind of costume.

And just for this occasion a master class will be useful, in which you can quickly and beautifully sew a New Year’s suit for a boy with your own hands. Patterns and step by step photos will help even those parents who have little experience in sewing.

Bear costume
Anyone can sew such a charming costume for their baby with their own hands. loving mother. You can dress up a bear as a child who is just starting to go to kindergarten, or a very little one who spends the whole day in his playpen. What you will need to create the perfect New Year's look is an old brown fleece blouse. It is this that will make up almost 80% of the finished outfit.

To work you will need:
- fleece jacket (or footer) brown(a kangaroo, a body shirt or a sweatshirt with a zipper would be suitable, the main thing is that the product has a hood);
- two pieces of fleece fabric, brown and beige;
- padding polyester or other filler;
- threads in the color of fleece;
- pins;
- paper;
- a simple pencil or chalk;
- scissors.
Operating procedure:


You can see how to quickly and easily make a New Year's snowman costume for a boy with your own hands in this video.
Costumes for boys from 3 to 6 years old
Older children, who may already be involved in stage actions during the New Year's party, can already think about a more complex costume. But even here it is necessary to proceed from the age of the boy - than younger child, the simpler and clearer his character should be.

Gray Wolf Costume
An angry and scary gray ox often inspires parents to create New Year's costume. For 3 years this character is ideal as the main character.
In addition, to create this look you also do not need complex patterns; it is enough to use a ready-made sweater or pajamas gray, and correct it a little.

To work you will need:
- a soft sweatshirt and long pants or gray pajamas;
- a piece of light and dark gray felt, as well as white and black felt;
- scissors;
- needles;
- threads;
- pins;
- pencil or chalk;
- scissors;
- a piece of cardboard;
- elastic or braid;
- padding polyester
Operating procedure:
- Take a sweatshirt or pajama jacket and measure the width and length of the front shelf. Lay out a piece of gray felt and draw an oval according to the given measurements. We cut out the part and make sharp teeth along the edges along its perimeter. We apply the oval to the jacket and sew it on with a machine.

- We also decorate the panties and pajamas with imitation wool. We cut two strips from gray felt, 10 cm wide and a length equal to the girth of the trouser leg. We cut one side with fringe and attach it to the legs at the bottom, as shown in the photo.

- We cut out a square of dark felt with sides of 10 cm, round its corners and cut teeth on the sides. We attach them to the knees in the form of patches and do the same on the elbows.

- We cut two rectangles from gray felt with a width of 15 cm and a length of 40 cm. We cut out another piece from dark felt - 10 by 30 cm. We cut the teeth on the sides so that it looks like wool. We also prepare a piece of white felt to form the tip of the tail.

- We attach a white blank to one of the large rectangles, and a dark gray one to the other, as shown in the photo. We attach the elements, securely fastening them together. Leave a hole for stuffing at the bottom of the workpiece. We fill the part with padding polyester and sew the tail to the back of the pants.

- All that remains is to make a mask. We cut out a blank from cardboard, as shown in the photo. We put it on a piece of gray felt, fasten it with pins and make two patterns. Cut holes for the eyes.


- We make a nose from dark gray felt, and eyebrows from white felt. We sew by hand or glue the elements onto the front of the mask. Using a piece of black felt we shape the tip of the nose. Sew together both parts of the mask, sewing elastic on the sides. The costume is ready!


Interesting! New Year of the Pig 2019: what to wear according to your zodiac sign
Dragon costume
There is no 6-year-old child who would not dream of trying on the image of a real, fire-breathing dragon. So why not make a New Year's costume for a boy that can be worn to a party at 5 years old, and even at 7 years old.
And the main “highlight” that will make the child stand out from other peers at the holiday is the spikes, wings and long tail.


To work you will need:
- green fleece fabric in light and dark shades (about 1.5 meters of each color);
- orange fabric (cut about 0.5 meters);
- Velcro fastener (20-25 cm);
- matching threads;
- needles;
- pins;
- scissors;
- paper for making a pattern.

Operating procedure:

Costumes for boys 6 - 12 years old
Children of primary school age are already beginning to associate themselves with the characters of their favorite cartoons, fairy tales and books. Therefore, many dream of trying on one of the roles that so captivated his childhood consciousness.
Just for fans of modern films for children, we have prepared two master classes with patterns and step-by-step photos.

Teenage Mutant Ninja Turtles Costume
A wonderful choice for a New Year's costume for a boy are the heroes of the well-known animated series Teenage Mutant Ninja Turtles.
The child will be happy to try on the role of a superhero, and parents will not have to spend money on expensive costumes, because they can literally be made from scrap materials and leftover fabric.


To work you will need:
- plain children's pajamas in green;
- yellow flannel;
- acrylic paints;
- needles;
- pencil or chalk;
- pins;
- threads;
- brown ribbon;
- oval baking dish (made of foil);
- Velcro;
- glue or glue gun;
- a piece of embossed cardboard;
- a piece of thick cardboard;
- scissors;
- filler (holofiber or padding polyester);
- a small piece of fabric that is red, orange, purple or blue.

Operating procedure:
New Year's costume for a 7 year old boy - ready! You can dress up your baby. If desired, add weapons to the costume.
Harry Potter costume
The story about a young wizard certainly appeals to every child. And who among the children does not dream of going to Hogwarts and entering the Gryffindor faculty in order to see with their own eyes the life of Harry Potter and his faithful friends. And if it’s not so easy to get a real magic wand, then every boy can transform into his favorite hero.
Why not give this opportunity to your child and send him to the New Year's carnival dressed as a wizard?!

To work you will need:
- black and red fabric for sewing a mantle;
- matching threads;
- needles;
- pins;
- scissors;
- white shirt and dark trousers;
- gray sweater or turtleneck;
- red tie;
- yellow oracal (self-adhesive film);
- glue gun;
- cardboard;
- wire;
- pliers;
- hardening plastic;
- wooden stick;
- acrylic paint.


Operating procedure:
This outfit is designed for 9-12 years old, since the real Harry Potter from the first book in the story was 11 years old when he first received his letter from Hoggwarts.
Carnival costume bear - great option For children's party! We will tell you in detail how to create a pattern and sew a charming bear costume with your own hands.
Carnival bear costume: preparation for sewing
In the process of creation festive costume We will need: the base of the pattern, suitable fabric in several colors, to match, buttons and cords for ties. The bear's carnival costume will consist of a brown velvet jumpsuit with an insert - a shirtfront made of knitted fabric. The headdress will be made like a cap, repeating the shape of the head with ears. To give correct form We will use bones for the hat.
So, let's sew a bear costume!
Construction of the base
Jumpsuit design:
Measurements that need to be taken for construction: SB + increase for freedom under the elastic band, O legs, D of the product, H of the chest of the overalls (the size is taken at will, measured from the waist line up), W of the chest of the overalls.

Front half of trousers:
From the first point, we put D ed perpendicularly down, and ½ SB + 1/8 SB + 1.5 cm perpendicularly to the right. And then we connect the third point to the second at a right angle. Mark point number 4 below. The grid is ready.
From point 3 down the perpendicular we will set aside ½ SB + 1/8 SB + 0.5 cm, put the number 5.
From the fifth point, perpendicular to the left, set aside 1/8 SB and mark point 6, and then from this point raise the perpendicular upward until it intersects with the top line of the trousers, point 7.
From the seventh down we will set aside 1 cm - point 8. Now we will smoothly draw a line for the top of the trousers (points 1 and 8), and then a line for the bow (8 and 5).
From point 4 to the left along the bottom line, set aside ¼ SB - 1.5 cm, put point 9. Let’s draw a slightly concave step line, connecting points 5 and 9 by hand.
From point 9 to the left we will set aside (O legs – 2cm)/2 and mark the 10th point.
Divide the distance between the first point and the ninth in half and mark point a. Let's connect points a and 10 using a ruler.
We divide the distance between points 9 and 10 in half - the middle of the front half of the trousers.
From the eighth point up at a right angle, place the B breasts and mark point 11.
Perpendicular to the left of point 11, set aside ½ the width of the breast and place point number 12.
From the first point up, we will set aside the width of the belt; this value is taken as desired, for example, 5 cm. Let's mark point 13.
Let's connect points 12 and 13 using a ruler, and then divide this distance in half - point 14.
Perpendicular 14-15 will be equal to 3cm. Let's draw the side of the breast concave by hand. The front of the jumpsuit is ready!
Back half of trousers:
From the first point we put Dizd + 3cm perpendicularly downwards, and SB perpendicularly to the right - (1/16 SB + 1cm). And then we connect the third point to the second at a right angle. Mark point number 4 below. The grid is ready.
From the first point downwards we will put ½ SB + 1/8 SB + 2 cm and mark the fifth point.
From the fifth at a right angle to the right, set aside ¼ SB and place the 6th point.
From the first point to the right we will set aside ½ SB -1/16 SB – 1 cm, we will get point number 7. Let’s connect points 6 and 7 using a ruler.
From the sixth point up the line we will set aside ¼ SB - 2 cm, put point 8, and then connect points 8 and 5 by hand.
From the 2nd point to the right we set aside ¼ SB - 2cm and mark the 9th point, then connect points 5 and 9 smoothly by hand.
From the ninth to the tenth point we move to the right (O legs + 2cm) /2, and then from 3 down 3cm and mark the 11th point. Let's create a rhinestone along the top line of the back half by connecting point 7 to point 11.
From 11 down, set aside ½ SB and mark point number 12, and then smoothly connect point 12 with 10 by hand. Divide the distance between points 9 and 10 in half - the middle of the back half of the trousers.
We are building a belt for the upper part of the overalls. The distance from 7 points to 14 is equal to the distance from 1 point to 13 along the front half of the overalls.
The distance from 11 point to 13 is equal to the distance from 1 point to 13 along the front half of the overalls. Using a ruler, connect point 13 to 14 - the top line of the overalls.
Construction of the hat:
The only measurement that needs to be taken for construction is the height of the cap. Measured from the back of the head to the seventh cervical vertebra.

From the first point, perpendicular to the right and down, plot the height of the cap. Let's put point 2 and point 3, respectively. Let's connect them at right angles and get point number 4.
Divide the distance between points 1 and 2 in half. Let's mark the middle - X.
From 3 to 6 and from 4 to 7 points we will set aside 2 cm. This figure is taken depending on the required fit and style. After you have made several hats using this pattern, it will become clear what size to choose.
From point 1 down to 5 we set aside 3 cm. We divide the distance from point 2 to 4 in half - point a.
So, all that remains is to connect all the dots. First, use a ruler to connect point 5 to 6, then by hand 5 to x, and then to point a and 7. Connect the last points: 7 to 6. The first part of the hat is ready!

From the first point we put 9-10 cm down and mark point 2. And then we divide this distance in half - point x.
From point x to the left at a right angle we will set aside a value equal to 5 through x and a to point 7 along the side of the cap. Let's put point number 3.
From point three down and up we put 2.5 - 3 cm perpendicularly. At the top is point 4, at the bottom is point 5. We connect points 1 and 4, as well as points 2 and 5 using a ruler.
Costume modeling
We cut our pattern along the waistline both on the front half and on the back.

At the bottom we make the trousers wider, adding 2 - 3 cm on each side. We take the breast part of the front half and attach to it, butt to joint, the part cut off from the back half. This part is cut out in one copy, and it needs to be laid in the middle on the fold of the fabric, along the main thread.

The decorative detail on the chest in height from 1 to 2 is equal to the height of the overalls breast minus 4-5 cm, and the width from 3 to 4 is taken as desired. No modeling is required for the hat. The only thing that is necessary is to draw the appropriately sized ears by hand directly on the fabric.
Uncover
To sew the suit we will use:
- Fabric of several colors and dublerin
- Small pieces of bandeau
- Rubber
- Thin rope for ties
- Bones;
- Buttons
- Threads, scissors, pins, chalk

- For overalls: front half piece - 2 pcs, back half piece - 2 pcs, chest piece - 1 pc, chest insert piece - 1 pc.
- For the hat: side part - 2 pcs, middle part - 1 pc, ear parts - 6 pcs.
On all parts where there is a belt line, we make an allowance of 2 cm. We glue the part - insert - with double tape, and also glue the bandeau to the back of the ears. We cut the seeds along the length of the middle insert - 2 pcs. When sewing, we will also need bias tape, buttons for the straps and an elastic band that we will insert into the belt.
Work progress
Let's prepare the overhead insert. Fold the seam allowance along the entire contour to the wrong side, and then iron it with an iron.


We put the face with the face of the trousers and chest. We sew them along the waistband, an allowance of 2 cm - we process them with an overlocker.

Then iron the breast allowance and stitch it one and a half centimeters wide.

We try on and determine the length of the straps. We connect the cut out parts along the side seam, and then put in loops from the rope, according to the size of the buttons. We adjust the straps according to the width to secure the loops. Turn the straps over your face.

We place the straps on the back of the overalls on the wrong side and finish the open section of the chest with bias tape, from the front inside out.


We connect the three main parts of the hat along the middle seams. We process the allowances, iron them onto the middle part and stitch them.


On the upper parts of the ears we add zigzag details of a different color and smaller size. Then we fold the lower parts with the upper ones and grind them down. We turn it onto the face, straightening the ears according to the shape.

We use bias tape around the entire perimeter of the hat, inserting strings for ties on the sides. On the ear parts, fold the seam allowance inward at the bottom. And then sew it carefully hand stitches ears on a hat.

Soon your little son will have kindergarten New Year's party and everyone has to come in bear costumes? The prices for purchased products are steep, and for those that are more or less affordable, half the group will probably come...
Such thoughts recently tormented my head. And I decided to sew the suit myself!
Why this choice of style?
- Firstly, it will be in a single copy and I won’t have to look for my child in the crowd.
- Secondly, it's cheaper. I came across the most budget-friendly version of the suit in stores for 700 rubles, and the fabric cost me only 300!
- Thirdly, I was able to choose the style myself. Since the room is hot, I settled on a humane option and sewed a vest. And not fur, but fleece.
- Fourthly, I categorically did not like the fact that in 99% of cases the options with a hat were offered!!! What kind of hat, and even a fur one, in a stuffy room? And my answer was – hood! It can always be removed if necessary, without occupying the baby’s hands, and it will not get lost anywhere.
If you like this option, I’m very glad! Well? Let's sew then?
What is required to sew such a New Year's teddy bear costume?
The costume is designed for a boy 2.5-3 years old.
- 1. Fleece fabric in two colors - brown and sand.
- 2. Tracing paper for patterns. If you don’t have it, then you can safely use regular paper and glue. I like the second option even better.
- 3. Tailor's chalk.
- 4. Scissors.
- 5. Threads of three colors: brown, beige and white.
- 6. Brown lace.
- 7. Pencil or felt-tip pen.
- 8. Ruler or measuring tape.
- 9. Needle.
- 10. Corset tape (can be replaced with plastic tape from regular bottle, cut it yourself).
- 11. Pin.
- 12. White sewing tape.
- 13. Of course, a sewing machine.

Let's start sewing.
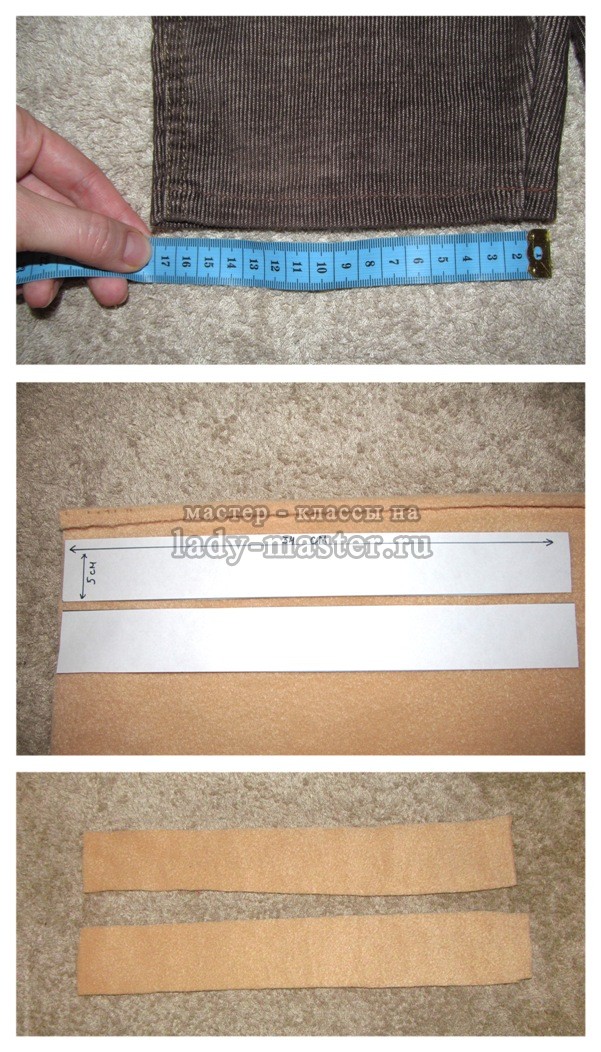
Surely every child has overalls or pants that are too small in length. So I found such a thing, and I was very lucky that it turned out to be thematic brown. I decided to make shorts by cutting and hemming the legs to the required length. You can take regular jeans or straight shorts, depending on the situation.

1. Now we need to make fleece cuffs along the bottom of the shorts. Measure the width of the leg at the bottom. In my case, it is 34 cm. From sand-colored fabric, cut out two strips 5 cm wide and 34 cm long. You can do this without a pattern, but if you doubt your abilities, it is better to first cut the part out of paper and then use it to cut from fabric.
2. Open the pant leg along the inner seam by 5–6 cm.

3. Place the fleece strip face down on the shorts as shown in the photo, 2 cm from the edge of the pant leg. Stitch.
4. Turn the fleece inside out and fold the edge into the inside of the shorts. Sew again, retreating from the edge about 7–10 mm. If it is difficult for you to do this without a hand basting stitch, do this before each operation, then removing the “rough” thread.

5. Stitch back inseam pant legs These are the cute fleece cuffs you should get.

6. Let's start sewing the vest. If your child already has a similar item, then you can cut out a pattern in its likeness. If not, then use the pattern with the dimensions shown in the photo. These parameters are suitable for a child 2.5–3 years old.

7. Now let’s cut out or create a pattern for the hood ourselves. You can take any item whose hood your child likes. If you cut it yourself, make the front pattern line a little longer than on the item itself.
8. Using the first vest pattern, cut two identical pieces from brown fleece. On one of them, make a cutout at the throat. This is how we will mark the front part of the vest.

9. I wanted to decorate the front of the vest with something. I printed out a drawing of a bear footprint from the internet, made sure it was the right size, and cut out the footprint from sand fleece. Then, I marked the main lines of the design with a felt-tip pen and basted it onto the main fabric so that it would not be deformed during sewing on the sewing machine.

10. This is what I got.

11. Now overcast the parts of the vest on all sides.
12. Using the hood pattern, cut out two identical parts. Sew them to each other along the line marked in the photo with chalk. Sew the edge. Turn the hood right side out.

13. Now we will need to sew a sand-colored edging to the edge of the hood. This is necessary both for beauty and in order to thread the lace there later. To do this:
- measure the length of the hood pieces that go near the face. In my case, this length is 64 cm (32 x 2);
- from sand-colored fleece, cut and stitch a strip 64 cm long and 6 cm wide;
- Place a strip of sand fabric on the right side of the brown fleece, wrong side up. Stitch them at a distance of 5 mm from the edge.

14. We follow the same principle as when creating cuffs on shorts. We turn the sand fleece inside out, fold it onto the wrong side of the hood and stitch again at a distance of 5 mm from the edge of the fabric. This is how we get a cute hood.

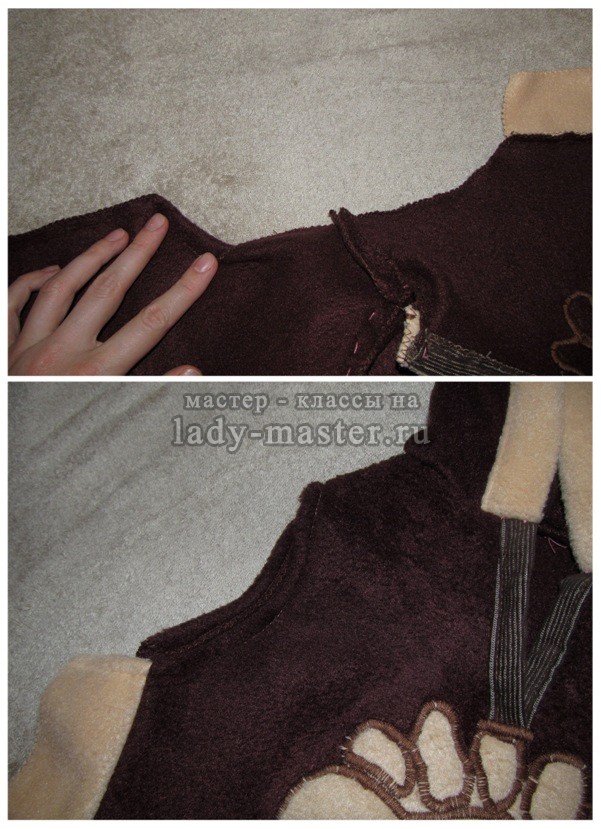
15. On the front part of the vest in the middle of the neckline, make a cut right up to the patch. This is necessary so that the child’s head can fit into the suit without any problems.

16. The edges of the cutout must be processed. We do this by analogy with the cuffs and hood. For this purpose, I took scraps of brown jeans that were left over from the overalls and cut two strips of them 3.5 cm wide and 6 cm long (along the length of the neckline). I swept over pieces of fabric.

17. Let's start processing the edges. With the wrong side, we place the strip of jeans to the edge of the neckline and attach it. Then we wrap it around and stitch again.
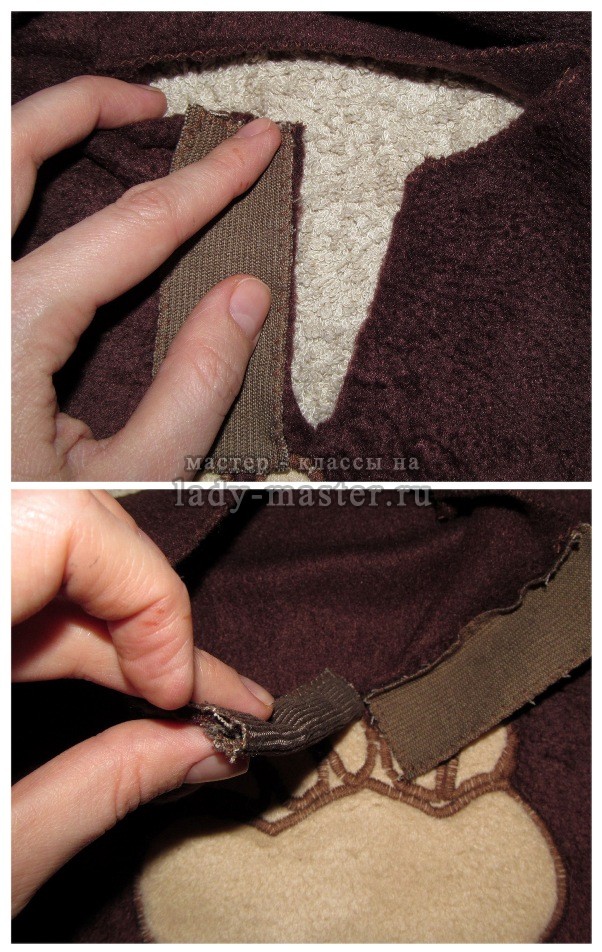
18. Do the same with the second edge. At the bottom, sew the edges of the cutout to the bear's footprint pattern with exactly the same type of stitch that was used to sew on the pattern itself, so that everything together has a beautiful and finished look.
 19. Sew the bottom of the hood (the one that connects to the neck of the vest).
20. Finally, connect the two parts of the vest at the shoulders - front and back.

21. Using a hand basting stitch, sew the hood to the neck of the vest. During the procedure, constantly check the lengths of the parts. Fleece is very stretchy, so small size discrepancies can be easily corrected by slightly stretching a certain part. First, sew one half of the hood (connecting its middle with the middle of the neck), then the other. This way you will avoid distortions.
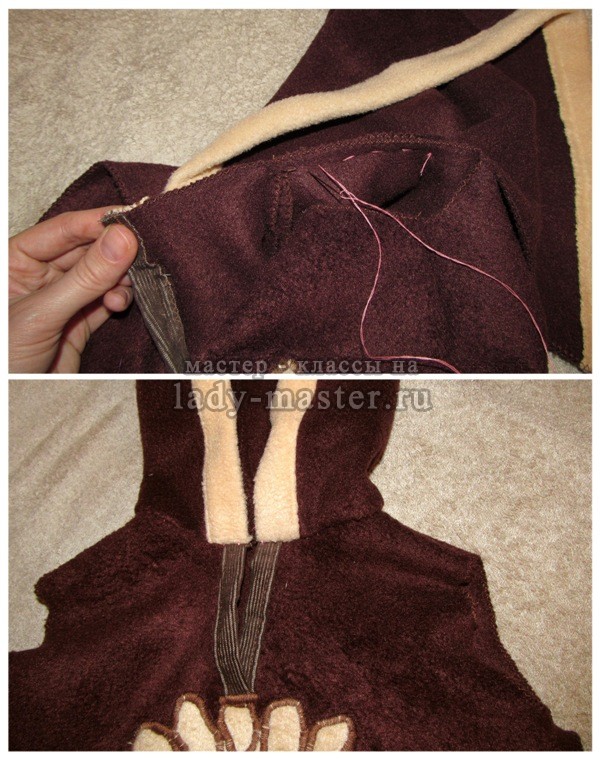
22. Sew the hood to the neckline. Please note bottom photo– the seams turned out to be very thick. But they are located at the child’s neck. In order to make the baby comfortable, we will now eliminate this drawback.
 23. Fold all seams on the neck down and sew with a zigzag using brown threads. This will make the seam neat on the inside and almost invisible on the outside.

24. Baste the side seams of the vest and measure it on the child. If everything is good, then proceed to the next point of the master class. If not, and it suddenly turned out to be too small (as in my case (well, even an old woman can have a hole), then make side inserts in the vest from sand-colored fleece. Cut strips of the appropriate length and width from this fabric so that they reach from from the bottom of the vest to its armhole. Serve them and stitch them to the sides of the vest.
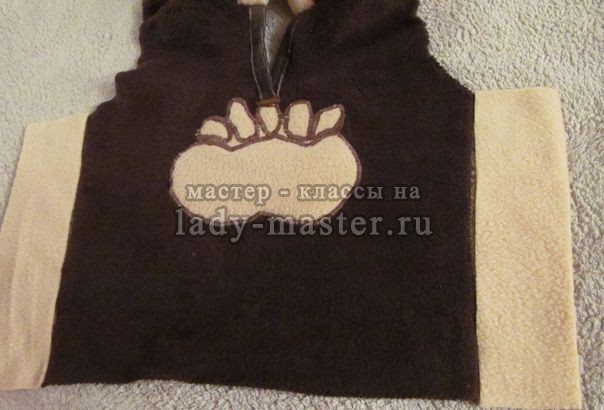
25. Now let's process the armholes. Fold the edge of the fabric inward and stitch.
26. Now you need to sew one side of the vest. After that, we process its bottom: we bend the edge inward and make a stitch.

27. Finally, we grind the second side of the product. The vest has taken on an almost finished look!

28. On the wrong side of the hood, 1 cm above the neckline, on its edges on both sides (in sand-colored fabric), use scissors to make cuts 8–10 mm long. Process them by hand and use a pin to thread the lace through. Now our hood can be tied and tightened. The vest is ready, and we get to the fun part - sewing the bear's face on the hood of the costume!
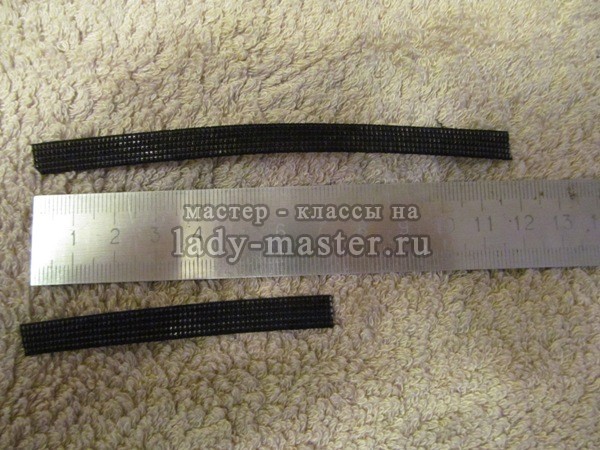
29. Now we will sew bear ears with you. To do this you will need corset tape of any color. Cut two pieces 12 and 7 cm long.
30. Using the patterns shown in the photo, cut out two parts. The larger one should be brown.

31. Fold the pieces as shown in the photo, with right sides facing each other and stitch in a straight line.

32. From the wrong side, place a corset tape 12 cm long on the brown fleece to the very seam and stitch it. Sew the second ribbon in the middle, perpendicular to the first. Fold the fabric in half as shown in the photo so that the ribbons remain inside. Bring the edges of the fleece together evenly. As a result, you will have a bear ear blank with a brown edging on top.
33. Make large folds along the edges and stitch them. Make one more fold next to each other and fasten them manually. This is quite problematic to do on a typewriter due to the small size of the parts.
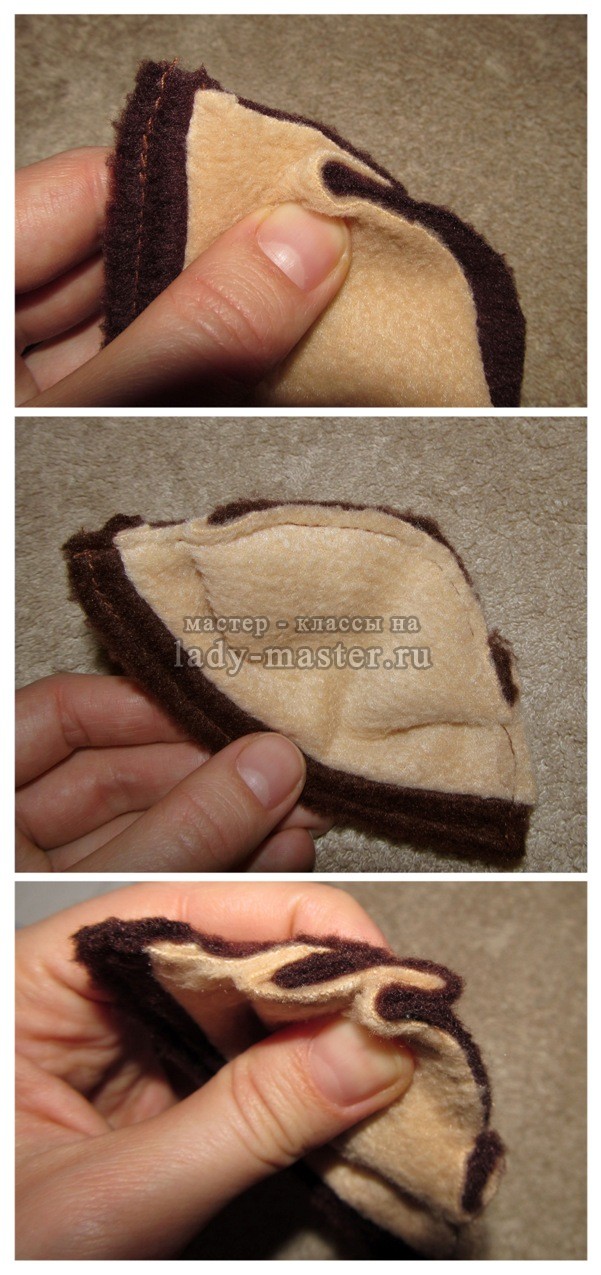 34. This is the ear you should get. Thanks to the corset tape, it will keep its shape and be tight. The beige fleece will be on the inside of the ear, the brown fleece on the outside. Make the same second ear.
35. Hand sew the ears to the hood.

36. Now let's make the eyes. To do this you will need a white sewing ribbon. It's great because it's washable, just like the permanent markers we'll use to draw the pupils later. I found a rather narrow ribbon like this, so I sewed its pieces together. Then I cut out ovals and drew eyes. They need to be basted onto the hood, and then sewn on a machine in a circle with white thread.

37. Making a nose! Take any black fabric, stuff it with cotton wool and hand sew a round spout, then attach it to the hood.

38. Exactly the same as the nose, we make the tail, but for this we take sand-colored fleece. Sew it to the back of the shorts.

39. Done! This is such a wonderful, and, most importantly, unlike anyone else, I got a New Year's bear costume!

But my child really liked it and then spent a long time spinning around the mirror and admiring himself!


I’m just sure that with such detailed photo instructions you’ll come out with a costume that’s just as good, and maybe even better! The ears and tail can be decorated with tinsel, giving the product a truly festive look!
New Year is coming soon and you need to make a teddy bear costume for a party? Price good suit It’s quite big, and every second child will wear this outfit. Today we want to talk about how to make a bear with your own hands.
If you have sewing skills, you can start making a bear outfit from scratch. But manufacturing takes a lot of time, so if you are in short supply, you can choose a faster option for making an outfit.
For example, you can make it from scrap material. You can make a bear costume for a boy from a jacket with a zipper, preferably with a hood. Also, to make a suit you will need pants made of soft fabric. The color scheme of the sweater is not particularly important, because it will be greatly changed.
In addition, to make the outfit you will need brown fabric and matching threads. When purchasing material, keep in mind that it is necessary to completely cover the jacket. You don’t even have to make a pattern, because our task is simply to wrap the old jacket in new fabric.
Wash the fabric and jacket in advance. Iron. Then start tracing each detail. First we cut out the back and front, after that we move on to the sleeves. All parts must be cut taking into account seam allowances. Pay the most attention to the hood of the blouse. To do this, we need to cut out four circles for the ears of the future bear. After this, we sew the circles along the edges. Leaving only 2 cm. Then turn out the blanks for the ears. Next, you need to fill the ears with filler. A circle of a lighter color is sewn onto each ear. Sew the ears to the hood.
After this, we move on to making the bear’s nose. To do this, we sew together two black circles with a diameter of 6 cm. We also stuff them with filler. You can sew on ready-made eyes, which can be purchased at any craft store.
The next step will be the mittens. It will not be difficult to make them. You just need to trace the child's hand, make a seam allowance, cut it out and sew it along the contour. On the inside of the mittens we sew the same light-colored details.
Step-by-step instructions for creating a bear costume for an adult 
If you need to make a bear costume from scratch for an adult, then you need to prepare patterns in advance. You can make a bear either whole or separate, so choose the option that suits you best:
- Common details for any bear costume will be paws, mittens, ears, which can be attached to a hat or hoop.
- To make the bottom, you can make loose pants from a soft material. The blouse is also made of soft fabric, which is complemented by mittens.
- To pattern the pants, you can take any of your own pants and make them with an elastic band at the bottom. Any sweatshirt is also suitable for a sweater.
- A suitable material for making a bear would be fleece or faux fur. But keep in mind that it will be very hot in such a suit.
Reference! If you decide to make a jumpsuit, be sure to make it with a zipper. You shouldn't make a lock in the middle of your stomach, because it won't look very attractive. It's better to make a side zipper. Be sure to overcast the edges of the product so that the suit does not fray.
To make a vest, you can also use old jacket, according to which you will make a pattern. It will be fastened with hooks or buttons. It is still recommended to use faux fur for a vest, because it will not look as impressive if made from regular material. Be sure to overcast the product on all sides so that it does not fray. Each hook is sewn parallel to each other.
Making a New Year's costume is a simple matter, the only thing that can cause difficulty is working with thick fabrics, which are quite difficult to sew; besides, not every machine can sew even thick fleece. It’s up to you to decide exactly how your outfit will look, don’t hesitate to create unique looks that will be different from everyone else.
What accessories to complement the suit 
You can decorate the bear costume with a butterfly, which you can sew yourself or use a ready-made one. To do this, you need to cut out 2 squares of black or red material measuring 20*20 cm and another 5*10 cm. A small square is stitched together to make a tube. After this, the workpiece is ironed. Large squares are also sewn from the wrong side, but do not forget to leave room so that the workpiece can be turned right side out. This will be the main part of our bow. It is put on a large square and it turns out to be a bow for the bear.
If it is not possible to sew a bear hat, then you can get by with a mask. On the Internet you can find a mask for every taste, print it on a color printer, or, as a last resort, decorate it with pencils. Don't forget to attach an elastic band to the cardboard mask so that you can put it on.
In addition, you can supplement the bear with a barrel of honey. Of course, not real. To make it, you will need fabric of two colors to create the appearance of wooden planks. To do this, you need to cut out a rectangle measuring 40 cm by 40 cm and two circles of 15 cm diamonds. You can sew a rectangle of two shades to imitate wooden boards. After this, we attach circles on both sides to make the glasses voluminous, and sew the side of the workpiece. Don't forget to do beautiful inscription"Honey". Now it’s clear that this is a bear.


