Ponytail hairstyle- an almost universal styling for hair of any length, which also does not require too much time - the ponytail, beloved by all girls without exception. Simplicity of execution combined with various variations make styling appropriate both during the day and at a noisy party.
Who is the ponytail hairstyle suitable for?
Of course, hair gathered into a playful ponytail, swaying slightly to the rhythm of his clicking heels, will attract many male glances. A knowledgeable flirt can turn her hair into a powerful weapon, forcing men to line up to fulfill her every whim. But is this styling option suitable for everyone?
Unfortunately, hair tied in a ponytail is not suitable for all ladies. The obvious exception is protruding ears. A ponytail will draw too much attention to them.
Owners of a narrow, pointed face with poorly defined cheekbones should not try to experiment with this hairstyle. But here two “tails” located on the sides of the head will look great.
True, there is a significant “but” here: a hairstyle has the right to exist only if one’s age and status can afford such liberties in appearance. In this case, a ponytail laid to one side will also look good.
Thin hair is also a reason to avoid this hairstyle. Especially if you have no or insufficient experience in giving your hair good volume. In this case, the chic ponytail is magically transformed into its pitiful mouse likeness. And this obviously will not add attractiveness to its owner.
Relatively recently, stylists were unanimous in the opinion that the ponytail is the exclusive prerogative of owners of long hair. Then the opinion changed radically, and now girls with naturally curly hair can wear their hair in a fashionable ponytail. However, the length of the hairstyle may vary.
Classic hairstyle

Hair styling in this style is familiar to all girls without exception. To pull your hair into a classic ponytail, you will need a minimum set of items:
- a regular comb (which you are used to using daily);
- styling product (in this case hairspray);
- bobby pin to secure your hair.
Step by step instructions:
- Wash your hair and dry it.
- You can do it with a hairdryer, or you can do it naturally.
- It all depends on the amount of free time.
- Comb your hair, then lift the entire mass as high as possible and secure with an elastic band.
- If the top of your head is not too smooth, then carefully comb your hair, moving all the unevenness to the base of the collected hair.
- Then spray the top of your head with hairspray and smooth your hair.
- The hairs that have come out on the sides also need to be hidden by pinning them with bobby pins to match the hair color.
- In this case, the hairstyle will be neat and will remain throughout the day.
Low ponytail styled to the side

This style of styling will look perfect on thick and fairly long hair. And if you need to add sophistication to your look, then this is the most suitable hairstyle option.
Step by step instructions:
- Wash and dry your hair well in your usual mode (hair dryer or natural drying).
- Now comb your hair to one side.
- Next, you can simply secure your hair to one side with an elastic band or a hair clip.
- Or you can form a twisted strand of hair on the back of the head, running from the base of the ear through the entire back of the head.
- And only then gather your hair into a low ponytail, dropping it over one shoulder.
- Be sure to secure your hair with an elastic band.
- Now it’s worth imagining a little.
- For example, curl your hair with a curling iron, forming beautiful large curls, or simply curl a few strands.
- You can also do a light backcombing on your hair, but in this case it is important not to overdo it.
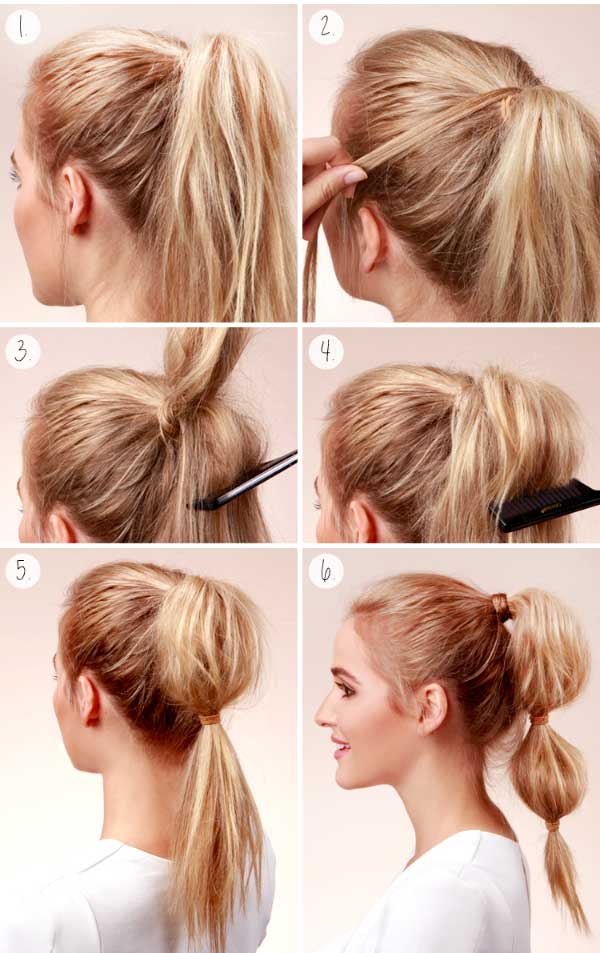
Ponytail with backcomb on top

This styling visually reduces facial features, making it more aristocratic. The hairstyle goes well with all clothing styles and can serve as both a daytime and evening styling option.
Step by step instructions:
- You need to wash your hair, then apply styling foam to it and dry it completely.
- Then, using a comb, add medium volume to the root area of the hair.
- After this, the top of the head must be collected, slightly raised above the surface of the hair and secured with bobby pins.
- Too much volume is not needed here.
- Then you need to gather your hair into a high ponytail and secure it securely.
- Then you can fantasize again: the hair can be left straight or curled using electric curling irons.
- If desired, the tail can be styled as a braid.
- It all depends on your personal preferences.
- To keep your hairstyle in place, spray your hair with hairspray.
Wrapped ponytail

Step by step instructions:
- Since the hairstyle should always be done on clean hair, it must be washed and dried well.
- Next, collect the hair at the back of the head.
- If you wish, you can raise the entire mass to the top of the head, which will look more interesting.
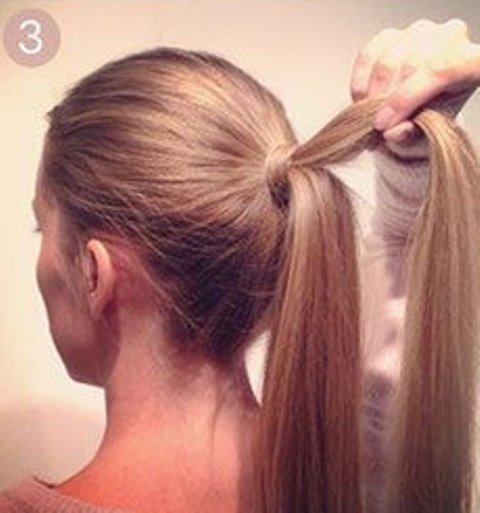
- Separates a fairly thick strand of hair from the collected ponytail.
- We fix the rest of the hair with an elastic band.
- Now we remove all the unevenness on the top and sides, smoothing the hair with a comb and fixing it with invisible hairpins.
- Then we simply wrap the remaining strand at the base of the “tail” several times.
- The elastic should be hidden by the hair.
- Don't forget to secure the tip of the strand well, hiding it under the base of the ponytail, using a pair of bobby pins.
Voluminous ponytail

- round comb;
- hair clip;
Step by step instructions:
- You need to wash your hair and dry your hair well.
- Now you need to collect a “tail” from the hair. You can place it at any height.
- In any case, the styling will be more than spectacular.
- When the hair is carefully fixed, you can begin to create a hairstyle.
- Gently comb the strands, giving them the desired volume.
- Secure your hair with hairspray.
- You can do things a little differently.
- Curl your hair with a curling iron (a large curl will look best) and separate it with your fingers.
- Now start treating your hair with hairspray, but spraying it inside the “tail”.
- And so on until the collected hair receives the desired volume.
- The main thing is not to skimp on varnish.
- After all, the life expectancy of your voluminous “tail” depends on its quantity.
Messy ponytail

Looks a little casual, but quite sexy! In addition, installation is very fast.
Step by step instructions:
- Wash and dry your hair.
- Once your hair is ready for styling, just forget about the comb.
- In this case, you will only need your fingers.
- Comb your hair with it and then gather it into a ponytail.
- Complete your hairstyle with a beautiful hairpin and leave a few “curtains” (released strands) near your face.
- Spray your hair with hairspray and you can go about your business.
Ponytail with backcomb

For backcombing you need:
- A comb with fine teeth, preferably thin and with a knitting needle for more convenient separation of strands.
- A brush with natural bristles to give your hair a finished look.
- Spray designed to make hair soft
- Foam, mousse or varnish for fixation. Do not use too strong products, otherwise you may get an unnatural result.
For the tail you will need:
- Thin elastic bands for fixation.
- Bobby pins or small hairpins: they are useful for hiding unruly short cowlicks and maintaining the required volume.
- Decorative elastic bands, combs, hairpins, ribbons are used to decorate the hairstyle and are therefore optional.
Before making a backcombed ponytail, wash your hair. It is better to use Volumizing Shampoo and blow dry your hair.
Step by step instructions:
- Separate a strand from the crown that will be used to create volume.
- Do the backcombing neatly and smoothly. If you have medium length hair: move from the roots to the middle, if you have long hair: backcomb it at the very roots.
- Using a soft brush, adjust the shape. It should be smooth and semicircular. You can do without a comb, modeling the styling with your fingers, then the hairstyle will turn out more natural.
- Use a bobby pin to secure your hair at the back of your head.
- Apply varnish to fix it.
- Gather the remaining hair at the desired height and secure with an elastic band. It can be hidden under a separate strand: to make it fit better, first curl it a little with a curling iron.
- If desired, you can curl or straighten your ponytail with an iron, braid it and decorate it with a ribbon or thread with sparkling stones or pearls.
Perfect ponytail

Step by step instructions:
- We make this simple design from a hair elastic and two hairpins.
- We collect the tail at the back of the head.
- When viewed from the side, the tail should follow the line of the cheekbones.
- We comb the hair towards the crown, paying special attention to the occipital area.
- We wrap the tail with an elastic band with two pins.
- We comb the collected hair again, sprinkling the top and sides with hairspray.
- Select a strand at the base of the ponytail, spray it with varnish and wrap it around an elastic band.
- We fix the wrapped strand with a hairpin.
- We loosen the hair on the top of the head with massaging movements, thereby emphasizing the volume on the upper part.
- Gently pull out small strands towards the face, adding volume at the forehead and making the styling more careless.
- Letting out some strands near your face (this could be bangs) will complete your look and add texture to your hairstyle.
- If desired, you can slightly twist the released strands onto a curling iron in the direction away from the face.
- Your styling is ready!
Long voluminous ponytail

Step by step instructions:
- To begin with, on the back of the head you need to divide the hair into two parts (one on the top of the head, the second just below);
- Then we collect the separated curls into two tails (do not tighten too tightly so as not to harm the structure of the hair; you should choose an elastic band that matches the color of your hair, even if we decorate it);
- After collecting the tails, you need to comb the curls a little, thereby giving them additional volume;
- After this, you need to take a strand of hair from the upper ponytail and wrap the elastic band (hide it), secure it with a bobby pin;
- Repeat step 4 with the second tail, hide the elastic there;
- Both tails are ready, now we visually form a single long, thick tail and fix the result with medium-hold varnish.
Classic ponytail

Step by step instructions:
- Use a horizontal parting to separate part of the hair at the top of your head.
- Stab it with a crab so that it doesn’t interfere for now.
- Tie the lower part into a ponytail.
- Release the top one from the clamp and comb it at the roots.
- Lower it down and smooth the top layer.
- Connect both parts using another elastic band.
- Take one thin curl and wrap an elastic band around it.
- Hide the tip in the general mass and pin it with a bobby pin.
- Lightly fluff the ponytail to give it volume.
Side ponytail

Step by step instructions:
- Apply a heat-protective spray and any styling product to your hair and curl it with an iron, forming vertical curls.
- Comb them with a wide-tooth comb.
- Take a small section of hair from the top of your head and comb it well.
- Using the thin tip of a comb, separate the comb from the hair near the forehead.
- Tie a ponytail.
- Divide the remaining hair into a straight or side parting.
- Twist each section into very light strands (literally two turns).
- Place the strands at the base of the ponytail and wrap the ends around the elastic band.
- Secure with bobby pins.
- Let out a couple of thin curls near your face.
Ponytail with braid

This is the optimal choice for long and medium strands. If you have basic weaving skills, be sure to try it at the first opportunity.
Step by step instructions:
- On the right side, take three identical strands.
- Braid the spikelet, adding loose curls from below and from above.
- The weave should not be too tight.
- Once you reach ear level, continue weaving in the traditional way.
- Tie the end of the braid with an elastic band.
- Gather the remaining hair into a ponytail with an elastic band.
- Wrap a braid around its base.
- Hide the tip in the middle and pin it with a bobby pin.
Ponytail with lanterns

This stylish hairstyle is perfect for dates, parties or going to the movies.
Step by step instructions:
- Tie your hair at the top of your head.
- Wrap a thin curl around its base and secure it securely with a bobby pin.
- Lightly comb the strands.
- Tie another elastic band a little lower and wrap it in a thin curl.
- Pin the tip as well.
- Form the next lantern, retreating the same distance.
- Continue until desired length.
- Remember to comb your hair with a comb or stretch each section with your hands.
Perfect ponytail

Step by step instructions:
- First you need to wash your hair.
- Then dry them with a hairdryer using a brush so that the hair roots become smoother and easily fit to the head.
- To make it work, you need to comb them, directing them to the point where the tail gathers.
- After thorough drying, spray with a straightening and protecting spray.
- When it dries, we make the hair perfectly straight by passing the strands along the entire length through a straightener.
- Using a simple comb, divide the hair into two equal parts.
- We select the part from below into a tight tail below about three centimeters from the top of the head.
- For greater evenness, you can tilt your head back.
- We also redirect the unused hair back, while covering the already collected part.
- Then we connect the entire head of hair into one ponytail.
- The result obtained must be sprayed with fixing varnish.
- In addition, smooth the remaining hair with a straightener or braid it into a braid or several small braids.
- These braids will also join together at the ends to secure the hairstyle.
- This hairstyle is quite comfortable and makes an impression.
- But you don’t need to choose it as an option for every day.
- The reason lies in the fact that when following care tips, it is not recommended to frequently and tightly pull the hair on the back of the head.
Ponytail with hidden elastic

Step by step instructions:
- Comb your hair to avoid frizz.
- If you have very thick hair, you can use 2 or 3 elastic bands at a time.
- When the ponytail is done, separate the bottom strand.
- You can apply a little foam, gel or other styling product to it.
- Wrap a rubber band around it.
- When a small tip of the strand remains, take the bobby pin, open it and wrap the strand around one of its sides.
- Insert the bobby pin from below into the base of the ponytail.
Low ponytail with backcomb

Step by step instructions:
- On the crown area, separate part of the hair, comb it with a brush and carefully arrange it.
- We collect all the hair in a tight ponytail at the back of the head.
- Lightly lift the bouffant with your hand.
- Gently comb stray hairs with a fine-toothed comb.
- Separate one thin strand and wrap it around the base of the tail.
- The ends of the tail can be slightly curled.
ponytail

Step by step instructions:
- Prepare a comb and an elastic band with bobby pins.
- We carefully comb the hair and collect the upper part of it on the top of the head, as for the Malvinka hairstyle.
- We select hair from the sides and back.
- We hold the ponytail in one hand (left) and fasten the bobby pin inside the collected hair, wrap the elastic band several times around the hair and similarly fasten the second bobby pin inside the ponytail (on the opposite side).
- The elastic and bobby pins hold the hair tightly to prevent the hairstyle from becoming loose or falling apart.
- Comb the ends to avoid tangling.
- Separate a small strand and wrap it around the elastic, pin the remaining tip with a bobby pin.
- At the same time, wrap a strand of hair around the tip of the bobby pin and it will not unravel.
Nicole Richie style ponytail

Step by step instructions:
- Comb your hair thoroughly and divide it into zones. Read more:
- The upper zone is the crown, lateral zones and occipital.
- We separate each zone with a comb and secure it with hairpins or clips.
- We tie a ponytail from the back of the head.
- Smooth, medium height.
- Lightly scratch the side strands from the inside and lay them on the sides, wrapping them around the tail.
- To secure it, use a bobby pin twisted onto a strand or fasten it with a bobby pin.
- Repeat on 2 sides.
- We comb the remaining hair in straight lines, moving from the crown to the forehead.
- For airy hair: spray each strand with hairspray.
- Do not comb the first strand over your forehead, leave it smooth.
- We lay the hair strand by strand on the ponytail.
- Smooth the backcomb and spray with hairspray to fix it.
- Place the bangs along the forehead and secure them near the tail with bobby pins; for short bangs, simply comb them.
Video: ponytail hairstyle
The ponytail hairstyle is considered universal. It is perfect for all occasions - be it going to work or a romantic date. Unfortunately, many people think that a ponytail is too simple and unattractive, but a selection of these stylish tutorials can convince you otherwise!
Classic version
Want to learn how to make a classic ponytail? These photos and a set of very simple hairstyle tools will help you - a comb and two elastic bands.
- Use a horizontal parting to separate part of the hair at the top of your head.
- Stab it with a crab so that it doesn’t interfere for now.
- Tie the lower part into a ponytail.
- Release the top one from the clamp and comb it at the roots.
- Lower it down and smooth the top layer.
- Connect both parts using another elastic band.
- Take one thin curl and wrap an elastic band around it. Hide the tip in the general mass and pin it with a bobby pin.
- Lightly fluff the ponytail to give it volume.
Elegant ponytail
A great choice for work that will make you look your best!
1. Apply a little styling product to your hair. Comb it into a side parting.

2. Separate a small part of the hair at the crown and lightly comb it at the roots.

3. Gather the strands into a ponytail, moving it slightly to the side.

4. Use the sharp tip of the comb to slightly lift the comb upwards.

5. Select a thin curl, wrap an elastic band around it, hide the tip in the general mass and pin it with a bobby pin.
Tail with sides
This simple hairstyle can be easily done by yourself in just 5 minutes. Unlike the businesslike previous MK, he looks romantic, very gentle and playful.
- Apply a heat-protective spray and any styling product to your hair and curl it with an iron, forming vertical curls.
- Comb them with a wide-tooth comb.
- Take a small section of hair from the top of your head and comb it well.
- Using the thin tip of a comb, separate the comb from the hair near the forehead.
- Tie a ponytail.
- Divide the remaining hair into a straight or side parting. Twist each section into very light strands (literally two turns).
- Place the strands at the base of the ponytail and wrap the ends around the elastic band. Secure with bobby pins.
- Let out a couple of thin curls near your face.

How do you like such a voluminous ponytail?
Ponytail with one braid
This is the optimal choice for long and medium strands. If you have basic weaving skills, be sure to try it at the first opportunity.
- On the right side, take three identical strands.
- Braid the spikelet, adding loose curls from below and from above. The weave should not be too tight.
- Once you reach ear level, continue weaving in the traditional way.
- Tie the end of the braid with an elastic band.
- Gather the remaining hair into a ponytail with an elastic band.
- Wrap a braid around its base. Hide the tip in the middle and pin it with a bobby pin.

Ponytail with lanterns
This stylish hairstyle is perfect for dates, parties or going to the movies.
- Tie your hair at the top of your head.
- Wrap a thin curl around its base and secure it securely with a bobby pin.
- Lightly comb the strands.
- Tie another elastic band a little lower and wrap it in a thin curl. Pin the tip as well.
- Form the next lantern, retreating the same distance.
- Continue until desired length. Remember to comb your hair with a comb or stretch each section with your hands.
Tail knot
A very original way to tie a beautiful ponytail. By the way, you will have to tie it in the literal sense of the word! The only caveat is that this style only suits long hair.
>Romantic ponytail with bow
This perky hairstyle will not leave your person without the attention of men. Therefore, if you are going to recklessly flirt and flirt, stop at this option.
1. Gather your hair at the back of your head.

2. Wrap the elastic in a thin curl. Hide the tip in the middle and pin it with a bobby pin.

3. Separate a not very large strand from the tail.
4-5. Fold it into a loop and secure with a clear elastic band.

6. Divide the loop in half - you should get a heart.

7-8. Attach each section to your hair using a bobby pin, forming the contours of the bow.

9. Separate another thin strand from the ponytail and lift it up, placing it between the two halves of the bow.

10. Secure it with bobby pins.

11. Wrap the remaining tip around the base of the bow.

Tiered ponytail
How to create a hairstyle that would help remove hair during work and training? Believe me, there is nothing complicated about this!
- Use two vertical partings to separate a small portion of hair near the forehead. Tie it with an elastic band.
- Using the next parting, separate a section of hair exactly the same width. Connect it with the previous tail and also tie it with an elastic band.
- Continue in this manner to the base of the neck.
- Comb the ends smoothly.

Retro ponytail with a bouffant
This retro backcombed ponytail will fit perfectly into a themed party setting. Yes, and for special occasions it can also be done.
- Comb it all back.
- Comb the strands well at the forehead and on the top of the head.
- Lower the comb down and smooth the top layer.
- Tie a high ponytail.
- Wrap a thin strand around its base. Hide the tip and secure with a bobby pin.
- Bring the ponytail over your forehead, leaving only a thin section.
- Comb it with a comb.
- Place another layer of hair on top and comb it as well.
- Leave the top layer smooth.

Hairstyle in the style of Nicole Ricci
Do you want to recreate the image of a famous Hollywood actress? Believe me, nothing is simpler!
- Separate part of the strands at the top of your head, leaving hair free near the forehead and on the sides.
- Stab her for a while.
- Tie the hair at the back of your head into a tight ponytail.
- Divide the hair near the forehead and ears in half. Throw one part to the tail first and wrap the elastic band around it. Repeat with the other part.
- Release pinned hair from the clip and lightly backcomb it near the roots.
- Lay everything back and smooth the top layer.

Reverse braid styling
This ponytail takes very little time, but the results will be absolutely stunning!
1. Comb your hair all over your head to give it volume.
2. Throw everything back.
3. On the right, take three thin strands and make a reverse French braid, picking up loose curls on both sides. Tie the end with a thin elastic band and attach it to the main body of hair with a bobby pin.
 4. Make the braid voluminous by stretching its links with your hands.
5. Braid exactly the same spikelet on the left side.
6. Once again, run the comb through the strands near your forehead.

7. Gather everything together with an elastic band. Accuracy in this installation is not at all important. It should be casual, very light and free, so don’t be upset if some strands come out a little.
8. Wrap a thin strand of elastic around the elastic and secure the end with a bobby pin.

Curly low ponytail
Do you only have 5 minutes? This option is for you!
- Comb it all back or part your hair.
- Gather the strands in your hand.
- Wrap a light tourniquet towards the head.
- Tie the resulting rope with an elastic band and secure with hairpins, otherwise the tourniquet will fall apart.
- Wrap a thin strand of elastic around the elastic.
- Throw the ends over your shoulder.

Another option:
Stylistic tricks
To get a great hairstyle, listen to the advice of experienced hairdressers:
- Tip 1. To decorate the tail, use satin ribbons, colored scarves and chiffon scarves.
- Tip 2. You can pin a flower at the base of your hairstyle - it will be very romantic. The main thing is to choose those flowers that can last at least a few hours (gerberas, orchids, lilies).
- Tip 3. If you can’t boast of thick hair, curl your tied hair with an iron or curlers - the curls will add volume.
- Tip 4. An alternative to curls is a curling iron with a corrugated attachment. Such strands look better on long hair and do not suit short hair at all.
- Tip 5. Experiment with the level - tie the ponytail either high on the top of the head, or lower it to the back of the head, or even place it at the base of the neck. In this case, you should take into account the shape of your face, the length and thickness of your hair, as well as the presence of bangs.
By the end of the Middle Ages, it became a tradition for women to grow their hair long.
And since constantly walking around with loose hair was considered inconvenient and untidy, a huge abundance of hairstyles with collected hair arose, including a ponytail.
Women began making their first hairstyles in ancient times, using combs made of bones and wood.
As civilized society developed, hairstyles became more beautiful and varied, women found new ways of styling, and decorated their hair with floral wreaths and ribbons.
By the end of the Middle Ages, it became a tradition for women to grow their hair long. And since constantly walking around with loose hair was considered inconvenient and untidy, a huge abundance of hairstyles with collected hair arose, including a ponytail.
Currently, there are more than 80 variations of ponytail hairstyles.
Do you want to look original and interesting? It is not necessary to contact a stylist for this; it is quite possible to do it yourself, it all depends on your ingenuity and imagination.
The ponytail hairstyle is performed in 3 options: high, when the hair is collected at the top of the head; low - at the back of the head, medium - at ear level.
What variants of tails are often found:
- ponytail is smooth, height: high, low, medium;
- with fleece;
- volume;
- asymmetrical;
- inverted;
- with and without bangs;
- with braids;
- malvinka;
- tail waterfall;
- ponytail with bow;
- Kardashian ponytail;
- ponytails for school;
- with accessories.
Secret: A smooth ponytail is a hairstyle that is also suitable for 2-3 days after washing your hair.
Hair styling before creating a ponytail
Before creating any hairstyle, you need preliminary preparation and styling. Your hair will look beautiful and well-groomed if you follow a certain sequence:
- First you need to wash them with shampoo designed for your hair type.
- Use conditioner, balm or other care product to make your hair smooth and manageable.
- Dry and comb your hair well.
This option is for a classic or smooth ponytail, but for a voluminous ponytail with volume, you should choose a different styling.
Look, giving them volume in a matter of minutes, and the instructions in the photo and video format will allow you to repeat them after the 1st viewing.
Use this knowledge to add sophistication to your ponytail.
Learn how to style long bangs so that your look will surprise and delight everyone! All the secrets of styling bangs Many options and 50 photos will delight both beginners and advanced hair “gurus”.
Styling for a voluminous ponytail
- Wash your hair using shampoo.
- We apply the balm only to the ends so as not to overload the roots.
- We dry our hair with a hairdryer and comb it thoroughly.
- We process the root zone using a small corrugated iron. We process each strand for 1/3 of the length.
- Using a classic curling iron, twist the ends inward. Hold the curling iron at maximum setting for 20 seconds. We do not untwist the curls.
- We pull the strands from the back of the head to the face. Apply glitter to your hair to add shine.
Tutorial video on creating volume in your hair to create a voluminous ponytail.:
Depending on what occasion you are preparing your hairstyle for and what effect you want to achieve, curl your hair or, on the contrary, straighten it, comb it or create a little volume at the roots, part it. So, the hair is prepared and styled, which means half the work is done and it’s time to start creating the hairstyle.
How to choose a hair tie?

How to make sure your hair stays in place all day long? You need to choose the right rubber band. Give preference to soft elastic bands; they cling less and break hair.
Elastic bands “handle” your hair with care: with a fabric cover (with an elastic band for underwear inside), for hair with terry, and silicone springs. 
Nowadays, elastic bands with a hook have become popular; they perfectly and permanently fix the hair in the desired position, stretch and compress perfectly.
Secret: You can easily create such an elastic band yourself using an ordinary elastic band and two bobby pins.
Which one to choose: size, shape, thickness and color is up to you.
How to make a beautiful ponytail from the hair on your head?

Making a spectacular ponytail at home is quite simple, it will take a little time.
Correct placement of the tail: right, left or center.
Want to make your ponytail exactly centered?
When determining where the tail will be on your own, use your palm as a guide; the distance behind the ears when placing your hand should be the same, as should the height of the tail itself. When choosing a high one, do it right on the top of the head, a medium one at the back of the head, and a low one at the beginning of the neck. Practice before making an exit ponytail for the first time.
Let's consider several tail options for different occasions.
Classic high ponytail

The most popular option is a high ponytail. Well suited for everyday wear and will make your look well-groomed and elegant. If your hair is curly, you must first straighten it with an iron.
- Prepare a comb and an elastic band with bobby pins as described above.
- We carefully comb the hair and collect the upper part of it on the top of the head, as for the Malvinka hairstyle. We select hair from the sides and back.
- We hold the ponytail in one hand (left) and fasten the bobby pin inside the collected hair, wrap the elastic band several times around the hair and similarly fasten the second bobby pin inside the ponytail (on the opposite side).
- Comb the ends to avoid tangling.
- Separate a small strand and wrap it around the elastic, pin the remaining tip with a bobby pin. At the same time, wrap a strand of hair around the tip of the bobby pin and it will not unravel.
The elastic and bobby pins hold the hair tightly to prevent the hairstyle from becoming loose or falling apart.

A training video on how to make a beautiful high ponytail is suitable for those who do not like photos:
Secret: for those who make their own ponytail. You need to tilt your head forward, this will make it easier to collect all the hair.
Volume tail

Creating a voluminous ponytail hairstyle has similar steps to the classic one and several secrets.
Adding volume after tying the ponytail:
- It is easy to avoid a tight head by slightly stretching the strands near the face, thereby creating volume around the face. Leave the temples smoothly tightened.
- Comb the tail, shape the curls. Lightly comb along the inside to add volume. Distribute a small amount of shine in the spray.
- Using a separate strand of hair, we hide the elastic band, wrapping it around the tail. We wrap the tip of the strand around a bobby pin and secure it at the base of the tail or to a hairpin.
- For more volume: turn the tail over and pin it at the base with 3 pins on the reverse side.
Step-by-step video with explanations for creating a voluminous ponytail:
Nicole Ricci style 60s ponytail with and without extensions

Pay attention to the photo, where the creation of a ponytail without false strands is shown step by step, in the video with them (for those whose hair is sparse or not long enough). Use the option you like best.
Step-by-step instructions for tying a 60X ponytail:
- Comb your hair thoroughly and divide it into zones. The upper zone is the crown, lateral zones and occipital. We separate each zone with a comb and secure it with hairpins or clips.
- We tie a ponytail from the back of the head. Smooth, medium height.
- Lightly scratch the side strands from the inside and lay them on the sides, wrapping them around the tail. To secure it, use a bobby pin twisted onto a strand or fasten it with a bobby pin. Repeat on 2 sides.
- We comb the remaining hair in rows, moving from the crown to the forehead. For airy hair: spray each strand with hairspray.
Do not comb the first strand over your forehead, leave it smooth. We lay the hair strand by strand on the ponytail. - Smooth the backcomb and spray with hairspray to fix it.
- Place the bangs along the forehead and secure them near the tail with bobby pins; for short bangs, simply comb them.
Video on creating a ponytail hairstyle in the style of Kim Kardashian, Nicole Ricci a la 60:
Low inverted tail

This hairstyle will only take a few minutes to create. With this ponytail, your look will be sweet and romantic. Let's consider the option of creating a tail and its modifications. In the first case, it will be a waterfall of ponytails, the second is an evening one.
First classic version
- Comb all your hair back.
- Gather a loose ponytail and secure with an elastic band.
- Lower the elastic slightly.
- Twist the resulting tail into a rope.
- Make a hole above the elastic and thread the tail through it, raising the elastic to the base of the tail.
To make this ponytail, watch the step-by-step video on how to tie a low twisted ponytail.
Waterfall from an inverted tail

Difference from the classic one: 3 ponytails are tied and each one is turned out in turn. The first one is without picking up the lower strands, and 2 and 3 are with picking up.
The video will help you understand in more detail how to create a waterfall ponytail.
This video shows step by step the inverted ponytail hairstyle with its transformation into a waterfall:
This video will show the second version of an inverted tail, when the tails are wrapped without grabs, the previous tails are simply passed closer to the head behind the tails.
Asymmetrical side ponytail
Another simple and interesting solution would be to create a side ponytail. A sleek, feminine look suitable for any occasion. Depending on your mood, your hair can be either wavy or straight.
- Make a side parting and comb all the hair to one side, on which it will be convenient to wear the hairstyle.
- Gather hair into a loose ponytail and secure with an elastic band. For coquetry, it is welcome to use others.
- Hair accessories, for example, decorate with a hairpin, or tie with a ribbon or scarf.
Messy ponytail

Choose this hairstyle option if you haven't had time to wash your hair. It will also be appropriate for creating a spectacular image.
- Apply a small amount of mousse or foam and beat your hair.
- Create root volume by combing your hair a little or fluffing it with your fingers.
- Without combing, gather your hair into a loose ponytail at the back of your head or below.
- If desired, twist the tip of the tail or pull out a few strands.
Ponytail with a backcomb
To create the image of a femme fatale, this option is suitable; its basis is the backcombing of the hair on the top of the head. An excellent option for girls with thin or thin hair. It is not advisable to backcomb girls with brittle, dry and split hair; they will be damaged even more.
- Separate a wide strand of hair from approximately the forehead to the middle of the head, and carefully backcomb it.
- Pin a strand at the back of your head with a bobby pin, smooth it with your hand or a comb and fix it by spraying it with varnish.
- Gather the remaining hair into a ponytail (preferably to capture the bobby pin holding the comb), secure with an elastic band or a hairpin.
- At your discretion, twist the tip of the tail onto a curling iron, straighten it, or beat it with your hands using foam.
Video on how to make a backcombed ponytail yourself:
Step-by-step video on how to make a voluminous backcombed ponytail for yourself:
An example of a video from professionals on creating a ponytail with a backcomb in the front:
How to make a beautiful ponytail for school?
For school, choose a neat and modest look, without using bright and flashy accessories: hairpins, hairpins, bulky elastic bands. A school hairstyle should be comfortable so that the hair does not distract from acquiring new knowledge and at the same time the child feels comfortable. So, it would be preferable to:
- classic high ponytail;
- neat ponytail on the side;
- inverted tail.
To prevent your hairstyle from looking boring, you can resort to some tricks:
Ponytails for the garden and school with weaving
Decorating the tail with plaits, braids, or a combination thereof is quite simple, but this styling looks more festive.
When choosing a ponytail hairstyle for school or kindergarten, it is worth considering that the elastic should not be too tight, otherwise the child may have a headache.

Look at the assortment of ponytails, they are easy to sell even in a hurry. Take note of them and hang them on the mirror where you do your baby’s hair.
To have a unique ponytail every day, take a photo on your phone or print a photo, ticking the option that has already been done.
We recommend watching what other ponytail hairstyles you can easily do in the morning for kindergarten or school. Detailed step-by-step descriptions and video tutorials will help you go about your business in a great mood. Discuss your hairstyle in the evening to avoid conflicts on this basis in the morning.
Video of a side braided ponytail and step-by-step instructions:
 An educational article on creating a ponytail braided in a circle with a detailed description and step-by-step photos will help even a beginner master this braiding option.
This hairstyle is based on ( , since you have already figured out how to make a ponytail without roosters, now you just have to learn how to weave a braid around the ponytail in a circle.
It’s time to sort out the hooks and repeat this “bell” hairstyle; this exact name has already appeared several times in the literature on creating this hairstyle.
To make it festive, add a bow to the base or small hairpins with white or black bows, flowers all over the head, they and the falling curls will support and decorate the hairstyle.
Video on how to braid a ponytail in a circle on a child:
Video on how to create such a ponytail on yourself:
Ponytail with tied strands
We begin creating a hairstyle with an inspection: on the front of the head, the bangs are divided into 3 parts and 3 inverted ponytails are tied (see how to do them above), the 2nd part is a high ponytail and knots are made along it, strand by strand.
Instructions for creating a ponytail hairstyle with tied strands
We will need: 4 rubber bands, 2 clips or crabs to hold strands, spray with water, a comb with a sharp tip and long hair.
- Divide the hair into 2 parts: 1 - bangs, 2 - the tail itself. Divide the bangs into 3 large strands, tying each with an elastic band and turning them out.
- Tie the ends of the inverted ponytails into a ponytail. Tie the ponytail high, since a low ponytail will leave little room for laying strands.
- Wet the ends of the hair spray with plain water. Comb the tail thoroughly with a wide-toothed comb.
- Separate two narrow strands at the edges (from the bottom of the ponytail) and comb them with a comb. Apply varnish.
- Tie them with a regular knot once. Quite tight, but not constricting the tail. Fasten the ends of the strands to the tail with crabs.
- Repeat the operation until you reach the end of the tail.
- When you reach the end of the ponytail, tie it with an elastic band. Straighten if there is a displacement somewhere.
The video will help you understand and easily repeat the creation of a ponytail hairstyle with tied strands:
Back to school ponytail with classic French braids on the sides
This ponytail option is suitable for both long-haired schoolgirls and kindergarten visitors with medium-length hair.
- Divide the hair into zones: parietal and 2 lateral, occipital separately. Pin or tie: the top and one side, the back of the head, so that you are not disturbed.
- We work with the temporal zone on one side. Separate 1 strand and divide it into 3 parts to weave a regular French braid with tiebacks on 2 sides. We weave like this: we transfer the right strand to the central one, the left strand to the central one. We pick up a narrow strand on the right and weave it, then do the same on the left. We weave this way until we run out of hair on the side.
- We braid it with a regular braid to the middle of the head, where the division occurs. We tie the end with an elastic band. We do the same with the second braid on the side. We tie them together with 1 elastic band.
- Lightly comb the parietal area strand by strand. Let's smooth it out and comb it back.
- We will collect in a high ponytail: braids, hair on the back of the head and combed strands.
- In the upper zone we braid a French braid with tiebacks on both sides, slightly giving it volume and not tightening it. Having finished weaving, we secure it with 2 invisible ones crosswise.
For schoolgirls
For kindergarten, we choose the option with a French braid.
The video will help you understand braiding and tying a braided ponytail.
 A braid made from ponytails with elastic bands would also be ideal, because... it does not require braiding, so even a beginner, as well as a child of 3-4 grades, can repeat it on his own with a tied tail.
Let the child practice first on a doll or mother, and then do this hairstyle without haste at home more than once and only then in the morning for school to avoid stress.
It can be done on a pigtail, a classic ponytail or 2 ponytails, whichever option you like best, choose that one.
How exactly to braid a braid from ponytails with elastic bands, what is needed for weaving, as well as what secrets you need to use to make it look chic are waiting for you in this tutorial.
as an option for modifying the ponytail, here you will find many options for this hairstyle with photo and video instructions.
Having mastered the ponytail, we suggest you add some zest to your ponytail in the form of a bow. What kind of bow do you want to make for yourself? Big or many small ones? Watch video tutorials and step-by-step photos on this
Can't do your hair neatly because of dandruff and itchy scalp? Find out how to deal with this in a few uses at home at:
How to decorate the ends of the ponytail?

Decorating the front of the head in a ponytail hairstyle is common, but decorating the ends is what we will do now.
Photos from left to right:
- Tail - tourniquet
- With weaving
- Tail with 3 flagella
- Ponytail with ribbon
- Ponytail + 4-strand braid
- Triple braid
Divide the tail into 2 parts and twist it into a rope, twist each strand and intertwine it with each other.
With the ponytail tied, we separate the strand and begin to weave a braid with a one-sided tie. We weave along one side and wrap the tail around the outside.
Divide the ponytail into 3 strands. Twist the strands one by one, tie them with an elastic band, making sure that the strands move from left to right and from top to bottom.
We braid a braid of 3 strands, with 2 strands being a ribbon. Braid and tie the ends with an elastic band.
We analyze in detail how to weave a braid of 4 strands. Experiment with a combination of hair and ribbons.
We braid a classic braid, but divide the separated strand into 3 parts and stretch it, while using foam to give it structure.
The ideas are presented in the photo, see which option did you like best?
Video on creating 6 hairstyles based on a ponytail:
Features of creating a ponytail for long and medium hair
For long and medium hair, it is not difficult to choose many options for hairstyles with a ponytail.
High sleek ponytail, brushed ponytail, bouffant ponytail, light side ponytail and many others. Regardless of whether you have straight or curly hair, wear bangs or not, all horizons are open to you. If necessary, create volume, add non-standard elements, add braids or false strands, surprise and delight others.
Ponytail for medium hair
Ponytail option for long hair
New Year's or evening hairstyle based on a tail
Festive ponytail hairstyle with extensions
If your goal is to create a unique, attractive hairstyle, it is not necessary to follow the instructions and tips exactly; look for your own options and experiment. Be beautiful and happy!
To the entry "How to make a beautiful ponytail: with backcombing, without backcombing, for long, short and medium-length hair (photo, video)?" 9 comments
Alternatively, you can make a waterfall. In this case, 3 tails are made, each of which is wrapped. In this case, the first one is done without selecting the lower curls, and the rest with selection.
Thanks for the useful information!
The ponytail hairstyle is an almost universal styling for hair of any length, and also does not require too much time - the ponytail is loved by all girls without exception.
Leave your comment
However, there are many tricks that will help you create the perfect voluminous or sleek ponytail and create a fashionable hairstyle.
Ponytail hairstyle
1. Fold two ponytails to create the illusion of one long, bushy tail.


2. This method is perfect for curly hair.

3. Do inside out ponytail and tuck the ends into a low bun.

4. When you want to remove hair from your neck, do inside out side ponytail.

5. You can simply twist your hair by gathering it on the right side and twisting it and securing it with bobby pins.

6. Another interesting option - double knot ponytail.


7. Tie it off two strands in a knot to wrap the tail.

Long ponytail hairstyle
8. If you want wrap the ponytail, it’s worth knowing one useful trick.

- Take a small section from the bottom of the ponytail and curl it with a curling iron.
- Then apply a strong hold hairspray to the strand and wrap it around the base of the ponytail, tucking the tip into an elastic band.
9. To give the ponytail the desired height, use butterfly clip.

10. You can also prop up your tail. two invisible ones.

11. Tail in several tiers- a great way to remove hair during a workout.

This hairstyle is ideal if you have long bangs or a layered haircut that often comes out of your ponytail.
12. If you have shorter hair, pull back sections of your hair into braids.

13. If you have side strands coming out, braid them side braids.

14. If you have thick hair, you can create a romantic hairstyle by twisting your hair into a voluminous side ponytail.


15. Give your ponytail a messy look with dry shampoo.


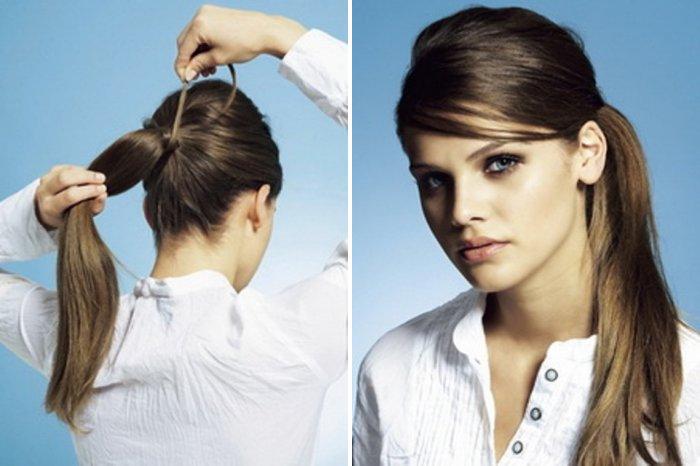
16. Add volume at the top by making a half ponytail first.

You can backcomb the top first before tying the ponytail.
Ponytail hairstyle options
17. Do big bow on top of the ponytail.


- Tie your hair into a ponytail.
- Wrap a small section of hair around your ponytail and secure with a bobby pin.
- Take a strand from your ponytail and use an elastic band of the same color as your hair to tie it around the strand.
- Make a loop and divide the loop into two parts.
- Secure the two resulting loops of the strand bow with bobby pins on both sides.
- Separate a small strand under the bow, wrap it around the bow and secure with bobby pins.
- Wrap the loose end into a loop, hiding it in a bow and securing it with a bobby pin.
18. Curl your hair in a minute, collecting them in a ponytail and dividing it into 2-3 parts.


19. Even if you short hair, you too can add volume to your hair in the style of Brigitte Bardot.


How to make a ponytail hairstyle
20. Here’s a way that will help prevent sticking hairs.

Representatives of the fair sex have learned to create a wide variety of hairstyles since ancient times, using wooden combs. Thanks to the development of civilization, hairstyles have improved more, become more varied and attractive, ladies have found more and more new styling options.
Due to the inconvenience of always having loose curls, many styles have been created with collected strands, one of which is the ponytail.

Styling before creating a ponytail
If you are interested in how to make a beautiful ponytail out of hair, you cannot do without preparation. Curls will look perfect if you follow a certain sequence:
- First you should wash your hair with shampoo.
- Using a conditioner is also important to keep your strands smooth.
- Dry and comb your curls thoroughly.

This is a great option for creating a classic ponytail. For a voluminous ponytail, you should choose a different style.
Tail with volume
We invite you to learn how to beautifully make a voluminous ponytail on your head:
- Wash your curls with shampoo.
- Apply the balm exclusively to the ends.
- Dry your hair using a hairdryer and comb the existing strands well.
- Treat the area at the roots of the corrugation with an iron, one small strand half the length.
- Curl the strands inward using a curling iron.
- Pull the curls towards the front from the back of the head. Apply hair gloss to give it a unique shine.
Choosing the required elastic band
In order for the styling to last as long as possible, you should choose the elastic band wisely. Elastic bands with fabric on the outside, with terry, and springs made of silicone are distinguished by their careful treatment of hair.

Elastic bands equipped with a special hook are also very popular, as they help fix the hairstyle for as long as possible, they compress well and also stretch.

Would you like to create a ponytail in the center of your head?
If you yourself determine the location of the ponytail, then align with the palm of your hand, while the distance in the ear area in the case of applying the upper limb should be the same as the height of the ponytail.
You can make a tail at the very top of the head, closer to the neck, or at the back of the head, it all depends on your preferences.

Ponytail with locks: classic
How to make a ponytail out of hair with strands? You will need elastic bands (4 pieces), a crab (2 pieces), spray water, and a comb.
- You need to separate the bangs from the tail. Then you need to divide your bangs into several strands, tie each one using an elastic band, and then turn it out.
- Gather the ends of the ponytails that are turned out into a ponytail. This ponytail should be made high because a low ponytail will leave no room for curls.
- Moisten the ends well with warm water and comb the tail well.
- On the underside of the tail, separate several small curls from the edges, combing them thoroughly with a comb. Apply varnish.
- They should be tied once in a tight knot, but the tail should not be pulled together. Attach the very ends of the curls to the ponytail with crabs.
- Repeat the steps until you reach the very end.
- When the very end is reached, you should tie the tail with an elastic band. If there is a bias, it must be eliminated. Look at the photo below on how to make a beautiful ponytail.
Ponytail with braids
This method of creating a tail is suitable for girls of any age category.
- Divide the curls separately into the occipital, several lateral and parietal zones. Tie or pin the side, top and back of the head so that they do not interfere with further work.
- Separate a strand from the temple side to divide it into several parts. Weave with hooks on both sides. Carry out weaving as follows: place the strand on the right over the central one, then place the left strand here. Pick up a small curl on the right side for weaving, then do the same on the left. Braid in this manner until the end of the curls on the side.
- Add a simple braid to the middle part of your head in the parting area. At the same time, secure the end using an elastic band. Do the same with the other side braid. Secure them into one piece, also using an elastic band.

Features of a ponytail for long curls
Interested in how to make a beautiful ponytail for long curls? Nothing complicated, because for such a length a variety of hairstyles are offered, including a high, fluffy ponytail, with a backcomb and a huge number of similar original hairstyles.
Regardless of the fact whether you have curly or even curls, whether you like bangs or not, various horizons are open to you.


If you need to create maximum volume, then we recommend complementing your hairstyle with original details, false curls, or luxurious braids; delight and delight all the people around you with your originality and excellent sense of taste!

Photo instructions on how to make a beautiful tail