So, you got acquainted with the Rubik's Cube 3x3x3 puzzle and you liked it. But you don’t yet know how to learn to solve a cube, or even better, to solve it faster. Especially for you, beginner puzzle lovers, I am making this instruction, which will not only help you learn how to solve the Rubik's Cube, but also do it in less than 1 minute (in the future, we plan to create instructions for those who want to solve the cube in less than 30 seconds).
Let's start with the fact that here you can, this is especially true for those who want to solve the cube quickly, but the old cube does not allow this for technical reasons =)..
The most common method for solving a 3x3x3 cube is Jessica Friedrich's method. This technique breaks down solving a Rubik's cube into 4 stages. And at the initial level of assembly (at a speed of up to 1 minute), there are not so many formulas to learn. I will try to make instructions that will be clear and contain all the necessary information.
First, briefly about the assembly stages.
Stages of solving a Rubik's cube

1. We collect the cross. The task of this stage is to place 4 cubes in their places around the white center (many people use this white you can use any one as the main one for assembly).
2. In Jessica Friedrich’s method, at the second stage, the first 2 layers are assembled immediately ( F2L – first two layers). But for a beginner puzzle assembler this will be quite difficult, so we will look at how to do this step in 2 steps, simplifying the task a little.

3. Assembling the yellow side of the cube ( OLL – orientation of the Last Layer). At this stage we collect the yellow side of the cube. Assembly of this stage, even by advanced speedcubers, is not always accomplished using one formula. We'll look at how to assemble the yellow side in a few steps.
4. The last stage of assembling the cube is called Permutation of the Last Layer (PLL). At this stage, it is necessary to place the corner and edge cubes correctly in the last third layer of the puzzle.
Well, now let's move from theory to practice.
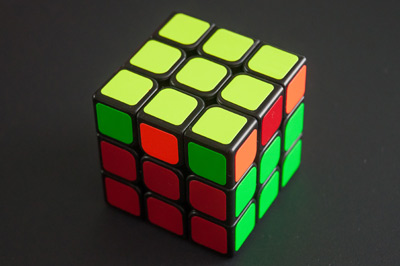
So, let's start assembling the cube. For ease of learning, please remember that the cube must be kept with the white center down and the yellow center up!
Assembling the cube begins with a cross on the main side, usually white. In this instruction, white will be the main one.. This stage is carried out completely intuitively, there are no formulas here, but there are typical situations that are worth remembering to speed up the assembly.
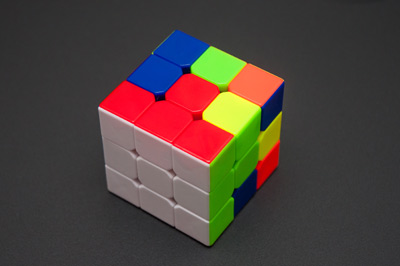
Important! We are not just collecting a white cross on the white side. Each edge cube has two colors, and it must match two centers, white and one of the other four colors (in the photo you can see how the orange-white and green-white edge coincide with the orange and green centers).
1. Check the side with the white center for the presence of white edges. If they exist, then simply by rotating the bottom layer of the cube you can match this edge with the second center. Let's see how to do this in the video below. Let me remind you that you need to solve the cube with the white center down!
2. If you have already completed the first step of this step, turn your gaze to the top of the cube (the side with the yellow center). If there are white rib cubes near the yellow center, then they are easy enough to install in the desired place on the main side (with a white center). To do this, you need to rotate only the top layer to match this edge with the second center (orange, red, green or blue), while turning the side on which the center coincides and the edge to face you. After the edge coincides with the additional center, you need to rotate the front edge twice so that the white color is not at the top of the cube, but at the bottom (where the white center is). Let's see a visual application in the video below.
3. All other situations are solved by lifting the cube with the white side up (the side with the yellow center) and turning it down towards the white center as in point 2. Below is a video with visual examples.
I propose to assemble the first two layers in two steps. After assembling the white cross, our task is to install the four corner cubes in their places, followed by four more edge cubes.
Like assembling the cross, this can all be done purely intuitively.
Installing corner cubes in the first (bottom) layer
To make the information easier to understand, I will demonstrate how to install corner cubes.
To install the corner cubes in their places, you need to learn one technique, which is called “bang-bang” among speedcubers. The formula for this technique looks like this R U R' U'. read here.
In the video, I looked at 4 situations that arise during the installation of corner cubes.
 The corner cube faces the white side to the right (we hold the cube with the white center down). We perform the U’F’UF form
 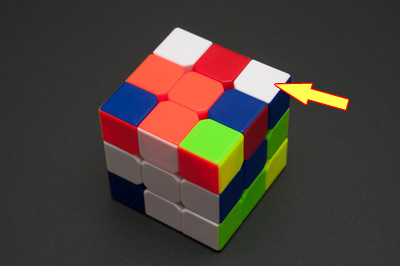 The corner cube faces the white side to the left (we hold the cube with its white center down). We perform the URU’R’ form.
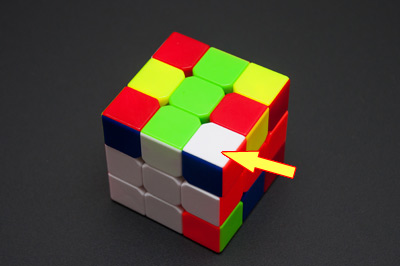
 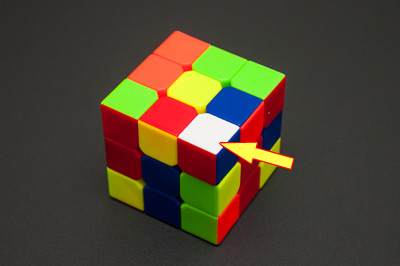 The corner cube faces up with its white edge (we hold the cube with its white center down). We perform the form R U R’ U’ R U R’ U’ R U R’ U’ (three bang-bang) The corner cube is in its place, but upside down (we hold the cube with the white center down). We perform the shape R U R’ U’ (one bang-bang), after which the corner cube will be on top (on the side with the yellow center). From this position we perform one of the formulas described above.
 Once all the corners are in place, the cube should look like this:
Installation of rib cubes
After you have placed all the corner cubes in the bottom layer, our task is to install the edge cubes into place. After this, the F2L stage will be completed.
The installation of rib cubes is carried out using one formula and its mirror execution. Before executing the formula, the main thing is to install the rib cube in the right place; this is done by rotating the top layer.
The rib cube must be installed so that the color of the side face matches the color of the central cube of the middle layer.
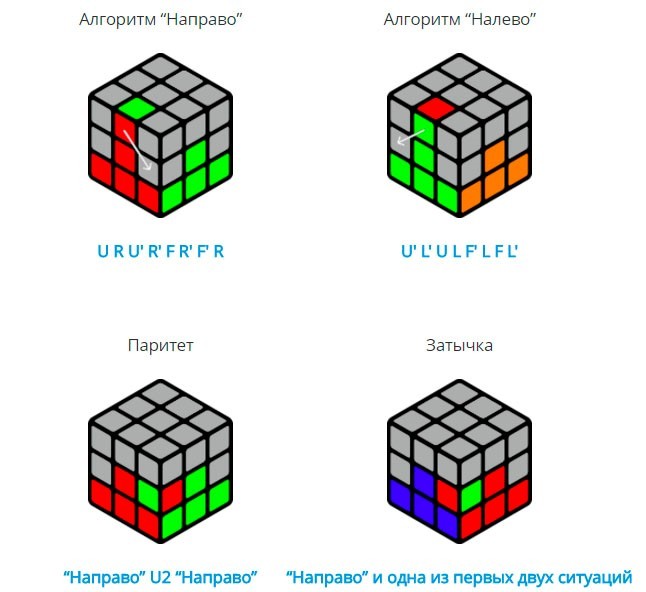
1. If after this the rib cube is located to the left of its place, we perform the formula URUR’ U’F’U’F.
2. If the rib cube is to the right of its place, then we perform the mirror formula U’L’U’L UFUF’.
3. There are cases when the rib cubes are not in their places, or in their places, but upside down. The above formulas will help raise the rib cube to the top layer, after which you can easily install it in the right place.
After assembling the first two layers, you need to assemble the side with the yellow center, this stage is called OLL. At the same time, our task is simply to assemble the yellow side; at this stage it is not at all necessary that all the cubes be in place.
We look at the video on how to install rib cubes when assembling the first two layers
1. Corner
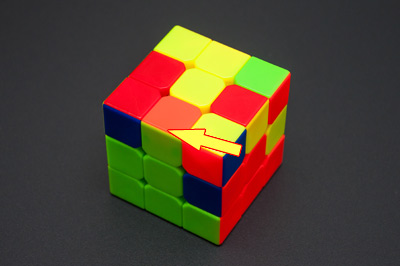
Once you've completed the first two layers, the yellow side of the cube might look like this:
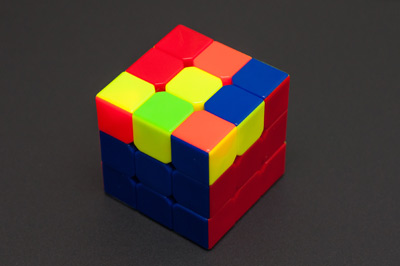
But in practice, during the assembly process, other combinations may appear. Let's look at how to get out of all these situations using universal formulas.
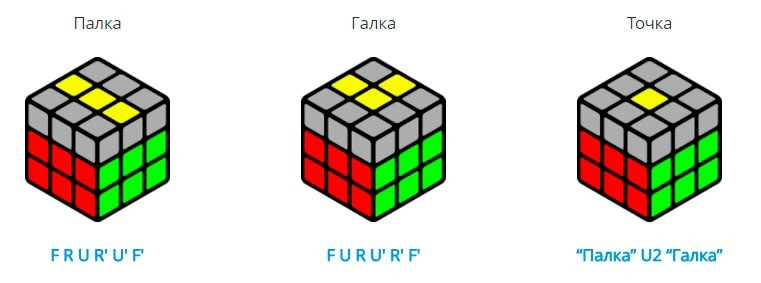
Our task is to make a corner from yellow cubes. After assembling the first two layers, you can see completely different combinations of yellow cubes at the top, but most often we get either a corner or nothing. By nothing we mean that neither a corner nor a cross nor a fish fell out. The images show several possible combinations that may exist before assembling the corner.
The corner is very easy to assemble. We carry out the formula: F RUR’U’ F. After completing the formula, you will receive one of the many combinations that are possible when assembling an OLL that contains a corner. Let's move on to the next step.

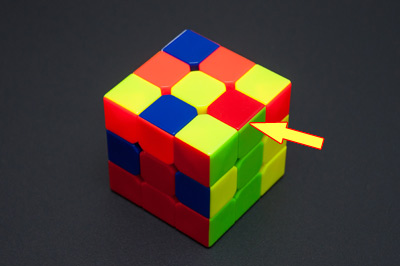
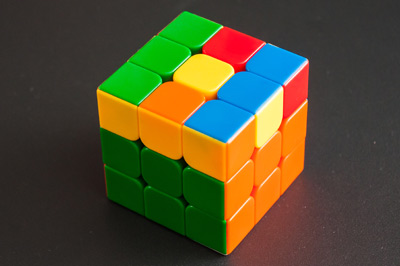
2. Cross
The cross can be assembled using one formula, but only at the stage of the assembled corner. There can be many combinations based on the corner, but to assemble the cross you only need to know one formula. So, before assembling, you need to take the cube so that the corner vectors look: one towards you, the other to the left (in fact, as in the picture above). Next we perform the formula: RU BU’B’ R’. As a result, you will get one of the combinations based on the cross:

 After this, you can proceed to assembling the fish.
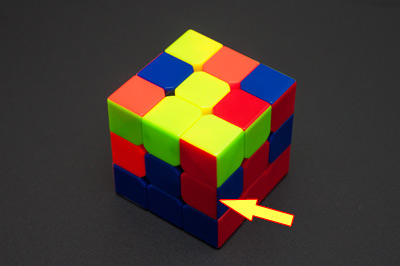
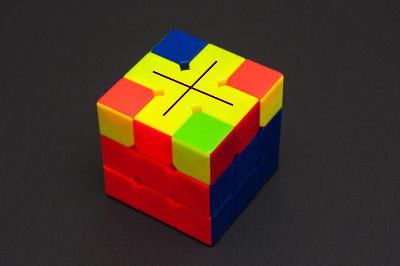
3. Fish
We need the fish combination in order to use one formula to collect the entire yellow side. In fact, after assembling the cross, the same formula will help you make a fish, and after the fish, completely OLL.
For this operation there is a universal formula that will help us - RU'-RU-RU-RU'-R'U'-R2 (mirror version on the left: L'U-L'U'-L'U'-L'U- LU-L2). In the video I tell you in what cases which formula to use.
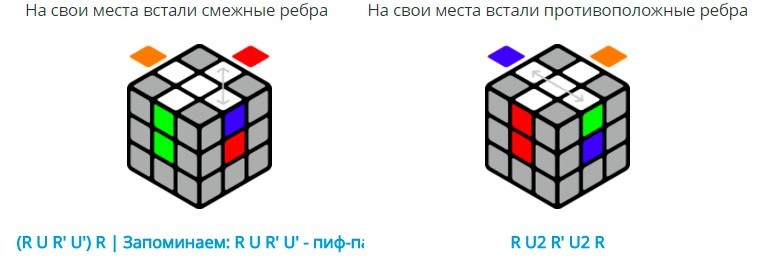
2. Arrangement of corner cubes
In the video I show how to arrange the corner cubes in the two most common cases.
Formula for case one (the formula should be performed from the position shown in the video): R'U2RDR'U2RDR'U2RDDR'U2R
Formula for case 2 (the formula should be performed from the position shown in the video): R'U2RD2R'U2RD'R'U2RD'R'U2R
These formulas are easier to learn intuitively than simply memorize.
For children and adults, the task of solving a 3x3 Rubik's cube can sometimes seem overwhelming. A diagram with pictures for beginners in this matter is one of the main assistants. Also, to make everything clear and transparent, you can use video instructions. We will actively use both of these aids in practice so that you finally learned how to solve the eternal problem with a Rubik's cube.
You can solve a Rubik's cube in different ways and methods. You can do this in 15 moves, 7 moves, and even as many as 20. For many years, all sorts of smart people have been struggling to find the optimal solution to this problem. After all, the Rubik's cube is a mechanical puzzle that can be solved quite logically. All you need is step by step instructions, as well as a small supply of logic and patience.
Before starting the assembly algorithm itself, you should learn key concepts.
The name of the toy speaks for itself - the cube consists of 6 sides (faces), 12 edges, 8 corners. The faces of the cube consist of 9 small colored elements that can rotate simultaneously, but only clockwise and counterclockwise. Letters of the Russian alphabet the names of the faces will be indicated as follows:
F – facade;
P – right;
L – left;
B – top;
 Many descriptions and diagrams contain designations for the faces of the cube in English.
The next secret of the Rubik's cube lies in the arrangement of small colored elements.
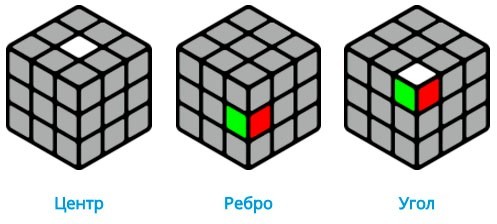
- Central cubes Determine the color of the entire side of a Rubik's cube. We will call these cubes by analogy with the name of the faces (F, T, P), etc.
- Edge cubes are adjacent to two faces at once, therefore the name will be double (for example, FP, PV) - depending on the faces with which they interact.
- Corner cubes contain 3 letters in the name at once, since they refer to three faces simultaneously (FPV).
And one more mini-secret - when you study the face rotation patterns, letters without any additions will mean rotate 90 degrees clockwise, and letters with an additional sign ' - counterclockwise.
Having understood all these symbols, it will be much easier for you to solve the Rubik's cube and you will do it correctly and quickly.
How to solve a 3x3 Rubik's cube: the easiest way, assembly diagram
The easiest and most reliable way to assemble our Rubik's cube starts with the bottom cross. Make a cross on the bottom edge of the cube and proceed to a step-by-step solution to the problem of how to solve a 3x3 Rubik's cube: the easiest way, the diagram of which is right in front of you.
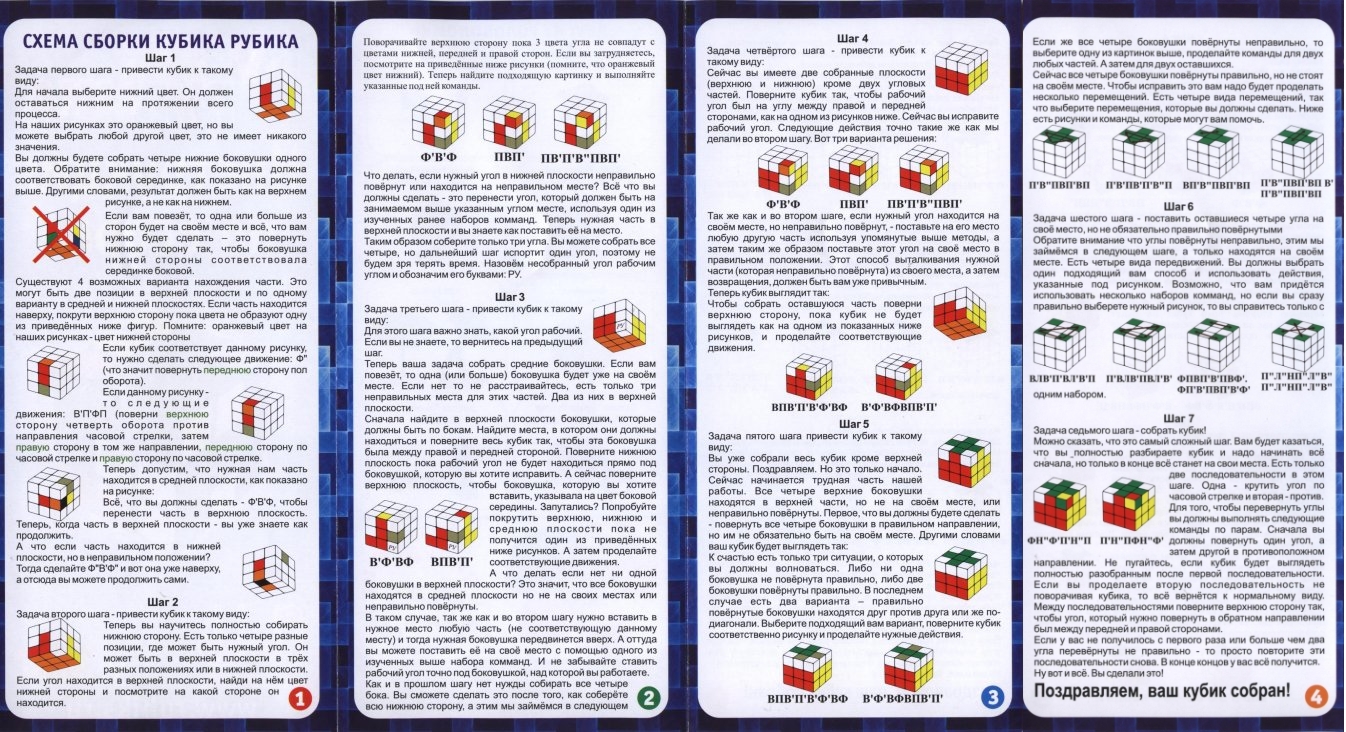
Scheme for assembling a 3x3 Rubik's cube for beginners in pictures
In the first stages of practice in solving a Rubik's cube, we will use the same cross method, but this time we will have a cross made of colored cubes on the top edge. As you understand, speed solving a Rubik's cube awaits you ahead, at this stage you should learn correctly determine the location of the edges and moving them in the plane of the cube.
 There are different methods for assembling a cube, and now you are about to learn how to solve a 3x3 Rubik's cube: the scheme for beginners consists of 7 stages. Pictures describing the assembly process are available for each step. You may spend more time on this puzzle than expected, but you will solve a problem that not everyone on our planet can achieve! It's worth the sweat. By the way, the last one world record for solving a rubik's cube was set to speed in 4.73 seconds. And it belonged to Australian student Felix Zemdegs, who defeated the previous record holder by just 0.01 seconds. We are in no hurry in this matter, so we carefully study the instructions and begin to assemble the first layer.
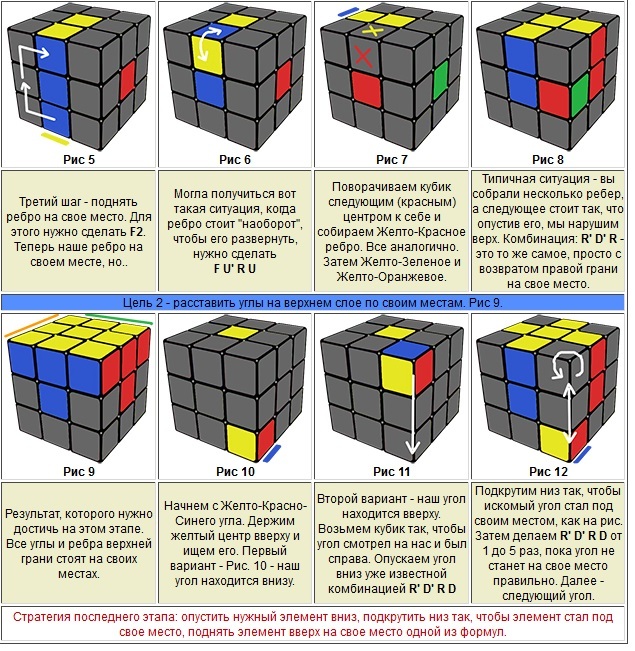

The principle of solving a Rubik's cube from the initial cross is not so complicated. Here it is necessary to correctly study the location of the edges. And then it’s a matter of technique, as they say. Basic concepts and rules for assembling a cube Rubik for dummies we have already passed. We are sure that the diagram for assembling a 3x3 Rubik's cube for beginners in pictures helped you set your own record and in further attempts you will reduce the time to a minimum.


At the seventh stage we unfold the corner cubes of the third layer.
Video: how to solve a 3x3 Rubik's cube?
If all of the above methods and formulas turned out to be another puzzle for you, no worse than a Rubik’s cube, we offer you a YouTube video with detailed instructions and comments. Perhaps these patterns will be clearer than any formulas and algorithms, and you will be able quickly fold a cube using the video as a guide.
The famous puzzle, which consists of several colored sectors combined into one cube, appeared in 1974. The Hungarian sculptor and teacher decided to create training manual to explain group theory to students. Today this toy is considered the best-selling toy all over the world.
But success came to this puzzle only when the German entrepreneur Tibor Lakzi drew attention to it. He, together with game inventor Tom Kremer, not only launched the production of cubes, but also organized the promotion of this puzzle to the masses. It was thanks to them that competitions in high-speed assembly of Rubik's cubes appeared.
By the way, the people who are involved in assembling this puzzle are called speedcubers (“speed” - speed). It’s not difficult to guess that the high-speed assembly of a “magic” cube is called speedcubing.
The structure of the Rubik's cube and the names of rotations
In order to learn how to assemble this puzzle, you need to understand its structure and find out the correct name for certain actions with it. The latter is important if you are going to find instructions for solving the cube online. Yes, and in our article we will call all the action with this puzzle, according to established expressions.
A standard Rubik's cube has three sides. Each of which consists of three parts. Today there are also 5x5x5 cubes. The classic cube has 12 edges and 8 corners. It comes in 6 colors. Inside this puzzle there is a cross, around which the sides move.
At the end of the cross there is a rigid square with one of six colors. Around it you need to collect the remaining squares of the same color. Moreover, the puzzle is considered completed if all six sides of the cube have their own color.
IMPORTANT: In the original puzzle, yellow is always opposite white, orange is opposite red, and green is opposite blue. And if you take a puzzle apart and then put it back together incorrectly, it may never be able to be put back together.
In addition to the centers of the cube, the corners are the constant components of this puzzle. Each of the eight corners consists of three colors. And no matter how you change the position of the colors in this puzzle, the composition of the colors of the corners in it will not change.
IMPORTANT: The Rubik's Cube is solved by placing the corner and middle sectors to match the colors of the central sectors.
Now that we understand the construction of this puzzle, it’s time to move on to the names of sides and rotations and their designation in specialized literature.

In the process of solving a Rubik's cube, it may be necessary not only to move the sides, but also to change the position of this object in space. Experts call these movements interceptions. This is shown schematically like this:

IMPORTANT: If in the cube assembly algorithm you found, only a letter is indicated, then change the position of the side clockwise. If there is an apostrophe “’” after the letter, then rotate the side counterclockwise. If the number “2” is indicated after the letter, this means that the side needs to be rotated twice. For example, D2′ - rotate the bottom side counterclockwise twice.
Simple and easy assembly method: Instructions for children and beginners
The most detailed instructions assembly for beginners looks like this:
- At the first stage of assembling this popular puzzle, we start with the correct cross. That is, from the fact that on each side of the cube the color of the edges and centers will be the same.
- To do this, find the white center and white edges and collect the crosses according to the diagram shown below:
- After the steps described above, we should receive a cross. Of course, the cross will not be correct the first time and you need to slightly transform the resulting version. If done correctly, it will be enough to simply swap the ribs with each other.
- This algorithm is called “bang-bang” and is shown in the diagram below:
- Let's move on to the next step of assembling the puzzle. Find the white corner on the bottom layer and place the red corner above it. This can be done in different ways, depending on the position of the red and white corners. We use the “bang-bang” method described above.
- As a result, we should get the following:

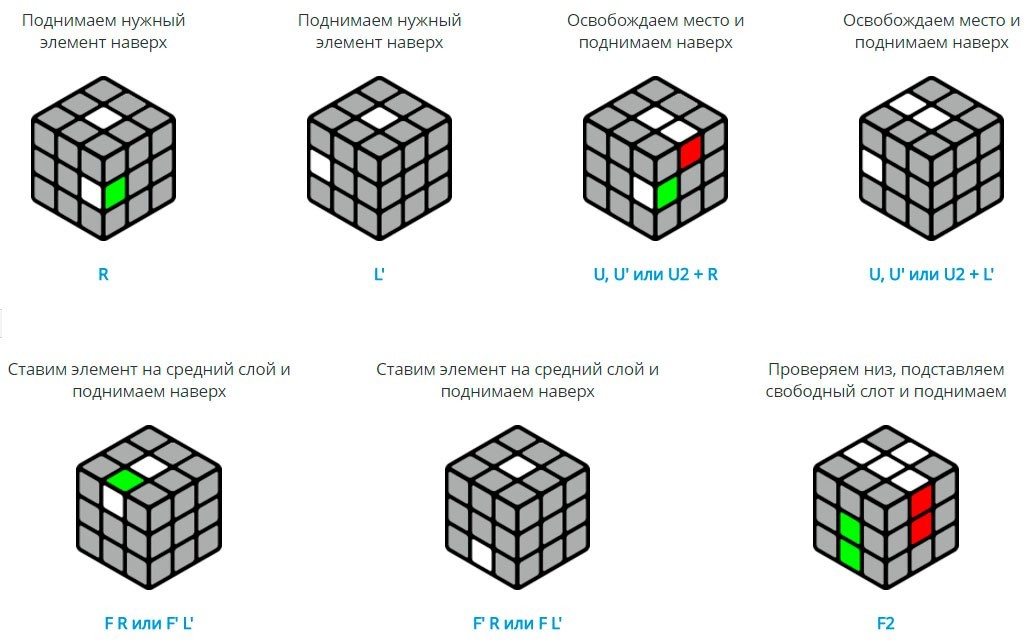
- We begin to assemble the second layer. To do this, find four edges without yellow color and place them between the centers of the second layer. Then we spin the cube until the color of the center matches the color of the edge element.
- As with the previous layer, to achieve this goal you may need one of several options:
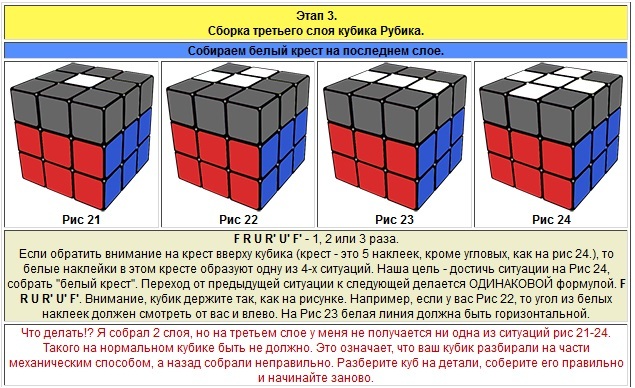
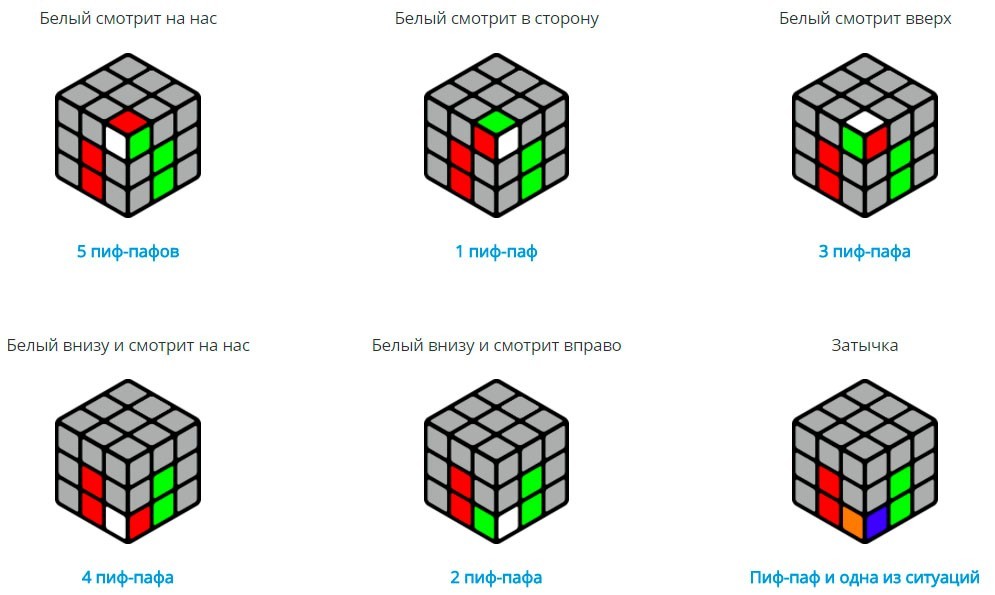
- After we have successfully completed the previous step, we move on to assembling the yellow cross. Sometimes he gets ready on his own. But this happens very rarely. Most often, the cube at this stage has three options for the arrangement of colors:
So, the yellow cross is assembled. Further action in solving this puzzle comes down to seven options. Each of them is shown below:

In the next step we need to assemble the corners of the top layer. Take one of the corners and move it into place using the U, U' and U2 movements. This needs to be taken into account. So that the corner colors are identical to the colors on the lower layers. When using this step, keep the white cube facing you.
 Next build step
 - The final stage of assembling the cube is assembling the edges of the top layer. If you did everything described above correctly, then four situations may arise. They are solved very simply:

The fastest way. Jessica Friedrich Method
This puzzle assembly method was developed by Jessica Friedrich in 1981. It is conceptually no different from most known methods. But it focuses specifically on assembly speed. Thanks to this, the number of assembly stages was reduced from seven to four. To master this method, you need to master “only” 119 algorithms.
IMPORTANT: This technique is not suitable for beginners. You need to study it when your speed of solving the cube becomes less than 2 minutes.
1. At the first stage you need to assemble a cross with side edges. In the specialized literature this stage is called "Cross"(from the English Cross - cross).
2. At the second stage, you need to assemble two layers of the puzzle at once. He is called "F2L"(from the English First 2 Layers - the first two layers). To achieve the result, the following algorithms may be required:

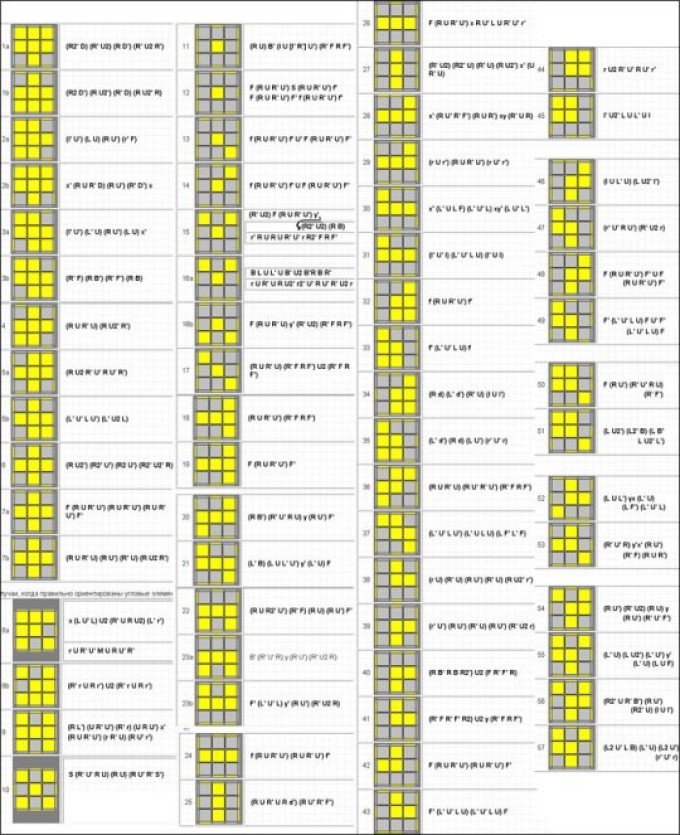
3. Now you need to assemble the top layer completely. You shouldn't pay attention to the sides. The name of the stage is OLL (from the English Orientation of the Last Layer - orientation of the last layer). To assemble you need to learn 57 algorithms:
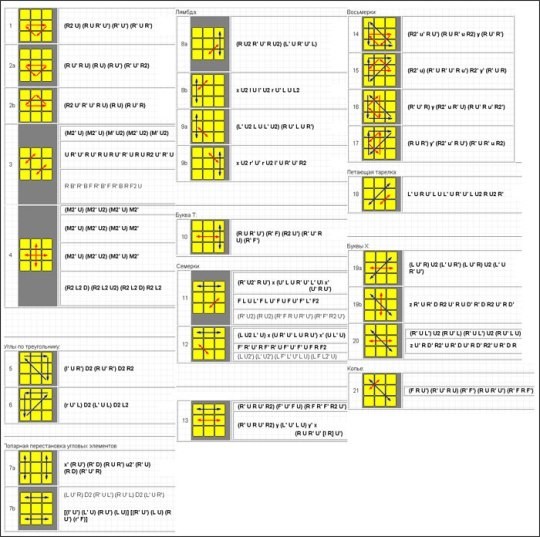
4. The final stage of assembling the cube. PLL (from the English Permutation of the Last Layer - arranging the elements of the last layer in their places). Its assembly can be done using the following algorithms:
Scheme for assembling a 3x3 Rubik's cube in 15 moves
Since 1982, when competitions for high-speed solving of the Rubik's cube appeared, many fans of this puzzle began to develop algorithms that will help correctly arrange the sectors of the cube with a minimum of moves. Today, the minimum number of moves in this puzzle is called "God Algorithm" and is 20 moves.
Therefore, it is impossible to solve a Rubik's cube in 15 moves. Moreover, a few years ago, an 18-move algorithm for solving this puzzle was developed. But, it cannot be used from all positions of the cube, which is why it was rejected as the fastest.
In 2010, scientists from Google created a program with which they calculated the most fast algorithm solving a Rubik's cube. He confirmed that the minimum number of steps is 20. Later, the Lego Mindstorm EV3 robot was created from parts of the popular construction set, which is capable of solving a Rubik's cube from any position in 3.253 seconds. He uses 20 stepper in his “work” "God's Algorithm". And if someone tells you that there is a 15-step diagram for assembling a cube, do not believe him. Even Google is not powerful enough to find it.
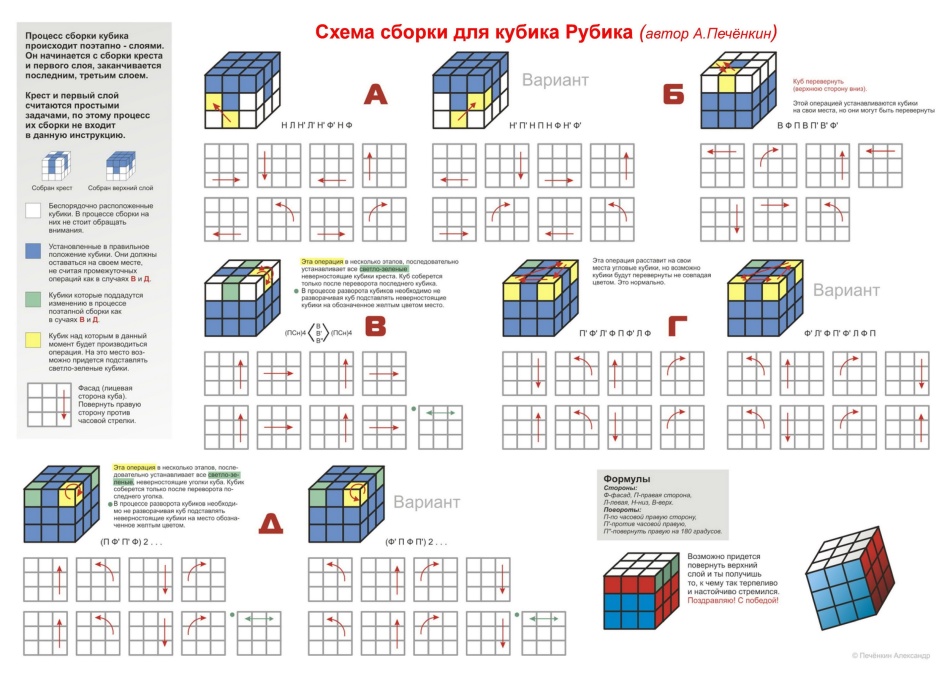 Another assembly diagram
The correct name is " Rubik's Cube». Rubik- Hungarian sculptor and inventor of the popular puzzle. The Rubik's Cube was invented back in 1974, and since then its solution has occupied the thoughts of all mankind.
This puzzle is a plastic cube consisting of 26 cubes that can rotate around the three internal axes of the cube. Each side is painted a specific color and consists of 9 squares.
By rotating the sides of the Rubik's cube, you can change the arrangement of the squares. The goal is to return the squares to their original position so that each face consists of squares of the same color. This is not so easy to do. Many people can solve only a certain part of the cube on their own.To complete the puzzle, there are certain rotations and algorithms calculated using formulas.
We invite you to familiarize yourself with one of the algorithms for solving a 3x3 Rubik's cube

The easiest way to solve a Rubik's cube - remember which rotations were used to disassemble it and repeat them in reverse order. However, this option only exists if the cube was originally solved. If the cube is disassembled, it is difficult to reassemble it. Intuition, spatial thinking or chance can help here. But it’s better to remember the algorithm for collecting the cube. There are several of them.
The traditional name of the algorithm that solves the Rubik's cube in the least number of moves is “God’s algorithm.” The maximum number of moves with this algorithm is the “number of God”. In July 2010, it was proven that this number is 20. That is, with known algorithms, you need to make at least 20 moves to solve a Rubik's cube.
Solving a cube for speed is a whole sport called speedcubing ) . There are competitions between speedcubers, and even blind assembly competitions!
You can also look video on how to solve a Rubik's cube step by step for beginners:
5 ways to solve a Rubik's cube
Editor's responseOn May 19, 1974, Hungarian sculptor and architect Erno Rubik invented the famous puzzle — Rubik's cube.
When and how was the Rubik's Cube invented?
In 1974 Erno Rubik taught industrial design and architecture to Hungarian students. According to one version, the Rubik's cube was invented as a teaching aid to clearly explain the basics of mathematical group theory. The inventor's task was this: to make individual multi-colored cubes rotate freely in their places without disturbing the structural unity of the entire device.
The first testers of the puzzle were Rubik's friends and Academy students.
In 1975, Rubik received a patent for his invention. However, the release of an experimental industrial batch of cubes took place only at the end of 1977. The first manufacturer of the cube was a small cooperative in Budapest, which released the cube as New Year's toy around Christmas 1978.
One day a German saw a Rubik's cube in the hands of a waiter entrepreneur Tibor Lakzi. Lakzi, who is passionate about mathematics, was delighted with the toy and began promoting it together with Tom Cramer- a successful game inventor.
As a result of their efforts, a real “cubic” invasion began in the early 1980s. At that time, about 100 million “legal cubes” were produced and even more were fakes.
How long does it take to solve a Rubik's Cube?
People who are keen on solving the Rubik's cube at speed are called speedcubers (from the English "speed" - speed). And the high-speed assembly itself is speedcubing. Official competitions for speed solving the Rubik's cube are regularly held by the World Cube Association.
The current record for speed cube solving was set by Mats Volk, who solved the cube in 5.55 seconds. The current world record is held by Felix Zemdegs and is 5.66 seconds. His unofficial record is 4.79 seconds.
How to solve a Rubik's cube?
Before you start solving a Rubik's Cube, it is recommended that you take it apart and reassemble it to make sure that the cube is put together correctly.
Method for beginners
Assembly steps:
1.
cross in the first layer;
2.
corners of the first layer;
3.
middle layer ribs;
4.
cross in the last layer;
5.
arrangement of edges of the last layer;
6.
placement of the corners of the last layer;
7.
turning the corners of the last layer.
Beginners should, in addition to the video, have instructions before their eyes to make it easier to assemble the puzzle.
Lesson 1
Lesson 2
Jessica Friedrich Method
At the moment, one of the most popular speed assembly methods is the Jessica Friedrich method. In this assembly there is no need to memorize a large number of formulas, the main thing is to understand the principle.
Assembly steps:
1.
Assembling the cross on one side.
2.
Assembling the first layer simultaneously with the second.
3.
Orientation of top layer elements.
4.
Rearranging the elements of the top layer.
Video
Valery Morozov's method (intuitive)
The purpose of this method — do not give ready-made formulas for memorization, but show the principles of assembly.
Assembly diagram:
1.
Assemble 8 corner elements.
2.
4 rib elements in the middle layer are assembled into a cross on any of the side faces.
3.
The remaining 8 edge elements are assembled into correct pairs.
4.
6 centers are installed each on its own face.
Video
Stripes method
The method for solving a 5x5 cube is designed for beginners who can at least solve 3x3.
For advanced
How to solve a Rubik's cube in 31 moves.


