Probably, each of us has tried at least once to solve a Rubik's cube, but your attempts to solve it never reached the result and you never succeeded in solving the cube. On the Internet you can find many articles and videos about how to solve a Rubik's cube. But articles on the Internet often describe an assembly that is not entirely clear and accessible for the average person, but in our article we will try to tell in detail and simply how to solve a Rubik’s cube. The main thing is to be careful when reading the article, you can also immediately take your cube with you and repeat everything according to the instructions. If, after reading the article, you still have any questions or you do not understand the process of assembling the cube, then this will mean only one thing - that you were inattentive after reading this article. And no one will help you in solving your problems; you will have to read our article again. Whatever this happens and you don’t have to waste time reading the article multiple times, try to understand everything the first time. After all, you can solve a Rubik's cube for beginners in just a few steps. So, let's begin.
First of all, we will talk about the colors on the Rubik's cube and explain the very principle of their construction. Various options cubes are colored differently, but usually different sides They are trying to paint it in a similar color to make assembling the cube more difficult. But in this article we will talk about a specific example of coloring. You can also talk about flowers conditionally. Let's say we have a warm color in the front edge (it could be red or orange). If there is a dark red and a light color, then you need to give preference to the light red color. In general, you yourself have the right to choose any color that you want to collect first. This may also depend on the disassembly of the cube itself, and if this cube is disassembled in such a way that it will probably be more convenient for you to assemble the yellow color, then you can easily start assembling your cube from this particular color. It may also happen that this cube will already be assembled on the blue side, for example. Then you will definitely try to patch up this side and solve the cube further. In general, we came to the conclusion that there is no need to focus on any specific color when starting assembly. Start solving the cube with the color that is most convenient.

The color of which side will be here depends on the color of the center. If the central cube is blue, then the entire square will have to be blue. There is no way to change the central color, so there is no need to do something your own way. If it is said so, then it will really be correct. The cube contains six sides, which in turn will be divided into three opposite pairs. In our version, we will consider such color pairs as orange and red, yellow and white, green and blue. IN in this case opposite sides of the colors will not have any common detail.
The cube also contains gray, but its location is not so important, since it is not taken into account and can be changed as desired. It only helps in performing various moves or combinations.
Important to know!
You can solve a Rubik's cube quite quickly, the main thing is to perform the combinations correctly and repeat them more than once, until the cube puts all the colors in their places.
We divided the assembly instructions itself into a couple of parts. In the first part, you don’t have to remember all the formulas or know them; the main thing is to understand the meaning of all combinations and movements and the results to which they will lead you. As for the second part, it’s worth remembering some formulas and combinations, but when you perform these combinations when assembling a cube, you may not even think about what result you will get during these actions.
To quickly assemble the cube, we tried to describe in the article exactly the simplest and easiest combinations and movements. But first, it wouldn’t be a bad idea for you to remember them a little. If you learn how to solve a Rubik's cube without any problems, then the time will come to learn more difficult combinations. The main thing is to do everything smoothly. Move from easy combinations to heavy combinations. But if you did not know how to solve a cube and immediately decided to move on to complex combinations, then it is unlikely that you will succeed.
How to solve a Rubik's cube according to instructions?
WE talked about the colors and combinations of the cube themselves, now it’s time to figure out how to solve a 3x3 Rubik’s cube. But this is not so difficult, since you can solve a 3x3 Rubik's cube using the instructions.
To begin, you should select the layer and its color that you will collect first. In this case, try to choose so that it is at the top, and on the other squares at the bottom. This can usually be white, since many people prefer to assemble the cube with this color. You can collect one color without any algorithms or rules, and if you are able to collect one square completely, then you can immediately start with the second step of action. You try to assemble a cross from some color and put it on two legs (squares) so that the colors of the legs are also the same. That is, one leg is completely green, the other is blue, the third is yellow, and the fourth is red. But this is only if your cross is white. After you have managed to do this, you can safely move on to the third stage of assembling the Rubik's cube. After you have assembled the cross, you will need to assemble the rest of the square.

On the opposite side of the cube there will be a different color. Start assembling it, on the contrary, with the side cubes, and finish with the cross. And continue to do this on each side of the cube. If you get confused when collecting a cube, then it is better to start all over again, since any failure can interfere with the correct assembly of the cube. If, after reading our article, you still do not understand the principle of solving a cube or you have not been able to solve it, then on the Internet you can watch a video on how to solve a Rubik’s cube or a diagram on how to solve a Rubik’s cube. Well, in general, assembling a cube is not that difficult, the main thing is to understand the principle of assembly and the main combinations. With these combinations you will be able to solve the cube quickly and without unnecessary problems. You can also try to develop your own movement algorithm or come up with your own new combinations. Then be sure to write about them on the Internet, and you will help beginners who also dream of solving a Rubik's cube. We wish you success.
For children and adults, the task of solving a 3x3 Rubik's cube can sometimes seem overwhelming. A diagram with pictures for beginners in this matter is one of the main assistants. Also, to make everything clear and transparent, you can use video instructions. We will actively use both of these aids in practice so that you finally learned how to solve the eternal problem with a Rubik's cube.
You can solve a Rubik's cube in different ways and methods. You can do this in 15 moves, 7 moves, or even as many as 20. For many years, all sorts of smart people have been struggling to find the optimal solution to this problem. After all, the Rubik's Cube is a mechanical puzzle that can be solved quite logically. All you need is step by step instructions, as well as a small supply of logic and patience.
Before starting the assembly algorithm itself, you should learn key concepts.
The name of the toy speaks for itself - the cube consists of 6 sides (faces), 12 edges, 8 corners. The faces of the cube consist of 9 small colored elements that can rotate simultaneously, but only clockwise and counterclockwise. Letters of the Russian alphabet the names of the faces will be indicated as follows:
F – facade;
P – right;
L – left;
B – top;
 Many descriptions and diagrams contain designations for the faces of the cube in English.
The next secret of the Rubik's cube lies in the arrangement of small colored elements.
- Central cubes Determine the color of the entire side of a Rubik's cube. We will call these cubes by analogy with the name of the faces (F, T, P), etc.
- Edge cubes are adjacent to two faces at once, therefore the name will be double (for example, FP, PV) - depending on the faces with which they interact.
- Corner cubes contain 3 letters in the name at once, since they refer to three faces simultaneously (FPV).
And one more mini-secret - when you study the face rotation patterns, letters without any additions will mean rotate 90 degrees clockwise, and letters with an additional sign ' - counterclockwise.
Having understood all these symbols, it will be much easier for you to solve the Rubik's cube and you will do it correctly and quickly.
How to solve a 3x3 Rubik's cube: the easiest way, assembly diagram
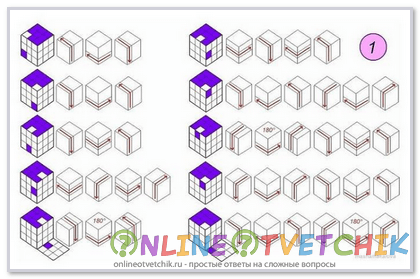
The easiest and most reliable way to assemble our Rubik's cube starts with the bottom cross. Make a cross on the bottom edge of the cube and proceed to a step-by-step solution to the problem of how to solve a 3x3 Rubik's cube: the easiest way, the diagram of which is right in front of you.
Scheme for assembling a 3x3 Rubik's cube for beginners in pictures
In the first stages of practice in solving a Rubik's cube, we will use the same cross method, but this time we will have a cross made of colored cubes on the top edge. As you understand, speed solving a Rubik's cube awaits you ahead, at this stage you should learn correctly determine the location of the edges and moving them in the plane of the cube.
 There are different methods for assembling a cube, and now you are about to learn how to solve a 3x3 Rubik's cube: the scheme for beginners consists of 7 stages. Pictures describing the assembly process are available for each step. You may spend more time on this puzzle than expected, but you will solve a problem that not everyone on our planet can achieve! It's worth the sweat. By the way, the last one world record for solving a rubik's cube was set to speed in 4.73 seconds. And it belonged to Australian student Felix Zemdegs, who defeated the previous record holder by just 0.01 seconds. We are in no hurry in this matter, so we carefully study the instructions and begin to assemble the first layer.
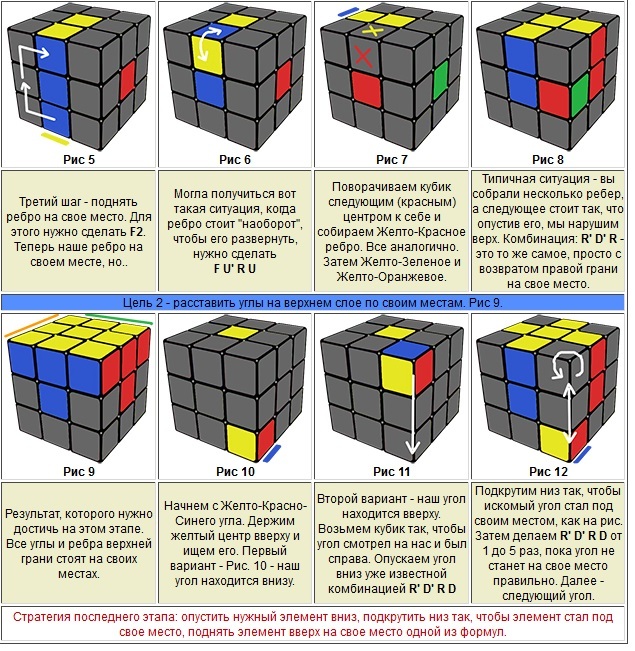

The principle of solving a Rubik's cube from the initial cross is not so complicated. Here it is necessary to correctly study the location of the edges. And then it’s a matter of technique, as they say. Basic concepts and rules for assembling a cube Rubik for dummies we have already passed. We are sure that the diagram for assembling a 3x3 Rubik's cube for beginners in pictures helped you set your own record and in further attempts you will reduce the time to a minimum.


At the seventh stage we unfold the corner cubes of the third layer.
Video: how to solve a 3x3 Rubik's cube?
If all of the above methods and formulas turned out to be another puzzle for you, no worse than a Rubik’s cube, we offer you a YouTube video with detailed instructions and comments. Perhaps these patterns will be clearer than any formulas and algorithms, and you will be able quickly fold a cube using the video as a guide.
The correct name is " Rubik's Cube». Rubik- Hungarian sculptor and inventor of the popular puzzle. The Rubik's cube was invented back in 1974, and since then its solution has occupied the thoughts of all mankind.
This puzzle is a plastic cube consisting of 26 cubes that can rotate around the three internal axes of the cube. Each side is painted a specific color and consists of 9 squares.
By rotating the sides of the Rubik's cube, you can change the arrangement of the squares. The goal is to return the squares to their original position so that each face consists of squares of the same color. This is not so easy to do. Many people can solve only a certain part of the cube on their own.To complete the puzzle, there are certain rotations and algorithms calculated using formulas.
We invite you to familiarize yourself with one of the algorithms for solving a 3x3 Rubik's cube

The easiest way to solve a Rubik's cube - remember which rotations were used to disassemble it and repeat them in reverse order. However, this option only exists if the cube was originally solved. If the cube is disassembled, it is difficult to reassemble it. Intuition, spatial thinking or chance can help here. But it’s better to remember the algorithm for collecting the cube. There are several of them.
The traditional name of the algorithm that solves the Rubik’s cube in the least number of moves is “God’s algorithm.” The maximum number of moves with this algorithm is the “number of God”. In July 2010, it was proven that this number is 20. That is, with known algorithms, you need to make at least 20 moves to solve a Rubik's cube.
Solving a cube for speed is a whole sport called speedcubing ) . There are competitions between speedcubers, and even blind assembly competitions!
You can also look video on how to solve a Rubik's cube step by step for beginners:
So, you have chosen and bought your first one. It's time to learn how to assemble it.
You can either learn how to assemble it directly from this page. So let's begin.
3x3 cube design
The 3x3 Rubik's Cube has six different colored sides and consists of 26 elements that are fastened together and move freely among themselves.
Cube elements are divided into three types
Fig.1 basic elements of a Rubik's cube
 Fig.2 The crosspiece is the internal mechanism for attaching the Rubik's cube.
To solve a Rubik's cube you need to know the formulas for assembling it. Therefore, first of all you need to learn the language of rotations.
The language of rotations. What do the letters mean in the formulas for solving a Rubik's cube?
Main
- The cube has a top, a bottom, a right, a left. When rotating, keep the cube in one position relative to you, and simply rotate the desired side. REMEMBER THIS!
- The centers of the cube do not move anywhere, they always remain in their places relative to each other, because they are fastened together by a cross (Fig. 2).

Rubik's cube formulas are written with letters that indicate the rotation of a certain side of the cube 90° clockwise. If there is an apostrophe (’) next to the letter, the side is rotated counterclockwise. The number before the letter indicates the number of turns.
We remind you: when you rotate the sides, the cube itself remains motionless, you simply rotate the desired side.

Practice rotating the desired sides of the cube clockwise and counterclockwise. Let your fingers remember the movement, and your mind - what and where to rotate if there is a certain letter in the formula. This will make it a lot easier for you to learn assembly algorithms.
As a respite, we recommend that you learn about the differences between professional speed cubes and beginner cubes. And is it worth it for a beginner to immediately invest in the purchase of an expensive sports cube? Briefly, our opinion: on the one hand, it’s damn nice to twirl the cosmically mobile MoYu Hualong in your hands, for example. An elite cube can be a great motivation for speed building. On the other hand: beginners may not notice the difference between a budget cube and a sports one, if the budget cube is good and fast, but we don’t keep others :)
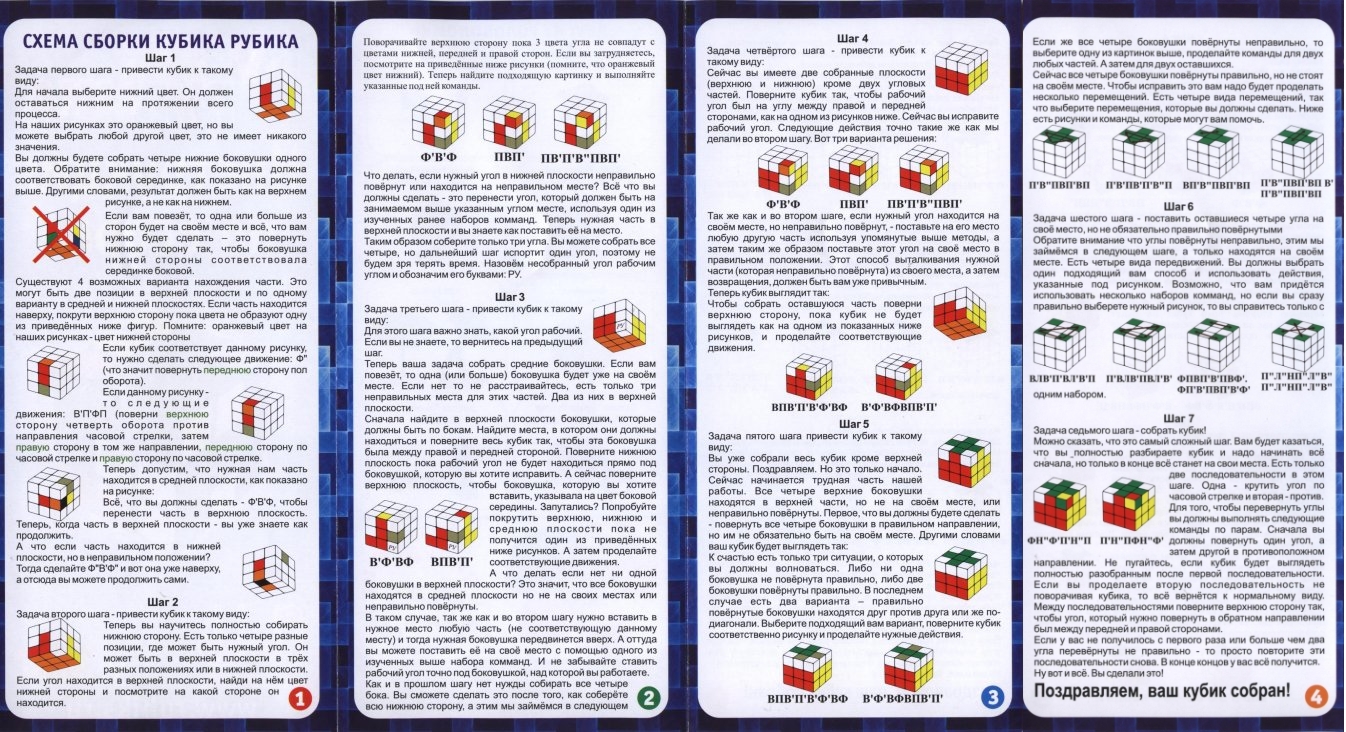
Stage one - assembling the first (bottom) layer of the Rubik's Cube.
Assembling the cross
Assembling the cross is the first step in assembling the first (bottom) layer. Take the cube at your convenience and study the position of the centers. Remember the color of the bottom and top. In our case it is blue.Until the end of the first assembly stage, keep the blue center at the bottom and the green at the top.

Your task when assembling the cross: one by one, find four on the cube ribs With blue color and move them down to blue center so that they second rib colors coincided with colors of the lateral centers. The picture shows ribs with a blue color that have become at the bottom, and their second colors yellow And red matched the colors of the side centers - this is correct.
In order to assemble a cross, you do not need special algorithms, but for example, let’s look at situations that may occur and test your understanding of simple algorithms.
Attention! Once you start executing the algorithm cube solving algorithmtwirl it yourselfcube in hands before performing a combination. Ccenters different colors must maintain their position. For example, yellow is in front of you, blue is below, red is to the right.
 |
Assembling corners
So, the cross is assembled. We move on to assembling the corners - the final stage of assembling the first layer. Take the cube with the cross facing down. Please note colors of the three centers, between which there should be corner, find it on the cube. In our case we are looking for blue-yellow-red corner. There is only one in the cube.
We put the corner in the top layer above the place where it should go down and do the URU’R’ algorithm. If the corner is in its place and the colors from the centers match, then we move on to the next corner. If not, then we repeat the algorithm until it becomes as we need.

Interesting fact: if the cube is solved and we repeat this algorithm (URU’R’) six times, then the cube will get confused and then solve. Let's see what happens to our corner after each algorithm. All of the options below may be available to you during assembly.

Stage two - assembling the second (middle) layer of the Rubik's cube
Hold the cube with the blue side facing down and the green center facing up.

In order to assemble the second layer, we need only one algorithm, but before executing it, we need to prepare the cube - bring it to one of the two possible situations shown below. Find in the top layer any edge who has no green. Rotate the top layer (movements U or U') so that the side color of the edge matches any of the side centers. Now take the cube so that the coinciding center is facing at you, and blue, as before, remained at the bottom. In our example we found yellow - red edge. Lateral rib color - yellow. Rotate the top layer and align the edge with the yellow center. You may also have an option when you combine red edge with a red center, and yellow the rib color remains on the top side.

We take the cube with the yellow or red center towards us and get one of three possible cases.

THIRD CASE
The rib is already in place, but twisted. We need to “replace” it with any edge with green from the top layer, then again we bring to the two cases that are indicated above and solve.

The third stage of assembly is assembling the top layer of the cube
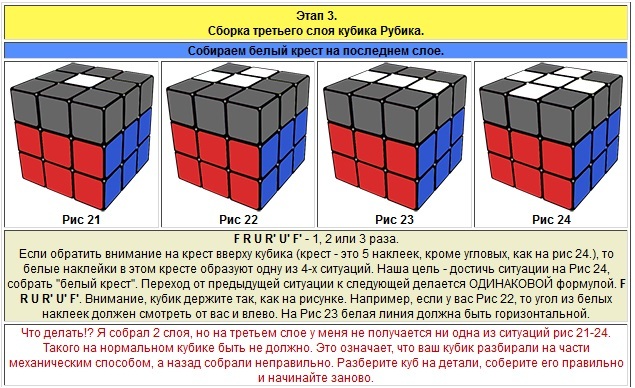
We are approaching the last stage - assembling the 3rd (top) layer of Rubik. First, we need to arrange the edges on the top layer so that they form a green cross. After assembling the first two layers, on the top layer you will get one of the four cases shown in the pictures. Find the one you have and perform the algorithm FRUR'U'F' to make a cross. You can start with a “dot” and consistently come to a “cross”.
Important! Before each start of the algorithm, hold the cube in your hands exactly as shown in the pictures!

So, at the top we have a cross.
We combine the side colors of the ribs with the side centers.

By rotating the top face (U or U’) trying to combine side ribs colors With lateral centers. All four colors must match (yellow, orange, white, red). If four do not match, then put the layer so that they match at least two ribs.
If you don't find two matching edges, then run the algorithm R U R’ U R 2U R’ U and look for the ribs again.

So, on the top layer we have a cross assembled and the ribs are correctly placed.
We put the corners in place.
Check that the corners of the top layer are in place; the corners may be twisted. But the main thing is that they have the same colors as the centers between which they stand. If so, then skip this step and move on to the next one.
If the corners need to be placed correctly, then take the cube in your hands so that there is a corner on your right that is in its place and perform the algorithm without changing the position of the cube:U R U’ L’ U R’ U’ L

If there is not a single corner that stays in its place, then do the algorithm given above from any position and the corner will appear.
The cube is almost complete, all that remains is to twist the corners.
You may have two, three or four twisted corners. Corners are twisted by a simple algorithm R' D' R D R' D' R D,
Important!!! This algorithm only works for one corner, which is located to your right. The secret is that when the corner becomes correct, you need to turn the top edge (U or U’) and substitute the next corner that needs to be twisted in its place. We can repeat the algorithm from 2 to 5 times and it will seem to you that the cube is confused, don’t worry, it will come together. The main thing is not to let go of the cube, not to twist it in your hands until you have completed the entire sequence of algorithms.
Let's consider the most complex case with four twisted corners:

Congratulations!
Now you know exactly how to solve a Rubik's cube! Disassemble and assemble your cube according to these instructions until you remember all the algorithms!
And then a huge world of mechanical puzzles will open before you, the assembly formulas of which are based on the formulas of a 3x3 cube!
Write a review
One of the most famous childhood puzzles is the Rubik's Cube. Every child has always wondered how can be assembled Rubik's cube fully . Very often, most people failed to assemble it, and such fun was put aside in a drawer. Only a few have managed to solve a Rubik's cube quickly and easily.
The most common version of the cube is the cube, which consists of fifty-four small cubes. Each side consists of nine cubes, which are colored in colors such as yellow, white, blue, green, red, orange. The main essence of the puzzle is the ability to assemble a toy so that each side corresponds to a specific color. Therefore, in this article, readers will learnhow to quickly solve a Rubik's cube
One of the modern cartoons called “The Fixies” details that a hero named Nolik recklessly said that he could easily assemble it. But he didn’t succeed, and Nolik and his friend Fire disassembled and reassembled the cube, securing it in such a way that it was impossible to disassemble it again. This method deprived them of the most important thing - interest in the assembly process.
The history of the creation of the Rubik's cube
The inventor of this puzzle is University of Architecture teacher Erno Rubik. He came up with his masterpiece at the age of 30 in order to prepare teaching aid for students. With the help of the invention, the author wanted to introduce students to the theory of groups in mathematics. The puzzle received awards and prizes in 1980 for the originality of the invention.
The project itself was created over several years. Even the author himself understood that assembling his invention was not so easy. In 1975, the inventor managed to obtain a patent. And the first batch arrived in the USSR in 1981. This toy was very popular and in short supply among the inhabitants of the USSR.
Nowadays, puzzle solving enthusiasts participate in various puzzle assembly competitions. Only a man named Mats Valk managed to solve a Rubik's cube in 5.55 seconds, which is an absolute record at this time.

Stages of solving a Rubik's cube
In this part of the article, readers will learn how to learn how to assemble a puzzle. The steps to solve a Rubik's Cube include:
1. Assembling a cross on one of the faces of the cube. Usually the top edge is chosen. To build a cross, you need to select any color whose fragment is in the center of the face. Then try to build a cross around it. In order for the cross to be assembled faster, it is necessary that its “branches” continue on the next faces, which consist of two similar fragments of the figure.

2. Direct layer-by-layer assembly of the cube. It is necessary to assemble a side of the same color. The puzzle pieces must form a special “belt”, which is located near the assembled edge. Then you need to assemble the second “belt”.
3. You need to assemble the cross on the side that is opposite the side containing the cross. And then completely assemble the side containing the second cross.
4. Arrange the corner parts of the cube so that all three sides match the edges in color.

5. Arrange the sides of the cube according to color.
It is believed that the smallest number of steps by which this puzzle can be completed is twenty.
Having mastered the simple method, you can move on to Jessica Friedrich’s method, which is more complex. According to this method, solving a Rubik's cube goes like this:
- The cross is assembled on the starting side.
- The first and second layers are assembled.
- Assembling the remaining layers.
Thus, the process of solving a Rubik's cube is quite exciting and educational. Having learned to assemble such a puzzle, you can amaze both friends and ill-wishers with your intelligence.
The implementation of these methods in practice is presented in the video below.


