The patron of 2018 will be the Yellow Earth Dog. According to beliefs, in order for the year to be successful, the main animal must be appeased the day before. This can be done by preparing dishes that the Dog loves or dressing in the colors of the patron. Or you can decorate your home, creating a New Year's atmosphere, adhering to the symbolism. And it is absolutely not necessary to purchase jewelry; you can make crafts with your own hands, for which available materials and tools are perfect. So let's begin.
Since a dog as a pet loves its owner very much and is devoted to him, trust is still worth winning, it needs to be loved, cared for, and protected. The dog prefers a homely atmosphere, peace, and comfort. And those DIY crafts for the New Year of the Dog 2018, which we suggest you familiarize yourself with, will definitely please the mistress of the year.

You will need:
- Cardboard.
- Thick fabric.
- Cotton wool.
- Scissors.
- Sewing needle.
- Threads.
- Beads or small buttons.
In order to sew a dog, you will need to make a blank on cardboard, as shown in the figure, cut it out and transfer it to thick fabric, this will be your pattern. Next, you need to sew the edges of the fabric, leaving a hole in the part of the tummy, stuff cotton wool through it and sew it up. The eyes will be dark beads or tiny buttons.

Fridge magnet
Such original crafts for the coming New Year, Dogs 2018 will be an incredible surprise and will accompany the owner throughout the next year.

You will need:
- Felt in black and white.
- Beads – 3 pcs.
- Threads with a needle.
- Glue.
- Cardboard.
- Magnet.
- Gel pen and pencil.
- Soap, sharpened at the end.
- Blade.
We invite you to print 2 sheets with a picture of a dog. One will be useful as a base, the second will be used for cutting out details of a different shade. Next, trace the base template twice on black felt, and use a pen to trace the remaining details on light fabric. The first base will be useful for creating the front part of the magnet, the second - for the back side.

Glue small components onto the front base. Make the nose from a bead, sewing it in the required place. Using a blade, make small indentations in the places of the eyes and also sew beads, after placing pieces of felt in these areas. This step will make the eyes more natural. White fabric use for eyebrows, also stick to the dog.

Using the template, make a pattern on cardboard, this will be the lining. It is important that its size is slightly smaller so that the cardboard base is not visible from the sides. Glue the cardboard onto the part of the base that was prepared for the back of the animal, then glue the front part of the puppy on top. Everything should work out in such a way that the cardboard is inside. Now you can stick the magnet on top of the back of the dog.

Button dog
Button applique can take a full-fledged place in home decoration for the New Year. You can frame it and it will turn out to be a great picture.
You will need:
- Rhinestones, beads.
- Buttons of different sizes and colors.
- Glue.
- Cardboard.
On a cardboard base, make a sketch of the future dog, fill the image with buttons, selecting them according to size to get smooth edges. Those small gaps that remain between the buttons can be filled with beads or seed beads. All parts of the craft are glued with glue.

Poodle made of cotton wool
This craft is especially relevant if a representative of this breed already lives in your family. Although the poodle is such a cute animal, those who are partial to the symbols of the year can create a toy in its likeness.
You will need:
- Cotton wool.
- Glue.
- Felt pens or markers.
- Cardboard (black and white).

To create a poodle (or any other dog), you need to tear off small pieces of cotton wool, roll them into medium-sized balls and glue them to each other, trying to get the outline of a dog. At the end of the work, draw a nose with a marker, cut out eyes and eyelashes from cardboard, and also glue on. You can decorate your dog with a bow, hairpin and other little things.

Keychain claw
The craft will not only be beautiful, but also useful. You can hang it on your keys or present it to friends.
You will need:
- Felt.
- Threads with a needle.
- Glue.
- Cardboard and paper.
- Sintepon.
- Chalk.
- Scissors.
- A carabiner and a piece of fabric or rope.

Print out the pattern or make it yourself and transfer it to cardboard. Place the template on felt, trace the outline with chalk, cut out the base and other parts. Next, place all the small elements on one side of the pattern and sew. Then connect and sew the 2 bases, leaving a little unstitched space for stuffing. Place the padding polyester inside. Next, make a loop out of the fabric, thread the carabiner and sew it into the left unstitched area. The keychain is ready!

Original dogs can be made from yarn. You can decorate your Christmas tree, your home, or just play with them.
You will need:
- Yarn 2 colors.
- Colored felt.
- Glue.
- Large size beads.
- Scissors, blade.
- Cardboard.
- Threads for tying pompoms.
Make 3 pompoms: 2 larger, one smaller. The large ones will be used for the body and head, the small one will become a blank for the face. Depending on the size of the pompoms you plan to make, cut out circles from cardboard and make the middle hollow. Attach the resulting rings one to the other and wind light-colored threads onto them. The cavity of the circle should be tightly filled with threads. Next, move the blade in such a way as to reach the space between the 2 circles of cardboard. Cut until you reach the cardboard base.

Then slightly move the circles apart and wind the pompom as tightly as possible with thread and tie it in a knot. Then, with careful movements, remove the circles from the cardboard and do the same manipulations to build the second pom-pom. Next, make a third, smaller pompom from dark threads. Leave the threads with which you wound the workpieces inside long. And cut the threads according to the diameter of the balls so that they are all the same length.

Glue a pom-pom face inside the pom-pom head. Next, take the black threads, cut a few pieces and twist them with your fingers to get balls. From these you will make the nose and eyes. Lubricate them completely with PVA glue and let them dry, glue them in required places muzzles. Using the threads that tied the middle of the pom-poms, fasten the body to the head, tie the ends very tightly. To hold the joint more firmly, you can coat it with glue. Now cut out the ears from felt and glue them to the desired part. You can make a brightly colored collar and enjoy your work!

The symbol of the year can also be represented by a pillow - great gift for relatives.
You will need:
- Soft fabric.
- Colored scraps that will be used for the tongue and ears.
- Threads.
- Felt black, beige and white flowers.
- Sintepon.
- Chalk.
- Pencil.
- Needle.
- Cardboard.
- Scissors.
Make 2 identical rectangles from fabric. Mark the muzzle by sketching out the nose, mouth and marking the place for attaching the eyes. Using black threads, embroider the puppy's "grin" and his nose.
After this, draw a tongue on a sheet of cardboard, prepare a pattern, transfer it to fabric and make 2 such elements, sew them and fasten them in place of the mouth. Also, draw a pupil and an eye on a cardboard sheet, cut them out too, trace them on fabric in black and white colors, respectively, and also make 2 copies. To decorate the face, make a spot on white felt and cut it out.

We assemble the face: we sew a spot to the marked areas, an eye on it, and a pupil on top. We perform the same manipulations with the other eye, only there will no longer be a stain.
Make a blank for the ears on cardboard. Cut out 2 pieces from black felt and 2 from brighter fabrics. Sew dark and bright felt together.
Now we move on to connecting the back and front components; push the ears to the place where they meet. Make sure that the dark colored felt is on top. Sew the pillow pieces from the inside out. Leave a part through which you can turn the pillow out. Turn it inside out, use padding polyester for stuffing and sew it up to the end.

Dog cards
And, of course, how can we do without postcards that can be presented to friends and family. And to make the gift doubly pleasant, you can make a postcard in the form of a dog.
You will need:
- Cardboard.
- Red and black gel pens.
- A sheet of carbon paper.
- Braid.
- Colored cardboard.
- Double sided tape.
- Buttons.
- Silicone glue.

Draw a dog on any sheet of paper; if you do not have the skills of an artist, then simply print out the blank and transfer it using carbon paper onto white cardboard. Follow the outline with a black pen. Inside, fill the entire space with small circles. Do the same with the bow, only in red.

After this, stick tape to the white cardboard and connect it to the colored one. Glue tape along the edge of the white cardboard, and decorate the corners of the resulting picture with buttons. Write your wish inside and your craft is ready.

It’s quite possible to make such excellent and original crafts to pacify the Yellow Earth Dog. Another good thing about DIY crafts with your family for the New Year of the Dog 2018 is that you can bring the most fantastic ideas to life, all together. This is very touching, because on New Year’s Eve the family must be under one roof. Happy holiday to you!


So, according to eastern calendar next year will be marked by yellow earth dog. In many schools and kindergartens, during labor lessons, children are given the task of making a craft on a given topic. In this article we have collected the most interesting and fascinating crafts. Let's get started.
Making themed crafts for 2018
Craft ideas for kindergarten and school.
A dog craft for children is something that will be of interest to many. Most likely, children's institutions have already begun to prepare for the arrival of 2018, which has not yet arrived. For kindergarten, simple, but bright crafts, because young children cannot sit in one place for a long time and be focused. Let's try to make a postcard in the shape of a dog. Prepare the details for our craft in advance, a sheet of paper. Fold it in half, draw an outline, color it and together with your child, glue on details in the form of a tail, eyes, etc. The card is ready. 
For students primary school We suggest assembling a voluminous dog. Print out a blank dog or draw a template yourself. So, in order for our structure to stand, the body must be cut out of cardboard folded in half, then glue the head onto it, and draw the muzzle with a felt-tip pen or pencil.

Craft - Dog for competition.
The Dog craft is easy to make on your own and the next master class will demonstrate this to you. If you need to make a craft for a competition, then try to make every effort together with your child to ensure that the resulting toy looks decent. Here's an example: take a cylinder from under toilet paper. Fold the sleeve inward. Paint the resulting body with gouache or watercolor. Cut out parts for the muzzle from cardboard or paper. Then stick them on the cylinder. Ready!
Let's take advantage modern technologies– color 3D printer. Print out the finished parts and glue them in the right places. 

Craft made from new and modern material.
Foamiran. Quite amazing and good material for making craft toys. It is synthetic, non-toxic and comes from North Korea and Iran. The texture is similar to plastic suede. Note that foamiran should not be confused with porous rubber. What colors and shades can you find on the market!
Work progress:
Prepare some kind of board, foamiran itself various colors and awl.
Then make the head. Draw elements of a muzzle on it, mold a black or brown nose, and then a body and legs. 
After that, you need to make little white pads for the paws, on which you need to make cuts.
All that remains is to glue the legs and head to the body. As an accessory, also make a blue collar, for example, or bows. 
Now make the ears. Choose the color at your discretion. It can be either black, dark brown or light brown.
At this stage you need to make the eyes. They can be either molded from foamiran or drawn with pencils or felt-tip pens. 
The resulting craft can be varnished. Ready!

Let's sew a dog.
Here we are talking about how to make a dog craft. And we are ready to offer you many options. This section is intended for those who have basic sewing skills. Let's try to sew soft toy in the shape of a dog, which can be a great gift for the New Year or a Christmas tree decoration. 
So, everything is quite simple. Draw a pattern (or print it out). Then everything is transferred to any type of fabric (the choice is made according to your taste, but if you are not well versed in fabric, then we can recommend felt - it is more popular nowadays). We cut out two parts at a time, then sew them together with a buttonhole stitch. The main thing is to remember to leave a hole for the filler. Having filled the toy, sew up the rest. The toy is ready!

If you are a fairly experienced tailor, then I offer the following toy patterns to choose from...


Ideas from Japan.
All New Year's Dog crafts should be beautiful. So try your best while creating them. Among the readers, there will probably be people who know how to spin. We suggest connecting volumetric craft using hooks and knitting needles. Let's use Japanese technology called amigurumi. The point is that the toys are knitted in a spiral. The end result is cute and cute creations.


We make a Christmas tree toy - a dog.
Consider three options for crafts that are suitable as New Year's decorations.
Felt dog. We have already considered this case above. This material makes an amazing and creative toy.

Paper dog. We will need a sheet of paper of any color and markers to draw eyes and a nose. Below is a diagram on which you can assemble the toy. All that remains is to thread the thread and hang it on the tree. 
Rubber dog. Recently, weaving with small rubber bands has become very widespread among children of primary (and older, too) school age.

Let's sum it up
To make the dog's garden craft interesting, use our ideas. In addition, add your own imagination to them. Many ideas and thoughts are spinning in our heads. As you can see, you can make a talisman for next year using any available means. So let it bring you good luck in the new year 2018.
On the eve of the new year 2018, which will be held under the auspices of the dog, I would like to reflect its symbol in holiday decorations. Every housewife makes interesting dishes with themed decorations, costumes for children, and so on.
Children also love to take part in preparing the house for the holiday. But besides the usual annual carving of snowflakes, they probably want to do something interesting. Why not make the little fidgets' wishes come true? Moreover, when making crafts, imagination develops, fine motor skills hands and strengthens the bond between parents and children.
A fairly simple option for realizing what you want - Christmas tree decoration DIY dog. This will be discussed below.
What can a toy be made from?
 Even an extremely limited budget is not a reason to refuse to decorate your home with the symbol of the year. You can make a Christmas tree dog toy with your own hands from a variety of materials. These will include:
- paper;
- felt;
- paint and Christmas ball;
- pom-poms;
- cardboard;
- salt dough;
- plasticine;
- any fabric and padding;
- shells;
- and much, much more.
You just need to turn on your imagination and creative thinking. Now let’s take a closer look at a few easy-to-make Christmas tree decorations for the Year of the Dog.
Several master classes
Manufacturing New Year's crafts Not only will it decorate your home for the holidays, but it can also bring your family closer together. Many are simple and beautiful Christmas tree crafts dogs on New Year 2018 can be done with your children.
Twitchy dog
This craft is easy and quick to make, but brings a lot of joy to children. You can hang it on the Christmas tree, or you can just play with it. To complete this we will need:
- cardboard;
- awl or gypsy needle;
- small buttons;
- elastic thread;
- strong thread, thin cord or wire.
 First you need to draw a future Christmas tree toy in the shape of a dog. Now we break the product into parts and draw each of them separately. Next you need to cut them out and use them as a stencil. Trace the details onto cardboard and cut them out.
We mark the junction of the legs and tail with the body and make holes.
In order for the parts to be movable, they must be loosely attached to the body. For this you will need a wire with a button.
 First, the fastener is threaded through the holes on the body, and then into the moving parts.
First you need to tie the paws together and tie the tail to the hind paw with an elastic band.
We leave a button on the front side and thread a wire through it and the hole, securing it. We get a dog with moving paws and a tail.
It is better to take transparent buttons or to match the finished dog.
You need to tie a string to the elastic band that connects the paws, which you will subsequently pull to move the dog.
At the end you can attach a stick to hold the dog or a loop of ribbon to hang the toy on the Christmas tree.
Symbol of the year made of felt
 This material is very popular both among beginning needlewomen and among experienced craftswomen. The best part is that the felt does not fray at the edges and therefore does not require additional processing.
A felt Christmas tree dog toy can be flat or voluminous. To make a flat one we will need:
- felt different colors;
- scissors;
- threads;
- cardboard;
- pen or pencil.
For a voluminous toy you will need more filler. Cotton wool is quite suitable for these purposes.
Let's get to work. First, we draw the details of the future dog on cardboard. These will be patterns. Cut them out and trace them onto felt.
If you don’t know how to successfully break a dog into parts, use the patterns below.
One of the most popular Christmas tree decoration dog with a spot around the eye and multi-colored ears. If you are making this, you will need two colors of felt.
 From the main one we cut out two parts of the body and one ear. The second color will be needed for the second ear and the spot around the eye. You can also cut out a collar strip from a contrasting shade and a black nose.
First, we sew a nose and a spot onto the front part of the body. Next we outline and embroider the eyes and mouth.
To sew on a spot and connect parts, you can choose contrasting threads that will not stand out from the main color scheme.
Now we fold the front and back parts of the body, sew them along the edge, leaving room for stuffing the toy. Through the remaining hole we stuff the toy with cotton wool and sew it up until the end.
The ears are sewn on from the back, then the collar is placed. It is important not to tighten it, otherwise it will not be beautiful.
The collar is secured at the back with a button. Now the three-dimensional Christmas tree toy, the symbol of the year, the dog, is ready. You can additionally sew a loop of ribbon to hang it or simply place the dog under the tree.
It will also look great flat dog. Muzzles are usually made like this and it is much easier than a bulky toy.
Here you will also need a cardboard pattern. We draw ears, a face, a nose and a spot.
From the selected colors of felt, you need to cut out the listed parts using a cardboard template.
If you use two colors, the craft will look brighter and more interesting.
Now all that remains is to connect all the parts using thread and needle. Eyes, antennae and mouth need to be drawn and embroidered. You can also replace the eyes with buttons.
Finally, you need to sew a ribbon between the ears for hanging. Now, as promised, we bring to your attention patterns for a Christmas tree dog toy made of felt.


Symbol of the year on Christmas balls
 If you have no desire to bother with sewing, but you like to draw, this great option. There are two ways to make such toys. You can paint ordinary plain balls or make toys from old incandescent light bulbs.
Christmas balls with a dog are very easy to make. For work we will need:
- plain Christmas tree decorations in the form of balls;
- any degreaser;
- primer;
- acrylic paints.
We take the ball, degrease it and prime it. Now you need to make a sketch with a pencil and then paint it with paints. You can depict a landscape with a dog or draw a face.
 A do-it-yourself Christmas tree dog toy from an old light bulb is made in the same way. Degreased, primed, painted.
To cover the base of the light bulb, you can make ears and a New Year's hat from felt. Secure with regular PVA.
Decoupage
 Another fairly simple way to make your own Christmas tree toy with the image of a dog. Here you will need the following materials for work:
- three-layer napkins with a picture of a dog;
- Christmas ball;
- tassels;
- degreaser;
- acrylic paints;
- water-based varnish;
- nail glitter or glitter polish;
- sequins or tinsel for decoration.
First, degrease the toy, then apply paint - it will serve as a background.
It is better to apply paint in 2-3 layers.
Cut out a picture of a dog from a napkin and separate the top layer. Using PVA we attach the image to the toy. When the glue has dried, you need to coat the product with varnish and tint it with paints.
Finally, we decorate the ball with glitter and chopped tinsel, giving it a New Year's mood.
Master class in pictures on making a fluffy dog


As you can see, making decorations for the New Year tree with your own hands is simple and interesting. And if you involve children in the process, it’s also useful. Use your imagination, do it together, you can even give such souvenirs as a gift to your loved ones. Happy holidays!
Video tutorial on making a Christmas tree dog toy from a light bulb
Sew and stuff the body, then sew the head, paws and tail to it. Sew the ears to the head. Using black thread, embroider the nose, mouth and claws on the paws.
Glue ready-made plastic eyes (you can get them at a sewing supply store) or black beads. To make the craft look more decorative, tie a ribbon around your neck.
DIY dog toy
A very cute animal can be made from felt; this material is ideal for beginner needlewomen, because it does not crumble during work.
Cut out two dog bodies from felt, also cut out a pair of ears (they should be different colors), a spot and a nose. Also prepare a felt strip 0.8 by 12 cm, it will be useful for the collar.
Sew the spot and nose onto the front part of the body, first outline the mouth and eyes with a pencil, and then embroider them.
Fold the parts of the body, and then secure with pins, sew along the edge, not forgetting to leave a small hole. You should stuff cotton wool through it, then sew up the hole.
Sew the ears from the back half of the body, place the collar (do not pull it off), secure it at the back and sew on a button.
DIY Christmas tree toy - year of the dog
From felt you can also sew a wonderful DIY dog Christmas tree toy- be sure to decorate the Christmas tree with it for the upcoming New Year 2018. To make it, first of all, draw a pattern: the head, ears, nose and spot around the eye. Attach the pattern to the felt so that it does not move - secure with pins and cut out the muzzle. Then cut out all the other parts. Christmas tree decor will be even more attractive if you use fabric of different colors. And if you work a little longer and make it double-sided, then you simply won’t be able to take your eyes off this decoration.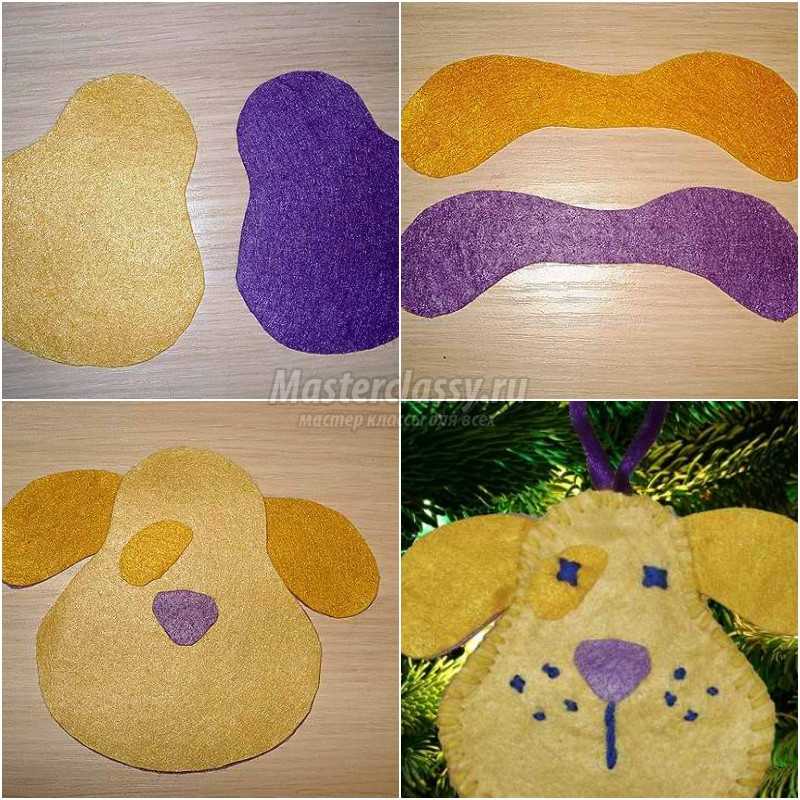
Now all that remains is to collect DIY dog Christmas tree toy. Glue on the nose and spot (you can use fabric glue for this). Embroider the eyes, mouth and mustache, however, instead of eyes, you can also sew buttons. The final step is to place the ears and ribbon for hanging, followed by covering with a top layer of felt.
Year of the Dog - DIY toy
The cute spotted dog is sewn from fleece - the result is an incredibly cute soft craft.

First, make a pattern for the toy - draw the body, tail, ear and head on paper, then cut it out. Transfer the body pattern onto the white fleece, cut out two pieces, not forgetting the seam allowances. Also use white fleece for two elements of the head, four for the ear, two for the tail. When cutting, be sure to add seam allowances.
Place the body parts right sides on top of each other and sew them together without leaving any holes. Make two darts on the head parts and sew them, leaving a hole here. Place the ear pieces in pairs (face to face) and sew without sewing up the holes in the upper parts. Do the same with the tail, but do not leave a hole.
Make a small cut on the body and turn the part inside out, stuff padding polyester inside and sew up the cut. Do the same with the head and tail, turn the ears out and straighten them.

Sew the ears to the head, the tail to the body. Cut patches of different sizes from black fleece and sew them to the body and tail. Also cut out a black fleece circle with a diameter of 3 cm - this will act as a spout. Sew this circle with black thread along the edge, tightening it slightly. Place some padding polyester inside and tighten the thread. Sew the nose and spots to the head, and then sew it to the body. Lower the ears down and grab them with a couple of stitches, glue the eyes. Tie a satin ribbon around your neck.
It will also be unusually cute.
DIY Christmas dog toy
Children also want to take part in making the symbol of the New Year 2018. For them the best option there will be modeling from plasticine, because everyone knows perfectly well how this plastic mass has a positive effect on the development of various skills.
In order to sculpt a cute mongrel, you should take plasticine brown. Also, you can’t do without a stack.

You should cut off a small part from the plasticine bar, knead it well and transform it into a ball. Pull out the ball on one side - this will be the nose part. You should stick a black ball-nose to it, and use a stack to cut the mouth. Make round eye holes using the same tool and insert black and white balls into them.
Make ears from brown plasticine and attach them to your head; if you want, you can use white or beige. Transform the rest of the brown plasticine into the body of a mongrel - first of all, roll out an oval roller, then sharpen the neck and highlight the chest in a semicircle.
To sculpt the hind legs, prepare rollers and balls. Squeeze the balls to form flat drops, attach to the bottom of the dog’s body, then attach the paws.

To make the front paws, the plasticine should be pulled out into thin tubes and bent at the ends. The limbs can be based on matches. Attach the front paws to the body, cut the pads with a stack.
If you want, you can “hang” a collar on your neck; this is best done when the head is not yet attached. Attach a tail to the back; if you wish, you can make it “fluffy” with a stack.
Attach the head by piercing the neck with a match. Then go over the entire surface of the chest with a stack - it should also become fluffy.
As you can see, both an adult and a child can easily make a charming dog craft, we recommend that you start creating now so that by the New Year you will have excellent toys.