Are you going to visit, have chosen a gift, and now you don’t know how to wrap it? Then you are at the right place. In this article, we’ll look at how to make a bow from ribbon to decorate gifts, and we’ll also tell you how you can make an exclusive gift for every taste from an ordinary ribbon.
How to create a festive mood?
A beautifully packaged gift with original decoration always creates a festive mood, no matter whether you give it or whether such a gift was given to you. Exactly beautiful bow, which can be called a classic decoration technique, “warms up” the imagination, making you tremble in anticipation of a surprise. The originality of this decoration lies in its versatility, since a bow can be made from ribbons different shapes or size, and today’s market offers a wide range of colors, from plain to complex drawings. Such decorations can give the souvenir more solemnity. Initially, you need to pack the surprise in gift paper, how to do this, read the article: Well, we will teach you how to make a bow from a ribbon, the main thing is to be patient and not quit your job after the first failure, because the wonderful grateful smile of the hero of the occasion to whom you are going guests deserves a little effort.
How to make a voluminous bow from ribbon to decorate a gift?

To get a truly voluminous bow, you need to give preference to cuts made of hard material. Having selected the ribbon, do the following:
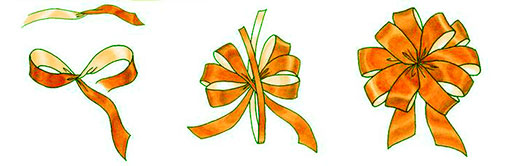
- Having decided on the size of the bow (the longer the loops, the larger the bow), you need to make loops from the ribbon in 5-9 folds, placing them one on top of the other.
- Smooth out the resulting loops and carefully trim the edges, as shown in the photo below. You should end up with almost triangles around the edges.
- Take the loops by the middle and spread them to the sides so that the cut out parts are in the center.
- Secure the narrowest central part. You can do this:
- the same ribbon;
- sew with thread;
- fasten with a stapler;
- twist with wire.
- Straighten the resulting half-loops, give them volume and the beautiful bow is ready!

How to do lush bow from tape? Video lesson
How to make a simple bow from ribbon to decorate a gift?

You can make a strict version for a “male” present. It will look great both on the packaging and on a bottle of an expensive strong drink. And you can read more about souvenirs for the men's holiday in the article:. Let's get started:
- Cut a piece of wide ribbon the right size, roll up, glue the edges with glue. It should look like a ring.
- Flatten the resulting ring.
- Hide the joint under the same, but thinner cut.
- Carefully glue the edges and the simple decoration is ready.

How to make a ribbon bow - a classic option
The classic version of the decoration is very simple to make, and at the same time creates an excellent frame for any gift.

With such a bow, a book, a box of chocolates or a service, as well as ordinary wildflowers will look great. This classic is performed according to the following steps:
- Take a long ribbon and fold it into two loops, as in the photo below. There should be one addition in each hand.
- Place the loop on the left at the back, crossing the two folds. It turns out to be a circle at the bottom.
- Pull the right loop through the formed circle and pull it off. The middle should be in the middle.
- Straighten the loops - the beautiful bow is ready! If necessary, you can cut the lower ends to the desired shape (oblique, triangle, etc.).

Video lesson: how to tie a ribbon bow classic style to decorate a gift?
How to make a Dior bow from ribbon to decorate souvenirs?
The Dior bow is used not only to decorate gifts. With its help, unforgettable decors are created for parties, weddings and other celebrations. By the way, take note of the rules of behavior at the table at such celebrations. They are described in the article: .

To make such a bow, you need to follow these steps:
- Prepare four cuts of different lengths.
- Roll each of them into a circle and secure with thread or glue.
- Stack the circles incrementally one on top of the other.
- Tie the resulting structure of ribbons in the center, inserting the binding tape into the upper (smallest) circle, as in the photo below.
- Fasten the structure.

How to make a ribbon bow on a fork?
Do you believe that you can tie a beautiful bow on a fork? No? Then let's learn, we suggest trying out two options for making such a decoration.
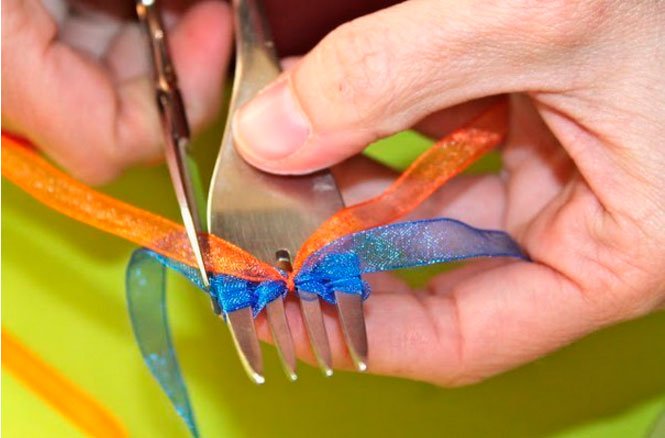
Option No1
Let's try to solve the following equation: Ribbon + Fork = Original bow. To solve, you need to do the following:
- Cut a narrow ribbon of the desired size. For ease of use, it should be at least 18 cm.
- Conditionally divide it into long and short sides. The short side will not be used.
- Pass the long part between the 2-3 teeth of the fork you are using.
- And bring its end up between these same teeth.
- After these steps you should get a small loop. Don't tighten it yet.
- Thread the remainder of the long end through the loop inward again.
- Pull this end out and tighten the knot.
- Trim the long ends as needed and singe them with matches or a lighter.

OptionNo2
To get a beautiful bow in the form of a lush flower, you need to use two different ribbons:
- thin;
- wide nylon.
Execution steps:
- Insert a narrow ribbon transversely into the center of the fork. You will need it almost at the end of the work.
- Use a wide piece of nylon to braid the teeth of the fork, as shown in the photo below.
- Use a thin ribbon to tighten the bindings and tie them.
- Remove the workpiece and straighten it.
- Scorch the edges with fire.

The decoration is delicate. It will ideally complement any souvenir intended for the fair half of humanity.
Video lesson: how to make a ribbon bow on a fork
Photo ideas for decorating gifts with bows


Here's a photo showing a variety of techniques for creating simple handmade ribbon bows.
How to make a simple bow?
You can make the simplest bow yourself as follows:
- Before starting work, prepare two tapes (wide and narrow) different colors. The length and width of the light tape is 20x5cm, dark - 40x5cm, respectively.
- Next, fold the wide ribbon into a loop and secure the edges with glue.
- Repeat the same with a narrow ribbon. To do this, you need to put it on top of the wide one, and fasten the ends of both with glue to each other.
- Take the remaining piece of narrow ribbon and tie it loosely in the middle of the resulting product.
- Free edges allow you to attach a bow to a gift or clothing
How to make a lush bow from ribbon
There are many variations on this theme. Here is one simple way to make a satin bow at home:
- Purchase a ribbon of the required length and width from the store. The longer it is, the more magnificent the product will be.
- Fold the ribbon like an accordion and tie the part in the middle with thread.
- To make a large satin ribbon bow, use several of these elements connected to each other.

Lovely bow in kindergarten or for September 1st, it’s easy for first-graders to create using a two-meter white ribbon.
To do this, perform the following steps:
- Prepare several sections equal length(15cm).
- Place them right side inward.
- Glue is applied at a distance of 2cm from the bend.
- The gluing area is pressed with tweezers for strength.
- After the glue has dried, the bows can be turned outward.
- The edges are fastened with thread and sewn to the base (felt, cloth).
- Rhinestones and beads are suitable as additional decoration.
Wide ribbon bows
Often, when choosing a bow tie, difficulties arise, since the store does not always have the model in the desired color.

A worthy solution to this problem would be to make such a tie from scrap materials. Here's a quick guide:
- Prepare 2 pieces of tape different lengths and width: first – 20x5, second – 18x3
- Fold each one in half, securing the ends with glue.
- For strong bonding, it is recommended to use a needle
- Connect both parts using stitches
- Pull the thread and fasten

The original decoration is considered to be “roses” - beautiful DIY bows.

Creation proceeds according to the following scheme:
- Wrap the ribbon around your hand and make a knot
- Spread the “petals”, bending them inward
- Repeat the action with each “petal”

Narrow satin ribbon bow
The Dior decorative element will add sophistication and charm to your clothes. Making a kind of bow is not difficult:

- Cut elements of varying lengths from tape
- Make figure-eight coils out of them.
- Place them on top of each other from largest to smallest
- To fasten the bow - to do this you need to thread a small piece of ribbon of the same shade into the last turn
The finished product will fit into any packaging box and will be especially stylish when combined with round and oval shapes.

The following video will clearly present a master class on how to make many small bows from a narrow ribbon using a table fork.

Hair jewelry
Handmade hair bows are a great way to stand out. To do this, adhere to the following points:

- Take 2 pieces of tape (5x25) and a thin tape
- Fold the corner at one edge of the wide ribbon
- Combine the end of the second corner with the first
- Connect the resulting corners with a needle to form a loop.
- Then do the same next to the corners. Turning the product over, make another corner (perform these steps until a triangle of tape remains)
- Bend the resulting “diamond” in half twice
- Fold the free end to form a triangle
- Carefully hold it in the center so that the structure does not fall apart
- Remove the needles and bend the inner triangle to create a petal.
- Sew the element in the middle
After this, you should prepare another such part and connect both using a narrow ribbon. To attach the products to your hair, you will need a clip or elastic band.

How to make a chic bow from nylon ribbon
To ensure that the homemade process is not too labor-intensive, it is enough to follow the step-by-step steps:

- You will need 2 ribbons of the same size (150x8)
- Bend each one in half and try to thread it on a needle and thread.
- After finishing the work, pull the thread so that the remaining piece of tape is 30-40cm
- Make a knot and straighten the resulting product
- Take thick felt and prepare a circle (diameter 8cm)
- Make two holes in it and thread a thin ribbon through them
- Glue the first tape to the base in a spiral, then the second.
- Cut off the rest of the tape and trim the ends

Photos of DIY ribbon bows


Pay attention!


Pay attention!


Terry bow(in foreign sources called the ambiguous playful Pom-pom) will look more impressive and elegant if you take a ribbon made of hard material that can hold its shape.


We roll it into several rings, the diameter of which is equal to the diameter of the future bow. Smooth out the loops and make diagonal cuts as shown in the figure. We fold the loops again so that the cut triangles are in the center of the folded strips of fabric lying in front of us.
Then you should tightly tighten the slits with tape or wire and alternately straighten all the loops on each side of the bow, starting with the inner ones: one to the right, the other to the left, etc. Let's fluff up the bow and mentally admire the beauty that we have just created playfully.
 Classic bow outside of time, fashion, space and circumstances. The main thing in this method of tying a bow is that the ribbon does not wrinkle when tying.


 Strict bow. Fold the ribbon in half as shown in the picture. We fix the junction of the ends of the tape with glue and smooth it by hand. Take a small piece of tape (or a different color) to wrap around the unsightly joint. Glue the ends of the second ribbon to the back of the product - and the bow is ready.


 Tiered bow. To tie such a bow beautifully, you should take three pieces of ribbon of different width and color. Trim them so that the widest piece is the longest and the narrowest is the shortest. Form the ends of the bow. Now tie the folded pieces together with another ribbon, leaving long ends to secure the tiered bow on the gift bag.


 Two-color bow. After such manipulations, dealing with a two-color bow will be as easy as shelling pears. We take narrow and wide ribbons of different colors. First, we form a loop from a wide satin ribbon, fastening its ends with glue, and then do the same with a narrow ribbon placed on it. We smooth the resulting “sandwich” tightly with our hands and fix it from the inside in the center with glue or a paper clip. The final bow is formed using a third ribbon, long enough to be tied to the gift bag or box.


Bow "Dior". Some say that the Dior bow is a more complicated version of the “strict” bow. We glue together “rings” from pieces of tape of different lengths, which we then connect together using glue or a stapler. The half-finished bow is placed on a base - a ribbon with cut out ends. And with a third - small - piece of tape you should disguise the paperclip by gluing its ends to the back of the bow.


Bow flower. The first step in creating this fantastic flower will be an ordinary ring, which you will make from a ribbon, holding it with your thumb and forefinger. This movement should be repeated until there are more than ten such rings in your hand - depending on the desired size of the bow. We tie the rings in the middle with a long narrow ribbon, straighten the loops one by one, and secure them to the gift.


 Chrysanthemum bow. Tying a beautiful chrysanthemum bow is much easier than it seems at first glance. To do this you will need strong tape, wire, scissors and a little more patience than in previous versions. The beginning of making “Chrysanthemum” is reminiscent of working on a terry bow. But after fastening the ribbons with wire at the cut site, the time comes to give them the appearance of curly chrysanthemum petals. To do this, uniform cuts are made on the loops folded together. After this, we begin to straighten the “petals”, turning the loops first to the right, then to the left, starting from the inner ones, first on one and then on the other side of the bow.

 And finally, another - simplified - version of the bow decoration with curly petals made of plastic braid. We take about a dozen thin, rigid ribbons and tie the gift crosswise with them, fastening the intersection of the ribbons with a tight double knot. Then we will tie the most ordinary classic bow. Let's cut its loops in half, iron each one between the blades of the scissors - and before us is another magnificent, spectacular decoration.
Small matter: match the bow beautiful gift- go visit!
Hello all readers! Today, as always, Nastya Skorekeva is with you with a story about how to make a bow for a gift. And in as many as 10 ways
Like you, I love wrapping gifts (I don’t think you would have come to this article if it weren’t for that)) But simply wrapping a present in beautiful paper is sometimes clearly not enough, even if the surprise is already made with your own hands. There is a feeling that something is missing... But what?
Definitely banta! It will decorate both a small gift and a large Bentley (just kidding, but why not?))
And now I will show you several ways to create this decoration from different materials.
Satin ribbon bows
What is good about satin ribbon? At a minimum, its convenience lies in the fact that it is not afraid of water, that is, rain will not turn it into a multi-colored mush.

On the other hand, a creative person may find this decoration useful in the future, to complete his own projects, that is, it is such a mini-gift that complements it. Yes, it looks interesting and unusual)
Well, why pour water, here are 5 ways to create a bow:
- Classical
- Double
- Multilayer (terry)
- Lush
- "Chamomile"
Classical
This is the most common bow that is used almost everywhere. The most important thing in it is to carefully straighten all the folds and not to pull the central part too much.
In order to make it you will need a small piece of satin ribbon. Then follow the diagram:

Double
In fact, it can be multi-layered. To do this, you need to fold one strip once or many times, and shape the other into a bow, folding the ends crosswise in the middle.
The entire structure must be connected using another tape.

Multilayer (terry)
It’s just very impressive) To create it, take a long piece of ribbon (enough for several folds). Again, fold a number of times.
Now cut out two triangles in the center, as in the photo. Tie the center with a small piece of ribbon and “fluff” the bow, pulling out all the elements, starting from the inner ones. Pull it out from the right, then from the left, taking turns processing the sides of the bow.

Lush
For this you will need three different ribbons (this is optional, but the effect will be cuter).
Fold one 4 times so that all layers are on top of each other. And process the second one in the same way, but straighten the ends so that they lie crosswise.
Drag the beauty with the third ribbon and that’s it)

Flower
In some ways it resembles a multilayer one, but is distinguished by its greater flatness. The beginning is repeated.
The only difference is that there is no need to make cuts in the center of the multiple folds. Due to this, the petals will straighten out more flatly than for a multilayer one.
Paper ribbon bows
Whatever you say, we almost always have paper at hand. Yes, and you can buy it in a much larger number of places, unlike the same satin ribbons.
Therefore, I have prepared for you several types of original paper decorations for a gift:
- Origami
- Star
- Chrysanthemum
- By template
- Flower explosion
Origami
Anyone who likes to fold something like this out of paper will definitely like this method. For it you will need a square sheet of the required size. Fold it 4 times, and then proceed according to the scheme:

Star
For this chic gift decoration, prepare several strips of paper. Fold each strip into a figure eight with the ends toward the center and secure with a stapler or glue.
Having made 8 pieces in this way, connect them according to the diagram. Attach one round piece in the center to complete it. You can also glue a bead instead.

Chrysanthemum
Very similar to multi-layer. Only after fastening in the center with a ribbon (or wire) are the parts of the resulting loops cut into several strips.

By template
A bow consisting of two pre-cut parts will also look interesting:

It looks very elegant, and it’s easier to handle than the same origami.
Flower explosion
To be honest, I thought for a long time what to call this hugeness. It turned out a little extravagantly, but in my opinion it was appropriate.
For this you will need several decent pieces of tissue paper that need to be folded many, many times. Then cut the edges into a semicircle or triangle and straighten the edges.

Well, dear readers, this is where I say goodbye to you. Be sure to tell us which bow you liked the most. And also share your options. See you soon!
P.S. Subscribe and get a lot more interesting things and also share with friends on social networks.
Sincerely, Anastasia Skoracheva
Beautiful packaging is an integral part of the gift. A common attribute of gift wrapping is a bow. This decorative element can be anything: strict and frivolous, classic or fancy, tiny or huge. You can see in the photo various options bows decorating gift boxes. If desired, you can learn how to make this decor yourself.
Let's look at how to make a ribbon bow for a gift. To make this decorative element beautiful, you will need an eye, a certain dexterity and a little patience. Right after difficult option You shouldn’t try it, it’s better to practice on simpler bows first.
What tapes should I use?
What ribbons can be used to make a beautiful bow for a gift? The most diverse! However, it is advisable to select a material that holds its shape well. Often used for decoration satin ribbons, but you can also use satin, velvet, nylon. Materials such as organza, tulle or polyester have proven themselves well.

To decorate a bow, you can use a variety of decorative elements: self-adhesive rhinestones, beads, seed beads, beautiful buttons, pieces of lace, feathers, etc.
You can also use a combination of materials to create a bow, for example, combine nylon and satin or silk and velvet in one element.
Classics of the genre
Official gifts and presents intended for men should be decorated with simple bows of a classic shape. If you want to make a decorative element more elegant, you can decorate it with beads, sequins, and rhinestones.
Everyone probably knows how to make a classic bow from ribbon, but just in case, let’s recall the sequence of actions:
- The tape, without twisting, is folded four times, so that two loops are formed at the top and one at the bottom;
- fold the top right loop crosswise with the top left loop;
- tie a regular knot;
- pull out and straighten the top loops, as well as the middle of the bow;
- the free edges can be shortened or notches in the form of triangles can be cut on them (on the end part).

There is another option for making a classic bow. To do this, you need to use two pieces of tape, one of which is significantly shorter:
- We fold a long piece of tape in half and fasten the free ends with threads, we have a ring;
- fold the ring in half so that the attachment point is in the bottom row in the center;
- Now we take a short piece of ribbon and, folding it several times, form a false bow knot. To do this, we simply wrap the structure from a long piece of tape at the attachment point. All that remains is to secure a short section with threads, giving it the shape of a fluffy knot.

Multi-tiered and multi-color bow
Using the technology described above, more complex bows can be made. For example, it’s easy to make a multi-tiered bow from non-fraying material. This will take several years (the number depends on the number of tiers, optimally three), which differ in width. We cut the ribbon so that the widest is the longest (the length of the segment is equal to the length of the bow), and the narrowest is the shortest. We fold the ribbons into a “sandwich”: at the bottom is the widest, then the middle and narrowest, in the center we tie this structure with another ribbon (the width of this segment is to your taste). All that remains is to trim the ends, giving them a curly shape.

Similarly, you can make a multi-tiered and multi-colored bow; for this you need to take ribbons that differ not only in width, but also in color.
Bow fan
This option for decorating a gift is also called a Dior bow. To make it, it is recommended to use a rigid tape that holds its shape well.
To make a “fan” you will need to make several rings from the tape so that they differ in length. To tie a lush bow you will need at least five of these rings.
Then you need to fold the rings in half so that the attachment point is at the bottom, and place them one above the other from largest to smallest. Now we take another piece of tape, pass it under the bottom of our structure and through the top (the smallest ring, no more than 2 cm in diameter). We fix the segment and straighten the resulting “fan”.

Bow flower
A beautiful large bow in the shape of a flower can be made from satin or silk ribbon. You need to take the end of the tape and fold it into a ring, holding it with your index finger and thumb. Then you need to make at least a dozen more such rings (the splendor of the bow will depend on the number of rings). The resulting rings should be tied in the middle with a thin ribbon and carefully, one by one, straighten each loop, forming the “petals” of a flower.
One version of a flower bow can be made like this:
- take two types of tape, the first should be twice as wide as the second (for example, 5 and 2.5 cm);
- the color of the ribbons can match or simply combine beautifully with each other;
- cut five pieces of wide ribbon 10 cm long (for a medium-sized bow), and five pieces of narrow ribbon 7 cm long;
- We begin to form a bow: fold the first piece of wide ribbon in half and sew along the edge with “forward needle” stitches, making a gathering;
- “string” all five petals on one thread, then cut the thread, leaving a long tail;
- then we pull out part of the thread from the side of the knot and tie both free ends, having first straightened the petals of our flower bow. We got something like a five-petalled daisy;
- we make a similar daisy from a narrow ribbon;
- place the smaller flower on top of the larger one so that the central parts coincide;
- We sew a beautiful button or bead into the center of the flower, you can glue a large rhinestone.
Terry bow
To make this bow, you need a material that holds its shape well, for example, polyester.
Sequence of actions:
- we roll up the ribbon, forming several rings nested one inside the other; the size of the future bow will depend on the diameter of the rings;
- fold the rings in half, smooth them out and cut off the corners on both sides so that the integrity of the ring is preserved;
- turn the rings over so that the cut out place is in the center;
- If at this stage you make several cuts on the ribbon, then the finished bow will be appearance resemble a chrysanthemum flower;
- We tie it in the center with a narrow ribbon, and then carefully straighten the flower petals.

Bow on a fork
To decorate a small gift box, you need to make tiny bows. They are convenient to tie on the most ordinary table fork with four prongs. To make the decoration you will need a piece of thin ribbon or braid about 15 cm long.
Procedure:
- Place the ribbon on the center of the serrated part of the fork, leaving a small (non-working) tip of the ribbon. Hold it with your thumb;
- take the second (working) end of the ribbon, wrap it around the fork and pass the end between the second and third prongs below the formed loop;
- now with reverse side We draw the working end of the fork between the same 2nd and 3rd prongs above the loop;
- pull the working end of the ribbon, tightening the loop;
- All that remains is to remove the resulting bow from the fork and decorate the gift with it.

So, there are many options for bows for decorating gifts, and learning how to make them is not difficult at all.


