Many tasks such as graphic dictations for children 6-7 years old and preschoolers, they develop spatial thinking and perception of the world around them, perseverance and attentiveness, and most importantly, they help prepare preschool children for writing and the basics of mathematics.

– this is very interesting tasks which the child must complete on squared paper under dictation. The graphic dictation technique itself is based on developing the child’s attention and fine motor skills. This is very useful to develop before the child goes to school, but it’s okay if the child has already entered first or second grade, these tasks will be a useful addition to education.
- To complete the graphic dictation exercise, you need to prepare sample tasks, and give your child a piece of paper, a writing tool (pencil, pen, felt-tip pen), a small ruler and an eraser. It is easier for the youngest students to use a pencil; the fourth or fifth year of life is already suitable for this type of exercise.
- You can also make special sheets of paper for preschoolers, on which there will be large squares (not the standard ones of half a centimeter, but for example - 1 cm), they can be drawn in advance or printed. But children must complete the 1st grade graphic dictation on standard-checked notebooks.
You will have a drawing on your sheet, it could be different animals, a pattern or transport. The purpose of the exercise is for children to repeat the actions dictated by you, at the end of which the pattern should be identical to the sample.
Rules for drawing by cells

The tasks follow certain rules; this is not a math lesson, but it still teaches children the basics of counting and the concepts of direction in space. At the very beginning, you place a dot on the paper at the corner of the square (this will be the starting point), it should be in such a place that the child, repeating the pattern, can fit it on the piece of paper. Also, your child can set this point on his own, but you should tell him how much he should retreat from the top and side of the sheet.
Next, arrows will be drawn on your sheet, indicating the sides of the direction of space and numbers indicating how many cells need to be drawn to get the desired pattern. Example: horizontal arrows “5←” - five cells to the left, “1→” - one cell to the right.
Vertical arrows “3” - three cells up, “6↓” - six cells down. Diagonal arrows: “2↖” — two cells diagonally up to the left, “4↗” — four cells diagonally up to the right, “↘” — down to the right “↙” — down to the left.
Options for graphic dictations by cell

- Dictations can be simple or complex, it all depends on the level of development of your child. So, for example, dictation for preschoolers should be very easy, since kids are just learning to hold pencils in their hands and are just beginning to navigate space. But dictations on cells for children in grades 1–2 can be more complex and the pattern can be made in different colors.
- Exercises can be written in text ( short story) or simply have directional designations and numbers. Other dictation options can be intended for different genders. So a graphic dictation for boys can consist of drawings that the boys liked, these could be: a robot, an airplane, animals (pelican, rhinoceros, dog, etc.). Whereas for girls the picture can be: a flower, a doll, a cat, etc.
Simple tasks

Simple exercises are considered easy to repeat and form. So, for example, you can teach the basics of geometry using pictures with squares, triangles, trapezoids, rhombuses, etc. To make it easier for your little one to complete the lesson, help and guide him while sitting next to him.
If the baby gets confused, then tell him that he drew in the wrong direction and be sure to praise him when he does the right thing. In simple lessons, the lines should be directed strictly horizontally or vertically. You can draw a hint in the corner of the piece of paper, in the form of arrows and a number of names of directions.
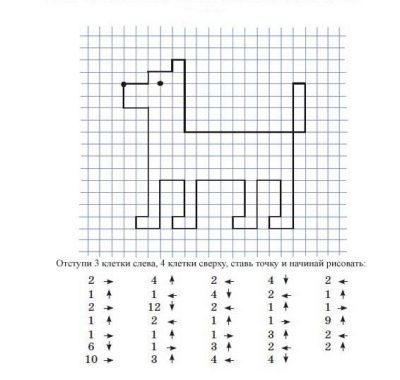
Dog
To draw the “Dog” dictation, we retreat six cells to the left of the sheet and six from the top, put a dot, and start drawing from it:

2→, 1, 2→, 1, 1→, 5↓, 7→, 2, 1→, 3↓, 1←, 7↓, 2←, 1, 1→, 3, 6←, 4↓, 2←, 1, 1→, 3, 1←5, 3, ←2.
Paint the dog yellow, add an eye to it, or you can add spots with another color, for example brown.
Robot
We retreat 6 cells from above and 7 to the left, draw from the point:

1→, 1, 3→, 1↓, 1→, 1↓, 1←, 1↓, 1←, 1↓, 3→, 1↓, 2←, 2↓, 1→, 2↓, 1→, 1↓, 3←, 2, 1←, 2↓, 3←, 1, 1→, 2, 1→, 2, 2←, 1, 3→, 1, 1←, 1, 1←, 1.
Paint it in any color.
Robot (graphic dictation by cells), draw a robot by cells
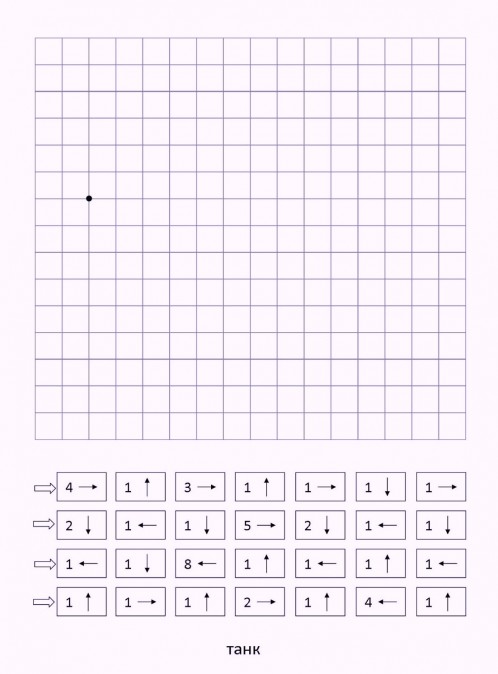
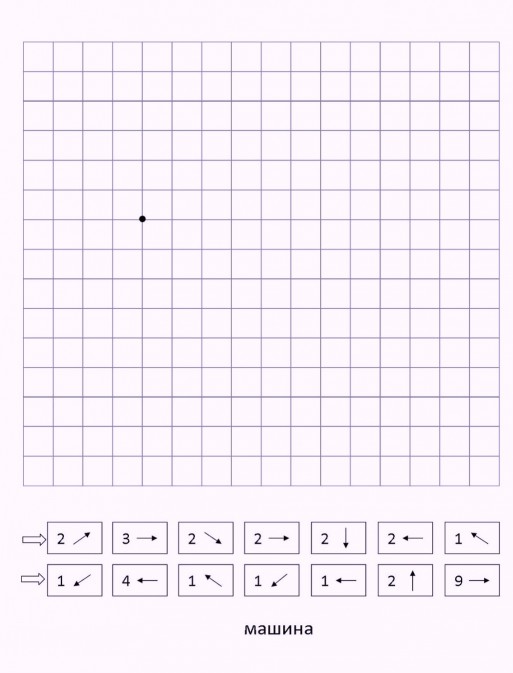
Car
To draw a car, move two squares to the left of the sheet and 9 from the top, put a dot, and start from there:

4→, 2, 8→, 2↓, 3→, 3↓, 2←, 1, 2←, 1↓, 6←, 1, 2←, 1↓, 3←, 3.
Offer to finish drawing the wheels and windows and doors of the car, and paint it in any color.
Difficult tasks
The difficult lesson is that the shape of the drawing is not simple, it is no longer just squares and triangles, but full-fledged graphic drawings with many bends. In addition to horizontal and vertical lines, you can add diagonals.
This complicates the process quite a lot, and should be done if the child loses interest and completes everything very quickly. You can also add different colors, i.e. one part of the drawing is drawn in one color (red), and for the second half the color changes (blue or green).
Donkey
In order to get a donkey you need to retreat 32 cells to the left and 2 from the top, put a dot and start:

1→, 2↓, 1→, 1, 1→, 1, 1→, 2↓, 1←, 2↓, 1→, 5↓, 1→, 3↓, 1←, 1↓, 2←, 1, 1←, 1, 1←, 1, 1←, 4↓, 1←, 2↓, 1←, 2↓, 1←, 2↓, 1←, 2↓, 1←, 6↓, 1←, 7, 1←, 3, 1←, 1, 1←, 1↓, 1←, 1↓, 6←, 1, 1←, 1, 2←, 1↓, 1←, 2↓, 1←, 1↓, 1←, 1↓, 1←, 6↓, 1←, 8, 1→, 5, 1←, 1, 1←, 4↓, 1←6, 1→, 1, 1→, 1, 1→, 1, 2→, 1, 14→, 1, 2→, 1, 2→, 1, 2→, 1, 1→, 1, 1→, 3.
Color the donkey gray and add an eye.
Airplane
Try to draw an airplane with your baby, use a special “formula” for this.:
![]()
2→, 1↘, 5→, 3↖, 2→, 3↘, 4→, 1↘, 2←, 1, 1→, 2↘, 5←, 3↙, 2←, 3↗, 5←, 3↖, connect at the starting point. Color the airplane gray, blue or green, do not paint over the cockpit.
Kangaroo
So, the graphic dictation of a kangaroo needs to start by setting a point, retreating 2 on the left and 5 on top:

1, 2→, 1, 1→, 1, 1→, 1, 1→, 1, 1→, 1, 2→, 1, 1→, 4, 1→, 1↓, 1→, 1↓, 1 →, 1↓, 1←, 2↓, 2→, 2↓, 1←, 1, 1←, 1↓, 1←, 2↓, 2←, 1↓, 2→, 1↓, 4←, 1 , 1←, 1, 1←, 1↓, 1←, 1↓, 3←, connected to the beginning.
Color the kangaroo orange and add an eye.
Kangaroo (graphic dictation by cells), draw a kangaroo by cells
Giraffe
To draw a giraffe you need to start from the starting point:

1↗, 2→, 1, 1→, 10↓, 4→, set a point, from it 2↘, 1→, 1↓, 1←, 1, returned to the set point, from it 8↓, 1 to the left, 5 , reverse 5↓, 1←, 5, 3←, 5↓, 1←, 4, 1↙, 2↓, 1←, 2, 2↗, 1↖, 1, 1↗, 7, 1←, 1↖ and connect to the starting point.
You can draw spots on the giraffe and finish drawing the eye.
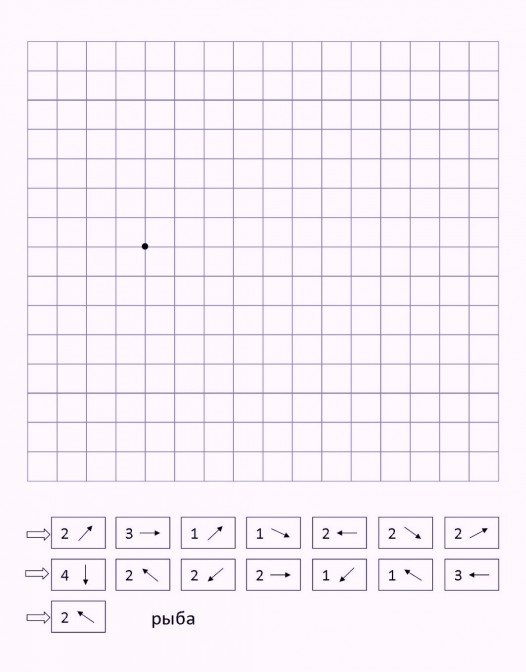
Fish
To draw a graphic dictation of a fish, we retreat six cells to the left of the sheet and seven from the top, put a dot, and start drawing from it:

1→, 1, 3→, 1, 2→, 1↓, 2→, 1↓, 1→, 1, 1→, 1, 1→, 1, 1→, 1, 2→, 3↓, 1←, 1↓, 1←, 2↓, 1→, 1↓, 1→, 3↓, 2←, 1, 1←, 1, 1←, 1, 1←, 1, 1←, 1↓, 2←, 1↓, 2←, 1, 3←, 1, 1←, 2.
Color the fish's fins blue, add an eye, and color the fish itself green or purple.
Fish (graphic dictation by cells), draw a fish by cells
Egorova Natalya Viktorovna
Fun activity for preschoolers –
graphic dictations.
Drawing by cells– a very exciting and useful activity for children. This game method development of the baby’s spatial imagination, fine motor skills of the fingers, and perseverance.
Graphic dictations help develop attention, the ability to listen to the teacher, and spatial orientation. They will also prepare your child's hand for writing. They will teach the baby to be more attentive. This is a great way to develop logic, abstract thinking, and meticulousness. With the help of these activities, the child develops, corrects the correctness of his movements, “gets a steady hand,” this skill will help him in school. Graphic dictations can be successfully used from the age of five.
What are graphic dictations? Graphic dictations are drawing in cells using the pointers in the task. To complete them we will need: a sheet of paper on which the cells are drawn, a pencil, an eraser. The tasks contain arrows (showing direction) and numbers (showing the number of cells that need to be passed in the indicated direction). If you follow the signs accurately and carefully, draw a line in the right direction at the right distance, you get a picture. It could be an animal, various objects, vegetables, fruits, trees, transport and much more.
Drawing by cells – good way teach your baby to use a pencil and pen. Teach how to hold it correctly, practice so that your fingers don’t get so tired from holding an object at school. This exercise will help teach your child to count correctly; here you will need to count the cells so that by drawing a line you will get a picture.
I practice graphic dictation, both with the whole group of children and in individual lessons with children. Children really like these exercises. Children also take great pleasure in drawing themselves on lined sheets with tasks.
How to do graphic dictation
(Rules for drawing by cells).
Graphic dictation can be performed in two versions:
1. The child is offered a sample of a geometric design and asked to repeat exactly the same design in a checkered notebook.
2. An adult dictates a sequence of actions indicating the number of cells and their directions (left, right, up, down). The child does the work by ear, and then compares his image of the ornament or figure with the example in the manual using the method of superimposition.
When offering children such tasks, the teacher must observe certain rules. la:
• When the teacher begins to dictate, he cannot pronounce any other words. And even more so repeat the same direction twice.
• Dictations are written in complete silence.
• If the child gets confused, he quietly puts down the pencil and calmly waits until the teacher finishes dictating. Only after this can you find out the error.
I start getting acquainted with the cell with middle group.
I start work with the simplest thing - I write tasks in a notebook with a large square, the child must continue the row. Learning to see a cell and a line. We write sticks, squares, corners, simple patterns, each time making the tasks more difficult. We first divide the patterns into segments - we train, then all the particles are assembled into a pattern.
The following notations are used in the tasks: the number of cells being counted is indicated by a number, and the direction is indicated by an arrow.
Before you start writing a graphic dictation, you should explain to the children how the dictation will be carried out. First, we talk with the children that I will dictate to them how many cells the lines need to be drawn and in what direction. And they will draw these lines along the cells without lifting the pencil from the paper, and then together we will see what happens. Encourage the children to try to draw straight and beautiful lines, then the drawing will turn out wonderful.
For the first time, you can draw on the board with the children so that they can see how they need to work, and the children will be able to complete subsequent dictations without prompting. Before the dictation you need to repeat where the right and left hand, how to draw a line to the right and left. You can agree with the children about any marks (draw the letters “p” and “l” on the board, make marks on the walls, or stipulate that, for example: the right hand points to the window, and the left to the bedroom, etc.)
Then we move on to drawing under dictation.
To begin with, on the sheet with the dictation, in the upper corners, you need to mark - right and left. We give it to the child notebook sheet in a checkered pattern, pencil and eraser.
In older groups, at the top of the picture we always indicate how many cells need to be moved away from the edge and top to start the dictation. In the indicated place, for example: retreat 5 cells from the edge to the left, count 6 cells from above. This is where you need to put a point. For children younger age It’s better to count the cells yourself and set a reference point (from this point the child will draw lines under dictation).
It’s better to start with the simplest: - one cell up (1, one cell to the right (1), one cell down (1), one cell to the left (1). The result is a square.
You need to dictate clearly, the child must perceive everything by ear. At the end of the work, look at how well the children’s figures coincide with the given elements. Review the sample. If the baby made a mistake, find out together where exactly. You can use an eraser to wipe away the point of failure and continue. The main thing is to support the child, praise him, if something doesn’t work out, you can offer to redraw the picture from the original.
Before each lesson, be sure to talk with your child about the fact that there are different directions and sides. Show him where is right, where is left, where is up, where is down. Pay attention to the baby that every person has a right and a left side. Explain that the hand with which he eats, draws and writes is his right hand, and the other hand is his left. For left-handers, on the contrary, it is necessary to explain to left-handers that there are people for whom the working hand is the right, and there are people for whom the working hand is the left.
This activity includes graphic dictation, discussion of images, tongue twisters, tongue twisters, riddles and finger gymnastics. Each stage of the lesson carries a semantic load. Activities with your child can be arranged in different sequences.
Application:


Publications on the topic:
The didactic game "Graphic Examples" includes a set of cards with graphic images geometric shapes, located.
Consultation for parents “What are visual dictations for” Your child knows and distinguishes well geometric shapes on any table he can find the same geometric shapes by shape and color.
Game as a leading activity for preschoolers A game for preschoolers is a way of learning about their surroundings. The social nature of games and play activity due to the fact that the child lives in society. Already.
Work plan for the circle in the preparatory group “Graphic skills” Month Week Topic Goal September 3rd week 09/16/15 09/18/15 Rain 1. Develop the skill of orienteering in a lined notebook. 2. Learn to conduct.
The embodiment of expressive images with personality traits in the drawings of older preschoolers is due to: mastery in different ways images.
Project activity is a special type of interaction between a child and an adult and is based on the following principles. 1. Project activities.
Project activities for preschoolers“Project activity of preschoolers” In the context of the new person-oriented paradigm, the main criterion for the quality of preschool education.
The children of the Kalinka middle group went with great interest to the library of the cultural and leisure center of our village. For our group such a visit.
Synopsis of an open screening of a specially organizational educational activity “An exciting walk with Kolobok” municipal budget preschool educational institution"Child Development Center - kindergarten No. 73" of the city of Stavropol.
Preparing for school is a long stage in your child's development. You should start classes no earlier than a year before this moment. Teachers and parents have a huge selection of a wide variety of exercises and tasks in mathematics to achieve this goal. Among them, graphic dictations on cells for preschoolers are of no small importance.

Fun or challenging?
For many children, such pictures in the cells in a notebook are interesting game and exciting entertainment. It is important for an adult not to turn this activity into a boring, tedious task, where the child is scolded for failures. And then the child will always be happy to study.
But many kids may have difficulties. Most often, they are due to the fact that the child has not yet mastered counting within 10, he confuses the concepts of “right-left”, “up-down”. In this case, adults need to help the baby not make mistakes, correct him, and praise him for a positive result.


Age at which you can start training
You can start drawing in boxes with your child as early as 4 years old. The first homework at this age should be easy. At first, you can complete the task with your child on a board or piece of paper so that he can see how to move. For beginners, drawing simple geometric shapes is quite suitable. You can start with an image of a square, rectangle, or simple patterns. You can learn to move diagonally from drawings of a triangle, trapezoid, or rhombus.

At 5 years old, a child can easily draw simple pictures from dictation without visual support.. For example, you can invite him to draw a flower on paper. Also, a five-year-old preschooler can easily cope with drawing a house or an airplane.

For children 6-7 years old, tasks can begin to be complicated by drawing more lines diagonally. An example of such a task would be drawing a rocket.


Methodology for conducting the lesson
The lesson should begin with preparing the workplace and necessary materials . Drawings are done in a checkered notebook with a simple pencil. In order for the child to have the opportunity to correct the mistake, he will need an eraser that can be used to remove incorrectly drawn lines. An adult should prepare or print out instructions with a sample of how to complete the task. You don’t have to tell the child which drawing will be the goal of the graphic dictation. After correct execution, he will see the result on his sheet.

As a rule, the instructions offer digital symbols with arrows, such as 2, 3←. The numbers in this case indicate the number of cells by which it is necessary to move in a given direction. It is indicated by an arrow, which is drawn next to the number. So, in our example it should read: move 2 cells up, 3 cells to the left. They begin to move from a starting point, which for younger children the adult sets himself, and older preschoolers can already be asked to set it themselves.
Before starting a lesson for preschoolers, you need to repeat with them counting within 10, the concepts of “right-left”, “top-bottom”. You can ask the baby to show what it means: “we move to the right side, we move up, to the left of, we move down.”

Try to diversify the graphic dictation itself by including tongue twisters, tongue twisters, riddles, finger gymnastics, physical minutes, discussion of the results obtained and a conversation or story. It is advisable that everything included in the lesson be on the same topic as the drawing.
Before conducting a graphic dictation, instruct your child that he must try to draw straight, neat lines and be very careful when completing the task.

After the dictation is finished, be sure to praise your child for achieved result, if necessary, together with him, find the place where he made a mistake and correct it. If the child has a desire, you can invite him to color the finished picture or shade it. If the child is not tired yet and wants to continue the lesson, then you can ask him to independently come up with a drawing according to the cells, and then together with him make a graphic dictation based on his figure.

Methods for conducting graphic dictations
You can conduct a graphic dictation in different ways.
- For those guys who are just starting to practice them, the simplest method is suitable - under the dictation of an adult. In this case, the teacher or parent dictates to the child how many cells and in what direction he needs to move.
An example of such a dictation is the “Dog” dictation. The task is completed by the child under the dictation of instructions from adults.
- The second way is to offer the child a piece of paper on which instructions for completing the task are written and a starting point is set from which the child needs to move. The child himself looks at the number of cells and the direction of movement.
As an example, look at the graphic dictation
- "Car"
- "Horse"
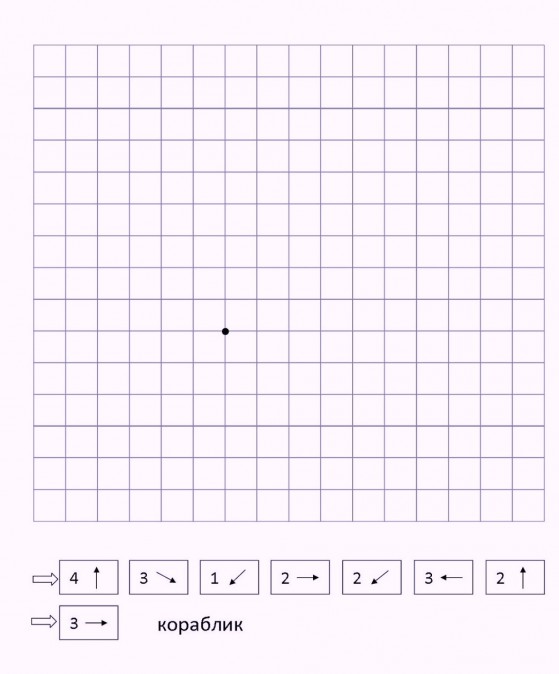
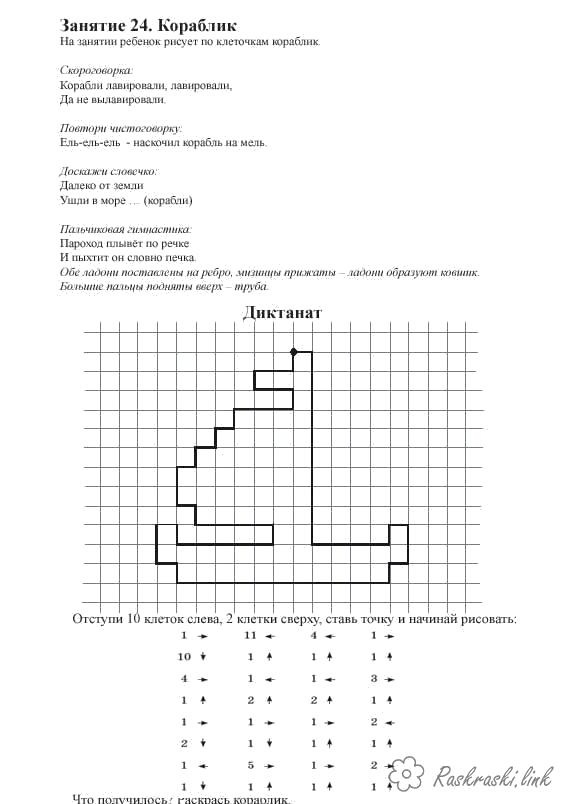
- "Ship"


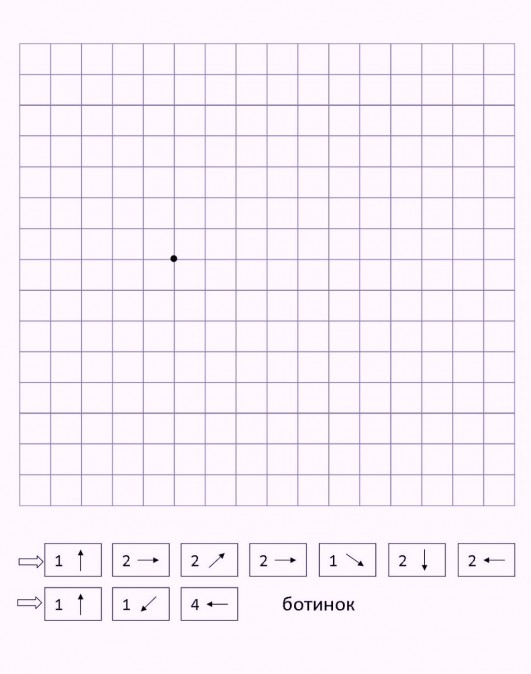
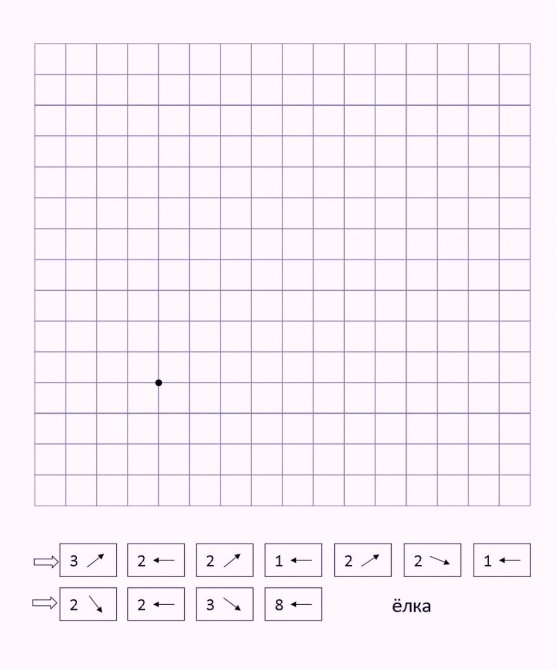
- The third way is to draw by symmetry. In such dictations, the child is given a sheet on which half of the drawing is depicted and a line of symmetry is drawn. The child completes the drawing by symmetrically counting the required number of cells.
Here an adult draws half of the Christmas tree and draws a line of symmetry. Children are asked to complete the second half symmetrically.
- The fourth method is suitable for older children. Here the child is offered a sheet with a sample graphic dictation. The child must draw the same picture on his sheet as in the sample, independently counting the required number of cells and determining the direction in which he needs to move. Such dictations can be not only in the form of drawing lines along the cells, but also with completely coloring the required number of cells with colored pencils. As a result, the baby gets a colorful, beautiful picture in his notebook.
Of a very different nature - construction sets, various electronic training books, puzzles, mosaics and much more. All of them help develop very important skills in the child - attention, perseverance, develop logic and thinking.
Today I want to offer you another one interesting view developmental activities - graphic dictation. I'm just in love with him. To be honest, it is no less interesting and exciting for me than my son to complete the task in order to see at the end what was encrypted in the picture.
Geographical dictation is drawing in cells. The path for drawing is prescribed and, if you complete the task clearly and correctly, you will end up with some kind of image (a dog, a car, etc.). The process itself is very exciting, since the picture is born before your eyes, you want to quickly complete the task in order to see what was encrypted, but you can’t rush, because in a hurry you can do something wrong and then the image will not work.
Graphic dictation is very useful for preschoolers. It helps the child develop very important skills - attentiveness, perseverance, coordination of movements, fine motor skills fingers.
How to conduct a lesson with graphic dictations
1. Print out the name of the picture you like, the dictation itself is written below (numbers with arrows). Just in case, let me explain the notation:
2 - means that you need to draw a line 2 cells down,
3- means that you need to draw a line 3 cells up,
5 - draw a line 5 cells to the right,
2 - draw a line 2 cells to the left,
1 - diagonal down and to the right one square
2 - diagonal down and left two cells
2 - diagonal up and left by two cells
3 - diagonal up and to the right two cells
2. There is a point in the picture - this is the starting place, the task must be completed from there.
3. The lesson itself can be carried out in two ways - you dictate the child’s moves, or he does it on his own, looking at the path (my son, 5 years old, does it himself, so as not to get confused, he circles the task he has done, then he himself completes some more did in the picture).
Good luck to you!
Download graphic dictation
| House | Ship | Swan |
 |  |  |


