Craftswomen who want to make gifts for loved ones with their own hands can try making home shoes. You can crochet ballet shoes in one evening, step by step detailed diagram with a description of the entire creative process will help you easily and quickly prepare warm and beautiful slippers for your household.
Small and large, high and low, with or without an insole - the variety of ways to make knitted shoes allows you to choose the appropriate option for a girl, a boy or an adult.
In this article with step by step description Two options for ballet shoes will be considered: booties for a baby and felt slippers for an adult.
Learning to crochet warm ballet shoes: diagram with description
Master class on making ballet shoes on felt sole. An insole of this texture will soften the foot when walking and help retain heat. You can use other material, such as suede or artificial leather.
You will need:
1) Felt insoles;
2) Hooks with numbers 2 and 3;
3) Yarn of the desired color;
6) Scissors.
Knitting pattern:

Manufacturing process:
1) Make holes in the insoles using an awl at a distance of several millimeters from each other. Then knit intermediate air loops around the entire perimeter. The result is a sole tied with single crochets.
2) We tie the insole with yarn, but you can also leave it with felt.
3) Making the upper part of the slippers. Dial 5 air loops in the first row, to knit the next row, turn the workpiece over and add 1 lifting loop.
4) Then add loops, knitting 2 columns from one loop.
5) We do the next row without adding. You should get 20 loops.
6) Then we make an increase of two single crochets on both sides of the knitting row.
7) In the following rows you should increase to 28 loops.
8) Then we knit the 11th row in single crochets, making a shell.
10) At the end of the work, we sew the resulting top to the insole and tie the outline with a “shell” pattern.

Not everyone can knit small ballet shoes, also called booties. To make this wardrobe item you will need a little patience and at least basic crochet skills. After mastering simple models, you can start making various animals for boys, flowers and fruits for coquette girls, which will make your child’s shoes original and beautiful.
Next we will tell you how to connect simple model booties. Warm slippers are perfect as gifts for newborn babies. We take the size of the foot to be 10 cm, since the length of the foot of a born baby is usually from 7 to 10 cm.
You will need:1) Acrylic yarn in blue and white colors;
2) Crochet hook;
3) Scissors.
Stages of work:1) Let's start working with blue yarn. We cast on 12 air loops and another 3 lifting air loops, then place the hook in the fourth loop from the hook. We knit 3 rows in a similar way.

2) We knit the next row in white. In the fourth row, we knit a single crochet loop into each column (a total of 56 loops). We do the fifth row in the same way.
3) We switch to blue yarn again. We knit the so-called “bump”, which consists of 2 air loops, 2 unfinished stitches and another air loop. Next, we make a loop and knit the “bump” again. After that - an air loop. We arrange the entire row in a similar way and close it. We do the same actions with the seventh row.
4) Break the thread and mark the middle. Let's start knitting the toe. To do this, we knit a “bump” from two unfinished loops with a white thread, inserting the hook into the back wall of the loop.
5) Then we make the same “bumps” from three unfinished loops. There will be 14 pieces until the middle. The outermost “bump” will be made of two unfinished loops.

6) Turn the product and knit further in the same way. It turns out 7 “bumps” that need to be connected.
7) Then we knit 4 “bumps” and finish the row in the same spirit. Next we make 2 more rows in the same way.
8) Take blue yarn, which we will use to decorate the edges of the booties. To do this, we knit 3 air loops for each column.

These are such cute booties! This pattern is perfect for a boy, but for a girl you can use yarn of other colors, for example, pink, green or yellow.
Video materials on the topic of the article
Below are video tutorials on how to create original ballet shoes using other performance techniques. These materials will help you understand unclear points, which is especially important for beginning craftswomen. They will also inspire you to create original wardrobe items that will delight your friends and family for a long time.
SLIPPERS - BALLETS (Crochet)
I want to warn you right away that this is not exactly a master class. Rather, these are my notes as I knit. This is my first time doing this kind of work, so mistakes and all sorts of “jambs” cannot be avoided. Please don’t judge harshly because I tried my best.
MK slippers
So, for everyone who is interested in my embodiment of slippers (the model was not invented by me, the slippers are knitted according to a description from open sources), I want to tell you how I did it, step by step. First of all, I want to say that the description is quite simple and understandable, so I’m sure you could do it without my advice. By the way, here it is, this very description:
//img-fotki.yandex.ru/get/4710…
Abbreviations used in the description:
st b/n - single crochet
st s/n - double crochet
СС - connecting post
p - loop
v.p. - air loop
For beginners:
Single crochets are knitted like this: //img-fotki.yandex.ru/get/5412…
double crochets like this:
and this is how half double crochets are knitted: //img-fotki.yandex.ru/get/5312…
Regarding the required materials: 
we need:
- yarn for the sole. This time I took a skein from those that sell for 15-20 rubles. at the market, I will knit in 2 threads;
- yarn for the main part. For this pair, I took a wool blend from Kamtex “Romance” 120 m per 100 g (I would like to advise you to take a thread thicker than mine);
- hooks No. 3 and No. 4;
- satin ribbon 3-5 cm wide for bows and 1 cm wide for tightening these bows;
- insoles the right size;
- tailor's pins with a plastic tip;
- sewing threads and needles.
Let's get started
I would like to warn you that the numbers given in the description refer to hooks of a larger size than those that I will use. This time I am knitting size 36 slippers, but I will focus on the numbers that correspond to the average size.
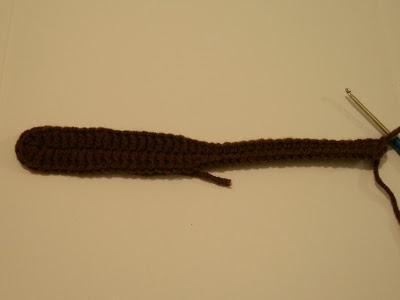
1 circle: Using black thread in 2 folds and crochet number 4, I cast on 27 vp. 
I make 2 tbsp. b/n in the 2nd loop from the hook 
St b/n in the next 13 vp, half-dc in the next loop, dc s/n in the next 9 vp. 
2 st s/n in the next ch, 5 st s/n in the last ch. Next we knit from the opposite side of the chain 
2 dc in next st, dc in next 9 ch, dc in next ch, dc in last 14 ch, sl st in first dc ( total 58 loops) 
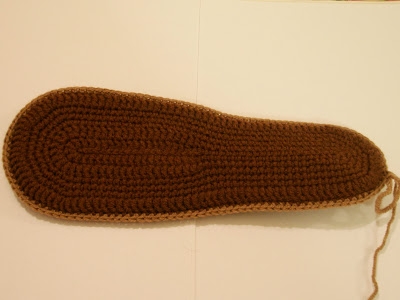
2 round: 1 v.p. for lifting, dc in the first loop (I make this stitch directly into the loop in which I closed the sl st in the previous row), 2 dc in the next loop, dc in the next 14 vp, half-dc in the next 12 loops, 2 half-dcs in the next loop, 3 half-dcs in the next loop, 2 half-dcs in the next ch, half-dc in the next 12 loops, sc in the next 14 loops, 2 dc in the last loop , join SS in the first st (64 stitches in total) 
3rd circle: 1 v.p. for lifting, sc in the first loop, 2 sc in the next loop, sc in the next 13 loops, skip the next loop, sc in the next 12 loops, (2 sc in the next loop, sc in the next 3 loops) - repeat 2 times, 2 sc in the next loop, sc in the next 12 loops, skip the next loop, sc in the next 13 loops, 2 sc /n in the last loop, connect. (total 67 loops) 
4th circle: We attach the thread for knitting the main part. SC in first stitch, 2 SC in next stitch, SC in next 30 stitches, 2 SC in next stitch, SC in next 3 stitches, 2 SC in next stitch, sc in next 29 stitches, 2 sc in last stitch, join. (total 71 loops) 
Please note: the edges of our knitting began to curl inward. As my mother says, there is nothing written about this in the cookbook. So, personally, I continue to knit as I knitted and do not turn my knitting inside out. This way, the right side of the knitting remains inside.
5 circle: 1 v.p. for lifting, sc in the first loop, sc in the next 2 loops, 2 sc in the next loop, sc in the next 29 loops, 2 sc in the next loop, sc n in the next 7 loops, 2 sc in the next loop, sc in the next 28 loops, 2 sc in the last loop, join. Total 75 loops 
From 6 to 8 circles: knit straight, without increasing or decreasing. Don't forget to do v.p. for lifting 
9th circle: From this row we will begin to decrease. Ch 1, dc in first stitch, dc in next 26 stitches, (skip next stitch, dc in next 2 stitches) - repeat this 4 times, (dc in next 2 sts, skip next st.) - repeat 4 times, sc in remaining 24 sts, join. Total 67 loops 
Now the front of our sneaker has begun to curve and close 
10th circle: Ch 1, sc in the first loop, sc in the next 28 stitches, (skip the next sts, sc in the next loop) - repeat 3 times, (dc in the next st , skip the next st.) - also repeat 3 times, st b/n in the last 26 sts, connect. There are 61 points left in total. 

11th circle: Ch 1, sc in the first loop, sc in the next 29 sts, (skip the next st, sc in the next st) - repeat 3 times, sc in the last 25 p., connect. There are 58 stitches left in total. 

12th circle: In the pattern, it is recommended to knit this row behind the back walls of the loops. When knitting the first pair I did exactly this. And in the next one I knitted it in the standard way “under the loop”. I'll explain why. When knitting behind the back walls of the loops, the edge stretches more than with the usual knitting method. If your yarn is soft, I recommend knitting “under the loop”; if the yarn is elastic, you can knit behind the back walls - at your discretion.
In the description, a thread of a different color is also attached to this row. I continued knitting with the main color. Ch 1, dc in first st, dc in next 29 sts, dc in next 3 sts together. If you suddenly don't know how to do this: 


St b/n in the last 25 sts, connect. Total 56 p. 
13th circle: again, it is at your discretion to knit this row behind the back wall of the loops or as standard “under the loop”. 3 v.p. for lifting, st s/n in each loop in a circle, connect.
This completes the knitting according to the description. 

Next I tie the slipper. To do this, I attach a black thread. The thread is not the same one that went to the sole. It is softer and thinner. So, I attach the thread and turn the work!!! That is, I will knit in the direction opposite to the direction of knitting the main fabric. I knit this row using the back walls of the loops. I also change the hook to No. 3. I knit 2 ch. for lifting and in a circle in all loops with half double crochets. 

House shoes have become an integral part of the coziness and comfort of our home. But at the same time, women treat her appearance with special trepidation. These shoes should not only protect our feet, but also serve as their decoration. And what can cope with this task better than something made with your own hands? This is especially true for crocheted models. They not only have an attractive appearance, but also help health. After all, a woven sole massages a person’s foot, but it contains many acupuncture points. Moreover, great skill and skill in the creation process is not required. Even an inexperienced needlewoman can handle the work; just carefully study the description and diagram.
Features of creating crochet ballet shoes 
All the work to create this wonderful thing can be divided into three stages:
- Making the sole. It can be knitted or made using available materials. For the preparation, take suede, thick leather or felt. Stand on a piece of material with your foot and trace the outline of your foot. Add 1.5 cm along the edge and cut out the workpiece. Then, using an awl, make holes at equal distances for crocheting. As a sole, you can use a ready-made felt insole, which is sold in shoe stores;
- Knitting the base. You can use any yarn for the product, but when choosing, keep in mind that the product will quickly get dirty and often need to be cleaned or washed. Therefore, it is better to use synthetic fiber: high-quality acrylic or viscose. Another parameter that is worth paying attention to is the thickness of the thread. For this product, choose thick threads. If you only have thin yarn, fold it several times. The optimal number of fiber folds at which it is comfortable to work with yarn is three;
- Decorating finished shoes. I don’t think it’s worth talking about the role of jewelry in transforming the appearance of a thing. Both knitted elements and various decorative details can act in this capacity: beads, seed beads, sequins, ribbons and more.
Reference! Also, shoes can consist of a single piece or be assembled from several pre-connected motifs. They also differ in shape: they can completely cover the limb or do so only partially.
For the cold season, it is preferable to use a thicker model, and for summer, knit slippers that cover only the toe and heel. They will have better air circulation and the leg will not overheat.
How to crochet ballet slippers 
The principle of knitting home ballet shoes is the same for almost all types of models. Let's look at the detailed procedure using an example.
This sample is made of yarn with parameters 120g\50m - sole and 140g\50m - base. The sole is crocheted No. 3. The rest of the knitting is done with crochet number 2:
- Cast on a chain of 40 vp. and knit 2 sc, 19 sc, 1 hdc, 17 sc. Next, we knit 5 dcs into the outer loop of the chain and knit 17 dcs, 1 hdc, 20 sc, a connecting stitch along the second side;
- Then every new row we start with a lifting v.p. and performing increases: 3 on the heel and 5 in the toe area. We knit the remaining loops as in the previous row;
- Starting from the fourth row, do the work with sc;
- At 7 p.m. instead of sc, knit dc;
- From 8 p.m. Continue work RLS without increments;
- From 15 p.m. we form the toe. To do this, we make five decreases evenly in the toe area;
- At 16-18 p.m. perform 7 decreases;
- In the 19th row, after decreasing, we knit 2 sc and unfold the work;
- Knit several rows to cover the toe;
- To create a shape in the center of short rows, perform a decrease in the central part;
- Next, we perform a circular row. At the same time, perform three decreases on the heel with an interval of two loops;
- Complete the last row and sew on decor, if desired.
If you want to knit shoes from individual motifs, then the order of work looks a little different. The initial stage (making the sole) is performed similarly. After this, the required number of elements is knitted according to the selected pattern. It is better to use hexagonal shapes.
Then, using a needle or hook, they are attached to each other and to the sole. The edge of the product is tied, and the thing, if required, is decorated with decor.
How to decorate ballet shoes
 There are many techniques for decorating knitted shoes. These could be pom-poms or a yarn flower, an embroidered applique or a beaded pattern. Another interesting way to give this item an unusual look that will lift your spirits is to make them in the form of a cute animal face. Let's take a closer look at each option:

Taking a hook in your hands, you can easily knit comfortable and stylish ballet slippers yourself. The pattern is so simple that even a novice needlewoman can master it.
For slippers size 37 - 39 you will need:
- 90-110 m of medium thickness yarn;
- hook with a diameter of 3.25 mm.
Nuances regarding knitting
- Yarn consumption is approximate. It will depend not only on the size of the product, but also on the density of knitting.
- At the beginning of each row, 2 air loops are knitted, which do not participate in the calculations (sometimes they are called lifting ones).
- The slippers are knitted alternately.
Knitting ballet shoes step by step
Let's start with the sock. First, we make a ring of air loops large enough to pass 10 double crochets through it.
Row 2 will already consist of 20 columns. Through each double crochet of the previous row we knit 2 stitches.
In the 3rd row there will already be 30 loops. To obtain this result, we attach 2 double crochets to every second double crochet.
We knit rows from 4 to 9 with a double crochet, not forgetting to make lifting loops at the beginning of each row.

From the 10th row we begin to create a pattern. Knitting sequence: 2 lifting stitches, 21 double crochets, 2 chain stitches, 9 single crochets, 2 chain stitches, half double crochet.

11th row: 2 lifting loops, 21 double crochet, 4 chain stitches, 7 single crochet stitches, 2 chain stitches, half double crochet.

12th row: 2 lifting loops, 21 double crochet, 6 chain stitches, 5 single crochet stitches, 2 chain stitches, half double crochet.

Row 13: 2 lifting loops, 21 double crochets, 8 chain stitches, 3 single crochets, 2 chain stitches, half double crochet.

The 14th row consists of 2 lifting loops and 21 double crochets. From this moment on, knitting stops going in the round. To maintain the pattern of the pattern, the knitting must be turned over at the end of each row.

In the 15th row we increase the number of double crochets by 2, making additions along the edges, we get 23 loops.
16 row; 2 lifting loops, 23 double crochets.
Row 17: similar to 15. At the exit we get 25 loops.

Subsequent rows consist of 25 double crochets. So we knit to the desired length, not forgetting to turn the knitting. Taking into account the fact that knitted items stretch, the last row of straight fabric should fall in the middle of the heel. Otherwise, the ballet slippers will slip off your feet.

All that remains is to knit the final row. We start by connecting the corners of the straight fabric.

Now we add a lifting loop and tie the slippers with single crochets. Having reached the 14th row we stop.

We cast on 10 air loops and secure them with a single crochet exactly in the middle of the front part of the slipper.
Charming indoor ballet shoes, crocheted and decorated with a satin bow.

So let's start with the materials. My yarn is half wool. For the sole a little thicker ALIZE Lanagold 100g/240m, and for the rest of the YarnArt Merino De Luxe/50 100g/280m.
The hooks are also different for each yarn. I crocheted the sole with crochet No. 3, and the top with my favorite crochet No. 2.1.
We will also need satin ribbon 5 cm wide. But this is optional, you can decorate your ballet shoes knitted flower or pompoms, as you wish.
Abbreviations:
sc - single crochet
psn - half double crochet
dc - double crochet
increase - knit 2 stitches in 1 loop
decrease - knit 2 stitches together
Now to the point!
I’ll say right away that I don’t count every stitch; I count the initial number of stitches and carefully remember how many increases and decreases are made in each row.
SOLE
1r. We dial 40 VP.
2 rub. In the second loop from the hook we knit 2 sc, then 19 sc, 1 hdc, 17 dc, in the last ch we knit 5 dc and continue to knit symmetrically on the other side of our chain of ch 17 dc, 1 hdc, 20 dc, finishing the row with a connecting stitch.


7p. Similar to the previous rows, only we knit dc, keeping 5 increases (above the increases in the previous row) on the toe and 3 increases on the heel.
You need to knit 2 or 4 of these soles, as desired. I knit 4, as my dad says, regarding shoes - the higher you are from the ground, the warmer it is. Of course, we won’t be walking on the ground in them, but still clump- it's warm =)

1r. Place the two soles together, inside out, and crochet along the edge. It's better to start from the heel.
8 rub. We begin to form the toe. in this row we need to make 5 decreases on the toe. To do this, we find the middle on the sock and count 14 stitches back from it - and knit the first decrease, then 5sc and decrease again, repeat this fragment so that there are 5 decreases in total. We knit sc to the end of the row.
9r. There should be 7 decreases in this row. We knit a sc to the toe, on the toe from the first decrease in the previous row we count 6 loops back and knit a decrease, then 4 sc and a decrease again, repeat this fragment so that there are 7 decreases in the row.
10 rub. We knit a row of sc, continuing to decrease on the toe, in this row after 3 sc. We simply knit decreases over the decreases that were in the previous row.
11r. We knit a row of sc, continuing to decrease on the toe, in this row after 2 sc. We simply knit decreases over the decreases that were in the previous row.
12 rub. We knit a row of sc, continuing to decrease on the toe, in this row after 1 sc. Having knitted the last decrease and 2 more sc, ATTENTION! unroll the knitting! and knit in reverse side(we tie it above the fingers so that the ballet shoes are deeper) It should look like this:

To do this, we knit 4 short rows (back and forth above the toe), knitting a decrease in the middle of each row. We continue to knit the last row in the circle, and above the heel we make 3 decreases after 2 sc, so that the slipper does not slip, but stays well on the leg.
Final stage
We need to tie our ballet shoes around the edge to hide the unevenness on the toe and give them a finished look. To do this, we again take darker threads and tie the top of the ballet shoes. I knit not on the top row, but on the penultimate row, so that the loops seem larger, and not in each loop, but through one, then the edging also tightens the top, again, in order to so that the ballet shoes do not slip off your feet.

All that remains is to hide the threads so that they do not unravel, after all, shoes, and decorate them with a bow or flower.
I tied the bow one by one on a fork, but I didn’t have a fork of that size, I asked my beloved to spread his fingers and be a “fork” for a short time =)))

And here is a video tutorial on knitting such ballet shoes:
Good luck and inspiration!


