Toy pendant Dog “Friend” is interesting both as a decoration for a nursery and as a toy for New Year's tree, and as a fun bookmark.
The dog toy is good gift, which a little creator will make with his own hands!
To make a toy you need to prepare:
Paper (thick cardboard) for the base of the toy;
Scissors;
Double-sided tape (glue);
Knitting threads;
Small pompom for nose.
Step-by-step process for making crafts.
1. Cut out the dog figure according to the template.

.jpg)
2. Cut a thread 20-30 cm long and fold it in half. We place the ends of this thread on the top of the figure’s head between the ears.
3. Glue the double-sided tape onto the base of the head and remove the protective film.
You can use glue instead of tape, but you should apply glue to small areas, starting from the center of the head. There is no need to spread glue over the entire head area.
.jpg)
4. Glue the end of the white thread to a point in the center of the circle and begin to glue the thread in a spiral, laying the turns tightly together, turn by turn.
If you use glue, then spread small area, glue the thread in a spiral, let the glue dry, then coat the next small area with glue, lay the thread, etc.
.jpg)
5. The entire circle is filled with thread.
.jpg)
6. Glue on the eyes.
You can take plastic eyes. You can draw eyes or cut them out of colored paper.
.jpg)
Glue the nose - a small pompom.
.jpg)
Glue the mouth.
The mouth can also be drawn or made of black thread.
.jpg)
7. The toy pendant “Friend” is ready.
.jpg)
The second version of the New Year's toy Dogs
1. Print out the templates.

2. Cut out the details of the dog.
.jpg)
3. Roll a large semicircle into a cone and glue it together. To do this, apply glue to the valve and align it with the opposite edge.
.jpg)
.jpg)
4. If you want to make a New Year’s toy, then before gluing the head, glue a thread (rope), by which you will hang the toy on the Christmas tree in the future.
.jpg)
.jpg)
5. Glue the head to the cone; to do this, apply glue to the top of the cone.
.jpg)
6. Glue the paws.
.jpg)
7. Glue the two parts of the tail together.
.jpg)
8. Glue the tail.
.jpg)
9. Our Dog is ready.
.jpg)
Happy creativity!
Very soon the year 2018 will come - the year of the Yellow Earth Dog, which accompanies an improvement in material condition. If you want to appease next year's symbol and increase your capital, it is not at all necessary to go to the nursery and buy a real pet, just do New Year's dog with your own hands.
Dog made of colored paper
You will need:
- colored paper
- scissors
- markers or pencils
Let's start making:
1. Cut out the details of the dog from multi-colored paper, draw its face and fingers.
2. Glue the parts together.
Dog made of cones and plasticine

You will need:
- a few bumps
- plasticine
- beads
- toothpicks or twigs
- a small sheet of colored paper (to represent the mouth)
Let's start making:
1. Using two cones of different sizes, make the body and head of a dog.
2. Make paws, a tail, ears from plasticine and fasten all the parts together.
3. To make the craft more durable, connect the head and body using a toothpick or a twig.
Volumetric paper dog

You will need:
- paper
- glue or glue gun
- scissors
- markers or pencils
Let's start making:
1. Print out the dog pattern.
2. Draw the face and paws.
3. Cut out and carefully glue the dog.
Origami dog

Follow the photo instructions and you will get a cute origami dog face.
Dog using quilling technique

From strips of multi-colored paper, first twist the body, then the head and paws. The rest of the body can be made from fur or fabric. Fasten all the parts with glue.
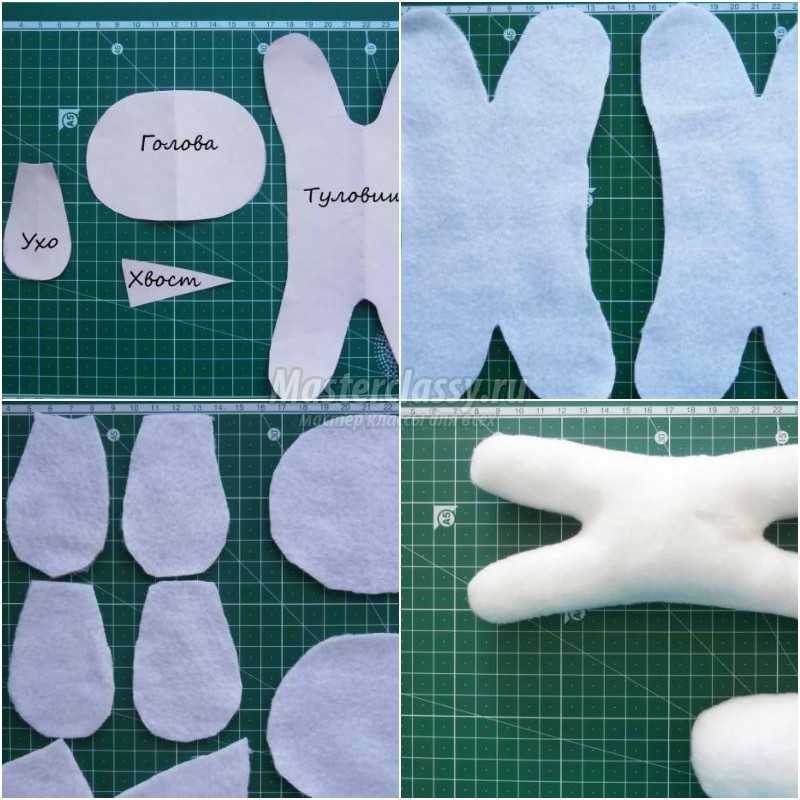
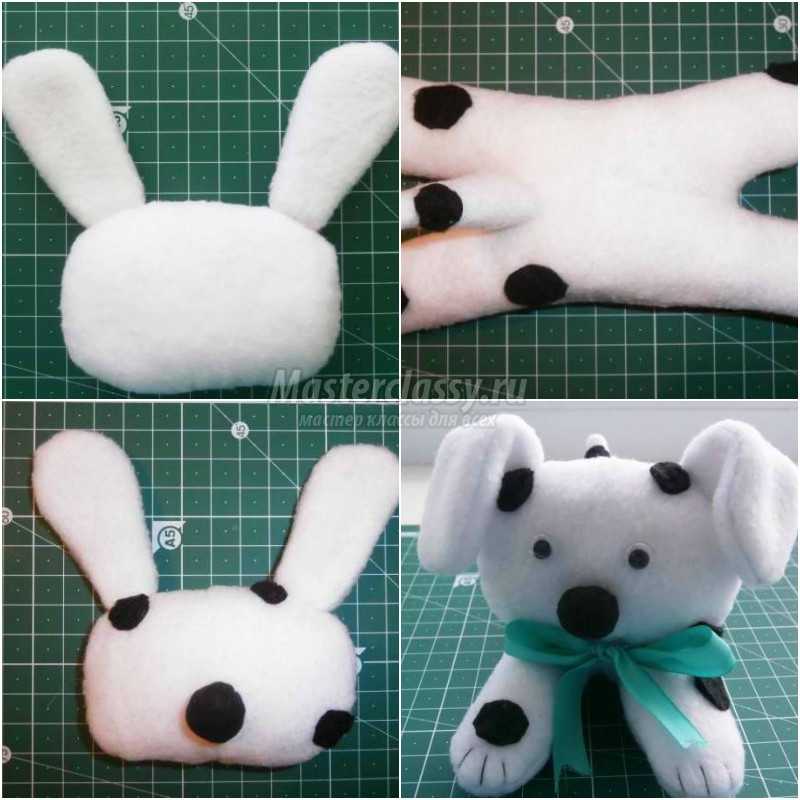
Felt dog

You will need:
- yellow, brown, black and white felt pieces
- scissors
- thread and needle
Let's start making:
1. Cut out 8 parts from felt - paws, tail, head and body.
2. Sew the cut pieces together using even stitches.
3. If desired, you can also make a collar from felt or fabric.
Sock dog

You will need:
- socks
- thread and needle
- beads
- cotton wool, padding polyester, holofiber or pieces of fabric for stuffing
Let's start making:
1. Cut off the toe and top of the sock to make the body of the dog.
2. Sew one edge of the sock, fill with stuffing material and sew.
3. In the same way, make a head from the second sock and sew it to the body.
4. From the remaining parts of the socks, make ears, paws and a tail.
Fabric dog

You will need:
- thread and needle
- fabric or scraps of fabric
- beads for eyes
- scissors
The work is done on the same principle as a sock dog. Make eyes from beads.
Dog made from plastic bottles

You will need:
- plastic bottle
- scissors
- colored paper
- cardboard
- acrylic paints (yellow and black)
Let's start making:
1. Paint the bottle yellow and the cap black. Cut out parts for the dog's body from the bottle.
2. Glue the parts together and make a muzzle, ears and paws from colored paper.
Pillow dog

You will need:
- thread and needle
- soft fabric
- padding polyester
- scissors
Let's start making:
1. Mark the details of the dog on the fabric with chalk and carefully cut out.
2. Sew the parts, filling the body with padding polyester.
3. You can make the eyes and nose from fabric or using beads.
Pom pom dog

You will need:
- pieces of felt
- knitting threads
- scissors
- glue or glue gun
- beads
Let's start making:
1. From knitting threads you need to make 2 large and 1 small pompom (for the nose).
2. Sew the pompoms together and make ears and a nose from felt.
3. Make eyes out of beads.
Knitted dog

Knit all the parts separately, fill with padding polyester and sew together.
Dog made from cotton pads

Glue cotton pads or regular cotton wool together and fluff them well. Make eyes and a nose from colored paper.
Dog made of nylon tights

A dog made from nylon tights is made according to the same principle as a dog made from a sock.
Other ideas on how to make a New Year's dog with your own hands:


The brightest and most joyful holiday is getting closer. New Year- these are children's dreams and faith in miracles, anticipation of a fairy tale and a meeting with Santa Claus, hope for the fulfillment of a cherished desire. And in your free time, you can do handicrafts with your children and make cute New Year’s toys and gifts. We have selected for you several master classes on making dogs with your own hands.
The symbol of 2018 will be the Yellow Earth Dog. Her strong traits can be called devotion, courage and kindness. But there is also weaknesses: stubbornness, sensitivity and conservatism.
The coming year under this symbol promises to be interesting, full of good events and travel.
How to make a New Year's dog toy with your own hands
Yarn, paper, felt are not all the materials that can be used in making toys. We'll tell you what else you can put into action below.
Paper dachshund
One of the advantages of paper is that it is easy to work with and parts made from it are easy to glue together. This is a safe material, so even kids can make toys from it.
Paper is one of the simplest and most affordable materials
To work you will need:
- colored double-sided paper brown;
- checkered notebook sheet;
- ruler;
- glue;
- scissors;
- black pen or felt-tip pen.
- From notebook sheet cut out templates of the future dog.

Cutting out templates
- Transfer the contours of the template to colored paper: body, head, 4 parts for paws, 2 ears and a tail. Using scissors, carefully cut out all the details along the contour. Using a pen or black felt-tip pen, draw the dachshund’s nose in the corner of the head sector.

Draw a nose on the cone-head
- Carefully fold the head and glue along the seam.

Roll the cone and glue along the edges
- Glue the ears to the head and draw the eyes.

We attach the ears to the head
- We fold the body part, carefully glue it along the long seam and glue the tail.

Glue the tail to the body
- Glue the dog's head to the body.

Glue the head
- We roll the paw parts into small cylinders and glue them together.

Making cylinders out of paper
- We glue the resulting blanks in pairs to the dog’s body.

Glue the paws to the body
Cardboard puppy running
More durable and stable toys and figures can be made from cardboard. For crafts, sheets of white or colored cardboard from the sets are suitable.
Making a dog requires some skill. Be careful when working with wire and awl.

To make such a toy you will need thick cardboard.
What you need for work:
- sheets of cardboard and paper;
- pencil and markers;
- scissors, awl and tape;
- glue and wire;
- elastic thread, bamboo skewer;
- beads and buttons.

In addition to cardboard, you need to prepare threads, buttons and wire with an awl
Step by step steps:
- Cut out the stencil (you can save it to your computer and print it).

Cut out the dog template
- We transfer the contours of the template onto cardboard, cut it out and make holes with an awl at the marked points.

Cutting out the parts for the toy
- We make fastenings for the legs: we pull the wire through the holes into the button and align the ends. We string the body, legs and tail onto the fastenings. The buttons should remain on the front side of the craft.

Pull the wire through the holes on the parts
- We fasten the moving parts together: we thread an elastic thread into the holes shown on the stencil in one circle and tie them one by one. In this way, we first tie the front paw to the hind paw, and then the back paw to the tail. After this, tighten and secure the wire.

We fix the wire
- We tie a long rope to the thread connecting the paws. Then we will pull on it so that the puppy will run. We attach a bamboo skewer to the dog with tape.

Secure the skewer with tape
- This is what the craft will look like from the reverse side.

Reverse side of the toy
- We decorate the front side of the toy: using felt-tip pens we draw a muzzle, an ear and spots. Glue a piece of braid to the neck.

We design the front side of the toy
Movable toys can be used for shadow theater or in home puppet shows.
Cute felt dogs

Felt makes cute souvenirs and toys - characters from your fairy tale
You can sew various useful products from cozy felt: coasters, bookmarks, key rings, various souvenirs. Products made from this soft material will not damage the pages of books or the surface of the table. The edges of the felt do not fray, so you can cut out any details from it. This is another plus of the material.
To make a dog you need:
- felt of various colors;
- scissors;
- sewing threads;
- floss threads;
- sharp needle;
- cardboard and pencil;
- padding polyester;
- collar braid.
Step-by-step master class:

Video: Christmas tree toys in the shape of dogs
Even more ideas for felt toys and decorations in our next article:
Original dog made from a light bulb
To create original New Year's decorations You can also use unnecessary materials: disposable cups, empty plastic bottles or old burnt out light bulbs.

You can make a garland from dogs
Required tools and materials:
- old light bulbs;
- acrylic paints;
- material for the cap;
- glue;
- braid or cord.
These dogs will make an original garland for the Christmas tree. Instead of regular paints, you can use fluorescent paints, then the figures will glow in the dark.
Execution steps:
- Painting the light bulb brown, paint the spots with paint of a different color.
- Draw the eyes, nose and mouth.
- We sew a warm hat with ears from the material and glue it to the dog’s head.
- We sew a strong cord or twine to the hat.
Video: How to make a dog out of a light bulb
Souvenir dogs made from salt dough
Salt dough is a universal elastic material for modeling that lends itself to any metamorphosis. The crafts are strong, durable, and can be painted with any colors.

Funny fridge magnet with wishes
To work you will need:
- “extra” salt - 2 tbsp;
- wheat flour - 2 tbsp;
- sunflower oil - 10 tbsp. l.;
- water - 0.5 tbsp.;
- food coloring;
- PVA glue;
- foil;
Step by step steps:
- From flour, salt, water and oil, knead a homogeneous and dense dough that does not stick to your hands. Wrap it in cling film or a bag and put it in the refrigerator for 2 - 3 hours.

Knead a thick elastic dough
- Draw a sketch of a dog.

We draw a template according to which the figures will be made
- We take the finished dough out of the refrigerator, divide it into parts and color it with different food colorings. To do this, make a hole in a piece of dough, add a few drops of paint and knead until the color is uniform.

Add dyes to the dough to get the desired color
- Based on the sketch, we sculpt three bodies and lay them out on foil so that the dough does not stick to the table while working.

Make blanks from pieces of dough
- Lubricate the upper parts of the body with glue and attach the heads.

Glue the heads to the body
- On the face we make a nose, eyes and mouth.

Decorating the face
- We attach the tails and hind legs to the body.

Glue the paws and tails
- For each dog, we make sausage, meat and cheese from the dough, and attach it with glue.

Attach sausage, cheese and meat from salt dough
- Glue the front paws and write wishes.

Adding wishes to souvenirs
Dachshund made of threads
Funny souvenirs can be made from woolen threads.

Funny toys are quite easy to make from threads
To work you will need:
- bottle cap or cardboard roll of foil;
- wool threads;
- wire;
- pliers;
- foam;
- glue.
Step-by-step manufacturing process:

Crochet dog potholder using amigurumi technique
Amigurumi toys have gained popularity due to their cuteness. Include a cozy knitted dog warmer in a gift bag and it will melt the recipient.

Crochet potholder
What you need for work:
- acrylic yarn of medium thickness white and brown;
- hook No. 3;
- needle;
- scissors.
Execution steps:

Video: Knitting a pug using the amigurumi technique
Interesting gift ideas with the symbol of the year
Now you can find a lot interesting ideas for creativity, we bring to your attention several of them.
Video: Mug Warmer Dog
Preparing for the New Year is a troublesome task, but pleasant and joyful. There is still time to give everyone gifts, decorate the Christmas tree and come up with interesting activities for the winter holidays.
Sew and stuff the body, then sew the head, paws and tail to it. Sew the ears to the head. Using black thread, embroider the nose, mouth and claws on the paws.
Glue ready-made plastic eyes (you can get them at a sewing supply store) or black beads. To make the craft look more decorative, tie a ribbon around your neck.
DIY dog toy
A very cute animal can be made from felt; this material is ideal for beginner needlewomen, because it does not crumble during work.
Cut out two dog bodies from felt, and also cut out a pair of ears (they should be different colors), spot and nose. Also prepare a felt strip 0.8 by 12 cm, it will be useful for the collar.
Sew the spot and nose onto the front part of the body, first outline the mouth and eyes with a pencil, and then embroider them.
Fold the parts of the body, and then secure with pins, sew along the edge, not forgetting to leave a small hole. You should stuff cotton wool through it, then sew up the hole.
Sew the ears from the back half of the body, place the collar (do not pull it off), secure it at the back and sew on a button.
DIY Christmas tree toy - year of the dog
From felt you can also sew a wonderful DIY dog Christmas tree toy- be sure to decorate the Christmas tree with it for the upcoming New Year 2018. To make it, first of all, draw a pattern: the head, ears, nose and spot around the eye. Attach the pattern to the felt so that it does not move - secure with pins and cut out the muzzle. Then cut out all the other parts. Christmas tree decor will be even more attractive if you use fabric of different colors. And if you work a little longer and make it double-sided, then you simply won’t be able to take your eyes off this decoration.
Now all that remains is to collect DIY dog Christmas tree toy. Glue on the nose and spot (you can use fabric glue for this). Embroider the eyes, mouth and mustache, however, instead of eyes, you can also sew buttons. The final step is to place the ears and ribbon for hanging, followed by covering with a top layer of felt.
Year of the Dog - DIY toy
The cute spotted dog is sewn from fleece - the result is an incredibly cute soft craft.
First, make a pattern for the toy - draw the body, tail, ear and head on paper, then cut it out. Transfer the body pattern onto the white fleece, cut out two pieces, not forgetting the seam allowances. Also use white fleece for two elements of the head, four for the ear, two for the tail. When cutting, be sure to add seam allowances.
Place the body parts right sides on top of each other and sew them together without leaving any holes. Make two darts on the head parts and sew them, leaving a hole here. Place the ear pieces in pairs (face to face) and sew without sewing up the holes in the upper parts. Do the same with the tail, but do not leave a hole.
Make a small cut on the body and turn the part inside out, stuff padding polyester inside and sew up the cut. Do the same with the head and tail, turn the ears out and straighten them.
Sew the ears to the head, the tail to the body. Cut patches of different sizes from black fleece and sew them to the body and tail. Also cut out a black fleece circle with a diameter of 3 cm - this will act as a spout. Sew this circle with black thread along the edge, tightening it slightly. Place some padding polyester inside and tighten the thread. Sew the nose and spots to the head, and then sew it to the body. Lower the ears down and grab them with a couple of stitches, glue the eyes. Tie a satin ribbon around your neck.
It will also be unusually cute.
DIY Christmas dog toy
Children also want to take part in making the symbol of the New Year 2018. For them the best option there will be modeling from plasticine, because everyone knows perfectly well how this plastic mass has a positive effect on the development of various skills.
In order to sculpt a cute mongrel, you should take brown plasticine. Also, you can’t do without a stack.
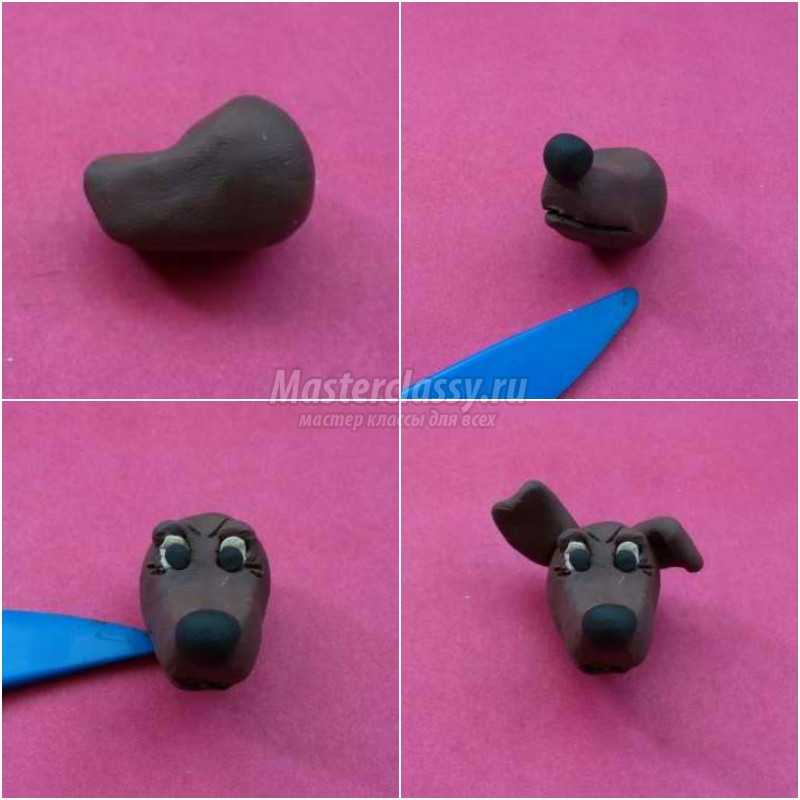
You should cut off a small part from the plasticine bar, knead it well and transform it into a ball. Pull out the ball on one side - this will be the nose part. You should stick a black ball-nose to it, and use a stack to cut the mouth. Make round eye holes using the same tool and insert black and white balls into them.
Make ears from brown plasticine and attach them to your head; if you want, you can use white or beige. Transform the rest of the brown plasticine into the body of a mongrel - first of all, roll out an oval roller, then sharpen the neck and highlight the chest in a semicircle.
To sculpt the hind legs, prepare rollers and balls. Squeeze the balls to form flat drops, attach to the bottom of the dog’s body, then attach the paws.

To make the front paws, the plasticine should be pulled out into thin tubes and bent at the ends. The limbs can be based on matches. Attach the front paws to the body, cut the pads with a stack.
If you want, you can “hang” a collar on your neck; this is best done when the head is not yet attached. Attach a tail to the back; if you wish, you can make it “fluffy” with a stack.
Attach the head by piercing the neck with a match. Then go over the entire surface of the chest with a stack - it should also become fluffy.
As you can see, both an adult and a child can easily make a charming dog craft, we recommend that you start creating now so that by the New Year you will have excellent toys.
For creative individuals, the end of the year will be marked by a permanent ritual - after all, it’s time to make New Year’s crafts with your own hands for the 2018 Year of the Dog. In honor of the friendly and kind patroness of the coming year, we should make some cute dogs and puppies from various materials. In addition to the symbol of the year, other New Year’s crafts will suit the Christmas interior and mood:
- Christmas trees;
- snowmen;
- Christmas tree decorations;
- stars;
- balls;
- bunnies;
- deer.
All this in detailed photo, master classes, instructions and explanations, you will find below in our New Year's article.
Bloggers are a people who always keep up with the times. In fact, bloggers themselves set the pace according to which users move around the Internet. And right now together with handmade masters and craftswomen We will be inspired to make crafts for the New Year 2018 with our own hands - the most interesting and beautiful things await you and your participation. Cones are a unique material, which seems to be created for New Year's decor. 

 Another traditional New Year's attribute is real winter raging in a glass jar.
 Santa toys will decorate your Christmas tree.
 Such Christmas decorations are very easy to make– and they look impressive and non-trivial.
 Christmas balls that don't break– this is the dream of all young parents and owners of playful cats.
 Eco style has long been winning audiences around the world, and along with live Christmas trees, for the sake of which hectares of forest have to be destroyed, such compositions do not require sacrifices or large expenses.

 It’s the turn of the patroness of 2018 – the dog. This was discussed in detail in the previous article. And in front of you - bright felt dogs.
 Felt Christmas tree decorations They look very cozy, stylish and festive in a New Year's way.
 Large candlesticks regular half liter bottles look luxurious in a New Year's interior.
DIY gifts for the New Year 2018: master classes and ideas
Making New Year's crafts with your own hands for 2018 is not so difficult if you have before your eyes detailed plan actions and high-quality bright photos. Such step by step instructions called master classes, and they are a great help for beginners and even experienced needlewomen.
The ability to make interesting and exclusive gifts with your own hands is very helpful during the period New Year's holidays, since a lot of gifts are required, and there is usually not enough money to buy them. In this case, you should rely on your imagination, useful tips and quality master classes. Let's create!
 By simple steps the usual The glass ball turns into a stylish Christmas tree decoration. All you need is some glue, some old rims and a piece of shiny fabric. You can decorate your Christmas tree with these balls at home or give them to friends.
Cute little Christmas tree made of threads will decorate the apartment of your friends or relatives. Give them a gift.
 If you are planning new year party, make attractive hats for all guests.
 Snowmen will cheer you up, even if... New Year's Eve it won't snow. They can use as bookmarks, if, for example, you are going to give a book.

 From plastic bottles
You can make cute penguins and give them as a gift. There is no shame in bringing such a craft to kindergarten.
From plastic bottles
You can make cute penguins and give them as a gift. There is no shame in bringing such a craft to kindergarten.


 By the way, about the kindergarten, it won’t hurt you to know how make New Year's paraphernalia from paper.
 IN kindergarten you can also make it with your child plasticine dog. Your little one will like such a friend.
We continue to make gifts together for the New Year 2018 with our own hands. Master classes and meaningful ideas will help you quickly and happily master new techniques and acquire new invaluable skills.
 Like this bright plywood Christmas tree Will serve as a decoration for any interior. To make it you should prepare:
- a piece of plywood;
- acrylic paints - green and gold;
- stained glass paints;
- jigsaw;
- sandpaper;
- pencil;
- Christmas ball;
- glue;
- sponge

- First of all making a plywood stand- in the shape of a circle, in the middle of which we cut a hole.
- Apply the outline of the Christmas tree to the plywood, marking the places to cut out the stars.
- Cut out a Christmas tree from plywood.
- We clean the surface of the Christmas tree with sandpaper.
- Take a sponge and use green paint color the Christmas tree.
- We paint the stand and the outlines of the stars golden.
- We fix the Christmas tree on the stand, coating the joints with glue.
- We hang the ball on the Christmas tree.


 And here in front of you several drawings with manufacturing options New Year's toys
from felt.
And here in front of you several drawings with manufacturing options New Year's toys
from felt.
 Detailed master class and pattern will help you make a cute felt deer. This is an indispensable symbol of Christmas and the coming fun.
 Felt parts can be used to make crafts - cute owls from pine cones.
A few more New Year's ideas with explanations and detailed instructions you will find in the video.
What to give for the New Year 2018: gift ideas for family and friends
We are used to meeting new people with family and friends - and this is simply a wonderful tradition. In preparation for a family celebration, you should show persistence and creative ingenuity: think through the holiday menu, look through, decorate the apartment, study entertainment program and, of course, prepare gifts for the New Year with your own hands. 10 best New Year's ideas 2018 already on our website - we recommend using it.
 If you celebrate the New Year with your closest people, give them memories. Family photos with Christmas decorations will bring many pleasant emotions.
 Give as a gift to a married couple cute snowmen in love. For this masterpiece you will need felting wool, bamboo cloth and soap. The rest of the process is in your hands.
 Fragrant decorative wreath
jewelry lovers will love it self made. We talked about this in detail in one of the previous articles.
Fragrant decorative wreath
jewelry lovers will love it self made. We talked about this in detail in one of the previous articles.
 If you draw beautifully, give your loved ones a unique surprise - own painting.
 With the wishes of home comfort, give your guests hut on chicken legs.
 Beaded keychain in the form of a neat Christmas tree you can give it to your friend or mother for the New Year.
 Dachshund made of bright fabric will become a great gift for adults and children.
 Together with your child you can make New Year's figures made from salt dough.
 The variety of jewelry that gives us ordinary salt dough
, simply amazing.
The variety of jewelry that gives us ordinary salt dough
, simply amazing.
 From salty to sweet –
This is the kind of sleigh that every sweet tooth dreams of getting under the Christmas tree.
From salty to sweet –
This is the kind of sleigh that every sweet tooth dreams of getting under the Christmas tree.
 The gastronomic theme is inexhaustible, as are the creative ideas for New Year's gifts. From ordinary wine corks you can make stylish Christmas tree decorations.
DIY New Year's gifts: 10 best New Year's ideas 2018
So that you can succeed high quality and stylish gifts for the New Year of the Dog 2018 with your own hands, use the ideas of experienced hand-made masters.


