How to do a home manicure yourself, so that the result surpasses even the work of professionals from a beauty salon? In fact, in order for our nails to look impeccable, it is not necessary to spend a lot of money in beauty salons. It is enough to make a stylish and modern manicure at home using adhesive tape and several types of nail polish. In this material you will find photo and video master classes for beginners.
Nowadays, technologies for creating manicures using improvised means (sponge, foil, newspapers), which are not used in cosmetology, are becoming increasingly popular. New techniques emerge every day and we will look at one of them - applying varnish using tape.
To make such a manicure at home, you need the following tools: tape (transparent or colored, it doesn’t matter, you need to pay attention to the level of adhesiveness of the material). A product for fixing varnish, which will help preserve the masterpiece created on your nails for a long time. Two matching nail polishes. Rhinestones, sparkles and other embellishments can complete your nail design. By the way, this technique can be successfully used to form a “smile line” when doing a French manicure on short nails.
Let's talk about performance technique fashionable manicure at home. Cover your nails with base polish and wait until it hardens. Don't rush to move on to the next stage; an undried base on your nails can ruin the entire design. You can use a hairdryer and the varnish will dry faster.
Next, we cut out geometric shapes from tape (it’s easier to work with triangles). Glue the figures onto a layer of base color. We recommend positioning them so that the base is at the edge of the nail, and the corner is facing the cuticle.
Now paint your nails with the following polish, don’t be afraid to apply it over the tape. You can stick sparkles or rhinestones around the figure. When the second color is completely dry, carefully remove the tape. If the clear lines of the figure are not visible, you can outline its edges with a contrasting varnish (brush) and sprinkle with glitter. And the final touch is to apply the fixative. An original and unique manicure has been done.
You can get a beautiful manicure in different ways. Masters combine several geometric shapes; stripes of various sizes, parallel or directed in different sides, three or more colors (for example, in a French jacket - black white and red ); lightning; peas and everything that imagination and momentary mood can suggest.
One world-famous designer came up with a special technique for applying designs to nails using double tape. Naturally, it cannot last a week, but at some bright event such a manicure would be very appropriate. It is necessary to cut out the desired material and tape according to the shape of the marigolds. The prepared design is glued to one side of the tape, and the other side is pressed firmly against the nail.
It’s easy to create a manicure using tape, if you’re not afraid to follow your imagination and do something unusual. Choose harmonious colors and act. An amazing effect is guaranteed.
As you can see, you can make a spectacular and original manicure quite simple. In the process of work, you have the opportunity to show your imagination and make the design on your nails absolutely unique and elegant, in contrast to the template samples that most beauty salons can offer you. By using step by step wizard class with photos of work stages and video lessons, you can easily and quickly make original designs on your nails using adhesive tape at home. Good luck to you and beautiful, well-groomed nails!
VIDEO MATERIALS:How to make a beautiful and modern manicure at home. Video lesson.
Video master class - how to create a flawless and stylish manicure using tape at home.
How to choose tape for manicure?
The most common mistake a novice craftsman makes is choosing the wrong tape. This reason explains the unsuccessful design nail plate, blurring of varnishes and other problems.


So, what should you pay attention to when choosing tape for manicure?
- Stickiness
- Size
- Unilateralism. Double-sided tape sticks to your hands and leads to discomfort when performing a manicure.
- Track

Advice! Carefully secure the tape to the nail plate, otherwise the polish will spread and ruin the manicure.
Manicure technique with tape
A manicure using adhesive tape follows the same pattern. The only difference is in the chosen design, which may require two, three, four or even five instead of one straight line. But we will not go that far, but will learn only the basics. If you perfectly perform a simple manicure with tape, then soon you will be able to create complex geometric prints (and more!).


The main set of tools differs from the usual only in the presence of adhesive tape. That is, your arsenal should contain several colored varnishes, a base for them and a fixative, and optional decorative elements.
Step-by-step instructions for a basic manicure with tape:
- Treat your hands. Bend the cuticle so that it is not too long, give the nails a shape (in our case, the contours of a soft square look better).
- Apply a clear base coat to your nail plates and wait until it dries completely.
- Apply one of your chosen colored polishes to all nails and wait until dry.

- Paint the part of the nail not covered with tape with a different colored polish. You can use a brush to go over the tape, carefully outlining an even strip. When each nail is processed, you need to wait for the varnish to dry.

- Cover the top with clear sealer and take a photo of your work.
In fact, the tape can be placed in any direction. Diagonal is the most common and simplest option. Using tape, you can create an amazing design for your nail plate if you give freedom to your imagination. Don't forget that you can use multiple adhesive tapes in one design.


On short nails, a simple but at the same time interesting manicure with a stripe looks harmonious. To do it, you need to first apply the background color to the nail. Wait for it to dry completely. Then glue pieces of tape on both sides so that there is a vertical stripe in the middle. It needs to be painted over with another color of your choice. After this step, also give the polish time to dry, and sharply tear off the tape from your nails. You will get a straight line of a different color. To fix the result, apply a fixative or regular clear varnish.


Advice! Before each decorative design of your nails, pay due attention to the condition of the skin of your hands, shape, length and cuticle. Marigolds should be identical and well-groomed - this is the key to success. If everything is completely wrong, even first-class design will not save the situation.
Life hack for creating a French manicure using tape
Classic French manicure involves drawing smooth, neat smiles that give the nails naturalness and sophistication. Special adhesive tapes are sold at every turn. But what if you suddenly don’t have them, and you need a manicure urgently? Scotch tape comes to the rescue.


Please note that French requires rounded edges, but they cannot be achieved with tape. Therefore, it is best to do a manicure on a short nail plate. A thin edging of the nail looks harmonious and appropriate, even if it is straight. The advantage of this edging is that the tape fits tightly to the plate, preventing the varnish from flowing under the sticky layer.


So let's get started:
- Choose polishes of two colors you like for a French manicure. Today, classic white and nude shades are not as popular as before. For everyday interesting looks, give preference to a combination of different shades. For example, beige with wine, silver with black, golden with red, cream with dark green look good. The color combination depends on your imagination and fashion catwalk trends.


- Apply the base coat and wait for it to dry. With its help, you will level the surface of the plate and hide minor imperfections.

- Paint your nails with the base color and also let it dry well.
- Wrap each finger with a pre-prepared narrow tape of tape so that a strip remains at the very edge. The second option involves taping the smile and painting the main part.

- Paint over the resulting stripes with a different color of varnish. Watch the layer thickness. If you cover it several times, the line will protrude above the main line, which looks sloppy.
- Dry your nails well and remove the tape.
- To even out the edges, coat the nail with clear polish. If unevenness is visible somewhere, use decorative elements in the form of rhinestones, stickers, stones.

Original manicure ideas with tape
If you've already gotten the hang of it and are professionally performing a simple manicure using tape, you're ready to switch to new level and create original designs. In 2018, geometric prints, combinations of several colors, triangular lines of smiles and holes are relevant. Let's awaken our imagination and take a look interesting ideas nail design.
- Thin colored lines are obtained by painting the nail in three colors parallel to each other. Then narrow, pre-cut strips of tape must be secured to the plate so that there is no space left between the tape and the nail. Can be placed in a chaotic order: diagonally, horizontally, vertically. The main thing is that it is perpendicular to the three previous colors. The top of the structure is coated with a different color of varnish, for example, black. After it dries, the tape is carefully removed, leaving thin multi-colored stripes on the background.


- Original moon manicure. To create it, take tape and trim the edge with serrated scissors. You will get a kind of wave. Then proceed according to the standard scheme: paint the nail with the main color, wait until it dries, glue the prepared tape to the hole line and go over the top of the nail with a varnish of a different color. Once dry, remove the tape with a gentle movement and seal the colors with a clear coat.

 Geometric prints, combinations of several colors, triangular lines of smiles and holes are relevant.
 - Smooth geometric patterns easy to obtain with tape. Simply cover with adhesive tape those areas of the nail that will later be painted a different color. To create triangles, you can use three strips of tape at a time. To create squares you will need from two to four, depending on the location of the geometric figure.


- Scotch It is very easy to use as a decorative element. You just need to paint it with varnish and cut out the desired shapes. These can be ready-made patterns, stripes, or individual decorative elements. They are glued on top of an already applied base and sealed with clear varnish on top for durability. In this case, there is no need to tear off the tape. It becomes an integral part of the design.
 As we can see, tape can be used as a stencil for any nail design
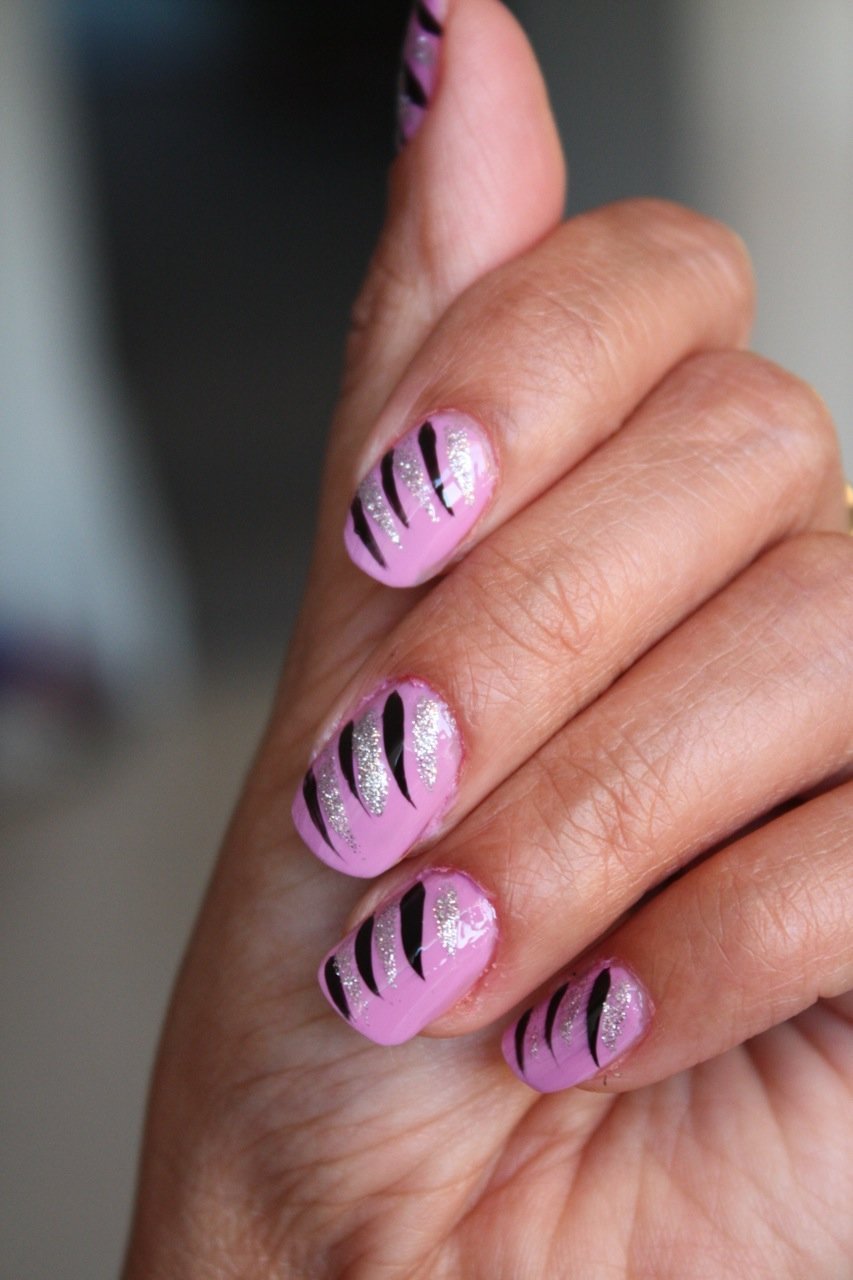
Water manicure is becoming fashionable again. Improve your technique with tape. To design, you need to dilute several multi-colored drops of varnish in water to create patterns. You need to wrap your fingers with tape so as to protect their skin from getting varnish. Only the required area of the nail plate remains open. Then each finger is lowered into the water one by one. The image turns out to be random, it is impossible to think it through. This is the peculiarity of the unique design.
As we can see, tape can be used as a stencil for any nail design. The main thing is to carefully cut out the desired shape and carefully attach the adhesive tape to the plate.
Every woman should look 100% not only her body or face, but also her arms, legs - especially her nails. Nails must be well-groomed and clean - not only from the point of view of hygiene, but also aesthetics. Recently, fashion trends offer women, girls and even little ladies to create an extraordinary manicure using design tape.
Among the many nail design options, it is worth paying attention to nail design tapes. A photo design for step-by-step use of different types will be offered in several options.
Nail art tape is a metallic tape in a reel of different widths, lengths, colors and shapes. An adhesive coating is applied to the back of the tape, with which the tape is attached to the nails.
This tape is used in nail design, in any manicure and with regular nail polish, acrylic coating, and gel polish. The main rule for its use is that the nails must be dry, then the tape will hold firmly and lie flat, photo of the design.
Benefits of using tape
The main advantage of design tape is the huge selection of shapes, colors, widths, and thicknesses.
And also:
Working with such a design, there are many more advantages that every woman will highlight for herself.
Two options for using tape in manicure
First of all, nail design tape is a decor that is used to create and highlight a design on the nails using a certain color of the tape.
When creating an aquarium design in the form of a 3-D effect, it is carried out in several stages:
- Apply one layer of gel to match the tone of the nail plate, glue several tapes on top, and dry;
- Apply a transparent gel, crumble cut tape or strips on top, but in a different direction, dry the nails under the paw;
- Apply another layer of clear gel.
- A beautiful 3-D manicure with ribbons is ready.
The second option for using ribbon is as an auxiliary design element. It creates various geometric and other shapes on the nails and removes the tapes using tweezers.
Nail design with ribbon (+photo)
To design nails with tape, you need to prepare your hands and nails for manicure:
Where to start? The simplest option for manicure with tape is zebra:
Lunar manicure
Fashion trends are constantly changing, but every woman wants to be in trend from the top of her head to the tips of her nails. One of the fashionable trends in nail art is moon manicure.
What is a moon manicure? It is quite easy to recognize; the base in the form of a “crescent” stands out on the nails, but some create a square or triangular, double highlight with ribbons, in combination with a jacket. There are many ideas, everyone chooses according to the event: for everyday or special occasions.
For an everyday lunar manicure, a design in white and pink tones with a gold or silver ribbon, as in the first photo, is suitable:
It is possible to create such a manicure with one color of varnish (second photo):
Black and gold
Black color is not only sadness, but also the color of creative individuals, and a manicure in the form of black polish with a gold ribbon or vice versa is a refined and elegant classic. This manicure on your nails will look rich and luxurious.
To create this nail design using tape, you will need several steps (design photo):
Quick Ribbon Design
At home, you can quickly create a manicure design using tape on your nails; there are many options with a photo of the design.
1st option – “Herringbone”:
2nd option – “Sailor”:
For this manicure, we select the colors of the ribbon and varnish in accordance with the marine theme: blue, blue, white, coral, silver.
3rd option – “Oblique lines”:
In this manicure, the tape plays a supporting role, for an even distinction between colors.
Each of the presented options takes from 40 minutes - quickly and beautifully.
Geometric designs with ribbons
The most beautiful manicure using ribbons is creating geometric shapes for nail designs - easy and simple.
1st option – “diamonds”:
If you want to make a large rhombus, then you will need 4 ribbons. 2 are glued so that a triangle is formed on the edge of the nail and 2 more so that a sharp triangle is formed at the cuticle.
Next, you can cover the entire nail with a different color and remove the tapes or paint over the resulting diamond in the center of the nail. If you leave the diamond in the form of ribbons, then the edges must be trimmed so that they fit tightly around the nail and secured with clear varnish.
2nd manicure option – “spider”:
- Apply golden varnish to the nails and dry;
- Cross the tape with glue so that the intersection point of the cross is in the center of the nail;
- We glue the tape at an angle on 4 sides of the nail, so that the angle faces the center of the nail;
- Apply black varnish on top, dry it and remove the tapes, first the corner ones, then the cross;
- Apply clear varnish on top and dry.
This option is possible in various matching tones; you can use Goethe’s “modern color wheel” to choose matching tones.
3rd option of geometric shapes – “multi-colored triangles”:
4th option:
- Cover your nails with pink polish and dry;
- Apply 2 tapes from the center of the edge of the nail, diagonally to the cuticle;
- Glue two tapes so that it separates the outer edge of the nail;
- We take 2 more tapes, one edge, each of the tapes should be glued inside the first triangle closer to the tape that separates the edge of the nail;
- 2 inner ribbons must intersect - with a cross, so that a rhombus is formed between the 2 corners (external and internal);
- After applying the tapes, paint the nail with a varnish of a different color from the main one, for example: coffee color and dry it;
- Remove the tapes and apply sealer.
Striped frappe
Women who love the taste of coffee or coffee drinks can please themselves with one of the most fashionable, stylish, discreet designs in the Striped Frappe style. It perfectly combines shades of beige and brown.
You can combine these colors and their shades using water and liquid tape, then a design in the form of intricate patterns is formed on the nails, similar to coffee foam (design photo).
Smooth, straight lines are made using regular nail design tapes. Dividing the nail along, across, diagonally, in the form of geometric shapes. Adding touches of black varnish, rhinestones, beads, seed beads and additional designs as decoration.
Wedding manicure design with ribbon
What is the difference between a regular manicure and a wedding manicure? Wedding nail design consists of delicate light tones of varnish, light, airy designs. Use gold, white, silver, beige, soft pink ribbon. Most often you can see a French manicure on the bride’s hands; some frame it with shiny ribbons, others with rhinestones and beads.
The idea of a wedding manicure depends on the wishes of the bride and the capabilities of the master. The fashionable trend is to decorate nails with some kind of decor on one finger, the rest are done in the same style.
Choice of ribbon: thin, thick or curly?
Nail design tape is available in different widths and shapes. Usually the width of the tape is: 1mm, 2mm, 3mm, there are more. All ribbons have a metallic sheen, in different colors. There are ribbons in the form of corners, zigzags and other patterns. Also very often, craftsmen use tape with a rough surface with glitter.
Liquid tape for nail design
Liquid tape - dries quickly, forms a dense film, protects the cuticle and skin around the nail from excess varnish. With the help of such tape, beautiful, original drawings are created. The advantage of this tape is that it dries quickly, is easy to remove, does not leave stains on the skin and cuticles, a convenient brush or sponge, and a small bottle.
Apply liquid tape to the skin around the nail with a brush, wait 30-40 seconds for it to dry. Remove it by prying it a little from one edge, it is elastic and can be easily removed. It is well suited for airbrushing, stamping nail decor, water-based, gradient manicure.
For water-based nail design using tape, it is done in several stages:
At home, liquid tape can be replaced with PVA glue, tape, or cling film.
Materials and tools for execution
Materials and tools for performing manicure and design with ribbons, each woman chooses her own set, which she is used to working with.
Basic tools:
This list may be expanded or reduced depending on the type of manicure and design.
How to make a design with ribbons: step-by-step instructions
The first step in creating a beautiful nail design with ribbons is preparing your hands and nails:
With the advent of a variety of tapes for nail design, every woman can create a unique, neat manicure at home, at the right time for her, and save her money.
Video about nail design with ribbon
Nail design using tape and foil:
Nail Designs with Ribbons! Abstraction on nails:
With the advent of the airbrush in the arsenal of nail designers, the finest lines and the most complex designs are no longer a problem. But how can you save money and make a beautiful design yourself? Thin manicure tape comes to the rescue.
What is a manicure with tape?
Nail designs have long imitated various structures: leather, velvet, knitwear, marble and the like. By using the layer-by-layer coating technique, masking areas with tape, you can achieve interesting patterns that imitate fabric.
When the artist sticks a piece of tape on the nail, it remains uncovered with varnish. This principle formed the basis of this technique. If you use this technique several times, the camouflage covers more and more new areas. This way you can achieve thin, even lines and identical patterns on all nails, which is impossible when drawing.
Manicure with tape: ideas
A detailed consideration of the above styles will help you choose the appropriate design option. All are united by one principle - the use of thin adhesive tape. You can buy it in a professional store or order it on Aliexpress.
Manicure with tape comes in the following styles:
- "Patchwork".
- "Fry Villa Style"
- "Nautical".
- "Plaid".
- "Raye."
- "Aragail."
- "Puzzles".
"Patchwork Quilt"
Patchwork is a design that resembles a patchwork quilt. Usually these are multi-colored squares or diamonds. First, the nail is covered with a light tone, for example, pastel mint. Then, after drying, thin strips are glued on. You will need 4 of them, glue them diagonally, as if dividing the nail into three parts. Two diagonally with a distance of approximately half a centimeter and the other two perpendicular to the first to make squares.
Then each square is carefully painted over with a semi-dry brush, using the color stamping method. When the coating has dried, remove the auxiliary tapes and cover the nail with top coat.
“Tarriage” is often red and green squares with thin green stripes running across a red background. This is done in the same way as the first option, but the backing is made white. After removing the auxiliary ribbons, some of the white stripes are painted over with green. This can be done with a brush that is very specially designed for drawing straight, thin lines.
“Fry Villa Style” is almost the same, but the squares are not so strictly arranged, and you don’t have to make a mint-colored backing. You can generally get by with two ribbons glued crosswise.
The colors can be any, but not dark. After removing the auxiliary ribbons, draw the color boundaries with a gold or silver gel pen. Dry well and cover with topcoat. Some people glue new ribbons instead of drawing. It won't last long. The foil comes off even through the top, revealing the coating. These tapes are auxiliary and are not suitable for this design.
Multicolored stripes
“Marine” is a style that features blue stripes on a white background. The nails are coated with white varnish. After drying, thin strips of tape are placed, covering half of the nail. Some pieces are glued at an angle. Blue stripes are painted over. One or two nails can be done in red stripes. You can draw a red semicircle on one nail and put an inscription with white dots. This will be a lifeline.
"Raye" - multi-colored stripes, may not be the same in width. The main thing is contrasting tones. It is performed similarly to marine stripes.
“Aragail” is a design of strict light and dark squares crossed out with a white dotted line. Blue and beige combinations look good.
“Puzzles” is a fun drawing that is easy to do on your own. The nail is divided into four parts, dark and light squares are located opposite each other. After drying, large dots of contrasting tones are placed. It turns out to be an imitation of puzzles. Yellow and red, pink and black, orange and green look good.
Everything ingenious is simple
A simple manicure with tape is obtained if part of the coating is shiny and part is matte. To do this, you will need two tops: regular and satin. First we cover the nails with a regular top coat, shiny. Then, after drying, we mask them with the usual one, which is located diagonally. Apply a matte top coat and remove the tape after drying.
The result is a simple and effective manicure. It is better not to use this technique on light shades; it appears juicy and bright only on deep dark ones.
Plum, eggplant, black, cherry, and burgundy tones are good for this design. A manicure with tape cannot be done on all nails; using a matte top will significantly increase the number of possible design options.
What you need for a manicure with tape
You can cut stencils from regular masking tape. Especially wavy or jagged lines. They mask a light substrate, which is then painted over with a dark contrasting varnish. This stencil is placed along the side rollers. If you have absolutely no ability to draw stencils, it doesn’t matter.
A manicure with tape can be done without it. A simple masking of a vertical stripe in the middle of the nail is also very effective. You can put rhinestones on it and go to the party.
But it is best to master the technique using professional thin tape. It comes in different colors. This is used when masking layers in complex designs. Sequentially removing strips of the same color, apply the coating to all nails. Identical drawings are obtained.
So, a manicure at home with tape requires the following materials and tools:
- Thin professional colored adhesive tape.
- Masking tape.
- Scissors.
- Tweezers.
- Basic varnish coating.
- The top is shiny and matte (optional).
- Palette for brush pressing.
- Gel pens - gold, silver and black (optional).
A small master class on working with adhesive tape
How to do a manicure with tape? Our step-by-step instructions describe everything in detail:
- First you need to do a manicure, shape your nails and trim your cuticles.
- Then the nails are covered with a thin layer of base.
- After drying, apply a color that will serve as a base.
- After drying (some do this the next day), mask the nail with tape in accordance with the chosen design.
- Using a semi-dry (not dry, just well-wrung out!) brush, carefully paint the areas using the padding method.
- If the design requires it, the color border is drawn with a gel pen (optional).
- After drying, remove the tape and cover with topcoat.
- If necessary, repeat masking and color application.
Whatever design option you choose, even the simplest one, you need to dry the varnish thoroughly and only then remove the tape. This guarantees straight lines and spectacular results. Nothing other than accuracy and caution is required. Try to give yourself a gift, and you will definitely succeed.
The desire to create nail designs with strict geometric lines has led nail art masters to use tape for manicures. Adhesive strips are an excellent temporary barrier when working on patterns, which in some cases can even become an independent element of a creative design.
How to choose tape for manicure?
Scotch tape in manicure is simply necessary when you want to create something laconic, geometric, and strict on your nails. Of course, it is possible to draw perfect lines, but artistic clarity is not accessible to everyone. Scotch tape is a great solution to creative problems and becomes a real help for manicurists.
Choosing manicure tape is not an easy task, since the range of specialized stores offers few options. But that's okay. The role of adhesive tape for manicure can be perfectly fulfilled by:
- Regular thin single-sided tape with a weak adhesive layer. Such a roll is unlikely to be useful in everyday life, but it is ideal for manicure. Ordinary film tape is perfect for creating straight, wide lines, triangles, and fancy strict ornaments.
- Masking tape. It is convenient to use, as it has a weak adhesion ability and can be cut perfectly with ordinary scissors. This tape is suitable for creating stencils and any geometric patterns.
- Tape tape. A real manicure tool that looks like thin colored stripes on an adhesive base. This material is used both to create geometric patterns and directly for decoration.
All types of adhesive tape for manicure are easy to use and open up wide possibilities for creativity.
Manicure designs with tape
Most often, adhesive tape is needed to create geometric volumetric ornaments or strict linear designs. In any case, for creativity it is recommended to use several shades of varnish, a base and a fixing coating, as well as decor and imagination.
With the help different types You can make adhesive tape for manicure:
- Quilted manicure. You will need tape to create “stitches” for volume. After applying the second layer, the ribbons are removed, leaving behind a three-dimensional ornament.
- Geometric patterns. All triangles, lines, wide stripes are made using pieces of tape, which is glued to the first color layer before applying the second layer with a different shade. There are a lot of variations of this manicure, since the complexity of the nail design is determined solely by the imagination of the master.
- French manicure. Regular and reverse French are easily created using tape. The resulting nail art may not be as subtle as with regular smiles, but it is done quickly, simply and does not require any special skills.
- Thin stripes. This manicure is performed with tape, which can be used in two ways: either simply stick colored metallic strips to decorate the nails, or use them to remove the top layer of the applied colored coating.
You can come up with ways to use manicure tape over and over again, and each option will be attractive in its own way. This explains the demand for auxiliary material and its relevance in the development of modern nail designs.


