- fairy-tale creatures that appeal to both adults and children.
If everyone loves them so much, why not make yourself one (or a couple)?
Such handmade dragon It can also serve as an excellent resource, especially for a person who is passionate about this topic.
Today's one was provided for our site by a forum member Irbisina from the HobbyPortal forum, where you can read the original of her master class about dragons made of paper, wire, rope and modeling mass.
So, if you decide make your own dragon, first draw it sketch or choose an image you like, fortunately there are more than enough pictures with dragons on the Internet.
Now it's time to think about what size your dragon how the wire will be located in his body frame. Cut the wire for the frame: body, paws, wings.
In order to do it yourself connect separate parts of wire,
you can solder them or tightly wrap them with tape, electrical tape, thin sections even with thread.
For frame adhesions you need to remove the varnish from the wire using sandpaper with your own hands, tin the soldering points (the tinned surface is better wetted with solder) and solder the frame.
Give the frame an approximate form and solder it:
Let's get busy paws: we solder, cut to the required length, sharpen the claws with a file and bend them.
This is what ours looks like at this stage dragon self made
. Still far from perfect:
Now it is very important to make sure that the dragon's legs turn out same length.
(removing the paper wound after) and shorten the leg by 1.5 cm.
Now let's arm ourselves toilet paper and wrap it with your own hands around the frame in one layer.
Cover with diluted glue PVA and let dry.
When the glue has dried, tear off the paper in small pieces, squeeze with our own hands and tie it to the dragon (with threads),
then we wrap it on top toilet paper before education thickness we need all parts of the dragon:
On the legs we act in the same way, only more carefully than on the thick body,
handmade dragon is already taking final shape:
When you wrap the entire dragon with paper, coat it thoroughly with glue and let it dry.
Usually dragons are covered scales. In order to create its likeness, the author uses a rope with the amazing name “Packaging made from recycled materials”. It needs to be glued to the dragon’s body using universal transparent glue (for example, Moment).
Instead of rope, you can use flagella twisted from toilet paper.
We start gluing where the rope can go in a circle (in the photo - the dragon’s neck), it’s easier to first lubricate the surface with glue with your own hands.
Wrapping neck and go to body(we also apply glue to it, but not too much), move from the body to the tail and
We fasten our rope. We don’t pay attention to the empty breasts and butt for now, let them be paper for now. 🙂
Cut off a small amount of rope we share her and already thin on we mat on the base for wings.
Don't forget about glue.
This is what we get as a result of our work with your own hands:
Apply to paw a little glue and wrap it around, reaching the claws. Again we share rope into three parts,
wrap each finger, reaching the claw,turn the dragon over and connect all three strands of the rope into one.
WITH Using a piece of string, we make a loop around the paw and glue it. Here it is, the finished paw handmade dragon:
Left with your own hands seal with rope all the places where paper is still visible.
Let's start with handmade dragon breasts.
Cut from the rope piece, exactly equal in length to the remaining “hole” on the dragon’s body, and we begin to lay it down,
smeared with glue. This is probably the most tedious and messy stage of working on a handmade dragon.
Behind the paws and near the paws, press the threads harder to make recesses.
We continue to glue with our own hands rope, we do flagella to size remaining holes. Apply a drop of glue to the hummocks, twist them, and glue them. This completes the work on the dragon's chest.
Now we make rope inserts with our own hands hind legs handmade dragon.
The gap was left unpasted between the hind legs, we glue it in the same way.
When the entire dragon is wrapped, apply primer and leave to dry. When it dries, it's better to cover it
Handmade dragon acrylic paint(for example, white) so that it is monochromatic.
Now it’s time to sculpt the dragon with your own hands head. The author does this from a special air-hardening mass KERA Plast
If the masses for modeling are really tight, then you can make a dragon’s head with your own hands from
papier-mâché or salt dough
, but it will not be so convenient, simple and fast.
First you need to give general shape
head, do it with your fingers recesses under the eyes, shape beak
(he will also be the nose),Use a toothpick to make holes and give the desired shape.
Above Place a flat cake on your head and press everything well, smooth out the joints, give shape eyebrows.
Place the pre-prepared wire(curved to the shape of the head and horns).
Make sausages under the wire and on top and then level everything out. Pgiving the head the desired shape from above,
Apply directly with a toothpick with your own hands drawing. Nand apply modeling paste to the wire and
It should look like in the photo. While the paste has not hardened, use a toothpick or
Using a needle, scratch the horn and adjacent parts of the head to give your handmade dragon a realistic look.
We do it on the head notch, where we will then place the middle horns.
Let's start doing DIY dragon eyes. To do this you need to roll up a small ball and press
it into the places for the eyes that we prepared in advance (pits). Insert immediately rhinestone(or bead).
If it doesn't stick well, glue it.Sculpt the lower jaw and connect it to the upper.
Roll it up sausage and stick it below the eye of a handmade dragon to create a predatory squint.
Spread the sausage under the eye and smooth it out (with your finger). Apply with your own hands cheeks and try to shape your cheekbones.
If necessary, remove excess modeling paste.
Cover the back of the dragon's head with a modeling paste and achieve the final look.
If there are also such near the head of your dragon needle decorations(as in the last photo),
then make cutouts for them. We will now make them according to the same principle as the wings.
Scratch the head a little with a needle, giving skin effect. We place the head on the remaining unwound
end of wire on the neck.
Let's start making the wings, the "feather" of the ridge and the needle-like decorations next to the dragon's head.
They are all made according to the same principle.
To do this, place the dragon sideways on a piece of paper and trace the general shape of the future wings with your hands.
Complete the drawing veins. Place the resulting handmade dragon wing pattern under transparent polyethylene.
Place the veins on top and stick them flagella, rolled from toilet paper or newspaper,
coat them with diluted PVA glue.
Glue on top of the flagella toilet paper, paper towels, napkins or crumpled paper (sold in rolls).
If you use toilet paper, try to ensure that the joints go along the flagella -
veins of the wings, and not between them.
Turn it over and glue it on the other side with your own hands. second layer of paper so that the flagella -
the veins ended up between two layers of paper.
We coat the paper with PVA glue (this should create small folds on paper),
Wait for it to dry, carefully remove the wing from the polyethylene. We cut the wing exactly according to the pattern and glue it to the handmade dragon.
Let's do ridge. Almost the same as the wings. We place flagella on toilet paper at a certain point
distance (you can estimate so that they are more often towards the tip of the tail and less often towards the neck of a handmade dragon).
Cover second layer of toilet paper, coat with PVA, dry. To stick
This strip of toilet paper is applied to the dragon's spine, first glue it approximately in the middle of the spine long flagellum from toilet paper or newspaper, glue a strip to it, glue the strip on the other side second flagellum, supporting the protruding ridge.
We trim the ridge to the required length and cut out the desired shape.
Now only the dragon remains paint and cover it with your own varnish!
We continue to actively prepare for the New Year! I hope you have already decided on the main symbol of the holiday itself in its tabletop - paper and cardboard - version. If not yet, then perhaps you will need a selection of 3D models of paper Christmas trees or a master class on making an amazing origami Christmas tree according to the design of designer Francesco Guarnieri. However, in no case should we forget about the symbol of the coming 2012, which, as you know, is the Dragon. A great way to “appease” him is to make this mythical creature the main guest of the New Year’s celebration. And if you also create it with your own hands, then such a sign of attention, I’m sure, will help you earn the favor of the Dragon for the whole coming year.
We will, of course, make a dragon out of paper. To make your choice easier, I bring to your attention my selection of paper dragons, baby dragons and dragonets that I liked the most. There are exactly 12 of them. They all have different levels of difficulty, but detailed instructions and master classes clearly demonstrates how to make a paper dragon, therefore, absolutely anyone can recreate the proposed models. So choose the dragon you like best and go for it. Or you can go even further and make all 12 paper dragons - for each month of the year :)
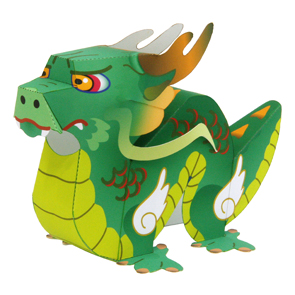
To make this big-eyed monster, you will need to print just one part on an A4 sheet, punch it along the marked lines, trim it a little with scissors, slightly glue the body and tail (if desired) and fold it.

paper in in this case It’s better to use something thicker (from 200 g/m2) or even cardboard. For most of the models presented below, matte photo paper with a density of 120-160 g/m2 is optimal.
Next paper dragon also refers to the simplest models, only it consists of several parts. The assembly procedure is described in English, but figuring it out is not a problem. As a last resort, Google Translator is always at hand.

The author of the blue dragon did not create instructions for assembling it. But, I hope, looking at the photo collage with images of the finished product from different angles, it will not be difficult to understand what and how to fold and where to glue.
If you have watched the American cartoon How to Train Your Dragon, then these three dragons are very familiar to you. It will be even more interesting to collect their 3D models.

Download patterns and get acquainted step by step instructions Can .
Another 3D model from the category of simple ones is the Chinese dragon from Canon “CREATIVE PARK”. All you need is to print 1 sheet of A4, fold and glue the unfolded paper.
But here you will have to work hard. The components of this Chinese dragon (Canon “CREATIVE PARK”) will have to be printed on 17 sheets. That's a lot of work :). Although if you get together with the whole family, the assembly process will definitely be more lively. The main thing is not to get confused in numerous details. To do this, when you cut out, be sure to mark them on the wrong side.
 The result will be a very realistic paper figurine that will look great against the background of the festive surroundings on the occasion of the coming of the Year of the Dragon.
Download/print patterns and instructions
Another gorgeous dragon that can be done sitting or flying. Assembly will take a fair amount of time, but the results are definitely worth it.

Download patterns and instructions:
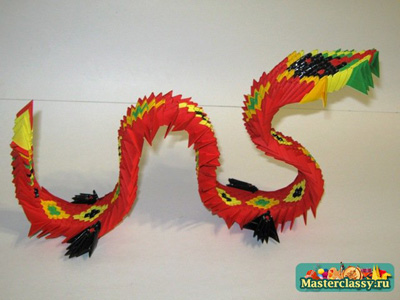
The following paper dragons are prominent representatives of products made using the modular origami technique. This is a task for the most patient, those for whom the need to fold several hundred identical paper modules does not extinguish the sparkle in their eyes, but, on the contrary, ignites them with creative passion.
Even if for you the words “ modular origami“- while it’s the same as Chinese literacy (figuratively speaking), then you still shouldn’t be afraid to try. Detailed master classes you will be guided through each step of the assembly, from the first to the last module. Moreover, there should be just enough time to master this “titanic” work in order to be in time for the New Year
Fire Red Dragon
Three headed dragon, aka Zmey Gorynych

And finally, a funny little dragon, which is not at all as simple as it seems at first glance. All its hidden capabilities will be revealed to you after you collect it.
 And believe me, it’s simply impossible to take your eyes off him, and he won’t leave you unattended :)
This paper dragon, demonstrating a stunning optical illusion, was invented quite a long time ago (author - Jerry Andrus), but, you see, on the eve of the Year of the Dragon, it is quite worthy of giving it new life. And it will certainly cheer you and your loved ones up.
Download the patterns (in blue, green and red), print the one you want (or change the color tone in a graphic editor, for example, Adobe Photoshop Elements), cut and fold according to the instructions.
Good luck in your creativity! And see you again in KARTONKINO!
PS. Do you want to be the first to know about new lessons and master classes, as well as when new box templates and other useful and entertaining cardboard crafts appear on the site? Receive announcements
I found a pattern for this Chinese Dragon in an old magazine that my mother subscribed to 24 years ago. But nothing remained except the pattern, so I had to work a little to assemble it.
For the work I needed: threads, fabric for the dragon’s body (it’s better to use a thick one, like cloth), cotton wool for filling it, paper for the pattern and safety pins.

When printing, I increased the size of the conditional square to 2 cm. Cotton fabric should be starched, but synthetic fabric should be cut out with a burner (this is how the edges are processed well). I used synthetic fabric and so I cut it out using a burner. With this method, you can cut out each part separately, then they will be neat and will not fray, or you can cut out the parts together, then they will not move when sewn together, but here you need to be careful not to solder those parts that should remain free, otherwise they will It will be impossible to separate and there will even be nowhere to stuff cotton wool.

1. Connecting body parts separately top and bottom.

2. We sew the legs and stuff them with cotton wool, using regular thread. I used a stiff thread with lurex and so when I stuffed them with cotton wool, the dragon’s fingers bent, it didn’t turn out very nice.

3. Sew the body and sew the legs to it. It would probably be more correct to sew the body, stuff it with cotton wool, and only then sew the legs into it. But I'm not that big of a friend with hidden stitches, so I did something different. Starting with the tail, I began to sew the body in a circle, first of all connecting the side of the body where the legs were (sewing them in parallel). Then she sheathed the upper part in parts and gradually filled the body with cotton wool.


4. Assembling the head. I had to tinker with the head, I altered it several times in parts to make it work well.
a) Sew together: the mouth, 2 parts of the head and the lower jaw, inserting the teeth in the right places. I tried to attach my teeth with double-sided tape so that at least they wouldn’t fall out, but this only made the task more difficult. The tape categorically refused to be pierced with a needle. We fill the space between the mouth and lower jaw with cotton wool, do not fill the entire space with one piece, otherwise the mouth will open and you can’t do anything with it, it’s better to use two pieces for the lower and upper jaw.
b) Sew in the forehead with a mustache, do not forget to attach the horns in the right places. Then they can be corrected.
c) Let's start decorating. Sew on the collar and comb; fill the voids with cotton wool; glue on the tongue and eyes. The finishing touches.

5. Connect the head and torso. Place the head on the end of the main frame protruding from the neck and stuff it tightly with cotton wool. Turning the head slightly to the left, towards the viewer, we firmly sew it to the neck along the same dotted line along which the decorative collar is attached from the inside.
On one of the upper curves of the body we will sew an inconspicuous loop so that our dragon can hang on the wall or on the tree and celebrate the New Year 2012.
It is believed that a dragon figurine can bring wealth and prosperity to its owner. That's why such a souvenir is a great gift. By the way, you can try to make a dragon yourself. Making a paper souvenir in the shape of a dragon is not at all difficult. For this you will need: corrugated paper, printer paper, wooden sticks and glue, as well as paints or colored markers.
Find a coloring book for your future dragon on the Internet. Then print the picture on a printer and color it. The dragon's body should be cut into long strips of corrugated paper. Glue the opposite ends of the body to the head and tail. That's all. All that remains is to glue a wooden stick to the tail and head.
Handmade dragon made of wire and paper
If the first option seemed too simple to you, you can make a more complex dragon figurine. To create the frame, take the wire and cut it into pieces of different sizes for the paws, wings and body. You can connect the wire parts using glue or solder them for reliability.
After creating the wire frame, wrap it with one layer of paper (toilet paper will work for this purpose). Cover the paper with glue and let it dry. Then attach another layer of paper to the figure with threads to achieve the desired thickness. Using transparent glue, attach small paper flagella to the surface of the dragon's body, which will symbolize scales. Instead of flagella, you can use a special packaging rope made from recycled materials. She will need to wrap the entire figurine of the future dragon. Then apply primer to it and leave it to dry. After drying, cover the dragon with acrylic paint white.
You can start manufacturing. It is better to form it from a special mass for modeling or papier-mâché. Don't forget to make indentations for the eyes and shape the eyebrows. Place horns made of wire on top of the resulting head. Then apply some modeling paste to the wire to make the antlers more realistic.
Now you can move on to creating the dragon's eyes. Take some modeling mixture and roll into two small balls. Glue a bead on them. After this, you can press the balls into special recesses for the eyes. You should also create a predatory squint by sticking small sausages under the eyes. Then give a clear shape to the cheekbones and cover the back of the dragon's head with a modeling paste. Scratch the head a little with a needle to create a leather effect and place it on the wire on the neck.
To make the wings, you will first need to make a pattern on paper. Place the resulting pattern under transparent polyethylene, and stick paper flagella on top. Stick toilet paper over the flagella. Wait for the glue to dry completely and remove the wings from the polyethylene. Glue the wings to your homemade dragon. The spine is made in a similar way. At the end of the work, be sure to cover the entire dragon with pre-prepared varnish. As a result, you should get a nice souvenir.
Hello, dear daddies, mommies and all visitors to our blog! Today I will tell you how to make a Chinese Dragon with your child.
It’s just around the corner and we continue to prepare for it.
Not a single New Year's parade in China is complete without a dragon dance. These parades begin on the first day of the year and last 15 days.
You can watch one of these dances and show the kids what it is at the end of the article.
Tell your child that the Chinese Dragon, unlike the Western dragon, is not evil at all. He represents wisdom, strength, nobility, wealth, and is an important figure in Chinese culture.

According to legend, the Dragon dance on the first day of the New Year scares away evil spirits and all misfortunes.
It is mainly performed by men, they carry a Dragon made of silk and paper on long sticks.

To the sound of horns, drums and gongs, they raise and lower the Dragon. It turns out that the Dragon seems to fly up and down. Inside, the Dragon is often lit with many lights and candles. In the dark, it seems that he comes to life. It is believed that the larger the Chinese Dragon, the more luck and prosperity it will bring.
I suggest making this colorful Chinese Dragon that will add a touch of luck and wealth to your home!
This Dragon can be used to decorate your home and for creative play with your child.
We made a drum from disposable cymbals, and we will play with it and with our Dragon in Chinese.
Although, all the steps of making a dragon are simple, but they will take some time. If the child decides to do it, parents will need help.
I made the dragon myself, for my daughter, she helped me lubricate the parts with glue.
You can use traditional red and gold colors, or you can experiment with different colors, patterns, types of paper and cardboard.
To make a Chinese Dragon we will need:
*red paper for head and body;
*paper or cardboard of various textures, patterns, colors;
*scissors;
*glue;
*hole punch or thick nail;
*3 buttons with two holes;
*three small pieces of thin copper wire;
*two small sticks;
*dragon template.
How to make a Chinese Dragon with your child.
1. and print it out.
2. Cut out the dragon's head from red cardboard in duplicate (mirror each other).
3. Cut out 2 yellow eyes and stick them on the head in the right places. Glue black eyebrows and pupils onto the eyes.
4. Cut out a nose from black paper and teeth from white cardstock. Glue it to your head.


5. From multi-colored paper or cardboard, cut out shapes in the shape of the eye template, but half the size. Quantity is optional. We will use them to decorate the dragon's head. It took me 17 pieces for one side.
Glue them on your head in several layers.


6. Let's make the body of our Chinese Dragon. To do this, we cut out 4 parts from cardboard according to the template - two mirror ones.
7. We cover all 4 parts of the body on the outside with strips of multi-colored paper - cut the paper into strips, glue one by one.


Afterwards, cut off the excess with scissors.


8. We cut out 6 triangles from double-sided cardboard or colored paper and glue them to the top of the front parts of the body.


9. Glue the parts together. You will get two parts of the body, covered with stripes on all sides.
10. We cut out two mirror-opposite parts of the tail, glue it on, just like the body, and glue three red triangles.


11. We attach sticks to one part of the head and one part of the tail using tape.


12. We make holes using a hole punch or a nail in the back of the head, on both ends of the two body parts, and on the front of the tail.


13. We fasten them to each other. To do this, insert a thin copper wire into the holes of the button and twist it a little. Thread the twisted ends of the wire into the hole of the head and body. Then we separate the ends of the wire in different sides, cut them and secure them with tape on the wrong side.


In the same way we connect both parts of the body, and the first part of the body with the head.
14. Glue two parts of the head and two parts of the tail together.
Use scissors to trim the protruding parts of the Dragon.
15. Buttons can be painted red or another color.
That's all, our Chinese Dragon is ready!
Wishing you and your little ones a Happy Chinese New Year!
Sincerely.
Elena Medvedeva.
And here is the promised video with the dragon dance:


