Crafts made from acorns are an interesting and simple form of creativity. These fruits can be held together with toothpicks, painted in any color or patterns drawn on them. It would be appropriate to use plasticine in autumn-themed crafts.
Children's crafts from acorns, which you can make yourself, are incredibly popular not only in schools, but also in kindergartens.
Family of acorn men
A family of funny little people is the simplest craft that even children can make.
Materials:
- acorns of different sizes with caps;
- toothpicks or thin twigs;
- leaves from trees;
- pencil;
- glue.
- If the caps on the fruits do not stick well, then they must be glued with glue.
- On the acorns, using a pencil or felt-tip pen, you need to draw a mouth, eyes and nose. If you turn on your imagination, the facial expressions of the people will be different. They can be made happy, sad, angry.
- To make the composition more unusual, the little people need to make arms and legs using branches or toothpicks. You shouldn’t limit yourself to this master class; you should use your imagination and then crafts on the theme of autumn will become unique.
The family of little people is ready, it will be the same as in the photo or a little different if you use other decorative elements.

Craft “Owls”
Creating such a craft will be interesting not only for kids, but also for adults.
Materials:
- various acorns;
- multi-colored felt;
- beads;
- glue;
- scissors.

Acorn horse
Crafts made from acorns using plasticine can make the most of children's imagination and use natural materials in the process.
Materials:
- a couple of acorns that have an oblong shape;
- plasticine;
- toothpicks;
- glue;
- dry grass.
- One oak fruit should be large, and the other smaller and with a twig on its cap. You need to make a hole in a large fruit and insert a branch. To keep the head in place, you can further strengthen it with plasticine or glue.
- Now the horse's legs are being made. Using an awl, four holes are made in the body into which toothpicks are inserted.
- Eyes are made from plasticine and beads.
- Dry grass is collected in a bunch and attached to the body as a tail, and the second bunch will serve as a mane and attached to the head.
You will end up with a horse like the one in the photo, but you don’t have to stop at this result and decorate it further.

Grapes from acorns
The “Grapes” craft made from acorns turns out very beautiful and realistic; a simple master class will help with this.
Materials:
- twenty acorns;
- thin wire;
- green corrugation;
- lilac gouache;
- paper;
- pencil;
- scissors;
- glue;
- Using a large pin, you need to make a hole in each fruit. This stage is dangerous and difficult, so if grapes are made with children, this needs to be done by an adult.
- A thin wire is inserted into the resulting holes. To prevent the oak fruit from slipping, the wire must be twisted at the end.
- Using green corrugation, the wire must be carefully wrapped so that the future grapes look realistic.
- Next, the acorns need to be painted with gouache. If acrylic paint is used, then one layer is enough, and if gouache, then several.
- After the paint has completely dried, the grapes can be collected in bunches. To ensure that the fruits do not fall apart during the assembly process, you need to collect four berries and rewind them with wire, and so on until the very end.
- After assembling the bunch, the stem is cut off and wrapped using corrugation.
- When the grapes are ready, you need to varnish the painted berries with gouache paint so that the look is natural. If acrylic paint was used, then this step can be skipped.
- While the grapes are drying, you need to make leaves and tendrils. Leaves of the desired size are drawn on white paper and cut out. Next, they are applied to green corrugation, outlined and also cut out.
- To give the grapes a realistic appearance, veins are made on the leaves. To make them you need to wrap small pieces of wire corrugated paper and glue to the leaves from the inside out. The finished leaves are glued to the grapes.
- Next, the antennae are made: the wire of the desired size is wrapped with corrugation and screwed onto a pencil. After this, the wire will look like a spiral, and it can be attached to the grapes.
Homemade masterpieces made from natural materials are always beautiful, creative, natural and, to some extent, very stylish. To make interesting crafts from cones on the theme of autumn with your child, it is necessary, of course, collect materials, discuss ideas and successfully apply several of them in practice. The preparation procedure itself is no less pleasant than the upcoming creative process. After all, taking a walk with your baby through the forest or park, listening to the sounds of nature, breathing in the clean autumn air is just as interesting as creating crafts from pine cones with your own hands. Why exactly cones? This unusual coniferous fruit can be turned into anything: V christmas tree, in a little animal, in a basket, in flowers. We have already told you how chic they are, in this same article we again returned to this vast topic to show you all the newest, most relevant and most interesting in the current season.
It’s hard to imagine autumn crafts without materials such as spruce, pine and pine cones. Before you get to making figurines, crafts and compositions made of this material, it must be cleaned of dust, debris and other contaminants, as well as lightly dry for at least 2-3 weeks after collection. If you don’t want to wait that long, put the pine cones in the oven for half an hour and dry at 200 degrees.
Also in some cases cones can be covered with transparent glue or varnish so that they do not crumble after a while. Children love to work with forest cones because of their unusual shape, natural color and aroma. The products always turn out bright, beautiful, fantasy!
As auxiliary materials When making crafts you can use the following:
- salty dough;
- polymer clay;
- felt;
- plasticine;
- buttons, rhinestones, beads, beads;
- plastic bottles, cups, waste material;
- seeds, vegetables, fruits;
- leaves, acorns and chestnuts;
- burlap, cotton wool, twine and much more.
 All of the above materials are well known to children, as well as their parents, they are accessible and understandable to kindergarten and for home creativity with children. We'll consider many options for crafts from pine cones in combination with other natural and synthetic materials, and also pay attention to Special attention such a type of creativity as crafts from acorns - since these wonderful fruits are often found next to cones - in the forest or in the park.
Autumn compositions for kindergarten– it’s always a flight of fancy, warm autumn colors and a sea of children’s joy.  Autumn is about bunnies, which change their everyday gray coat to white, warm and fluffy.
 Or about hedgehogs who carry their supplies to warm mink, and then hide themselves until spring.

If you want to make a cute prickly hedgehog out of pine cones with your child, step-by-step instruction to help you, as they say. Made from pine cones, felt and small beads you will get a cute forest animal, and not even one. 
Fir cones can be used when making a figurine of a little fox.


And if we add “heavy artillery” to the cones, namely - leaves, acorns, berries, chestnuts, then you will get very beautiful and very original products.


 Some of them may be quite childish - but so real and funny.

And others can be called true works of art that will easily amaze everyone at the exhibition with their originality and beauty. Such a chic product can become topiary of autumn fruits.
 Here's what materials you will need to make topiary, and as a base you can use a paper or textile sphere, onto which all the constituent elements and decor are glued. For more information on how to make autumn topiary, watch the video.
Crafts from cones and acorns: the most interesting
The autumn theme when making crafts is inexhaustible and very interesting. In autumn, nature itself inspires the creation of such masterpieces: with its landscapes, its silence and its wealth.
 At what time will you still find so many bright colors, so many fruits and so many ideas to create funny characters? We have collected for you only the most beautiful crafts from cones with your own hands: photo diagrams for children will just help you understand the intricacies of processing such delicate materials as acorns and cones.
 Products made from cones and acorns can be fastened with glue moment, If you are working with a child, do not let him glue the parts on his own. Let him select materials better and help you create a preliminary layout.
  Such a cute little lamb can be made from unopened cones, acorns and pistachios. In this case, you don't even need glue, because all parts can be fastened using plasticine, make eyes from the same material, and draw a mouth with a felt-tip pen.
  Is it possible to make such a cockerel? using two cones, a pair of acorns, several leaves and twigs. Secure the cones with plasticine, as shown in the photo. To make the paws, pierce the acorns with a needle or awl and insert suitable branches, securing with glue. Make a comb and beard from leaves, make a beak from plasticine or grain, and glue the legs to the body.
When you already have a good hand for creating crafts, you can repeat this composition.
 Material such as pine cones and acorns literally lies under our feet in the fall. He simple, versatile, environmentally friendly, and, most importantly, interesting for children and adults, since you can create many wonderful figures from it. We suggest you look at the options carefully in the photo - they are very simple and cute.


The idea of creating a hedgehog from cones and plastic bottle not so new, but it is a simple and very creative way to dispose of unnecessary things and garbage that gets in the way everywhere. We have already told you how to tinker, so this is an original way of transformation regular bottle The cute hedgehog may be familiar to many for a long time. 
We have selected simplest option creating a funny hedgehog - from the neck of a plastic bottle, plastic bowl, three caps, a pair of artificial eyes and an arbitrary number of cones.
Here's what you need to do Cut off the neck of the bottle, choose a bowl of the appropriate size.
  Glue the bottle to the bowl to create the face of the future animal.
- Glue the pine cones tightly to the bowl so they don't fall off.
- Ahead of attach the lids with hot glue and glue artificial eyes on them.
- Twist the wire around the spout cap.
 And here is another version of the finished product. A decoration such as a cute autumn hedgehog is suitable not only for a children's exhibition, but also as a decor - For summer cottage, garden, vegetable garden or playground.
New Year's crafts from pine cones: fast and beautiful
We just have to consider the most pleasant and most exciting question - New Year's crafts from pine cones, because very soon we will need to decorate the house for Christmas and New Year's holidays
.
 From cones you can make a beautiful Christmas tree.
 Or chic natural candlestick.
 Or a New Year's garland.
  You can also make budget ones, and most importantly - unbreakable Christmas tree decorations.
 Moreover, the sizes of jewelry can be both small and colossal.
  You can do it for the New Year beautiful decor for the door. We have already told
Nature is the queen of decor, and autumn is the most suitable season for this. In order not to fall into the seasonal blues in anticipation of prolonged rains and winter cold, autumn creativity from natural materials. With their help, you can create a magical atmosphere of comfort and warmth in your home.
So get outside to find the materials you need, then grab your scissors and glue to create your own amazing fall decorations. Such crafts are so great to do with the whole family, together with the children.
DIY acorn crafts
I love acorns very much, because from this natural material you can come up with a huge number of different things that will decorate your house, cottage or garden. When walking with my child in the park, I try not to pass by the acorns I like.
Editorial "So simple!" I have prepared 14 autumn ideas for you decor from acorns: fast, simple and very stylish.
Many of these crafts can be made with children, it’s not at all difficult and you don’t need to have any special skills. All you need are a few tools, acorns, imagination and time to make.
- To create such a bowl of abundance, you will need a classic transparent vase, which can be interestingly played up by adding all kinds of rose hips, acorns, nuts, cones and chestnuts, small pumpkins and carrots, halves dried oranges and apples.
- And in this way you can decorate the table. Take about 10 acorns and pierce them through with an awl. Holes can be made on the sides or along. Place the acorns on the wire and connect it into a ring in which you can place a napkin. Simple, but how original!

- You can decorate a photo frame with acorns.

- To create such a panel you will need a not very thick cut of wood. Glue thin twigs onto it with a heat gun different lengths, and place acorn caps on top of each one.

- Using plasticine you can turn an acorn into an unusual bird. To do this you will need to sculpt the beak, eyes and wings. And if desired, you can create a composition from several birds, complementing it with a tree branch, nest or flower.

- I think I'll take on this idea with the mirror.

- And to create such a photo frame you will need acorn caps. Look how stylish and interesting it turned out!

- Children will be delighted with this idea. The heads of the men can be made from a wooden bead of a suitable size. Just look how simple and at the same time cute autumn craft it turned out to be!

- Together with the kids you can fantasize about what fabulous or cartoon characters they are reminiscent of the oblong shape and smooth surface of acorns. Some will see them as adorable yellow minions, while others will be inspired by Japanese anime characters.
To make them, arm yourself with a set of paints, a thin black marker and several wooden skewers.

- Wooden boxes decorated with acorns look beautiful.

- What do you think of this autumn wreath?

- To create this vase you will need a plastic pot, hot glue or superglue, acorns and acorn caps. Start gluing the acorns to the plastic container from the bottom up, and cover the top of the container with caps.
However, please note that it is better to keep such a vase outside, since debris and insects can accumulate in such a number of acorns.

- This composition of branches and painted acorns looks very elegant, stylish and will set a festive mood in any room.

Collecting various natural materials is one of the most favorite activities for children on an autumn walk. Cones, twigs, leaves and seeds of plants, chestnuts and, of course, acorns - everything goes into the children's piggy bank. And if you apply creative imagination to them and skillful hands, you can make cute crafts from them.
In addition, in autumn and winter we spend much more time at home than in spring and summer, and this is a good opportunity for development creativity. We can start making beautiful autumn crafts from natural material. Isn't this wonderful?
Acorns are usually collected in September. Choose only hard, smooth fruits, without holes - otherwise insect larvae, traveling from acorn to acorn, will spoil all the supplies you have prepared. The more different acorns (round and oblong, large and small) you collect, the more varied your crafts will be. Don't forget to collect the acorn caps. You should not put off making crafts from acorns for a long time - after all, it is easier to make holes in fresh acorns - they are less likely to crack and crumble. Acorns make very cute people and animals.
Crafts made from acorns differ in their shape and size. It is best to make all possible little people from this natural material, as well as horses, deer, birds, and insects.


Arms, legs, paws and horns can be made from matches, toothpicks, and small thin twigs. For ease of making crafts, the acorns must first be pierced with an awl. Acorns can also be connected to each other using glue or plasticine.
So, crafts made from acorns - interesting ideas
1. "Horse"

To make crafts you will need: acorns, twigs (matches, toothpicks), glue, plasticine, threads, small wooden blocks, colored paper(seeds).
We make a mane and tail from threads and use an awl to secure them in the acorns. We make holes for the legs and secure them with glue. To make legs, we use matches, thin twigs or toothpicks. We fasten the neck in the same way. The neck can be made thicker using plasticine. We cut out ears from colored paper (you can take any suitable seeds) and attach them to the head.
It’s not difficult to make a person either.
The horse feeder can be secured with plasticine or glue. The neck, legs and arms are matches or thin twigs. To secure all the parts more firmly, we make holes in the acorns using an awl.
We decorate the face of the man and the muzzle of the horse with elements cut out of colored paper or sculpted from plasticine.
2. “Instructive conversation”

The father bunny teaches the baby hare how to behave.
For work you will need the following materials: acorns, an awl, glue, plasticine, twigs, colored paper, cotton wool.
To make a baby bunny, you need to prepare an acorn with a cap, an acorn without a cap and a twig.
We make holes in the acorns with an awl, sharpen the branches-legs, cut out ears from colored paper (you can use suitable seeds). Now, using glue and plasticine, we connect all the parts.
We do the same for the father bunny. Well, we make the ponytails and neck collar from cotton wool.
Using the same principle, you can make other interesting crafts from acorns. Here are some options:
This is how, by showing your imagination and using the gifts of nature, you can make interesting toys for your home puppet theater, beautiful compositions for your home and good gifts for friends.

Source: http://karapysik.ru/podelki-iz-zheludej/#ixzz3nUmiAgPi
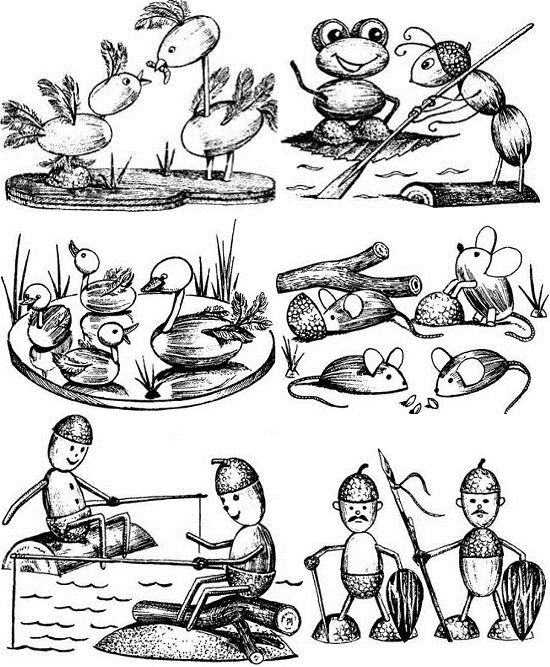
Here are some other craft options. Let's look further...
Horse made of acorns.
To make a horse, we will need two oblong acorns of different sizes; it is advisable that the small acorn be “in a cap” on a branch. We will also need: plasticine, toothpicks, a bunch of grass and an awl.

Let's connect the horse's head (small acorn) with the body (large acorn). To do this, we will make a hole in a large acorn using a toothpick or an awl. Insert a sprig of a small acorn into the resulting hole. You can fix it there with transparent glue (for example, supermoment). If your acorns have already lost their caps, connect the horse's head to their body using a piece of a regular toothpick, making two holes - one in each acorn.

Next, let's put our horse on its feet - for this, also using an awl, we will make four holes at the bottom of the acorn-body. To make the legs, we used toothpick halves, but you can also use tree branches. Now we will make eyes for our horse - for this we will first glue circles of white plasticine, and on top of them circles of black plasticine of a smaller diameter.

Let's make a tail for our horse from grass. To do this, collect 15-20 blades of grass into a bunch and connect them together at one end using plasticine, trim the free ends with scissors. Let's do the mane in the same way. Let's attach them to the craft.

Our horse is ready!
Acorn man.
Making an acorn man is very easy. To make the head, take a round acorn with a cap. If the cap flies off, secure it with plasticine.The body of the man will be a large oblong acorn. We connect them using a small piece of toothpick, after making the necessary holes in the acorns with an awl.

Let's make eyes and a mouth from plasticine. Let's make the little man's legs from toothpick halves. For stability, glue them from the bottom with superglue to the upside down acorn caps.

Let's add toothpick handles with plasticine “mittens”.
Our acorn man is ready.

Craft "Dog"
To make a dog from acorns we will need: two oblong acorns, a toothpick, plasticine and a couple of maple seeds (helicopters). Let's connect the dog's head and body using a piece of toothpick at a slight angle (as in the photo) - it's better to make the dog's face from the sharp part of an acorn. From plasticine we make eyes, a nose, paws and a tail.

Let's make our dog droopy ears like a dachshund's. To do this, we will take the lionfish of maple seeds and attach them with glue or plasticine.

Our acorn dog is ready.
Craft "Bird"
To make a bird we will need: two acorns, plasticine, several toothpicks, ash seeds and acorn “caps”. Connect two acorns using a piece of toothpick, as in the photo. We’ll make the bird’s legs from toothpick halves, gluing them onto the upside-down “caps” of acorns for stability.

We will make eyes and a beak from plasticine. We will make the bird’s tail from ash seeds; for this we will collect them in a fan, as in the photo.

Let's secure the base of the fan with plasticine and glue the tail to our craft. Decorate the bird's head with a hat.

All we have to do is add the wings - we will also make them from ash seeds. Our “bird” craft is ready.

Ant made from acorns
To make this craft we will need: three acorns, one of which will have a “cap,” toothpicks and plasticine. Let's make a head from an acorn with a cap - for this we will attach plasticine eyes to our ant. Connect the acorns using pieces of toothpick, as shown in the photo.


Our ant will need six toothpick legs (about one-third the length of a toothpick). Let's attach them to the bottom of the craft.

Our acorn ant is ready.
Hello, friends. For the benefit of your health, we have already published an article . The benefits of oak bark were also mentioned in the article .
Today I will tell you a few useful tips the use of acorns in the treatment of diseases of the gastrointestinal tract and in everyday nutrition.
Treatment of diseases of the gastrointestinal tract.
Acorns contain a lot of tannins and other useful natural substances, which have a very beneficial effect on the elimination of ulcerative formations in the stomach and intestines, as well as on getting rid of the putrefactive intestinal microflora that occurs in carrion eaters (“lovers” of meat from innocently killed animals, birds and fish ).
The folk recipe for eliminating ulcerative formations in the stomach, intestines and getting rid of putrefactive intestinal microflora is as follows:
- Collect high-quality (not wormy) acorns (wormy ones float in water) and germinate them in cotton fabric, abundantly moistened with water.
- When the acorns sprout, peel them, cut them into pieces and lightly fry them in a frying pan with vegetable oil.
- On an empty stomach, before roasting sprouted acorns, eat a little salad of raw herbs and vegetables that you are familiar with. After this, you eat your fill of roasted sprouted acorns until you feel full.
This should be done in the morning, and if you like, then 3 times a day for as many days as it takes to heal the ulcers and eliminate putrefactive intestinal microflora. If you have stopped eating corpses, then acorns will eliminate your ulcerative and putrefactive problems of the gastrointestinal tract quite quickly (minimum in 1-2 weeks, maximum in a month). Be healthy and no longer turn your gastrointestinal tract into a cattle burial ground.


Using acorns in everyday nutrition.
Acorn flour(an old recipe).
Golden autumn, our favorite time, we will prepare flour from acorns. You can collect acorns from the beginning of their fall from the oak trees until the beginning of October. True, in October it is already difficult to do this, because... acorns begin to sprout, and the rains press them into the ground.

The first stage is to clean them:
Some break them with a rolling pin, others with a nut cracker. My method is exclusive. Take a cast iron frying pan, lay out some of the acorns so that they are all in contact with the bottom, put it on maximum heat and, shaking frequently, fry until they crack (no more than a minute). They will release juice and sizzle.
The shells may burn, but do not let the acorns burn.
After this, with a slight movement of the hand, we remove the acorns from the shell. Remember, they are easy to remove while they are warm; as soon as the acorn cools to room temperature, it becomes difficult to remove it.


The second stage is to sort and grind:
The second part of the process is best done during cleaning. Only slightly brown, almost milky-colored acorns suit us. Cut each acorn into 4 parts.


The third stage is bringing to readiness:
Pour the resulting acorns with cold water and soak for two days. Every day you need to change the water 3 times.
After two days, add new water and bring to a boil. Remove from heat, drain the water and let drain.
From the experience of past years, it is known that at this stage it is better to immediately pass them through a meat grinder (since it will be easier to grind them in a coffee grinder later). Place on a baking sheet and dry in the oven at 40 degrees until completely dry. Dried acorns can be stored as is or ground into flour. It is better to grind before use. It is best to store this in paper bags, but you can also store it in clean glass jars.


Acorn milk soup.
Pour acorn cereal into boiling water in a thin stream, stirring all the time, cook until the cereal is ready, then add homemade milk, sugar, salt and bring the soup to a boil.
When serving, add a piece of homemade butter to the bowl of soup.
Ingredients: acorn cereal - 30 gr., milk - 250 gr., butter, sugar, salt, turmeric, cinnamon - to taste.

Sweet flatbreads made from acorn flour.
Heat homemade sour cream, add acorn flour, boil lightly, remove from heat and cool. Add grated cheese and sugar to the resulting mass, mix well, cut the flatbreads and brown in a frying pan.
Product consumption: acorn flour - 30 gr., cheese - 20 gr., sour cream - 30 gr., sugar - to taste, vegetable oil.

Acorn dumplings.
Homemade cream or sour cream, salt, water are added to the acorn flour and a loose dough is kneaded, which is rolled out 1/2 cm thick and cut into squares.
Dumplings are boiled in salted water. Onions are fried in vegetable oil and mixed with boiled, strained dumplings. Serve hot.
Product consumption: for 2 cups of acorn flour - 1/2 cup of water, 1/2 teaspoon of salt, 2 onions, vegetable oil, homemade cream or sour cream - depending on thickness.
Coffee made from acorns.
Ripe acorns are peeled, each cut into 3-4 pieces and dried in the oven. Then they are fried, making sure that they do not burn, but turn into a brittle mass that can easily be turned into a brown powder in a coffee grinder. Brew and drink like regular coffee, with milk or sugar, but it is better to use honey instead of sugar.
Acorn coffee is especially useful for children suffering from scrofula and rickets (coffee made from acorns strengthens the abdominal organs and eliminates hardening of the mesenteric glands). Children are given twice a day: morning and afternoon.

Acorn coffee jelly.
Stir acorn coffee with sugar, dissolve in a small amount of hot water, then add water (180 g) and strain. Pour potato starch diluted in cold water (20 g) into boiling coffee made from acorns, pour into a glass and sprinkle with powdered sugar or granulated sugar to prevent film formation. It is better to use honey instead of sugar, and carob instead of powdered sugar.
Product consumption: acorn coffee - 7 grams, potato starch - 10 grams, sugar - 15 grams, water - 200 grams, carob and honey - to taste.
Acorn porridge.
Pour homemade milk and water into a deep saucepan, add salt, homemade butter or ghee, heat to a boil, add cereal and stir. After the cereal swells, cook the porridge over low heat, stirring until it becomes thick. Then cover the dish with a lid and cook at low simmer on the stove or in the oven.
Serve hot, topped with homemade butter or ghee.
Product consumption: acorn cereal - 150 g, homemade milk - 200 g, water - 100 g, homemade butter or ghee - 10 g, salt, spices - to taste


Acorn dumplings.
Cook porridge from acorn cereal as described above, cool to approximately 70 degrees, add thick homemade sour cream or cream to it in 3-4 additions, stirring thoroughly after each added portion.
Scoop the porridge prepared in this way for dumplings with a tablespoon, then run this spoon over the edge of the dish so as to cut off excess porridge. As a result, the spoon is filled with porridge even with the edges.
With the second spoon, having previously dipped it in water, take half of the porridge from the first spoon and lower it into a bowl with hot salted water (10 grams of salt per 1 liter of water). Then scoop up the spoon again, etc.
Immediately boil the resulting dumplings at a very low boil in the same water in which they were immersed when cutting. Serve grated cheese in a separate bowl with the boiled dumplings.
Product consumption is the same as indicated above, but thick homemade sour cream or cream is added to it.
Acorn pudding with apples.
Place acorn grits in boiling, lightly salted water and, stirring with a wooden paddle, cook until half cooked. Then, put the cereal on a sieve, transfer it to a saucepan, pour in homemade milk and cook until tender.
Add cheese, finely chopped apples, cinnamon, homemade butter to cooked acorn grits, mix well and bake in the oven.
When serving, pour jam over the pudding, which should preferably be preheated.
Product consumption: acorn grits - 40 g., homemade butter - 5 g., apples - 30 g., cheese - according to the required pudding thickness and taste, sugar (preferably honey) and cinnamon - to taste, homemade milk - 60 g. ., jam - 30 gr.
Enjoy your meal and good health!


