All women in the world are trying to create a cozy nest from their home. IN modern world, you can buy a lot of little things to decorate your apartment. But now more and more representatives of the fair sex use the advice of our ancestors (wickerwork) to decorate their homes. The most chic items are considered to be products made from wood wicker, which is prepared in advance. This is a labor-intensive and time-consuming process; not every tree branch is suitable for weaving. Proper harvesting of the vine, soaking and drying is required. The most interesting method has been invented and is easier to make, simply by replacing the twigs with newspaper. Therefore, today you have the opportunity to learn how to weave from newspaper tubes for beginners, we will tell you all the step-by-step lessons of the skill, and teach everyone who wants to master this technique. And after several trial products, it will be very easy to create your own unique masterpiece!
How to properly prepare paper vine
The first stage of work, selection required material. You can work with regular blank paper, but since such paper is quite thick, it is difficult to work with. It's great if you know where to find the paper that printing houses use. As long as it is clean, it is easy to work with in terms of painting the product. But, if not, then we use regular newspaper in huge quantities. Using a utility knife or razor, cut the newspaper into wide strips, about 10 cm each, but no more. Weaving products is much more convenient and easier if the newspaper is cut into long strips.
We take one strip and place it near us; we place a thin, long metal object at the sharp corner. This could be a knitting needle or a bicycle spoke. We wind the strip onto this knitting needle, quite tightly.
Don't be alarmed if one end is thicker, it happens. But still, keep an eye on the thickness; the difference should be minimal. To ensure that the tube has a shape and does not unwind, wet the edge of the strip and secure the corner. This method requires winding about 50 tubes. How many of them you will need directly depends on how complex the product will be and what size it will be.
Before continuing work, you need to decide whether you will paint the woven product. Or paint the sticks first and then weave.
It is worth remembering that you need to select the appropriate varnish. If this is not done, the sticks will become brittle and harsh, the entire appearance will be ruined. Most best option, an acrylic varnish that is used for artistic purposes.
A basket made of tubes looks original, on which the text is clearly visible, with a one-color or two-tone coloring. This great option for a floor box, a photo frame, a chest for small change. If the product is not complex, you can paint it at the end of the work.
Weaving the bottom of the product
The bottom can be of completely different shapes: square, rectangular, round. Let's start experimenting with a vase with a solid bottom. Prepare fairly thick paper, cardboard will do, and cut out 2 circles from it. You will need exactly two, since the ends of the tubes from future racks will be hidden between them. We take the first circle and make marks with a pencil, there will be fastening of the racks.
If you decide to weave a vase, then the distance between the posts can be quite wide. There is this type of weaving (oblique), where you are allowed to work on a small number of stacks. After this, glue the ends to the marks and immediately close with the second circle. In a similar way, the bottom is made into a square shape if you decide to make it solid. But the bottom looks much more interesting if it is wicker. From this bottom the work of weaving a box or basket begins. To do this, we cross some tubes, for example 5 and 7. We take one tube and start weaving from the center, moving in a circle, passing the main sticks, either from above or from below.
After the tube ends, we build up the next one. The technology of this process is described below. This creates a circle of the required diameter.
A square-shaped bottom is rarely found in wicker form.
How to grow tubes and weaving
Vases are usually woven in a high shape; to obtain such a product, the paper vine has to be extended. If the tubes are connected correctly, the work process will be much easier. And the product itself will look much more attractive. Earlier in the text there was a description of how a paper vine has different sized ends. This is very convenient for an inconspicuous connection. To do this, you need to insert the thick end of one stick, the thin end of the other and carefully twist it. For a good connection of the joints, it is necessary to coat the thin end with glue. This transition is much more aesthetically pleasing and completely invisible when the product is painted.
Consider a simple weave made from newspapers, one strip. We attach a stick to the prepared bottom, next to any of the racks. Prepare a suitable form for braiding. As an option, a can or a bottle, if you want to weave a basket, then a box will do for weaving. Next, lift all the racks to the top and secure them with something, a clothespin would be good for this. We braid the racks with the previously secured vine. If you want to weave a basket with two sticks, then the weaving technique is the same.
It is more difficult and time-consuming to braid in rope style; for this you braid with two tubes. They are arranged according to to different parties from the rack, and then intertwine them between the racks. Weaving from newspaper tubes made using this technique looks very beautiful, and the basket will be durable.
An interesting way of linear weaving, weaving obliquely (in a spiral). This method is ideal for weaving vases or glasses; in this weaving only stands are used, they are intertwined with each other and slightly shifted.
All main types of weaving are solid, each new row this is a continuation of the previous one. If the product has a lid, then its weaving is no different from the main craft, only the height is lower.
When the entire process of making a craft is completed, it must be painted. To do this, you can use a brush or a spray can, if you wish, you can decorate with patterns. What will the patterns be made of (from satin ribbons, embroidery or beads) and which ones, imagination will help with this. The last step in the work will be to coat the craft with varnish.
What is woven from paper vines?
Many people think that you can’t make many products of different modifications this way. And in the process of mastering this technique, they realize that they are making mistakes. They say “appetite comes with eating” and so it is here. When everything has been studied, all the work is completely clear, then your own imagination wakes up to come up with your own original crafts.
To weave a basket from newspaper tubes, weave the shape using regular weaving. Then weave a pair of tubes from opposite sides, which is the basis for future handles.
Weaving from newspaper tubes for beginners should be mastered with something simple: cups, coasters, candy dishes. Next, you will be able to create more difficult ones, such as a laundry basket, it will significantly large size and the frame must be strong enough.
You can make a chest for sewing supplies, its complexity lies in the weaving of the internal partitions. The most common wicker product is a vase. To make such a product original, make the edge openwork.
Products made from newspaper wicker are easy to use thanks to their simple technique; anyone can learn how to make them. And after looking at examples of such works at least once, you will definitely want to create such beauty at home.
Such weaving from newspapers for beginners simply cannot leave indifferent all those who have a craving for beauty. And this will become another one of your hobbies, and maybe your only one!
Weaving from newspaper tubes video lessons for beginners
Also, to visually familiarize yourself with the process of weaving from newspaper tubes for beginners, we recommend studying several videos from experienced designers and craftsmen. These reviews will talk in detail about the technology and also illustrative examples finished products.
Video: Lesson on rolling tubes from newspapers - secrets and nuances
Video: How to weave a basket with a rectangular bottom
Video: Basket of magazine tubes for beginners.
Video: Basket made of newspaper tubes for beginners
Video: Weaving a heart basket from newspapers
Turn your ideas into reality, and you will succeed, we wish you success in your endeavors!
Below we have put together a gallery of photo ideas for weaving from newspaper tubes that will help you customize and choose exactly what you like. We offer more than 50 photo options:


Some experts condescendingly claim that handicrafts are something bordering on art. Looking at the masterpieces of our craftswomen, we can say with confidence that such things have a place in an art gallery and this is precisely true creativity. Here there is a flight of fancy, exquisite taste and the most complex technique of execution. Today we will look at weaving from newspaper tubes step by step. New ideas for beginning needlewomen, basic techniques and useful tips- in this material.

In the finished work it will be difficult to paint all the weaves with high quality.
You should not use watercolors for painting. It gives a dull color. Gouache or acrylic paint is more suitable. It is worth considering that acrylic cracks after drying, so if you decide to paint with acrylic, treat the finished product. To add color to the work, some craftsmen use spray paint, water-based composition and food coloring.
For shine, finished works are coated with several layers of varnish. In addition to its decorative purpose, varnish also serves as a hardener.

Weaving methods
It is enough for a novice craftsman to master several basic weaving methods. All other options are based on them and will not be difficult to deal with.
- Spiral weaving. A simple option that even a child can master. The tubes are successively built up and threaded through the base in a continuous manner.
- Layer weaving. Two tubes sequentially go around the posts so that one passes in front of it, and the other behind it. This principle is used on cotton fabrics.
- Rope technique. The strips are intertwined with the posts on the product and with each other.
Mastering these basic techniques will lay the foundation for further experiments.

For more information about weaving techniques from newspaper tubes, see the video at the end of the article.
Related article:
In the article we will consider in detail the technology of making flowers from paper with a photograph of each step, as well as others original crafts that even a beginner can do.
Weaving from newspaper tubes for beginners step by step: different products
After mastering the basic techniques, you can begin your first job. It's better if it's a basket. This simple option will help you master the technology, and the finished product will certainly be useful in the household.
How to make a basket from newspaper tubes step by step
To make a basket you will need:
- newspaper tubes;
- base - pot or jar;
- for the bottom;
- acrylic paint;
Sequence of weaving a basket from newspaper tubes photo:


- Two circles are cut out of cardboard. Newspaper tubes for the stands are glued to one of them at equal distances. The structure is closed from above with a second circle. The tubes - racks are bent upward. A form is inserted inside the frame. The top of the posts can be fixed wide elastic band. The frame is ready.
- We weave the walls. To do this, we take a tube, fix its edge at the base of one of the racks and begin to weave it around the racks. When the length of the tube does not allow you to continue weaving, you need to increase the newspaper vine. To do this, the ends need to be inserted into each other, after dropping glue at the junction.
Important! When you twist the tubes, one end is narrower than the other. Accordingly, when connecting, the narrow tip is inserted into a wide hole.
- To decorate the edges of the basket, the racks are sequentially intertwined with the main vine and secured with inside using glue.
- The last stage of work is decorating the product. To do this, the basket is completely covered with acrylic paint and two layers of acrylic varnish. Afterwards, you can decorate the basket with ribbons, beads, braid and other accessories.
Advice! The base of the basket can be made not from cardboard, but from tubes. To do this, a flat base is woven, the axes of which become racks.
In the same sequence, you can make a vase from newspaper tubes:
Secrets of weaving a rooster from newspaper tubes
The rooster is not only a symbol of the year, but also a talisman for the home. In Russian culture, the symbol of the rooster signifies wealth and prosperity in the family.
To weave a talisman you will only need newspaper tubes painted in bright colors.
- It is necessary to create a basis. For strength, you can thread a wire inside the newspaper tube.
- The cockerel's body, head, beak and beard are successively entwined with colored tubes.
- The tail and paws are done last. If the weave is tight enough, the cockerel can be placed on its feet. For additional strength, it is better to coat the product with varnish.
Photo of a cockerel step by step (crafts from newspaper tubes for beginners).
You can create unique things without spending a lot of money. A striking example of this is weaving from newspaper tubes. Of course, it will take a lot of time. But, in addition to the satisfaction and joy of creativity, you will become the owner of original and beautiful crafts. The problem with gifts will be solved - you can make them with your own hands.
Preparation of tubes
Before you start weaving, you need to prepare the starting material - wind tubes from newspapers or magazines. You will need the paper itself, PVA glue in a bottle with a dispenser, a long pushing knitting needle or a piece of stiff wire. The diameter of the knitting needle/wire is 1.5-2 mm. These are all tools at the preparatory stage.
Lots of ideas - lots of material!
Let's spin
To prepare the straws, you must first cut the paper into pieces. the right size. We cut newspaper strips or magazine spreads into several parts. Aspect ratio - 1:3 or 1:4 (for example, 27 * 9 cm, 35 * 10 cm). The exact dimensions are not important. Divide the page into several parts so that they are approximately the same aspect ratio as above.
Take a knitting needle and a strip of paper. We twist the corner of the paper around the knitting needle, and gradually, layer by layer, roll it into a tube. Secure the edge of the strip with a drop of glue. To make the tube the desired density, we lay the paper at 45° relative to the knitting needle. Then it will be quite dense, but at the same time it will bend well.

We take out the knitting needle. The tube is not too long; to work, you will have to splice them together. If everything is done correctly, one edge will be thin, the other will be thick and hollow from the inside. To connect two newspaper tubes, drop a few drops of PVA glue into the thick part and insert the second tube with a thin edge. Now we wait until it dries.
Painting and other processing methods
Sometimes, for more simple weaving, the tubes are rolled using a regular rolling pin. They become flatter. In this form it is easier to work with them - stretch them between the rows. But this is an optional step. Try “rolling”, maybe you will like weaving from newspaper tubes more this way.
Not everyone likes " natural look» weaving from newsprint. To improve the appearance, the wound tubes are painted. Acrylic paint is best suited for this. It fits tightly, behaves well with any type of paper, does not flow, dries quickly and has no odor. A water-based, moisture-resistant stain will also work. Paper tubes coated with acrylic varnish, to which a coloring pigment is immediately added, look good. Simultaneously with painting, they become less sensitive to moisture.

Painting each tube with a brush is long and tedious, so they look for a long tray into which the tubes are placed. Paint is poured into it, and ready-made newspaper tubes are lowered into it. Then they are laid out on a layer of polyethylene to dry.
Before starting weaving, so that the “newspaper vine” bends well, you can moisten it. It is better and easier to do this from a spray bottle, simply spraying water.
Beginning of weaving - forming the bottom
In most products, you first need to form the bottom. There are two options: make it out of cardboard, gluing stands to the edges. The option is simple and clear. Perhaps it is better for beginners - weaving the walls is a little easier than shaping the bottom. And so that the ends of the glued posts do not “scratch” the eyes, they are covered with a second similar piece of cardboard.

Among the features: in the corners you need to glue a double number of tubes. One will be on one side, the other on the other. In addition to the above option, there is another way - to stick them not on the corner, but on both sides. In this case, the racks are placed from the corner at a distance of no more than half a step (this is the distance at which you placed the other racks).
The second option is to weave the bottom from newspaper tubes. You will need long tubes - spliced from two or three. There are many methods, they are mainly taken from wicker weaving. The principle is the same - the tubes, one at a time or in groups, are intertwined with each other, forming a center. Then, using some of the lozins, they braid the warp, adding dimension or giving it more depth. round shape, if necessary.
Round bottom for large items
It will be a little easier if you cross several tubes laid one next to the other. In the photo (see below) we took five tubes and intertwined them relative to each other. To make the bottom less voluminous, it must be flattened. The easiest way to do this is with a rolling pin or a bottle - rolling it several times. To make it easier to work further, coat the intersections with PVA glue.

Next, we take the straw and begin to tie the bottom, passing the straw through three tubes (the rope method). So - through three tubes - we make two rows. Then - several rows - after two. A few is to ensure that the dimensions of the bottom are almost “right” - in shape.

We weave the last two or three rows through one tube. During weaving, the warp tubes must be spaced at the same distance. This is actually how it works, you just need to make sure that the distance is the same.

When switching to weaving the walls, we cross the base tubes one with the other. This makes the product more stable and the transition more reliable. To weave the walls, you can use the working tubes that were used to weave the bottom.
A simple version of the bottom made of newspaper tubes
You can start weaving from round-shaped bottom tubes in an easier way. Such a bottom will not look so elegant, but for beginners we recommend trying this method.
For a small product, take eight long tubes. Four at a time we fold them crosswise. You can also roll them with a rolling pin and glue the joint - there will be fewer problems at the start.

In the described embodiment, 15 racks are obtained (16-1). If you need more, either add as you weave the bottom, or take a larger number from the source.
Photos and patterns of weaving bottoms of different shapes
As you gain experience, you will want to make products of other shapes - oval, rectangular, multi-faceted. The section contains several diagrams showing how to make forms more elegant and complex.
Weaving from newspaper tubes for walls
As soon as you start weaving products, the patterns will become clear to you. Having gained a little experience, you will learn how to reconstruct the weaving method by looking at the photo. For beginners, we recommend starting with the most simple patterns. This is a rope, and then a pigtail. It won't take much time to master them.

Rope
To master the technique of weaving from newspaper tubes, you will need about five to seven stands. To begin with, you can attach several pieces of thick wire to some kind of stand (a piece of dense foam plastic, for example).

This is what weaving looks like live on a “simulator”
- We take two tubes and place them crosswise between the two outer posts. It turns out that one tube is in front of the work, the other is behind.
- Holding the tubes at the intersection with one hand, bend them with the other, going around the next stand. As a result, the tube that was in front turns out to be behind, the one that was behind turns out to be in front.
- We bend it again, going around the next rack and so on until the end of the row.
That's all - this is a method of weaving a “rope” from newspaper tubes. Already using this technique you can do the simplest things. The product is dense and durable. One important point: for this pattern to look normal, there must be an odd number of racks.

By changing the “starting” location of the tube, we get a different one appearance pattern
If you want to make it a little more complicated, you can take two tubes and go around two posts at a time. But then you need to calculate the number of racks so that the second row is offset - then the pattern will turn out to be interesting. No less interesting are two ropes directed towards each other, and not woven in one direction.
Chess
Checkerboard is another simple weaving method. To do this, you need to take two tubes, placing them one above the other.

This way you can weave a basket, tray and many other products. In terms of density, the product is not as strong as with the previous weave.

If you combine the two methods described, you get a rather interesting product. And if the transition is also decorated in a different color, it will be even prettier.
Shutdown
In order for the product to look neat, it is necessary, firstly, to remove the working tubes, and secondly, to somehow form the edge and do something with the stands.

We fix the working tubes
First you need to secure the working tubes. Usually they are hidden in the weave - in the nearest binding. For this operation you will need a knitting needle or a long wooden skewer.

This is a simple and reliable way to secure the working tubes. Their ends are hidden in the weaving, but are securely fixed and clamped. For those who are just starting to master paper weaving, this is perhaps the best option.
Weaving the edge - the main technique
Next, you can begin to close the edge. There are many different ways- more or less complex. The simplest one is to do the same as with the workers, but bend them inside the product. But then the edge is not very beautiful. If you want to make it more aesthetically pleasing, you can try the “rod” edge. It is not too difficult for beginners to master, and it looks interesting.
To close the edge with a “rod”, you need an auxiliary tube or you can take a skewer or knitting needle. With its help, we bend the first post to the right, bring it behind the next post and bring it forward. We bend it to the right in the same way, hook it behind the next one and bring two more posts forward. In total, we have three bent.


We cut it with pliers so that 8-9 mm of tube remains behind the stand. To fix this trim, we bend the first of the standing posts to the right, pressing the trimmed edge. Again we have three tubes at work (bent). Again we take the left one and repeat everything again.

A side is gradually formed that covers the top of the weave. We repeat all these steps until three posts remain: two bent and one standing. It’s easy to track this moment, it’s important not to miss it. This is where you need to be careful. If everything is done correctly, it will be impossible to find the place where the work begins/ends.
Final chords
When three racks remain uncovered, you need to make sure that the newspaper tubes are laid in the same sequence and in the same direction, so that they lie the same way as before. We take out the auxiliary tube or skewer with which we began to close the edge.
Again we take the leftmost tube, in front we go around the last standing post and then, according to the previous weaving algorithm, we need to lead it behind the next post. This stand is already bent and secured. This is the one with which they began to close the edge. We insert the tube from the back, slip it under the first curved post (it’s more convenient with a skewer) and pull it forward, laying the tube like the rest. We cut it off.


Now there are no standing racks, only three working ones remain. They must be laid in the same way as those that are already fixed. We take the far left one, it must be pulled under the third post. Look carefully. This is the first stand that does not have a cut tube near it. Stretch, lay, cut.

We stretch it under the third rack. If you look closely, this is the first one, under which there is no cut tube
We lay the left tube along the top, covering the tubes we just laid. We start it from the back, pull it under the counter, in front of the laid tube.

Here we extend...
We repeat the same operations with the next leftmost one. It must be placed behind an “empty” stand, near which there is no cut tube. This stand is located to the right of the one we just worked with. Here you can’t do without a skewer - you need to slip a newspaper tube under the two already laid (look at the photo).

We lay the tube on top, hiding the cut one above. We start it from the back, put it on a skewer and pull it out. Holding it with your fingers, we rock it from side to side so that there is a place for it and it “lies down.” We cut it off.

You also need to lay it out correctly - repeating the same pattern as before
All that was left was a newspaper tube sticking out. We start it behind the third rack. It’s not difficult to find your way: under the first two there are already scraps of the ones that were just laid. We insert the skewer under the laid turns and bring it out near the bent post.

Using a skewer, we bring the last rack out and lay it out so that it lies the same way as the others. Now it can be trimmed. The edge of the basket is ready and it is impossible to find where the row begins and ends.
Photo ideas for weaving tubes
Beginning craftsmen master weaving from newspaper tubes on simple crafts. As you gain experience, you want to diversify your products and use more complex patterns. In some cases, interesting-looking weaving is not necessarily complex. Such an example is in the following photo gallery. It contains step by step photos creating chess weaving.
Beginning - we braid two posts The number of turns is at your discretion It is more convenient if the tube “looks” to the right We finish the second row of checkerboard weaving, cut off the extra working tubes and secure their ends Leave as many working tubes as needed
The article will tell you how to weave beautiful baskets from simple newspaper tubes and present you with detailed master classes.
Weaving from newspaper tubes is a very unusual, but very popular handicraft that almost anyone can do. In addition, this handicraft is not expensive, because it does not require purchasing materials. Any product woven in this way is made from the most ordinary newspapers, rolled into a thin tube and fixed with varnish.
What is required for this job:
- Form - any square-shaped object that allows the product to have a given silhouette: vase, box, jar, drawer, toy, and so on. Choose an item that suits you in size.
- Newspapers – any newspaper sheets, double sheets preferably.
- Clothespins – ordinary or stationery, needed for fixation while weaving a basket.
- Scissors - for work
- Glue - dry or PVA for fixing and twisting tubes.
- Decorative materials – to add design to the finished product.
- Long wooden skewer - necessary for curling a sheet of newspaper.
- Cardboard – necessary to create the bottom of the product
How to weave a basket:
- Flatten the newspaper sheet
- Take a skewer and place it towards the edge of the newspaper sheet.
- Roll up the newspaper sheet and begin rolling, rolling the sheet tightly.
- Newsprint should be coated with glue so that it curls and sticks in place.
- If you used PVA, let the twisted tubes dry a little.
- Cut out the base for the basket, a square: large or small.
- Glue the tubes to the base and secure with clothespins, let dry completely.
- Remove the clothespins and glue a second square (exactly the same), press and secure. Let dry.
- Place the form on top of the bottom and begin weaving, tying each vertical tube with a horizontal one.
- The weaving looks very solid, because you shouldn’t weave several tubes. Each time you glue several tubes into one long strip, which you work with.
- Press the ends of the protruding tubes onto the mold with clothespins
- When weaving, you need to use patterns to create a pattern and carefully weave the edges of the tubes inside.
Detailed wizard class in photo:
Square basket
Video: “Weaving a square basket from newspaper tubes”
Weaving a rectangular basket from newspaper tubes: patterns, diagrams, description
You need to weave a rectangular basket from newspaper tubes according to the same principle as a square one. If you wish, you can also weave a lid, which should be only 1 cm in diameter larger than the product itself.
Step-by-step weaving in photos:

 Materials for work
 Twisting tubes with a skewer
 Gluing tubes
 Thick tubes are vertical, thin tubes are horizontal
 Gluing the cardboard base, fixing with clothespins
 Gluing the second cardboard, inner bottom
 Fix with clothespins until dry
  Establishing the shape and braiding it
  You can weave using only vertical tubes or weave horizontal ones
  You can adjust the height of the product yourself
 Secure the product with clothespins at the top for easy operation
 Completing the weaving
 Wrapping the tubes
 The final stage of work
 Rolling the tubes inward
 Cutting tubes that are too long: the ends can be left or glued
 Video: “How to weave a rectangular basket from newspaper tubes?”
Weaving an Easter basket from newspaper tubes: patterns, diagrams, description
You don’t have to buy a beautiful Easter basket; you can weave it yourself from scrap material – newspaper tubes. These baskets can be filled with Easter treats and given to your loved ones. Depending on how many treats you want to put inside or how much skill you have, there are several designs and ways to make such a product.
IMPORTANT: Weaving is similar to the previous lessons, however, to create such a basket you should not use cardboard for the bottom, but a round shape (a dish or a deep plate), which you will tie.
In order to create a small basket with a handle, you will need about 90-100 tubes, which should be twisted in advance. Let the tubes dry and only then get to work:
- Weave together 8 tubes with a double cross
- Start tying in a circle to make the base.
- Place the base form on top of the knitted small round bottom.
- Tie it, lengthening the tubes and creating patterns (for this you should use weaving patterns).
- To ensure that the product is neat and even, the tubes should be secured vertically, pinching them to the edge of the mold.
- The handle for the basket is knitted separately in the same way as weaving a braid from several tubes at once (see photo).
Step-by-step weaving with photos:

 Creating the bottom
  Tying the base: deep dish
 Fixing with clothespins
 After tying, remove the form
 Tying the edges, rolling the tubes
  Handle weaving: preparation
  Weaving into the edges of the warp
 Fixing handles with clothespins
  The handle weaves at both ends
  Tying the ends and tying them with tubes for a neat look
 Video: “Easter basket made from newspaper tubes”
Weaving an oval basket from newspaper tubes: photo, description
An oval basket woven from ordinary newspaper tubes can serve as an excellent piece of furniture and a dish for some food products, for example, sweets, fruit or bread. Making such a product is not difficult, and upon completion of the work you can paint it with any color and even varnish it. This coating will give the basket strength and moisture resistance.
By its principle, weaving an oval basket is similar to other products (square and rectangular, ordinary baskets), however, in in this case special attention should be paid to creating the bottom. You, of course, can use a cardboard base, or you can weave it by hand, which is much more beautiful.
How to weave an oval basket:
 In order to make the base, you need to intertwine several tubes together
  You can fasten the tubes together by tying them together
 After the base is made, start weaving in the usual way.
 When you have tied the required diameter of the bottom, wrap and lift the tubes up
 Secure the tubes with clothespins and continue weaving
 Video: “How to calculate the diameter of the bottom and weave an oval basket from newspaper?”
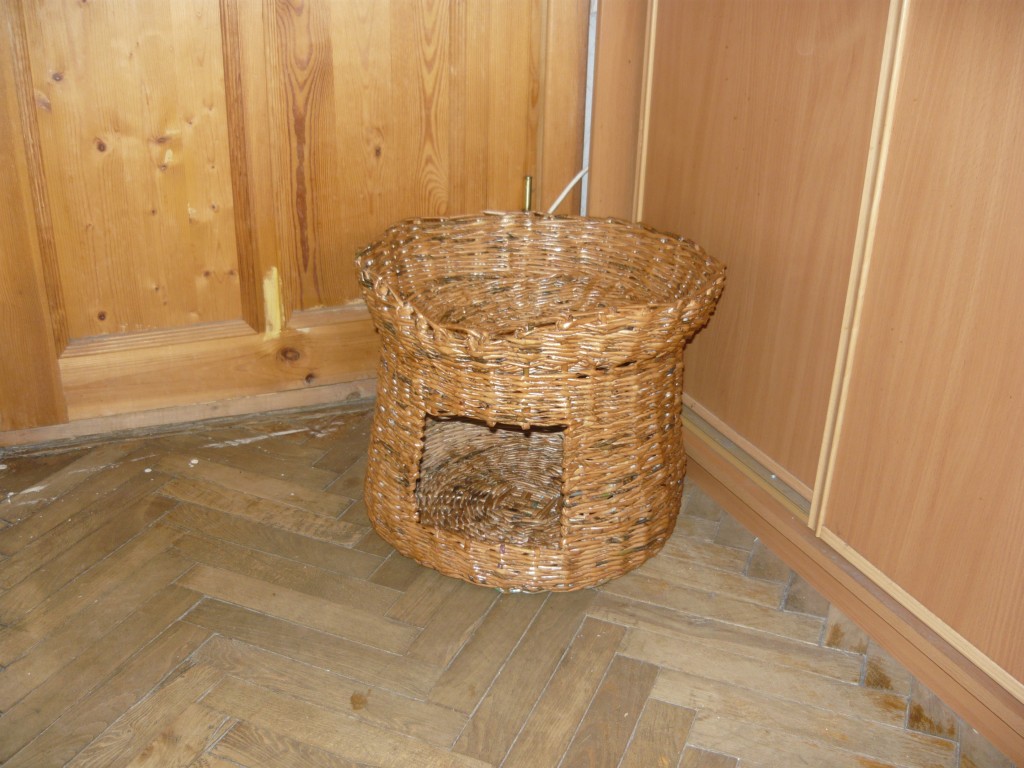
Weaving a “chicken” basket from newspaper tubes: photo, description
The “chicken” basket is very impressive and is perfect for making surprises for loved ones during the Easter holidays. It can be filled with dyes and Easter cakes and given as a gift to family and friends. Of course, such a product is much more difficult to weave than a regular basket, however, using video lessons and master classes, you can create a basket of incredible beauty.
Prepare a sufficient number of tubes in advance. Do the weaving according to the usual method: first create the bottom, and then put the form down and tie it. Choose a shape that is not very large, since the chicken should not be huge - this product is miniature and decorative.

 Getting started
 Finished product:

 Chicken baskets
 Video: “Detailed master class on weaving a basket in the shape of a chicken”
Weaving a round basket from newspaper tubes: photo, description
A round basket made of newspaper tubes is a beautiful and practical product that can be used as a box to store personal items: jewelry, money, cosmetics, threads and much more. Depending on your preferences, you can make a basket of any diameter, with a lid or handle, and decorate it with different accessories.
Square baskets
 Marine style baskets
 Video: “Unusual basket made of newspaper tubes”
Baskets and baskets help keep your home tidy and decorate the interior, so you can never have too many of them. Beautiful braids can be bought in the store, but it is much more profitable to learn how to weave them yourself.
- If you have a couple of free evenings and a pile of any paper, then you can weave a basket not only without financial losses, but also in the size, color and shape you need. And weaving baskets with your own hands is a very pleasant and peaceful process that you can do, for example, while watching your favorite movie.
And don’t let it bother you that the baskets are not made of wicker or rattan, because if everything is done correctly, then in appearance homemade baskets made from old papers will not differ from real wickerwork. Of course, they will not be as durable and moisture-resistant, but, nevertheless, they are ideal for storing most things.
For beginner craftswomen, we have prepared step-by-step master class on weaving such a rectangular basket from kraft paper with leather handles. And at the end of the article you can see several ideas for using baskets different forms and sizes.
Basket weaving workshop for beginners
In this master class we will talk about how to learn how to weave a basket from rectangular, square or round paper.
For work we will need:

- Kraft paper - you can also take baking paper, several paper bags, packaging mailing paper, pages of newspapers, magazines, etc.;
- 2 identical bases made of thick cardboard or fiberboard, cut in a square or rectangular shape - you can choose cardboard if you want to weave just a basket just for storage, and if you like the idea of a basket-tray like in this master class, then use size 24 fiberboard ×38 cm, thickness 2.5 mm.
Important: if you want to weave a basket with higher walls than in our tutorial, then you will need some kind of auxiliary template, for example, a shoebox. The template will help you weave a basket of the correct rectangular shape. The cardboard base in this case should correspond to the size of the box.
- Wooden kebab skewer or thin knitting needle;
- Scissors;
- Any paper glue and stronger glue, for example, “Moment”, as well as double-sided tape;
- Transparent matte water-based acrylic varnish in a spray or can;
- Long narrow leather belt (preferably size XL);
- 8 brass cap nuts, 8 brass flat head Phillips screws, 8 brass washers (sold in hardware stores, the whole set of fasteners will cost you about 70 rubles);
- An electric drill or awl to make holes in the leather belt;
- Marker.
Instructions
Step 1. Making tubes
To do this, you first need to cut the paper into equal sizes, for example, A4 or A5. Suppose you chose old newspapers to make a basket, which already have the size we need. Next we need to cut the newspaper pages into strips - future tubes. Here's how to do it quickly:
- Open the newspaper completely, then fold it in half lengthwise and press the fold.
- Now take a kitchen or utility knife and cut the newspaper at the fold. It is advisable that the cut areas be smooth and not frayed.
- Separate half of the resulting stack of paper, bend it lengthwise and cut it again. You will get strips about 10 cm wide. Now carry out the same procedure with the remaining stack of paper.
- Next, sort out those strips that have light edges without text or pictures - it is from these strips that you will make tubes white. They are more convenient for work, because they are easier to paint to resemble rattan or wicker. But this does not mean that you cannot use colored strips; it is simply advisable to pre-coat the tubes twisted from them with light paint, or paint them more densely (we’ll talk about the nuances of painting below).
- So, let's start twisting the tubes. Place a wooden skewer on the very edge of the strip (but not on the white one!) at a minimal (!) angle and try to tightly screw the paper onto it (photos 1 and 2). At first, this can be done on the table, twisting the skewer and holding the paper, and when you reach the middle of the tube, you can lift it up and continue twisting.

When you only have the tip left, you need to lightly grease it with glue and only then screw it to the end (photo 3). Woo-ala, the first tube is ready! All that remains is... to wind another 100-500 of these tubes (the exact number depends on the size of the basket). Don't be afraid, it's not that difficult or time-consuming, but patience will help here.
For those who want to learn all the intricacies of the art of making straws, we suggest watching a video tutorial from Elena Tishchenko.
So, we have learned the basic way to make tubes from newspapers. However, let's get back to the instructions.
- In this master class, the decorator first rolled only 24 tubes from strips of kraft paper (7x45 cm in size), and then about 120 larger tubes (from strips 7x90 cm in size). Why did he do this? Read on.

Step 2. Making the frame
Next we need to make the frame of the basket. To do this, take a base made of cardboard or hardboard and, using double-sided tape or glue, attach the tubes to it, maintaining the same interval between them (2-5 cm). You should end up with approximately the same design as in the photo below, but the exact number of tubes depends on the size of your base and the chosen spacing.
- These tubes are called vertical posts, since later they will “stand” and serve as the frame of the future basket.

- According to the decorator's idea, the main weaving of the basket should be deliberately rough, so thicker tubes were used for the walls. However, these 24 stand tubes are made thin to make them easier to braid later. You can repeat the designer’s technique, or you can weave a basket from identical tubes.
- If desired, the cardboard or fiberboard base can be pre-upholstered with fabric, such as linen.

Step 3. Start weaving
The base is ready, which means it’s time to start weaving! There are a lot of weaving methods, we suggest mastering the most basic one – “rope”.
- Bend the tube in half and wrap it around any vertical tube stand (you can start from anywhere);
- Then cross the ends of the tube as shown in the photo below. You will have your first loop.

- Then wrap the second post and cross the ends again. You will get the first eight.
- Continue weaving until the horizontal tubes run out. As soon as this happens, drop a little PVA glue inside each and insert new tubes to a depth of 2-3 cm (their tips can be slightly bent).
- Thus, you need to weave 7 rows if you want to make a low basket like in our master class.

- If you want to weave a basket with higher walls, then after the first two or three rows you need to use a template box and weave around it. In this case, you should periodically correct the weaving - align the racks, compact the woven rows, etc. For convenience, the racks can be fixed in a vertical position using clothespins, as shown in the picture on the right. By the way, if you want to weave a round basket, then a saucepan, round box, flowerpot, etc. will work as a template.
Step 4. Finish weaving
Finally, we completed the last row, trimmed and adjusted everything, and took out the box template. Now we need to finish the job beautifully. To do this, we simply cut off the horizontal tubes with which we weaved the walls, leaving only 5-10 cm of their length, and hide the ends inside the weaving (left photo below).

Great, now let's get to the racks. You can simply cut them off, lightly smearing the edges with glue, or make a simple but beautiful edging:
- Bend the first vertical post 90 degrees and braid it behind the adjacent post on the right, then bring it along the outside of the third post. And finally hide it behind it and glue it. Repeat with the next upright and all the others.
Step 5. Apply varnish
Hooray! The basket is almost ready, all that remains is to coat it with varnish. This tutorial uses acrylic spray varnish, but you can go over your braid with a brush.

- If desired/necessary, the basket can be painted before applying varnish, but it is best to paint the tubes before weaving begins - this way the coating will be of a higher quality. Water-based acrylic paints are ideal for painting; they will add density to the paper and dry quickly. For more information on coloring newspaper tubes, see the following video tutorial from Elena Tishchenko.
Step 6. Attach the handles
- Cut off the buckle and the end with the holes from the belt. Then cut the middle part of the belt into two equal parts. This is what you should get.

- On the back of the resulting strips, use a marker to mark the location of 2 screws at each end of the two strips.

- Use a power drill, awl, or just a nail to make holes in the strips at each mark (8 holes total).

- On the front side of the tape, place a washer on the hole made, screw the screws into them using a screwdriver.

- Next, attach the handles to the outside of the basket. Each fastening screw must fit between two rows of weaving as shown in the next right photo. Then, from the inside of the basket, screw the end caps onto each of the 8 screws.


