Short rows tend to strike fear into the hearts of the uninitiated, but as with all things knitting, there's really nothing difficult about it.
Short rows are used to create triangles or wedges in knitting, and they are also used to form rounded edges. They form everything: from darts on the chest to “ears” on a hat with earflaps.
There are several ways to make short rows. The main method is that the row is not knitted to the end. You knit to a certain point and perform an action called "wrap and turn" (turning the stitch and turning the knitting), and then continue knitting the other way until the end of the row or to the point where you need to wrap and turn again. There are certain differences in making short rows on the front and back sides.
So see how it's done.
Working short rows using the Wrap and Turn method on the right side

Step 1. The working thread remains behind the work. Slip the first stitch on the left needle onto the right needle as a purl stitch (that is, inserting the right needle into it from right to left).

Step 2. Move the working thread so that it is in front of the work as for knitting a purl loop.

Step 3. Move the previously slipped stitch on the right needle back to the left needle.

Step 4. Move the working thread back behind the work as for knitting a knit stitch.

Step 5. Turn the knitting to the wrong side to continue working. Knit purl stitches.
Working short rows using the Wrap and Turn method on the wrong side

Step 1. The working thread is located in front of the work. Slip the first stitch on the left needle onto the right needle as a purl (that is, inserting the right needle into it from right to left).

Step 2. Move the working thread behind the work as for knitting a knit stitch.

Step 3. Return the previously removed stitch from the right needle to the left one.

Step 4. Place the working yarn back before working as for knitting a purl stitch.

Step 5. Turn the knitting over to the other side to continue working. Knit facial loops.
After you have completed a short row, you will see gaps in the knit fabric where the wrapped stitches are. To correct this, when knitting the next row, you need to “pick up” the wrapping loops and knit them together with the one they wrap. To avoid confusion, note that the stitch that is on the left needle is called “wrapped” (it is wrapped by another loop), and the one that is located around it is called “wrapped” (it wraps another loop). It is not initially located on the spoke.
Knitting a wrapped stitch on the right side

Step 1: Pick up the wrap stitch with the right needle from front to back.

Step 2: Next, insert the right needle into the wrapped stitch on the left needle.

Step 3: Knit these two stitches together.
Knitting a wrapped peli on the wrong side

Step 1: Pick up the wrap stitch by inserting the right needle from back to front.

Step 2: Place a wrap stitch on the left needle, draping it over the stitch you were wrapping.

Step 3: Purl these two stitches together.
The method of knitting short rows is “Wrap and Turn”.Every craftswoman, at least once, is faced with the need to use the technique of knitting in short rows. This technique gives us knitters a lot of advantages and opportunities. Using knitting in this way, you can get a variety geometric shapes, from the simplest (triangles, squares, circles) to intricate and complex. Short rows help to knit the heel at the toe, the sprout at the jacket; obtain curved shapes of the product in accordance with the pattern.
The list of possible uses of this technique could go on for a long time.
Today I'm sharing my favorite way to knit short rows - "Wrap and Turn". 

Knit with knit stitches from the beginning of the row to the turning point.
Without knitting, slip the next stitch onto the right needle, as in knitting. Bring the thread forward to the right side of the work between the knitting needles.
Move the removed loop back to the left needle. Wrap the thread around the loop and move it (the thread) back to the work, as in knitting. 
Turn the work to the wrong side, as if knitted to the end of the row. The removed loop will be entwined and there will be a long constriction around it. Then knit with purl stitches.
Knit a row with purl stitches until the turning point. Slip the next stitch onto the right needle, as in purl knitting.
Bring the thread forward to the right side of the work between the knitting needles.
Transfer the removed loop back to the left needle. 
The thread wrapped around the loop.
Turn the work as if knitted to the end of the row. Knit front row.
The facial loops above the turning point (loops with constrictions) are knitted like this:
knit the fabric until the entwined loop, then pass the right knitting needle under the constriction along with the loop and knit them together.
The purl wrapped loop above the turning point is knitted like this:
insert the right knitting needle behind the back wall of the waistband and move it in front of the purl loop. We knit them together. 
Hello.
Today we are knitting short rows with knitting needles.
A few words about what they are needed for.
Sometimes in a knitted fabric it is necessary to knit rows different lengths. For example, to make darts:
or a sprout when knitting raglan (this is how I finished the top part):
With the help of shortened rows you can beautifully and neatly design:
- sloping shoulder line
- bulges (when knitting heels)
- wedges in berets
- an even semicircle at the skirt
- semicircular neckline, etc.
Usually in these cases I, like many others, simply close off several loops in each next row. And the edge turns out to be stepped and very uneven. Shortened rows allow you to do the work more accurately, without holes.
Below we will look at 3 ways to perform shortened rows.
How to knit short rows with knitting needles
The essence of these rows is that each row is not knitted to the end, the work turns around and continues in the opposite direction. This type of knitting is also called rotary or partial.
For clarity, I use yarn different colors. Each of the following examples shows how to knit short rows, first on the front side and then on the wrong side.
Method 1 - Short rows with double crochets
We knit a row until the place where we need to turn the knitting.

We turn the work to the wrong side and make a yarn over. We knit the row as usual until the turning point.

In the next row, on the front side, yarn over and knit the next loop.

As you can see, there is no hole here.

Now let's see how to knit a short row with a double crochet on the other (wrong) side. After purl. row, turn the knitting and yarn over, knit a row.

Then, having knitted the purl row back, we reach the yarn over, slip it onto the right needle and turn over the next purl loop.

Then we throw this loop and yarn over onto the left knitting needle and knit a purl loop, bringing the right knitting needle from behind and below, grab the working thread and pull it through 2 loops.

It turns out that the yarn over (pink loop) is at the back. And everything looks very neat.

And if we had not turned the purl loop over, but knitted it with the yarn over the way it lay,

it would have turned out like this (the drawing on the front side is broken):

Method 2 - Short rows with a twisted loop
At the point of turning on the right side, slip the next knit stitch onto the right needle,

we pull the working thread forward behind it and put the removed loop on the left knitting needle again.

We turn the knitting, again throw the working thread towards us and knit the reverse row as usual.

On the front side (after knitting the next row) the turning point looks like this:

Using the right knitting needle, pick up the yarn over and knit stitch from the front from below

and knit both knit stitches.

From the wrong side we knit a shortened row with an entwined loop like this: we slip off the next loop, we start the working thread from ourselves,

turn the knitting, pull the thread through the work.


We do not knit it right away, but first turn it over on the knitting needle (before that we remove the pink loop).

We knit both loops, bringing the knitting needle from below to the back walls.
The pink loop remains on the wrong side of the knitting.

And from the front side the knitting looks like this:

Method 3 - Short rows with a tight loop
Another way to knit short rows without holes. Try it, maybe you will like it more than others.
We tie the front row to the turning point.

Turn the knitting and remove the knitted loop, purl-wise.

Then we bring the thread up and away from us and pull it so that we see 2 half-loops (blue).

Then, when you knit the purl. and persons rows and you get to this stretched loop in the front row, it will look like this:

Knit it knit by inserting a knitting needle, as shown in the photo,

and stretch the working thread.

From the wrong side we proceed in the same way: we tie it to the turning point,

remove the loop like a purl

and move the working thread over the knitting needle away from you.

We stretch the working thread,

and then, in the next purl row we knit it purlwise


And from the front it looks like this:

Now you know at least 3 ways: how to knit short rows with knitting needles. All of them are on this sample. But there are no holes)))
And, if the entire fabric is knitted with yarn of the same color, then the transitions will not be noticeable at all.
I hope you find the information above useful. Personally, I will now knit the neckline without closing the loops in every 2nd row, but using shortened rows.
Have fun knitting!
Regular rows when knitting do not always have to be knitted to the end, in which case they are called shortened. This concept includes “partial knitting,” that is, on a certain part of the knitting, on several loops, the row is not knitted to the end, the knitting is turned around and knitted in the opposite direction. This modular knitting is used when forming a bevel of the shoulder line, a rounded edge of a product, when knitting the heel of a sock, a dart of a product, a neckline, and bulges.
How to avoid holes when knitting.
In most cases, when knitting short rows, gaps may appear at the end of the row. These holes can be avoided in three ways: “wrapped loops” (easy to perform and a neat result), “double crochet” (results in a loose knitting), and “from the broach” (the neatest method).
“Knitting with wrapped stitches” is the first method.
1. In the front row, do this: knit until the turning point. Without knitting, slip the next stitch as a purl on the right needle, move the working thread forward, to the front side, between the needles. Return the removed loop to the left needle and return the thread to work. The removed loop will be wrapped. Turn the knitting and purl the shortened row. Repeat wrapping the loops in each turn in the middle of the row.
2. In the purl row, do this: at the turning point, without knitting, remove the loop as a purl, and transfer the thread to work. Return the removed loop back and move the thread forward, before working between the knitting needles. Turn the knitting and knit the shortened row. Repeat wrapping the loops in each turn in the middle of the row.
3. We knit the next row up to the “wrapped” loop, we knit it like this: insert the right knitting needle behind the wall of the “wrapper” and into the wrapped loop itself (knit or purl) at the same time. We knit them together (with a knit or purl stitch).
“Knitting with a crochet” is the second method.
1. Knit with knit or purl stitches until the turning point. We turn the knitting and yarn over on the right needle (in the back row, yarn over with a movement away from you, in the front row, yarn over with a movement toward you). Knit the shortened row to the end. (The picture shows the purl row.)
2. In the next row we knit along all the loops to the yarn over, knit the same yarn over with the next loop together.
3. If we knit purl along all the loops, then we knit until we yarn over, thread before work, remove the yarn over, as if we were knitting knit stitch, and the next loop after it in the same way, we return them back, without twisting, to the left knitting needle, and knit them together purlwise behind the back walls.
“Knitting from a broach” is the third method.
1. In the front or back row we knit a shortened row to the point of turning. We turn the knitting, remove the first loop as a purl, and knit the shortened row in the opposite direction.
2. In the next row (the knitting is temporarily turned to make this method easier), the right needle is inserted into the broach between the 1st and 2nd loops on the left needle, as shown in the figure. Raise the loop from the broach onto the left needle.
3. Turn the knitting back and knit together the broach loop and the next loop on the left knitting needle.
4. If the next row is purl, insert the left needle from the bottom up into the broach between the 1st and 2nd loops of the right needle, 2 rows below. (Shown in the picture.) Pull this loop out and drop it temporarily from the knitting needle. Slip the next stitch without knitting from the left needle to the right needle. Pick up the dropped stitch again with the left needle. Return the slipped stitch from the right knitting needle to the left one, and purl these two stitches (slipped and pulled out) together.
Formation of the shoulder bevel line.
1. In our example, we will look at how to form a shoulder bevel when knitting stockings. We will form the bevel line of the left shoulder using decreases of 8 loops every other row. The outer edge of the shoulder is lower than the highest point of the neckline, which means the short rows should “rise” at the end of the knit rows.
2. For the sample, cast on the knitting needles a number of stitches that are a multiple of 8. (The figure shows a set of 24 stitches.) Knit in stockinette stitch to the height at which we begin decreasing to form the shoulder. Using a marker, divide the loops into 3 equal parts. We will knit the front row without decreasing (although it is in the front row that we begin to make decreases for the shoulder bevel).
3. In the purl row, knit 8 purl loops (up to the 1st marker), and wrap the next loop (slip the loop as a purl, transfer the working thread from the front side to the purl side, then return the removed loop to the left knitting needle, transfer the working thread back to front side). Turn the knitting and knit a row with facial loops.
4. On the next row, purl 16 stitches (up to the 2nd marker), and wrap the next stitch as in step 3. Turn the work and knit until the end of the row. (8 loops on a knitting needle.)
5. Knit purl along all the loops of the row, while knitting the wrapped loops in the first way (described above): insert the right knitting needle behind the wall of the “wrapper” and into the wrapped loop itself at the same time, knitting them together with the front one. We close all the loops or remove them onto an additional knitting needle for further connection of the shoulder bevels.
Circle knitted in short rows.
The pattern is knitted in garter stitch, but other stitches can also be used. dense patterns. Keep in mind that when knitting in garter stitch, you do not need to knit the “wraps”.
Flawless knittingHow to make your knitting PERFECT? (1 part)
Short Rows or Partial Knitting Method
Many needlewomen are familiar with these terms and techniques and they actively use them in their work.
This master class is for beginners, those who are not familiar with knitting short rows or perform them differently.
Usually, by knitting the parts, their bends, you close the loops. The edge is not smooth, jagged.
This is a real nightmare, these steps of shortened stitches in a row, a hard joint, holes in the transition to the collar and other “charms” that beginner knitters encounter.
How can you improve your knitting and craftsmanship and get more beautiful and therefore high-quality, professional products?
How to make your products FLAWLESS?
Knitting in short rows, sometimes called partial knitting, allows you to model knitted fabric and give it the desired shape.
This technique in hand knitting is used extremely widely: shortened rows are used for
- making collars,
- visors on hats,
- coquettes,
- when knitting fabrics with an extended silhouette,
- for creating recesses and various folds,
- neckline and shoulder bevel,
- in the toes of mittens
- knitting beautiful heels in socks,
- knitting a sprout on panties and tights
- knitting a sprout in raglan sweaters
- when descending armholes
- to obtain a smooth line along the edge of the canvas
Sometimes it is necessary for one side or part inside the product to be longer than the other (for example, adding extra rows when stooping or for the tummy).
This technique is also used in combination different patterns in one row, for example, when combining facial stitch on the shelf and garter stitch and on the placket of the jacket. These patterns “grow” differently: to achieve the same height you need to knit different number rows, since the stockinette stitch is higher than the garter stitch. Having calculated the total number of additional rows for the “lagging” pattern based on the samples, they are evenly distributed along the height of the part being performed. The work is started at the point where the pattern changes.
The name of this method speaks for itself: in shortened rows, some of the loops are not knitted.
This can be done anywhere in the row: along the edges (Fig. 1, a), in the middle (Fig. 1, b) or knit loops of only one of the edges (Fig. 1, c).
As can be clearly seen in the figures, the part of the row that is knitted gradually gains height, while gradually decreasing in the number of loops. Having knitted the required number of loops in a row, turn the knitting and continue to do the work, leaving unknitted loops on the knitting needle.
The more the opposite edges of two adjacent sections of the canvas must differ in height, the more turns will be required. To avoid the formation of holes at the turning point, various techniques are used.
I want to teach you one of them.
Short rows on one side of the fabric
Let's practice knitting a sample. Take light threads, thicker knitting needles and knit loosely.
For example, let’s take (as it were) the calculation of the armhole: we will decrease 4, 3, 2, loops, and 2 times one at a time
(4 + 3 + 2 + 1 + 1 = 11)
You can use markers for marking
For example, I cast on a certain number (15-20) loops and knitted 2-3 rows
1 - Right side of knitting.
do not knit 4 (according to calculation) loops to the edge of the knitting, the thread is at work 
We remove the loop on the right knitting needle, draw the thread around the removed loop to the front side 
Return the loop to the left needle 
That is, we wrapped the loop with a working thread
Knitting turn, 
Knit a purl row to the end.
We knit the front row again, without knitting 7 (4+3 according to calculation) loops (or 3 loops before the entwined one) 
- remove the loop, twist it, return it to the left needle, 
- turn, knit a purl row.
Turn to faces. side Knit loops without knitting 9 (4+3+2 according to calculation) loops (or 2 stitches until the last twist)
- twist the loop, turn, knit the purl row to the end. 
Next according to calculation, 1 loop is shortened.
On the front side we knit loops, leaving 10 loops (or 1 before the last entwined loop)
- and in the same way - remove the loop, twist it, return it to the left knitting needle, 
Turn, knit a purl row to the end
We do the same with the next 11 loops according to the calculation - we knit a row up to it, wrap it around it, turn it and knit the purl row to the end.
I knitted the front row to the last loop. On the right knitting needle there are now loops (shelves) that will be knitted further.
On the left, all the loops that needed to be closed for the armhole are 4 + 3 + 2 + 1 + 1 = 11 loops
Arrows indicate entwined loops 
- pick up the wrapping thread with the right knitting needle 
-... and the loop around which it lies 
- and knit them together with the front one. 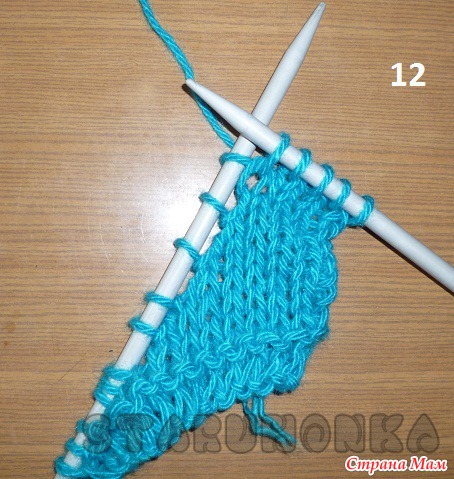

(you can put a loop on the right knitting needle, pick up the “wrap” with the left knitting needle, return the loop to the left knitting needle and now knit them together)
We also knit the remaining loops on the left knitting needle. We knit loops without twists as usual.
Front view 
... with the wrong side 
If this is an undercut, then you continue knitting with the chosen pattern and get an even, unnoticeable transition. 
If this is an armhole, neckline, shoulder bevel - the edge of the fabric, in the next row close the loops in the usual way and get a beautiful, smooth bend along the decrease line of your part. 

If the piece has decreasing lines on both sides, when knitting the wrong side, proceed in the same way as on the front side. BUT!
But pass the wrapping thread from the front, from the wrong side, to the front side.
When knitting these decreases, insert a knitting needle from below under the wrap and a loop from the wrong side and knit with a wrong loop.
REMEMBER!
Whatever pattern you knit:
- do not knit any additional rows - wrap the loops immediately, according to calculation, directly according to the pattern.
- in the front row, draw the entwining thread from the wrong side, around the loop and bring it to the front side. Having turned the knitting, knit the wrong side according to the diagram (description) of the pattern
- in the purl row - pass the wrapping thread from front to back, from purl to front and knit by inserting the knitting needle from behind, from below under the wrap and into the loop
Having learned this easy way, you will make your own products flawless.
Flawless knitting (part 2)
In the previous publication (http://www.stranamam.ru/post/4511011/) I told you why you need short rows or partial knitting.
We will continue here. On this MK we will knit the toes with partial knitting - this could be a toe for a mitten, a sock, a chest dart, or the back of a hat. I've come across the name "Boomerang", probably because it looks like this drawing: 
First we will knit in short and then in long rows.
We put 15 loops on the knitting needles and divide them into 3 parts - 5+5+5 - 5 loops each, bevels on the right and left + 5 loops in the middle
For mittens and sock heels, division by 3 is the most suitable calculation.
1 row (front) knit 14 loops, thread at work, twist 1 last loop, turn 
- 2nd row (purl) knit 13 stitches, thread before work, twist 1 last stitch, turn, 
- 3rd row(s) knit 12 p, thread at work, twist 1 p, turn, 
- row 4 (wrong) knit 11 p, thread before work, twist 1 p, turn, 
Let's continue
5 row(s) knit 10 p, thread at work, twist 1 p, turn,
Row 6 (wrong) knit 9 sts, thread before work, twist 1 st, turn,
7 row(s) knit 8 sts, thread at work, twist 1 st, turn,
Row 8 (purl) knit 7 sts, thread before work, twist 1 st, turn,
9 row(s) knit 6 sts, thread at work, twist 1 st, turn,
Row 10 (purl) knit 5 p, thread before work, twist 1 p, turn,
On the knitting needles there are 5 twisted loops on the left + 5 middle + 5 twisted loops on the right 
Now ATTENTION: We will knit loops with double twisting!
11 row(s) knit 5 p. thread behind work, twist 1 p, turn, 
This will be the second twist on the loop - as you remember, we already wrapped it once
Row 12 (wrong) knit 5 sts, thread before work, twist 1 st, turn (same as in row 11)
13 row(s) knit 5 sts, insert the knitting needle immediately under 2 wraps and into the loop and knit this trinity, 

Row 14 (purl) knit 6 sts, insert a knitting needle from the back of the fabric under 2 twists and into a loop and purl this trinity, 
thread at work, twist 1 p, turn, 
If it is difficult to insert a knitting needle under two wraps and a loop at once, pry them with the right knitting needle from the wrong side. from below, drape over the left and knit together
We continue like this until we have knitted all the loops.
15 row(s) knit 7 sts, knit wraps and loop (3 knits together), twist 1 st, turn,
16th row (purl) knit 8 sts, knit wraps and loop (3 together purl), twist 1 st, turn,
17 row(s) knit 9 sts, knit wraps and loop (3 knits together), twist 1 st, turn,
Row 18 (purl) knit 10 sts, knit wraps and loop (3 purl together), twist 1 st, turn,
19 row(s) knit 11 sts, knit wraps and loop (3 knits together), twist 1 st, turn,
20th row (purl) knit 12 sts, knit wraps and loop (3 together purl), twist 1 st, turn,
21 row(s) knit 13 sts, knit wraps and loop (3 knits together), turn,
Row 22 (purl) 1, remove 13 stitches, knit wraps and loop (purl 3 together).
You knitted the toe in short rows. 
This is what the loops look like on the wrong side 
And here is the front, neat side 
Happy knitting and warm gifts!


