Plastic bottles cause horror among all environmentalists on our planet. The problem is that repeated use of this (seemingly) convenient device is harmful to the body. How to be? The answer is simple - creativity. New Year's toys made from old bottles will create incredible comfort. Making them will be as easy and enjoyable as possible, and we will show and tell you how to make them yourself. Let's start with the video.
The simplest craft option
For this craft you will need:
- bottom of the bottle;
- paint/markers/markers;
- needle, thread, fishing line;
- paper;
- ribbon.
It is necessary to cut off the bottom of the bottle (you can take any volume). And then do some magic on it: paint it or leave the original color, decorate it with snowflakes, make a hole and thread a fishing line on which the toy will hang on the Christmas tree. You can make a single design using the same fishing line. All this can be seen in the photo below. We have selected several master classes.


Balls from a bottle
In this case, we just need to cut our bottle into strips. These strips must be the same length and width. They need to be glued at one end and then at the other so that the future Christmas ball is formed. This ball can be decorated as you please: so you can build on this, and also refer to traditional New Year’s symbols (sparkles, ribbons, red/green/gold paints, rain, pine cones, etc.).


Bells from a bottle
Bells in the form of a New Year's toy will decorate the Christmas tree with their presence. How to make them - the top part of the bottle is necessary, because it is similar in shape. You will need paper, foil, paints, tinsel, fishing line, ribbons, glue. Part of the bottle should be wrapped in foil, secured with glue (preferably instant fixation) and decorated with snowflakes, tinsel, etc.


One two Three! Shine Christmas tree!
For this Christmas tree decoration you will need several bottles. Again, we take several of the upper parts, cut them into small strips, and place them on top of each other. The lower part can serve as a base. They can be secured with glue, but this is optional. Decorate with balls, beads or tinsel.

A few more ideas...
Toys made from bottles are just your imagination, which you can literally make into reality with your own hands. You can use any paints. The shape depends on preference. It is not necessary to take small bottles; for example, you can make a Santa Claus from a five-liter bottle (you can make a beard from plastic spoons). Lids can also become a Christmas tree decoration. We have selected several ideas.


We suggest making Christmas tree decorations with your own hands from plastic bottles!
We've been waiting for a long time now New Year's holidays when all your most cherished dreams come true. Therefore, it is worth thinking about such pleasant chores as: choosing the right outfit, creating a festive atmosphere and decorating the Christmas tree.
Many needlewomen love to create Christmas tree decorations with their own hands, so I often use the most simple materials to create a new masterpiece: paper, felt, plastic bottles, etc. By combining them with sparkles, tinsel and bright decor, you can create an unusual and elegant Christmas tree decoration.
Due to the fact that these are very easy to make, you can create more than one Christmas tree decoration with your own hands that will delight you and your loved ones. In order to make a craft you will need:
- 2 plastic bottles;
- paints or markers;
- multi-colored ribbons;
- Double-sided tape;
- paint brush;
- stationery knife.
Process of creation:
- First of all, you need to cut out the bottom of each bottle. These blanks will be needed to make one toy.
- Now we take brushes and paint and paint on inside each blank a snowflake.
- After this, you can put tinsel, confetti, decorative balls or sparkles into the toy.
- Then we connect the two parts together using double-sided tape.
- To hide uneven lines, you will need a ribbon that matches the color of the paint you are using. It's best if you wrap the ribbon in several layers and tie it in the shape of a bow. This way you will complete the top of the toy.
- Now the craft is almost ready and you can secure it with a paper clip, which must be bent into the shape of a hook.

Despite the fact that such toys are considered the easiest to make, they open up great prospects for your imagination. This is a great way to teach your child new ways to decorate and create their own New Year's masterpiece.
Christmas balls
In order to make a Christmas tree decoration in the form of a ball, you will need to take a plastic milk or water bottle (preferably the surface is transparent). Their shape is most suitable for creating this decoration.

Now let's prepare the following auxiliary tools:
- dye;
- glitter;
- stationery knife;
- glue.
First of all, you need to take a utility knife and cut four circles (up to 1 cm wide) from the bottle, and then connect them into a ball. After this, you need to fasten them together with glue.

You can use clothespins to hold them on both sides to keep them in place until the glue is completely dry. You can decorate the balloons at your discretion. For example, you can glue ribbons to the side edges or strew them with a large amount of multi-colored sparkles. The main thing is that the result pleases you.
Decoration in the form of Chinese lanterns
Christmas tree decorations in the form of Chinese lanterns, which you can make with your own hands, will look very original. To do this you will need the simplest materials:
- plastic bottle;
- ruler;
- marker;
- thin thread;
- beads;
- decorative elements (rhinestones, sequins, sparkles, etc.);
- scissors.
It is worth noting that there are several options for creating this toy. Let's look at one of them:

- First you need to remove all unnecessary elements (label, glue) from the bottle. This will be easier if you put it in water for a while.
- Now take the measuring tape and apply it to the top of the bottle. We mark points in a circle that should be located at a distance of 1 cm from each other.
- Then you need to attach a ruler to any point and draw a small line downwards. And make the same marks at the bottom of the bottle, near the bottom.
- After that, take the scissors and make holes in each of the marks using rotating movements. You can also use an awl for this.
- Now we make cuts between the top and bottom marks that you previously made. Carefully bend each strip upward. And then we select the middle and make another fold.
- We take scissors and make holes in the middle of the bottom and cap of the plastic bottle.
- Now you need to take a pre-prepared bead and thread it through a thread or wire. Connect the free ends together. It is only very important that the bead is in the middle of the thread. To do this, you can secure its position by twisting the wire several times. Then we thread the ends of the wire through the hole in the bottom and stretch it along the entire length of the bottle to the hole in the cap. After this, the lid can be screwed on. The remaining thread or wire can be used to create a loop to hang the toy on the Christmas tree.
- You can remove marker marks using nail polish remover.
Use your imagination and decorate a toy made from a plastic bottle as you please. The main thing is that your Christmas tree decoration is created with your own hands and with all your soul.
Plastic garland
We have already seen that you don’t need much to create a festive atmosphere. And you don't have to spend a lot of money on expensive ones New Year's toys and decorations. Continuing preparations for the New Year, we can create another Christmas tree decoration with our own hands in the form of a garland made of plastic bottles. This DIY Christmas tree toy made from plastic bottles can attract the attention of even the most demanding guests.

To do this you will need:
- electric garland;
- plastic bottles;
- wire;
- scissors.
Process of creation:
- First, make sure that the LED garland you choose is working properly.
- Then lay it out on the floor to get an idea of how many plastic bottles you will need to make the craft.
- After that, you need to cut off the bottom and cut a small hole in it to place the bulbs in it.
- Carefully connect the resulting parts using wire.
- As a result, you will have a beautiful flower garland!

There are several more options for DIY Christmas tree decorations made from plastic bottles that will help you quickly decorate your home for the upcoming holiday.
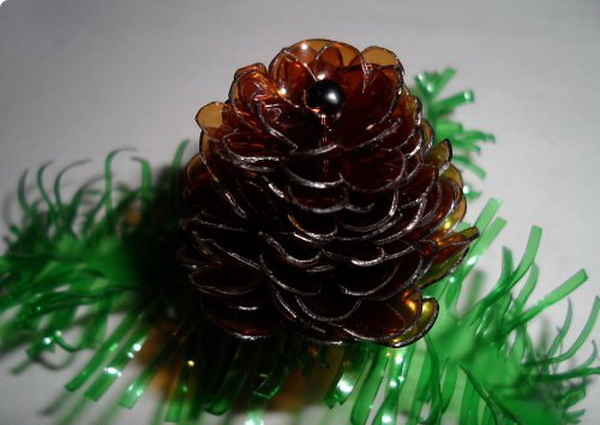
Christmas tree decoration – pine cone
This pine cone toy will be a great addition to your holiday decor. To create one blank you will need:

- dark brown plastic bottle (2 l) – 1 pc.;
- green plastic bottle – 1 pc.;
- templates for each layer;
- wire;
- pliers;
- large beads;
- scissors;
- candle;
- marker.
Main stages of work:
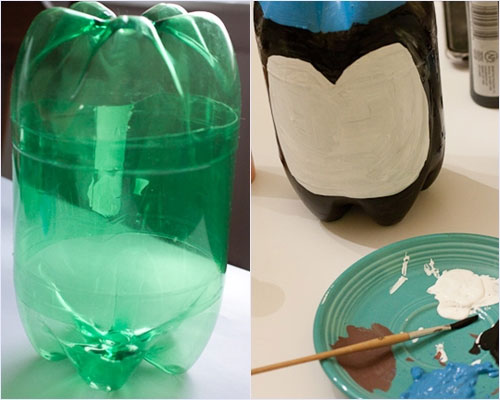
- Before you get started, you need to prepare your existing plastic bottles. You need to place them in soapy water and leave them there for a few hours. This is necessary to make it easier for you to clean it from the label and adhesive layer.
- After the bottle has dried, you need to cut off its neck and bottom. As a result, you should get an oblong cylinder, which we cut along one of the side faces.
- Now you need to take a marker and draw blanks of different sizes on the resulting rectangle - these will be the layers of our cone. Then we cut them out and make a hole in each with a hot awl, and two in the smallest one (the core of the cone). The wire will be threaded through these holes.
- Now you need to shape each part to get more natural look products. To do this, you will need pliers, it will be more convenient for you to hold the “layer”, and an ordinary candle. We take each piece and hold it over the fire for several seconds. After this, the plastic will begin to wrap inward and acquire the necessary shape. We repeat these steps with the remaining parts. It is worth noting that when heated, plastic may release harmful substances, dangerous to our body. Therefore, do this step with the windows slightly open.
- It's time to collect our pine cone. To do this, take the wire and put each layer on it, starting with the largest.
- Once you have secured the last piece, take a large bead and thread it through the center of the piece. This will be our core. Now pass the wire along the same path, only in the opposite direction. Twist its outer ends, you need to twist them together, we will need them later.
- Now you will need a green bottle. From it we will cut a blank that resembles a twig. After that, bring it to the candle and process the edges. After this you can attach it to the wire.
- From the remaining parts of the brown bottle you need to cut a thin strip. Then we heat it with fire and begin to gradually wrap the wire around it. But if you are unable to do this, then you can take some brown beads and decorate the wire with them.
In this article we looked at the most simple ways creating Christmas tree decorations with your own hands, using economical material - a plastic bottle.
Content
And we come to you, as always, with our interesting and original ideas New Year's crafts. This time we will create crafts from plastic bottles. Firstly, don’t forget that plastic takes more than 100 years to decompose, so we should use it as much as possible in order to do less harm to the environment.
Secondly, these crafts will not require too much money from you. Thirdly, you can make a lot of interesting things from this scrap material. In our article you will find figurines, a garland, a piggy bank, Christmas decorations and many other crafts made from plastic bottles.
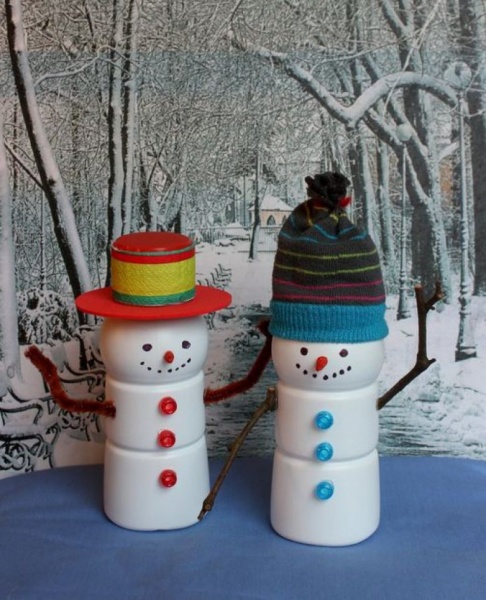
New Year figures made from plastic bottles
These crafts are on New Year It is very easy to create from bottles. Here is a set of necessary items:
- plastic containers;
- scissors and stationery knife;
- paints, brushes;
- textile;
- Knitting;
- felt;
- glue gun.
For example, you can make adorable penguins. To do this, you need to cut the workpiece in half, and cut off the bottom for the cap. Next, you need to paint them like penguins, glue the parts together using a glue gun and decorate the figures with textiles.
A little advice - instead of a glue gun, you can use tape, which you can simply paint over later.
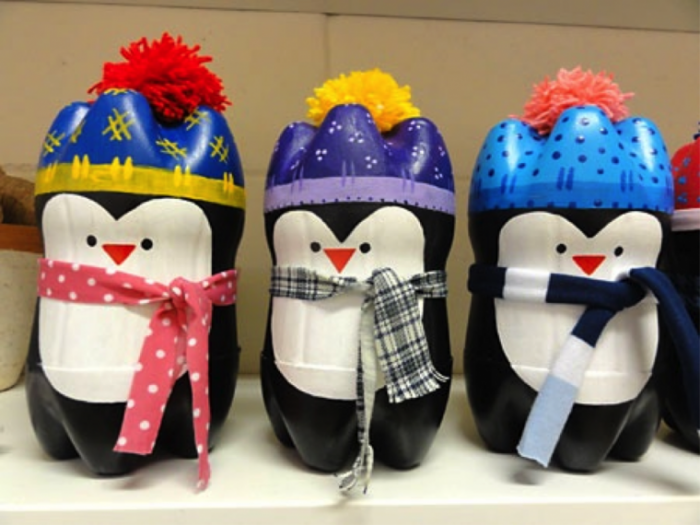
Use acrylic paints, they adhere better to plastic.
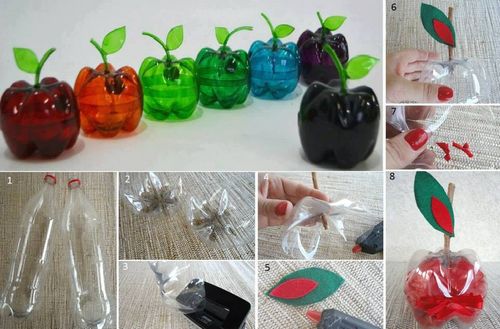
From this simple and affordable material you can also make bright and beautiful apples, which can be placed under the Christmas tree or used to decorate the kitchen. By the way, the decor is suitable not only for the New Year, but also for other holidays.
You can make a toy for a child - a horse on a stick. If you improvise, you can also create a dog, because this is a symbol of the upcoming 2018. And the color, by the way, is yellow! So use more yellow when creating your wonderful crafts.
Christmas tree decorations made from plastic bottles
If you have collected a lot of material that we need in the house, and you no longer know where to put it, then our advice to you is to get creative! Use this container for creativity! You can make wonderful snowflakes from the bases. They just need to be slightly decorated and a string attached so they can be hung. Use a thin brush to apply the design. From such blanks you can create a whole garland or a wreath for the door.

Crafts for the New Year from bottles are both original and inexpensive.
But these bells are obtained from the tops:

A whole ball can be created from the bases of bottles. Details can be decorated, or they can be used in their original form:

Crafts made from plastic bottles for the New Year are an opportunity to give old things a second chance, an opportunity to join the culture of recycling things and sorting garbage. Thus, we consciously approach the use of resources, and besides, you can always call yourself a trash art artist, and this, by the way, is a very fashionable movement today. In general, this handicraft is good on all fronts!

And the following Christmas balls made of strips that are decorated with various beads, paints, ribbons and other decor:

Snow globes
Another cool idea is to use plastic bottles to create Christmas snow globes. What we need:
- smooth plastic bottles;
- acrylic paints, brushes;
- glitter;
- decorative figures;
- glue;
- foam or artificial snow;
- sequins, beads.
First, you need to cut off the top and bottom parts of the bottle so that one tube remains. You need to cut a circle out of polystyrene foam along the diameter of the pipe; we will attach our decorative parts to it.
Then, having coated the sides of the foam with glue, it needs to be glued to the main part of the composition, placing the decorations inside.
The top and bottom of the pipe can be decorated with cut-off parts of the bottle, gluing them with a glue gun and decorating them with artificial snow and ribbons. Crafts from plastic bottles are ready! You can also sprinkle sparkles, sequins and beads inside.
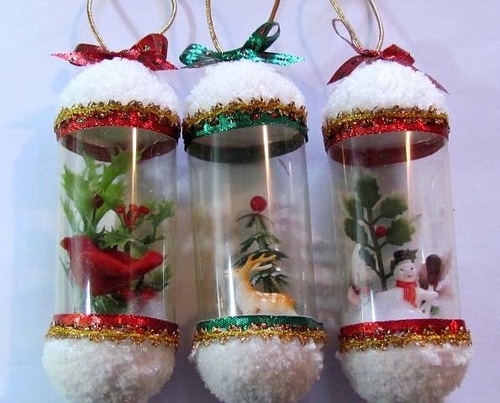
You can, on the contrary, use only the top and bottom to create a kind of New Year's snow globe.

Cones made from plastic bottles
Another decorative option when plastic is used to create a cone. It is better to use brown blanks right away.
You need to cut out something like daisies from your material and string them on a string. Make blanks of different sizes so that you end up with a cone. You can cut fir branches from a green bottle.
Wreath made from plastic bottles
For this we will need the bottoms of plastic bottles, wire, a bow and other decorations.

The details can be painted gold to give the craft pomp and completeness, and also to disguise the material from which the wreath is made.

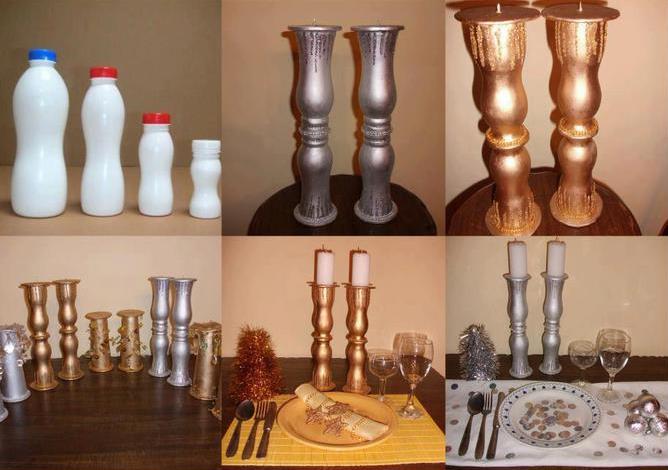
Candlestick for New Year
One of the New Year's attributes is a candle. Well, you and I can make some pretty good candlesticks.

The next candlestick is made of two components, decorated with coffee beans, but, most importantly, it is a beautiful decorative candle.

By the way, do not forget that you can use not only bottles of mineral water or sweet water, but also bottles of yoghurt, kefir and other products.
Souvenirs for the New Year
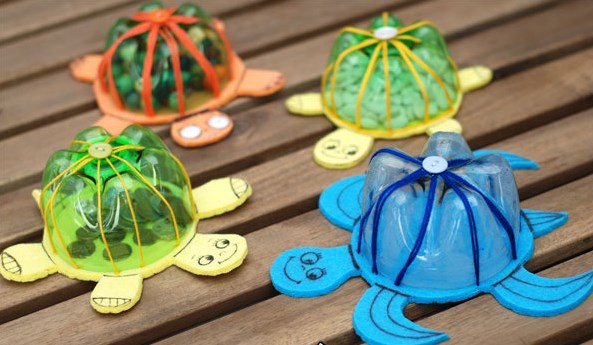
You can prepare something humorous and funny for guests or children. For example, make a pig piggy bank out of a plastic bottle. And what? Very original! If you manage to make a dog piggy bank, it will be even better!
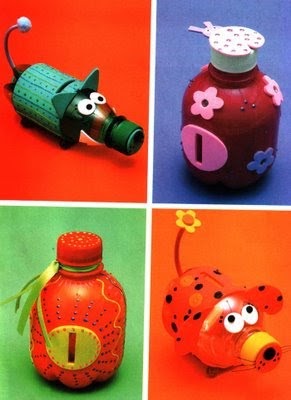
Use acrylic or spray paint, felt parts, fabric, beads and various other decor for decoration. But children will definitely be delighted with such funny turtles. For the base, use thin kitchen sponges or foamiran. We have already described how to work with this material in our articles.
How do you like a whole flowerbed of tulips in the middle of winter? This composition can be decorated country cottage area or the courtyard of a private house. Guests will definitely not understand at first that these beautiful flowers are made from ordinary plastic bottles. As they say, crafts made from plastic bottles for the New Year are a manifestation of imagination and ingenuity.
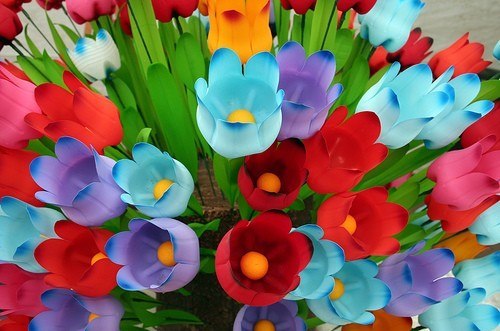
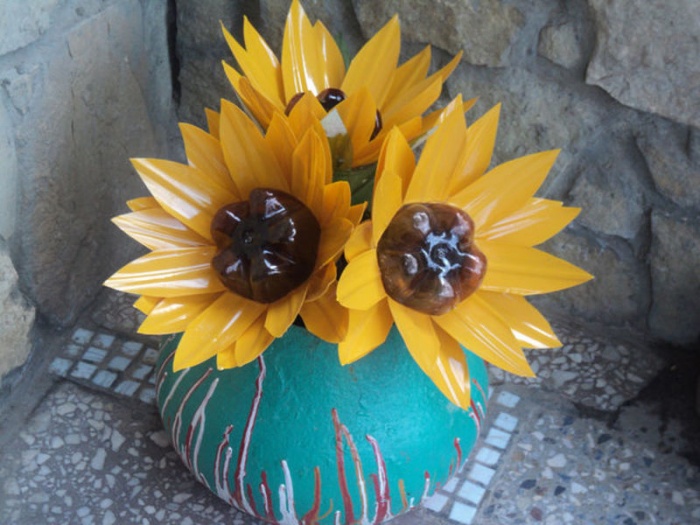
And a few more options for completely non-winter flowers made from the simplest and most accessible materials at hand:

Cup made from a plastic bottle
If you want to stand out from the crowd, have a special attribute, or you need to have a cup to match your costume, then it can very easily be made from the material we know. By the way, read our articles where we tell you how to make crafts for the New Year from a bottle of champagne - this may also come in handy. So here's the cup:

Luxurious, right? And, at first glance, you can’t tell at all what it’s made of, and at the second glance, too!
The design of a future cup for wine or as a reward may look something like this:

Or like this:
We really enjoy telling you about different unusual crafts, about materials from which you can make amazing things and which are found in almost every home. All this so that you can find a moment for creativity, for relaxation, for your hobby. Slow down time around you, let, as they say, the whole world wait while you create beautiful things. Well, in conclusion - crafts for the New Year from bottles video master class:
See how you can create a fun garland that you can hang in the kitchen or in the children's room, or wherever you want, at your discretion.
Post Views: 994
Probably every mother has bought a jar at least once. baby food: broccoli puree, prunes, apples and more. The baby happily devoured the puree, spreading its contents over all surfaces. And the jar was carefully washed and sent to the shelf with its fellows. What should we do with it?
There are a lot of ideas for using glass baby food jars. Website “Mom can do anything!” I collected the most interesting of them.
Ideas for using baby food jars
- Pincushions. It’s easy to make these cute pincushions from glass jars that can hold buttons and other small handicrafts.

- Fairy houses. If you are into modeling, then you should try to make such a delightful fairy house.

- Aquarium. A jar is a small aquarium for a toy fish. Pour soil inside, install algae - the craft is ready. You can also make fish from plasticine together with your child and place them in a jar.

- Terrarium. Plant moss and other small, low-maintenance plants inside.

- Decorations for the holiday. Decorate the jars with glitter, make holes in the lids and install decorative elements, letters and numbers. A very original decoration is ready.

- Bird feeders. Few people realize that an ordinary baby food jar makes such delicious water bowls and bird feeders. In the sun they will shimmer with all the colors of the rainbow and delight the eye.

- Storage for small items. Jars make not only beautiful things, but also very practical ones. Screw the covers to wooden surface you will get very convenient containers for storing small items.

- Candlesticks for the garden. Buy a lot of small candles, put each one in its own jar and hang them on ropes on tree branches. A beautiful setting for a romantic evening is ready.


- Container for growing onions. Green onions are a treasure useful substances, which are so lacking in the cold season. Growing such an onion is not difficult. Pour water into a jar, place the onion on top, and in a few days we will get the first shoots.

- Pots for seedlings. It is convenient to plant parsley, dill and other herbs in small jars.

- Crafts from baby food jars. It’s easy to make such beautiful flowers in pots yourself with your children. We trace the palm on a green sheet of cardboard, cut it out, and glue a flower to each finger. We put it in a pot-jar - beautiful craft ready. There will be such flowers a great gift for mom or grandma by March 8th.

- Storage containers. It is very convenient to store buttons, beads, and seed beads in mashed potatoes jars.


- Pencil holders.

- Night lights.

- Snowball. A baby food jar makes an adorable snow globe. Just glue the figure onto the lid. Pour baby oil into the jar and add glitter, close the lid tightly and shake.


- Gift-treat for guests or children.

- Original frames. Just place photos inside the jar.

- Storing spices. Glass jars with a screw-on lid will help keep spices fresh for a long time.

- Vases for flowers. Just dip a jar in paint and get unusual vases for small flowers.

- Jelly mold. Small jars are great for making jelly. It looks beautiful and appetizing in them, one jar holds one serving, and the screw cap will help keep it in the refrigerator for a long time.
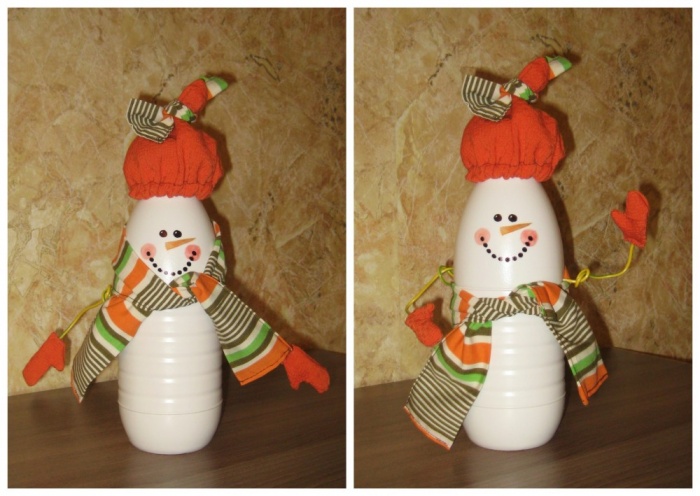
Just recently I was visiting my friend. Elena has been doing needlework for a very long time, and it is from her that I often borrow amazing ideas for creativity. Whatever the girl comes up with, she tries to implement immediately.
So this Saturday she showed me several of her finds, which can be a wonderful help in preparation for the New Year and Christmas. After all, it is not at all necessary to spend a lot of money on purchased decor, when it is quite possible to make it yourself from scrap materials.
New Year's crafts from plastic bottles
Editorial "So simple!" prepared for you unusual master class About, how to make a christmas bell from a cola bottle. Easier than ever and without extra costs!

You will need
- PVA glue
- linen thread
- packing tape
- plastic bottle

Manufacturing

I also suggest you check out a few more ideas New Year's decor , which can be made from unwanted plastic bottles.

We also have a wonderful master class for you on how to create caramel using plastic bottles, colored packaging garland and LED flashlights. On the eve of the New Year, don’t be lazy to make such a decoration. It will come in handy more than once, tested from my own experience!
As you can see, even ordinary plastic bottles can become an excellent material for creativity. Moreover, the New Year is just around the corner, which means that you need to create something new and get rid of the old. And these ideas will just help you get rid of the old, while creating an original and beautiful holiday decor.


