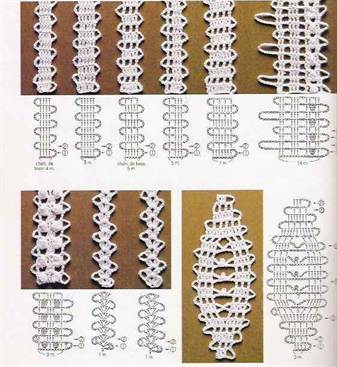
To obtain figured lace from a simple straight braid, the braid is connected with side arches in the required places during the knitting process.
The first rule necessary for making braid roundings is to make beveled rows!
Technique for making beveled rows.
To complete a semicircle, 7 beveled rows are knitted. In the first row dial 6 ch, turn knitting and knit 2 double crochets, single crochet, single crochet, dial 6 vp, turn knitting (Fig. 1). In the next row, knit a single crochet, a half crochet and 2 double crochets, dial 6 vp, turn knitting.
rice. 1 pic. 2 fig. 3
Alternate these two rows. Thus, it turns out that the short columns (single crochets) of all rows are located on one inside and lead to rounding of the braid! In total, you need to knit 6 rows, and in the 6th row, knit 3 air loops for the arch (Fig. 2), insert a hook under the three previous arches (Fig. 3), pick up the working thread and pull it through all the loops on the hook, knit another 2 ch (Fig. 4), and finish another (7th) beveled row (Fig. 5).
rice. 4 fig. 5
WAYS TO CONNECT BRAND
1. Using a connecting stitch or single crochet.
Opposite arches can be connected as follows. When knitting the opposite arch, 3 chain stitches are made, the hook is inserted under the desired arch (Fig. 6), the working thread is grabbed and pulled through all the loops on the hook, cast on 3 ch. and continue knitting the braid (Fig. 7). Or pull the working thread through the arch, pick up the working thread again, pull it through both loops on the hook and knit 3 ch.
Rice. 6 fig. 7
2. Using posts of different heights.
If it is necessary for the arches to be connected to be located at a certain distance from each other, columns of different heights are made at the junctions of the arches. In Fig. Figure 8 shows how to perform a double crochet stitch. Knit 3 ch, make a yarn over, insert the hook under the arch and knit a double crochet (grab the working thread and pull through 2 loops on the hook. Grab the working thread again and pull through the remaining 2 loops on the hook). Dial 3 ch. and continue knitting the braid.
In Fig. Figure 9 shows the execution of posts of different heights to connect opposite arches. Accordingly, starting from the inner rounding of the braid, the arches are connected using a single crochet, double crochet, double crochet, 3 double crochet, and 4 double crochet. This leads to a change in the distance between opposite sides of the tape. In the diagrams, the numbers between the arches indicate the number of yarn overs in the connecting column.
rice. 8 fig. 9
3. Using cross-shaped posts on the leg.
Let's consider this method using the example of knitting a "Double Snake". First, one snake is knitted. Then the second, and the second is connected to the first during knitting.
Cross connection technique:
1) We dial 3 v.p. (Fig. 11), make 4 yarn overs, insert the hook under the lower left arch (Fig. 12), grab the working thread and pull it through the arch, grab the working thread again and pull it through 2 loops on the hook, grab the working thread again and we pull it through 2 loops on the hook (Fig. 13).
rice. 11 pics. 12 pics. 13
2) We make 2 yarn overs and insert the hook under the upper left arch (Fig. 14), grab the working thread and pull it through the arch, *grab the working thread and pull it through 2 loops on the hook*. Repeat from * to* 2 more times.
Rice. 14 fig. 15 pics. 16
3) We make 2 yarn overs and insert the hook under the upper right arch (Fig. 15), grab the working thread and pull it through the arch, *grab the working thread and pull it through 2 loops on the hook*. Repeat from * to * until there is 1 loop left on the hook. Dial 3 ch. (Fig. 16) and continue knitting the braid.
This way you can get different types of snakes.


This filigree technique with which you can create a large number of exquisite models, it uses long ribbons in the form of curls and arabesques.
Bruges lace, often confused with the Irish crochet technique, allows you to create elegant and complex projects. Knitting a lace ribbon is quite simple, but you should not neglect the precise execution of the knitting sequence, which determines the harmony of the product. Knitting the ribbons and connecting them must be done very carefully. Connecting ribbons is aesthetically important - it is easier to connect straight ribbons. Working with rounded parts requires special care, because you need to get beautiful curves.
MAIN TAPE
The Bruges lace ribbon shown consists of 5 tbsp. s/n. Depending on the model, its length and number of st. s/n may change. Alternating st. s/n and cells, you can also knit a fancy border. At the beginning of each row for lifting, an arch is made, the number air loops which depends on the length of the ribbon and the style of the motif.
Bruges lace ribbon master class
Lace connection
There are many ways to connect the ends of ribbons.
You can use either a hook or a needle.
As in modular products, the ends of the knitted strips can be joined using an over-the-edge seam or a loop seam using a hook. The easiest way to connect is with a seam over the edge. On crochet it looks best on a strip without a main chain, since there are no noticeable traces of fastening.

Bruges lace connection for beginners
Basics and tips for knitting.
This braid consists of two rows lush columns, which, taking into account the relief of the pattern, are made on a base of 9 loops.

The two models shown are very similar to each other; the only difference is that in the first the central arch consists of one loop, and in the second of two: this gives the latter greater transparency.

In this model, the braid expands and splits, creating rounded lines and a central picot motif. By repeating this motif, you can knit a charming braid that will serve, for example, as a bookmark.

The magnificent fantasy braid consists of checks and lush columns, which are made on a base of 14 loops. Please note: the uneven arrangement of the arches adds originality to the model.

Performing small motives allows learn to crochet various types Bruges lace braid.
Leave 10 cm of thread free, tie 5 ch. for the 1st arch, then perform 5 tbsp. s/n at the beginning of the thread, 5 vp. for lifting. Continue knitting in a straight line until the 35th row. and attach the 1st row. in the process of fulfilling the 36th r. braid to close it in a circle, then cut the thread. To fill the central part, perform 1 ch, pulling the thread to tighten the product, perform 6 yarn overs, insert a hook under 2 internal, successive arches of the braid, 1 yarn over and pull out 1 loop, then 7 times: 1 yarn over, knit 2 loops. Continue knitting in the same way, inserting the hook when performing a new st. from 6/n to the next 2 arches of braid. Then finish the work and secure the thread.

Leave 10 cm of thread free, perform 5 ch. for the 1st arch, then knit 2 tbsp. s/n, 1 v.p. and 2 tbsp. s/n on the remaining 10 cm of thread, tie 5 vp. for lifting. In the 2nd r. perform 1 tbsp. s/n on all points of the previous row, 5 v.p. for lifting. Knit 47 rows in this way, then add the 1st row. in the process of fulfilling the 48th r. and cut the thread. To fill the central part, tie 1 ch, “4 yarn overs, insert a hook under 2 successive arches of the inner part of the braid, pull 1 yarn over 1 loop, then complete the st. from 4/n, knitting loops 2 to 2, then 4 ch, 1 joint st. in the 3rd stitch from the hook (= 1 picot), 1 ch. and go to * again, connecting the next arches of braid 2 by 2. Complete the work and secure the thread.

Crochet Daisy motif
Leave 10 cm of thread free, tie 5 ch. for the 1st arch, then perform 5 tbsp. s/n at the beginning of the thread, 5 vp. for lifting. Continue knitting until the 25th row. At the beginning of the 26th and 28th r. replace the arch of 5 v.p. on 2 vp, 1 connecting st, tied into arches of the 4th and 2nd rows located opposite each other and 2 vp. so as to attach the central part of the braid. Continue knitting until the 47th row. and attach the 1st row. in the process of performing the 48th row, then cut off the thread. For 2 filling motifs, first perform 1 ch. and alternate st. with 2/n, art. from 3/n, art. with 4/n, inserting the hook into the inner arches that remain unknitted on each side of the braid, then secure the end of the thread.

Cast on a chain of 5 vp. + 5 v.p. for the 1st arch, start knitting at the 6th st from the hook, alternate rows of 5 sts. s/n and from 2 cells. Continue knitting until the 7th row. and at the end of the river For the 1st corner, perform 2 ch. and 1 tbsp. b/n, connected simultaneously under the three previous internal arches. Continue knitting in this way, working the other 2 corners of the triangle in the same way. Cut the thread at the end of the 48th row, leaving 10 cm to sew on the last row. to the cast-on chain with a seam “over the edge”. For the filling motif, perform 1 ch. and repeat 9 times: 1 tbsp. b/n, 3 v.p. into the starting loop; finish 1 connection st. in the 1st art. b/n and link extra. connection art. in the 1st arch. In the process of completing the 2nd round. r. connect the inner arches of the braid that remain unknitted using a group of 2 tbsp. with 3/n, tied together; close this circle. r. 1 joint st., connected in the 3rd of 3 ch., replacing the 1st st. s/n, cut the thread.

http://youtu.be/1fWw1XKB20k
http://youtu.be/3SdWFNMnx_E
A charming bolero knitted using a combination of Bruges and Irish lace techniques, as well as a handbag to go with it.
A charming bolero knitted using a combination of Bruges and Irish lace techniques, as well as a handbag to go with it.
Bolero size: 36.
You will need: 200 g of lilac and 150 g of purple yarn (100% cotton, 560 m/100 g), white beads for the centers of the “flower” elements, needle, hook No. 1.5.
Braid pattern: diagram 5-4. The diagram shows forward and reverse rows.
“Wave” composition pattern: diagram 5-1 The diagram shows the places where the braid is connected.
Element " small flower": scheme
5-2. Knitted from the center in the round with lilac yarn.
Element " big flower": scheme 5-5. Knitted from the center in the round with lilac yarn.
Element “leaf”: pattern 1-4, see description of pattern 1. Knitted with purple yarn.
Basic pattern for a handbag " loin mesh": scheme 5-6. The diagram shows forward and reverse rows. Knitted with lilac yarn.

Description. See the pattern for dimensions and placement of the braid (Fig. 5-1, 5-2). The work is carried out in stages.
First stage (back). Make it on thick paper (thick paper will do). old fabric) pattern of the part according to your dimensions. Come up with a composition, we suggest combining Bruges and Irish lace in it. Use purple yarn to knit braid according to pattern 5-4. When tying the braid of the required length, fold it in waves, forming the top of the back. Diagram 5-1 will show you how to connect the braid in waves. Baste the finished piece of Bruges lace to the pattern with the wrong side up. Using lilac and purple yarn, tie the required number of flowers and leaves according to patterns 5-2 and 1-4. Place them on the pattern, wrong side up, according to your composition. Try to trim all edges. Using purple yarn, sew the touching sides of the elements and braid. In places where there are large gaps, connect the elements with bridges. Do the work with purple yarn. Remove the finished piece from the pattern and lightly steam it.
Second stage (shelves). Make a pattern of the part according to your measurements. The length of the front, the length of the shoulder and side seams must correspond to the dimensions on the back. Come up with a composition, we suggest using Irish lace. Using lilac and purple yarn, tie the required number of flowers and leaves according to patterns 5-2 and 1-4. Place them on the pattern, wrong side up, according to your composition. Try to trim the side and bottom edges. Using purple yarn, sew the touching sides of the elements. In places where there are large gaps, connect the elements with bridges. Do the work with purple yarn. Remove the finished piece from the pattern and lightly steam it. You knit the second shelf in the same way, but in a mirror image.
Along the contour of all edges (neck, front and bottom), knit a border according to pattern 5-1. This is a braid knitted with lilac yarn, which is folded into a “wave”. Knit in a circle, connecting the braid into waves while working and with the edge of the main part (see photo of the model). Having tied the edges along the contour, finish the work. The border width in this version is 8 cm.
The fourth stage (sleeves). Make a pattern of the part according to your measurements. This will make it more convenient to form the sleeve cap. Knit 15 stripes with lilac yarn
Braids according to scheme 5-4. The three longest (length 18 cm) are located in the center. Then, on both sides for bevels, place strips, each shorter than the previous one. The edges are the shortest (length 9 cm). While working, connect the strips to each other. Don't forget to join the sleeves at the seam. Use purple yarn to connect the sleeve to the main piece along the edge of the ruffle. Along the contour of the bottom edge, knit a border according to pattern 5-1. This is a braid knitted with lilac yarn, which is folded into a “wave”. Knit in a circle, connecting the braid into waves while working and with the edge of the main part (see photo of the model). Having tied the edges along the contour, finish the work. Knit the second sleeve in the same way.
Fifth stage (assembly). Tie all edges along the contour with purple yarn and a pattern according to pattern 5-3. Sew beads into the centers of the flowers.
Join our groups - there is even more interesting stuff:
Handbag.
Description. First, pick up something from old unnecessary small handbags or clutches, or you can buy a new inexpensive handbag. Choose a color to match the yarn. If this is difficult to do, then universal colors will do - beige, white or black.
To give to a handbag new image(this is very easy to do), you need to tie it with yarn to match the clothing model.
See the pattern for dimensions and knitting direction (Fig. 5-3).
First, use lilac yarn to knit a fabric measuring 19 x 60 cm in a “loin mesh” pattern according to pattern 5-6. Tie it with a pattern according to pattern 5-7. Cover your handbag with this knitted fabric. Come up with a composition of flowers and leaves, knit them and sew the elements onto the handbag, folding them into a composition. We suggest for imposing elements of schemes 5-5 and 1-4.
Bruges lace.Hook.


DESCRIPTION.
We knit a chain of 11 chain stitches.
1 row. Double crochet (dc) in the 6th loop of the chain and then another 5 dc
At the end of the row, instead of 3 air loops, we make FIVE, turn the knitting over and knit the next row.
2 row 6 double crochets (6CH) +5 VP and turn the knitting over.
I hope everything is completely clear here?
And so we continue to knit the ribbon to the desired length.
I would recommend knitting those ribbon strips that go through the shoulder seam with ONE ribbon for the front and back, so that you don’t have to sew them on the shoulder.
The second ribbon strip is knitted in the SAME way. BUT! During the knitting process, one side is attached to the first.

Everything is simple, especially for those who practiced connecting squares and other elements with a HOOK (rather than sewing them with a needle)
Having knitted a row, we knit 2 VP connecting stitch in 3. VP of the first tape and 2 more VP.
And then we unroll the knitting and continue knitting our strip.
And so on along the entire length (if the model requires it)
I think that very small skeins of yarn are also suitable for this knitting - the strip does not have to be the same color along its entire length.
And the result of such a combination can exceed all your expectations!
You can make stripes of other widths - it's very easy! It is enough to make not six, but 4 or 8 double crochets.
Methods for connecting braid
To obtain figured lace from a simple straight braid, the braid is connected with side arches in the required places during the knitting process.
The first rule necessary for making braid roundings is to make beveled rows!
Technique for making beveled rows.
To complete a semicircle, 7 beveled rows are knitted. In the first row, cast on 6 ch, turn the knitting and knit 2 double crochets, a half double crochet, a single crochet, cast on 6 ch, turn the knitting. In the next row, knit a single crochet, a half double crochet and 2 double crochets, cast on 6 ch, turn the knitting. 
Alternate these two rows. Thus, it turns out that the short stitches (single crochet) of all rows are located on one inner side and lead to the rounding of the braid! In total, you need to knit 6 rows, and in the 6th row you need to knit 3 air loops for the arch, 
Insert a hook under the three previous arches, 
Pick up the working thread and pull it through all the loops on the hook, knit 2 more chain stitches, 
And finish another (7th) beveled row. 
WAYS TO CONNECT BRAND
1. Using a connecting stitch or single crochet.
Opposite arches can be connected as follows. When knitting the opposite arch, 3 air loops are made, the hook is inserted under the desired arch,

The working thread is grabbed and pulled through all the loops on the hook, cast on 3 ch. and continue knitting the braid. 
Or pull the working thread through the arch, pick up the working thread again, pull it through both loops on the hook and knit 3 ch.
2. Using posts of different heights.
If it is necessary for the arches to be connected to be located at a certain distance from each other, columns of different heights are made at the junctions of the arches. In Fig. 
The execution of a double crochet is shown. Knit 3 ch, make a yarn over, insert the hook under the arch and knit a double crochet (grab the working thread and pull through 2 loops on the hook. Grab the working thread again and pull through the remaining 2 loops on the hook). Dial 3 ch. and continue knitting the braid.
In Fig. 
The implementation of uneven-high columns to connect opposite arches is shown. Accordingly, starting from the inner rounding of the braid, the arches are connected using a single crochet, double crochet, double crochet, 3 double crochet, and 4 double crochet. This leads to a change in the distance between opposite sides of the tape. 
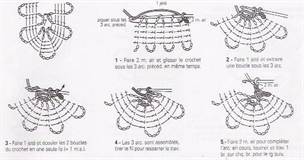
3. Using cross-shaped posts on the leg.
Let's consider this method using the example of knitting a "Double Snake". First, one snake is knitted. Then the second, and the second is connected to the first during knitting.
Cross connection technique:
1) We dial 3 v.p.,

We make 4 yarn overs, insert the hook under the lower left arch, 
We grab the working thread and pull it through the arch, grab the working thread again and pull it through 2 loops on the hook, grab the working thread again and pull it through 2 loops on the hook. 
2) We make 2 yarn overs and insert the hook under the upper left arch, 
We grab the working thread and pull it through the arch, *grab the working thread and pull it through 2 loops on the hook*. Repeat from * to* 2 more times.
3) We make 2 yarn overs and insert the hook under the upper right arch, 
We grab the working thread and pull it through the arch, *grab the working thread and pull it through 2 loops on the hook*. Repeat from * to * until there is 1 loop left on the hook. Dial 3 ch. 
And continue knitting the braid.
This way you can get different types of snakes.
1)

2)
3)
4)


Openwork dress knitted using guipure and Bruges lace techniques.

Partial coloring of already finished elements is the author’s trademark, giving modern look ancient art. Light, airy, dress knitted using the techniques of interlocking guipure and Bruges lace.


Openwork dress
Size: 42
The model is made with crochet.
You will need: 800 g cotton yarn with viscose white; hook No. 2.5; needle; beads under malachite" round and oval shape, beads under > pearls"; some fancy yarn with white pile; green acrylic paint.
The dress is made using the techniques of interlocking guipure and Bruges lace. The use of a small group of motifs allowed the author to create a harmonious composition. The author manages to model the silhouette of the product, obtaining the effects of expansion and asymmetry of the canvas, while maintaining fashionable proportions, thanks to the use of 2 versions of the original braid.
It is impossible to copy a model in detail, but by showing creativity and the ability to improvise, you will create your own unique item.
To begin with make a working pattern (see Fig. 2), according to your measurements. Tie the motifs of large flowers according to pattern 2 and flowers according to pattern 2 a, for which first make a braid of 6 scallops, close in a twist and tie with scallops with a “picot” along the outer contour.
Then knit leaves of different sizes, guided by patterns 2 b and 2 c. Motifs should not be cloned in detail. Deviations from the proposed schemes are only welcome, since, being carried away by the creative process, you create your own, new and original options.
You can manipulate the size and shape of leaves by:
1) knitting a larger (smaller) number of stitches in the cast-on chain for each petal;
2) the height of the double crochets when knitting the 1st row of the fillet pattern. By gradually increasing the height of the columns towards the top of the petal, you model its outline;
3) changes in the height and number of double crochets when tying the 1st row;
4) changes in the number of VPs in the cells of the fillet row. The degree of openwork of the motif depends on this.
Iron the finished motifs from the wrong side.
Next place them face down on the pattern, focusing on the location in the photo, or create your own composition.
Then fix the most appropriate position with a basting. Connect the motifs together using a thread and a needle along the wrong side of the fabric. Fill the gaps with irregular mesh fragments.
To create the impression of integrity of the lace fabric When filling a pattern with a composition of motifs, join the side seams of the parts. Continue working, knitting the braid according to patterns 2 d and 2 d and connecting individual fragments of the fabric, as well as strips of braid with each other using chains of VP or RLS. Carry out the connection by grasping the edges of the elements to be connected one by one in a rhythm that you determine experimentally during the work. For the option of forming an openwork fabric made in a combination of guipure lace with braid, as well as modeling the expansion in the lower part of the dress, see diagram 2 e.
Decorate the finished dress with voluminous details. To do this, knit 2 flowers according to the pattern and sew them randomly onto identical motifs and along the neckline.
According to pattern 2, knit spirals, form them into flowers, then sew them onto the dress.
Attach pieces of yarn with a pile to the center of the flower.
Next, proceed to tonal coloring of individual fragments of the canvas with acrylic dye, following the instructions on the package. Finally, sew beads into the centers of the flowers and into the openwork cells of the leaf petals.


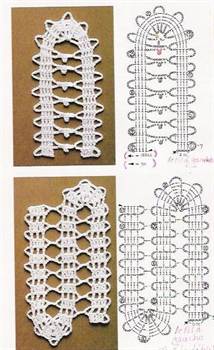
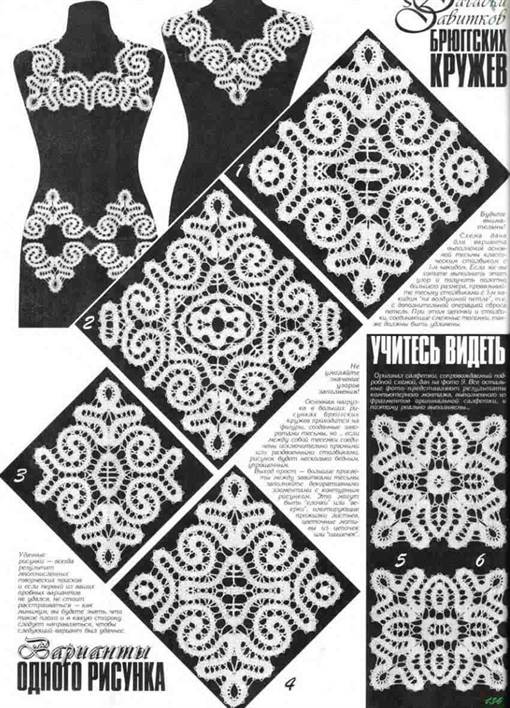
Belgium is the birthplace of the interesting art of knitting, now called Bruges lace. Its name comes from the name of the town of Bruges, where, back in the 16th century, products made from threads knitted in an unusual way using a hook, were extremely popular and highly valued. Despite its ancient origins, this technique is quite popular today. We will help you master Bruges lace, and for those who have never held a crochet hook before, we will help you with patterns for beginners.
Sometimes it is confused with Vologda lace, which is actually very similar in appearance. However, the difference is fundamental: the Bruges technique does not use bobbins, but a hook that imitates bobbin ligature.
At the heart of the construction lace pattern lies the interweaving of crocheted ribbon-braid and its connections into curls and ornaments. The tape itself is quite simple in execution; the complexity and at the same time uniqueness of the patterns is created by its attachments according to the pattern. It is this fantasy pattern that makes each product exclusive.


Bruges lace knitting technique with patterns
All knitting is based on the combination of three elements: the main tape, the mesh and the motifs.
This is what a small master class looks like, thanks to which we will create Bruges lace:

In the example shown, the main tape-braid is made of 5 treble stitches. It is knitted in two directions, and the number of columns in width and the length of the ribbon can vary according to the model. An arch is made using air loops at the beginning of each row to connect the motifs.
In this technique you can use a wide variety of ribbons:
Connecting motives with job descriptions
In the process of knitting the motifs, the braid-ribbon is connected by bows formed by air loops. The connection is made by air. loop, st. s/n and st. b/n, depending on the design. The parallel arrangement of the braid is achieved by connecting two tapes with identical columns. The divergence of the ribbons is obtained by connecting columns of different heights, this is how we achieve bending of the ribbon:


Complex columns form a grid and fill the void created by knitting the bend of the ribbon:
The ends of the ribbons can be connected in different ways, using a hook or a sewing needle for knitwear, joining with an over-the-edge seam or a loop seam using a hook.
Master class on connection:

We analyze the schemes for beginning craftsmen
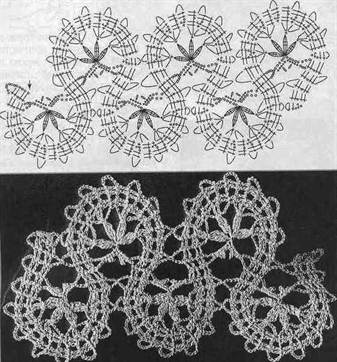
The braid, closing in a circle, a square, forms elements that form various patterns. Some patterns of Bruges lace, crocheted, we offer you below:
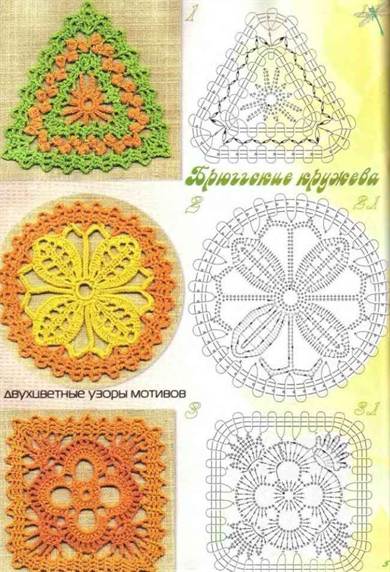

The Bruges technique allows you to produce amazingly beautiful products - dresses, skirts, blouses, collars, napkins. We offer you a diagram of unusually feminine models from Japanese magazines.
The Bruges technique became widespread in the manufacture of household items. Its similarity with lace and woven bobbins once became the reason for its widespread use in the manufacture of pillows, bedspreads, tablecloths and even items of clothing as decoration. And at all times, Bruges lace has retained the right to personify prosperity, wealth and splendor.


