There are only a few days left before the New Year and Christmas, Christmas tree decorations have been purchased or taken from the distant shelves of pantries and mezzanines, all that remains is to hang them in their places. But if, due to some coincidence, you have nothing to decorate your house for the New Year, then for a change you can build New Year's toys with your own hands. This process is not complicated, interesting and will not take as much time as it seems at first glance, and the result of the handicraft will certainly please its creator.
A little about the tradition of making Christmas tree decorations with your own hands
It so happened that in our pre-revolutionary country the Christmas tree was erected only for the holiday of the Nativity of Christ. At that time, the production of toys was poorly established, and the main symbol of the winter celebration was ennobled with attributes brought to the country from Germany, or with decorations of their own production, which reflected the events taking place in the world.
They decorated holiday trees with apples to honor the tree of Good and Evil. Candle products and angels were a reflection of purity, and the six-pointed star was a memorable symbol of the Bethlehem miracle of the Nativity of Christ.
After the revolutionary upsurge to celebrate this happy holiday a ban was imposed, but the tradition did not fall into oblivion, but continued to exist. At that time, underground production organizations were formed Christmas decorations, which were distinguished by their simplicity and simplicity.
Nothing could destroy the “spirit of Christmas,” so the tree became legal again in 1935, although it was already a symbol of the New Year. It was then that the Christmas tree decoration underwent serious changes, which did not stop from year to year, but became more diverse and perfect. Not only the form of decorations changed, but also their content.
Now is the time when you can openly trace the life and traditions of previous generations. However, now it is possible to purchase not only an ordinary holiday toy, stamped at a mass production plant, but also to create unique New Year decorations with your own hands using modern materials.
DIY New Year's toys
What materials can you use to make your own Christmas tree decorations?
In general, Christmas tree decorations can be made from almost any material. Therefore, before you throw something away, think about whether it might make an original decoration for your New Year tree. Below we have given just a few examples of how you can create New Year's masterpieces from simple things.
DIY gingerbread toys for the Christmas tree
Decorations made from gingerbread and cookies have quite ancient roots; they are also traditional in our country. Nowadays a huge number of dyes of all colors and names are sold, but in the old days gingerbread cookies were covered with glaze and gold or silver foil. IN special cases gold leaf was used, which was so thin that it was impossible to separate it from the product itself, so confectionery products were eaten with it.


DIY New Year toys made from salt dough
Salt dough toys also have a traditional focus. However, they are completely unsuitable for food, despite the fact that just by looking at them they cause appetite. They also differ from gingerbread cookies in their long shelf life and ease of production.
A simple recipe: To make the dough you will need only 1 cup of salt, 2 cups of flour and approximately 250 grams of cool water. All ingredients are thoroughly mixed together, then the dough is kneaded and rolled out.
You can cut out various figures from the rolled out dough, which can later be given color using paints. But first, salt dough products need long-term drying. They need to be dried outdoors two or three days. There is a faster option, which takes from six to twelve hours: the figures are placed in the oven with the door open (the oven should be set to the average heating temperature).
Finished products are decorated with paints or decorated with various shells, buttons, beads and stones. If you don’t have time for a long enough coloring process, then it is recommended to mix dye with water, flour and salt.
It is better to create New Year's toys from salt dough (as, indeed, from any other materials) with children. In this case, you will combine business with pleasure; in addition, joint creativity will allow you to concentrate entirely on the task at hand, and not be distracted by childish pranks.


DIY Christmas toy made of beads and seed beads
There is nothing more elementary than collecting beads onto a common thread or wire, which is then given the desired shape. This method allows you to create jewelry of completely different sizes and character.
If you want something truly unusual, you can sew beads on scraps of fabric with a complex texture; this will add more variety to the production process.


Christmas tree decorations made from pompoms
Everything inside is filled with warmth just by looking at the charming owls or sheep decorating the branches of the New Year's tree. There is a feeling that just a couple of minutes ago they came out of the pages of fairy-tale children's publications.
To make such toys, you need threads, preferably thick ones, then you will need much less of them, a small amount of cardboard, glue and decorative eyes, which can also be drawn if you couldn’t find ready-made ones in the store.
Threads are wound onto a pre-cut cardboard circle, then they are cut along the edge of the cardboard blank, which is subsequently removed. The resulting thread pattern is tightly tied in the center with the same thread and fluffed, then formed desired image, eyes, horns, hoofs, etc. are added.


How to make a Christmas tree toy in the shape of a snowman from rice and socks
It's easy to make but very effective. New Year's craft, which is gaining more and more popularity among DIY enthusiasts.
It is not necessary to buy new socks to create such a New Year's decoration; a fairly worn pair of socks will do just fine, even though they may have become thin at one time.
Cut off the nose part near the heel, pour a small amount of rice inside and tie the edge well strong thread. Now divide the workpiece approximately in half and tie it in the middle with a beautiful ribbon or strip of knitted fabric. Thus, you have formed the head and body of the snowman. All that remains is to decorate the craft.
You can place a cut from the top of the sock on the head, first tying it with braid or thread along the cut line, thereby getting a funny hat. But you shouldn’t stop there, since the body of the newly-minted Christmas tree toy can be trimmed with beads or various buttons, and the face is carefully drawn with mom’s shadows, pencils and fondants.


Snowman made from a sock in 15 minutes
How to make Christmas toys with your own hands from threads
Making New Year's toys from threads is very similar to the process of making decorations from pompoms. You will need the same materials: threads, glue, cardboard. However, there is one difference, which is the structure of the threads, which must be silky in order for the New Year's decoration to be more interesting.
Figures of various shapes are cut out of cardboard, which can be replaced with foam plastic. Then they are wrapped with yarn on top. Next comes the decorating process, where all sorts of beads, rhinestones, bows and so on are used.


DIY felt toys for the Christmas tree
Felt makes very beautiful Christmas tree decorations, giving the tree a special atmosphere that harmonizes perfectly with the spirit of the holiday itself. Felt decorations seem to break the time barrier, taking you back to the past and allowing you to plunge into the world of mysteries and New Year's magic. They are simple to make. Cut out the figure according to the template in two copies and sew the blanks together, stuffing a little cotton wool or padding polyester inside. Decorate the resulting craft with beads, seed beads, ribbons, and pieces of felt of a different color.


How to make New Year's toys from twigs, wire, straw
If you have wire, straw or ordinary tree branches on hand, try making your own New Year's toys from these materials. They are flexible enough to carry out various kinds of manipulations with them. You can pre-coat them with spray paint.


How to make a New Year's toy from foam plastic with your own hands
There is nothing simpler than toys made of foam plastic, which first needs to be shaped into some geometric figure or, for example, a heart, and then decorated.
Various decorative ribbons, beads, fabrics, sparkles and beads are the most common materials for decorating foam Christmas tree decorations. To securely attach decorative elements with a foam base, you need to use transparent superglue.
Ready Christmas decorations Made from this material, sold in shopping centers, often have an unreasonably high cost. Moreover, such decorations can be found in many homes, which cannot be said about toys. self made, which look no less attractive and original, and their cost is absolutely delightful.

DIY paper Christmas toys
Paper is the simplest and most common material from which you can make Christmas tree decorations. Each of us at least once in childhood created New Year's crafts from this material. Using paper with skillful hands you can create memorable New Year's toys that will show off on the Christmas tree and please the eye. Moreover, you can use not only colored paper, but also newspapers, if such a design suits your taste.
Not only funny cones are made from paper, but also real balls made using the origami technique. The process of creating paper balls is sometimes quite long and difficult, but the good thing about this method is that thanks to it you can make very simple toys that will look great in any case.
Hello.
How often do you spend time with your young children? Do you play games with them or build something together? I don't succeed very often. Work, everyday worries and other routines take up a lot of time and, unfortunately, there is not much time left for children.
All the more valuable are those moments when you are still together. And preparing for the New Year holidays, decorating the Christmas tree and apartment is a wonderful occasion not only to play with children, but also to teach them something new. They love it so much!
Last year I made a small selection with my own hands for schoolchildren, and now I offer you several master classes dedicated to making simple but cute Christmas tree decorations from paper for children of kindergarten age.
Making them is not at all difficult. Spend 20-30 minutes teaching your children and then they will be able to cut and glue themselves colorful toys and, from my own experience, I will say that they will do this even after the New Year, exactly until the house runs out of colored paper and glue.
DIY paper Christmas decorations: ball for the Christmas tree
The most popular Christmas decorations are, of course, balls. You can make a bunch of them different ways, I propose the simplest ones that a child can handle. Naturally, after adults teach him.
This figure is called a charcoal.

To make it you will need:
- Colored paper (4 A4 sheets per 1 ball)
- Scissors
- Pencil
- Any cylindrical glass
Assembly:
1. Take a glass (or mug), place it upside down on colored paper and trace it with a pencil to make an even circle.

For one ball you need to draw and cut out 27 to 32 circles.
You can take paper different colors and combine as you like.

2. Now you need to give the circles a three-dimensional shape. This is done in several stages.
First, bend the circle in half.

Then cut in half again. Press the folds well.

The result is a “piece of pizza”, which we mentally divide into three parts and wrap in a rectangle. First we bend the larger side.

Then a smaller one.

With these simple steps you need to fold all the cut circles.
This preliminary preparation allows me to distract the children and attend to urgent matters for about 20-30 minutes.
3. After preparatory stage assembly begins. We unfold one of the circles and see that it has now become “ribbed”.

4. Apply glue to the second edge on the left and the second edge on the right on the lower half of the circle.
It is better to use PVA glue in a tube with a spout for more precise application.

5. Connect and press the halves so that they stick together. We do this with all the circles.


And glue the next half to it. We coat and glue all the halves in the same way.

As a result, you will end up with this rather weighty thing that needs to be weighed down with a book or something else heavy and left for 15 minutes for the glue to dry.

7. After the glue has hardened, the halves can be unfolded like a fan. The last step remains: grease the upper side part with glue and glue the thread. We also lubricate one of the sides of the future ball with glue.

And, opening the ball, glue it to the other side.

Let the glue dry and you're done!

Paper ball - master class for kindergarten
If the previous method is more suitable for entertaining one child, then this one can be done together with a whole group of children. Making the ball is very simple and will not cause any difficulties in explaining.
Only all the elements will need to be prepared in advance, because... you need a needle and children can’t handle it.

So, we will need:
- Thick colored cardboard A4 format
- 2 beads
- Needle and thread
- Scissors
Assembly:
1. We cut the cardboard along the short side of the sheet into strips 1.5-2 cm wide. We do not need perfectly even lines and strict adherence to the width, so it is not even necessary to use a ruler.
In total you need to cut 8 strips.

2. We put the strips in a stack and, having made a hole in the middle, thread a thick thread with an attached bead. We take the length of the thread to be 15-20 centimeters.


4. We pull the ends of the strips together and make the same hole and pull the thread through inside the opposite end of the stack.

5. Stretch and measure the length of the thread so that we get a circle, then thread the second bead into the thread and tie a knot on top, fixing the shape of the circle.

6. The ball is ready, all that remains is to “fluff” the stripes.

Christmas tree toy in the form of a three-dimensional ball - a simple assembly diagram
Well, another simple but beautiful version of a paper ball.

1. And again, using a glass, pencil and scissors, we make circles from colored paper. This time you will need 8 of them. Available in different colors.

2. On each circle we make a cut to the middle.

3. Apply glue to the places where the cut was made and roll one side into a tube first.

And then another. It turns out to be such an interesting figure.

4. Glue all the circles together in the same way.

5. Then we take a thick thread threaded through a needle, pierce the top of the cone and thread it onto the thread.

We do the same with all our blanks.
It is important to ensure that the figures are strung on the same side: either the front or the back.

6. And now all that remains is to tie and tighten the opposite ends of the thread.

And the workpiece will turn into a beautiful three-dimensional ball.
The simplest Christmas tree toy for children 4-5 years old
If your child has not yet mastered assembling a three-dimensional ball, then you can simplify the work even further and make just a round Christmas tree toy.

All you need is colored paper, scissors, a stapler and a ribbon for hanging.
Assembly:
1. From colored A4 paper, cut 12 strips about 1.5-2 cm wide.

2. Then we leave the first strip unchanged, shorten the second by 1.5 cm, the third by 3 cm, the fourth by 4.5 cm and so on.

3. And we collect them into one bundle, aligned along the bottom edge. Along the same bottom edge we fasten the strips with a stapler.

4. Consistently twist the ribbons into rings, again aligning them along the bottom edge. As a result, it turns out that each subsequent ring is larger than the previous one.

5. When all the rings are rolled, we fasten them with a stapler at the base.
Instead of a stapler, you can use glue, but then each strip will need to be coated separately.

6. Done, all that remains is to tie the ribbon and hang the toy on the Christmas tree.

DIY paper lantern
But I’m sure you all made this toy yourself in childhood. There is nothing simpler than this.

Assembly:
1. Take a sheet of A4 colored paper, fold it and cut it in half. For those who understand, the result will be A5 format. We will continue to work with him.
Fold the sheet in half along the long side.

2. On the folded side, make cuts at a distance of 1.5-2 cm from each other. The cuts should not reach the opposite edge by about 2 cm.

3. Open the sheet and glue the opposite sides together, rolling the sheet into a tube.

4. Done, all that remains is to glue another strip of paper on top, with which the lantern will be hung on the Christmas tree.

Video on how to make a Christmas tree toy out of paper
If all the previous toys seem banal to you and you want something unusual, then watch this video on how to make a Christmas tree decoration using paper and knitting needles.
Templates of Christmas decorations in the form of crystals
Now let me move away from the classic forms and offer you something really interesting. I'm talking about Christmas tree decorations in the form of crystals. Surely, many have already come across these templates on the Internet; this topic has been popular for a couple of years now. But if not, then believe me, this is really the most interesting way you can make a Christmas tree decoration out of paper.
All you need to do is print out the templates below, fold them along the dotted lines and glue them along the protruding flaps.
Short crystals:

Diamond:

Elongated crystals:


Important: when printing, make sure that the entire picture fits on the sheet and adjust the size if necessary. Most often, it is enough to uncheck the “Image to frame size” setting.
Well, with this I will finish my first article this year, dedicated to preparing for the new year. There are still 2 months ahead, so check back often, I'm sure I can surprise you.
That's all for today, thank you for your attention.
New Year is just around the corner. You can feel the approach of a holiday in the air, which is slowly but surely moving towards our homes and hearts, because the New Year is a special holiday when you want to believe in a dream, hope for the best, and expect miracles.
The New Year is a special and bright holiday for children, because on New Year's Eve, children often spend quite a lot of time with their parents, enjoying pleasant family joys.
And if parents usually don’t have time, then on New Year’s Eve they definitely find it to take care of New Year’s chores with their children.
A very entertaining and joyful thing for children on New Year's Eve is the opportunity to decorate the New Year tree together.
If you can afford to buy New Year's toys, creating amazing stylish design Christmas tree - super!!! This Christmas tree will appeal to both children, adults and your guests.
If beautiful toys for the New Year and you won’t be able to buy new New Year’s decorations for the Christmas tree, we advise you to get creative and create beautiful New Year’s toys and decorations for the New Year with your own hands.
DIY Christmas toys and DIY Christmas decorations for the Christmas tree and home are a very fun activity for the whole family.
Therefore, laziness to the side!!! Let's look at what New Year's toys and New Year's decorations for the New Year you can make with your own hands without special effort, not only to decorate your home, but also to bring you even closer to your family members.
We create New Year's toys and decorations with our own hands
Firstly, let us immediately note that creating New Year’s toys with your own hands by making homemade decorations New Year's Eve is a very fun activity. It can be compared to a ritual, to an exciting process, in the minutes of which a miracle is born and a fairy tale comes into its own.
After all, when making homemade New Year's toys and unusual, homemade New Year's decorations for the Christmas tree and home, you breathe into them a piece of your love and warmth, so such New Year's decorations and beautiful toys for the Christmas tree turn out to be truly special.
Done with my own hands New Year's toys will not only decorate the house, but will also give a special atmosphere to your home, enriching it with bright accents and cozy little things.
What kind of New Year's decorations can you come up with so that it is not expensive, interesting, and so that such New Year's decorations transform your home.
In order to make New Year's toys and decorations for the New Year's tree and home, stock up on all the necessary materials.
In order to make New Year's decor, namely homemade New Year's decorations and New Year's toys, you do not need special materials.
For this purpose, available materials such as threads, a needle, of course, paper, pieces of multi-colored fabric of different textures, beads, sparkles and many other little things that may be standing and waiting in the wings to become an original mega fashionable New Year's toy are suitable.
Of course, you can’t start making New Year’s decorations and toys without imagination, because it is the driving force of the whole process.
New Year's decorations made from paper look creative. They are not at all difficult to make, and today’s New Year’s decorations in the style of papier-mâché and quilling are so diverse that even if you are not the greatest craftsman, you will no doubt succeed New Year's snowflakes made of paper, New Year's garlands, stars or balls for the New Year.
And if, in addition to multi-colored or white sheets of paper, you have ribbons and sparkles, you are simply risking being a master of quilling and papier-mâché if you try a little.
New Year's decorations and New Year's toys are not only New Year's quilling and papier-mâché.
For New Year's decor a great option will become New Year's toys, knitted with your own hands using knitting needles or a hook. And there are no fewer ideas here than in paper decorations.
A retro-style Christmas tree will look amazing if your New Year's decorations, crocheted or knitted yourself, resemble birds and little animals.
Decorate the Christmas tree and the house New Year's bells, flowers, snowflakes and stars, balls made using decoupage technique, which will make the design of the Christmas tree and home especially warm and cozy for family evenings.
The tree will look rich and tasty if it has New Year's garlands of sweets, fruits and other goodies.
Such New Year's decorations will shine with bright colors on the New Year's tree and will become a tasty surprise for the little residents of the house.
You can make New Year's decorations for the Christmas tree and home in the form New Year's gifts. If you have old trinkets gathering dust in a box, treat them with varnish and dust them with glitter, and you will have a very original New Year's toy.
You can also create very successful New Year's toys and decorations from polystyrene foam. Make blanks in the form of balls or cubes.
Cover the workpiece with bright ribbons, sequins, you can take beads, these will also work different types cereals, with which you can create a whole masterpiece, and not a New Year's toy.
New Year's decorations in the form of large multi-colored socks, felt boots and mittens, which are best made from thick fabric, have already become a tradition.
Very interesting New Year's toys and decorations are made from burlap and felt. This material is easy to work with, and any decor on it will look very impressive.
Both children and adults will enjoy making New Year's toys made using the kanzashi technique.
To make such New Year's decorations, you need to stock up on ribbons, beautiful fabric, beads, pearls, laces and wire.
New Year's toys in the form of garlands create an unusually festive mood. DIY Christmas garlands can be much more interesting than store-bought ones.
Garlands made of paper can be combined with garlands of foam balls, garlands of old toys decorated in a modern way, etc.
Don’t forget that DIY New Year’s toys can serve not only as decorations, but also as symbolic New Year’s gifts that will always remind you of pleasant New Year's Eve spent with loved ones.
Children especially love making such New Year's toys, because they put a piece of their soul into such a homemade surprise for mom, dad, grandmother and other family members.
Now let's see what New Year's toys and beautiful New Year's decorations, besides those mentioned, can still be made from ordinary materials, giving them a completely unusual and very important essence.
What kind of New Year's toys do you make with your own hands?
DIY New Year's toys: photo ideas for inspiration


The New Year is getting closer, and for those who know how to do DIY Christmas toys, the time for fruitful work is coming. Making toys is a tradition that arose at a time when mass production of Christmas tree decorations had not yet been established. Today, there are plenty of factory-made toys in stores, but the tradition of making them yourself has not disappeared. This is explained simply - handmade jewelry and toys give off a special warmth; they look homely and cozy. A nice bonus is that you can be proud that the toy you made yourself exists in a single copy.

How to make New Year's toys with your own hands?
New Year's outfits for the green beauty have undergone changes many times during the existence of the tradition of decorating the Christmas tree. In stores you can still buy standard decorations - glass balls of various colors and sizes, stars reminiscent of the Soviet past, glass cones, fruits and other traditional products. You can also bring it to Christmas and new year holidays an element of creativity, and try to make New Year's toys for 2017 with your own hands.

DIY New Year's toys from scrap materials
The choice for work is almost limitless - any available material can be used. Christmas tree decorations are sometimes made from the most unexpected materials. New Year’s creativity also has its own “leaders” - materials that are used most often:
- Wood, plywood;
- Paper;
- Beads;
- Felt;
- Textile;
- Beads;
- Natural materials - branches, vines, cones, etc.

Christmas tree toys made from salt dough
You can even make DIY New Year's toys for the New Year 2017 from flour. One of the simplest and most inexpensive materials for making New Year's toys is salt dough. There is flour in every home, the process is interesting (especially for children), and the result is a completely worthy replacement for ceramic and glass toys.
To work you will need:
- Wheat flour;
- Water;
- Salt (fine);
- Paints;
- Varnish (optional);
- Leg-split;
- Oil;
- PVA glue.
Important! To make the dough more flexible, you can add a little baby oil (can be replaced with vegetable oil or olive oil).
Dissolve salt in warm water, add flour, knead the dough. To get a variety of figures, you can use dough molds. The lack of shapes is not a problem; figures from salt dough can be sculpted by hand. To add texture, you can use anything - pencils, caps from plastic bottles, lace. While the dough is still wet, you need to make holes for the rope holder.

After drying (1-3 days, depending on the thickness of the product), the toy can be painted, a pattern applied, small photos pasted and coated with acrylic varnish.
Christmas decorations made from branches
DIY New Year's toys are often made from scrap materials. A simple but effective way to decorate a Christmas tree or home for the New Year is to make toys from natural materials- for example, from branches. To make a stylish toy “Ball in eco-style” you will need wire and branches.

Lifehack! It is better to collect branches in October or November, when they still contain a sufficient amount of moisture. The vines and branches collected later may be brittle and unsuitable for making toys.
Make several (5-6) circles from the wire. Form a “skeleton” of the ball from them, fasten the circles together with hot glue or wire. Carefully twist small diameter branches or vines over the base. To keep the branches tightly, they can also be secured with hot glue. It is easy to thread a ring of twine or ribbon into the finished ball. The stylish eco-ball is ready!
Beaded New Year toys
You can also make spectacular New Year's toys from beads. It will not be easy for beginners to make jewelry that is massive or has complex shape decorations. But without any problems you can make hearts, Christmas trees, and stars. To make such a toy you will need wire and beads. First you need to string the beads onto the wire, and then form the desired shape, tightly securing the ends of the wire. You can use ribbons for hanging.

New Year's toys made from light bulbs
For those who are still puzzling over the question “How to make New Year’s toys with your own hands?” An option using items that previously had a utilitarian function is perfect. New Year is coming soon, so don’t rush to throw away burnt out light bulbs. They make charming Christmas tree decorations. A little imagination, and you won’t have to settle for the usual glass balls.

Attention! For the first (background) layer, it is better to use spray paint. It is easier to apply, and this paint goes on evenly. It is much more difficult to create an even coating with a brush or sponge.
DIY New Year's toys made of paper
Paper is a universal material, and Christmas tree toys and decorations made from it are cheap, practical and simple. To begin with, you can choose flat (not voluminous) jewelry. These can be snowflakes, Christmas trees, and other themed figures.


Important! You should not take too thick paper or high-density cardboard: when cutting, the edges of these materials become “shaggy” and the product does not look neat.

Another affordable way- this is the use of paper to decorate ready-made toys - for example, balls. An ordinary glass ball will look much more original if you stick decorations cut out of paper on it. Or, for example, a small collage of photos.
A more complex way is to make toys using the origami technique. Using separate paper blocks, you can assemble a variety of decorations - for example, a Christmas tree.

Even children can make New Year's toys out of paper with their own hands. Most of the diagrams and patterns are simple; it will not be difficult for a child to cut out a snowflake, a Christmas tree or a silhouette of a bird. And from individual paper figures and silhouettes you can make New Year's garland for decorating a Christmas tree or room. To do this, you can use a ready-made diagram from the Internet or come up with a design yourself. Christmas garlands can be decorated with snowmen, balls, patterns, Christmas trees, and animals.


From felt
Felt is a soft, fairly dense felt. This material is perfect for making New Year's toys. It’s easy to work with – you don’t need to process the edges; you can buy felt in almost any color and shade in the store. To make a stylish New Year's toy, only two or three colors of felt are enough. For example, a combination of red and white - classic New Year's colors, is perfect for creating simple jewelry. It is not necessary to choose complex patterns; it is enough to cut out simplified silhouettes from paper. For example, these:

You can transfer the pattern to felt using chalk or a bar of soap. Then each type of figurine must be cut out in duplicate. Large DIY New Year's toys can also be made from felt, as it is sold in sheets of different formats.

Attention! Felt lends itself well to cutting, but you need to choose sharp scissors for the job. It is better to secure the pattern on the fabric with pins to get a neat silhouette.
In the photo: DIY felt Christmas toys:


It is better to sew felt parts with contrasting threads - if the toy is red, then you can use white or beige threads. If the toy is white, the decoration with red, green, and brown threads will look harmonious.
And don't forget the buttons!
Small felt toys can be used both to decorate the Christmas tree and to make interior garlands. Bright ribbons, regular white clothesline, and twine can be used as a base.

Christmas trees, hearts and houses are traditional details of New Year's design. Recently, toys in the form of animals with which the New Year is associated - deer and elk - have become increasingly popular.


DIY felt Christmas toys look bright and festive without any additional decor. If desired, you can give them additional flavor by decorating them with buttons, sequins, ribbons, or, for example, embroidery.


The advantage of a homemade garland is that it can be made taking into account the size and color scheme of the room that needs to be decorated. To make a garland you don't need sewing machine– felt parts are sewn by hand.

Thanks to the pliability and softness of the material, making toys takes very little time - about half an hour for each. If there is a need to make the toy voluminous, it is stuffed with cotton wool or holofiber.
Important! For stuffing, you can use either cotton wool or holofiber, but you need to take into account that when washed, the cotton wool inside the toy gets knocked down and the product loses its shape. If you are going to use toys in the future, it is advisable to use holofiber for stuffing - it tolerates moisture well and the product does not lose its shape.
Made from fabric
To make a New Year's toy from fabric with your own hands, it is not at all necessary to have sewing skills. For example, this ball can be made using scraps of fabric. The usual one is used as a base. Christmas ball or a foam blank.

The fabric can be tightly wrapped around the base or glued. To work with fabric, you can use any glue available, but:
Important! When drying, PVA can leave a yellowish mark on light-colored fabric. Craft glue will hold the fabric to the backing, but since it is not designed to work with textiles, the product may not last long. Hot melt adhesive - good option for working with fabric, but it must be applied in as thin a layer as possible.


DIY New Year's toy Cockerel
The coming year 2017 Fire Rooster, so toys in the shape of birds will be especially relevant. A DIY rooster Christmas tree toy is easy to make - just draw or copy your favorite sketch from the Internet.

The easiest way is to make a rooster out of felt or paper. To do this you will need a piece of felt, a pattern, threads, and scissors. The toy can be flat or voluminous. From thick felt you can make parts for a garland, or toys - pendants.

You can use beads for decoration, and suede or waxed cord or twine to make a pendant.
There are many manufacturing options, and the approach of the New Year is the best way to inspire creativity. It is advisable to start preparing for this holiday in good mood– toys made with positive attitude, emit special warmth.

Liana Raimanova
New Year is a time of magic, fairy tales and a festive atmosphere that permeates the frosty air. And, of course, everyone, without exception, is preparing for the exciting moment - decorating the Christmas tree. But, despite the wide selection of toys in stores, many prefer to decorate the Christmas tree on their own and with homemade decorations.
Most popular material for making New Year's toys - paper. This material is affordable and easy to use. But you can see how to make Christmas tree decorations from paper with your own hands in this article. It will be much more interesting if you involve your children in this activity, because children are able to create something that an adult simply does not have enough imagination for.
How to make a Christmas tree toy from colored paper
Toys made of colored paper will add bright accents to the festive interior. The main thing is to take high-quality and thick enough paper so that the finished product is durable and will delight you with its appearance for a long time.
New Year's paper toys
The most traditional New Year's toy is considered Christmas ball. So why not try making it from paper. It’s very easy to make similar paper Christmas tree decorations with your own hands, but you need to stock up on the necessary materials and tools.
To make it so interesting Christmas ball you will need the following materials:
- thick paper of any color;
- scissors;
- a compass or any round object;
- PVA glue;
- satin ribbon or thread.
When all the tools are at hand, you can start working. It won't take long. Similar paper fakes for a Christmas tree are made in several stages:
- Draw identical circles on paper using a compass or, for example, a coffee lid, and cut them out. As a result, the number of circles should be 20.
- In each circle, draw an isosceles triangle with a pencil or bend the circle in half on both sides to mark the center with a cross.
- Fold the edges of the circles along the lines of the triangles and smooth the fold well with your fingers.
- Glue the base for the ball from the resulting triangles. To do this, lay out a line of triangles on a flat surface so that their bases form a straight line. Here you can notice that the “top” of the line has spaces, so you need to insert five more circles into the gaps. The result is a strip of 10 triangles, which must be closed into a circle.
- Using the remaining 10 circles, make the bottom and top of the ball. To do this, you need to glue 5 triangles into a circle so that the tops of the triangles are together.
- Glue the resulting caps to the base. The ball is ready.
After the ball is completely glued, you need to take a ribbon or any thick thread and attach it with glue to any place. This is necessary so that the ball can be easily hung on a tree branch.
If you find it difficult to draw triangles in each circle, you can make a spare circle and cut out the desired triangle from it. This will serve as a template and will greatly facilitate the process.
You can also make a square ball instead of a round one. This requires 6 laps. Only the edges need to be folded not into a triangle, but into a square. As a result, it will take 4 squares for the base and 2 for the lids.
Similar paper toys New Year can be made monochromatic or multi-colored.
It is important to understand that the larger the diameter of the circles, the larger the Christmas ball itself will be. Thus, you can create entire compositions from balls of different sizes.
Christmas tree toys made of cardboard
The simplest New Year's toys made of cardboard are Christmas trees made from animals, which can be placed next to these Christmas trees. The principle of making animals and Christmas trees will not be explained; it is quite easy. Refer to the image below.
Christmas trees made of cardboard
But making a ball out of cardboard is not so easy. In addition, it is not always possible to find a ball with the desired design in the store, but we know that it you can always do it yourself. Such New Year's decorations made of cardboard can become the main and brightest accents on the Christmas tree.
Required materials:
- a postcard with your favorite image or photograph;
- scissors;
- hole punch;
- thread or ribbon;
- small screw and nut.
The unique Christmas ball is prepared in three stages:
- A photograph or postcard must be cut into any number of strips.
- On each strip at the top and bottom you need to make a hole with a hole punch.
- Put all the strips together by threading a screw through the holes and securing them with a nut so that they can move. The toy is ready.
After the toy is assembled, you need to straighten the strips so that the pattern is visible. And in order for it to be hung on the Christmas tree, you need to attach a thread or ribbon to the top screw.
It is not necessary to use a photo or postcard for the image to be viewed: it is quite possible to use colored cardboard, two or more colors. You can decorate the ball with a bow or beads.
The number of stripes should not be less than 5 pieces. If there are fewer of them, the ball will look awkward
You can create beautiful “winter” toys from cardboard. How to do this, watch this video:
What New Year's toys can be made from corrugated paper
Paper Christmas tree decorations look especially interesting if they are not used. plain paper, but corrugated. Looks very nice Christmas tree from corrugated paper.
Required materials:
- green corrugated paper;
- scissors;
- PVA glue;
- a sheet of cardboard of any size.
First you need to make the base of the tree from thick cardboard, for example, a rolled cone. It needs to be secured along the seam with tape or glue. For stability, the cone cavity is filled with any material.
Strips of corrugated paper should be 10 cm long and 2.5-3 cm wide. The strip should be twisted in the middle and folded into a loop, pressing with the tip of your finger. All prepared loops are glued to the cone, starting from the bottom row. The fluffiness and volume of the Christmas tree depends on the number of loops used. You can attach a bow or a large bead to the top of the finished beauty.
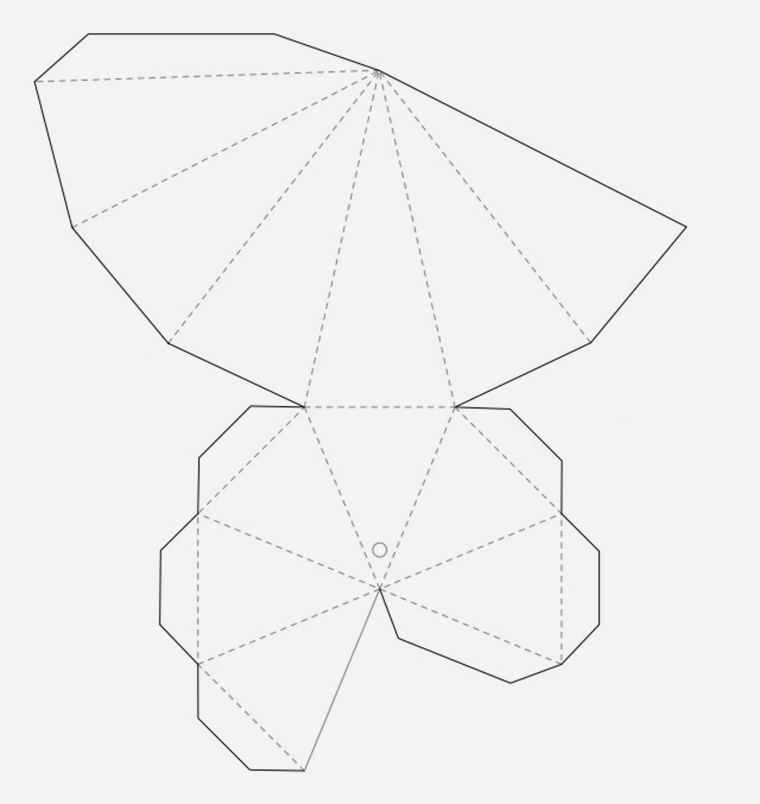
How to make voluminous New Year's toys from paper
If you have looked at various photos of DIY Christmas toys made from paper, you have probably noticed that Christmas tree decorations are mostly made in volume. The thing is that such toys are much easier to make, because they are made according to special templates. Such templates for Christmas tree decorations made of paper are easy to find on the Internet, they are even sold in stores.
To make a toy using such a template, you need to print the template on a color printer, cut it out and glue it along the indicated lines.
It is better to print such templates on thick paper; plain office paper will not work. The glue will make it soggy, and the toy will look sloppy, or even fall apart.
The finished products look very original. They can be given as a small gift, after putting a small treat inside, for example, a few candies or a chocolate egg.
Don’t think that homemade Christmas tree decorations will look unnatural and ugly on a holiday tree. This is not true at all. You can’t buy such jewelry in a store, but the time spent with your family creating something will remain for a long time. bring a smile to your face. The youngest members of the family will especially enjoy this activity.
September 27, 2017, 10:12 pm


