Volumetric paper flowers are used to decorate interiors, furniture, ready-made accessories, gift packaging, postcards. Making them is not difficult: the process does not require special skills, it is exciting and enjoyable. Combine business with pleasure: try making flowers in different ways.
Making flowers from paper – simple process. The material is accessible and inexpensive, it is easy and convenient to work with, so even beginners who have not previously done needlework can master the process. Studying detailed master classes will provide the opportunity to find good options and receive exclusive jewelry. By the way, popular in 2017-2018.
For production you may need:
- Material. This can be plain white printing paper, colored or corrugated, Whatman paper, tracing paper, old newspapers or magazines. It is convenient to make small elements from soft materials, and large ones from dense ones, which should retain their shape.
- Scissors are used to cut out parts. Choose quality ones that will cut cardboard.
- Glue: universal, silicone, PVA. The choice depends on the type of paper: the denser and thicker it is, the more securely it should be fixed. For convenience, protection from dirt and good bonding, you can use a glue gun.
- Schemes, templates. If the master class with instructions left you with questions, a visual demonstration will answer them. Using the template, you can make ideal blanks, and detailed diagram will help you figure out how and in what sequence to act.
- Materials for frames. If flowers are made from paper with stems and leaves, you will need wire to serve as reinforcement and fixation of the composition.
- Good mood and calmness. Start making if you are calm and determined to succeed. By being nervous, angry and worried, you will not achieve good result and you won’t get pleasant emotions from the process.
Volumetric flowers made of corrugated paper
 The flowers look attractive corrugated paper. To make them, stock up on materials and tools. Need to:
- wire;
- scissors;
- corrugated paper (green, red, white, yellow);
- glue;
- ribbon.
 Process :
- Cut a strip of wire to prepare the stem.
- Cut a strip 1.5-2 cm thick from green corrugated paper.
- Coat the wire with glue, wrap it with a green strip along the entire length (fix the edges with glue).
- Cut out a strip of red (or other) paper: do not touch the bottom part, but cut out semicircles or ellipses on the top. Wrap the edge of the stem with this blank, having previously coated it with glue.
- Cut out the remaining petals and glue them to the bud one at a time. Fluff the flower.
- Cut out the green leaves and fix them on the stem.
- The first flower is ready, make the rest, making them multi-colored.
- Gather flowers into a bouquet and tie it with a ribbon.
Advice! You can make large flowers in the same way, increasing the size of all the parts several times. This will be an original interior decor or photo zone for a holiday.
 There is another way: by combining many flowers, you will get a beautiful garland. You will need multi-colored corrugated paper, fishing line or strong thread, scissors, a needle, glue or a stapler.
Description of actions:
- Cut out rectangles from paper: the same size or differing by 1-2 cm.
- Place the blanks in stacks of five. To obtain solid colors, combine elements of the same tone, and to make bright jewelry combine different shades.
- Fold each stack like an accordion. Fix the centers with a stapler or tie them with thread. Round the edges with scissors to make the flowers look delicate and cute.
- Straighten and fluff the edges of the paper elements.
- String the resulting buds onto a fishing line or thread, piercing them with a needle in the central parts.
Volumetric flowers on the wall
 Large voluminous flowers will become a non-standard wall decor in any room: living room, nursery, bedroom, hallway. Prepare:
- cardboard for the base;
- scissors;
- colored double-sided paper (can be replaced with stickers - small pieces of paper glued together into a block for notes);
- glue.
 Master class:
- Cut out a round base blank from cardboard. Diameter – 13-14 centimeters.
- Prepare paper squares. It is more convenient to use ready-made stickers, since you do not need to prepare the parts. If there are none, cut out squares of approximately 7.4x7.5 cm from double-sided colored paper. Quantity for a circle with a diameter of 13-14 centimeters: 24 pieces for the first layer, 22 for the second, 17 for the third, 14 for the 4th and 15 for the core.
- Form small balls from all the squares (much like for seeds). A sharp cone should form at the bottom, and a circle with one triangular petal at the top. Connect the edges with glue.
- Take the base, coat the edges with glue and fix the bags back sides(parts with protruding triangular petals).
- Glue the second, third and fourth rows in the same way.
- When making the core, glue the central bags to the neighboring ones so that the center turns out to be voluminous and neat.
- A beautiful three-dimensional flower is ready. You can attach it to the wall with double-sided tape or using a nail and a thread loop glued to the base.
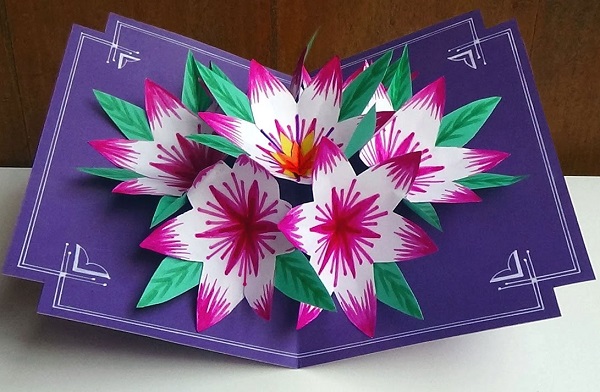
Postcard with voluminous flowers inside
To please loved one or a friend with a postcard with a bouquet of paper flowers inside, try making such a gift with your own hands. Make beautiful three-dimensional chrysanthemums. You will need:
- colored paper in lilac, pink, yellow, white, green (lime) colors;
- a sheet of cardboard for the base;
- thread;
- scissors;
- glue.
Master class:
- For one flower you will need five paper circles: two large size, two medium and one small. Fold the first circle in half three times, cut out two oblong petals from the edge (deepen the cutout slightly towards the center).
- Unfold the circle and fold the petals in half to give the composition volume.
- Place two medium ones on the large circle, then the small one. Connect the parts with thread or glue. The center can be decorated with a thread tassel or left as is.
- Make several chrysanthemum buds.
- Prepare the card base by folding a piece of cardboard in half.
- Glue the resulting flowers, for example, one in the center on the fold of the cardboard and several on both sides.
- Cut out strips - flower stems. Fix them under the buds.
- Cut out the leaves, fold them in half and secure them near the stems.
- The DIY card is ready, and the flowers seen inside will definitely delight the recipient!


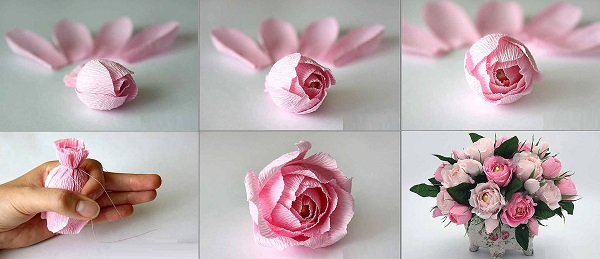
There is another option for those who love roses. You need to prepare:
- bilateral colored paper(red, pink or white);
- felt-tip pen or pencil;
- scissors;
- cardboard;
- glue.
 Manufacturing instructions:
- Draw a spiral on paper and cut out the blank along the line.
- Twist or bend the edges of the long turn of the spiral - this is the center of the future flower.
- Wind the remaining turns of the spiral around the central part, periodically fixing them with glue to secure the composition.
- The edges of the petals can be bent a little, then the flowers will look more realistic and voluminous.
- Make a few more flowers.
- Fold a piece of cardboard in half to form the base of the card.
- Glue the buds inside the card.
If the recipient prefers delicate calla lilies, make this paper card for them. You need:
- double-sided colored paper (corrugated paper is suitable);
- modeling dough or polymer clay;
- universal glue (glue gun);
- scissors.
 Description:
- Make a stamen - mold it from dough or clay. But you can crumple the paper and roll it into a tube.
- Cut out a heart from paper.
- Place the stamen between the rounded parts of the heart and secure.
- Wrap the stamen into the petal, leaving most of the part out. Glue the connected sides of the heart together, carefully turning the edges out.
- Make several buds, glue the flowers into a card and give them as a gift.
Templates and volumetric color schemes
You can make flowers from paper using templates or diagrams. After studying the diagram, you will understand the sequence of steps and make the product identical to that described by the author. For beginners, it is better to use simple and understandable options.
The template will simplify the process as much as possible. You just need to open and download the image, transfer it to a Word document or other file and print the image on paper. But it will not be possible to make large flowers using templates, since the size of the design is limited by the sheet format. 


Volume flowers video
Hand-made flowers will become an original interior decoration or an exclusive gift for any occasion. Consider all the methods proposed in the article, choose the one you like, study the instructions and start making.
Paper flowers can be used for interior decoration, decoration and even as a gift! Let's try to learn how to make voluminous paper flowers with our own hands, look at examples and photos of beautiful finished works, and also watch a master class for beginners.
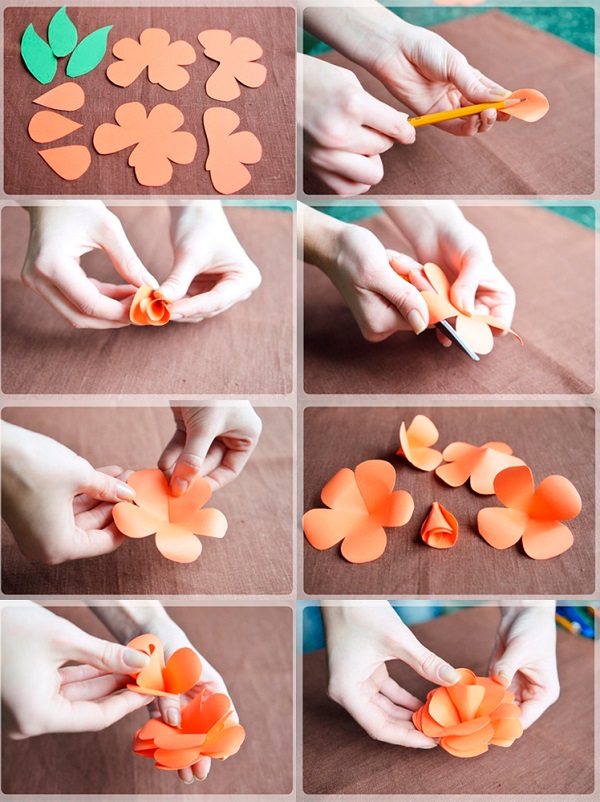
The easiest way to make flowers is from colored paper - it can be corrugated or ordinary, and if you plan to make strictly decorative flowers, you can take paper with a mother-of-pearl or metallic effect. You shouldn’t make a tulip or a rose as your first experiment - try something very, very simple first.
Decorative crafts

In order to make simple and spectacular flowers you will need:
- double-sided colored paper (corrugated paper is also suitable);
- thin wire;
- sharp scissors and a pencil for marking.
It is better to take colored paper of several shades, so your flowers will look impressive and attractive - for example, it can be shades of yellow or several tones of red. Don't try to mix cool and warm colors if you doubt your taste.
For beginners, the easiest way to do this is to fold colored paper several times so that you get a stack of squares approximately 6*6. Then mark the shape of the future buds on the top square with a pencil - it can be a smooth rounded figure, regular circles, or whatever your imagination suggests.
Then, using scissors, you need to carefully cut the stack according to the shape of the marked sepal and disassemble it into components - for each flower you will need three to five blanks. The wire needs to be cut into pieces of about 15-25 centimeters, twisted on one side so that a decorative center is formed, then the previously obtained “petals” are put on each wire, after which a stand is made at the bottom of the wire (a stable ring is twisted).
With such crafts you can decorate a table for a holiday, or use them for a photo shoot or interior decor, or you can simply attach them to the wall in the nursery or in the hall near the mirror - good mood secured.
Or this simple option:


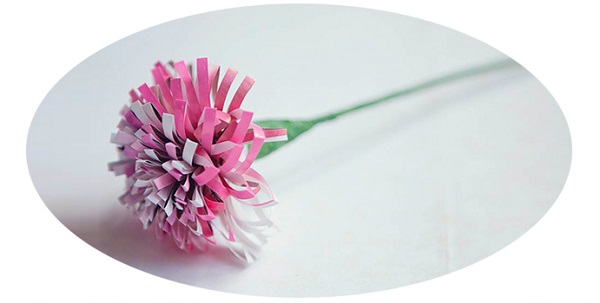
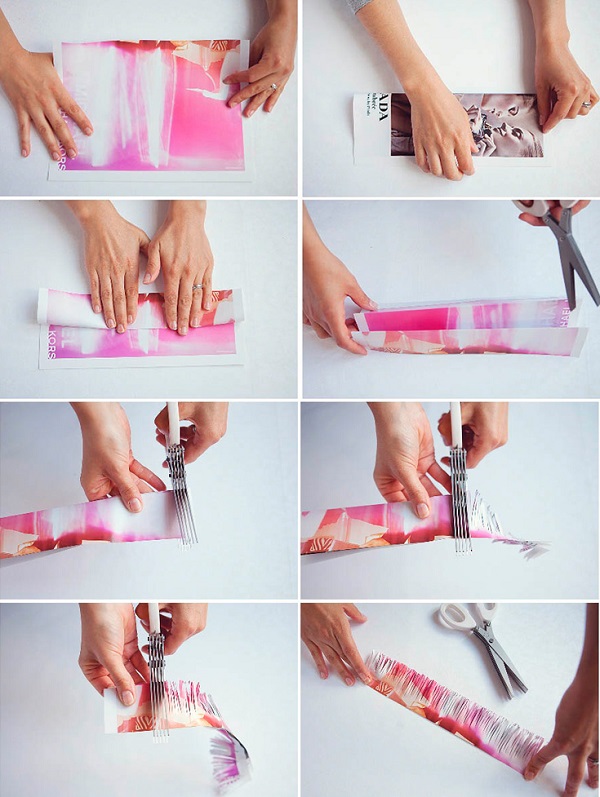
From what is at hand
Old magazines or newspapers are used to make these products. This way you can make large flowers out of paper - the technique is simple, and paper crafts turn out to be quite impressive.

What you will need:
- unnecessary magazines (absolutely any);
- green adhesive tape;
- sharp scissors;
- large barbecue skewers;
- paper glue or regular hot melt glue.
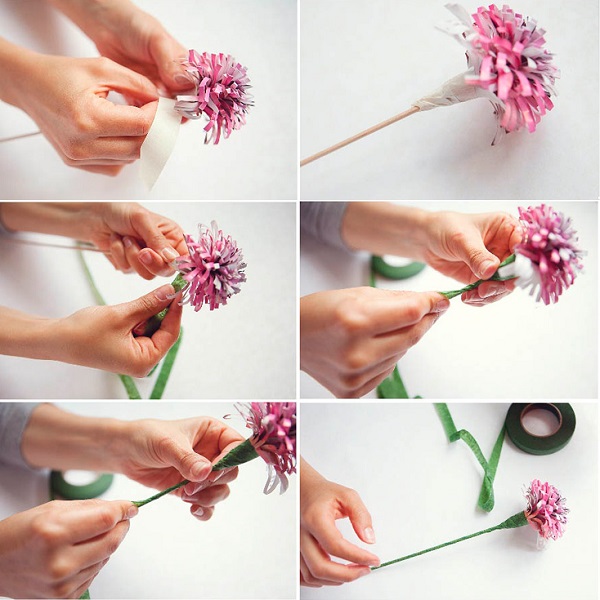
How to make voluminous paper flowers easily and quickly? I'll tell you step by step.
- Disassemble the magazines into pages and choose the brightest and most colorful ones - these are the ones we will use to make decorative paper crafts.

- Each page must be folded four times along its length, cut with fringe from the fold side, not cutting to the edge about one centimeter.

- We begin directly making the buds - you need to take the resulting fringed ribbon and wrap it around the top of the skewer, securing it with glue or adhesive tape. This is how buds of voluminous flowers like asters and chrysanthemums are made.

- Then you need to make several turns around the skewer with a fringed ribbon so that the bud turns out lush and beautiful. When there are enough turns, you can glue the free edge of the fringe so that the bud holds on.

- Wrap a skewer with adhesive tape, cut out plant petals from magazines, shape them and glue them. Your beautiful and fluffy flowers are ready.

By the way, these recommendations can also be used for beginners - they are quite easy to do. If you want to make such flowers with children, then make sure that they have safety scissors, or cut the fringe yourself.


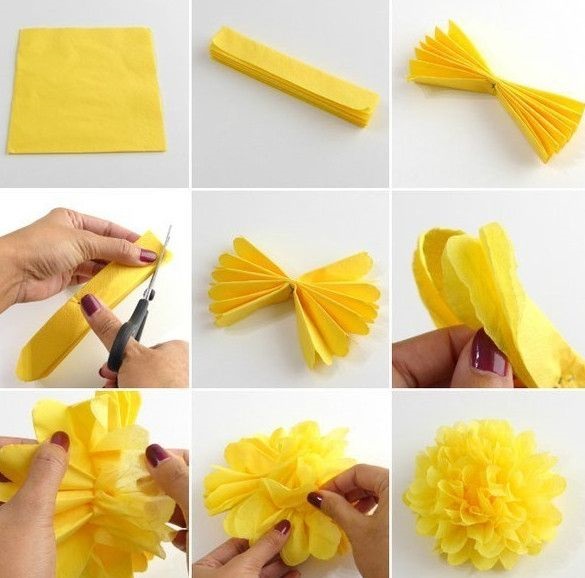
Decorative flower garlands
Want to make chic garlands? Use giant paper flowers for them. By the way, making paper flowers for garlands with your own hands is very simple - you only need beautiful, eye-catching paper and a little skill. No flower templates for cutting out or diagrams are required; the main task of such large products is to look bright, unusual and attractive; large paper flowers do not have to be realistic.

- scissors;
- corrugated paper of two or three colors (it is better to take bright and light);
- thread or fishing line;
- stapler or glue.
You need to cut rectangles out of corrugated paper and put them in a stack of five. If you want to get flowers of the same color, then fold them by color. And if you want to make original flowers from paper, then put several shades in one pile - pink, white, light red and yellow will look chic.
You can choose the size of the rectangles yourself; you just need to remember that the flowers will be the same diameter as the rectangle on the narrow side.
Each pile is assembled into an accordion (look at the photo on how to make flowers from such accordions, if it is not too clear from the description).

Each accordion of five sheets of paper must be fastened in the center with a stapler or glued with a paper ring. It is best to round the edges of the accordion - cut out something like a petal.
Now each blank needs to be turned into a bud - straighten the buds from the accordions you made. The accordions need to be straightened in different sides, and you will see how you can create beautiful paper flowers in just a few seconds.
Then cut the required length of fishing line or thread and string the buds - your garland is ready.


Another garland option:

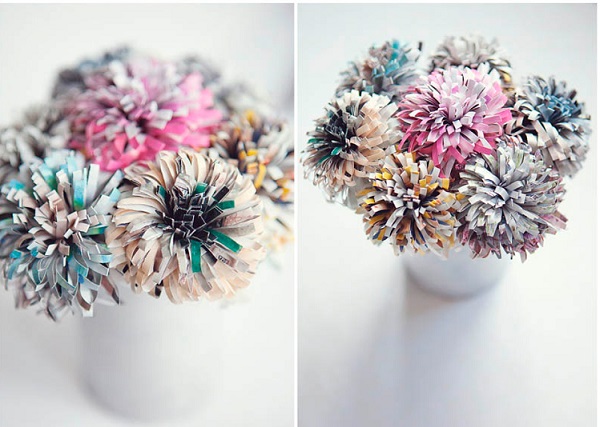
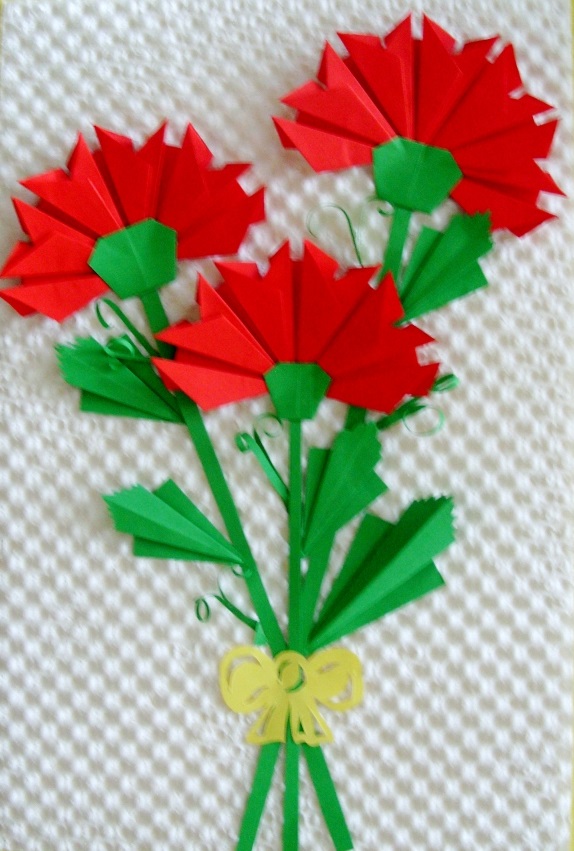
Bouquets for decoration
Do you want to make a bouquet of flowers from paper? See photo:
Do you want to learn how to make a tulip? Watch the video below step by step photos how to make tulips in different ways.
Useful information and several step-by-step master classes
At the very end of the article, download patterns and color templates for cutting. By the way, if you want to make origami out of paper, it is best to use special double-sided paper.
Look detailed master class How to make flowers and plants out of paper using the origami technique is not only interesting, but also quite difficult, so don’t expect perfectly made flowers right away, you’ll have to try a little to make paper flowers with your own hands.
Flower stencils will also come in handy if you make large paper flowers complex shapes- the same tulip or rose is more convenient to collect from a special shape of petals.

Try making large paper ones - just collect a huge rosebud according to this master class (see photo below on how to make flowers lush and beautiful).
Here are templates of large flowers for cutting out of paper:

And here are the step-by-step photos:
How to make flowers for children? Try to minimize any risks - for example, do not let children work with adult scissors, prepare the wire in advance and make sure that children are disciplined.
Learn how to make paper flowers with your own hands using coffee filters or napkins - a thin and fragile napkin looks almost like a real petal, you just need to give it a shape and collect the bud.
This video shows how to make a paper flower for beginners.
A few inspiring photos - see how beautifully you can decorate your holiday with camellias or roses.

Try making voluminous paper flowers with your own hands using cardboard or thick paper - even a child can handle this technique.

Another option for a simple flower:

Leaf templates:


Learn how to make flowers out of paper, a master class on the technique of soaking paper - such products look almost like the real thing!
Now you know several ways to make spectacular and expressive flowers from colored or even regular glossy paper, which means you can easily put together a chic bouquet, make accessories for a photo shoot, or even just decorate a room for a party.


If you want to show your imagination, then try tinting the finished products with a thin brush using the watercolor technique - with veins, the flowers will look even more elegant and interesting.
Making an accent in your home, decorating a souvenir package, or complementing a gift with a unique bouquet - this is now available to everyone. It only takes a little effort to get the desired result.
How to make beautiful flowers from paper? – about this below the article. In it you will find several detailed master classes.
Also, you might be interested learn how to make flowers from shells - with your own hands.
How to make a simple and beautiful paper flower with your own hands?
Lately flower arrangements made of paper have become an alternative: both in the design of halls and souvenirs.

Try making these simple but beautiful flowers yourself. Detailed instructions and the diagram is below.
To work you will need:
- colored paper;
- scissors;
- diagrams and templates for cutting out parts;
- pencil or pen;
- glue.
Manufacturing process:
- From paper you need to cut out the parts for the future flower using templates (for each product you will need: 3 parts in the form of a drop, 1 - four-leaf, 1 - three-leaf, 2 - five-leaf, 3 green parts - leaves).
- A pencil (pen, or you can use a brush) will help give the necessary shape to each detail for the future product.
- All blanks are glued together. First, you need to glue the larger fragments, and then the small ones. Repeat everything according to the diagram below.
There's another one interesting option simple but lush paper flowers.
They are made using the quilling type.
What you need for work:
- Illustrated magazines.
- Adhesive tape (green).
- Glue.
- Scissors.
- Barbecue skewers.

Step by step instructions:
Here's how to make a bouquet of paper flowers very simply and effectively.
Large paper flowers - master class
 Huge buds allow you to create a unique interior for celebrations. Thanks to them, you can accent or highlight a place for a photo shoot.
Large flowers can be grouped into arches, various compositions on the ceiling or wall. Making such a decoration will be quite simple.
Materials for work:
- patterns (diagrams) of parts;
- scissors;
- adhesive tape;
- colored paper (both sides);
- stick or skewer (thicker).
How to make a paper rose?

These roses can be made as a souvenir or decoration for a photo shoot.
DIY crepe paper flowers - diagrams
To make beautiful buds, you can choose one of the instructions presented below. Small or huge flowers can be made in a few hours.
Wonderful lush peonies or a pink bouquet will be a wonderful addition to your interior or souvenir.
These are such wonderful flowers blue color you can make it from crepe paper with your own hands if you follow step by step diagram in the picture.

Volumetric flowers made of corrugated paper - step by step photo
You can use crumpled paper to create beautiful bouquets, such as a composition of crocuses.
To work you will need:
- corrugated paper;
- glue;
- toothpicks;
- scissors;
- brush.

Composition making process:
- The paper must be placed in such a way that the relief is on the short side.
- Now you should cut the paper into rectangles measuring 8*4 centimeters.
- The blanks need to be crumpled in the form of an accordion.
- Now you need to cut out 6 identical petals from these folds, then you need to slightly twist their ends with a toothpick.
- Now it's up to the stamens. They are made from the same rectangles as the petals. The blanks are cut with fringe, leaving a narrow strip (see the diagram above).
- The fringe (each of its elements) needs to be twisted into a flagellum, and then the future stamen should be rolled into a tube. To do this, wrap the toothpick in a paper blank.
- The bottom of each stamen is smeared with glue, after which the flower petals begin to be fixed one by one.
- The completion of each flower is to wrap the stem in green paper and then attach the leaves to it.
How to make paper flowers for a postcard?
Decorating souvenirs makes every giver think about how to decorate the packaging in an interesting and original way.
A simple ribbon bow is a thing of the past, replaced by paper flower arrangements.

Even handmade flowers from cardboard will allow even a little person to create unique gifts for friends or family.
What is required for labor?
- colored paper (several colors: pink, red and green, you can choose other colors);
- a postcard purchased or made independently;
- glue;
- scissors.
How to make small decorative flowers?
- Round blanks are cut out of thin cardboard or paper. The edges of the circle are made jagged. The more such elements, the more magnificent the bud. You can make flowers of different sizes.
- Each blank is folded into 4 or more folds - it depends on what shape you want to give the bud.
- Each part is fixed with glue on the postcard.
- The stem and leaves will complete the paper plant.
These are such interesting master classes with step by step instructions were selected and presented in this article for your attention. Imagine, create - everything will work out!