On Women's Day, every man wants to express his warm feelings to his beloved women. And in this case, the most original gift will be the one that was created independently. As a rule, such a gift conceals the warmth of a person and his unique imagination. In this article it is worth talking about how to make beautiful crafts for March 8th with your own hands. We will offer you the most creative ideas that you will certainly like.
Beautiful crafts for March 8
Chrysanthemum.
Every woman will be pleased to receive a beautiful chrysanthemum. Moreover, it will be very easy to make. To begin with, you should prepare the materials necessary for the work. You will need: orange double-sided paper, PVA glue and scissors.
Work progress:
- It is worth cutting out a couple of circles from yellow and orange paper. In this case, the circles will have different diameters. Cut strips and leaves for the flower.
- Now it’s time to glue all the parts together. From each yellow strip you need to form a loop. And these loops should be laid out in a circle and, of course, glued.
- Fill the entire circle with these loops.

Paper violets.
In this article we decided to talk about how to make the most beautiful crafts for March 8 with your own hands. Such crafts include a craft - a pot of paper violets. Violet is a favorite houseplant of many women. Therefore, any lady will be pleased to receive such a gift on the holiday - March 8th. To create violets in a pot, it is recommended to use: velvet paper or felt. In addition, it is worth preparing: scissors and a hot glue gun.
Work progress:
- Leaves are cut out from green felt. For crafts, you should cut 5-7 of them.
- Petals for violets are cut out of lilac felt. You need 4 of them for each flower. Strips of stamens are cut out of orange paper.
- Now cut out a rectangle from brown paper. Its length should be 17 cm and width 9 cm. Round it on both sides.
- Then you should make a pot. It's very easy to do. You must glue the two edges of the brown paper strip together.
- Make flowers. Glue the edges of each petal, and then assemble all 4 petals together. The stamens are glued in the middle.
- At the next stage, all the elements come together. Glue the flowers to the leaves. Then coat the edges of the pot with hot glue and quickly glue the violets to the pot.

Volumetric postcard “Blue Flower”.
Volume cards are a real hit. Such postcards are not only pleasant to receive, but also to make with your own hands. Therefore, our selection of ideas will include this version of the craft. To make it yourself you need to prepare: colored paper and a lid, scissors, a ruler and a pencil, a coin, felt, cardboard, finger glue, glue with glitter.
Work progress:
- First of all, you should make a template. To do this, draw a circle of the desired size on a piece of paper. Use a ruler to mark lines in the middle of this circle. And use a coin to make curls around the edges of the circle.
- Cut out the wavy edges that were marked and make 3 more similar blanks.
- Now all 4 parts need to be glued together. Glue a black circle in the middle. You can use colored paper or felt.
- Next, we begin making the postcard. Fold the cardboard sheet in half. Glue your flower to it. Draw patterns with Hitler glue. It is also worth putting a congratulatory inscription.

Craft - water lily.
If the summer days are still far away, then you can make original crafts for March 8th. Such products will charge every woman with a positive mood and warmth. Try making a water lily. It's done very quickly. Try it and you will succeed. To make this craft you will need: a white napkin, a piece of decorative paper, floral interlining, scissors and PVA glue.
Work progress:
- Wrap your napkin. Fold all 4 corners towards the middle. After that, the resulting figure needs to fold all the corners again. These movements are repeated 3 times. Then turn the napkin over and bend all the corners towards the center again.
- After which you should straighten all the corners. To do this, you should put a napkin on the table and help yourself with your finger while working. Gently straighten the bottom petals of the napkin. First of all, you should straighten the uppermost corners. After which, the lower corners are straightened. At the end, straighten the corners that are at the very bottom.
- To decorate a water lily, make a core for it.
Wreath of live roses.
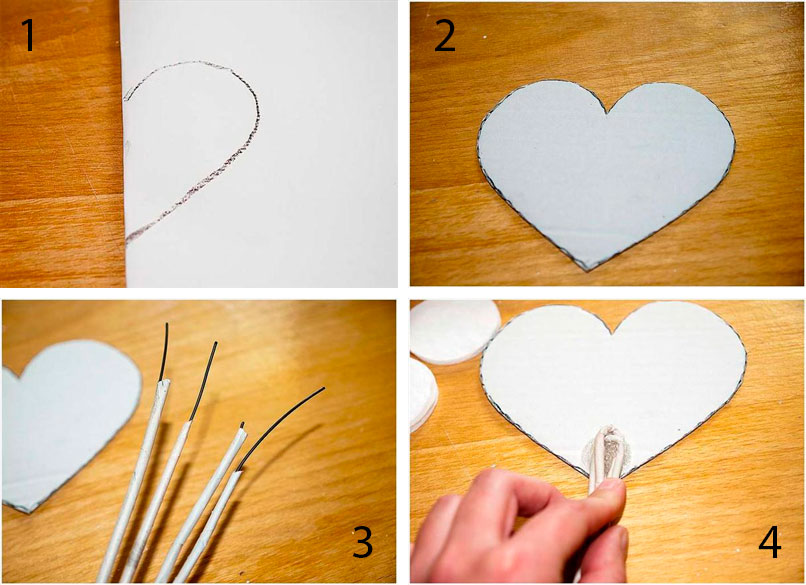
In our article above we listed simpler crafts. Now it’s worth talking about how to make a wreath from real roses. To create a wreath you will need: thick cardboard and a simple pencil, a paper knife and thick thread, small roses and a stapler.
Work progress:
- On cardboard you need to draw a heart-shaped blank. In this blank you need to cut out another heart.
- You need to tie a thread to the top of the heart.
- Then you should do the flowers. When working, it is best to use not very large buds. Using a stapler, it is the buds that are attached to the cardboard blank.

Gift box.
Creative crafts for March 8 are also very easy to make with your own hands. The next composition will be very easy to make. However, to create it you will need flowers, a satin ribbon and a floral sponge. The sponge should have the shape of a rectangle. You will also need foil to wrap around the bottom of the sponge.
Work progress:
- So, you need to wrap the bottom of the sponge with foil.
- The stems of fresh flowers should be trimmed with scissors.
- First, the sides of the sponge are decorated with flowers. Then you can decorate the top part. To make the composition look neat, you need to stick the flowers in even rows.
- For decoration, use a satin ribbon.

A beautiful topiary is a great gift for every lady. To make it you will have to prepare: a round ball and a long stick for the barrel, a stapler and napkins, scissors and a satin ribbon, corrugated paper and elements for decoration, a pot and polystyrene foam.
Work progress:
- First, the pot should be filled with foam.
- A barrel is inserted into the foam, and a ball is attached to the barrel. This ball can also be made of polystyrene foam.
- Now you should take a certain amount of napkins, connect them together and fold them 4 times.
- The napkins are fastened in the center using a stapler.
- Then a circle is cut out of the napkins. Then start folding 1 layer of napkins towards the center. As a result, you should get a fluffy flower.
- These flowers from napkins are used to cover the ball, as well as the top of the pot.
- The barrel is wrapped with a satin ribbon.
- Use crepe paper to decorate the pot. Wrap it around the crust and decorate the top with ribbon.
- Now you can decorate the pot with bows and beads.

In conclusion
As you can see, it’s incredibly easy to please your beloved lady on March 8th. You just need to want it, and everything else will definitely work out.
Even one-year-old creators will be able to please their beloved mother, grandmother, and sister on March 8th. A colored handprint or tiny footprint on a white sheet of paper, placed in a beautiful frame - why not a gift? This craft is very easy to make and extremely fun. Cover your palm with paint and slap it onto paper. Ready! You can use more than one paint, but several colors. You can also use your legs, of course, under the supervision of adults.
Application for March 8
With children from one and a half years old, you can already start applique. They are quite capable of gluing the parts you cut out onto the finished drawing. First, you will spread glue on the paper, and your baby will glue it. And a little later he will cope with this on his own.


Or these crafts at the intersection of applique and origami:


Wonderful and easy to make flowers using mixed media using applique and quilling:

By March 8th, original bouquets for mom will be made from ordinary colored paper. Crafts are suitable for kindergarten.
Volumetric crafts for kids
These are the simple and beautiful flowers you can offer to make for children from 3 to 6 years old. We cut under adult supervision!


Paper bouquets for March 8
Kids can make voluminous flowers in a vase if they have a little help with this.

And for children of primary school age, the crafts are more complex.
Click on the pictures and a step-by-step master class will open.


Artificial flowers made with your own hands for March 8th can be so beautiful that they will be a pleasure to decorate any room with.

A bouquet of flowers from multi-colored napkins will delight all women on this holiday.

Or give your mom a whole flower tree:

Don't forget to click on the pictures to watch the full master class of your favorite craft!
Cute aprons-cards for mom and grandma:

The card can be voluminous, like these flowers (to see how to make it, click on the photo):


Interesting crafts are made in the style of collages. Prepare pictures cut out along the outline from old books and magazines - flowers, animals, children, household items and whatever you like. If you decide, for example, to depict a flowering meadow, then create a background by gluing grass and the sky from colored paper. Let the child decide for himself where to stick flowers, butterflies, birds, clouds. Don’t stop him from creating on his own, and you will get a bright piece of work that you can present to your grandmother or older sister.
When talking about appliqué, we most often imagine paper pieces that create a complete image on a sheet of paper, but not only colored paper can serve as material for it. If your craft depicts a person or animal in clothes, cut out his pants and shirt not from paper, but from scraps of bright fabric or from a glossy magazine.

Pieces of leather and fur are also suitable for applique, and your little man’s hair can be made from woolen threads.
By March 8, you can depict a mimosa sprig with your child in the style of a cut-out appliqué. Draw a stem and leaves on paper, spread the surface of the future painting with glue. Show your child how to tear small pieces from a sheet of yellow paper (or, better yet, a napkin) and stick them on. Mimosa can also be made voluminous. Let the child, before gluing, roll the pieces of napkin into “cute” balls. This will also be a useful exercise for the baby’s naughty fingers.
If you use cotton balls instead of paper, you will get a fluffy willow twig.

You can also make dandelions from cotton wool by placing them on a green “meadow” and drawing stems. Very beautiful and unusual crafts are made from simple and affordable materials: eggshells ( Egg mosaic), semolina, woolen threads.
Crafts - flowers for March 8
Flowers can be made voluminous and arranged in vases.


Postcards for March 8th for kids
The easiest thing for a child is to make an applique postcard using a template prepared in advance by an adult, so that all that remains is to glue the details of the craft to the designated place. An older child can color a postcard (coloring book) himself well, or draw his beloved mother, grandmother or flowers for them.
Fans of crafts from plasticine can also make wonderful postcards; just draw a sketch on thick paper with a simple pencil and “color” it not with a pencil, but with pieces of plasticine:


And if the background is also made of plasticine, and even rhinestones and beads are applied, it will turn out even more elegant:

You can choose a more cunning path. For example, embroider a card with floss threads using the isothread technique. This is not difficult at all; 6-7 year old children are quite capable of coping with simple patterns.

When craftsmen get down to business, everything that is at hand is used! This card looks pretty nice, although it is made of absolute garbage - from lacy shavings coming out of a sharpener. It is enough to smear the outline of a figure eight, bird or flower with PVA glue and place rows of shavings on the glue.

But what if you don’t really want to make a complex craft? Then you can simply draw a card or even print and color it. We have a large selection of coloring cards on our page COLORING CARDS FOR MARCH 8 >>
If you are lucky enough to collect shells and sea pebbles by March 8, you can decorate souvenirs with them, for example,
The task of all men is to provide their women with attention on March 8th. If the husband or loved one can buy a gift, then the sons can make their own wonderful gift from scratch. The most beautiful DIY crafts are made very simply and take little time.
Such work has become traditional in schools and kindergartens. The most popular gift material for mom is colored paper. It is the most convenient way to make a pleasant surprise for a spring day.
Every child wants to surprise his mother, especially on such a spring day. For the holiday, children make various crafts in schools. Anything can be used as a material. In second grade, children can be asked to make clay figures and then paint them. Mothers and grandmothers will put such toys as a souvenir on a shelf or attach them to the refrigerator (magnet).

Crafts made from colored paper
Option #1
You can create a very beautiful craft from colored paper. It is suitable for primary school children. It is done quickly, but it turns out very beautiful.
To create a craft you will need:
Colored paper (green, red, white and yellow);
PVA glue;
scissors;
purple felt-tip pen;
simple pencil.
Creating a masterpiece:
First, lay out all the tools and materials in front of you. First of all, we will make weed. Take a whole sheet of green paper. Now start folding it into an accordion from any edge. You can start from the top or from the bottom, as you wish. Make sure each fold is the same size. When you reach the end, connect the conics to make a fan.
Now he will make tulips. Draw the simplest tulip on red colored paper and cut it out. Fold the red paper four times to make 6 more flowers. Attach the tulip to the paper and trace with a simple pencil. Cut carefully. The result should be 7 tulips.

Next, cut out the daisies from white paper. We do it according to the same principle as tulips. But in addition to the flowers, we also cut out the centers from yellow paper. We also make 7 flowers. We attach the centers to each daisy using glue.
All that remains is to assemble our composition. Glue tulips to the ends of the fan, alternating with an accordion. And scatter daisies in the center and glue them too. Our craft is ready!
Option No. 2
Also, children in first grade can easily make flowers using the origami technique. Since Women's Day is celebrated in the spring, you can make a bouquet of tulips. These will last a long time and delight the mother’s eye.
Colored paper (5 sheets of red and 5 sheets of green);
scissors.
Work progress:
We begin to create a festive bouquet from a bud. Take a sheet of red colored paper and place it in front of you. Grab the top right corner and fold the sheet diagonally to the end. Draw a line and cut. The result should be a square and a wide strip.
Bend the square diagonally, then straighten it. Take the upper left corner and also bend it diagonally, then straighten it again. Now reach out so that both fingers on your right hand are on the same diagonal, and your left hand is on the opposite side. Bend the square into a triangle.
Now take the left corner of the first triangle and flip it to the right. Then turn the craft over. Now there are 3 corners on one side, and 1 on the other. Where there are 3, turn one corner over to the opposite side.

Look carefully. There should be a hole at one end and 4 petals at the other. Blow into the hole as if you were inflating balloons. Then bend the tips of the petals.
Take a piece of green paper and cut a strip the same size as the red paper left over. Then wrap it lengthwise into a thin tube. So our stem is ready. All that remains is to stick it into the hole on the bud. Thus, you need to make the remaining flowers. The result should be 5 tulips. You can experiment with colors and make tulips of different colors (yellow, red, orange).
Option #3
By March 8th, all women are usually given a mimosa. These yellow flowers not only lift your spirits, but also give off a wonderful aroma. You can make such flowers with your own hands. They will delight mom and grandma all year long.
Required tools and materials:
Colored paper (green and pink);
simple yellow napkins;
PVA glue;
simple pencil;
ruler;
paints;
scissors;
disposable glass.
Work progress:
Let's start making the stem. Cut a long strip of green paper. Then twist a thin tube. Apply glue to the ends and wait until they dry. If you don't have glue on hand, use a stapler.
Let's start making flowers. Mimosa flowers resemble fluffy balls. Take yellow napkins and cut 3 cm strips. Fold each strip in half. Next, make cuts along the entire length and roll it up.
The opposite side should be fluffy. Make a lot of these balls. Do the math at the end. It is necessary that the number of flowers be odd. Then glue the fluffy balls to the stem. You can install them tightly to each other, in small piles.

But we will just end up with a bare stem with flowers, so we need to attach leaves. Cut out two long ovals from green paper. Fold in half and make cuts. Spread the leaves, apply glue to one end and attach to the stem.
Original beadwork
By March 8, boys in junior classes for mothers and grandmothers can make their own crafts from colored paper, and girls from beads. Now we will show several ways to create a souvenir.
Small bouquet of flowers
Even a first grader can handle this craft. But basically, only from the 3rd grade do they begin to teach beading. There is nothing complicated in this technique, the main thing is not to rush.
Required materials and tools:
Round beads (pink, green and purple);
wire (not thick enough to fit twice into the beads);
yellow beads;
small, decorative vase.
Work progress:
First we make the buds. Each flower will consist of 5 identical petals. Take a piece of wire, about 10 cm. Insert one pink bead into one end. Wrap the other end and insert the end into the hole, but from the other side. This way you will fix the beads. Now string two pieces and go through them with the other end. Then do the same with three pieces.
The result should be a small pyramid. You should also do up to 5 beads, then go down. That is, first: 1, 2, 3, 4, 5; and then: 5, 4, 3, 2, 1. At the end, twist the two ends of the wire along the entire length.

Use the same principle to make the remaining petals. We will need 10 pink petals and 15 purple petals. By the way, the leaves are made according to the same pattern as the petals, but from green beads. It's not difficult to count, we need 10 leaves.
For the centers, take a 10 cm wire and secure the bead. There should be 5 centers in total.
The next step is to collect our bouquet. Take 5 petals, place the middle in the center, and twist everything. Take two leaves and also twist them around the stem. Then straighten everything out. Also add all the flowers. Insert the finished bouquet into a vase or tie it with a beautiful ribbon. This is how easy it is to make small souvenirs. To add a spring mood, all the petals can be made multi-colored.

Creative works made from salt dough
Souvenirs made from salt dough will be a wonderful surprise for mom or grandma. This is a safe method, since it does not require piercing or cutting tools. In order for you to get beautiful figures and not fall apart, you need to properly prepare the salty composition. First, we will describe the recipe for salt dough, and then we will describe the process of work.
Required ingredients:
wheat flour;
fine salt;
water.
Preparing the dough:
Take flour and salt in equal quantities and mix. Add some water and knead the dough. Then you need to put it in a bag and place it in the refrigerator for a couple of hours. After which you can safely begin sculpting. If it seems to you that the dough is not elastic at all, add a little cream. This will be useful for your hands, and it will be more convenient to sculpt figures.

For a souvenir:
Ready salted dough;
gouache paints;
brush;
water;
magnet.
Work progress:
Now it's up to your imagination. You can make small flowers in a basket. First, make a round basket and attach a handle. Place 7 or 9 small flowers inside, like a chamomile, but with 5 petals. Leaves may stick out on the sides.
When everything is ready, you need to wait for the dough to dry and become stone. Then dip your brush in water and start painting. The basket can be made brown, the flowers pink, and the centers yellow. Accordingly, the leaves turn green. You can sprinkle glitter on top.
Our advice to you! Do not wet the brush too much in water, otherwise the paint will run off and the whole craft will be ruined. Next, when the figure is dry, you will need to glue a magnet on the back side. This is an original souvenir that mothers and grandmothers can make for March 8th.

All children want to surprise their mothers on this wonderful spring day. They come up with various souvenirs with their own hands. Kids can make gifts from colored paper, and older kids can do serious things. In general, crafts can be made from anything. You can sew a pillow and embroider a picture of your mother on it. All you have to do is take a photo on a flash drive to a photo salon, and they will transfer the image onto paper.
You can use simpler advice, especially if you don’t have time. Make a card out of cardboard by folding the sheet in half. Then cut out a big figure eight and glue it to the card. Glue flowers around the entire perimeter of the number. Inside you can write beautiful wishes for mommy.
Such gifts are always appreciated as they are made by hand. Your soul was put into their preparation. Use your imagination and surprise mothers and grandmothers with your surprises on this magnificent International Women's Day.
International Women's Day on March 8th is approaching, I would like to express my love, respect and gratitude to my mother. The best way to please your mother on this day is to give a good gift from the heart, made with your own hands. In this article we have selected the best gift ideas for mom on March 8th.
You will need: colored paper, scissors, glue.
Master class

creative indoor flower
You will need: pot, foam, skewers, artificial grass, glue gun, candy bars, chewing gum, gift cards, etc...
Master class

The creative indoor flower is ready!
Coffee mug
You will need: mug, coffee beans, cotton pads, thick white thread, brown acrylic paint, superglue.
Master class

Coffee heart
You will need: coffee beans, paper, wire, thread, glue, cardboard, jute thread, sponge, iron can, brown paint, ice cream sticks, decorative elements - flowers, ribbons...
Master class
- Fold a piece of paper in half and draw half a heart, then cut it out.
- Trace the heart on cardboard and cut it out in 2 copies.
- Wrap 2 pieces of wire in paper and glue to one heart. Repeat this process for the second heart.
- Glue cotton pads in several layers between the hearts to make the design three-dimensional.

- Cover the entire heart with cotton pads and wrap with thick thread.
- Color the heart.
- Glue the coffee beans in 2 layers.

- Cover the jar with popsicle sticks.
- Wrap the wires with jute thread.

- Stick the coffee tree into the sponge, then place it in the pot.
- Decorate to your taste.
The coffee heart is ready!
Ship made of money
You will need: 7 sheets of A4 format with images of different banknotes (euro, dollars, hryvnia, rubles), white sheets of A4 format, silicate glue, scissors, glue gun, thick cotton threads, skewers 20-30 cm long, polystyrene foam, a flat box of half as wide as the bottom of the ship.
Master class
- Fold a boat from a sheet of paper as shown in the photo.

- Carefully turn the boat inside out so as not to tear it.
- Fold and iron the boat.
- Trace the outline of the boat on another sheet, then draw a dividing line and cut out 2 parts.

- Coat them well with glue and glue them to the inside of the boat to make two-layer sides.
- Cut the money sheets into 1.5 cm wide strips.

- Cover the boat with money stripes.
- Carefully coat the entire boat with glue for strength and leave for 2 hours to dry completely.
- Place identical bills side by side and glue them together. Make 3 of these - from five, from three, and from four bills. These will be the sails.

- Carefully thread the sails onto skewers and secure the joints with glue so that they do not slip.
- Take the boat and glue 3 pieces of foam inside.
- Insert skewers into the foam for the front and back yard. The front yard should be 1/3 longer than the back one. Make sure the lines are level, then secure with a glue gun.
- Insert skewers with sails, placing them at the same distance. It is worth noting that the deck should be smaller than the stern.

- Fold the threads in 2-3 layers along the length of the sail and additional centimeters for the ties.
- Tie the threads to the skewers as shown in the photo.
- Cut 2 bills diagonally and fold the edges 0.4 cm.
- Glue the bills (sails) to the raking threads.

- Make sails on the stern in this way: do not twist the bill into a tube too much, bend the edge, then glue it.
- Fold 3 bills in half, shape them into flags, then glue them.
- Cover the deck with bills.

- Make a stand for the ship from a flat box.
- Glue the desired background onto the box.
- Glue the ship.
Vase from a bottle
You will need: glass or plastic bottle, magazine, PVA glue, decorative elements (beads, buttons, sparkles...).
Master class

You will need: a transparent glass, a ball, scissors, markers, a sheet of white paper, glue.
Master class
- Cut the ball in half along the wide side.
- Pull the ball onto the glass so that the hole is centered and pointing down.
- Draw a cute picture, cut it out and stick it on the glass.
You will need: tin can, wooden clothespins, flowers, water, hearts for decoration.
Master class

You will need: a sheet of paper 100x15 cm or glue A4 sheets together, 2 thick sticks, felt-tip pens, tape.
Master class

Bookmark "Nibbler"
You will need: cardboard template, scissors, glue, decorative elements - felt-tip pens, paints, buttons, beads, glitter...
Master class
- Print or redraw the template.

- Cut it out.
- Fold the paper according to the printed pattern.

- Glue the connecting parts of the paper.

- Decorate the catfish to your taste.
We present to your attention original and creative gift packaging! You can put sweets, magnets, jewelry, money and other small gifts inside them.
Candy tulips
You will need: corrugated paper of your favorite colors for buds, green corrugated paper for leaves, Raffaello candies, double-sided thin tape, green tape, satin ribbon, packaging material for a bouquet, scissors, wire, pliers, a wooden stick, optional transparent beads to create dew , glue gun, tweezers.
Master class
- Prepare the wire by making the required number of stems of equal length.

- Cut long strips of corrugated paper, cut the long strip of corrugated paper into 2 pieces, then cut into 4 pieces. You should get 8 strips, 6 of them will be needed for the tulip bud.
- Turn each strip over the center, folding it in such a way that the right sides of the strip are directed in one direction.

- Make 6 blanks in the same way.
- Attach double-sided tape to the tip of the wire.

- Attach the candy to the tip of the wire.
- Assemble a tulip bud in this way: take the first petal and attach it to tape. Place the second and third petals near the candy and, holding them with your fingers, secure with tape.

- Attach the remaining petals in the same way, forming a tulip bud and securing with tape.
- Trim the excess ends of the crepe paper at an angle at the base of the bud.
- Wrap the stem with tape.

- Cut a strip of green crepe paper.
- Cut into two almost equal parts.
- Fold each part 4 times and cut out the leaves.
- Pull each leaf out in a spiral using a wooden stick.

- Place a short leaf and a longer one below. Secure each leaf with tape. The tulip is ready! Make the required number of tulips of different colors.
- Assemble tulips into a bouquet in this way: connect 2 tulips and tie them with tape, then add one tulip at a time, placing the colors in a checkerboard pattern.

- Cut 20 leaves and place them around the perimeter of the bouquet, securing with tape.
- Wrap the bouquet in wrapping paper and tie with ribbon.

- Create dew drops on tulip buds by gluing clear beads using tweezers and hot glue.
Spectacular bracelet made of ribbon and beads
You will need: ribbon, beads, thread and needle.
Master class

You will need: a cardboard template, scissors, decorative elements - felt-tip pens, paints, buttons, beads, glitter, ribbons...
Master class

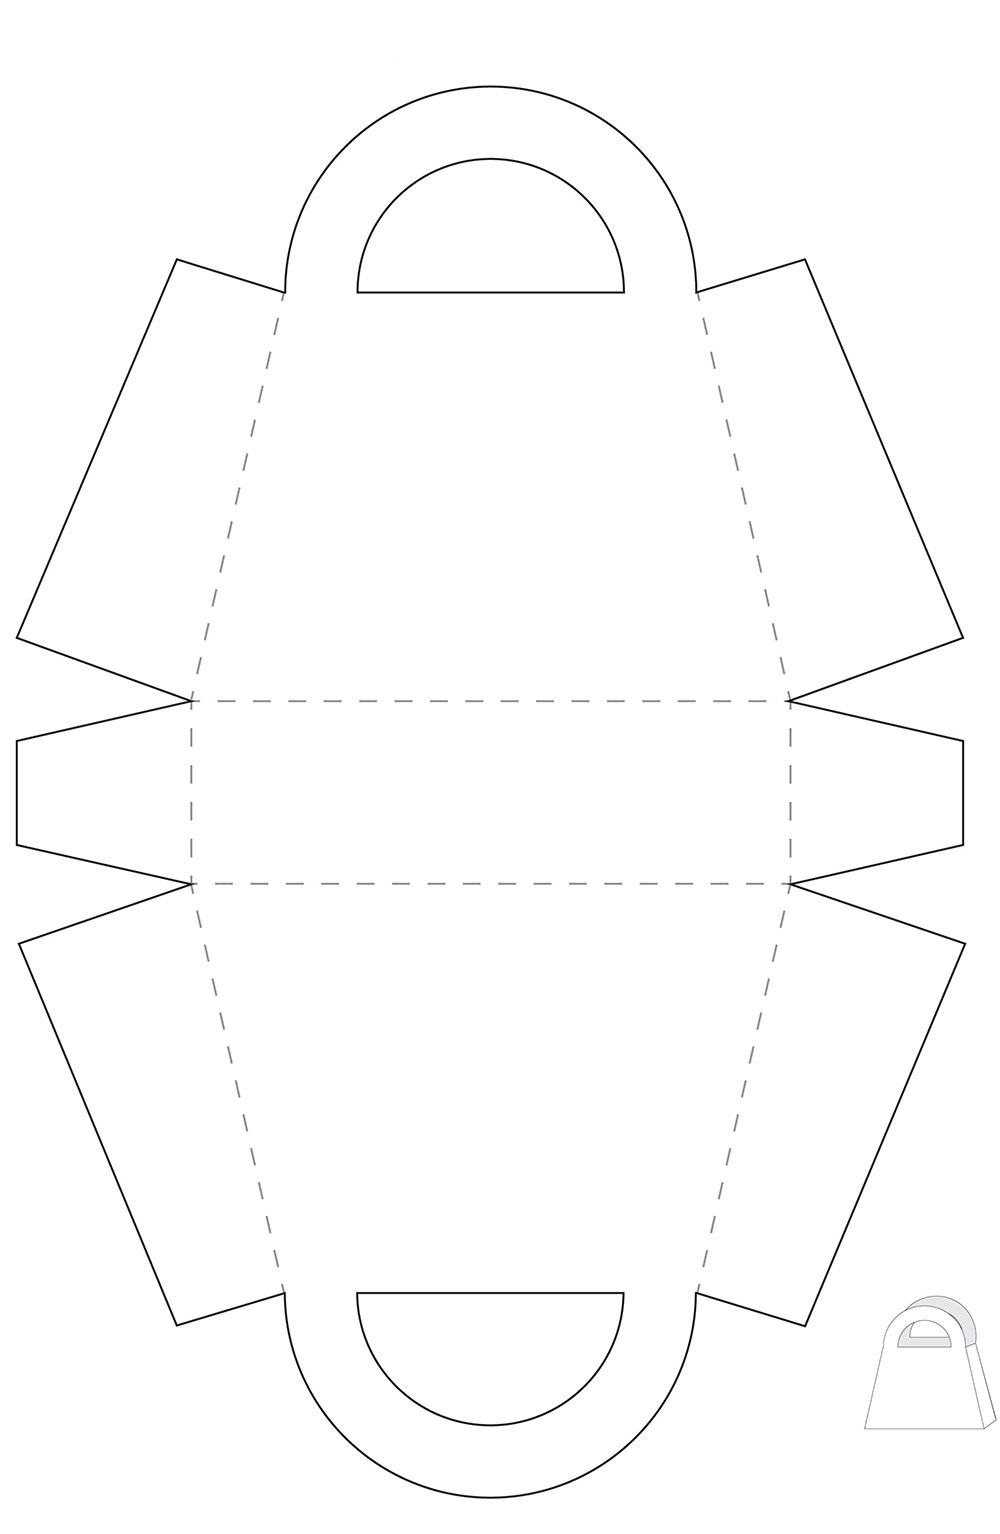
You will need: a printed bag template (listed below) or a redrawn one, scissors, decorative elements - felt-tip pens, paints, buttons, beads, ribbons, glitter...
Master class
Paper shoes
You will need: a printed shoe template (listed below) or a redrawn one, scissors, glue, decorative elements - felt-tip pens, paints, buttons, beads, glitter...
Master class

Paper cake
You will need: cardboard template, scissors, decorative elements - felt-tip pens, paints, buttons, beads, glitter...
Master class

Head wreath made of foamiran
You will need: foamiran 0.5 cm thick (orange, yellow, cream, light green, dark green and red), scissors, toothpick, curly scissors, oil paint in autumn shades, sponge, sheet of paper, iron, floral wire, ruler, super glue, lighter, lilac clay (for blueberries) or beads, tape, foil, wire at least 2 mm thick and 60 cm long, ribbon or string, mold (leaf shape).
Master class
- Print or draw leaf templates, then cut them out.

- Trace the templates onto foamiran with a toothpick, then cut them out.
- Make a sufficient number of multi-colored leaves, for example 60, remember, the more there are, the more magnificent and beautiful the wreath will look.

- Add realism to some of the leaves by trimming the edges with scissors.
- Scratch a small part of the leaves with a toothpick.
- Tint the leaves in this way: apply a little oil paint to the sponge, blot a sheet of foamiran, then remove the excess with a piece of paper.

- Combining colors: color the yellow foamiran leaf with light green and brown paint. Also, color some yellow leaves with orange, red and light green paint. Tint red leaves with brown, green leaves with burgundy, brown and dark green.

- Preheat the iron on the second setting, apply the sheet for 2 seconds, remove it and press it onto the mold to make an imprint of the sheet. Repeat this process with all the leaves. Please note that this should be done quickly and very carefully, as foamiran is highly flammable. If you are new to this business, it is better to skip this point and proceed further.

- Cut the floral wire into 7 cm long pieces and make a loop at the end.
- Glue the floral wire to the front side of each leaf using super glue.

- Treat the edges of the leaf with fire using a lighter. The edges should be realistically curved. Repeat this process with all the leaves. Do this carefully, I remind you that foamiran is highly flammable.

- Roll a ball of purple clay the size of a blueberry. Make 15 berries, place each blueberry on a wire with a loop coated with super glue. Using the tips of a pair of scissors, score the tops of the blueberries and set aside to dry. Beads can be used as blueberries.

- Start assembling the wreath in this way: form small bouquets of leaves and berries, secure them with tape.
- Cut rose petals in the shape of a drop from red foamiran. One bud will require 10-15 petals. The number of buds depends on your desire; you can make from 3 to 7.
March 8 is just around the corner and we with children We have already started preparing for the holidays crafts and applications. Plasticine, colored paper, newspapers, and leaflets are used. I will post the results of our work in about 1-2 days.
You should have seen with what zeal and interest children(my nieces and son) are getting ready for March 8! All you can hear is: “I’m making this craft for my grandmother,” “And I’m doing it for my mom,” “And I’m doing it for my sister” :) In this atmosphere of bright crafts, you can already feel the approach of spring and warmth! I think your children too, doing crafts for March 8, will fill the house with warmth, joy and celebration! Happy upcoming year everyone!
1. Postcard for March 8 “Flowers in a pot” (3-6 years)
How to do:
With your child, cut out a pot and flowers from white paper and decorate them with cutouts from a magazine. Trace the outlines of the flowers with felt-tip pens. Let the child glue the resulting pot onto a second sheet of paper and draw stems for the flowers. Now you can glue the flowers.

You can sign the card in an original way: attach it to the refrigerator with magnetic letters.
2. Craft from plasticine balls “Festive dress” (1-3 years)
The little ones will also be able to congratulate their mothers on March 8th! Varechka made this craft for her mother, sometimes asking me: “Yulia, should I sculpt here? Julia, right?”
Material: colored paper; plasticine; cardboard (ours is from a marshmallow box).
How to do:
Cut out a dress from colored paper: fold the sheet in half, draw only one half of the dress at the fold, cut out and unfold the sheet, you get a dress. Glue it onto cardboard.


Draw circles on the dress. Roll it up balls from plasticine, and let the child stick them into circles on the dress. By the way, I wrote about activities with plasticine balls and their benefits in the game.
P.S. Using plasticine balls, Varechka decorated the cardboard itself. Since she is still small and does not know how to write herself, we cut out the inscription “March 8” from the newspaper and glued it next to the dress.
3. Craft “Mimosa” (3-5 years)
Do you know why mimosa? It symbolizes the sun, warmth and the beginning of spring. When Slavik made this craft, there was a feeling that everything around was beginning to bloom, although there was still slush and snow in places outside the window.
This crafts I suggest making it for children aged 3 years and older, because it takes a long time to sculpt balls and not every two-year-old child can withstand 10-15 minutes of sculpting.
Material: yellow plasticine; cardboard (ours is from a candy box); colored paper (green).
How to do:
Draw the stems of the mimosa with a green marker.


Cut out leaves from green paper, slightly cut their edges - this way they will look more like real mimosa leaves. Roll balls out of yellow plasticine with your child and let him mold them onto the stems.
4. Craft “Talking Flowers for Mom” (5-10 years)
This craft was made by my older nieces Arisha and Vikusha. per day March 8 their mother will receive a gift that will say it all! like this crafts You can give it to your mother or grandmother not only on March 8, but also on your birthday.
Material: colored paper and colored cardboard
How to do:
Let the child trace his palm on 5 multi-colored sheets and cut out traces along the contours. These will be flowers.


Then you need to cut out the stems and the vase and glue everything onto the cardboard. The child can write on the vase “I love my mother (or grandmother) because...” and on the flower palms are the answers.
5. Craft “Bouquet for March 8” (3-8 years)
When we made this bouquet, we didn’t think it would turn out so... real!
Material:
- colored paper; 2 sheets of cardboard (I used a filter box);
- a round white paper napkin (if you don’t have such a napkin, cut a large circle out of white paper and make the edges wavy);
- ribbon.
How to do:
Cut out flowers and leaves from colored paper. Have your child glue them onto a round napkin.


To prevent the napkin from becoming wavy from the glue and to be more durable, glue a circle of cardboard on its back side.


From the second sheet of cardboard, cut out the base of the bouquet and glue it, as in the photo. Draw the stems with a green marker.
Finally, decorate the bouquet with a ribbon.
6. Craft “March 8” (1-3 years)
And again a craft for kids! We have already prepared a gift for mom (craft 2). Now we will make our grandmothers and sisters happy!
Material: colored cardboard (1 sheet); flowers cut out from magazines, newspapers and leaflets; plasticine.
How to do:
Cut out the number 8 from colored cardboard. For this I needed 2 bowls of different sizes and nail scissors.


Roll balls from plasticine and prepare cut out flowers. Let the child sculpt and glue everything onto the figure eight.


