Every woman has dreamed of a crown at least once in her life. I would especially like to try this jewelry on for little girls, to the envy of all their girlfriends. After all, each of them is a real princess. But if in adult life there are not many reasons to wear this accessory, then in kindergarten or on school holiday A crown made of beads will be relevant. Such decoration can perfectly complement the outfit of not only a princess, but also the queen of spades (hearts), snow queen and will also be an excellent reward for the winner of a school beauty contest.
What is needed?
If you are “friendly” with a material such as beads, then making such a decoration will not be difficult. special labor. In order to create a crown, you need to stock up on thick and thin wire, beads, beads and other material that you will weave into the outline of the product. These can be rhinestones, stones, feathers, crystals... Jewelry made from glass accessories looks great. They shine and shimmer beautifully, which evokes envious sighs of delight and admiration.
You also need to prepare a base if a beaded crown will decorate any product, for example You may need and In this article we will look at two options for creating such a decoration.
Such different crowns
Surely you have seen different types crown These can be small crowns attached to the side of the hairstyle, or large ones that practically cover the entire surface of the head. A beaded crown, made by yourself, can decorate a headband and go perfectly with loose wavy hair. Also, this decoration is very different in its shape: it can be the main one, the central part stands out, or the entire circle can consist of identical elements.
In addition, the decoration can be in the form of not only a crown, but also a tiara. Depending on what event is planned, the type of this accessory is selected.

Option #1
Many needlewomen often ask the question: “How to make a crown from beads?” This process is extremely exciting and quite simple, so you shouldn’t be afraid of it. For an experienced craftswoman, creating such an accessory will take little time (about 5-6 hours). Agree, this is very little for working on a small masterpiece.
Let's consider the first version of the crown. This is not to say that it is the simplest, but it is not extremely complex either. In order to make such a decoration, you need to bend a round base from thick wire. It should be slightly smaller than the circumference of your head. The desired elements are attached to a round base made of the same wire. These can be triangular parts, as in this picture.

Or bent in the shape of a heart. In fact, the crown itself depends on how the top is decorated, so a wide variety of shapes are welcome here.

Next, the beaded crown is decorated with your own hands. To do this, beads, beads and other decor are strung on a thin wire, and the wire itself is wrapped around the base. This can be clearly seen in the following figure.

After all parts are filled with beads, the crown can be left unchanged or decorated with additional fabric so that the wire edges are not visible.
If you choose a small base, you can glue it to the hoop, but a large beaded crown can also be made in this way. The master class on creating this product is simple and clear, so usually there are no difficulties in the creation process.

Another way
The second version of the crown involves a similar creation technique, only in this case the beads and beads are strung directly onto the wire (both on the base and on the protruding parts). A beaded crown created in this way (daisy pattern) looks very beautiful on girls.

In order to give such a crown more festive look, you can attach a beautiful glass bead to the center of each part. Thanks to this simple technique, the appearance products.

Creating such a crown from beads, the diagram of which is presented below, is very simple. It is enough to form a circle from strong wire and beads strung on it, onto which semicircular parts - petals - are then wound. Beads are also strung on each petal. The work is very simple and quick to perform.

Other options
There are also other ways to create this unusual decoration. A beaded crown is most often made openwork. But there are models in which all the small parts are filled. This beaded crown looks very stylish with a matching outfit.

Very often such decorations are used for photo shoots, and here they can be different forms and flowers. With such an accessory, every girl or woman will instantly become a magnificent princess, from whom it is difficult to take her eyes off.
Conclusion
To create a truly royal decoration, you need a small amount of free time, beads, wire and inspiration as the most important component. With these three factors in place, you are sure to create a gorgeous beaded crown. Such a wonderful accessory will perfectly complement the image of a princess, queen, fairy, and will become a bright spot in the photographs during a photo shoot. And most importantly, this decoration will give its owner unforgettable memories and indescribable delight.
Costume parties are not uncommon for a child attending kindergarten. Several times a year, parents have to come up with new costumes for their beloved child. If boys need to choose themed outfits, then girls just need to wear fluffy dress, place the crown, and that’s it – the princess is ready. To personalize your costume, you can create a royal accessory yourself. For example, a crown made of beads with your own hands looks impressive and unusual.
Royal decoration
The following will help you create such a crown: detailed description work.
To make the product you will need:
- thin copper wire (1-2 mm and 0.4 mm);
- large beads;
- medium size beads;
- large beads;
- glass beads

The color of beads and beads can be varied. It all depends on the palette of the main costume, to which the crown is created. The use of transparent elements in the product looks much more advantageous: glass refracts light and transparent parts sparkle like precious stones. Wire with a thickness of 1-2 mm is used to form the frame of the product. The other one is suitable for working with beads and beads.

Using a ruler, determine the height of each triangular element of the crown. Several pieces of wire are cut, the size of which corresponds to the double height of the product links plus 3 cm for the winding. The number of crown spiers is individually adjustable.
This master class includes 8 acute-angled parts.

A base is formed separately, the diameter of which is 12 cm. For strength, the frame in the form of a ring is wrapped with a layer of wire.

The wire circle is divided into equal parts, after which the prepared tops are attached to it. In order for the crown to have good strength, it is recommended to fasten the parts overlapping, as shown in the photo.

The next step will be attaching large beads to the tops of the triangles. To do this, take a thin wire, onto which a large bead is strung, then one bead. Then the wire is bent and inserted back into the hole of the large bead. The workpiece is wound with tight rings to the top of one of the triangles.

In this way you need to arrange all the sharp corners of the links. A thin wire is wrapped around the top of the triangle, and its two long ends go down. Prepared beads and beads are strung onto each of the wire threads. This is done in any form. Then, with fancy overlapping threads with decorative elements, they wrap around the area of the triangle to its base.


At the bottom, the ends of the wire are attached to a round frame.

Each wire link is framed in a similar way. The crown made of beads and wire is ready.

The crown is convenient to use not only for carnival. By creating a miniature decoration and attaching it to the headband, you can please your child with a new accessory.
Element for rim
This crown will help complement your look decorative decoration for hair at special events.

What will be useful at work:
- silver wire;
- pearl beads in three sizes (3, 5 and 7 mm);
- pliers.

When using a given size of beads and forming 9 tops, the height of the crown will be 3.5 cm. The diameter of the frame of the product is 3 cm. The product is created by weaving. To understand the sequence of actions, a diagram of work on the crown is presented.
A meter of wire is cut. Beads are strung on it in the following order: five small, a pair of medium, one large and one small. The beads are located in the center of the wire.

The thread returns through the large bead and is brought out through it.

Beads are strung onto a free wire, repeating the pattern of the elements on the adjacent thread, but there should be not 5, but 4 small ones.

The wire is pulled through the fifth bead of the adjacent thread.

The central top of the crown is made. The work is divided into two parts. First, the teeth are woven along one strand of wire. After this, a similar process is carried out at the remaining free end.
One large and five small beads are strung on one wire.

Its end is inserted into the hole of the second middle bead of the adjacent top.

The next crown tooth is formed, completely corresponding to the previous one.

In this way, weaving is carried out until the nine peaks of the crown are created.

To do this, one medium bead is thrown on each edge, after which both ends of the wire pass through the next medium-sized bead.


The ends of the threads are separated and four small beads are strung on each of them.

Each wire passes through small beads of adjacent edges at the base of the product.

A large bead is thrown onto one of the threads, and the ends of the wire are twisted together.

The twist is hidden inside a large bead.

The finished crown remains to be secured to the rim.
The small size of the product is quite suitable as a decoration for a doll. This idea will appeal not only to little girls, but also to creators of collectible dolls.
If you use smaller beads, then such a crown will be the size of very miniature dolls. Using this technique, it is possible to create a tiny accessory even for Barbie.
Video on the topic of the article
This video collection contains useful information about weaving a crown with beads.
DIY beaded crown for a little princess (video)
DIY beaded crown for a little princess (video)
It is very difficult to list all the items that can be made if you are proficient in bead weaving. These are a variety of flowers and trees, decoration of accessories, interiors and countless costume jewelry. Brooches and rings, necklaces and necklaces, earrings and bracelets, and even crowns. Our master class today will tell you how to make a beaded crown with your own hands. 


DIY crown made of beads and wire
We will need:

We begin the master class by making a frame for the crown from thick wire. It can be 1.5-2mm thick. To make it, let's measure a piece of this wire that will be sufficient to form the crown. The crown pattern assumes the presence of a wire connection, or the formation of a hook-type fastener. We bend the ends of the frame so that we can snap them together. After this you need to make a “tiara”, or the high part of the crown. To do this, measure and cut off another piece necessary for this. Let's connect it using the pine method of twisting along the sides of the circle. The length of the tiara wire depends on the desired height. 
Be sure to try the resulting crown frame on your head to make sure its shape is correct and the circumference is the correct size. Another action to complete the frame is the formation of that part of it that will hang over the forehead, and on which we will hang a crystal drop for beauty. Using the same method, we measure, cut off this part of the wire, and screw it into a convenient place around the frame circumference. When all the fitting steps have been completed, you need to add a few turns of thin wire in the places where the twists are made. This must be done to secure the twists so that the structure is strong and does not slip. We wrap the joints very tightly and quite often.
We proceed directly to beading our crown with our own hands. We will weave the cloves on the very top tier of the prepared frame. We secure a thin wire well at the base of the high part, and string three beads onto it. Fastening the wire to the frame, we thread it into the last of the three beads. We repeat this several times. Now we need to secure the large bead. To do this, we string it and return back to the first bead of the last three screwed on. Then we return the wire to the first bead and secure it. 
Then we repeat the same procedure a second time, screwing on the beads and the large bead. The next step is to go back to the first bead, passing the wire through the beads between them. We bring the thread into the first bead and up. We begin to string 7 beads on it, then one purple bead, and again 7 beads. The first tooth of our crown has formed. We repeat this stage so many times until the entire upper tier is filled.
Then we take a crystal drop and use a thin wire to screw it in the right place on the part of the frame that goes down to the forehead. The last stage of work remains, and the weaving pattern will be completed. We need to fill the space between the top and bottom of the tiara. For this we will use thin wire and beads. Screw the base to the lower side surface of the tiara and collect beads. The number of beads should be enough to reach the top of the frame. Having secured the wire at the top, we string the beads again and move down, screwing the wire there. Such actions must be continued until the entire space between the top and bottom of the frame is filled. Then we can consider our master class complete. You and I were able to make the frame of the crown from wire and weave its beaded component with our own hands.
Video: Making a crown from beads and wire
New Year's crown made of beads
Continuing our topic about weaving a beaded crown with your own hands, I would like to draw your attention to the next master class. It will talk about how to weave a beautiful crown for a girl. It is suitable for New Year's holiday, or carnival costume princesses. To work you need to prepare:

We will not make the crown for the entire head, but only 7 cm in diameter. It can be secured to the head using a headband, to which the crown is simply sewn at the end of the work. We make the twisting point 8-10 centimeters long. This is done to ensure that the fastening holds better. We do not cut the wire, measure 20 centimeters for the high part, and also screw its end to the main circle without cutting it off. We continue our work, performing the same operation a second time. We measure 20 cm of wire, form a triangle with the sharp end up, and screw the end. We will make five such triangles in total. We do not cut off the remaining tail, but secure it well to the base.
To determine the required wire length, you need to make a simple calculation. The length will depend on the design of the frame. The circumference of the crown is 20 cm, plus five tiaras of 20 cm, plus 20 cm for twisting. So, the length of the wire is equal to 140 centimeters. Until now, we have woven the entire frame of our crown from thick golden wire. But subsequent work will be done with a thinner one of the same gold color. We begin to secure this thin wire to the frame, while making sure that its ends are hidden as best as possible. This is necessary for the safe operation of the crown. 


After observing all the conditions and precautions, we begin weaving with beads. We string beads and seed beads in the order that seems most suitable to us. The more varied our selection of beads and seed beads, the more gorgeous our beaded crown will be. The weaving will go diagonally, from one side of the tiara triangle to the other, from bottom to top. And as you progress, fastening will be done on each edge using the usual twisting method.
Having reached the top of the tiara triangle, you need to work your way back from top to bottom, to the circumference of the frame. When weaving one part of the crown is finished, we transfer the wire to another triangle of the tiara without cutting it off from the skein. Moving from one vertical part to another, we continue to weave them with beaded threads until the very end of the work. We do not have a pattern for weaving beads, since everything here will depend only on imagination.
The last stage of work is to decorate the lower circumference of the crown. Since we did not cut the wire from the skein, we continue to string small beads of any color onto it. As we fill the thread with beads, we continue rotating movements around the bottom circumference of the crown until we fill it all with bead thread. 


Video: Crown made of beads and beads
Bright crown for a little princess

Almost every girl dreams of becoming a princess. We told you how to make a crown for any princess, and now we want to make with you another type of crown, which is called a tiara. The tiara differs from the previous crown in that it is made not on a circle, but on a semicircle made of wire. For work we will prepare the following materials and tools:
We begin the master class by making the frame of our tiara. It can be made from 20 gauge wire by folding it into three folds and twisting it around itself. The length of the wire for the frame is determined by trying it on the head. We give our frame the shape of a semicircle and wrap it with a thinner one. To prevent the ends of the tiara from hurting your head, we will wrap them with a loop. The next step is to create the silhouette of the tiara using thick wire. This will be a wavy vertical figure, with the wave increasing as it approaches its center and decreasing at the edges.
This is the classic form of a tiara. But this design bears little resemblance to a real diadem, since it is simply a wire frame. We need to decorate it with thin wire. We will string a mixed set of beads and beads on it, and braid the tiara in a chaotic manner. There are no rules here; any braid will look good. You can make the tiara multi-colored, or you can make it in one color scheme. It is very simple and accessible to everyone, but the decoration turns out simply magnificent. A suitable tiara for young princesses and princes, which can bring children a lot of fun and joy. 


Video: Original crown made of beads and beads
Comments
Related posts:
 DIY beaded dandelion (diagrams and video)
Absolutely every little girl dreams of trying on a beautiful crown and being in the role of a beautiful princess. For productions in school or preschool plays and matinees, very often little fashionistas need such props as a beautiful and bright crown. Such an unusual thing, of course, can be purchased in a store. However, imagine how much more advantageous and unique the beaded crown that we will weave with our own hands will look like. We invite you to learn how to make such a beautiful and spectacular thing with your own hands for your little princess.
In our article we will demonstrate several master classes on making elegant beaded crowns that will be a wonderful addition to any hairstyle.
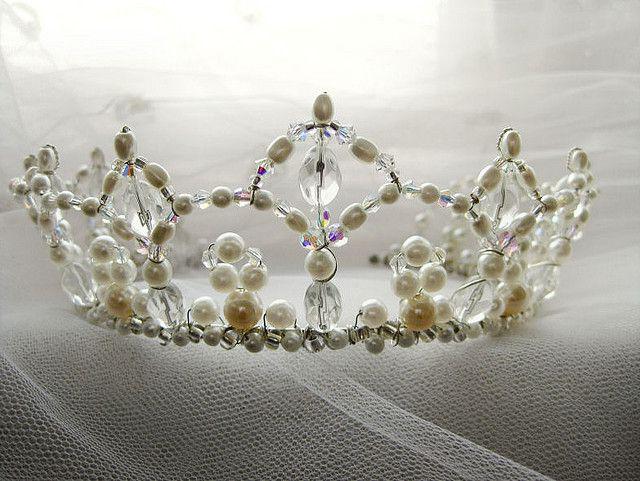
We weave a pearl crown from beads and beads with our own hands
The proposed master class is quite simple to perform, and the result will delight you with its elegance and beauty.

Prepare all the tools and materials necessary for the job:
- pearl beads of different diameters - three and a half and seven millimeters;
- copper wire;
- pliers.
As you noticed, you will need very few materials and tools. If you cannot, for some reason, find copper wire, you can replace it with fishing line. However, in this case, the woven crown may not hold its shape very well. Therefore, preference is still given to using a wire frame.
Weaving your royal bright crown must be carried out according to the pattern we propose below. The weaving pattern we presented contains the process of alternating rows with large beads and rows with small beads.

So, guided by the weaving pattern, put five of the smallest beads, two medium-sized and one large pearl bead on a piece of wire. Move the entire structure to one of the edges and string another small bead. Now take a long wire tail and thread it through the largest bead. Tighten the entire bead structure so that the beads are pressed against each other as tightly as possible.
Now you should symmetrically string two beads of medium size and four beads of small diameter. Then thread the tail of the copper wire through the hole of the largest first bead.

Weaving will be done in one thread, so you should use one single tail of copper wire, the one that is the longest. String a large bead on it, five small ones, and send the tail of the wire through the first of the two medium beads.
Continue further weaving the crown from pearl beads for the doll according to the pattern suggested above. As a result of such manipulations, you will receive a necklace made of beads. Next, you should connect the edges of the resulting openwork strip together. The ends of your copper wire should be twisted together and the excess cut off with scissors.
Your openwork pearl crown is ready. Thus, it is possible to produce the most various options decorations for your hair or for Barbie, if available suitable scheme weaving. You can decorate even an ordinary ponytail with such a crown by placing it on top of an elastic band. Beautiful, stylish and very original. Moreover, such a detail will help you feel like a real princess at a fairy-tale ball.
Let's look at a quick way to weave a beaded crown with your own hands
A beaded princess crown can be made in just one evening. You will need: multi-colored beads of different shapes and sizes, you can take various beads. At all, experienced craftswomen they say you can take whatever you have on hand. You will also need pliers and a coil of copper wire.
You need to make a frame for the future crown from wire. Just a wire that can be made denser if you additionally wrap it with thin wire. Cut a few more strips about ten centimeters long, maybe a little longer. And attach it to the base of the colorful crown. Now attach a bead to the top of the resulting triangles.

Now you can “fill in” your crown. String beads or seed beads onto the wire and secure. Your crown is ready! You can decorate your hairstyle or the hairstyle of your little princess with it.
See what beauty you can make with your own hands.
A selection of videos on the topic of the article
In conclusion, we present to your attention a small selection of videos on the topic described in the proposed article. We hope that after viewing this material it will be much easier for you to make a beaded crown quickly and easily with your own hands.
A beaded crown is a beautiful accessory that can complement your child’s New Year’s outfit or become an impressive detail in your themed look. Beads, beads, flowers, stones, tulle - this is an incomplete list of what you can use to make such a spectacular product with your own hands.

 The first master class is devoted to creating a golden crown from beads and wire.
Required materials and tools:
- golden-colored cutting – about 40 grams;
- beads in tone No. 6 – 5 grams;
- matching glass beads – 5 pieces;
- beading wire with a diameter of 0.3 millimeters;
- strong wire with a diameter of 1 millimeter;
- pliers;
- wire cutters
We begin the crown weaving master class by creating a headband with our own hands. We take a strong piece of wire, put beads on it and twist the ends. Make the width of the rim as you wish. In this version, it is slightly larger in size than a jar lid.
 The next step we need to weave parts shaped like petals. We use the French weaving technique for this. The scheme is as follows: on a piece of wire seventy centimeters long, we string 15 pieces of golden cut, having previously formed a small loop at one of the sides. Now, you need to make a larger loop and continue beading with arcs. We form the next arc after 4 pieces. cutting and securing. We string another cutting and create an arc that will be inside. We twist the wires at the base of the leaf. This process can be seen step by step in the photo.
In this way, you will need to make the following arcs, gradually descending along the border of the leaf by increasing the indentation by 5-6 and 7 pieces of the base material (cutting), respectively. We fix the ends of the wire. We unfold a small loop at the top and string glass beads and beads onto it. We twist the end of the segment around the bead. You need to make several turns and cut off what is not necessary. That's the whole weaving pattern. We make five similar petals for the beaded crown.
 At the next stage, the master class begins to assemble the crown. We take the blanks in the form of petals and attach them to the rim. The parts are connected to each other using beads, as in the photo.
 This completes the master class. In just a couple of evenings, even novice needlewomen will be able to make such a small masterpiece with their own hands.

Crown for a princess or prince
A fabulously beautiful bright crown made of beads, beads and other improvised materials will appeal to mothers and little fashionistas.
Required materials:

Using a ruler, measure the height of the links of the size you need. In this master class - ten centimeters plus three more for attaching the links to the base of the crown. Just twenty-three centimeters.
A small crown, so to speak, for a princess, can contain five links. The crown is a little larger, almost royal - eight with a base diameter of twelve centimeters.
To form a strong frame, we twist the wires with our own hands into several layers. The photo shows how to do this:
We divide the base of our crown made of beads and beads into eight components of equal length and begin attaching the parts. We place each of the parts slightly overlapping one another.
The frame for the crown is ready, you can continue the master class and start decorating.
We start making decoration from the top. We take wire pieces fifteen centimeters long, collect a bead, beads and thread the tip of the wire in the opposite direction through the bead large size. We wrap the piece around, capturing the top of the link.
 At the final stage, you are given complete freedom of action. By stringing a variety of decor in the form of beads, bugle beads and moving in all sorts of directions, fill the space of the crown at your discretion. Flowers, ribbons, tulle and other interesting elements can also be used in such work.
Such a master class gives you a wide field for action. By changing the color of the material used, you can make other interesting thematic crowns from beads, according to the presented scheme for any New Year or carnival costume.

Keychain in the form of a crown
This small beaded crown can be made in a few hours. This craft will become an interesting pendant for your phone or an original keychain for a backpack or keys.
To weave a small crown, prepare:
- beads of three different shades (red, white and blue);
- wire for weaving;
- round nose pliers;
- pliers.
We string eighteen red beads. We stretch one of the segments through the typed row. We form a loop and tighten the weave.
The next step is to collect eighteen more pieces of base material and do the same steps. Thus, we get a beaded eight, as in the photo:
We stack the rings on top of each other and fasten them with wire. We remove unnecessary parts.
 We move on to weaving the top part for the beaded crown. We collect seven pieces of basic material white, one red and seven white.
We secure the top, which will serve as a dome, with wire and carefully cut off the tip.
We create the second dome near the red bead on a new segment. On each tip we collect seven white beads.
The last stage is the creation of a small top in the form of a loop, which is formed on a small piece of blue beads. You can attach a special mount to this element and use the crown as a keychain or pendant.