Many people consider childhood the happiest period of their life. And the symbol of this carefree period are toys. This is probably why many adults take such pleasure in sewing funny animals from felt, fleece and even chintz. But in order for the product to turn out neat, you must first learn how to build simple patterns for toys from fabric with your own hands.
Dolls with soulRag toys perform several tasks at once. First of all, their texture is useful for the development of fine motor skills in toddlers. And besides, they:
- safe (there are no sharp or too small parts in the crafts);
- durable (they do not contain elements that will break);
- interesting (there are many options for playing with a felt toy).
The most important stage of work is the choice of material for sewing. Warm, soft, short-pile felt as if created for cute and original animals. This fabric is not capricious in operation, because:
- practically does not fray;
- does not twist or move;
- keeps its shape - in general, exactly what beginners need.
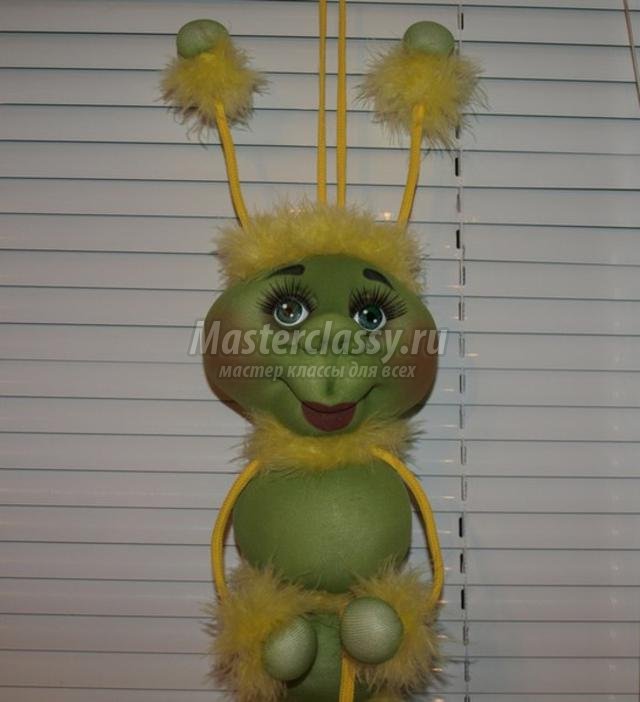
In addition to felt, textile toys - tildes - are also very popular. They appeared relatively recently, in the 90s, but have already won the hearts of millions. For their manufacture, linen, calico, cotton, etc. are used. As for patterns, the main principle of their construction is simplicity. Let's see this in practice!
6 elementary patternsA paper pattern helps you make things “just like in the picture.” Simple toy patterns are suitable for beginners, although they look so unique that they may also appeal to more experienced needlewomen.
Little girl in a pink dress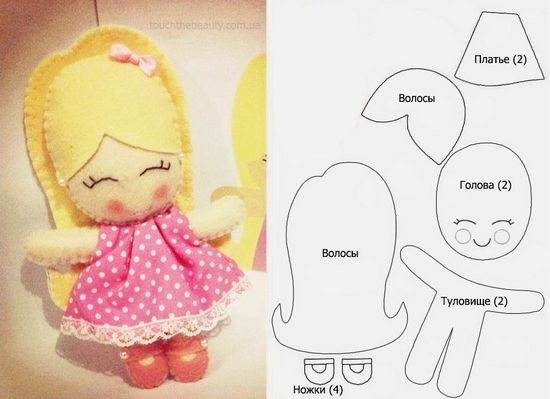
- a sheet of paper (tracing paper or wallpaper);
- scissors;
- tailor's chalk;
- pencil;
- eraser.
Please note that all the details of both simple and complex felt toy patterns are cut out with your own hands without allowances.
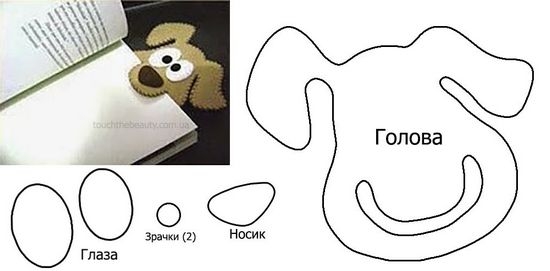
Funny puppyAll details of this model have clear outlines without ornate lines.
- pattern paper;
- pencil;
- compass;
- scissors;
- tailor's chalk;
- felt 3 colors;
- filler.
A distinctive feature of tilde toy patterns is that only the outlines of the figure are drawn on paper, without precise detailing.
- sheet A4;
- simple pencil;
- chalk for drawing on fabric or a piece of soap;
- scissors;
- filler;
- beads for eyes;
- textile.

- sheet of paper;
- pencil;
- scissors;
- textile;
- filler;
- 2 beads.
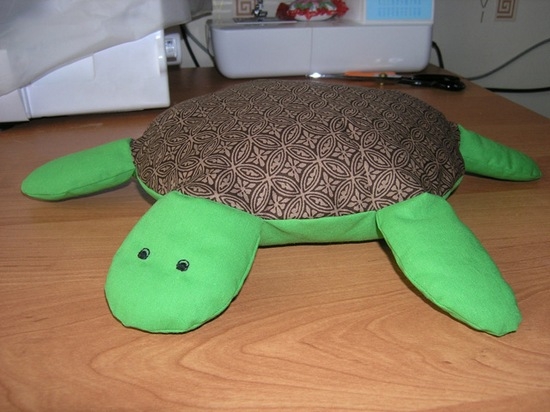
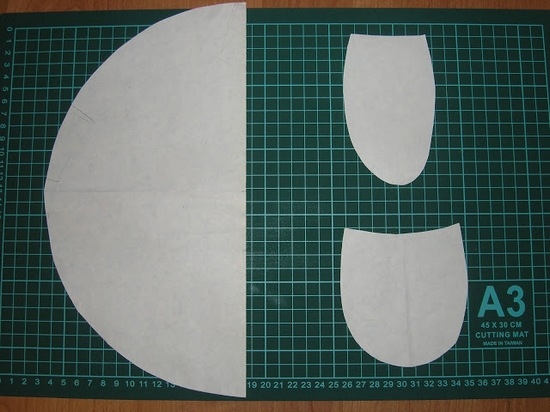
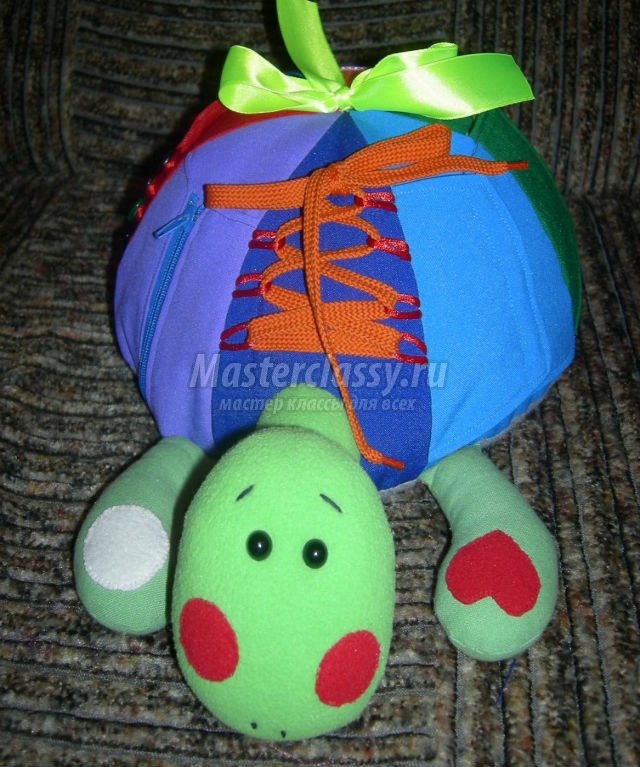
The kind, slow Tortilla will not only become your child’s favorite playmate, but will also perfectly cope with the function of a soft pillow.
- a piece of wallpaper or tracing paper;
- pencil;
- compass;
- scissors;
- fabric of two colors;
- filler.
 Cheerful teddy bear
 Bears are the most favorite toys of more than one generation of children. Every adult in early age there was definitely a bear. Don’t go away from tradition - make “his” teddy bear for the little one.
- paper;
- pencil;
- scissors;
- textile;
- filler.
Basic rules for sewing toys and a few basic patterns for making funny fairy friends.
Tell
One of the most popular anti-crisis hobbies is sewing soft toys. They are cheap because they can be made from old items or inexpensive materials, whereas buying new toy will cost a pretty penny. Plus, sewing toys is very relaxing. They can be done together with children, developing creativity kids.
Handmade toys are wonderful gifts for grandchildren, nephews and nieces. Beautiful, high-quality products can be sold for the New Year, Valentine's Day, or for no reason. Why not an idea for a business?
How to sew soft toy with your own handsNeedlewomen use a huge number of techniques for making soft toys. Lanky Tildas sew using a machine, felt small toys from wool, knit bright dolls in costumes from yarn, and make traditional rag dolls from old scraps. This is an incomplete list of materials and techniques from which soft toys are made.
The more experienced the craftswoman, the more deeply she understands the technology, the wider her horizons. Beginning needlewomen use simpler sewing techniques that do not require any special skills other than the ability to sew forward with a needle or other basic stitch. We will try to understand the principles of sewing the simplest toys.
We sew soft toys with our own hands, patternsSewing of any product, even the smallest one, begins with cutting. Ready-made patterns for soft toys are available on the Internet or in special printed publications. Having chosen a toy model, transfer the outline of the pattern onto transparent paper, and the field onto a thick cardboard base. You don’t need to cut out many pieces of the same shape from cardboard - this is a template. If there is a number on the part (indicating the number of fabric pieces of the corresponding shape), it must be marked on the template.
When the templates are ready, transfer the outline to the wrong side of the fabric. Trace with a pen, pencil, soap or chalk - whatever suits you. Thus, to make a pattern and prepare for cutting you need:
- flat surface;
- printed pattern diagram;
- cardboard (from a package of tights or a box of chocolates);
- simple pencil;
- remnant;
- sharp scissors for paper and fabric;
- material corresponding to the model.
When cutting, pay attention to the fact that there are mirror parts (ears or tail) that need to be cut out by applying the template to the fabric folded in half.
How to sew a soft toyAfter cutting out the fabric parts, try to sew them together correctly. Rule one - fold it facing inward and sew all the parts along the contour, leaving holes. Usually soft toys begin to be sewn by sewing seams large parts, then sew the small ones together.
Directly for sewing you will need the following tools:
- sewing machine (if you don’t have one, you can sew the parts manually);
- pen with cap;
- filler (it is best to use holofiber);
- needle;
- threads;
- thimble (for coarse fabrics and small parts);
- accessories (toy eyes, noses, mustaches, wigs or buttons and threads, for some models - wire for limbs).
- super glue or glue gun (for attaching non-sewn parts).
Pay special attention to the purchase of accessories. Even the most inconspicuous old toy comes to life before our eyes when the master uses running plastic eyes rather than soulless buttons. If you don’t have the funds to buy accessories, find 2 buttons on the leg and paint the eyeball, iris and pupil with acrylic paint or gouache with glue. Cover the top with clear varnish.
We sew soft toys together with kidsNot every mother is lucky enough to be born with a talent for needlework, but even the most clumsy seamstress can give her child the joy of making something with her own hands. Primitive toys can be made together with your child. They do not require expensive materials or superpowers. All you need:
- simple pattern;
- cardboard, pen and scissors;
- sock, or pieces of colored felt;
- needle and thread different colors and thickness;
- shifty eyes.
A child will always love the fruit of his creativity, so involve him as much as possible in the process of creating a toy.
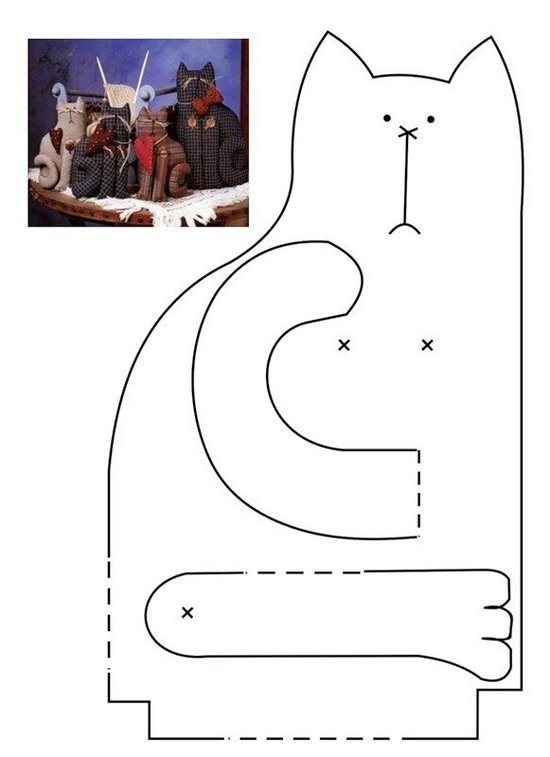
How to sew the simplest soft toys with the hands of a mother and childWe will look at some of the most popular fairy-tale characters that can be sewn according to simple patterns. These will be coffee-vanilla cat; a cat and a bunny made from bright cotton socks and a felt bear and an owl. For more experienced seamstresses, the task is more difficult - a rooster made from scraps of fabric.
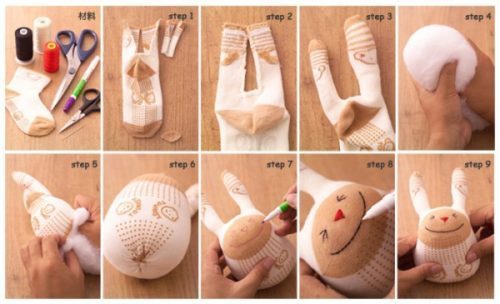
DIY fragrant soft cat toyThe principle of making a coffee-vanilla aromatic toy is the simplicity of the cut. At the same time, drawing skills will not be superfluous. In order to make a fragrant cat, you need the following materials and tools:
- white teak or linen;
- filler;
- scissors, pencil, cardboard;
- brushes of different thicknesses, acrylic paints, a glass of water;
- outline or black gel pen;
- PVA glue;
- instant coffee and dry ground spices: vanilla and cinnamon.
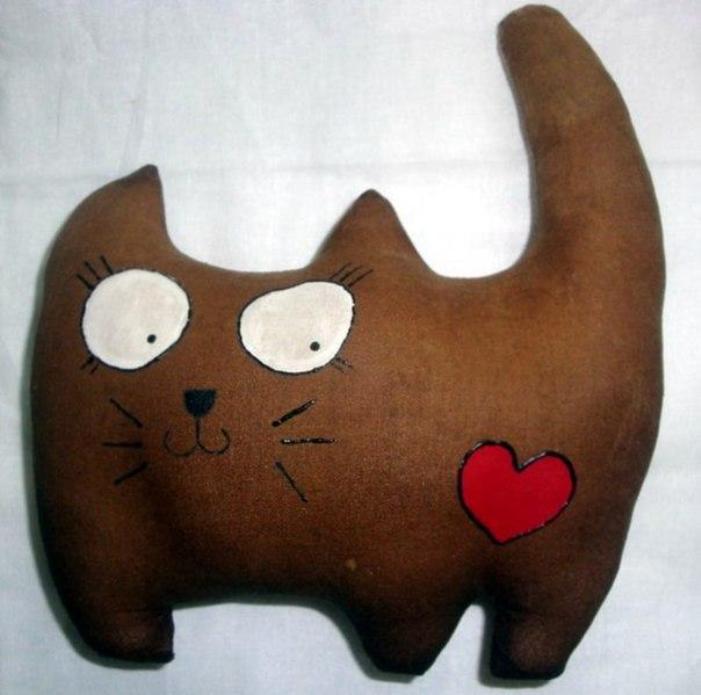
The beauty of this coffee-vanilla toy is its genuine individuality. From one blank with primitive outlines you can make a lot of different cats and cats. In addition to decorations with hearts and butterflies, cats can be “dirty” with sour cream or funny expressions can be written on them. This toy is a way to throw out all your creative energy. This is a great souvenir for children and adults.
DIY felt soft toyThe convenience of using felt is that it does not crumble; you can buy it at any craft store in colored pieces of about 20x30, spending a penny. Felt toys are usually made small and do not turn inside out. They start by sewing on the parts and finish with a seam around the base of the toy, leaving a passage for stuffing.
The outer seam is most often used “forward needle” with thread to match the felt. Sometimes decorative stitches are made with dense threads of a contrasting color. Such toys are decorated with pieces of felt using glue or thread. Sometimes they use accessories (eyes, bows, etc.).
Stuffing is done using a thin, blunt instrument (brush or pen). Creatively, you shouldn’t limit yourself to sewing according to patterns: simple toys can be created from standard shapes, taking as a basis a picture of the product.
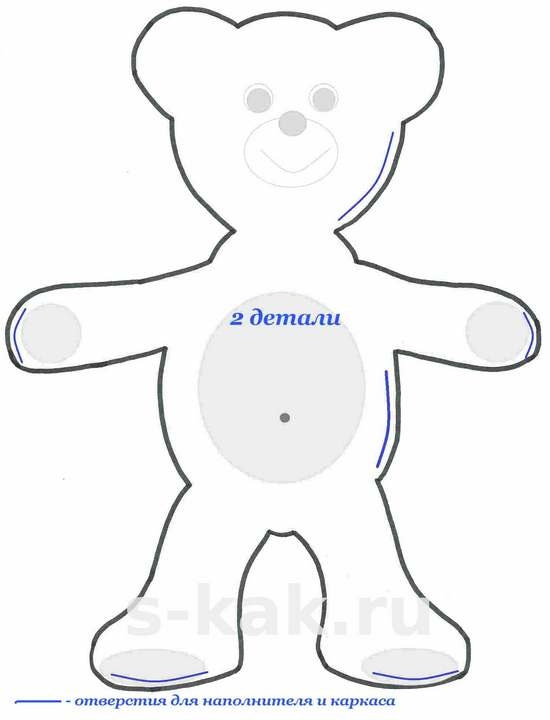
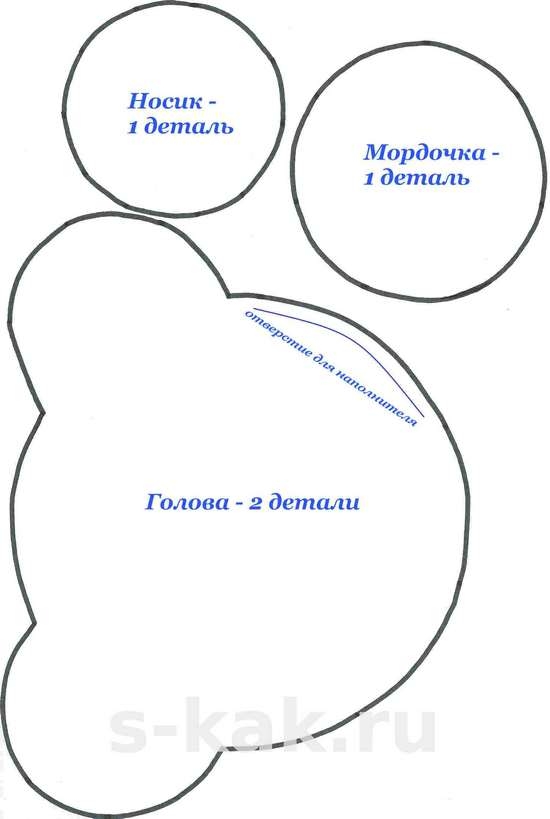
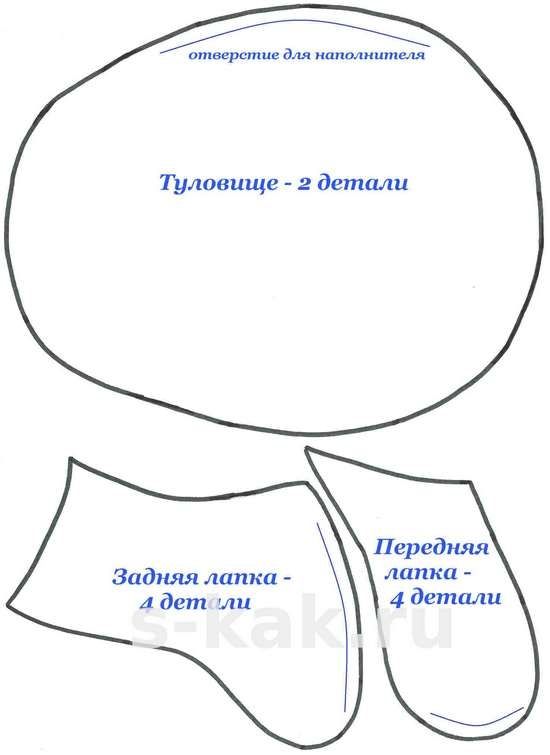
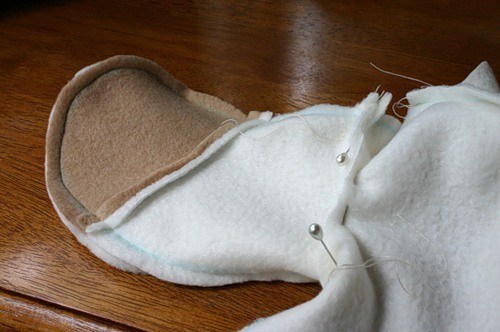
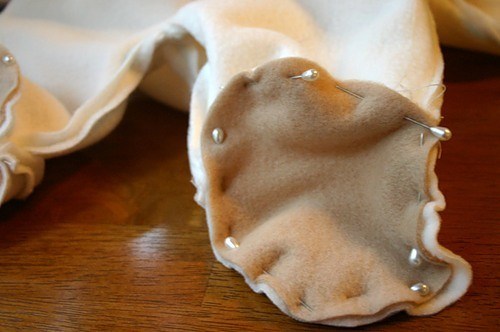
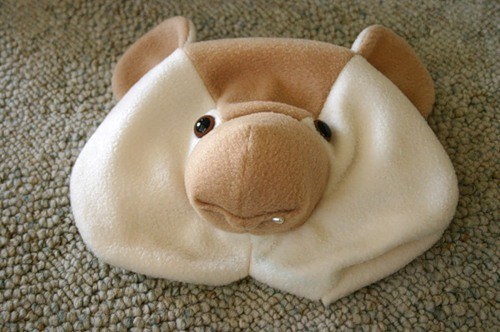
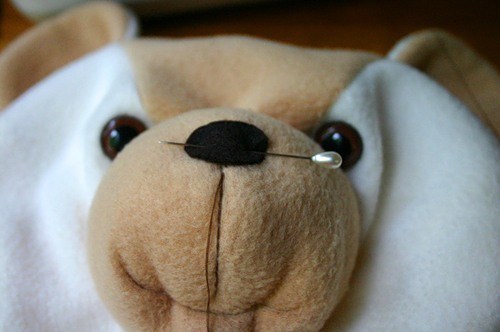
DIY soft toy - bearInstead of a pattern, use a ready-made image as a basis. If you have imagination, create it yourself interesting design character, having previously drawn it on paper. If not, translate the picture from the screen.

Please note that for the body you need 2 parts (back and front), and the eyes (2 felt circles) are sewn only on the front. Leave the seam for stuffing open above the head - you will still have to attach the tape, securing it with a seam.
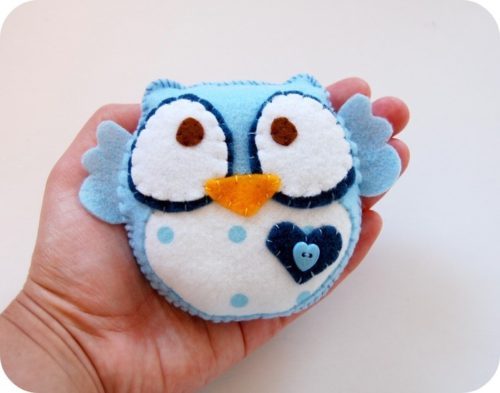
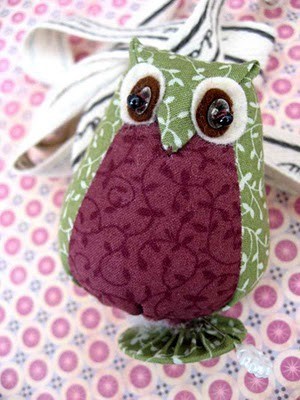
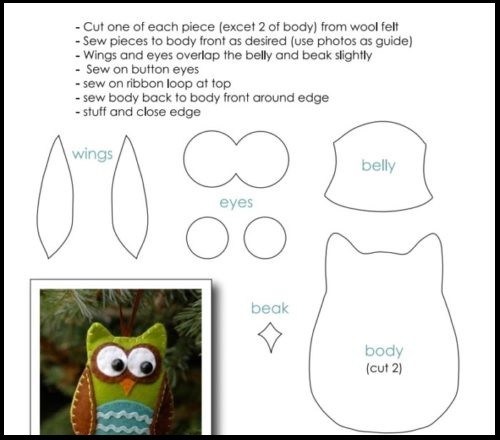
DIY soft toy owlFunny owls are the weakness of many novice artists. Simple details can convey mood and feelings. Owls have large eyes, so it won’t be difficult to make them expressive: sleepy, joyful, sad, etc.
In the schematic drawing all the details are clear:
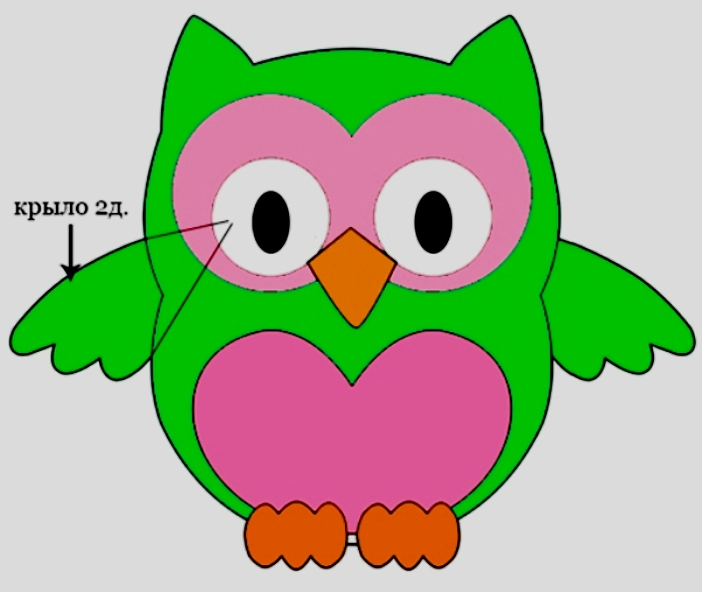
- base in the form of an owl silhouette – 2 pcs.;
- wings – 4 pcs. (2 on each side);
- foundations for the eyes and tummy – 1 pc.;
- eyeballs – 2 pcs.;
- pupils – 2 pcs.;
- paws – 2 pcs.;
- beak – 1 pc.
First, the front part of the toy is decorated. Afterwards, the parts of the wings are sewn together and stuffed. Sew to the back. Connect the front and back parts, leaving a hole in the middle at the bottom. We stuff the toy and sew up the hole.
DIY soft toys made from socksChildren's socks that are no longer the right size can be turned into funny soft toys. The color of the socks doesn't matter. The brighter and more colorful, the more interesting. The closer to one color, the more expressive the details will look.
DIY soft toy cat- To make a playful cat you need a pair of socks. We use one completely, there will be trimmings from the second. From the first sock we make paws, butt and torso: we place it with the heel up and make cuts. From the edge to the heel and from the toes to the middle of the foot.
- From the heel of the second sock, cut out a one-piece muzzle with ears, and a tail.
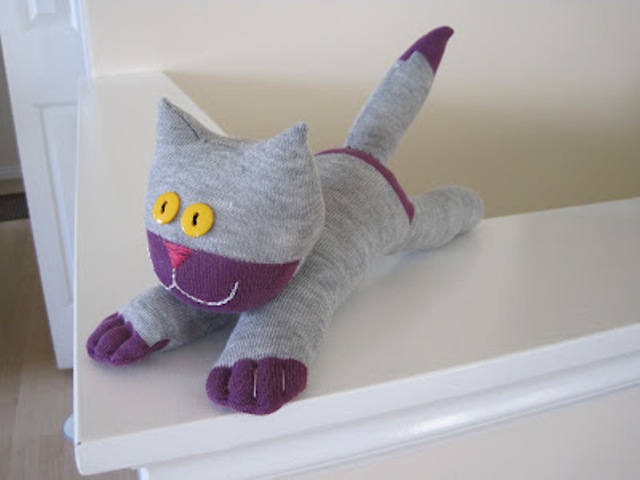
- We sew the parts together, stuff them, sew on the tail and head, and sew up the remaining holes. We decorate the cat with eyes or buttons, ribbons, bows and antennae.
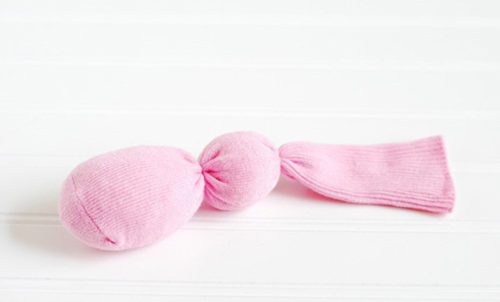
- You need 2 socks: 1 – white, the second – pink. For the base, we will need a part of the white sock from the toes to the heel (the heel itself is not needed). We loosely stuff a piece of white sock with filler and sew it up. Now we tighten the workpiece in the middle with a thread, separating the head from the body. Along the edges of the body we pull together 2 small balls - these are the paws.
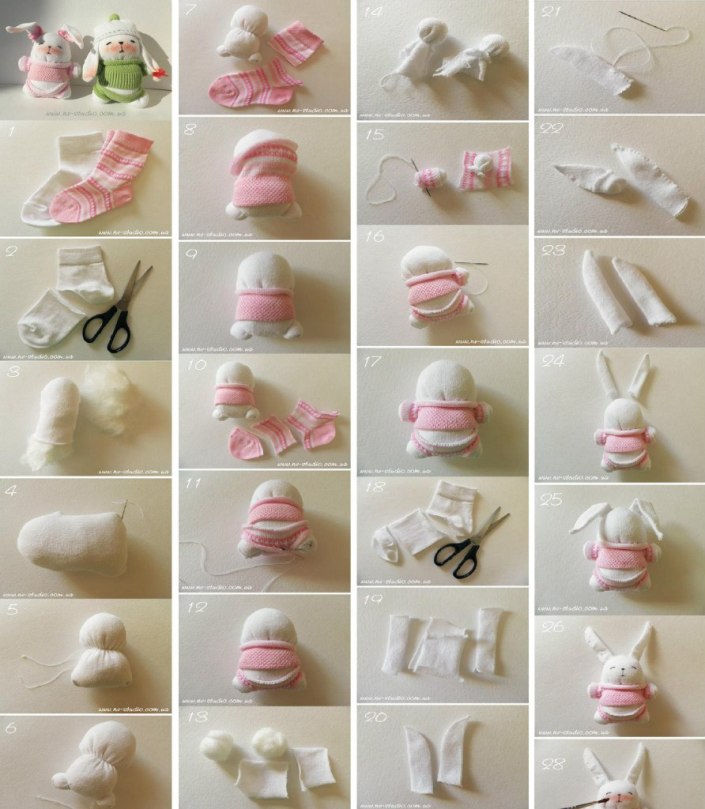
- We cut the pink sock into several parts, which will be used as pants and a sweater for the bunny.
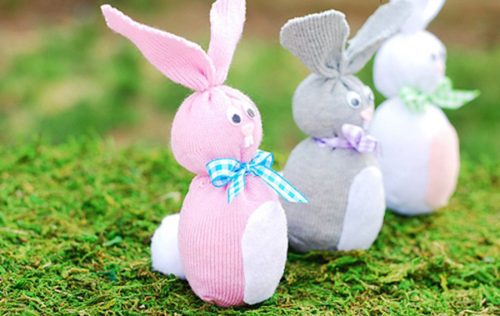
- From the remains of a white sock we make handles and ears, as indicated in the diagram. We sew the rest of the body parts to the base and make markings on the face using a gel pen.
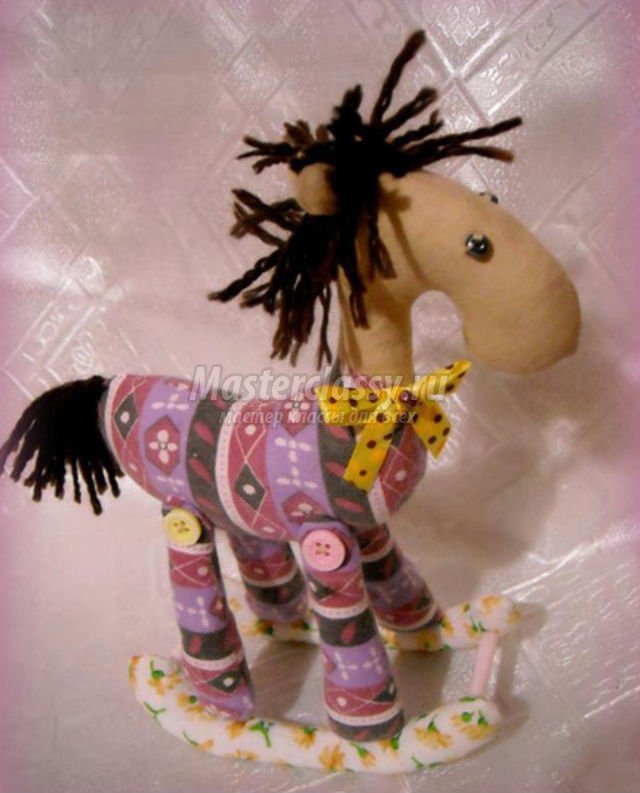
Tilda toys are remarkable unusual shape. They all have long limbs, and the body, bypassing the neck, smoothly passes into the head. All tildes are usually dressed. Therefore, do not forget to put on a dress or jumpsuit of the simplest cut.
The work of making Tilda is complex, so it is impossible to do without a pattern. Re-photograph the contours of the parts.
For sewing you need:
- 2 types of fabric: cotton and bright decorative fabric (for clothes whose design you can design yourself);
- padding (holofiber);
- needle, thread, scissors, chalk;
- colored fabric paints (acrylic);
- brush.
It’s easy to make soft toys with your own hands step by step if you have them good idea and any stale material. Sew with your children. Sew yourself for the soul. Sew for commercial gain. The main thing is to do it with soul and heart.
Video master class on making toys based on a fashionable cartoonIf you don’t have enough money to buy a themed toy after visiting the cinema, promise your child to help him make the most popular Minion. Believe me, it's fast, simple, interesting and economical.
It is no longer so easy to surprise a modern person with the sophistication and uniqueness of a soft toy, because the market is oversaturated with a wide variety of goods for every taste and age. True, the quality of market toys is not always able to satisfy the buyer and leaves much to be desired. For this reason, toys made with one's own hands are becoming increasingly valuable.
The effort, labor and time invested in the product required for self made, it is impossible to compare with the value of a purchased ready-made toy, even if it costs a lot of money. This kind of handicraft has a lot of advantages: handmade gives you the opportunity to relax after the everyday routine, express your creative self and do everything according to your taste and desire.
This article will help you understand various options sewing the simplest soft toys with your own hands, the quality and appearance of which can maximally satisfy even the most demanding toy connoisseurs.
How to sew a toy with your own hands?In order to sew a toy you will not need a lot of materials and all the blanks can be bought in a specialized store. If you have at least some of the necessary materials and sewing experience, you can improvise, use your imagination and adapt the toy to the available materials.
Materials needed to make toysFabric for a toy. Can be used various types fabrics, focusing on the purpose and personal preferences. In most cases, needlewomen choose:
- cotton
- knitwear
- wool
As for the material for stuffing toys, they usually use:
- holofiber
- foam rubber
- synthetic down
The choice of filler depends on the preferences and characteristics of the toy. Experienced craftsmen consider synthetic padding polyester and foam rubber cut into pieces to be the most suitable and easiest to use. Also, materials from various cereals are especially popular as fillers: porridge, peas, grain, etc.
These fillers will be most valuable for young children, as they contribute to the development of the child’s tactile senses.
In addition to all of the above you will need:
- Needle, multi-colored threads, scissors
- You can use buttons, beads, ribbons, lace
- Ruler 30 cm
- Paper
- Sewing machine
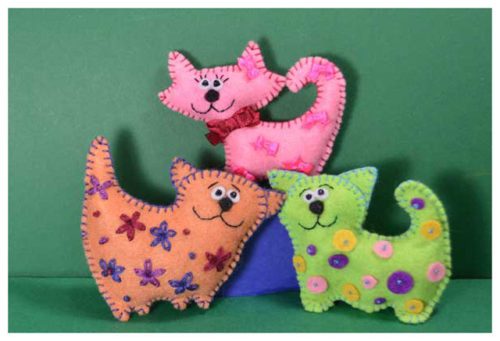
This DIY soft toy “Cat” made from felt is very easy to make, but incredibly beautiful and funny. This cat will become a faithful friend for kids, decorating his life with additional bright colors and a cheerful, touching smile.
Materials for making a toy:
- Bright colored felt
- Material for filling the toy (optional and based on who the toy will belong to)
- Beads - 2 pcs.
- Bows, colorful threads
Manufacturing process:
The soft toy cat is ready! You can sew a lot of these toys and then send them to a mobile for kids.
DIY soft toy hareYou can make a cute bunny without spending a lot of effort using an ordinary sock. Unlike all other bunnies, the “sock bunnie” will become indispensable in a child’s life, delighting him with his positive and unusual appearance.
We will need:
Master class on making toys step by step:
- We fill the toy sock tightly with the selected material.
- We determine on the sock a place for the hare's neck and tie it well with an elastic band or stiff thread.
- We determine the place that will serve as the head and also bandage it.
- We cut the piece of sock that remains into two parts. We cut out the ears for the toy, give them the appropriate shape and trim them around the edges.
- We cut out a circle from felt, which we will sew in place of the animal’s navel; we also cut out the nose and teeth.
- Eyes can be cut out of felt or made by sewing or gluing beads.
- Sew on a small pompom as a tail.
The funny bunny is ready!
You can also make a bunny using this simple scheme:
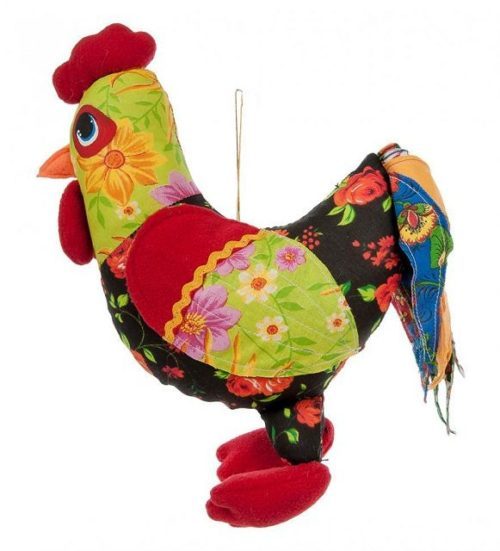
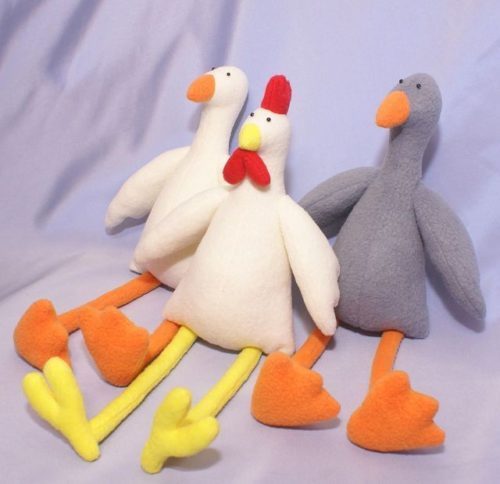
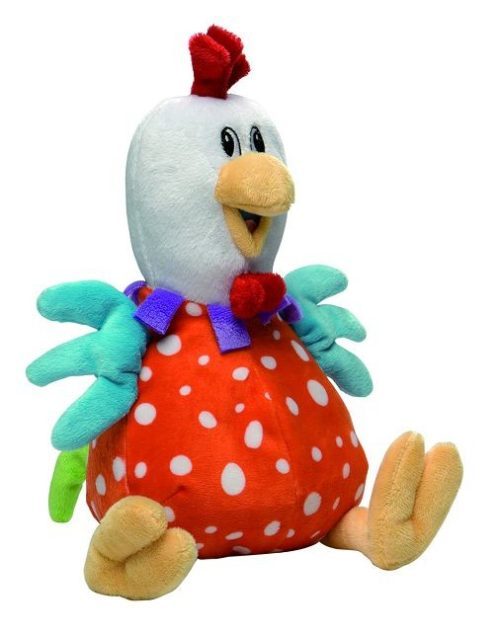
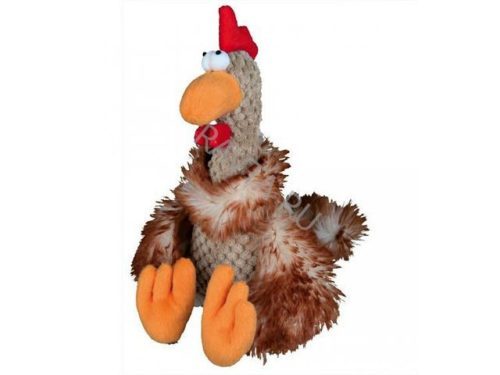
A toy in the shape of a rooster will be able to amuse not only children, but also adults.
To make a toy we need:
Manufacturing process:
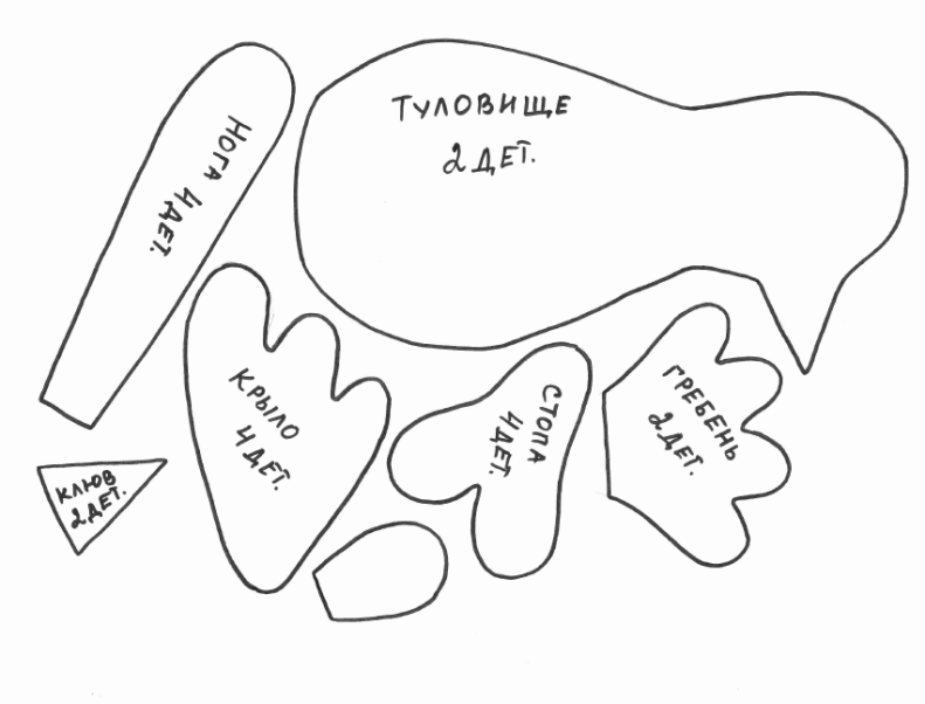
- Use the pattern diagrams given to you to determine the desired size and shape of the toy parts. The diagrams also indicate the required number of parts.
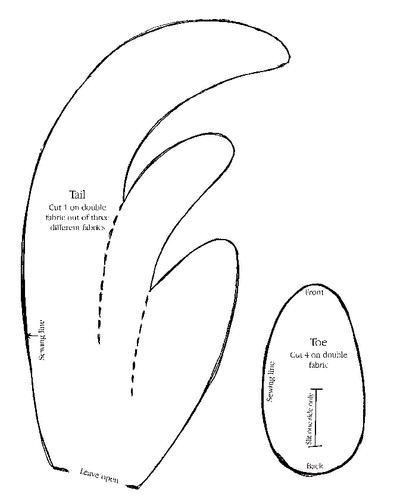
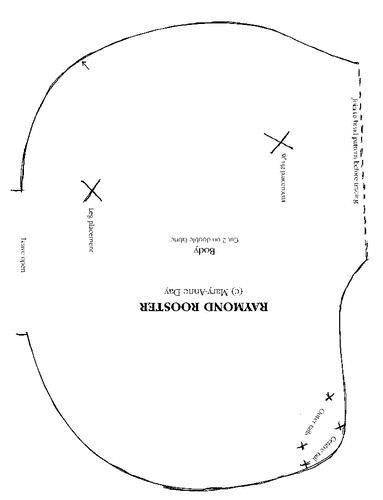
- Based on the size of the patterns, cut out the parts of the toy from the fabrics. When cutting, it is important to deviate from the intended lines about 2 cm for the seams.
- We sew the parts together, leaving a small hole to allow the toy to be filled with the material chosen for this.
- After stuffing the toy, sew up the gaps.
- The rooster's eyes can be made from cut out felt, either by purchasing ready-made ones or using buttons.
Toy options:
There probably isn't a child who doesn't love toy bears. Very often, it is this toy animal that deserves the title of the child’s most beloved, without which it is already difficult to fall asleep. And for girls and women of any age this item will become a great gift, because no one will be indifferent to the fact that they had to work hard to prepare the gift, which means the person deserves it.
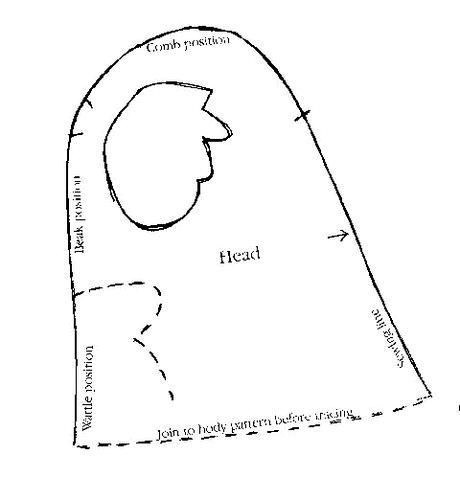
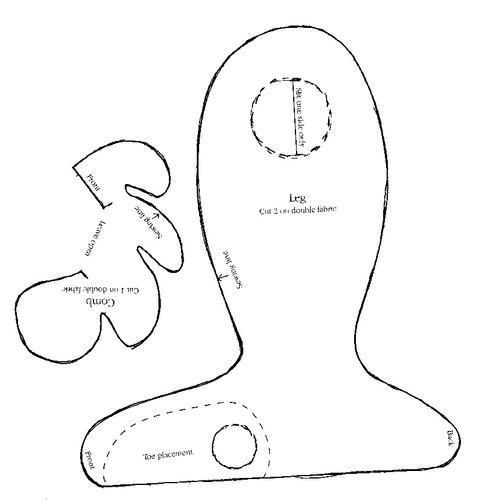
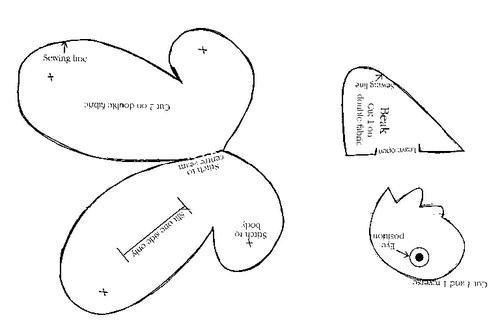
Manufacturing process:
- We print out the patterns and cut out the necessary parts for the toy from the fabric.
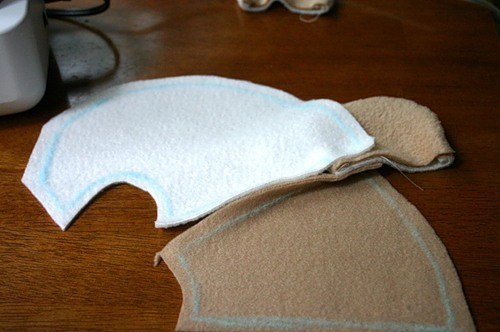
- First, we cut out the head and connect all subsequent parts, focusing on the pattern diagrams.
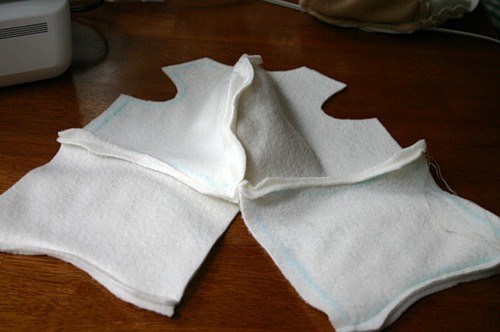
- Then we cut out and sew the fabric that will act as the body of the bear.
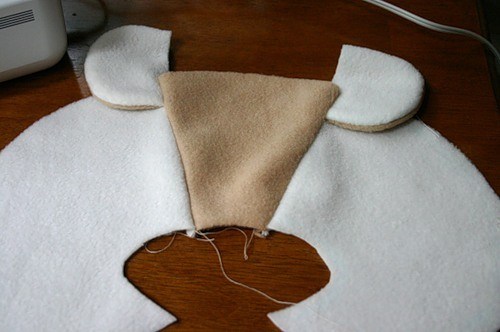
- For paws, you can choose a fabric of a different color (optional).

- Using the patterns, we cut out the bear’s head and ears and sew them together. For the nose, you can use either ready-made parts purchased in a specialized store, or improvise with your choice (buttons, felt, etc.). Soft bear ready!
The image of an owl is very popular today: from various accessories to prints on clothes. This interesting bird has also gained success in the world of toys, differing from others in its symbolic meaning and mystery.
An owl as a gift is a symbol of respect for a person, intelligence and success. All these toy symbols can also be made fun externally, which will delight the owner.
For a toy owl, hard materials (for example, felt) are best suited, as they are distinguished by their ability to hold their shape well, have cheerful colors and create the appearance of a voluminous toy.
Required materials:
Manufacturing process:
- First you need to prepare a pattern on paper according to a given pattern.
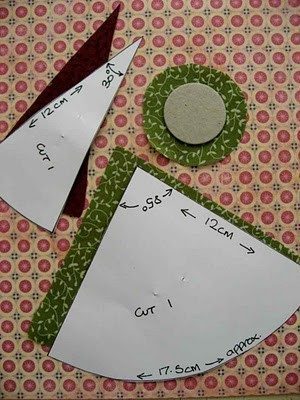
- We attach the fabric to the pattern diagram and cut out the necessary parts. We sew all parts except the bottom together. As a result, we should get a figure that resembles a cone in shape.
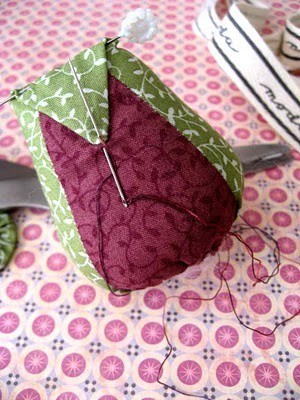
- Separate the top of the resulting figure with a pin (about a quarter of the total size).
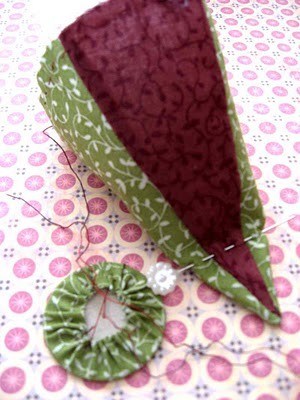
- We fill everything that is not separated by a pin with the material chosen for stuffing and sew it up along the edges.
- We sew the end of the not yet connected corner to the finished part (body) of the toy. This will serve as the head and beak.
- You can decorate an owl to suit every taste. One option is to focus on the finished pattern and cut off a circle slightly smaller than the bottom of the toy. We treat it with some hard material and sew it to the bottom of the toy. This will serve as a stand.
- Eyes can be bought ready-made or cut out of felt. For the eyes, cut out white circles from felt corresponding to the size of the head (the color of the eyes can also be made as desired). You can use the same black felt, beads or buttons as pupils. You can complement the owl with various accessories under desired image: bows, buttons, butterflies, etc.
We offer you patterns of another version of the owl:
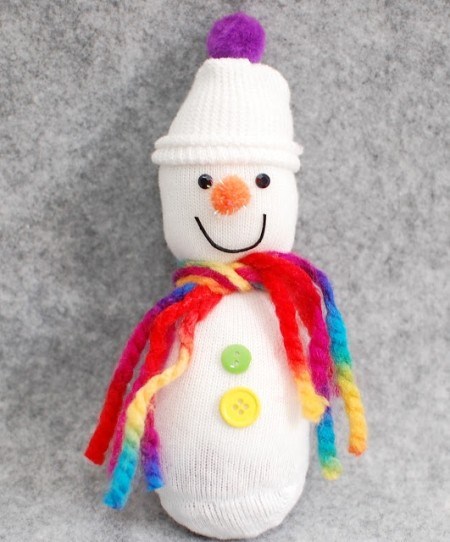
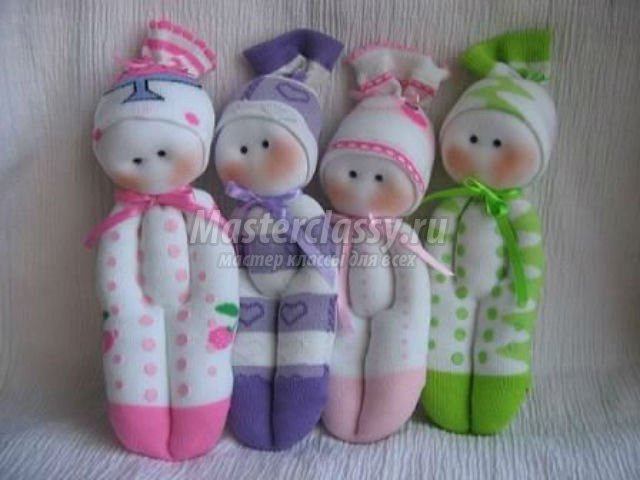
Very soon, most people will begin to carefully prepare the decor of their homes. New Year. One of the items that can create a cozy New Year's atmosphere in the house is this cute and cheerful snowman. The manufacturing process is striking in its simplicity and low resource consumption. See for yourself.

We will need:
- White sock
- Material for stuffing toys
- Black wool threads
- Peas, beans or grains
- Pompoms, beads, buttons, bows as decoration
- Fabric glue
Manufacturing process:
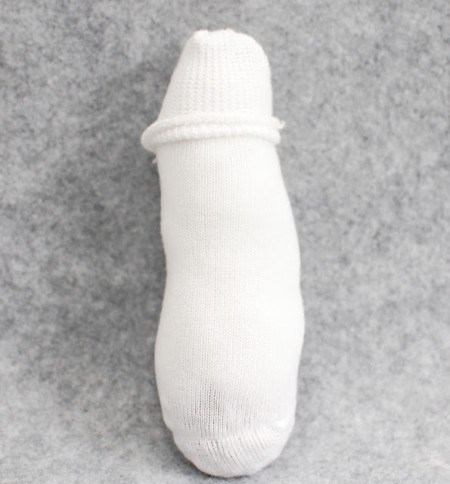
- With the filler you prefer, fill the sock to about ¾ of the total size. Separate the part free from stuffing with thread.

- We roll up the upper part along the edges to make a hat.
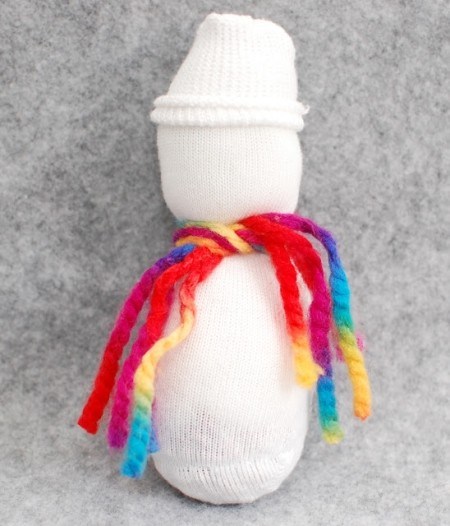
- We separate the head from the body by tying it with either multi-colored threads of medium thickness or with a ribbon. The head must be large enough to accommodate the snowman's eyes and mouth.
- We place beads or buttons as eyes; the nose can be made from a pompom, button, or cut out felt. The mouth can be either drawn or sewn with black thread.
- You can add fun to the look of toys with the help of ribbons, pompoms, buttons, focusing on the availability of details and your own preferences. A cheerful snowman is ready to add zest to your New Year's interior!
In fact, handmade toy making is not as difficult and inaccessible as it seems to a beginner at first. In order for the toy to turn out beautiful, you only need a little imagination, effort and time. And we should also not forget the fact that by making certain efforts in some area, we develop our abilities and over time the result of our work becomes better and better, we just have to not be disappointed prematurely.
Do-it-yourself soft toy patterns are very accessible today and you can find various options even for the strangest wishes. So let’s sew soft toys and don’t forget to get the most out of the process!
Video: How to easily make a soft toy with your own hands?
Many parents carefully store their favorite soft toys with which they played as children and went to bed tightly hugging a teddy bear, a soft bunny or a rag doll that a mother made for her daughter with her own hands. Time flies quickly and now our children are happy to play with toys from distant childhood, evoking tenderness and pleasant memories in us.
Many child psychologists believe that, starting from 2-3 years old, a child must have his own soft toys - of different sizes and from different materials. Today, many children's stores offer a wide range of soft toys - all kinds of materials for making and intricate patterns of toys for dolls, bunnies, bear cubs turn into beautiful and friendly children's characters in the experienced hands of craftsmen.
But soft toys created with your own hands will be much more unique and valuable than purchased ones - you just need to familiarize yourself with the simple technology of their manufacture, select the necessary materials and cut out toy patterns from thick paper or cardboard. We will be happy to help you learn how to make soft toys with your own hands, we will provide detailed description manufacturing with successive stages of work and patterns of soft toys, which you can copy, transfer to cardboard and cut out.
We will tell you how you can make an amazing Waldorf doll. A doll created by yourself will always keep the warmth of your hands and energy, as well as the love for your child that you put into the created soft craft. Your child will enjoy watching the doll making process. And it doesn’t matter at all whether you have a girl or a boy - for a boy you can sew a wonderful clown doll or spiderman doll, and dolls for girls - a fairy-tale princess or Cinderella. Doll patterns for this or that craft are almost the same. It is enough just to “conjure” clothes and hairstyle, as well as small details of a soft toy. Patterns for dolls can be easily found on the Internet, or you can draw and cut out some original patterns with your own hands (with experience, you will already be able to come up with your own versions of dolls and create corresponding patterns for soft toys).
To create soft toys with your own hands, we will need the following tools and materials:
1. Threads of different strengths and different colors
2. Scraps of different fabrics, lace, leather, felt, fur, ribbons
3. Cardboard for cutting toys and for some types of dolls - wire for the frame of certain parts
4. Foam rubber, cotton wool, holofiber, padding polyester and other similar (harmless for the baby!) materials for filling soft toys
5. Buttons, beads, beads for creating small details - eyes, nose, clothing fasteners of a soft toy
6. Scissors, thimbles, needles of different sizes
7. Sewing machine and iron
8. Pliers and an awl for mounting small parts and the frame of a soft toy
9. Ruler for cutting parts, carbon paper and tailor's meter
If you make soft toys with your own hands from start to finish, you will be able to realize all your fantasies and interesting ideas.
But you can also purchase a set in a specialized store, for example, “Handicraft. Do-it-yourself dolls” - but in this case, you will be very limited in your ability to implement your own ideas and you will have to follow the instructions, bringing to life the ideas of a professional craftsman for making soft toys.
Interesting patterns for soft toys can be found not only on the virtual space of the Internet - you can easily find suitable options in specialized publications on handicrafts, in a children's toy store (you can buy a whole set for creating dolls with your own hands), as well as “patterns for children” in a bookstore . Or you can also carefully tear apart old and no longer needed soft toys, then trace the parts with a pencil on a sheet of cardboard, cut them out - here you go ready-made patterns soft toys!
When you start working on making a soft toy with your own hands, be sure to invite your child to help. Such leisure is very useful for general development baby and will be interested in him. Step by step work During the making of a toy, it very much disciplines the child and teaches him to be neat. Working with different fabrics and small details contributes to the development of attention, coordination of movements, creative abilities and trains fine motor skills hands But don't forget about safety precautions! At all small child Do not give small objects or sharp instruments into your hands. It is advisable to keep the needles in a jar with a magnet with a thread threaded into each needle. The scissors that the baby will work with must have blunt ends. You should only allow your child to use a sewing machine under your close supervision.
What fabrics do craftsmen who make their own soft toys usually use?
1. Knitted fabric.
Their main feature is that they stretch easily and you can sew any soft toy from them - soft balls, cubes, horses, hare, clowns
2. Faux fur with short and long pile of various colors.
Suitable for making original soft animal pillows
3. Silk fabric.
It is flowing and very delicate. It slips in your hands and it is very difficult to sew a soft toy from it. But silk fabric is indispensable for making dresses for dolls, appliqués on clothes for dolls, trimmings, and besides, silk fabric of soft pink color makes excellent doll faces.
4. Cotton fabric.
Fabrics such as satin or chintz are distinguished by their colorful and bright patterns. You can make them out of them original dolls do it yourself, soft animal toys, pillows, clothes for dolls, crafts in the patchwork style. Terry cloth and flannel make wonderful animals with soft “fur.”
5. Wool fabric.
Smooth, dense, brushed woolen fabric in a checkered pattern, striped, with ornamental patterns is suitable for sewing soft toys in the form of animals, pillows, and panels.
6. Velvet and velor.
The surface of these fabrics is covered with silky, thick and short pile. They make wonderful soft toys such as fox, bear, hare.
7. Felted fabric.
Interesting crafts can be made from felt. This fabric is durable and does not fray - cut edges do not require overcasting. Felt is very suitable for creating small elements and parts of a soft toy - beaks, paws, tails, crests, noses.
Techniques for making a soft toy with your own hands:
1. Selecting materials and preparing them for work (steaming fabric, washing, ironing)
2. Cutting out the parts
3. Basting
4. Firmware for parts of the future toy
5. Stuffing with material for filling a soft toy (foam rubber, padding polyester)
6. Assembly, firmware
7. Final design of the craft
It is advisable to cut out patterns for soft toys from thick cardboard - such patterns fit tightly to the material, are easier to trace and retain their shape for a long time. The toy patterns are placed on the wrong side of the fabric, and then they are pressed tightly and carefully outlined with a ballpoint pen or marker (use a white marker for tracing if the fabric is dark in color)
So, having become familiar with the basics of making soft toys with your own hands, let’s begin creating a Waldorf doll.
A Waldorf doll is a specially designed soft toy that meets modern standards and high requirements for the comprehensive, harmonious development of a child. The “predecessors” of the Waldorf doll are traditional folk dolls, which our great-grandmothers made for children back in the day from rags, yarn, straw, and natural materials as small parts. The idea of creating and methods of making a Waldorf doll belong to Waldorf teachers and educators. The production of such dolls has become widespread in many European countries.
These are soft toys that, unlike the widespread animals made of fabric, repeat the human appearance. When creating a Waldorf doll with your own hands, you must adhere to the proportions of the human body. The head of such a doll is sewn from woolen fabric and requires more dense padding, unlike other parts of the body. In the design of the front part of a Waldorf doll, it is common to adhere to minimalism - unformed facial features are inherent in small children, and minimalism in the doll’s facial features has a positive effect on the child’s imagination, allowing the child’s imagination to actively and freely develop during play.
Most best material for stuffing dolls made by hand - sheep wool. Sheep wool is an ecological, fairly elastic material and makes the doll soft, warm and very cozy for a small child.
The body of a Waldorf doll is made of knitted fabric of a soft pink, flesh color. Hair can be made from cotton or wool yarn, which is attached to the doll's head in a special way, without the use of glue. The doll's clothes are made from natural materials such as linen, silk, viscose, cotton and wool. To create a harmonious image of a doll, you should think through the smallest details of clothing - cut, color combinations, location of fasteners, etc.
INTERESTING FOR WOMEN:
| Comments |
|
| Answer | ||||
| ||||
We grew up with them and continue to love them as adults. This love can be explained by the positive, tenderness that emanates from them in huge quantities. If you also love them, and perhaps collect them, then try making soft toys with your own hands. To do this, you do not need to know how to build a pattern and have sewing machine, because there are toys of simple shapes, the manufacture of which requires only material, thread and needle and the desire to be creative.
And the question immediately arises, from what materials they can be sewn. The field for creativity in manufacturing is very vast and varied, as is the opportunity to experiment with different materials. So, for sewing soft toys you can use fleece, cotton and knitted fabrics, felt, terry fabrics, fur, and even old socks.
On our website you can find various toys with your own hands, patterns for them, detailed master classes on their manufacture, which will help in this interesting process, both beginners and already established craftswomen, for whom sewing toys has become a favorite hobby.
So, before you make a toy with your own hands, it is important to answer yourself a few questions. Firstly, have a good idea of what kind of toy you want to sew and for what purposes it will be intended. This is very important point, because toys for young children must meet the child’s needs and meet environmental requirements. Namely, to be made without the use of harmful paints, which are often used to paint the face of toys, and also to be sewn from high-quality material that does not fade and is environmentally friendly, because children younger age They love to taste everything.
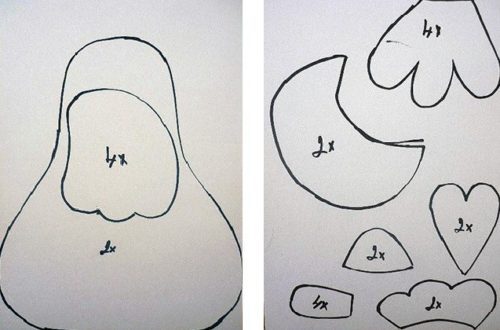
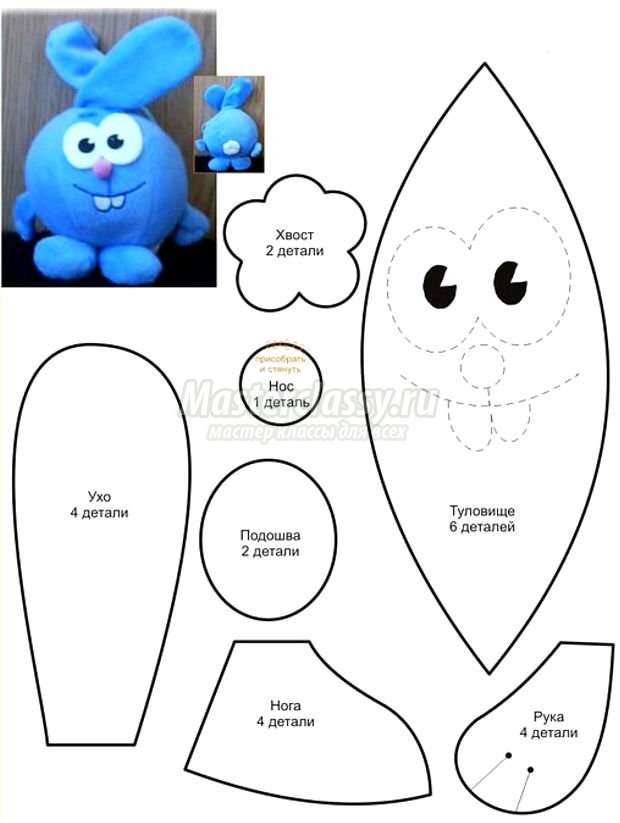
Let's look at some DIY soft toy patterns. Below is a pattern of a bunny from the cartoon “Smeshariki”. Print it out on a printer and transfer it to thick paper. The tighter the pattern, the more accurate your pattern will be when transferred to the fabric. It is better not to use chalk when transferring a pattern onto fabric, because it leaves thick lines, which means it can significantly distort the actual size of the parts.
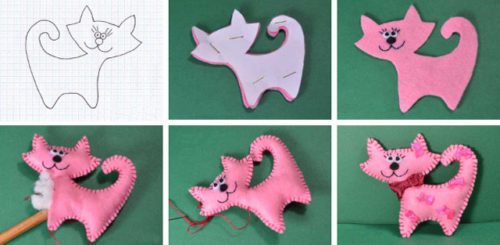
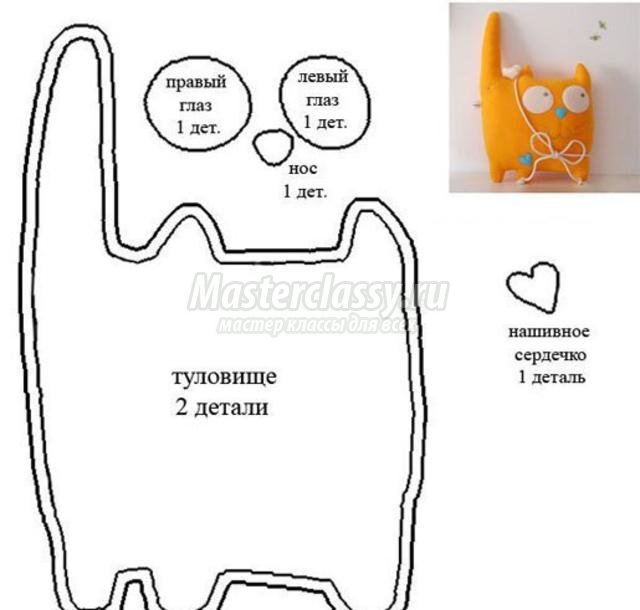
When transferring a pattern onto black fabric, use a white pencil, which must be sharpened before doing so. And this is a pattern of a beautiful cat, consisting of two main parts of the body and additional elements - eyes, hearts and nose.
After the pattern is transferred to the fabric. The parts of the toy are cut out and sewn on the wrong side. Turn the parts inside out and stuff them with filler. As a filler for soft toys, padding polyester, padding polyester, foam rubber, cotton wool, and holofiber can be used. Stuffing is a delicate process. To make your work look decent, you need to fill the toy slowly, distributing the filler evenly and making sure that no lumps form while stuffing. Particular care should be taken to fill small parts - legs, paws, tails, combs of the toy.
When sewing many handmade toys, especially when making them, they use a technique such as tightening. With its help, you can give a more expressive look to the toy’s face, as well as add realism to the body, making it more prominent and voluminous.
When all the parts of the toy are stuffed and sewn, we can consider that most of the work has already been done; only a little remains - to give the final appearance to the finished product. To do this, toys are added with eyes, hair, noses, or, if required, wardrobe items, including clothes, are sewn.
They look charming and homey with movable elements. As a rule, such toys have movable limbs - arms, legs, paws. There are several ways to movably attach these elements to the body of the toy. The simplest of them is to sew sewn one-piece pieces to the outside of the body using a button.
If the toy is one-piece, then the limbs are not stuffed with filler or are weakly filled with it, and the transition of the torso into the body is sewn with a “stitch” seam. As a result of this operation, the limbs of the toy will hang freely.
Did you know that when going to any celebration or just visiting, in addition to a bouquet of sweets, you can also make an original bouquet of toys with your own hands? Or you can combine these two types of bouquet and make a beautiful one with soft toys. Such a bouquet is not only a delicious gift, but also a joy for the eyes and a delight for the heart.
Almost all handmade bouquets made from soft toys contain floral mesh, sisal, wrapping or gift paper, bows made of paper or satin ribbons, corrugated paper or products made from it, represented mainly by beautiful flowers.
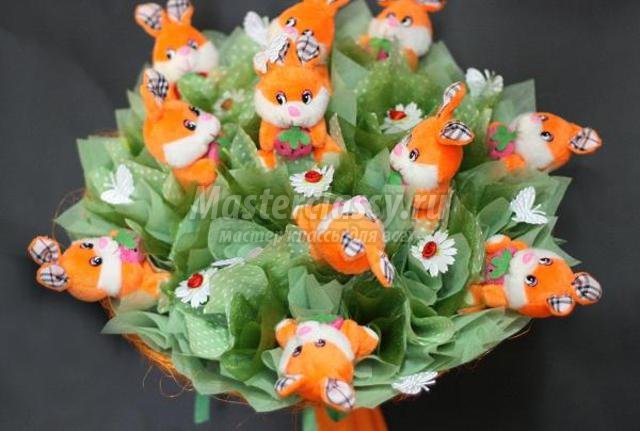
When composing it, be sure to use your imagination to help you with this. The number of soft toys for its production can be different, ranging from one to a whole guard of them. For such bouquets, it is better to use small toys, for example, those sold for keychains, or handmade toys that you sewed yourself. A separate question is the question regarding attaching toys in a bouquet.
The option with hot glue is not at all suitable for these purposes, because you will ruin the toys with it. Plastic clamps and wooden skewers, to which the toys are tied with decorative wire, are well suited for securing toys in a bouquet. satin ribbons, bright elastic bands or braid. As a frame for attaching skewers with toys, use a floral sponge, polystyrene foam, pieces of washcloth, or frozen mounting foam. Next, a circle or cone of the required size is cut out from the selected material.
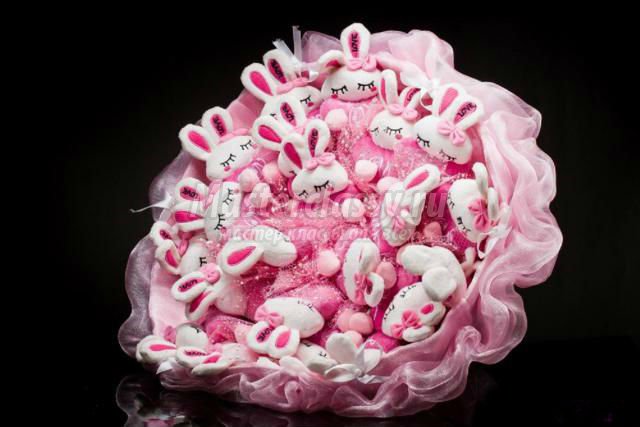
For additional decoration, you can use decorative butterflies, ladybugs, birds, artificial flowers, feathers, which can be bought in any florist department. When making a bouquet, it is very important to stick to a specific color. , made in the same color scheme, look more harmonious and stylish. The finished bouquet can be presented like this, or you can put it in a beautiful wicker basket or in a flower pot.
A lot has been said about the fact that DIY educational toys bring many benefits to children. If you have small children, do not miss the opportunity to sew them yourself for your little one, instead of purchasing them in a store, and sometimes for a lot of money.
The advantages of the former are obvious, and not only in cost. The toys that you sew yourself bring love, mother’s care, they are adapted specifically for a specific baby, your child, because who, if not the mother, knows what needs to be paid attention to in his development at the moment.
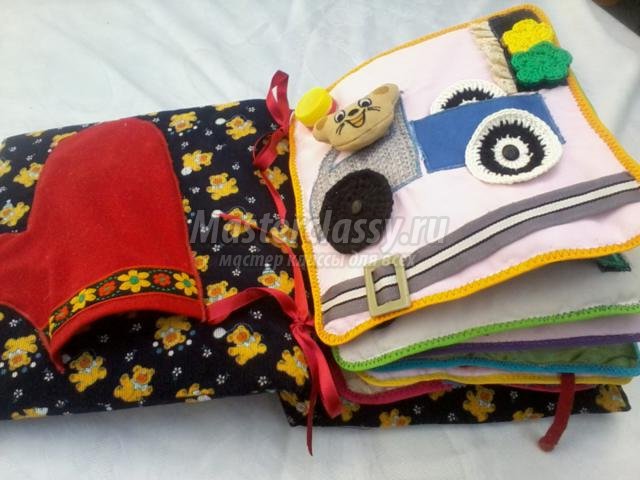
You can sew soft educational cubes for your child with images of objects, letters or various animals, or make a rattle from containers from Kinder surprises. And how beautiful the soft ones you make yourself or the sorters are. Educational books are widely popular among mothers who love handicrafts. On the pages of such books you can place scenes from one or another fairy tale. Girls will be interested in doll houses, and boys will be interested in cars made of cardboard, tanks, with opening doors.
All educational toys are aimed at developing individual skills. So, with the help of lacing, opening clasps, zippers, rings, and fasteners, you can develop fine motor skills. Vivid pictures, rough surfaces, bags of cereals, sand have a wonderful and very effective effect on sensory perception and the development of tactile sensations.
In any case, when making such toys for children with your own hands, you should remember that they must be safe for the child, because sharp objects can injure children, and small ones can get into the mouth. One of the safe and educational toys is this.
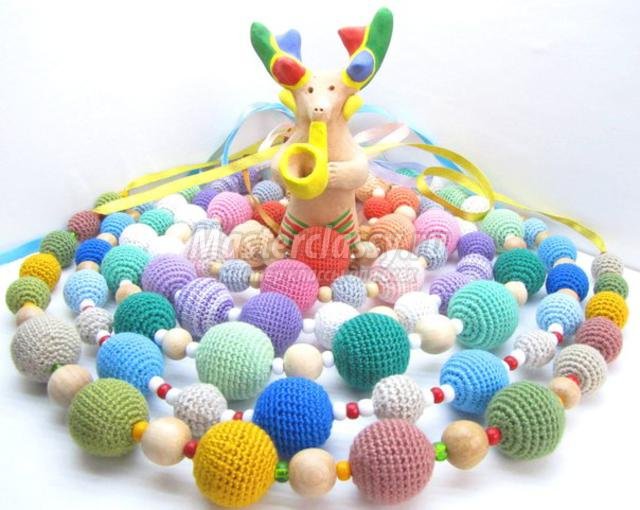
If you know how to crochet, then be sure to make such a wonderful thing that can decorate both a mother’s neck and become an educational toy for a child. By fingering bright beads with your fingers, the child develops color perception and tactile sensations.
For boys of average preschool age An exciting toy will be a stand with various items that can be found in dad's supplies - hangers, bolts, switches, curtains on the door, a ring with numbers from the phone and many other useful little things.
For those who want to try to create a soft toy for the first time, an excellent and most suitable option would be to make it from a sock. Yes, you heard it right. It is from socks that beautiful toys, but sewing skills are not required. This wardrobe item will certainly be found in every home.
Any toy made from a sock with your own hands is individual. You can make bunnies from white socks, ducklings and chicks from yellow ones, striped socks can be used to create an ostrich, a tiger, a kitten, and from spotted socks you can make a long-necked giraffe. Great example New Year's crafts- which even children can do. By the way, if we talk about children, the production of such toys, as well as various crafts with his own hands, forms in them such positive feature character, such as determination, and in addition develops perseverance and memory.
Now let's see how to sew a dachshund from a sock. In addition to a bright striped sock, you need to prepare threads, a needle, padding polyester, scissors and be patient. We cut off the area for the toes in the sock, in other words the nose of the sock. We cut it into two parts and fold it with the wrong side. We sew it by hand and turn it inside out. Cut off the top part of the sock along with the elastic band, 5-7 cm long.
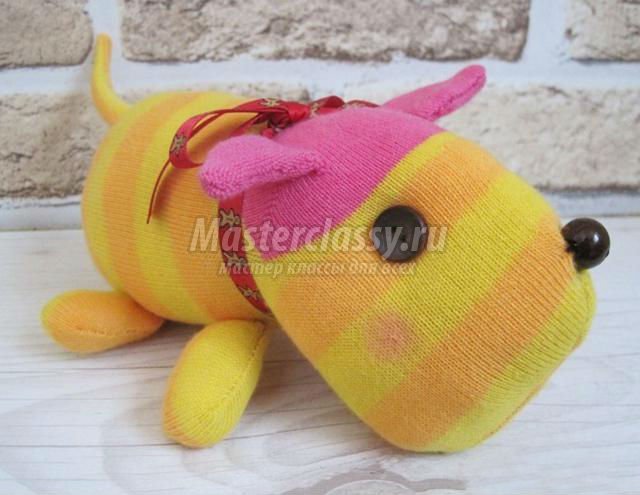
Thus, the sock, after cutting off its upper part and the sock, becomes the body of the future dachshund. We sew up the area near the sock, then stuff the sock with padding polyester and sew up the second area. The dachshund's body is ready. We sew on the ears that we made earlier. From the upper cut part of the sock you need to sew the paws and sew them to the body. The dachshund is ready, all that remains is to make its nose and eyes. We sew on a bead that will be the nose, and from buttons we will make the eyes of the dog. The dog's neck can be decorated with a beautiful ribbon.