A summer T-shirt is crocheted quite quickly. If you don't have much experience, it doesn't matter. Unlike knitting, when the uniform density of the entire fabric and the same size of loops are crucial, crocheting allows you to hide minor flaws of an inexperienced craftswoman. And any thing crocheted with thin threads always looks elegant.
Problems of inexperienced knitters
The problem with all beginning knitters is that they knit stitches of different sizes. The pattern knitted at the beginning is noticeably different from the pattern of the last rows. The monotonous openwork of loops of different sizes does not look entirely aesthetically pleasing. When crocheting, this problem can be easily veiled if you combine different techniques in one thing - floral round motifs, openwork polygons, elements of Bruges and Irish lace, as well as linear patterns.
In order for the openwork to turn out well the first time for a knitter who is picking up a hook for the first time, you need to follow the following recommendations.

Don't tackle a big item like a dress right away. You won't be able to tie it up quickly enough, and you risk postponing the work until "better times." And they can move very far away. The enthusiasm will disappear and you will no longer even try. But crocheting is an excellent activity that calms the nerves and develops creativity.
It’s also not worth starting with a shawl, because it is usually knitted in a large size with the same pattern. Consequently, rows or motifs of different sizes will immediately catch the eye.

A crocheted skirt is very beautiful, but you can’t wear it with every blouse, besides, making a lining is not the easiest thing, and the size of the skirt is usually quite large.
The first thing, knit from acrylic, polyester or other synthetic threads. This recommendation is due to the fact that natural yarn shrinks after washing. If you correctly calculate the number of loops in accordance with your size, then after the first wash you will be surprised at how much your T-shirt has changed and how short and narrow it has become.

Before you start work, think about what you will wear your new thing with. If you don’t have any special ideas, then focus on jeans. Each crochet T-shirt (a diagram with a description of the patterns is attached) that you see on this page is perfectly suited for such an occasion.
And one more thing. Often, after knitting a beautiful T-shirt, you want to continue working. You can tie a lot of different additions to the T-shirt that can be worn as a set. These include all kinds of sweaters, scarves or shawls, as well as skirts.

The reason why a beginner should start with knitting a tank top rather than any other item
The best thing for a beginner is a crochet T-shirt. A diagram with a description is given below. The T-shirt is knitted quickly, does not require much thread, and no lining is required for this item. One of the main advantages is that while knitting a T-shirt, you will, as they say, fill your hand, that is, you will even out the tension of the loops and the density of the knitting. By knitting one small T-shirt, you will become a professional in crocheting any thing.
Firstly, you will learn how to easily understand crochet patterns with descriptions, but without photographs of the proposed samples.
Secondly, you will learn to connect motifs flatly, neatly, evenly and imperceptibly.
Thirdly, you will learn how to knit a wide variety of stitches, patterns and understand various techniques.

Model made using Irish knitting technique
In our article you see photographs showing a crochet openwork T-shirt. The diagram with a description of the individual elements is clear and easy to implement. However, it requires great care and precision when connecting individual elements. For this reason, this model can only be recommended to fairly experienced craftswomen.

For a T-shirt you need to knit fourteen flowers and the same number of branches, and then combine them into a single fabric.
For the flower, knit a chain of ten chain stitches and connect them into a ring using Tie this ring with twenty-five single crochets, then tie eight petals around this center.

For a twig, cast on a chain of chain stitches about ten centimeters long, knit one single crochet into each loop. During the tying process, make branches for the petals and knit them in accordance with the diagram given in the article.
All motifs, before attaching to the T-shirt, should be ironed to give them an even shape.

Bandeau is a good basis for a model made from different types of lace
You can very quickly knit a kind of bandeau in a circle, consisting of only chain loops and single crochets. To do this, knit a chain of air loops equal to the length of the chest circumference and five plus three loops. Closes into a ring using a connecting post. Next - five air loops, a single crochet in the fifth loop, again five air loops, a single crochet in the fifth loop, etc. until the end of the first circular row. Attach the last chain to the third loop of the first arch. Next, knit five loops and one single crochet into the third loop of the arch, again five loops, etc. Knit until the bandeau is the height you need from the waist to the armpits. In the chest area on the front part, several arches should be made from six loops, then again knit five loops each. This way the required volume is achieved in the right places. In the lower part from the waist to the hips, the loops in the arches are also increased.

Made in this way, you will get a close-fitting crochet T-shirt for women with a well-defined bust shape and an accentuated waist. However, this option is not suitable for very plump women. A crocheted T-shirt for a girl can be crocheted without enlargements. In any case, it will turn out to be quite elastic. This mesh base is very convenient for sewing Irish lace motifs. The resulting bandeau needs to be put on a mannequin, motifs placed and sewn on. The top of the T-shirt needs to be tied with one row of picot posts. In addition, you need to double crochet two straps and secure them on the front and back. You can tie a beautiful border along the bottom edge.

Model of two large motifs connected from the center
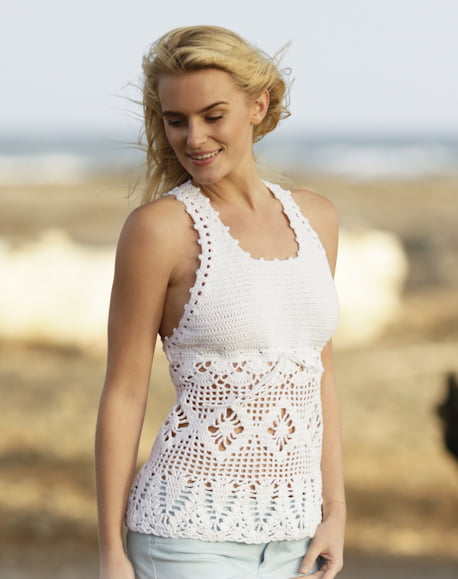
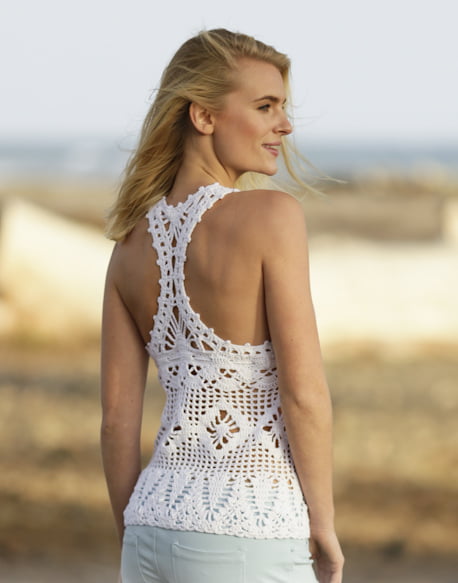
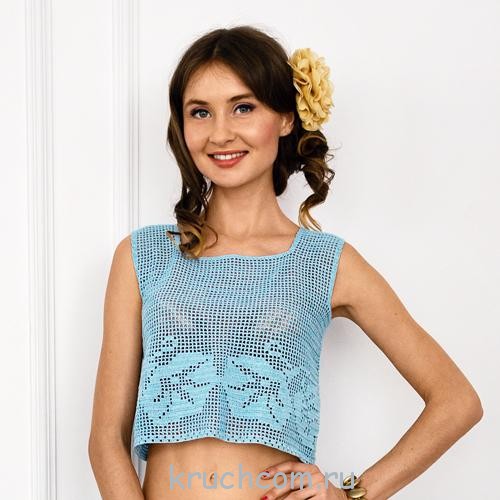
T-shirts made from two large motifs - one on the front and the other on the back - are very good. This summer crocheted T-shirt, crocheted from white threads, is shown in the photo. The upper part of the motif remains in relief, and the bottom of the T-shirt is knitted around the entire perimeter with two or three rows of the main pattern.
The second model of two large motifs has wide straps. Due to this, it is longer and ends below the waist. Wearing it with a contrasting undershirt will give you an additional interesting effect. Just don’t wear flesh-colored underwear under a T-shirt with a very sparse pattern - it’s not fashionable for a long time, so it looks vulgar. Just like a black bra under What looks good in a photograph or on the catwalk does not always look as complimentary in everyday life.

A model that hides fullness and makes the figure slimmer
A crochet T-shirt for women who want to hide a little plumpness should have a loose silhouette. The mint-colored model presented in our article will fulfill this task perfectly. Our T-shirt is knitted with a pattern reminiscent of vertical stripes. This visually increases your height and makes you slimmer. Knit two identical rectangular panels, connect them at the sides and at the shoulders. You will get a very stylish crochet T-shirt. A diagram describing several patterns suitable for it is in front of you. This model can be knitted both transversely and longitudinally. In our case, it is connected across. It is not necessary to observe symmetry in the arrangement of stripes. They can be made in different patterns. The main thing is that they create vertical lines.

Features of choosing a model for a child
Preschool age clothes should be knitted from cotton threads. It will turn out especially beautiful from “Iris”. These threads have a very beautiful shine, do not shrink or fade. You can safely take multi-colored skeins and knit from them. If the Irish technique seems complicated, then try making an outfit using square motifs. Crochet tops and T-shirts made using this technique are also very good. Identical round or polygonal motifs, sequentially connected to each other, create very interesting patterns. What should a crochet baby T-shirt be like? The diagram describing adult models is quite suitable for a child. A child's item should be more miniature, loose, bright and less sparse than a model for mom.
How to crochet a summer T-shirt? We will tell you about this with the help of our master class and diagram with a detailed description of each knitting step.
Tools and materials Time: 120 hours Difficulty: 10/10
- hook 3.5 mm;
- cotton yarn - 350-350-400-450-450-500 g;
- scissors.

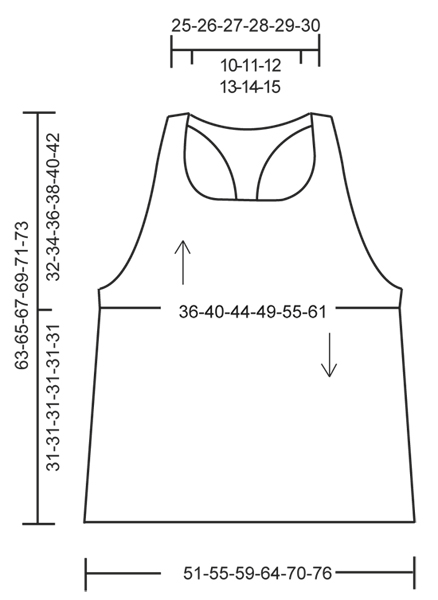
Size: S - M - L - XL - XXL - XXXL
Exact dimensions:
Bust: 72-80-88-98-110-122 cm.
Full length: 63-65-67-69-71-73 cm.
Abbreviations
- pp - lifting loop;
- VP - air loop;
- s2n - double crochet;
- dc - single crochet;
- sp - connecting loop;
- sc - single crochet.
Step-by-step description of the master class
The T-shirt is knitted in opposite directions from the middle. Also, the front upper part and the back upper part are knitted separately. The entire lower part is made in a single fabric in a circle.
Step 1: Knitting the Top Front of the Tank Top
Knitting occurs at 175-194-213-237-266-295 ch. We perform the first six rows with dc, in a circle. These rows cover both the front and back of the jersey. In the third row, skip 1 dc evenly and replace it with 1 ch. This will create the necessary holes for the lace at the waist.
Now knitting occurs only on 72-80-88-98-110-122 stitches of the front part.
- We begin to make side bevels for the armholes. To do this, we do not knit 1 outer stitch on each side of the fabric. We do this 16-18-19-21-22-24 times. 40-44-50-56-66-74 stitches remain.
- We begin knitting the front parts of the T-shirt straps. They consist of 10-11-13-15-19-22 stitches from the edge of the armhole bevel. Cut 1 stitch on each side until 4 stitches remain. in all sizes.
- We continue knitting for 40-44-48-52-56-60 cm. We cut the thread and fasten it. We knit the second strap in the same way.
Step 2: Knitting the Top Back of the Tank Top
The back part consists of two triangles, i.e., the upper part of the back and the lower part. All knitting occurs in accordance with the attached pattern, but in the last row it is necessary to connect the knitting of triangles with the already created straps and part of the belt.
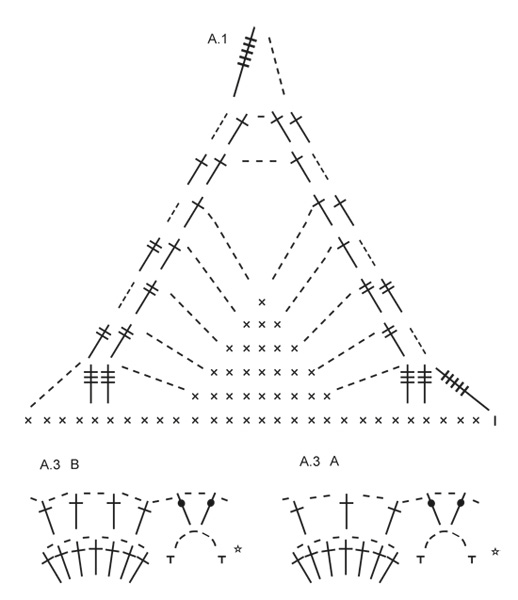
Step 3: Knitting the Bottom of the T-shirt
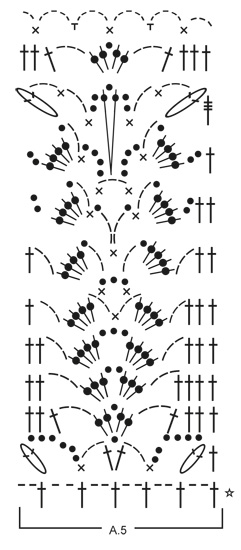
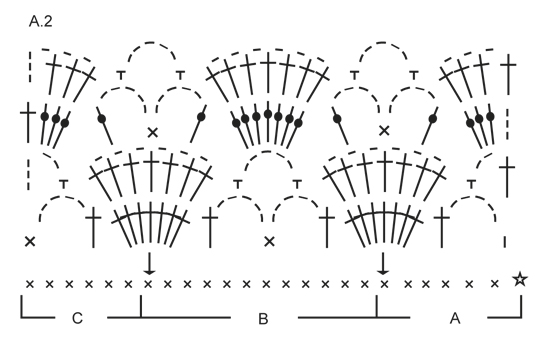
First we carry out the pattern with fans, then with diamonds, where the gradual expansion of the fabric occurs due to the addition of stitches to the knitting. And we finish knitting this part with a herringbone pattern. Thus, the lower part is wider than the part of the belt, by 15 cm in each size.
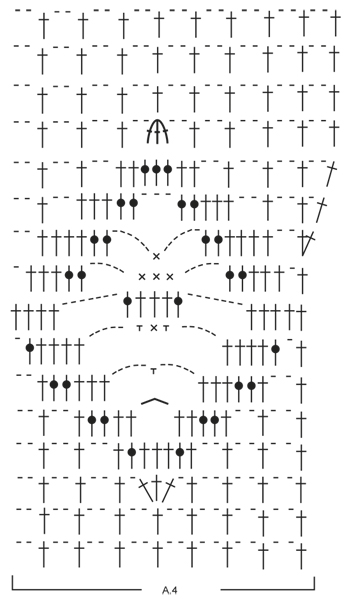
Step 4: Tie the top of the T-shirt
To do this, we perform all the edges:
- Row 1: Entire row sc.
- Row 2: Then follows a row with dc.
- Row 3: 2 dc, 2 ch and so on until the end of the row.
- Row 4: Dc and picot from ch 3.
Step 5: Completion of knitting and further care of the product
After completing the knitting, it is necessary to firmly fix the ends of the threads.
Wash the product by hand in soapy, NOT HOT!, water and lay it out on a terry towel without squeezing.
This should be done every time you wash a crocheted item made from cotton yarn. Then the T-shirt dries in this position; you only need to turn it over occasionally and stretch it slightly in different directions. After complete drying, the product should not be ironed! With proper care, such a thing will last for many years and will not lose its shape or overall attractive appearance.
Hi all! Grandmothers, mothers, girls, let's catch up!
We knit such a dress or top. Very effective, not complicated, universal, simply CHIC 

1. YARN AND HOOK
The threads should not be very thin - about 200-225 m per 50 grams. I have Periya Cotton Life (100 g. 425 m. - 50 cotton, 50 viscose). Diva stretch is suitable, Bella, as well as Semenovskaya Lily, Tenderness, Egeo on Yarna yarn and my yarn fit perfectly. That's all I can recommend about yarn. I use a 1.5 hook for these threads. Knit tightly. I assume the yarn consumption for size 48 is a little more than 400 grams.
Threads like Pelican, Yarnart Violet, Anna16, Alize Miss, I think that they will be a little thin and the products will resemble a cobweb, the pattern will not be clear, not distinct, but rather small and thin. But if you want this, then take these threads.
2. LINING
The dress is universal. You can wear it to work with a lining - and this is a common white or nude color combination. You can wear a petticoat to the market in the heat. Like a beach one - without lining.
Here are examples of slips and petticoats that are sold in lingerie stores. They are successfully worn under knitted openwork dresses.

3. MODELING - FOR THOSE WHO WANT TO KNIT A SUNDRESS WITH STRAPS
Here's a video - choose any straps for yourself

4. ACTIVE KNITTING (I will show the knitting process for size 48)
For those who are not confident in crocheting, make a pattern on whatman paper (search HOW TO MAKE A KNITTED PRODUCT PATTERN).
The model is knitted according to the pattern. The best option is when all the waves of our pattern look in the same direction - down.
We knit 2 front parts from two balls (so as not to forget). We start knitting from the shoulder line down.
I dial 35 air. loops + 4 to lift the next row. In order to achieve a smooth, beautiful neckline, I changed the order of knitting the pattern. In the diagram I showed in numbers which pattern to start with (from 1 - top).

That is, we knitted pattern 1, then pattern 2 - straight without additions.
In the next 2 patterns we make an addition - how much to add - try and see for yourself, focusing on this photo. Next we try it on to the pattern and from the 3rd ball we also knit the missing number of connecting air loops so that the repeat of the pattern is observed.


It should look something like this knitting


And then I knit in circles. Knitting must be done in rotating rows (face - back). That is, we reached from the beginning of the circle, made a connecting loop and then turn to the wrong side and knit along it, then a connecting loop and turn to the front side.
This is necessary so that our pattern looks the same throughout the entire product.
So I went to circular knitting.
The advantages of this knitting:
1. can be steamed and immediately tried on while knitting, which will ensure a perfect fit
2. looks beautiful, neat without seams.

MY TOP IS READY, tied around the neckline and armhole.

But I won’t stop at the top, but will continue knitting the dress.
We expand the fabric towards the hip line

Look at the end of the row, the arrows show 1 report. As we can see, there are 6 cells per 1 rapport.
I have 16 rapports around the knitting circumference, and I need to flare the fabric to the hips. That is, in the process of knitting the last row of the pattern, I need to ensure that my last row is 6 cells larger by adding cells. Thus, when knitting the next pattern, I will get not 16 but 17 repeats - this is flaring. Add as many reports (waves) as you see fit. I added 1 report (1 wave) in one pattern and 1 report (1 wave) in another pattern, and 2 repeats in the third pattern and went straight to the bottom with 20 reports (waves) in volume. (My hip size is 102 cm.) This fabric is straight from the hip line, does not hug the figure too much downwards, lies freely, does not fold. If you want to make the fabric more flared downwards, add more repeats (waves).
I'm going through a process

And now my dress is READY

See the dress I'm wearing in the report here
You can knit a T-shirt top for a party, and it is also suitable for going to the beach. A light, breathable blouse will come in handy more than ever in everyday life, especially in the summer heat. Today we will talk about beautiful crocheting T-shirts with descriptions, diagrams and detailed instructions for beginners.
White summer tank for beginners
We will need:
- yarn (70% cotton, 30% viscose, 350 meters per 100 grams), 2 skeins;
- cr. No. 3;
- about 1.5 meters of white narrow satin ribbon.
Patterns
- Cups: stick to cx. 1, where the crs are indicated. r. from 1 to 6, etc. and arr. from 7 to 16.
- Back: cx. 2, where the etc. and arr. are indicated. rr..
- Openwork: сх. 3, where crs are marked. r..
Finished product size: 36.
Schemes
Model description
We carry out the work in stages.
Bodice
Knitting is carried out in the direction from bottom to top.
We determine the rise to a new row in the middle of the front side, between the cups.
Having knitted 6 cm from the cast-on row, close 53 sts of the back and continue knitting each cup separately in straight and reverse stitches, adhering to cx. 1 from 7 to 16 pm.
Without cutting the thread, we begin knitting the straps (about 20 cm in length), repeating in height 17-18 pp. We sew the free end to the back.
We knit the second cup in exactly the same way, make another strap and sew it on.
Bottom part
Here we will use circular knitting from top to bottom, knitting an openwork pattern according to cx. 3 (about 10 repetitions). At this stage, we place the transition line to the new row on the side.
Assembly
We perform finishing on the top of the bodice and along the edges of the straps (see diagram 4). At the transition point from the top to the bottom we thread a satin ribbon, which will regulate the volume under the bust and serve as decoration.
T-shirt top with an open back: video master class
Sunny T-shirt with openwork stripe
We will need:
- yarn (60% cotton, 40% polyacrylic, 130 meters per 50 grams), 5 (7) skeins;
- cr. No. 3.5.
Finished product dimensions: 36/38 (42/44).
Main pattern: number of p. cr. 3 + 2 + 3 c. p.p.. Knitting is carried out according to the pattern.. Beginning. from p. before rap., rep. rap., zak. n. after rap.. Replace the first s. s n. each r. at 3 in. n.. Repeat x 1 from 1 to 3 r., then alternate 2-3 r..
Knitted flowers x 10 (x 12): 6 in. p., ss. We continue knitting cr. r. according to cx. 2, each new cr. r. we start from v. p.p. instead of the 1st p. and end with ss. in the last century p.p.. Repeat from 1 to 3 cr. r. x 1. Second motive and further added. in the last cr. r. in the places indicated by the arrow using ss. To the previous motive, in order to get a circle, we connect the last motive also with the first.
Basic knitting density knot: 24 p. x 9.5 r. = 10 x 10 cm, flower 8.5 x 8.5 cm.
Scheme and pattern
Model description
Back
We knit a chain of 101 (122) sts. p. + 3 v. p.p., basic pattern for 8 (9) cm.
For the top we again make a chain of 101 (122) chains. p. + 3 v. p.p., basic pattern until the length reaches 16 cm, where we leave 9 stitches for the armholes on both sides and 2 rows in each. x 3 p. = 71 (92) p..
Having knitted 26 (27) cm from the embankment. row, leave the central 39 (46) stitches (neck cut), finish each side separately.
For rounding, leave from the inner edge in each r. 2 x 3 and 1 x 2 sts. We finish the work after 35 (36) cm on the remaining 8 (15) sts of the shoulder on both sides.
Front
Knitted in the same way as the back, but with a deeper neckline: 21 (22) cm from the embankment. we leave the central 27 (34) p. and in each r. 4 x 3 and 1 x 2 p..
Assembly
We make seams on the lower and upper parts. We connect a strip of flowers to the top and bottom with chains of... p.. We tie all the edges with 1 cr. r. “shells” (= *1 s. without n., skip 1 p. av. r., in the next p. 5 s. with n., skip 1 p. av. r.*, from * to *).
Top T-shirt Filet crochet diagonally: video MK for beginners
Air top for beginners
We will need:
- yarn (50% cotton, 50% acrylic), 150 grams;
- cr. No. 3.
Finished product size: 46-48.
Knitting density: 22 p. x 17 r. = 10 x 10 cm.
Scheme and pattern of the model
Model description
Back
At high 42 cm from start. for armholes, decrease stitches on both sides, as shown in the diagram..
At high 59 cm from start. we leave 59 stitches in the center and then knit both sides separately (1 repeat + 1 symmetry stitch). We finish work in 2 days.
Front
Knitted in the same way as the back. To make a deeper cut, at a height. 37 cm, leave the central 27 stitches, knit the sides separately.
To cut the neckline, leave it on the inside in each r. alternating 3 sts and 2 sts until we get 1 repeat + 1 st of symmetry. We finish knitting at a height of 60 cm.
Assembly
We sew the side and shoulder seams, we do the processing of the edges of the armholes and the bottom of the product with a crochet and 3 r. With. without n., and then - 1 r. "crawfish step"
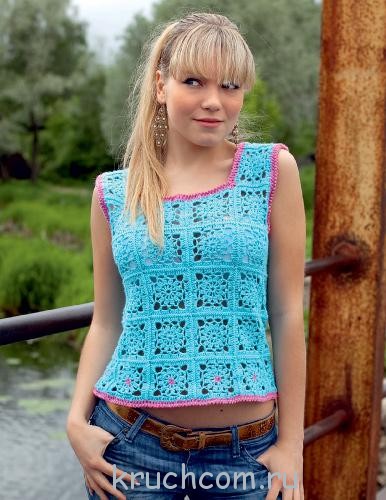
Knitting openwork T-shirts for beginners
We will need:
- yarn (57% viscose, 20% linen, 8% cotton, 15% popiacryl, 105 meters per 50 grams), 5 skeins;
- knitting needles No. 4;
- cr. No. 3.5.
Finished product size: 36-38.
Square of lace: chain of 6 c. p., ss., further along cx. crochet 1. Knitting each cr. r. we start marked in. p. instead of the first p.
We finish 1st and 4th cr. r. 1 ss. in the last V. p.p., second cr. r. we finish 1 s. s n. and 8 ss. 1st cr. r., third cr. r. we finish 1 s. without n. in in. p.p.. Repeat 1 x 1-4 cr. r..
Edging from arches (number of points 9): according to diagram. crochet 2 directly on 5 cr. r. bottom edge, this cr. r. is given under c.. We start from the 1st century. p. instead of 1st s. without n. and etc. before the rapport, repeat the rapport after finishing. 1 ss. in in. p.p..
Important! We knit arches in purl and knit stitches. The arrows indicate the direction of knitting.
Openwork pattern (23 stitches + 2 edges): according to diagram. for knitting needles (only knit stitches are indicated, in purl stitches, all sts and yarn overs are knitted purl). Let's start and finish. 1 edge loop, repeat 1-12 r..
Knitting density: square – 9 x 9 cm; openwork – 25 p. x 28 r = 12.5 x 10 cm; facial stitch – 18.5 p. x 28 r. = 10 x 10 cm; 20 s. s n. at the bottom = 10 cm.
Important! The direction of knitting changes during the process, follow the indicators on the pattern!
Scheme and pattern of the model
Model description
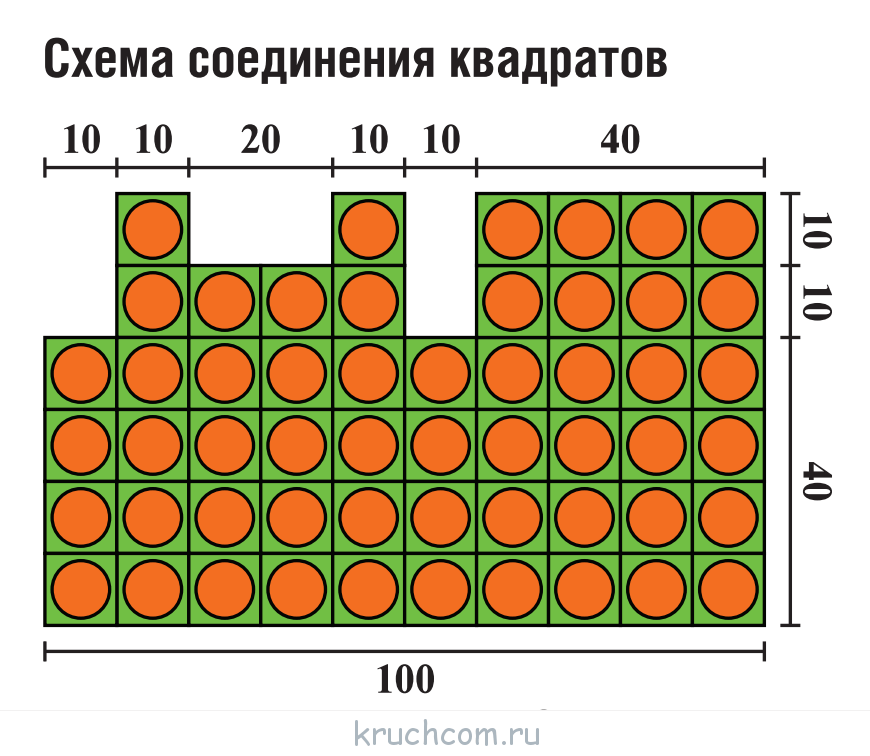
Lower front and back
We need to make 8 squares, then sew them into stripes, connecting the first and eighth, resulting in a circle, where 1-4 motifs are the front part, 5-8 are the back part.
For the top finishing strip, we tie the right long edge of a strip of 4 edges. R., every cr. r. starts from the 1st or 3rd century. p. instead of the first s. without n. or first s. s n. and finishing. 1 ss. in the last replacing c. p..
1 p.: 152 s. without n. (= 19 s. without n. per square).
2 p.: 1 s. s n., *above 1 s. without n. pr. cr. r. do 1 in. p., 1 p. s n. in the next With. without n.*, from * to *, 1st century. p. and 1 ss. in the 3rd century. p.p..
3 rubles: in each s. s n. and c. p. 1 s. with n..
4 rubles: p. without n. The height of the top bar is 3 cm.
For the bottom plank, we tie the left long edge of a strip of 6 edges. r.:
1 p.: 160 s. s n. (= 20 s.n. per square).
2 p.: p. without n..
3 p.: 2 v. p. instead of the first half-st., *over 1 s. without n. pr. cr. r. do 1 in. p., 1 half-st. in the next With. without n.*, from * to *, ending. 1st century p. and 1 ss. in the 2nd century. p.p..
4 rubles: in each half-st. and every c. p. 1 s. with n, at the same time in 1 and 80 centuries. p. need to be knitted in 2 s. s n. = 162 s. with n..
5 p.: 3 c. p. instead of 1st s. s n., *above 2 s. without n. previous cr. r. do 2 in. p., 1 p. s n. in the next With. without n.*, from *, above 2 s. without n. previous cr. r. 2nd century p., 1 ss. in the 3rd century. p.p..
6 r.: we knit 1 edge of the arches according to cx. crochet 2 (= 18 repeats, incl. beginning stitch). Bottom bar height = 6.5 cm.
Front and back center
We crochet 25 stitches and press between the edge stitches with an openwork pattern. After 72.5 cm = 204 r. from the embankment the edges are all closed. We sew the first and last pp, the left long edge of the openwork strip to the final edge of the strip of squares, slightly seating it.
Upper back
We crochet 66 stitches, stockinette stitch. For bevels approx. from the embankment edges on both sides in each 4 r. 6 x 1 p. = 78 p. After 10 cm = 28 r. from the embankment k. closing for the holes on both sides, 2 p. and 2 p. in each. 4 x 2 and 7 x 1 p.
Knitting 18.5 cm = 52 r. from the embankment to. closed for the neckline, last 44 stitches...
Top front
66 p., stockinette stitch. After 2 cm = 6 r. from set. to. mark the 16th and 51st stitches for the bust shape. Next. persons r. we do it on both sides of the mark. p. 1 yarn over at a time and knit them purlwise. r. purl (= 4 stitches); these increases are repeated. another x 3 each. 2nd r. After 5.5 cm = 16 r. from set. to. approx. for bevels on both sides, 1 p. and the next. 6th r. another 1 x 1 p. = 86 p..
Important! Arr. and ub. for the bust on the pattern are not taken into account; on the contrary, it is based on the dimensions of the back.
We perform armholes as on the back. Simultaneous with the 1st decrease in steps, we perform one double for the bust shape. prot.: remove the marked item from the previous one. p. together as the front one, next. knit stitch and pull it through both removed stitches. Repeat these decreases. another x 3 times each. 4th r.. Simultaneously with the first decrease in the closed armholes. for the neckline, center 2 stitches and both sides ending. separately. To bevel the cutout closed. crochet in each 2 r. 4 x 2 and 6 x 1 p.. At high. on the back we knit the remaining 3 stitches from each. double sides prot.; We do not cut the working thread.
Assembly
We make side seams on the top of the back and front; Sew the upper back and front according to the pattern to the long right edge of the openwork strip. For the straps, we include in the work a loop and a working thread on the upper toes of the front, we knit a chain of 60 chains. p. + 1 v. p., we tie the set. chain edge 60 s. without n. and finishing. on the front toe 1 ss..
For the finishing edge, we tie the common edges of the straps, armholes and neckline with 2 edges. r..
1 p.: p. without n., pay attention to the even number of sts. In the corners of the back we knit 4 s for rounding. without n. in the edge p..
2 p.: 3 v. p. instead of 1st s. s n., *above 1 s. without n. prev cr. r. you need to do 1 in. p., 1 p. s n. next With. without n.*, repeat from * to *, order. 1st century p. and 1 ss. in the last century p.p.; sew on the straps.
Openwork top: video instructions
White beach top
We will need:
- yarn (100% cotton, 125 meters per 50 grams), 5 (6) 6 skeins;
- cr. No. 3;
- 3 buttons.
Finished product dimensions: 34-36 (38-40) 42-44.
It is important to prepare the pattern in advance and approx. and ub. crochet, checking the workpiece with it.
Openwork u. (number of p. cr. 8 + 3 v. p, p.): circular pp. according to s.. Beg. from p. before rap., rep. p. rap., zak. p. after rap., issue. 1 x 1-7 pp., then alternate 2-7 pp.
Border: 1 s. s.n., pass. 2 p., 5 s. s n. in 1 st. basics, skip. 2 p.*, from * to *.
Knitting density: With. s n. – 18.5 p. x 12 r. = 10 x 10 cm; openwork u. – 22.5 p. x 12 r. = 10 x 10 cm.
Model diagram
Model description
Right cup
34th century p. + 3 v. p.p., p. with n., at the same time each. r. beginning from 3rd century p.p. instead of 1st s. With. n. 9 cm from the set. leave 17 sts on the left side. 18 cm from the set. we finish work.
Left cup
Symmetrically to the right.
Bottom
224 (240) 256 c. p., ss. in a ring, openwork at .. On the 13th r. reduce 40 p. for fitting: prop. 40 x across. each 5 and 6 s. without n. (40 x each 6 s. without n.) 35 x each. 6 and 5 x each. 8 p. without n. = 184 (200) 216 p..
These ub. repeat on the 25th p., skip. 40 x across. each 4 and 5 s. without n. (40 x every 5 s. without n.) 25 x across. every 5 and 6 and 16 x every 5 s. without n. = 144 (160) 176 p..
After 24 cm from the set. for the cut we divide the work at the beginning of the edge. r. and knit etc. and arr. pp.. After 32 cm from the set. do 3 p. With. with n..
Assembly
Vol. Crochet the central seams of the cups, tie them on both sides with a border. We sew them to the bottom so that the lion. calyx beginning at the cutout. For each strap, we attach a thread to the corner of the cup, make a chain from c. p. 30 cm long and tie it with a border. Sew on the straps, tying them off. cut 1 r. With. without n., while making 3 buttonholes. Sew on the buttons.
Top T-shirt: video MK for beginners
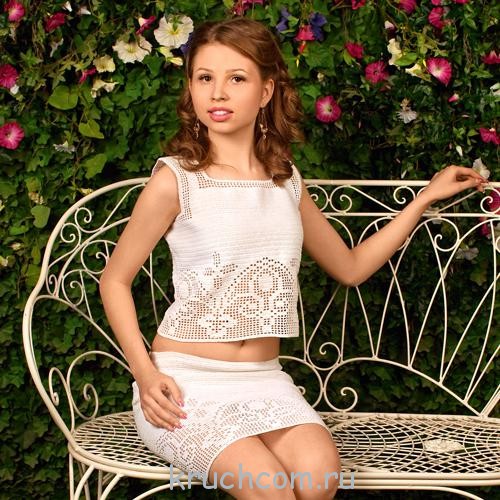
Smart summer white top
We will need:
- yarn (100% cotton, 150 meters per 50 grams), 4 skeins;
- cr. No. 3.
Finished product dimensions: 34-36 (38-40).
Flower u. (number of p. cr. 19 + 18 (5) + 3 v. p. p.): according to the diagram..
Knitting density: 24.5 p. x 10.5 r. = 10 x 10 cm.
Model diagram
Model description
Back
94 (100) c. p.+3 c. p.p., flowery..
After 17 cm from the set. to. add two sides 1 s. s n. = 96 (102) p..
After 27 (28) cm from the embankment. we finish work.
Front side
The same, but with cutouts for the bust. We draw and cut out the pattern in full size and 20 cm from the embankment. issue decreases under the bust, applying knitting to the pattern.
Bust (x 2)
6th century p., ss.. According to cx. 2 direct and reverse pp. Replace the 1st s. s n. or half-st. each r. at 3 or 2 v. p.p..
Repeat 1 x 1-4 rows, then alternate 3 and 4 rows, while continuing the increases in the middle. After 18 (19) r. from the embankment let's finish.
Assembly
Sit down a little, sew on both sides of the bust, then no. crocheted side seams. We tie the bottom 1 cr. r. With. without n. and “shells” (1 v. p. p., * 2 v. p., prop. 4 p., issue in the next p. 1 half-st., 1 s. with n., 1 s. with 2 n., 1 s.n., 1 half-st.*, from * to *).
We tie the top 1 cr. r. "shells". To knit the straps, attach a thread to the upper cape of the bust, knit along a chain from c. item 35 cm long, and tied. their 1 rub. half-st. We tie the straps around the neck or sew them to the back.
Selection of schemes


No one argues that the market is overcrowded with all kinds of women's clothing, in particular, lightweight T-shirts and openwork tops. However, when it comes to truly exclusive things, there are only two options: spend fabulous money on buying a stylish thing or try to make it for yourself. Hand-made is now at the peak of popularity, so if you have a hook and your favorite yarn in your arsenal, as well as some free time, you are welcome to try your hand at knitting T-shirts, all the intricacies of making which we will discuss in detail in today’s material.
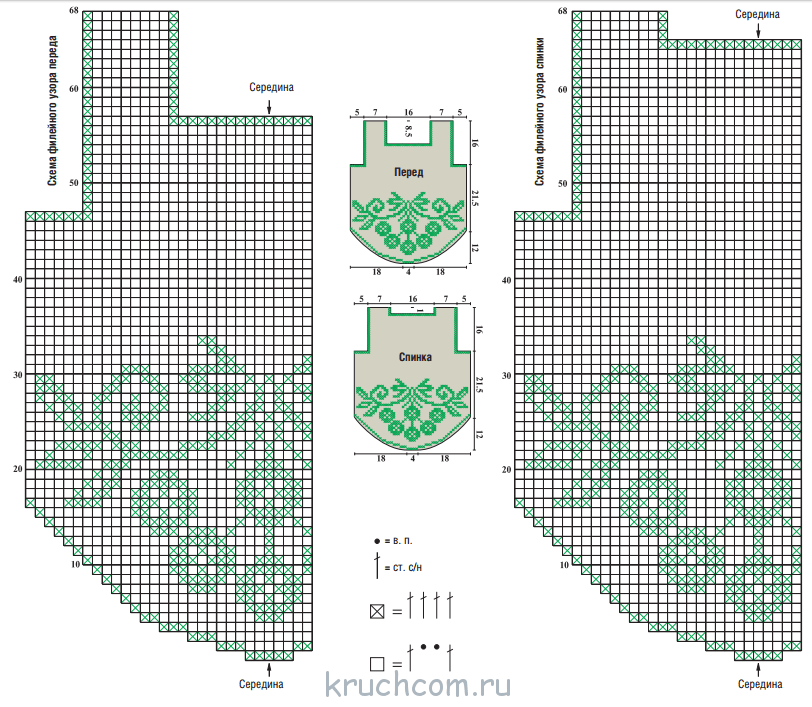
T-shirts knitted with a fillet pattern
What attracts knitters to the fillet technique? Incredible ease of execution, and, at the same time, magnificently beautiful products. The mesh of cells is knitted very easily, we have already talked about this in, the fillet pattern is also unpretentious in execution.
Even a novice craftswoman can knit a women's T-shirt using the fillet lace technique; the main thing is to find a suitable pattern with a detailed description. Having once knitted fillet patterns according to the steps described in detail, the next time the needlewoman will be able to start knitting such mesh lace without any problems, having only one diagram in hand.
So, we suggest trying to knit a translucent fillet T-shirt with a simple but memorable pattern. We guarantee that in such attire you will definitely not go unnoticed!

For knitting you need about 150 g. cotton yarn (you can use “Iris”) and a hook No. 1.5.
Schematically, knitting looks like this:
Conditional abbreviations that may appear further in the text:
- VP – air loop;
- runway – lift runway;
- SS – connect. column;
- RLS – single crochet;
- Dc – double crochet;
- C2H - double crochet stitch;
- C3H – double crochet stitch;
- PR – previous row;
- PS – half-column;
- FYA – fillet cell.
Step-by-step description of the work:
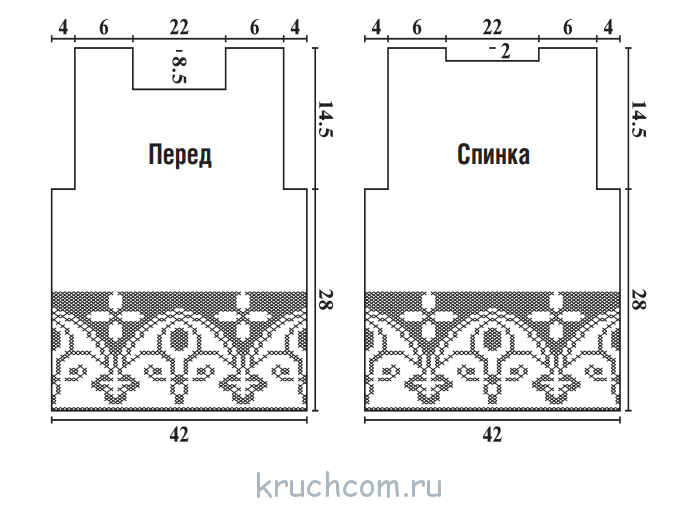
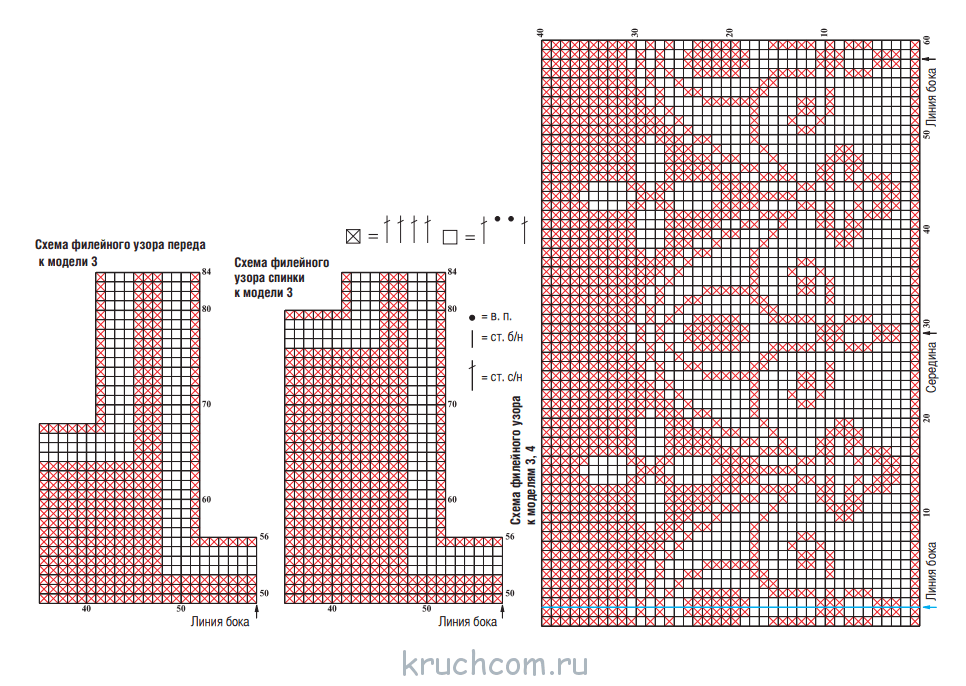
We knit the back:
Row No. 1: 10 SS in next. 10 VP of the chain from the hook, then 1 Dc in the fourth VP of the chain from the hook, then 14 Dc in the next one. 14 VP chain + 9 VP. We get 5 FY.
Rows No. 2-47: continue working in straight and reverse rows according to the back fillet pattern.
Row No. 48: we draw up the armhole line, leaving 6 FYa unknitted on both sides of the fabric.
Rows No. 49-65: knit straight and back according to the pattern.
Row No. 66: draw a neck line, leaving 19 FY unknitted in the center. There are 10 FPs left in work. We continue to knit in forward and reverse directions until the 68th row. We knit the left shoulder using the same principle.
We knit the front part of the product:
Zero row: chain of 28 VPs (16 VPs + 3 VPs + 9 VPs).
Row No. 1: 10 SS in next. 10 VP of the chain from the hook, then 1 Dc in the fourth VP of the chain from the hook, then 14 Dc in the next one. 14 VP chain + 9 VP. We get 5 FY.
Rows No. 2-47: continue working with straight and reverse rows according to the fillet pattern.
Row No. 48: we draw up the armhole line, leaving 6 FYa unknitted on both sides of the fabric. We knit straight and back, including the 57th row.
Row No. 58: we draw up the neck line, leaving the central 19 FYa unknitted from the beginning of work. In work – 10 FY. We knit with a fillet pattern for 68-1 rows inclusive. We knit the left shoulder in the same way as the right one.
We assemble the T-shirt by stitching the product on the shoulders and sides. Ready!
Bright top with relief patterns in Irish technique
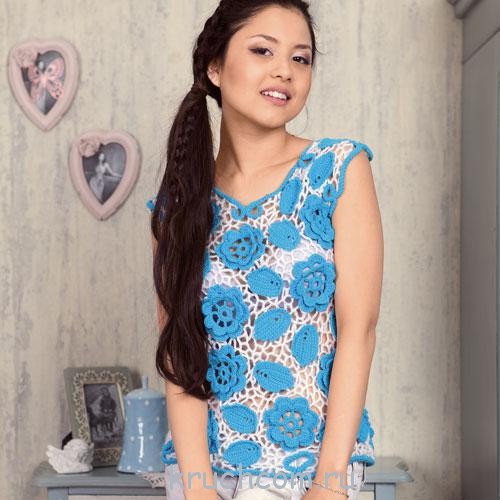
For those who are not afraid of difficulties, we suggest trying their hand at Irish lace. It will take a lot of time to knit a top, but believe me, the result is worth it - such an exquisite T-shirt will be an excellent addition to a romantic summer look! The T-shirt is knitted from individual plant motifs using the Irish typesetting technique, which are subsequently assembled into a complete product using a knitted mesh of VP chains.
We will provide a step-by-step procedure for working on a T-shirt; you will only need cotton yarn of a suitable color (50 grams), white acrylic yarn - 60 grams, as well as hooks No. 2.5-3.
Pattern

Knitting patterns and steps:
Initially, we knit the elements of typesetting lace: a pearl flagellum (caterpillar), three-dimensional flowers and leaves.
Pearl cord (used for tying a T-shirt along the free edge) - we knit a base chain of 3 VPs, turn the knitting clockwise 180° and knit a sc in the 1st VP from the hook. Then we knit with rapports: turn the knitting 180° and insert the hook under the formed arc, knit a sc, then turn the cord over again, insert the hook under the two formed arcs. Knit in repeats until the cord reaches the desired length.
Leaf: for a T-shirt you need at least 30 elements, more is possible.
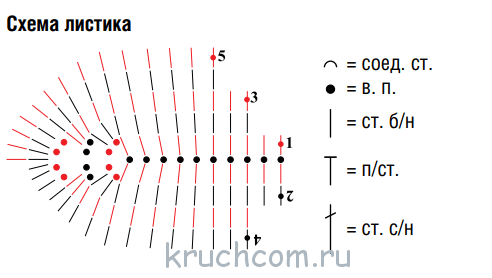
Zero row: chain of 11 VPs (10 VPs + 1 VP).
Row No. 1: 1 RLS in the third VP of the chain from the hook + 7 RLS in the next free VP of the chain, in the last VP of the chain we knit 4 VP + 1 RLS (in the same last loop of the base chain), then we tie the chain on the reverse side - 9 sc in each free stitch.
Rows No. 2-5: knit in a similar way, carefully following the pattern suggested above.
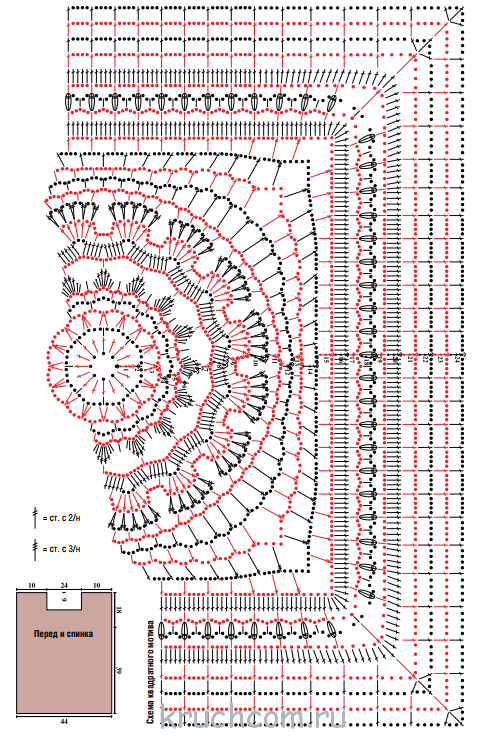
Relief flower: knit 25 floral motifs.
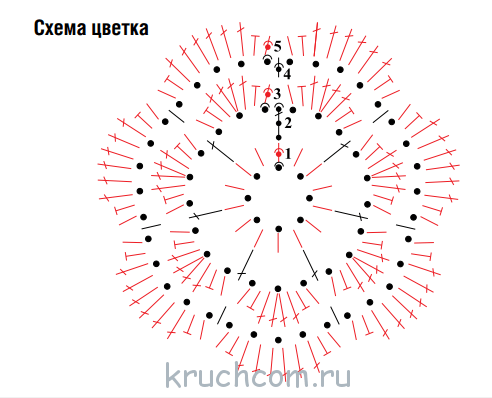
Zero row: a chain of 8 VPs, closed in a circle by knitting a SS.
Row No. 1: 1 runway + 13 sc (we tie a chain of VP with them). SS.
Row No. 3: 1 runway + 1 pc + 4 dc + 1 pc + 1 sc in an arch of three VP PR. Next we knit with rapports: 1 sc + 1 sc + 4 sc + 1 sc + 1 sc in the next row. arch PR. In total there should be 7 rapports. The end of the row is SS.
We continue to knit rows No. 4-5 according to the provided pattern.
As soon as the required number of motifs is ready, we begin assembling the blouse. Remember, this is a very painstaking work that can take several times longer than knitting Irish lace motifs.
In order to assemble a blouse, you need a full-size pattern. To do this, we recommend using plastic film; it is quite easy to work with, and at the end, when the T-shirt is ready, you can quickly get rid of it.
It is better to lay out the pattern on a flat surface that can be easily pierced with a tailor's needle. Place motifs (flowers and leaves) on top, showing your creative imagination. Pin with needles so that they do not slip while tying. Use white yarn to connect the motifs together; to do this, we make a mesh of chains of air loops in random order.
We remind you that before joining the motifs into a typesetting fabric, they must be thoroughly steamed with a hot iron using a starch solution.
After the fabric is ready, we connect both parts using side and shoulder seams, which can also be made from VP chains.
And, the last step - we connect the pearl flagellum with the free edges of the T-shirt - the neckline, armhole lines, and also the bottom. We separate the finished product from the film. The T-shirt is ready to go out into the world!
Playful T-shirt with deep armholes, decorated with Bruges patterns
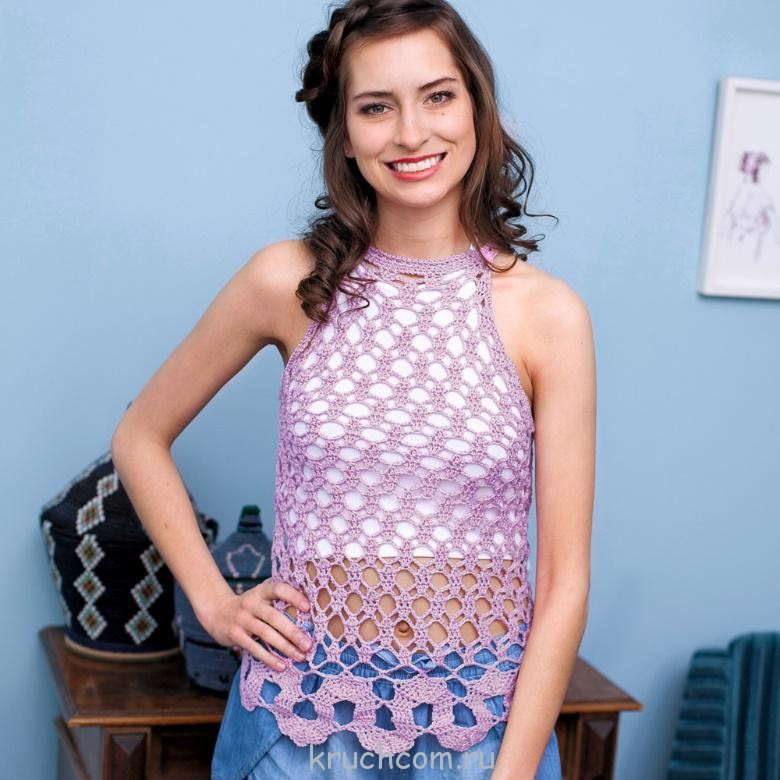
American armholes, combined with a high neckline, make this T-shirt stand out from other models. The combination of a transparent openwork pattern and finishing made with Bruges knitting is the pinnacle of knitted art. Let's try to knit such beauty!
We take 300 grams of lilac cotton thread, as well as hook No. 3.
Patterns used in knitting:
Wavy edging, knitted in Bruges style:

We knit 4 VP + 4 runways and continue to knit rows of 4 dcs + chain loops on the sides, and on the turns, sc, knitted into an arch from the VP.
We perform rows No. 1-23 by analogy, then repeat until the desired border length is achieved. Keep in mind that in rows No. 9 and No. 20 the arch from is performed differently: 2 VP + 1 RLS (in this case, the 3 previous arches are captured) + 2 VP.
main openwork pattern:

It is knitted in circular rows, and the number of stitches in the first row must be a multiple of 8. We knit according to the pattern of the pattern, perform circular rows from the first to the sixth, then constantly repeat knitting in circular rows Nos. 3-6 (straight and back).
Work progress:
We knit a wavy border, about 10 Bruges curls, close the knitted fabric into a ring, and sew it together. Align the upper part of the border with the green icons on the diagram. Focus on the designation “A” in diagram 1, from there we begin to perform rapport: we knit 7 VP behind the first arch of the edging + 1 SS at the top of the edging + 7 VP + 1 SS in the next. arch. The end of the alignment is SS.
Next, we begin to knit the openwork part of the T-shirt, straight to the edging. We make a chain of 80 VPs, and in the places indicated by the arrow, we knit a sc on the aligned edge of the edging. We close the chain in a circle using 1 SS, knit with the main pattern, in a circle, 21 rows in a row.
Approximately 30 cm from the chain, we divide the fabric in half to knit the bevels. We knit the back, as before, in straight and reverse rows. We decorate the raglan bevel on the sides with passes for the mark. four rows of one repeat (indicated in green in the diagram).

We knit the remaining loops until the fabric reaches 47 cm in height (approximately 33-34 rows). Before we knit according to the same principle.
We knit the neckline and straps: we tie the front neckline with sc, for the left strap we knit a chain of 8 VPs, we tie the neckline again along the back and add 8 VPs for the right strap. We finish the row with SS.
- Rapports: 1 VP + skip one loop PR + 1 PS, repeat to the end of the row, SS;
- Repeats: 1 SS + 1 VP + skipping 1 PR loop, repeat to the end, SS;
Shape the finished product, iron it - a stylish exclusive handmade T-shirt is ready!
A selection of knitting patterns with photos
For advanced crochet craftswomen, we provide a large collection of current T-shirts for this season, crocheted using various techniques. Detailed diagrams and patterns for them will help you complete any model in the shortest possible time.
T-shirt "Lacy Geometry"


Colorful top made of floral motifs


Lace T-shirt “Sea Breeze”


The most delicate T-shirt-tunic for romantic natures


Current "sirloin"
Airy lace

Original T-shirt made of squares


Today we got acquainted with the technology of crocheting various T-shirts - from simple to the most complex. To wrap up the lesson, we will provide needlewomen with a series of video master classes on knitting summer T-shirts and tops; we are sure that they will appeal to both beginning knitters and experienced needlewomen.


