Beautiful eyebrows, recently, have become a mandatory attribute of the finished image. They give the face expressiveness and the gaze a certain emotional coloring.
That’s why it’s so important to choose the right eyebrow shape. But not every girl can support it on her own. For this purpose, special eyebrow stencils were developed.
Why do you need an eyebrow stencil template?
It is quite difficult to create and maintain the ideal eyebrow shape at home. Stencils are designed to facilitate the process of daily makeup. However, professional makeup artists were the first to appreciate their convenience. Despite the fact that a master can create an ideal form without a template, templates turned out to be indispensable for clarity and discussion of the line with the client.
At home, they are used to determine the area to be painted with pencils, shadows, or waxed. This is especially convenient for thin or very sparse eyebrows.
Types of stencils

There are three main types of stencils. You can choose the appropriate one depending on the conditions of use.
- Stencils - cards are good for salon use. This is a plastic card with a slot in the shape of an eyebrow. The master applies it to the line, holds it with his fingers and paints the desired area;
- Masks with Velcro. Correction with their help can be done at home. The templates are fastened together and worn like a headband, fastened at the back of the head. It is convenient because it leaves your hands free;
- Masks that attach to the nose. Holds more firmly. They are rarely found on the open market, but can be bought in online stores for makeup artists.
Sold in packs of several pairs of different shapes. From these, choose those that are closest to the natural or desired shape.
How to use a stencil

First, apply translucent powder to the brow area. This way the stencil will not stick, and the lines can be corrected. After that, start using the eyebrow stencil.
- Attach the stencil;
- Use shadows with a thin brush or pencil to outline the line;
- Remove the stencil;
- Remove excess hair;
- Paint with shadows or a pencil (without a stencil, along the drawn lines);
- Apply wax
Keep it natural. The shape may be perfect, but if it seems to be drawn according to a ruler, it is unlikely to add sophistication to the image. Shade the edges, achieving maximum naturalness, but without losing clarity.
How to use Avon eyebrow stencils
A classic example of a template-card are Avon eyebrow correction stencils. They are recommended for home use. They are classic plates that need to be applied and held. Judging by the reviews, this is inconvenient and an assistant is needed to use such a device at home.
Pros

Many girls choose eyebrow templates. This method has a number of advantages:
- Completely symmetrical lines;
- Simple selection of shape;
- Easy to maintain a neat line;
- You can “try on” the form before performing it.
Added to these advantages is the relatively high speed of operation. However, it only appears if you have a certain skill. And also if you have a convenient stencil.
Cons
Despite the fact that the method gains many fans, nevertheless, many girls also refuse it. The disadvantages of the method include:
- The widespread use of stencils - cards that are inconvenient to work with;
- The same eyebrow shape in the most common sets, which means the same and recognizable eyebrows for everyone who uses them;
- Unnaturalness of the final result if coloring was used;
- The choice of shapes is not so large, sometimes it is difficult to choose the right one.
Thus, although with skillful use the result looks good, however, not everyone can get it.
Price per stencil
Prices vary. An Avon set of four mold options costs 115 rubles. Whereas the Ardell set costs 460 rubles. In these cases we are talking about cards. Velcro masks are more expensive. Buying a mask that attaches to the nose will require even greater costs. However, you can buy such a product in Chinese online stores not so expensively.
How to make a stencil for eyebrow correction
Making an eyebrow stencil is easy, but for an aesthetic result you will have to practice. Prepare a marker or gel pen, a utility knife and a piece of plastic (from plastic bottle or food container). You will also need a printer.
- Find the required template on the Internet and print it;
- Place the plastic on it and trace it with a pen (some people transfer directly from the computer screen to the plastic without printing);
- Cut out the opening with a utility knife.
The difficult stage is the third. It is not possible to carefully cut the opening - evenly and without sharp corners - on the first try.
Actual stencil size
When printing, it is difficult to understand in what size the picture with templates will be printed. Most often, such files are marked “actual size” or similar. If there is no such mark, then measure the length in centimeters using graphic editors.
If they are also missing, try doing it differently. Open the picture and enlarge until the sheet on the screen is as wide as A4. This is the actual size of the picture, and therefore the template, when printed on the entire page.
Which option did you choose?We look forward to your comments!
Modern society is very demanding when it comes to appearance and men pay attention to every detail when they meet. female face. Eyebrows cannot be called an insignificant element, since only their shape can both emphasize a number of advantages of the face and become a real problem that greatly spoils appearance. In relation to them, you should not give in too much to your imagination, since there are certain rules for creating the shape of an ideal eyebrow. Alas, achieving it is not so easy, especially if you do not have special knowledge and skills. To ease the fate of women, special stencils were invented, which, by selecting them to suit the shape of the face, can draw a beautiful eyebrow in just a few minutes.
Eyebrow stencils - what are they?
A stencil is a piece of material on which a hole of a certain shape is made. Eyebrow devices have a die cut different lengths, thickness and curve so that every woman can find a suitable option for herself according to her face type. Applying such a “mold” to the eyebrow allows you to determine which part of the hairs should be left and which to get rid of in order to get the ideal shape. Also, such “layouts” can be used during makeup application in order to draw an exact shape without flaws with a pencil. For painting, stencils are also often applied - this not only limits the shape, but also does not allow the coloring compounds to penetrate the skin.

Some commercial stencils may have special dots and lines applied to help you position the shape more accurately and create a symmetrical result on both sides.
Types of ready-made stencils for eyebrow design
As already mentioned, stencils differ from each other in the shape of the eyebrow that they allow you to create. But in addition to this criterion, we can also talk about the types of devices based on the material from which it is made, and on the principle of fastening during the correction procedure:

- disposable paper stencils;
- mask forms that are attached to the face and allow you to simultaneously model both eyebrows;
- paper adhesive models - they are also disposable, but they are quite easy to glue and during the procedure you do not need to hold them with your hand, which makes them more convenient;
- transparent plastic options that need to be held with your hand;
- plastic forms that have a Velcro strap, which allows you to secure the product on your head and carry out the procedure without fear that the device may slip and ruin the result.
Print the actual size of the stencils
If you want to experiment with stencils, but don’t want to spend money on it, then you should pay attention to disposable paper forms. You can simply download them and print them on your own printer - they are also functional and easy to use, but do not require any costs.

How to use and draw eyebrows using a stencil
Stencils are a great tool for shaping perfect eyebrows. After you have purchased a set of stencils, you need to choose from the offered quantity exactly the one that would in the best possible way fits your eyebrow shape. To do this, you need to apply each one to the eyebrow one by one and compare it - it should match as much as possible with the length and curve of the natural one.

The next step is to fix the selected stencil (either just with your hand, or glue it, depending on what type of device was chosen) and draw a shape on it using dark shadows or any makeup pencil. After this, you can remove the stencil and everything that is not sketched can be safely plucked or trimmed. This method is suitable for shape correction.
In the event that a stencil is used as a means to simplify the process of applying makeup, you must do the same thing, but at the sketching stage, use either a specialized pencil or shadows, clearly drawing all the lines. At the end of the procedure, plastic molds need to be cleaned of cosmetics with milk or plain water, and paper and disposable adhesive ones should simply be thrown away.
Video: how to use stencils to correct eyebrow shape
Creating perfect eyebrows with a stencil is not a difficult task and you can always achieve the desired result, but only if you know exactly what needs to be done. This video tutorial provides useful and valuable information, thanks to which the process of using factory forms will not cause any difficulties.
How to make templates with your own hands
You can make stencils, both disposable and for repeated use, with your own hands, using simple materials at hand. You will need plain paper or a piece of transparent soft plastic (this could be material from a folder or some kind of packaging). Today it will be quite easy to find life-size images of stencils on the Internet, and all that remains is to simply download them. Then you can either print the form you like or simply redraw it from the screen. To do this, you need to put the selected material (paper or plastic) on the monitor and carefully redraw the shape with a pencil or felt-tip pen. It is best to find a picture of stencils with auxiliary lines, which will be useful for the correct placement of the “mold” on the eyebrow.
Paper stencils are useful only for one-time use, so it is better to make several of them at once, but one plastic stencil will be enough. You need to cut a hole in the paper along the resulting contour, but when working with plastic you will have to arm yourself with a sharp construction knife. After carefully cutting along the contour, the reusable stencil will be completely ready for use.
Stencil overview
In addition to those made by yourself, you can also use higher quality and more accurately formed professional templates. Usually their cost is not too high, and when purchasing such a product you can be sure that the forms are created in accordance with all the requirements and rules of eyebrow modeling. The only disadvantage of purchased devices is that it can take quite a lot of time to find the perfect shape, but if it is found, then the difficulties with plucking and drawing will never bother you again. We suggest you familiarize yourself with some brands that produce similar devices.
Avon / Avon eyebrow design creation
 The stencil set consists of four elements of different thicknesses and lengths. Transparent material allows you to position the desired number in the eyebrow area as evenly as possible and evaluate how well it fits. The forms are quite flexible, so working with them is quite convenient. It is worth noting that the proposed forms may not be suitable for everyone, but given the low price of the set, this situation will not be critical.
Set from Divage / Divage brow stencils
 The Divage set already offers five options for modeling the eyebrow shape. Each of the stencils has its own length and special bend; the manufacturer claims that every woman will be able to choose the right option for herself. The stencils are made of durable and flexible plastic that is completely transparent. For ease of use, special lines (A, B and C) are applied to each of them, which must be positioned according to the instructions - this will create the ideal eyebrow shape.
RiveGauche Professional
In the RiveGauche chain of stores you can find branded sets for comprehensive care behind the eyebrows, which contains: tweezers, shadows and eyebrow gel, as well as three stencils different shapes. Using this product, you can easily not only create the ideal shape and bend, but also achieve expressiveness, thickness and well-groomed eyebrows. The stencils are made from a classic material for this type of product - transparent thin plastic, thanks to its flexibility and softness it is very convenient to work with forms
Beautiful eyebrows are the dream of every girl. They emphasize the expressiveness of the look and add a bright accent to the appearance. And although it has always been difficult to give the eyebrows the desired shape, the advent of special stencils has greatly simplified this task.
How to choose a stencil
It is much easier to achieve the ideal shape and symmetry of your eyebrows by using special assistants: a special ruler and stencils.
Why do you need an eyebrow ruler?
SKETCH MAKE UP rulers are typically made from soft, flexible material. Thanks to this, they follow the relief of the face, so they are very convenient to use.
The ruler will greatly facilitate the process of eyebrow modeling
Unlike a regular stationery ruler, here the zero mark is located in the center of the product, and the centimeter values are indicated to the right and left of it. Transparent plastic allows you to see both the eyebrow arch itself and the scale. Thanks to this, it is much easier to measure the correct proportions and shape the eyebrows symmetrically - at least with an accuracy of a millimeter. But a stencil will help give them the specific desired shape.
Some rulers have bows for fixing on the bridge of the nose
Types of stencils
A stencil is usually a plastic blank with a cutout that has the outline of an eyebrow of a certain shape. There are several main types of such templates, each of which has its own pros and cons.
Simple single
The most common and budget option. It is a small piece of thin transparent plastic or silicone with an eyebrow-shaped cutout in the middle.
There is a stencil for any eyebrow shape
They can be used an unlimited number of times. However, they also have their drawbacks: the plastic templates have to be held with one hand all the time. This is not always convenient, and there is a risk that it may move a little while applying makeup.
Stencils based on adhesive paper do not have these disadvantages. However, they have their own: disposable use. And peeling them off from the delicate skin around the eyebrow can be a little painful.
Disposable stencils are securely fixed on the face
The best option is templates made of thin silicone: they fit tightly to the skin and hold quite well if slightly moistened with water, but they are more expensive than their plastic counterparts.
Stencils made of high-quality silicone will help create even eyebrows
It is also worth noting that when using single stencils, it can be quite difficult to draw the second eyebrow absolutely symmetrically to the first. But this trouble can be avoided if you first mark the main points using a cosmetic pencil and a SKETCH MAKE UP ruler, or at least a regular one. We'll look at this point in more detail a little later.
Stencil mask with a “nose”
The small plastic mask consists of two horizontal arms with cutouts for eyebrows and a vertical mount in the middle that allows you to fix the mask on your face.
A mask with a “nose” is more expensive than a simple single stencil, but it is also more convenient to use
For a more reliable fixation, you can additionally secure it to the bridge of your nose with a piece of adhesive tape. Some girls prefer to simply hold such a mask with one hand.
A stencil mask with two holder arms is fixed quite well on the bridge of the nose
This stencil allows you to quickly and symmetrically shape both eyebrows. However, it is worth remembering that the width of the face and the setting of the eyes can differ significantly between girls, therefore the distance between the eyebrows will be different. And in a mask it always has some specific meaning.
Some models do not have slits, and the side arches themselves act as a template for the eyebrows, which is especially convenient when plucking out excess hairs
Double with fixation at the back of the head
The most convenient option for use at home is a template in the form of a thin strip of transparent plastic with two eyebrow slots, which is securely fixed on the head with an elastic band or Velcro. The only thing worth paying attention to, as in the previous case, is whether the distance between the eyebrows on the stencil is right for you.
The stencil on the strap will become your favorite assistant in daily eyebrow care
How to use eyebrow stencils
First of all, choose the stencil that suits you best. In order to correctly position it on the eyebrow, find the main points that determine its shape. A cosmetic pencil and a regular ruler will help you with this:
Following the diagram, identifying the main points of the eyebrow is not difficult at all.
How to use a ruler
The eyebrow ruler is very convenient to use at home. Having made the necessary measurements and notes just once, you get a ready-made template for further use.
Now you can start correction, makeup or coloring. Using the resulting markings, you can correctly apply the stencil and make your eyebrows absolutely symmetrical.
A ruler helps to apply a symmetrical pattern to the eyebrow
Eyebrow plucking and correction using a stencil
Just a few simple steps and you will enjoy perfect eyebrows.
Do not correct your eyebrows with tweezers immediately before applying makeup or going outside: give the inflamed skin time to calm down, and only then start applying makeup.
After giving the desired shape, you can clearly see which hairs need to be removed
Eyebrow makeup
The algorithm of actions is approximately the same as for correction, but there are a number of features:
The stencil helps not only to correct the shape of the eyebrows, but also to apply makeup evenly
How to do makeup using a stencil - video
Eyebrow tinting
For eyebrow tinting it is better to use natural remedy- henna. You can purchase a ready-made mixture of a suitable shade, for example, Brow henna, or prepare the composition yourself from ordinary henna - just add basma or coffee, otherwise you risk getting bright red eyebrows. In the latter case, select desired color much more difficult.
After dyeing with henna, eyebrows look well-groomed and expressive
For the first few days, it is advisable to protect your eyebrows from any cleansers.
If for any reason you need to remove henna, use olive oil, lemon juice, hydrogen peroxide or alcohol lotion.
A step-by-step option for applying henna to the eyebrows, which allows you to make the base of the eyebrow lighter than the tip
How to dye your eyebrows with henna at home - video
Unfortunately, even eyebrows drawn according to a template do not always look perfect. In order not to be deceived in your expectations, consider individual characteristics your face, and also use the recommendations of makeup artists:
How to make stencils with your own hands at home
Making a stencil yourself is not difficult at all. Plus it won't take much time.
What you will need
To make an eyebrow stencil you will need:
If you want to make a double template with a convenient fastening at the back of the head, you will also need braid and Velcro or elastic, as well as thread and a needle to sew them to the plastic blank.
Choosing a template for the stencil
First, you need to measure your eyebrow using a ruler. Even better is to apply a piece of plastic or tracing paper to your eyebrow and trace the outline. This blank will help you choose a shape that is closest to your natural one.
10 Most Common Eyebrow Shapes
Applying it to the eyebrow templates, we select the most suitable option.
Kinked eyebrows come in many different shapes.
We scale the image to natural size. This can be done using the mouse wheel while holding down the Ctrl key. To more accurately resize a picture, save it to your hard drive and then open it in any image viewing program.
24 eyebrow stencils from the popular set
Now we apply the plastic we prepared first and trace the outline we like with a marker. Be careful not to damage the surface of the monitor.
You can trace the template you like using even regular thin paper
Then carefully cut out the stencil along the contour with nail scissors or a paper knife. If you use a knife, place a cutting board underneath to avoid scratching the furniture. We cut slowly, with smooth sawing movements. Make sure that the edge is clear, smooth, without protrusions or burrs.
Stencils are very convenient for forming a bend, which can be quite difficult to draw.
Making eyebrows symmetrical
If you decide to make a double stencil, then cut out another hole for the eyebrow. To make them symmetrical, first mark the main points (the beginning, the break and the end of the eyebrow, as well as the height), as described above. Then sew Velcro tape or elastic to the resulting strip of plastic with slots.
If there is no template of a suitable shape on sale, it is easy to make it yourself
If you are making a single leaf stencil, then to achieve eyebrow symmetry, do the following:
Don't draw your eyebrows with a solid line: the tip should be the darkest part and the base of the eyebrow should be the lightest part.
An example of making a stencil - video
How to make an eyebrow ruler
To make your own SKETCH MAKE UP ruler, cut out, for example, a strip of plastic about 4x20 cm from a transparent paper folder. Use a thin marker to mark “0” in the middle of it, and then mark divisions in cm on the right and left (from 0 to 9) .
When modeling eyebrows, you can also use a regular transparent ruler, although it is not as convenient as a flexible professional one.
You can also carefully apply a millimeter scale, but this is too time-consuming and troublesome. It is much easier to apply the main points of the eyebrow location to the resulting blank, and then symmetrically mark them on the other side of the zero, taking the measurements themselves with a regular ruler from the stationery store. A caliper is also suitable for the same purposes - it is more convenient to use, and the measurement results are more accurate.
The caliper allows you to measure eyebrow parameters especially accurately
Since ancient times, women's appearance has changed to suit fashion. Even such a part of the body as eyebrows, had its own canons of beauty.
Take, for example, the famous Mona Lisa. She has no eyebrows at all. In those days, it was considered beautiful to shave them off.
The classics have descriptions of thick sable eyebrows. But we will not rush to extremes and focus on the fact that Nowadays, the fashion for well-groomed eyebrows.
Finding your own master who will make them not only beautiful, but also even, is sometimes an impossible task even in a metropolis.
Women will always find a way out of seemingly insurmountable obstacles.
If you don’t have eyebrows, we’ll draw them in; if you have too many, we’ll pluck them.
And in order for the eyebrows to always be perfectly even and make us happy, it has long been invented assistant in the difficult struggle for beauty– eyebrow stencil.
Manufacturers make clever marketing moves to increase sales. One of them is a set. They come with different templates, usually six pieces. Or components from brushes, combs, gel and other things are added to the stencil you need.
Agree, you don’t want to overpay for things you won’t use.
Is it possible to do it at home?
If you don’t have the opportunity to buy a ready-made stencil, don’t despair. It can be made at home. After all, this just a piece of plastic with a slot.
It is clear that when manufactured in production, it will be smooth and without jagged edges. But even at home you can make a stencil carefully if you follow these tips.
You can learn how to use eyebrow gel correctly from our guide.
Instructions for making a template

How to make your own eyebrow stencil? First, select the softest piece of plastic the right size available in your home.
Let it be transparent lid from cottage cheese or yogurt.
Sold in stationery stores folders for files. They have a colored back side, and in front, what we need, is a large transparent sheet in A 4 format.
If you can't do everything the first time, it's enough to more experiments. It is soft enough to cut with scissors. But suddenly, all the stores are already closed, and you urgently need a stencil; any transparent piece of plastic will come in handy.
Secondly, stationery knife, which we will use to cut the hole. And thirdly, the manufacturing process itself:
- 1st method. If you have a printer, great. Print out the template you like in the desired size and apply it to the plastic. Carefully cut out. Congratulations on your new look!
- 2nd method. For those who don't have a printer. Don't despair. We go to the mirror, apply a piece of plastic to the eyebrow and redraw it with a marker. This is necessary in order to know what kind of eyebrows you have - size and shape.

If you are satisfied with the result, redraw the template.
Now let's take stationery knife. Be careful here!
Punch a hole not on the outline of the template, but in the middle of the piece that will be thrown away.
We begin to carefully cut along the contour using sawing movements. If your hand trembles and there are jagged edges, file it carefully with a nail file.
Important tip from the editor
If you want to improve the condition of your skin, special attention It’s worth paying attention to the creams you use. A frightening figure - 97% of creams from well-known brands contain substances that poison our body. The main components due to which all the troubles on the labels are designated as methylparaben, propylparaben, ethylparaben, E214-E219. Parabens have a negative effect on the skin and can also cause hormonal imbalance. But the worst thing is that this nasty stuff gets into the liver, heart, lungs, accumulates in organs and can cause cancer. We advise you not to use products that contain these substances. Recently, experts from our editorial team conducted an analysis of natural creams, where the first place was taken by products from Mulsan Сosmetic, a leader in the production of completely natural cosmetics. All products are manufactured under strict quality control and certification systems. We recommend visiting the official online store mulsan.ru. If you doubt the naturalness of your cosmetics, check the expiration date; it should not exceed one year of storage.
How to use it correctly?
The stencil can be used in different ways. If you did it on one eyebrow, just apply it different sides . When the eyebrows are larger than the desired size, fill in the free space with any shadows or pencil. Everything else should be mercilessly plucked or shaved.
When the situation is exactly the opposite and eyebrows less template, they will help too. IN in this case You can draw any you like.
The good thing about making a stencil at home is that you can try it different types. Temple to temple strip option will help you adjust your eyebrows at the same height.
The only inconvenience in using it is that you have to hold it with your hands. To make you as comfortable as possible, do mask stencil. To do this, make holes at the ends of the strip and secure with an elastic band.
The fit will be tight, and the process of eyebrow adjustment will be more comfortable. After all, both your hands are free.
Why do you need eyebrow wax? find out right now.

The main mistake when using an eyebrow stencil is incorrect form template.
Consult a cosmetologist, he will tell you the right option.
Even though wide natural eyebrows are in fashion now, there are girls who It's better to leave it thin to make the face look more harmonious.
Possible different options use stencils - to touch up makeup, to correct eyebrows, or tattoo or coloring. The last procedures are best carried out in the salon by a qualified specialist.
As we have already discussed above, different stencil options are possible. If you have a strip that covers the area with the eyebrows from temple to temple, with the proper skill you can hold it with your hands.
It is better to secure it with adhesive tape for better fixation.
A stencil in the shape of a mask covering the area of the eyebrows and nose. Thanks to its shape, it goes around the nose, thanks to which the mask is fixed on the face. You have both hands free. This model better to buy in store.
Option of a mask with a Velcro or elastic fastener at the back of the head, the most optimal. But it is only possible for girls with perfectly symmetrical eyebrows. If there is even the slightest asymmetry, you will have to tinker with the design, adapting it to your needs.

In conclusion I want to say, keep it natural when applying makeup to the eyebrows. It is not necessary to draw them with a pencil, shadows are enough. Don't overdo it!
After all, you don't want to look comical. Suppose you forgot to apply makeup on your eyelashes or lips, did not apply foundation, but eyebrows should always be perfect. After all, they serve as a frame for your young, perky look.
You can learn how to make an eyebrow stencil with your own hands from the video:
You can do makeup of any complexity and draw perfect arrows of unimaginable shape, but when it comes to eyebrows, you turn into a little girl with her mother's cosmetics in her hands on her face. The clarity of the lines is treacherously lame, and the boundaries of the pencil have long gone beyond the limits of the natural form. Stop putting up with this! It's time to try an eyebrow stencil! In addition, you can make it yourself using available materials. The time spent on its creation is fully compensated by the opportunity to sleep longer in the morning.
Praise be to whoever thought of making a hole in a plastic rectangle that follows the shape and curve of an eyebrow. It is this simple device that is called a stencil. It is enough to apply it to the eyebrows to correct their appearance, remove unnecessary hairs or draw on the necessary ones.
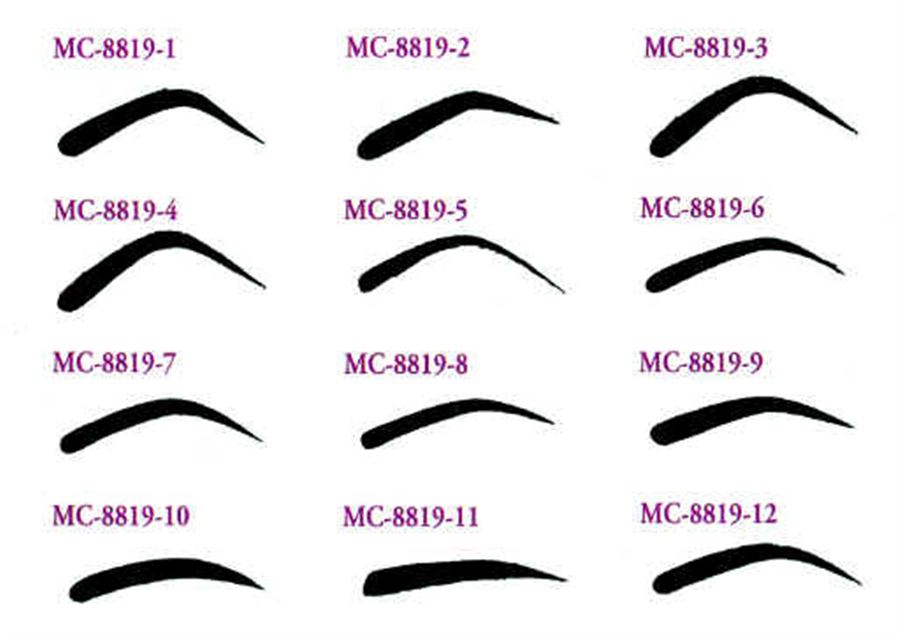
Distinguished by shape
There are many templates from which a stencil is made. They differ in the length, width and curvature of the slot. This was done so that any girl could choose the right option for herself.


Usually the stencil contains a marking consisting of a number and a letter, for example “C 5”. It allows you to understand where the eyebrow should begin and end, and where its highest point will be located.
If these numbers don’t mean anything to you, and in general all these stencils seem to look the same, then try them on yourself. This way you will clearly understand what suits you and what shape will look most natural.


We distinguish by type of fastening
You will be faced with another question while choosing a suitable stencil - how should it be attached?
There are 4 options:
- Disposable paper template with adhesive tape. It is convenient primarily because it leaves your hands free. It is enough to try on its location, tear off the protective strip and glue it around the eyebrows. Even if you accidentally miss and draw too much, it won’t go beyond the stencil.
- A mask template or, as it is also called, a pattern. It has a T-shape with slits for both eyebrows. You will have to constantly hold the tip with one hand and draw the eyebrows with the other. But they will definitely turn out symmetrical.
- Transparent plastic stencil. Presented in the form of a small piece of plastic with a slot imitating the shape of an eyebrow. The downside is that you have to constantly hold it with your hand, and there is a risk of breaking the symmetry.
- Plastic forms with Velcro or tape. The easiest stencil to use. Apply it to your eyebrows and secure it to the back of your head with tape or Velcro. The shape fits securely on the head, so your hands are free and your eyebrows are the same.
Making a template with your own hands
The average price for such stencils ranges from 200 to 400 rubles. Why spend so much money when you can do the same thing yourself? It won't turn out any worse.
Step 1. Selecting tools
To create a template you will need:
- plastic folder for papers
- knife or scissors
- marker
- stencil
- sewing kit
- ribbon
You can use any plastic product. Remember that it should be as soft as possible so as not to scratch the skin.
Step 2. Prepare the stencil base
Cut a ribbon from a plastic folder, approximately 3 cm wide and 20 cm long. This will become the basis for the stencil.


Place it on your forehead and mark three points: the middle of the tape and the beginning of your eyebrows.
Next, draw a vertical line defining the highest point of the eyebrow bend.
This blank will help you navigate the further selection of templates.
Step 3. Create a template
You can find many options for eyebrow shapes on the Internet. If you have already decided which one is right for you, then use it as a stencil. If not, print out the ones you prefer and try them on one by one. Then choose the most suitable option as your future template.


To determine where the arch of your eyebrow should be, take a pen and place one end of it on the side of your nose. The other end should pass through the center of the pupil and end just at the highest point.


It is not necessary to print the stencil. Just select the picture you like, enlarge it to the desired size and redraw it by attaching the sheet to the monitor. This way you can quickly adjust the scale and, if necessary, correct the shape.
Step 4. Transfer the drawing to the plastic
Once you have chosen a suitable design, feel free to cut it out and apply it to the plastic tape.
Do you remember those marks that we made at the very beginning? Use them as a guide to position the template correctly. If the drawing goes beyond the boundaries of the intended points, it is better to correct it immediately. You don’t want to get the sweeping wings of an eagle or a fat caterpillar instead of neat eyebrows?
Once the stencil matches the natural contours of the eyebrows, transfer it to the plastic using a marker.


Step 5. Cut out the stencil
Arm yourself with a stationery knife to accurately repeat the template design. Run the tip several times along the edges of the intended stencil until the middle falls off on its own. This will make your work easier and reduce the risk of unnecessary burrs.
If you don't like a knife, use scissors. They should be slightly warmed up so that they slide on the plastic. First, make a small hole in the middle of the template, and then start making slits along the contour from there.


Step 6. Sew on the ribbon
If you want your hands to always remain free and your eyebrows to be perfectly symmetrical, then sew on additional ribbons to secure the template on your head.
Make 2 slits along the edges and insert ribbons into them, securing them with a knot at the base. Or use a needle and thread to sew them to the plastic.
The entire process of creating a template is clearly shown in the video:
Alternative stencil option
If creating a plastic template seemed too tedious to you, then use an alternative, simpler version.
Print a ready-made template from the Internet that matches the natural contours of your eyebrows, and cut it out along the contour.
It’s better to make several copies of the stencil at once, so as not to waste time on preparation in the future.
Your homemade template is ready! Try it on and actively use it.