A button is an essential element of most knitted items. A beautiful designer button will do anything knitted product unique. Buttons for knitted items can be made from fabric, but the most suitable ones are crocheted. It's easy to make yourself. In our master class we will tell you in detail and show you how to make several DIY buttons- from the simplest to the more complex.
Simple round button
To make a round button you need yarn, a hook and a bead. 
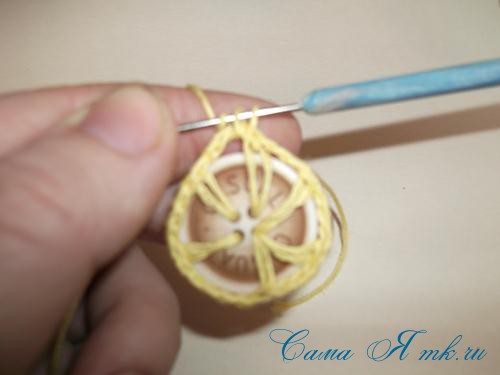
We dial 5 v.p.  close the knitting into a ring, tie it with single crochets.
  The first row consists of 14 tbsp. b/n.
  Before knitting the second row, cast on 2 vp. rise. We knit the second row on top of the first with single crochets, pulling the working thread through the ring.
  The second row consists of 24 st. s/n.
  Close the last loop and leave the thread for sewing on the bead.
  Pull the needle in and sew the bead into the middle of the button.
  The button is ready.
This button looks neat on any product, is suitable as an additional decor, and is used to hide rivets and hooks. The button will gain more volume if you tie the third row over the second row with double crochets.
Two-tone button
For making knitted buttons It is customary to use plastic rings, but they can be replaced by repeatedly winding yarn around your finger.  Fix the ring of thread with single crochets.
  They must be placed tightly for additional rigidity.
 We tie the resulting ring of loops with single crochets. Attach a thread of the second color.
  We knit the second row in a different color.
 We close the last loop and make membranes using a needle.
 We fix the resulting stitches with thread, wrapping it from bottom to top.
 The membranes will turn out neat and symmetrical if you constantly adjust the thread tension.
  The button is ready. It is functional and looks like a regular button.
On the basis of such a blank, buttons are made in the shape of flowers and geometric shapes. To make the button larger, knit an additional number of rows in a circle.
Square button with beads
We string the beads onto the thread and remove them higher along the thread, they will be needed later. We dial 4 v.p.,  close it in a ring. 1st row: 2 b/n columns, 2 vp.
 We knit the report 4 times. We get the sides of the square from the columns and the angles from air loops.
  For the second row, cast on 1 ch, knit the sides of the square with single crochets, knit the corners of the square according to the pattern: 1 dc + 2 ch. + 1 tbsp. b/n.
 The number of rows may increase depending on the required size. We tie the last row like the second, adding beads. When knitting with beads, we knit on the wrong side so that the beads are located on the outside of the square.
 We cut the working thread and attach the bead.
  For additional rigidity, we knit a similar square and sew it to the first one.

We fasten the button using a needle. We stretch three identical stitches and sew them with a needle, wrapping the thread tightly around the stitches from one edge to the other. 


To make such a button, you must use cotton yarn. This product comes out dense and does not require additional base.

An original button will update any item. Knitted buttons are decorated with beads and beads. Crochet buttons are a bright addition to any knitted item.
We hope everything worked out for you.
Share your result with us and leave comments.
Sometimes it is very difficult to choose buttons of the required shape, structure and color for a specific item. After all, this one is small, but enough important detail, at making the right choice will give clothes special expressiveness and originality.
Initially, buttons were used precisely as decorations. They were made from shells, stones and, of course, precious metals.
I would like to bring to your attention a master class on how you can make your own, using a hook and a standard button. openwork knitted buttons.
For work we will need:
- any H.B. threads as in the photo or “Iris” type (color to your liking),
- hook No. 1 (thin so that it fits into the button holes),
- buttons with 4 holes of different sizes and colors.
The wiring diagram is shown in the photo.

I apologize for the photo, I sketched it schematically.
Step 1: Tying a button with air loops.
We start by inserting the hook into one of the holes of the button and grabbing the thread, pulling the loop to the front side.

Grab the thread that is on your finger and pull it through the loop.

Now we knit air loops. Enough so that they are enough to reach the next hole and they lie flat (about 3 to 5 loops, depending on the size of the button).

Having reached the next hole, we insert the hook again and pull out the loop, grab the thread on your finger and pull it through the loop and air loop.


From one of the holes we pull out three or two loops with air loops between them, as shown in the photo.

At the end of the row, we tie everything into one using a connecting post into the first air loop.
Step 2: Knit the leaves of the flower.
We start with a single crochet, placing the hook under the arch of air loops.


So we knit in a circle.

At the end we join the knitting into one, using a connecting stitch, into the first single crochet.

We thread a thread into the resulting loop and pull it out, as in the photo. We cut it, but not very short, tighten it and tuck it in on the wrong side so that it is not visible.
Take another contrasting thread. We stick the hook into the place where our work begins and joins and pull out the loop.


At the end of the row we again connect everything into a single canvas. Pull the thread into a loop, cut and tighten. We hide all the threads on the wrong side.

With smaller buttons we do the same thing, only there will be not 6 petals, but 5. And in the pattern of tying the air arches we remove 1 double crochet stitch.
Some buttons do not need to be trimmed with contrasting thread.

Such buttons can also serve as independent decorations for your wardrobe.
Happy creativity!
You can tie any buttons, but round, inexpensive plastic buttons “on a stem” are most suitable for this; they are more convenient to sew on.
Choose a hook for tying buttons one size smaller. You need to knit very tightly so that the plastic button does not show through the fabric. For tying, choose buttons made of transparent plastic or buttons similar in color to the color of the threads.
Most buttons are knitted with single crochets, and you can use both the front and back sides of the knitting. When tying large buttons, you can start with double crochets and then move on to single crochets.
1 way
Start with a small ring of chain stitches (or a ring of threads) tied with single crochets. Next, knit in a circle, adding loops to increase the diameter of the knitted circle.
When the diameter of the knitted circle is slightly smaller than the diameter of the button, knit several rows without adding. Place the plastic button inside knitted cover, then knit, making uniform decreases, knitting one of two stitches. Cut the thread, leaving an end about 40 cm long.
Gather the loops of the last circular row onto the thread using a needle and pull it tightly without cutting the end of the thread; later you can use it to sew on a button.
2nd method
Tie a ring of several turns of thread or air loops several times with single crochets, each time inserting the hook into the center of the hole and thus increasing the size of the stitch in each row. For finishing, you can tie a finished buttonlobster step.


To make a crochet button you will need:

1 . This model looks dazzling when made from ready-made melange thread. However, you can crochet buttons using two or more colors of thread. To weave, fix the threads with a knot and wrap the ring tightly in two layers. After this, we stretch the threads to the other side of the ring, making four or five turns in a similar way.

2. In the same way, but perpendicular to the previous ones, we stretch four or five new turns. We got intersecting stripes. Now we tighten our turns in the middle with threads, pulling them out with a crochet hook. We carry out this operation in four places, as in the photo. In order to secure our thread onto the buttons with a crochet hook, we insert a hook from the underside... ... and secure our thread with a knot. We hide the tip of the thread with a hook between the other threads.


This is such a stylish button! We continue to do as much as we need.

Many of the buttons that we accumulate when we cut them off old things are ordinary and ugly. We can use them for binding to create crochet jewelry buttons.

1. We knit the cutest and most delicate round motif.

2 . We put it on a regular button and knit another row, reducing the number of our loops as we knit. Using a needle we tighten our knitting to the middle.


Crochet buttons: photo tutorial
Original knitted buttons can become the highlight of your outfit.
In this tutorial you will learn how to crochet buttons with different patterns.
In fact, making your own buttons using a crochet hook and yarn is super easy, and you can always freshen up your favorite outfit with these DIY buttons.
Difficulty level: for beginners.
Necessary materials - cotton yarn, hook, scissors, embroidery needle.
Production time - 10 minutes.
Here is a guide to making crocheted buttons. After studying it, you can easily make cute and convenient buttons for your things.

The following terms are used in this tutorial: chain stitch (CH), double crochet stitch (2H), and magic ring.
To crochet buttons you will need:
- yarn of two colors - main and contrasting;
- a crochet hook that matches the number of your yarn (in this master class, hook No. 4 was used);
- embroidery needle to join the ends;
- scissors.
Crochet decorative buttons: step-by-step description
After you have prepared everything necessary materials, you can start making crocheted buttons. Photos posted under the description of each stage will help you better navigate the master class.

Step 1 - Making a magic ring. Using a thread of the main color, make a magic ring and secure the thread.

Step 2 - Knit a button. Make 2 chain stitches and then knit 11 double crochet stitches around the magic ring. Knit tightly, forming a circle. You now have 12 loops. Actually, your button is already half ready.

Step 3 - Connect the ends using a needle. Cut the thread and pull it into a loop on the hook. Thread this thread through the needle.

Complete the round by passing the tip of the needle through the top of your first double crochet stitch (that is, into the second stitch, not the first one), and then thread the needle back through the last stitch.

This will create an extra decorative stitch and your button will look neater.

Step 4 - Decorate the button. Now you can use contrasting thread to decorate your project. To create a contrasting border, take yarn of a different color, insert the hook between the button posts and pull a loop between them.

Insert your hook between adjacent two double crochet stitches, pull up a new loop and chain. Continue knitting counterclockwise until you reach the last stitch.

Cut the thread, tighten it in the last loop and pass the end of the thread through the needle. Pass the needle under both strands of the first loop and then inside the last loop. Tighten the thread and cut it.

Your button is ready!
To decorate your button with radiating rays, take a small piece of contrasting yarn (about 30 cm in length). Thread the needle. First, pass the needle between two double crochets, then into the center of the button.

Do several such manipulations until you get a “star” pattern.
Step 5 - Turn your buttons over and sew them on - that's it! All you have to do is sew your products to the clothes.

Use your imagination. Now that you know how to crochet a button, you can create a stunning addition to your outfit.
Use different combinations of yarn colors - and your outfits will always be original.
You can tie any buttons, but round, inexpensive plastic buttons “on a stem” are most suitable for this; they are more convenient to sew on.
Choose a hook for tying buttons one size smaller. You need to knit very tightly so that the plastic button does not show through the fabric. For tying, choose buttons made of transparent plastic or buttons similar in color to the color of the threads.
Most buttons are knitted with single crochets, and you can use both the front and back sides of the knitting. When tying large buttons, you can start with double crochets and then move on to single crochets.
1 way
Start with a small ring of chain stitches (or a ring of threads) tied with single crochets. Next, knit in a circle, adding loops to increase the diameter of the knitted circle.
When the diameter of the knitted circle is slightly smaller than the diameter of the button, knit several rows without adding. Place the plastic button inside the knitted cover, then knit, making even decreases, knitting one out of two stitches. Cut the thread, leaving an end about 40 cm long.
Gather the loops of the last circular row onto the thread using a needle and pull it tightly without cutting the end of the thread; later you can use it to sew on a button.
2nd method
Tie a ring of several turns of thread or air loops several times with single crochets, each time inserting the hook into the center of the hole and thus increasing the size of the stitch in each row. For finishing, you can tie a finished buttonlobster step.
To make a crochet button you will need:
1 . This model looks dazzling when made from ready-made melange thread. However, you can crochet buttons using two or more colors of thread. To weave, fix the threads with a knot and wrap the ring tightly in two layers. After this, we stretch the threads to the other side of the ring, making four or five turns in a similar way.
2. In the same way, but perpendicular to the previous ones, we stretch four or five new turns. We got intersecting stripes. Now we tighten our turns in the middle with threads, pulling them out with a crochet hook. We carry out this operation in four places, as in the photo. In order to secure our thread onto the buttons with a crochet hook, we insert a hook from the underside... ... and secure our thread with a knot. We hide the tip of the thread with a hook between the other threads.
This is such a stylish button! We continue to do as much as we need.
Many of the buttons that we accumulate when we cut them off old things are ordinary and ugly. We can use them for binding to create crochet jewelry buttons.
1. We knit the cutest and most delicate round motif.
2 . We put it on a regular button and knit another row, reducing the number of our loops as we knit. Using a needle we tighten our knitting to the middle.
Crochet buttons: photo tutorial
Original knitted buttons can become the highlight of your outfit.
In this tutorial you will learn how to crochet buttons with different patterns.
In fact, making your own buttons using a crochet hook and yarn is super easy, and you can always freshen up your favorite outfit with these DIY buttons.
Difficulty level: for beginners.
Necessary materials - cotton yarn, hook, scissors, embroidery needle.
Production time - 10 minutes.
Here is a guide to making crocheted buttons. After studying it, you can easily make cute and convenient buttons for your things.
The following terms are used in this tutorial: chain stitch (CH), double crochet stitch (2H), and magic ring.
To crochet buttons you will need:
- yarn of two colors - main and contrasting;
- a crochet hook that matches the number of your yarn (in this master class, hook No. 4 was used);
- embroidery needle to join the ends;
- scissors.
Crochet decorative buttons: step-by-step description
Once you have prepared all the necessary materials, you can begin making crocheted buttons. Photos posted under the description of each stage will help you better navigate the master class.
Step 1 - Making a magic ring. Using a thread of the main color, make a magic ring and secure the thread.
Step 2 - Knit a button. Make 2 chain stitches and then knit 11 double crochet stitches around the magic ring. Knit tightly, forming a circle. You now have 12 loops. Actually, your button is already half ready.
Step 3 - Connect the ends using a needle. Cut the thread and pull it into a loop on the hook. Thread this thread through the needle.
Complete the round by passing the tip of the needle through the top of your first double crochet stitch (that is, into the second stitch, not the first one), and then thread the needle back through the last stitch.
This will create an extra decorative stitch and your button will look neater.
Step 4 - Decorate the button. Now you can use contrasting thread to decorate your project. To create a contrasting border, take yarn of a different color, insert the hook between the button posts and pull a loop between them.
Insert your hook between adjacent two double crochet stitches, pull up a new loop and chain. Continue knitting counterclockwise until you reach the last stitch.
Cut the thread, tighten it in the last loop and pass the end of the thread through the needle. Pass the needle under both strands of the first loop and then inside the last loop. Tighten the thread and cut it.
Your button is ready!
To decorate your button with radiating rays, take a small piece of contrasting yarn (about 30 cm in length). Thread the needle. First, pass the needle between two double crochets, then into the center of the button.
Do several such manipulations until you get a “star” pattern.
Step 5 - Turn your buttons over and sew them on - that's it! All you have to do is sew your products to the clothes.
Use your imagination. Now that you know how to crochet a button, you can create a stunning addition to your outfit.
Use different combinations of yarn colors - and your outfits will always be original.