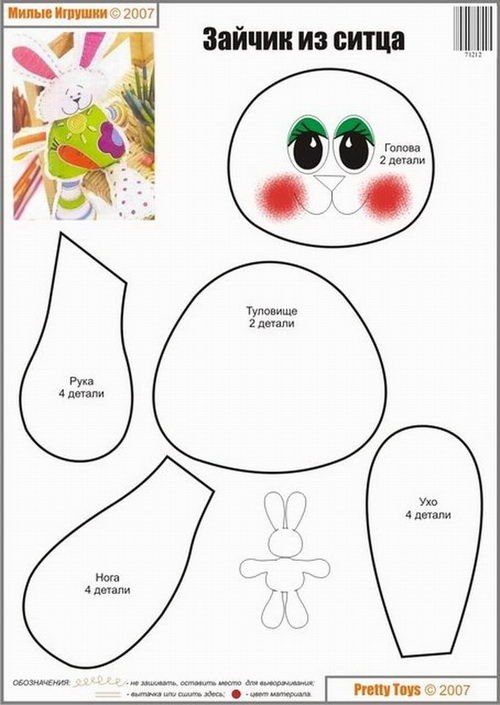
A very interesting frog toy made from cotton fabric, presented in this material. This is a fragment of the book "Animaux et personnages tout en tissu", thanks to which you can take a closer look at this cute frog. There is also a pattern for this wonderful toy. The book was not published in Russian, but I can confidently assume that the frog is made of cotton fabric and covered with acrylic fabric paints. So don’t be afraid to experiment and add another toy to your collection!
→
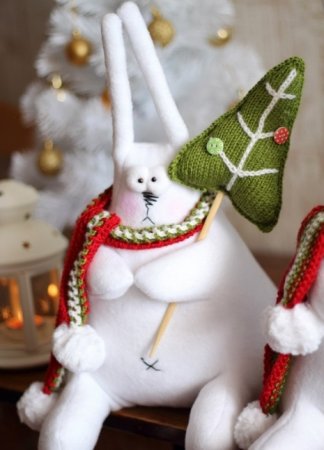
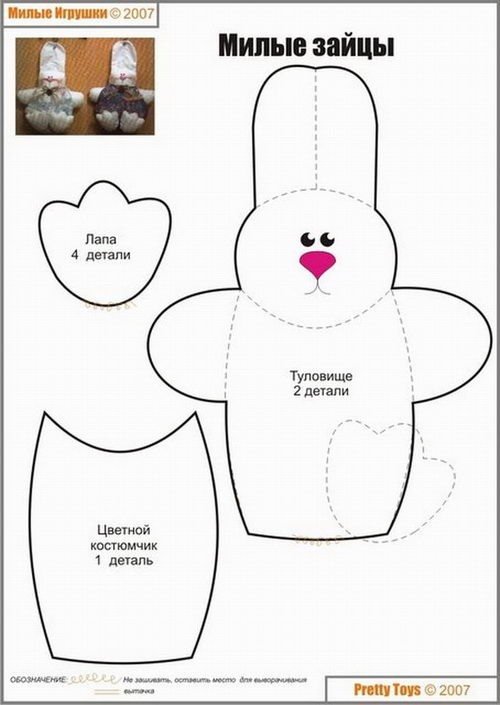
In this material we suggest that you familiarize yourself with an interesting interior textile toy - a sitting hare. Here is a pattern that can easily be used to create a similar toy. Let's add a minimum of accessories for any theme: New Year, March 8, February 23, Valentine's Day and other holidays, this toy will be an excellent souvenir for any celebration!
→

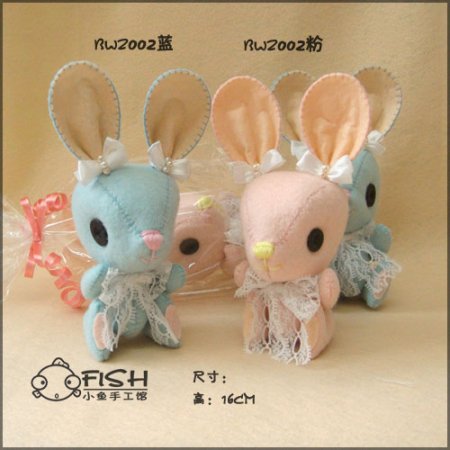
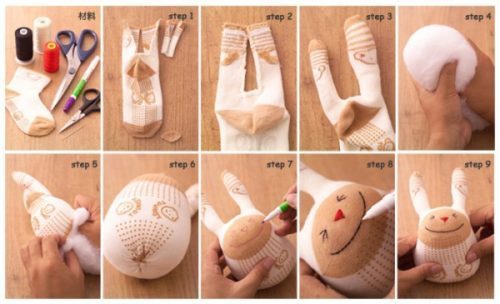
Look how cool the bunnies' ears are in a knot. Even if you started sewing recently, they will good choice. The photos below show the pattern and step-by-step instruction. Despite the Chinese (Japanese, Korean) language, in principle everything is accessible and understandable.
→
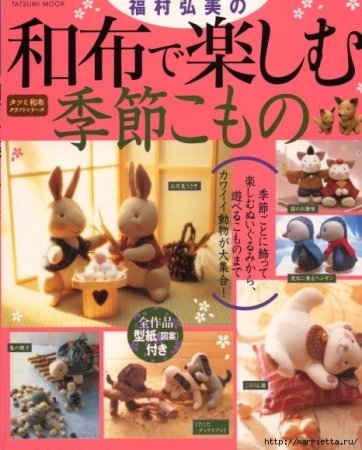
Toys made by your own hands are the highest value for your baby. They say that the products retain a piece of warmth and a charge of love from their creator. This means they will warm your children and give them joy. For craftswomen who love to sew children's toys, we invite you to get acquainted with this wonderful magazine.
→
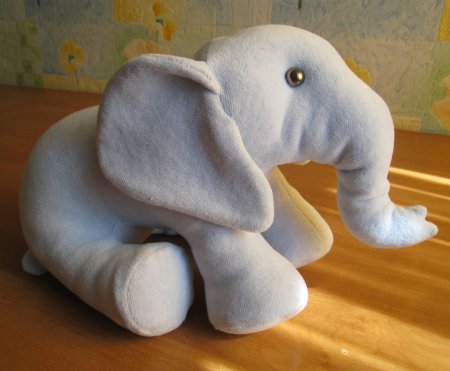
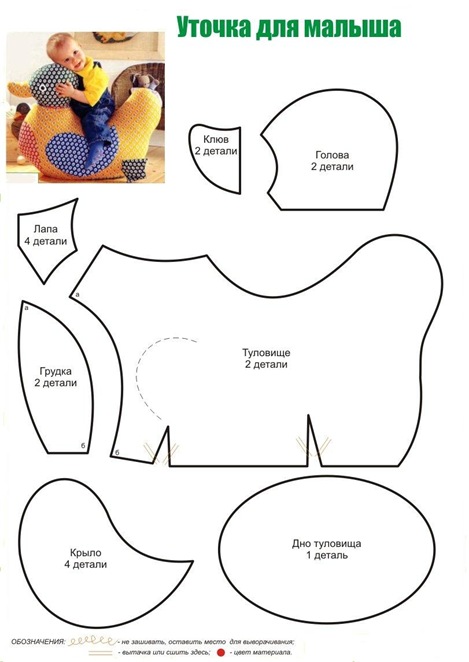
Having a soft, funny baby elephant is every child’s dream, and any needlewoman can make it come true.
We invite you to sew an elephant toy with your own hands. The pattern and instructions below will help you with this. Here you will find detailed description the entire manufacturing process, from the pattern to a description of each stage of work.
→
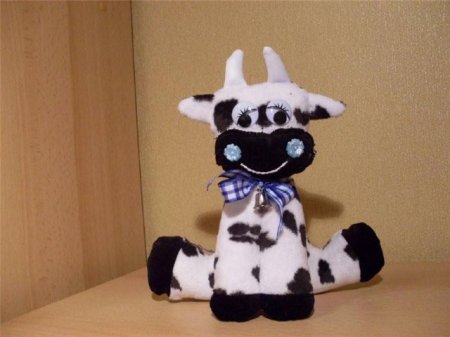
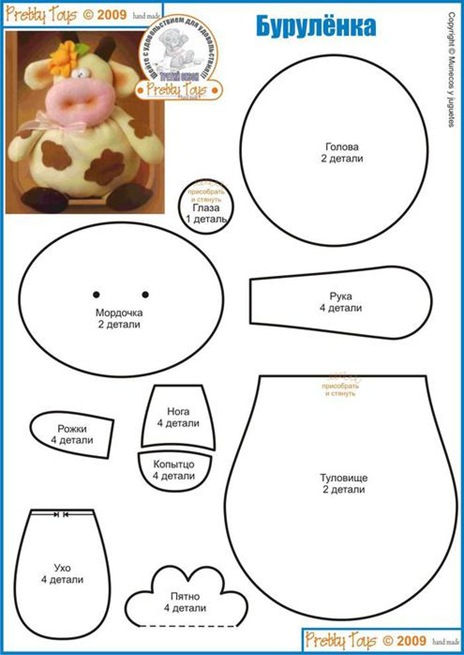
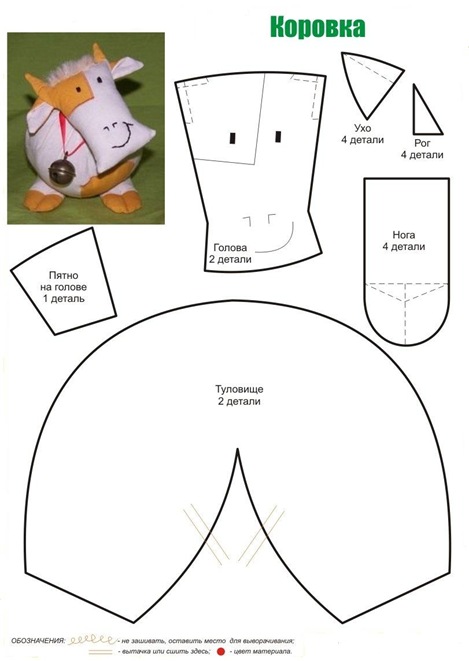
A cow sometimes symbolizes wealth, comfort, prosperity - an integral cozy attribute of any family home. Presented to MK - soft toy cow will show different variants its production: voluminous, flat, like an element of a picture, or - an interior stylish doll, a toy - with primitivism, or vice versa - will require a painstaking design solution. Using knowledge from previous MKs (modeling toy hair and hairstyles, sewing doll clothes and preparing amazing accessories), it is possible to create a toy unique, memorable image of an individual, “only yours” character.
→
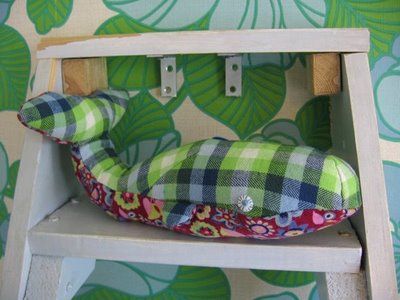
In the MK described below we will try to make an interesting whale pillow toy. My thought keeps repeating - this is a whale for a pleasant rest - you can put it on the sofa instead of a sofa cushion. The younger population will suggest using it instead of a “bat” in the “pillow war” (children will perceive this option more optimistically).
→
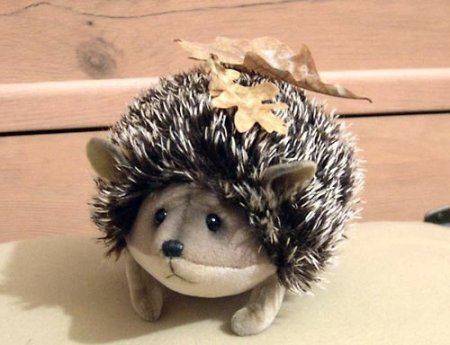
We are still very far away from autumn, but it is quite possible to plunge into this mysterious time, especially if you create the right mood for yourself. And it’s quite simple to make it with the help of an amazing forest dweller - a hedgehog. The master class below will tell you how to revive a cute thorn. A little time and thanks to your efforts a soft toy hedgehog will be born. Sewing pattern prickly hedgehog attached. And all that is required from the craftswoman is a little free time and preferably a positive attitude. As a result, a wonderful companion and dear guest of your home will appear. Good luck to everyone and enjoy your work!
→
The symbol of the coming 2013 is a snake, but no one forbade anyone from sewing calendar creatures in advance. Therefore, if you like a cute little dragon, don’t wait for his time to come and desired year, give him life immediately, right now. And at the end of the long work, you will see how easily the soft dragon toy comes to life before your eyes. The pattern is shown below. With the help of this small master class, you can quickly sew an amazing toy that will become an amazing gift or will remain yours forever, and will delight its owners every day.
→

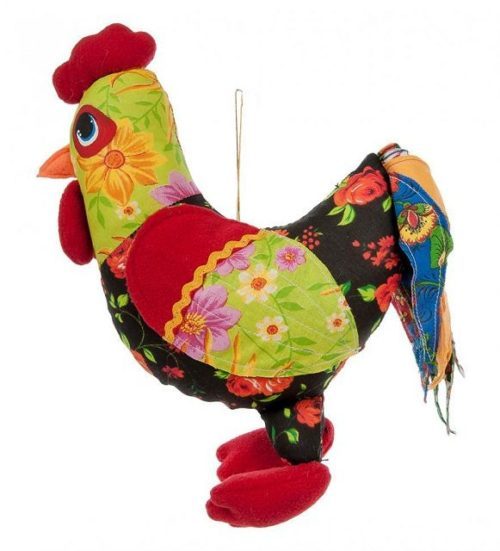
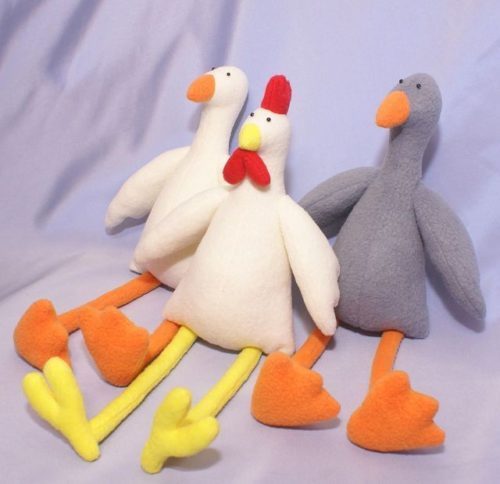
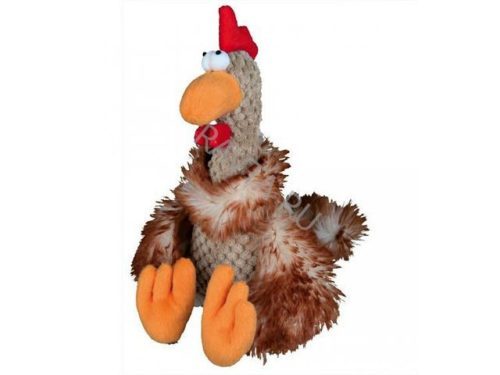
Remember darling nursery rhyme“In the morning the hearing disturbs you,” no? Well, then the clue is a poem about the early bird that will have everyone. They guessed, of course, it was a cockerel! Would you like such a bird to live, for example, on your windowsill or on the nightstand by your bed? Yes, well then arm yourself necessary tools, the necessary material and start handicrafts. There is just a tiny “but”. The bird will not get you out of bed with its loud cry, although this, of course, is more like a plus than a minus.
If you are already overwhelmed with desire, then look at the future result. Well, do you like it? This soft rooster toy can become your neighbor. The pattern is presented below.
→

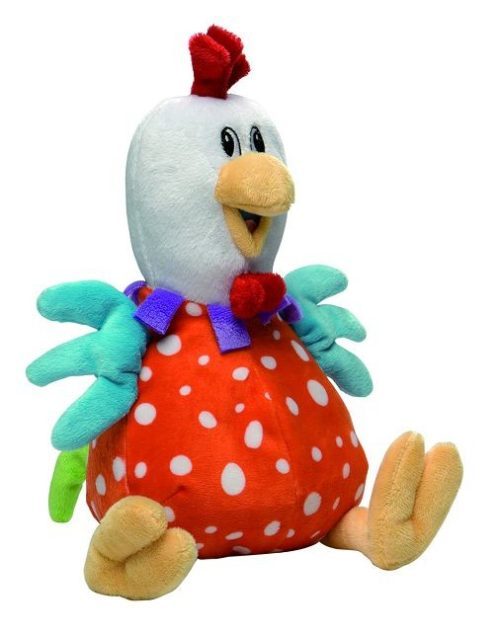
If you are looking for a master class on making a soft toy, then you are on the right track. Take a closer look, it’s a soft chicken toy. The pattern is attached and it is completely simple. Even a beginner in handmade crafts will enjoy the work, but experienced craftswomen will generally do it with their eyes closed. If you decide to give such a toy small child, then she will definitely suit his “taste”. Yes, and an adult will like it. This soft toy can be used for a variety of purposes. It will be a wonderful souvenir, and the new owner will certainly find a use for it. Give life to another cute bird, and you won’t regret it!
→
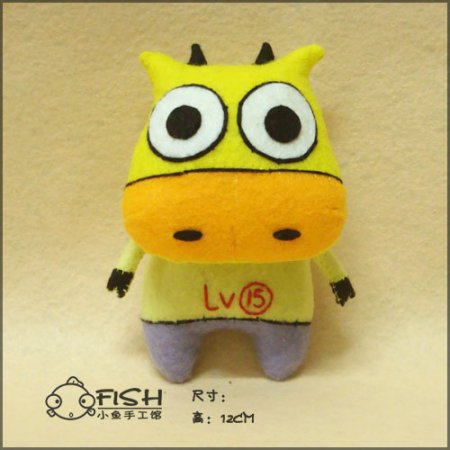
The presented master class describes in detail how to sew a bull - a textile soft toy. Although it can hardly be called a bull, most likely it is a surprised and funny bull, which with its appearance can amuse not only a child, but also an adult. Especially if such a toy is sewn with your own hands. Be sure to make it, because even the very process of making this bull helps to receive positive emotions, which are so lacking in our hectic and everyday life. In this article, to make it easier to work on the toy, you can find a pattern of all the necessary parts. So, let's get to work!
→
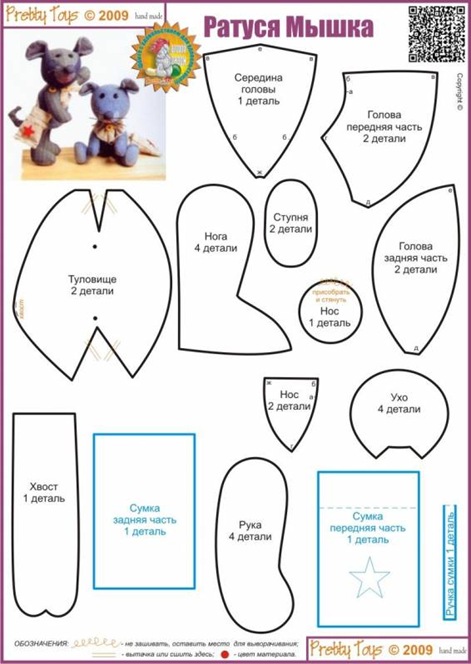
This small mouse - a textile soft toy is quite suitable as a gift for a newborn child, who, gradually growing up, will first simply hold it in his hands, and then play with it. Such mice can also become a small souvenir for an adult company, in which everyone will gladly accept a hand-made gift. If you decide to sew these mice yourself, pay attention to the given master class, which will help you sew this toy with its advice. There is also a pattern here that makes the work clearer and easier. Get down to business and good luck to you in your endeavors!
→

You cannot buy such a bright and funny toy as the soft parrot toy presented in this master class in a store. It can be done with my own hands what can you use it for? detailed instructions given in the article. Take some free time and give yourself pleasure while working on making this toy. To make it easier to work on the parrot, the master class presents a pattern of all the necessary parts of the toy. Pay attention to the brightness of the colors that are needed for this work. Such a soft parrot will also be appreciated by children, who will happily play with a toy sewn by their mother’s hands.
→
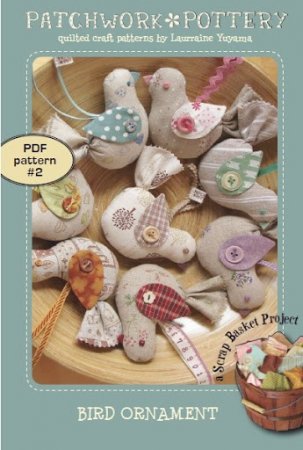
Options where you can use these Stuffed Toys birds, quite a lot. They can become an original decoration for the New Year tree, funny toys for your baby, or interesting souvenirs for your guests. To make such birds, you just need to stock up on free time and patience. For the rest, the presented master class will help you with your work, which will tell you in detail about all stages of the work. There is also a pattern here that will help the work go faster. You don’t have to think long about whether to start work or not, because making soft toys will only bring you pleasure. So, let's get to work!
Every mother knows that her child should have his own soft friends - toys. Child psychologists also insist on this: a child who is three years old should have at his disposal toys made of various materials that he can “explore” and “feel” while playing. Today, the range of toys for children presented in stores and on the market makes it possible to choose toys to suit your taste and budget - from traditional teddy bears to heroes of modern animated films. However, a toy sewn by mother’s hands will be especially warm and unique. And older children can even be enticed to participate in this exciting undertaking. Initial data, namely patterns of soft toys with your own hands, can be found in any magazine on needlework; an abundance of such information is located today on the Internet. As a last resort, you can “open up” an old shabby bear and see with your own eyes what was done and how to get the finished toy.
If you decide to act independently from start to finish, then your own design principles and imagination will be embodied in your toy. Having bought ready set To make toys in a store, you will have to strictly and strictly follow the attached instructions. We still advise you to remain independent and be creative to the fullest. Be sure to involve children in the activity, but do not forget about their safety: keep them away from needles, scissors and sewing machines without supervision.
Joint needlework is very useful for children, because it disciplines well, promotes the development of motor skills, trains attention and cultivates perseverance. Try to also encourage your dad to do this activity, because working together is a great way to unite the family. And besides, who, if not dad, can handle wire and pliers better than others?
The process of creating a soft toy includes several stages, such as selecting materials and preparing them for processing (washing, steaming), cutting the parts together, basting, final stitching, stuffing and design of the final appearance of the toy.
Do-it-yourself soft toy patterns are best made from hard materials, such as cardboard, since they are more convenient to work with (they fit tighter and are easier to trace) and are durable than, for example, patterns made from tracing paper. The resulting pattern should be attached to the wrong side of the material and traced with a pen if the fabric is dark, or with a white pencil if it is light. Avoid using chalk as it may distort the dimensions of the parts.
Neat toys made with one’s own hands conceal a special thrill and warmth from the person who put his soul into them. Therefore, if you want to give your child joy and a piece of your warmth even in your absence, make handmade gifts for your children.

It is no longer so easy to surprise a modern person with the sophistication and uniqueness of a soft toy, because the market is oversaturated with a wide variety of goods for every taste and age. True, the quality of market toys is not always able to satisfy the buyer and leaves much to be desired. For this reason, handmade toys are becoming increasingly valuable.
The effort, labor and time required for manual work put into a product cannot be compared with the value of a purchased finished toy, even if it costs a lot of money. This kind of handicraft has a lot of advantages: handmade gives you the opportunity to relax after the everyday routine, express your creative self and do everything according to your taste and desire.
This article will help you understand various options sewing the simplest soft toys with your own hands, the quality and appearance of which can maximally satisfy even the most demanding toy connoisseurs.
How to sew a toy with your own hands?
In order to sew a toy you will not need a lot of materials and all the blanks can be bought in a specialized store. If you have at least some of the necessary materials and sewing experience, you can improvise, use your imagination and adapt the toy to the available materials.
Materials needed to make toys
Fabric for a toy. Can be used different kinds fabrics, focusing on the purpose and personal preferences. In most cases, needlewomen choose:
- cotton
- knitwear
- wool
- If the toy falls into the hands of a child, it is better to use natural fabrics, namely - cotton. These fabrics are hypoallergenic and also have a wide range of colors.
- Universal for sewing a large number of items are knitted materials.
- Silk usually used as an accessory or element of a toy with a different background fabric.
- Wool Perfect for working on truly soft toys.
As for the material for stuffing toys, they usually use:
- holofiber
- foam rubber
- synthetic down
The choice of filler depends on the preferences and characteristics of the toy. Experienced craftsmen consider the most suitable and easiest to use padding polyester and foam rubber cut into pieces. Also, materials from various cereals are especially popular as fillers: porridge, peas, grain, etc.
These fillers will be most valuable for young children, as they contribute to the development of the child’s tactile senses.
In addition to all of the above you will need:
- Needle, multi-colored threads, scissors
- You can use buttons, beads, ribbons, lace
- Ruler 30 cm
- Paper
- Sewing machine
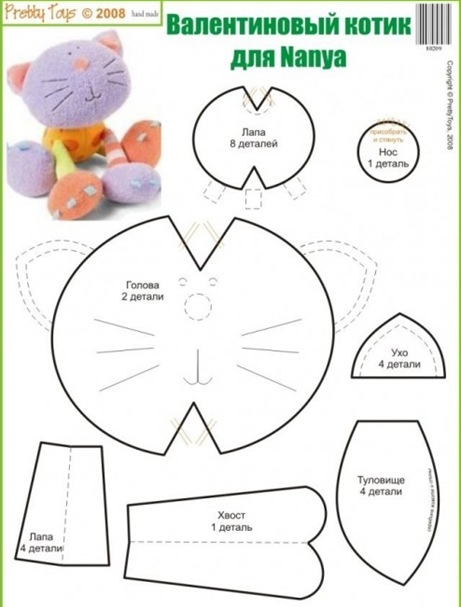
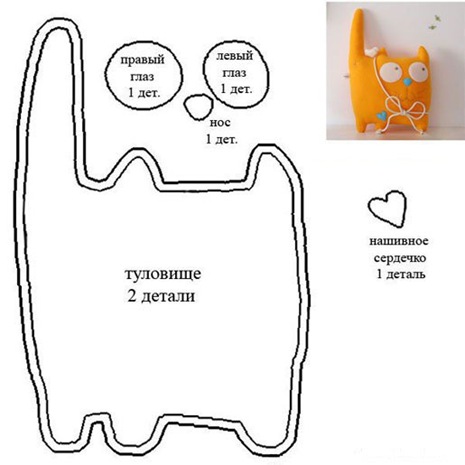
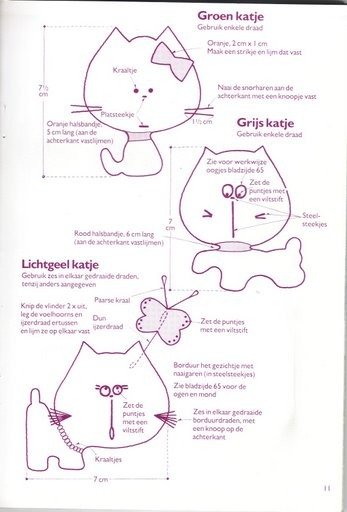
DIY felt soft toy
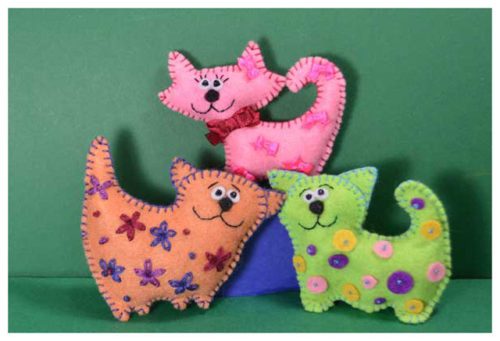
This DIY soft toy “Cat” made from felt is very easy to make, but incredibly beautiful and funny. This cat will become a faithful friend for kids, decorating his life with additional bright colors and a cheerful, touching smile.
Materials for making a toy:
- Bright colored felt
- Material for filling the toy (optional and depending on who the toy will belong to)
- Beads - 2 pcs.
- Bows, colorful threads
Manufacturing process:
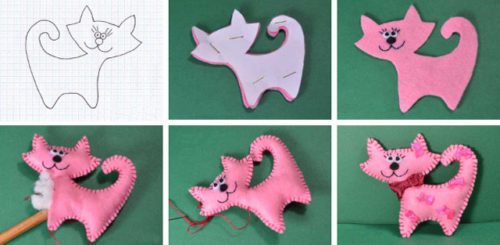
- According to the given pattern, we draw a cat on felt and make a pattern in duplicate.
- Let's start designing the cat's face. Small circles cut out of felt are suitable for the eyes. Insert a bead in the center of the eyes. Using black threads, carefully embroider the cat's eyelashes and mouth.
- We fill the cat with the chosen stuffing material and sew both parts of the toy together in the form of a loop seam. At the end of sewing, we supplement the toy with filler as much as possible: we push the filler material through the remaining unsewn hole. It is best to use synthetic padding as padding, as it will not harm the baby.
The soft toy cat is ready! You can sew a lot of these toys and then send them to a mobile for kids.
DIY soft toy hare
You can make a cute bunny without spending a lot of effort using an ordinary sock. Unlike all other bunnies, the “sock bunnie” will become indispensable in a child’s life, delighting him with his positive and unusual appearance.
We will need:
- Sock (preferably plain)
- Pompon
- Beads
- Thin elastic bands
- Fabric glue
- Ribbons
- Filling material (any cereal or cotton wool is best)
Master class on making toys step by step:
- We fill the toy sock tightly with the selected material.
- We determine on the sock a place for the hare's neck and tie it well with an elastic band or stiff thread.
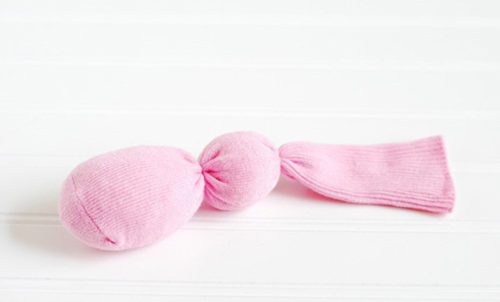
- We determine the place that will serve as the head and also bandage it.
- We cut the piece of sock that remains into two parts. We cut out the ears for the toy, give them the appropriate shape and trim them around the edges.
- We cut out a circle from felt, which we will sew in place of the animal’s navel; we also cut out the nose and teeth.
- Eyes can be cut out of felt or made by sewing or gluing beads.
- Sew on a small pompom as a tail.
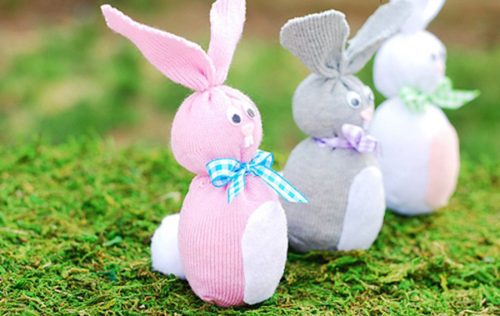
The funny bunny is ready!
You can also make a bunny using this simple scheme:
Rooster: DIY soft toy
A toy in the shape of a rooster will be able to amuse not only children, but also adults.
To make a toy we need:
- Different types of colored fabric (material optional)
- Multi-colored threads, needle or sewing machine
- Patterns and any filler material
Manufacturing process:
- Use the pattern diagrams given to you to determine the desired size and shape of the toy parts. The diagrams also indicate the required number of parts.
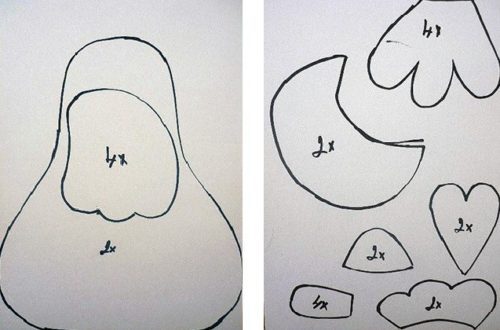
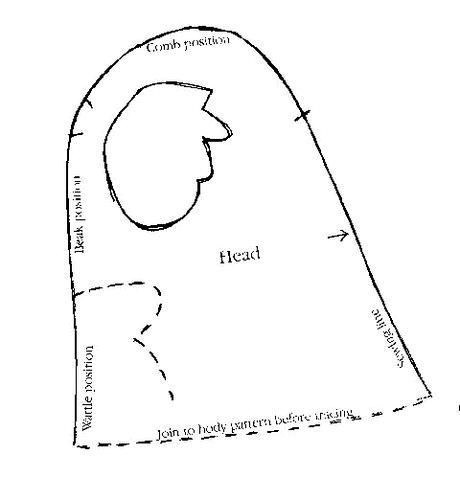
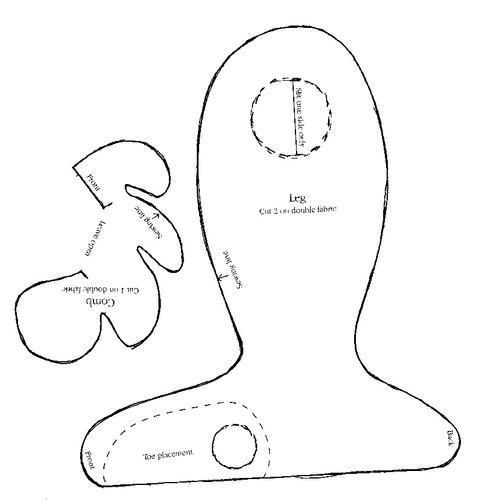
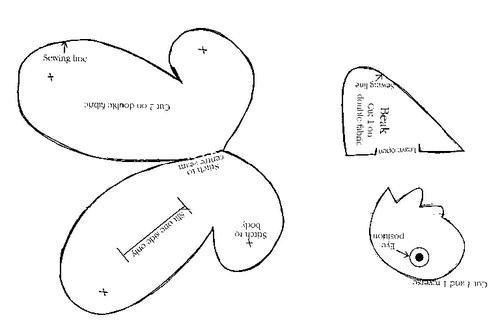
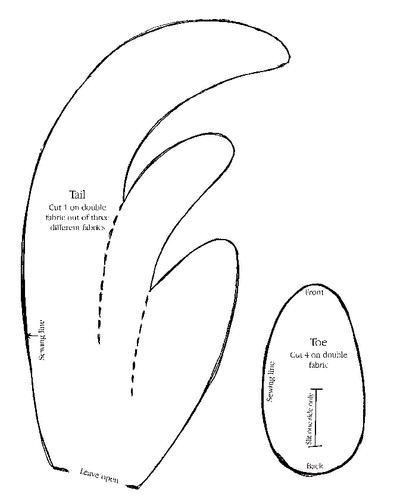
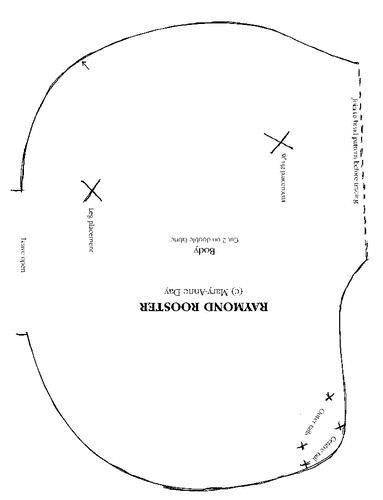
- Based on the size of the patterns, cut out the parts of the toy from the fabrics. When cutting, it is important to deviate from the intended lines about 2 cm for the seams.
- We sew the parts together, leaving a small hole to allow the toy to be filled with the material chosen for this.
- After stuffing the toy, sew up the gaps.
- The rooster's eyes can be made from cut out felt, either by purchasing ready-made ones or using buttons.
Toy options:
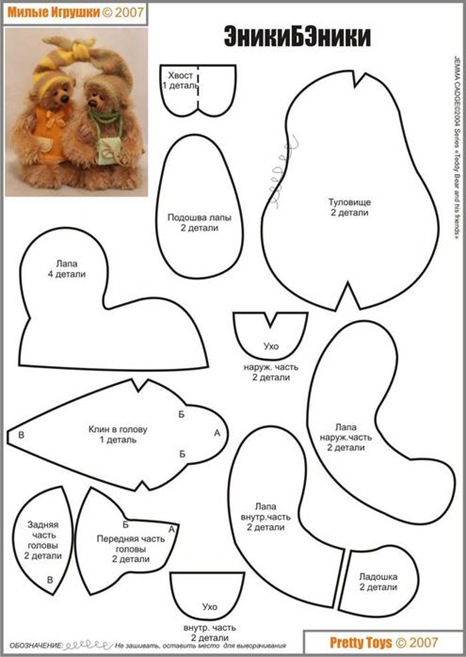
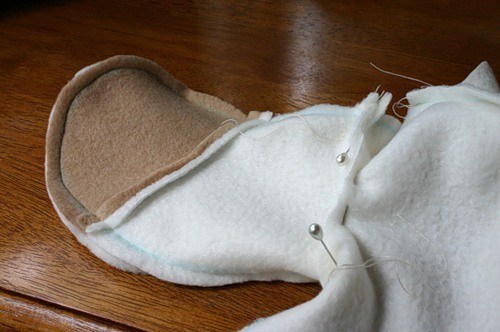
DIY soft toy “Bear”
There probably isn't a child who doesn't love toy bears. Very often, it is this toy animal that deserves the title of the child’s most beloved, without which it is already difficult to fall asleep. And for girls and women of any age this item will become a great gift, because no one will be indifferent to the fact that they had to work hard to prepare the gift, which means the person deserves it.
Manufacturing process:
- We print out the patterns and cut out the necessary parts for the toy from the fabric.
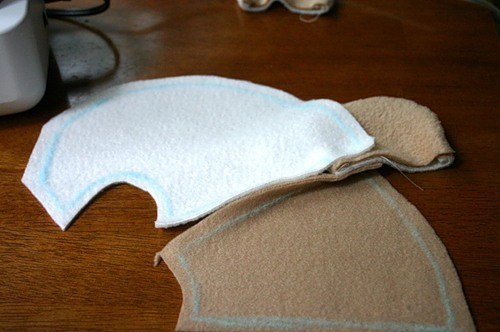
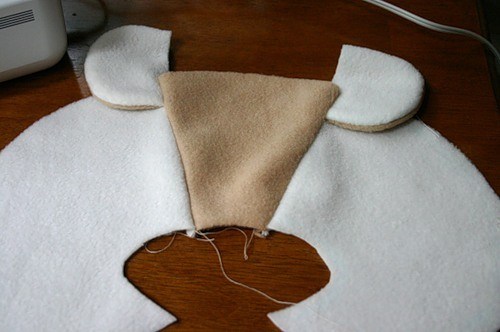
- First, we cut out the head and connect all subsequent parts, focusing on the pattern diagrams.
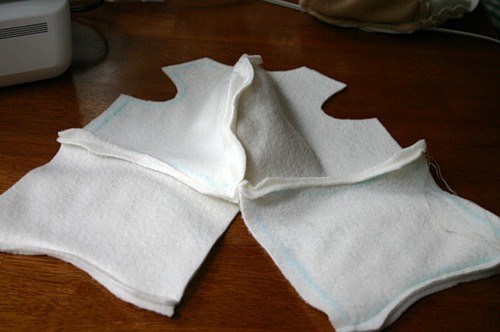
- Then we cut out and sew the fabric that will act as the body of the bear.
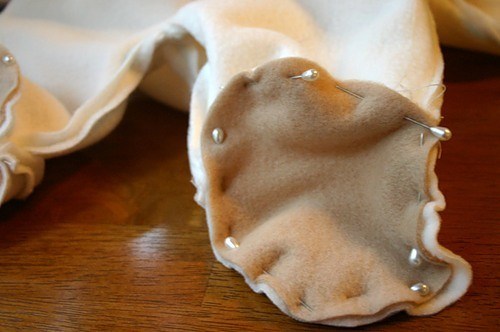
- For paws, you can choose a fabric of a different color (optional).

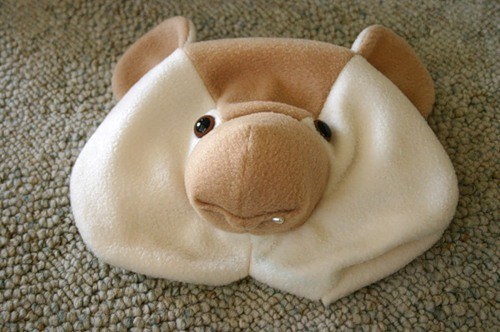
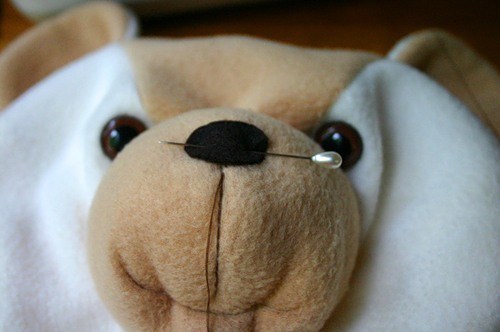
- Using the patterns, we cut out the bear’s head and ears and sew them together. For the nose, you can use either ready-made parts purchased in a specialized store, or improvise with your choice (buttons, felt, etc.). The soft bear is ready!
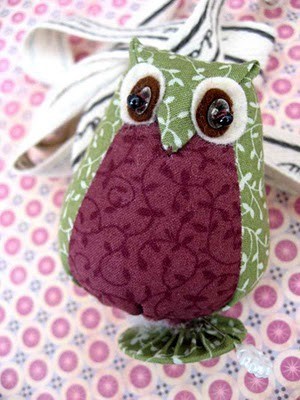
DIY soft toy “Owl”
The image of an owl is very popular today: from various accessories to prints on clothes. This interesting bird has also gained success in the world of toys, differing from others in its symbolic meaning and mystery.
An owl as a gift is a symbol of respect for a person, intelligence and success. All these toy symbols can also be made fun externally, which will delight the owner.
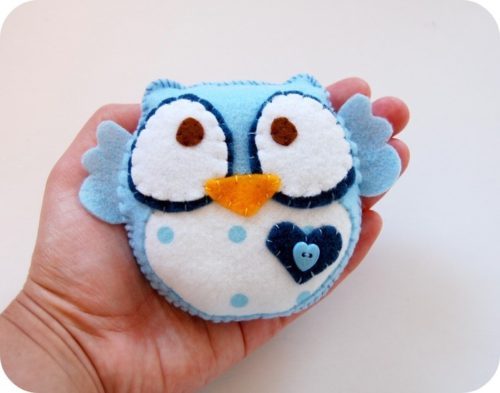
For a toy owl, hard materials (for example, felt) are best suited, as they are distinguished by their ability to hold their shape well, have cheerful colors and create the appearance of a voluminous toy.
Required materials:
- Cardboard or thick paper
- Textile
- Padding material
- Multi-colored threads, needle
- Material for the eyes (optional: buttons, multi-colored felt or beads)
- Scissors
Manufacturing process:
- First you need to prepare a pattern on paper according to a given pattern.
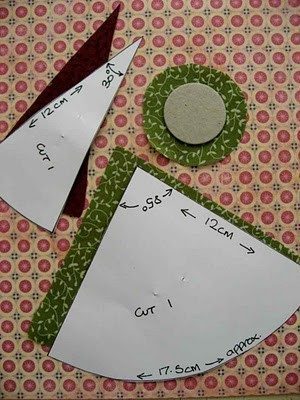
- We attach the fabric to the pattern diagram and cut out the necessary parts. We sew all parts except the bottom together. As a result, we should get a figure that resembles a cone in shape.
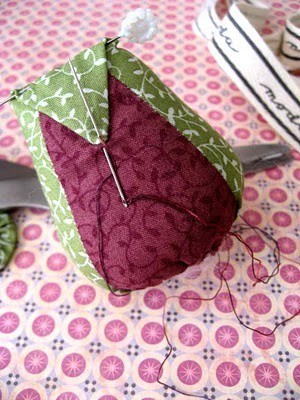
- Separate the top of the resulting figure with a pin (about a quarter of the total size).
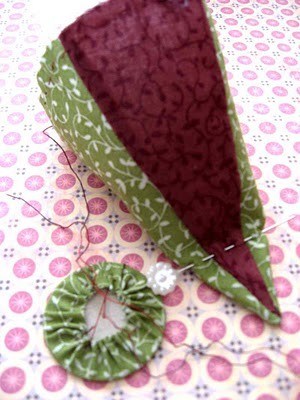
- We fill everything that is not separated by a pin with the material chosen for stuffing and sew it up along the edges.
- We sew the end of the not yet connected corner to the finished part (body) of the toy. This will serve as the head and beak.
- You can decorate an owl to suit every taste. One of the options is based on ready-made pattern, cut off a circle slightly smaller than the bottom of the toy. We treat it with some hard material and sew it to the bottom of the toy. This will serve as a stand.
- Eyes can be bought ready-made or cut out of felt. For the eyes, cut out white circles from felt corresponding to the size of the head (the color of the eyes can also be made as desired). You can use the same black felt, beads or buttons as pupils. You can complement the owl with various accessories under desired image: bows, buttons, butterflies, etc.
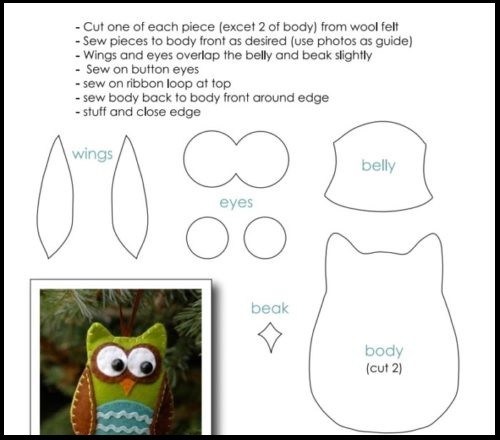
We offer you patterns of another version of the owl:
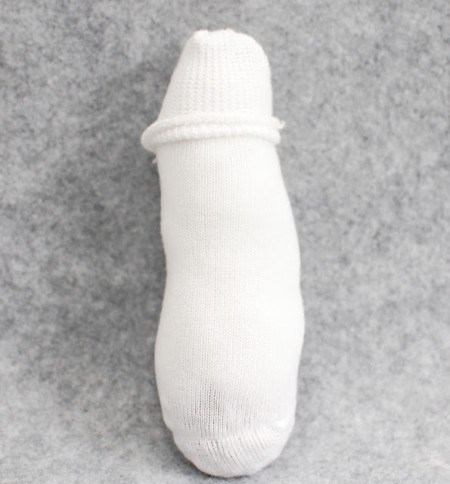
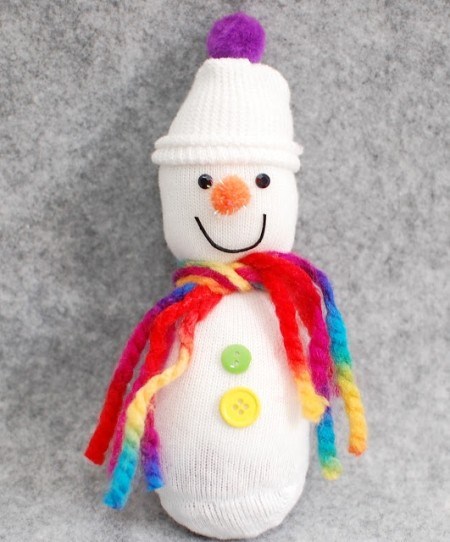
DIY soft New Year's toy made from a sock
Very soon, most people will begin to carefully prepare their home decor for the New Year. One of the items that can create a cozy New Year's atmosphere in the house is this cute and cheerful snowman. The manufacturing process is striking in its simplicity and low resource consumption. See for yourself.

We will need:
- White sock
- Material for stuffing toys
- Black wool threads
- Peas, beans or grains
- Pompoms, beads, buttons, bows as decoration
- Fabric glue
Manufacturing process:
- With the filler you prefer, fill the sock to about ¾ of the total size. Separate the part free from stuffing with thread.

- We roll up the upper part along the edges to make a hat.
- We separate the head from the body by tying it with either multi-colored threads of medium thickness or with a ribbon. The head must be large enough to accommodate the snowman's eyes and mouth.
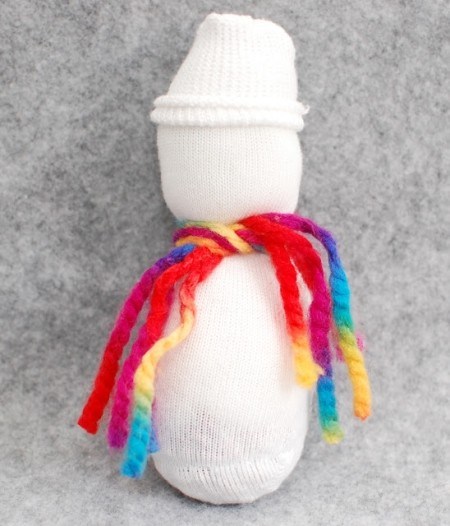
- We place beads or buttons as eyes; the nose can be made from a pompom, button, or cut out felt. The mouth can be either drawn or sewn with black thread.
- You can add fun to the look of toys with the help of ribbons, pompoms, buttons, focusing on the availability of details and your own preferences. A cheerful snowman is ready to add zest to your New Year's interior!
In fact, handmade toy making is not as difficult and inaccessible as it seems to a beginner at first. In order for the toy to turn out beautiful, you only need a little imagination, effort and time. And we should also not forget the fact that by making certain efforts in some area, we develop our abilities and over time the result of our work becomes better and better, we just have to avoid being disappointed prematurely.
Do-it-yourself soft toy patterns are very accessible today and you can find various versions of them even to suit the strangest wishes. So let’s sew soft toys and don’t forget to get the most out of the process!
Video: How to easily make a soft toy with your own hands?
Considering the popularity and demand for hand-made goods, a hand-sewn toy will be an excellent gift not only for a child, but also for an adult of any age: it can be presented as a souvenir or interior decoration. Making such a thing is not difficult. The main thing is to choose according to your experience.
Popular product options
A hand-sewn toy can be made in the form of a textile doll or an animal, and both products made solely for decoration and those that also have a utilitarian function look good. You can choose the option that suits you from the following list:
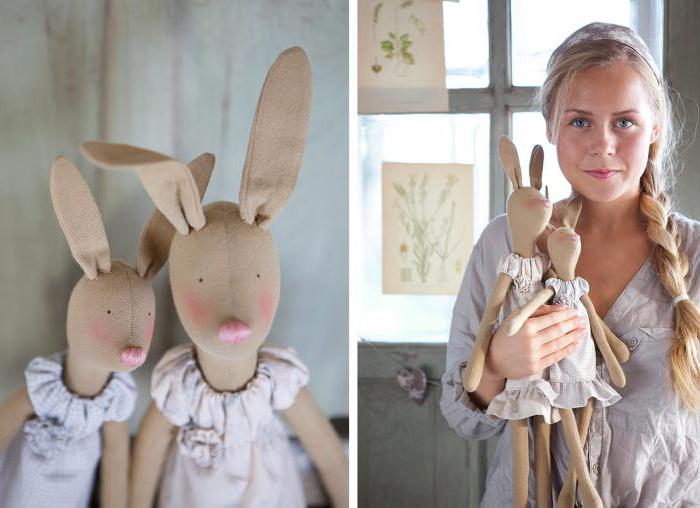
- very gentle and romantic tilde dolls;
- cute and funny coffee toys;
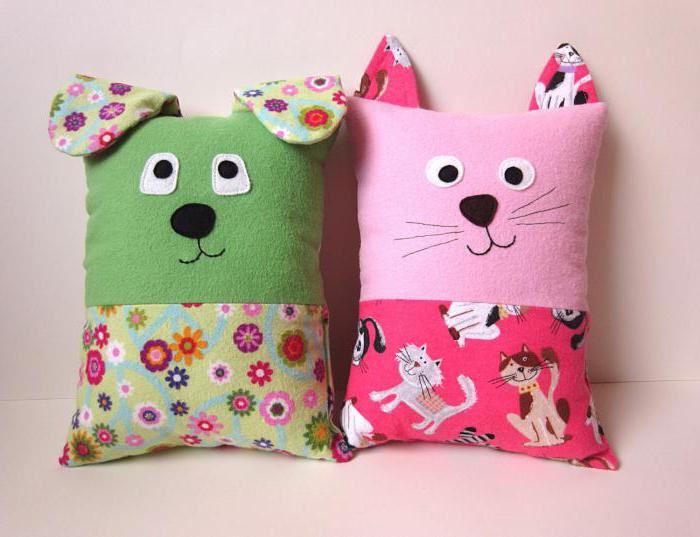
- functional and funny pillows in the shape of cats and owls.
In fact, there are many types of toys, including specifically textile dolls. Listed above are the most popular and the easiest to make.
Materials and tools
To make a beautiful and neat toy, sewn with your own hands, stock up on the following tools and materials:
- template, blank, sample (can be printed on a printer);
- pattern paper;
- pencil, eraser;
- scissors;
- textile;
- pins;
- needle and thread;
- filler (sintepon, holofiber);
- sewing machine;
- decorative elements (beads, buttons, ready-made plastic eyes and nose (for animals), satin ribbons etc.
As you can see, nothing complicated or expensive is required (except maybe a machine). Most likely, even a novice needlewoman already has everything listed.
How to sew a soft toy with your own hands: work sequence
Whichever sample or you choose, the execution steps will be as follows:
So, you have learned how to sew a soft toy. It’s not difficult to make simple products with your own hands. Of course, the manufacture of each item will have its own nuances; for example, it may be necessary to dye white fabric in the desired color for the face, arms, legs, and torso. When making coffee, or as they are also called, this operation is mandatory. You can dye the fabric both before cutting and after. It depends on the number of elements being prepared for painting and the convenience of working in one way or another specifically in your case. In addition, you can make hair for dolls, say, from yarn. The design of the face is a completely separate conversation.
Textile dolls
If you decide to sew soft toys with your own hands, you should choose the simplest patterns (of course, if you don’t have enough experience). They are very popular now. They are made both in the form of realistic people and humanized animals. Some products may consist of only two parts - the front and back halves of the body, in which the head, arms and legs are made as one whole. Clothes are sewn separately or made permanent, even without a pattern. If experience and time allow, it is better to choose options consisting of individual elements, that is, all body parts are performed autonomously, and then the character is assembled from them. Such toys look more realistic and neat.
Animals
Everything that was said in previous section, also applies to making animals. To sew, you can build it yourself. If you don’t draw very well, but don’t want to use a ready-made template, try creating a simplified animal pattern, and it’s better that all the elements are cut out in one piece with the body.
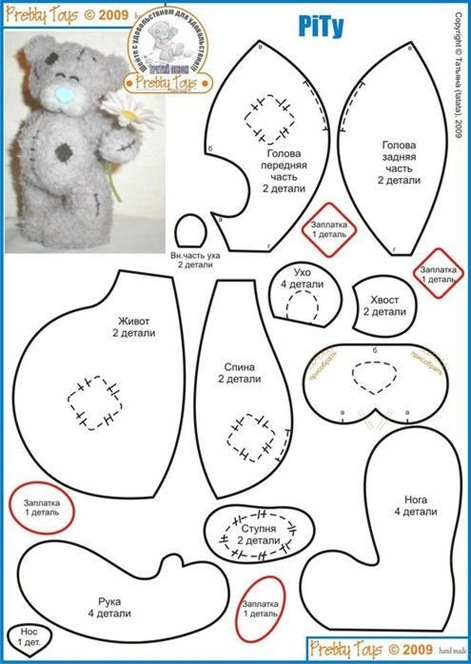
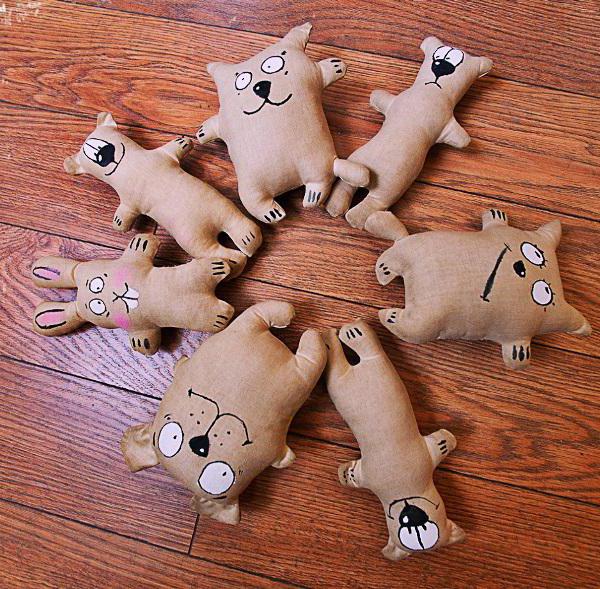
Coffee toys
Do you want to learn how to sew toys with your own hands (there is nothing difficult here for beginners, so don’t be scared), which will also be scented? Then this section is for you. The patterns for these products are the simplest. Funny and cute things usually consist of two parts. The base material is white cotton fabric. They are also called attic ones, as they resemble souvenirs found in an old chest, darkened by time. In order to give the fabric the appropriate brownish tint, the material or cut parts are kept in a decoction of coffee or tea. This, in addition to color, also gives a pleasant aroma to the product. Often these toys are painted with acrylic paints with a preliminary primer of the painted fabric, for example, PVA glue. Using a thin brush, the expression of the face is drawn (as a rule, animals are made in this technique), and you can also apply various funny inscriptions.
How to for beginners
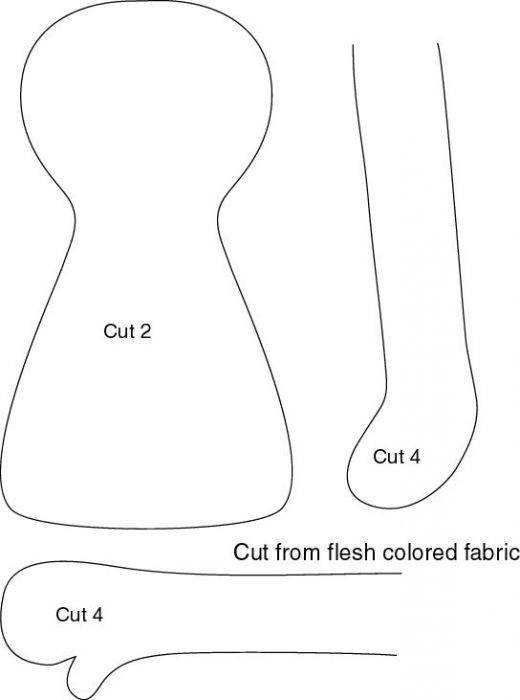
This section presents several options for simple templates. Easy to sew using the first piece textile doll. It is enough to make a couple of body parts and four arms and legs, and then follow the instructions given above.
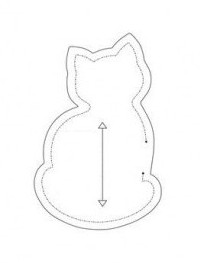
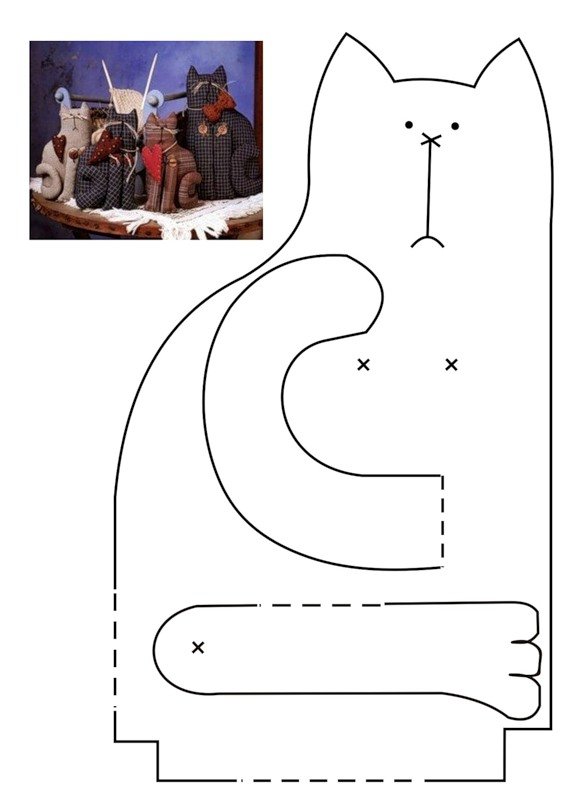
If you prefer animal characters, use one of the options below. The cat from the following diagram can be turned into a comfortable and cute pillow if you make the parts of the appropriate size.

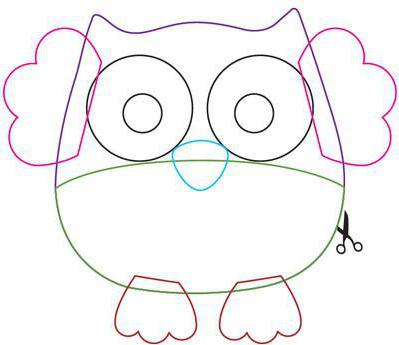
Using the following blank it is easy to sew an owl. It can also be used as a pillow or just as a small souvenir.
As you can see, a hand-sewn toy not only looks beautiful, but is also easy to sew. So making such gifts or items to decorate your home will not be difficult even for a novice needlewoman.
Today, many people are interested in handicrafts - they make crafts from beads, sculpt toys from salt dough, sew from felt, practice quilling, decoupage and other types of art. In this section I would like to talk in more detail about how to make fabric toys with your own hands. First, let's look at some patterns for fabric toys.
Various cats and kittens
Cute bunnies
Baby Bears Mice

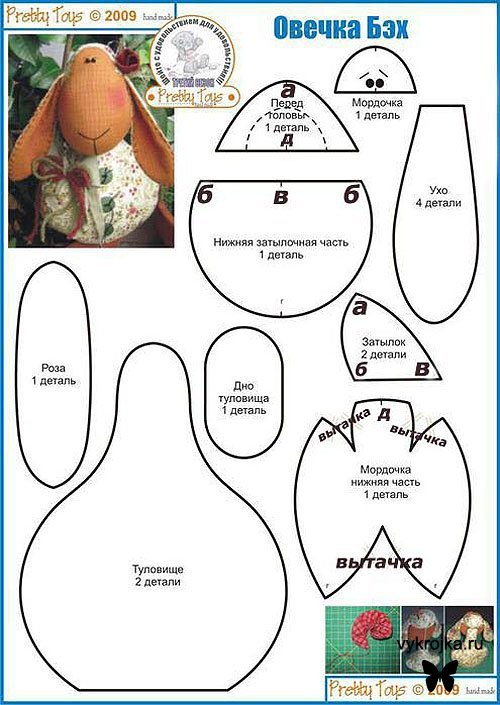
Sheep
Cows
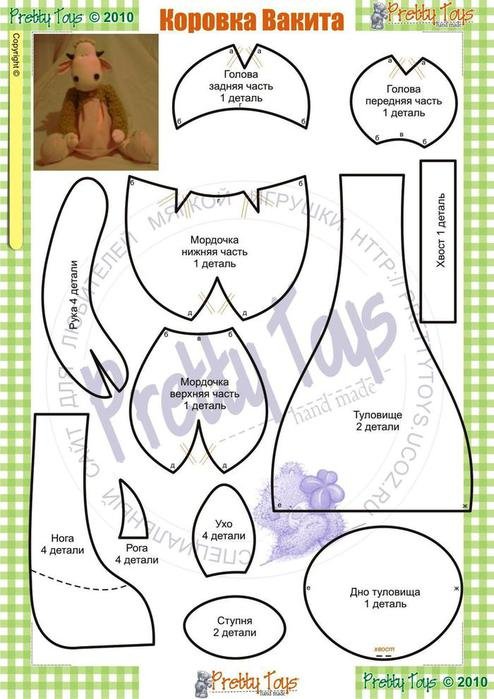
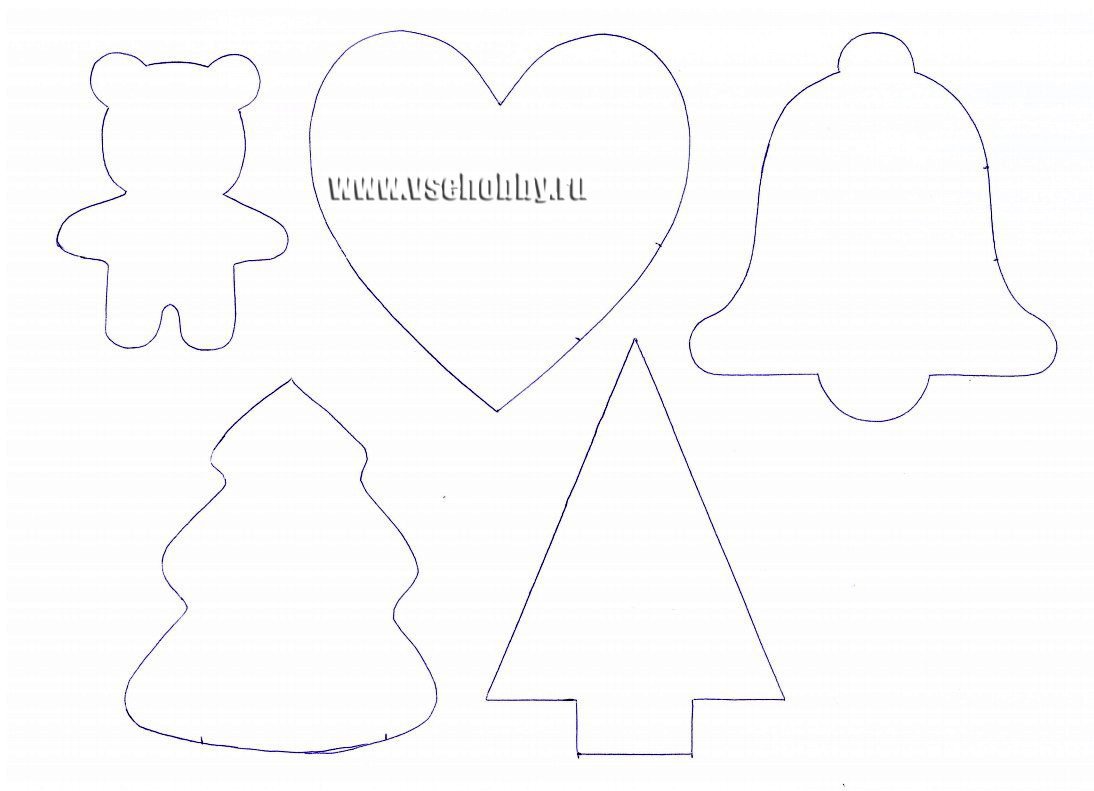
To sew such unusual toys, you just need to print out the patterns on a sheet of paper, pin them on the fabric and cut out the fabric pieces that will be used to make a toy in the future.
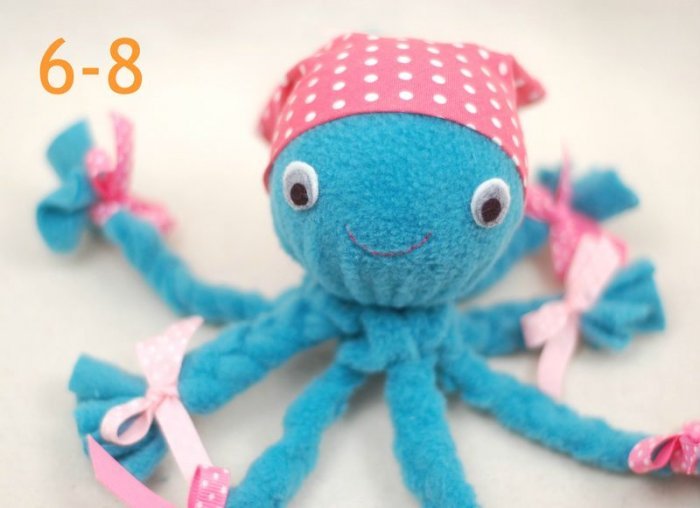
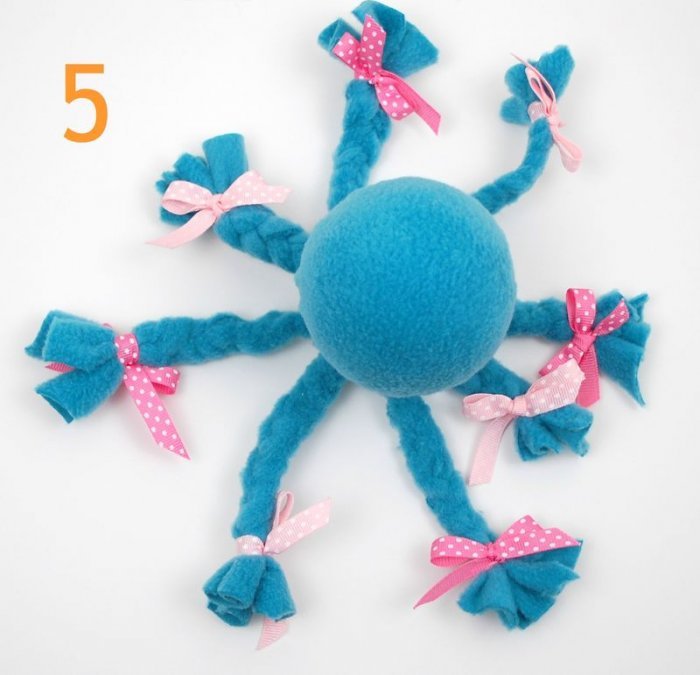
Such a funny octopus can be made without a pattern at all. Let's try together to create such a wonderful toy for your child.
DIY octopus
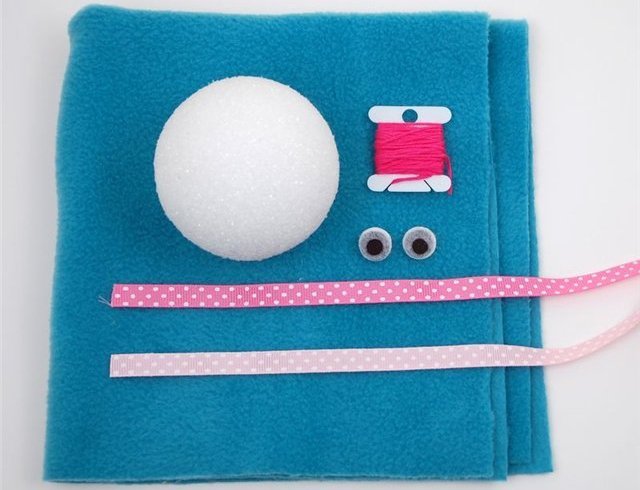
To prepare this toy you will need a ball of cotton wool, fleece or jeans, eyes with moving pupils, threads, ribbons, and a handkerchief. The octopus can be made from either fleece or denim.
The stages of work are quite simple, no patterns are needed, you don’t even need to sew anything. Take a cotton or foam ball and wrap it in a square piece of fabric so that there is enough loose fabric left for the legs.
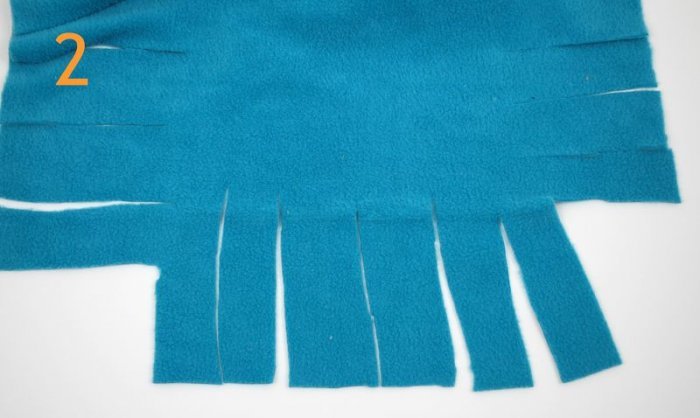
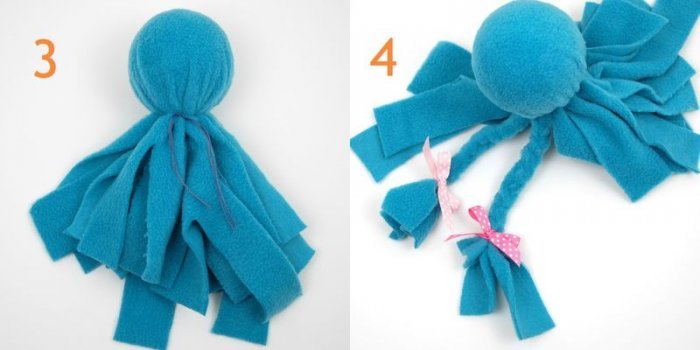
We tighten the fabric wrapped around the ball with floss threads of the same color as the fabric, weave a braid from the cut strips, and tie it with a ribbon of a contrasting color.
The strips at the end of the braids must be cut so that they are the same length.
All that remains is to design the octopus's face. We glue the eyes with glue and embroider a smiling mouth with threads, this is the only moment when we had to sew. And at the end we will tie a scarf on the toy’s head. The octopus is ready!
DIY New Year's toys
Now let's look at some patterns New Year's toys from fabric.
Christmas decorations
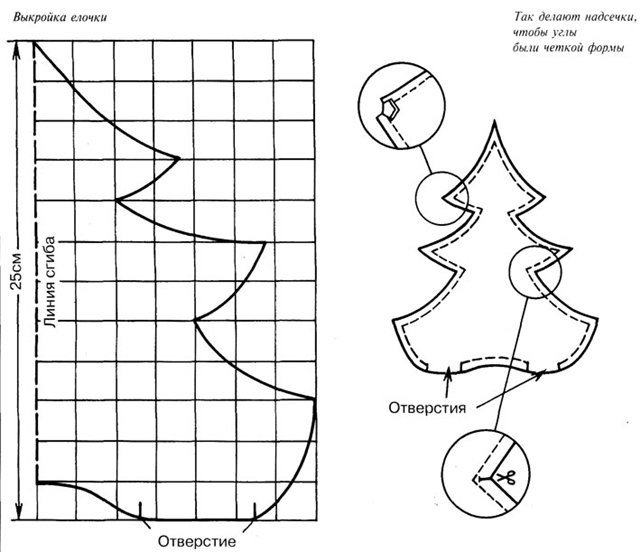
Herringbone
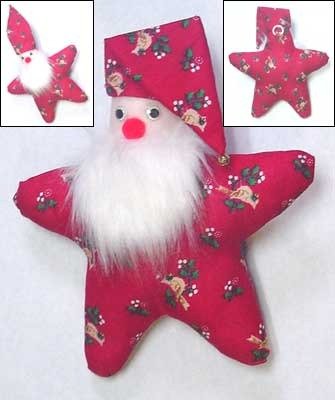
Father Frost
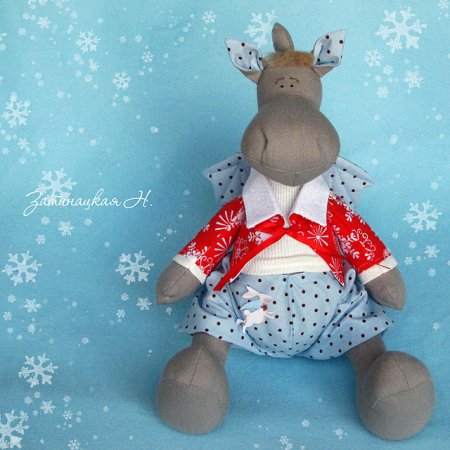
Deer
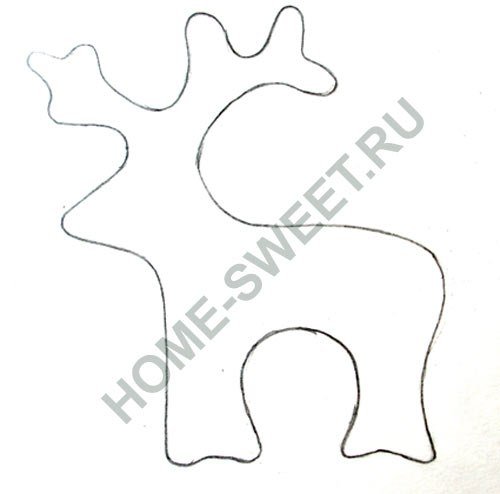
Here's a Christmas reindeer.


