One of the most inexpensive and easily accessible materials for crafts today, as always, is paper. Moreover, from it, with a certain imagination and skill, you can make almost anything your heart desires: from the simplest products, such as snowflakes and boats, to practical masterpieces of art and incredible craftsmanship - paintings, volumetric figures using quilling techniques, origami and so on. One of the wonderful craft ideas that are available to both adults and children are DIY paper angels. Their variety allows you to create decorations or gifts with your own hands for New Year, Christmas or other holidays. It’s not scary if ideas for crafts are drawn from books or on the Internet. After all, the main thing is the result and a lot of pleasure from your own creativity.
Simple doesn't mean ugly
In order to make paper angels, you can use a variety of options, one of which may seem  quite clumsy, but very simple and attractive.
To work on a craft in this version, you need to prepare:
— A4 paper;
- small scissors with pointed tips;
- a simple pencil.
It is with the help of a simple pencil that you can display contours or patterns of paper angels on a sheet of paper, which you can then successfully use when creating a variety of compositions.
If you replace copier paper with a denser option, which can be cardboard, a sheet of Whatman paper, or even a paper plate, then the crafts will acquire significant stability, which will allow you to install them on a horizontal surface in any place you like.
Creating paper angels with your own hands can eliminate the bulk factor; then figures cut out of paper, regardless of color and configuration, can be successfully placed on the surface of a dark background, which will create a stunning panel. And after additionally decorating the angels from the paper stencils for which they were used, with sparkles or tinsel, you can get a surprisingly tender and heartfelt gift for dear people.
We create three-dimensional paper angels with our own hands
To make an angel in the easiest way, you should fold the prepared paper sheet into grinds. On the one side  Using a folded sheet of paper, draw the outlines of a figure with a halo above its head, drawing out the details, and cut out along them. To decorate the dress, you should cut out small geometric and symmetrical elements on the fold. The type of wings can be made according to your own taste. The prepared figurine can be unfolded and the upper part of the halo can be gently bent forward, thanks to which the angel will have hands as if prepared for prayer. Glue is necessary to fix the folds in the area of the shoulders and palms.
The simplest version of a three-dimensional figurine of an angel can be a little more complicated if you experiment in the process of cutting, adding openwork elements, and creating additional volume using a simple pencil, thanks to which you can successfully “curl” the edges of the wings and the bottom of the clothes for the craft.
To create a composition from three-dimensional figures, it is worth trying to cut out a cloud from thick paper, to which, using threads or ribbons decorated with sequins or beads, you can hang light figures, also decorated with sparkles. It is possible to install such a composition not only under a chandelier, but even in a doorway or attach it to.
Angels as a decoration for the Christmas tree
If you create angels for the Christmas tree out of paper, then you can involve all family members in the process of decorating crafts. Christmas tree  decorations can be made using paper or paper plates, scissors, and glue. The uniqueness and ease of paper angel crafts lies in the use of templates from specialized books or the Internet. In this case, the template you like in terms of form and content must be printed or translated using carbon paper, independently determining the size of the craft. Then the template is transferred to paper or a plate, outlined and cut out along the proposed lines.
How to make paper angels for your child yourself? He should use the templates provided or colored paper from which he can cut out a couple of truncated cones for the dress of the future angel. If a template is used, then it is worth gluing the workpiece to give the “body” a cone-shaped shape.  You can make a face from beige paper, using felt-tip pens to draw the necessary facial features. For the wings, two blanks are needed, which, when connected to each other, are fixed on a cone. For the halo you should use yellow paper. The two blanks should have a round shape with an empty middle. The sleeves are made from rectangles, rolled into neat cones. The palms are also cut out of beige paper.
At the end of the assembly, you can attach a ribbon or thread so that the crafts can be easily hung on the Christmas tree. For greater variety and attractiveness of the figures, it is worth using curly scissors and paper with different colors and texture. Paints can also come into play.
Origami angels, in quilling style...
There will be no question about how to make paper angels for those who are interested in origami. There are a lot of execution options. One of them is the kusudama style. It is quite complex and requires time and manufacturing skills. The same can be said when paper angels are made with your own hands in the quilling style. Here, children cannot do without the help of adults who have the necessary knowledge and skills.
SELECTION OF IDEAS AND TEMPLATES


How to make an angel out of paper- several options from Tatyana Yablonskaya for Christmas 2019.
- These are the messengers of God. They are mentioned in every religion, so they are known all over the world. By appearance An angel is a weightless translucent entity characterized by humility, insight and immortality. As a rule, these entities have neither gender nor age. Most often, angels are depicted as humanoid, in free long clothes, with wings and a halo above his head.
People believe that angels protect them, so they decorate their homes with figurines of these cute creatures. You can make a guardian angel yourself, from almost any material. Figures made of clay, porcelain look great (see ours). Today we will try to make paper angels. This is the most affordable material that is always at hand. To make the result pleasing, you will need a little imagination, perseverance and diligence. Well, today there are many variations. You can come up with something of your own, unusual and original.
In our work we will use:
- regular napkins,
- openwork napkins,
- office white paper,
- cardboard,
- colored double-sided paper,
- special strips for quilling.
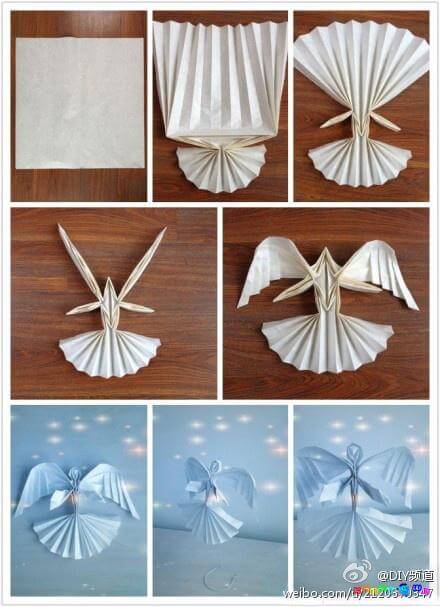
Let's do it first snow-white paper angels, which symbolize purity, purity, tenderness and lightness.
Three-dimensional paper angel (stencils)
Option 1
We take plain white paper and draw on it the silhouette of an angel from the front, with a pipe in his hand. Separately, draw the wings in span. These will be stencils.
Using these stencils, we cut out 4 blanks. On the wings (where the feathers should be) we make a fringe to make them look more magnificent. The bottom of angel dresses can be made openwork using a regular hole punch.

Now we make a small cut on the back and in the middle of the wings. We connect two parts.

You get these little angels with open wings.

We tie strings to each figure (either by the wings or by the halo) and hang them on the chandelier. The blowing air causes the figures to slowly move and spin on a string. It turns out very beautiful!

Option 2
On a white sheet of paper or thin cardboard, draw an angel with full skirt and high wings. You can print this template:
 We cut along the contour with scissors and carefully cut out a halo and heart for the figure.
 We take a figured hole punch and make a pattern on the hem of the skirt.
 Glue the edges of the skirt and handles using PVA glue. Now the angel can stand.
 We make a candle from a napkin and a yellow thread and glue the figures to our hands.
It turns out to be a voluminous angel with flowers on the skirt.

Option 3
On a thick sheet of white paper we draw two stencils: one part with wings, and the other without wings.
 Cut out 1 piece with wings and 6 pieces without wings.
 We fold those parts that are without wings in half lengthwise.
 Now we glue them to the blank with wings. To do this, coat the folded area with PVA glue and apply it to the middle of the central part. Three things in the front and the same number in the back.
The result is a magnificent bell-shaped angel.

Another difficult option from YouTube, but very beautiful! If you manage to fold a three-dimensional angel using this form, send us a photo, we will be happy to publish your boasts.
Angels made from napkins
Option 4
We will make this angel from three-layer white napkins.
 Unfold one napkin and place a paper ball in the center.
 We connect all the corners of the napkin and form the head of the future craft. We fix it with a napkin rope. Trim off the excess to make a full skirt.
We make the wings from a rectangular cut, which is pulled together in the center with a flagellum.
 Glue the wings to the dress using PVA glue. We decorate the head of the figurine with a paper flagellum.
The napkin angel is ready!
 Option 5
To make this craft you need to take openwork napkins round shape. You will need 2 pieces in total.
 From one whole napkin we form a low cone.
We cut the second napkin into segments. We glue handles (cones) from 2 pieces and make wings from 2 smaller triangles.
We make the head of the figurine from a napkin and a paper ball, as we did in option 4.
 Glue the head onto the sharp edge of the cone. We place our arms on the sides and wings on the back.
 All that remains is to decorate the craft a little with a golden thread.
It turns out openwork paper angel!

Video on how to make such an openwork angel:
Craft “Paper Angel” (accordion)
Option 6
To make this angel, cut a sheet of paper in half lengthwise.

We take 2 strips and form accordions from them. The width of the side should not be more than 1 cm.

We glue them together, not reaching the edge by 3 cm. We turn these parts to the sides - these will be the handles. And on top we glue a large pink bead - this is the head of an angel.

You can make the body differently. Fold one sheet like an accordion, and then make a 3.5 cm long cut in the center.

Bend these edges to the sides, as in the first case.

Glue an oval-shaped purple bead in the center.

Now we use a figured hole punch to make pink and lilac flowers.

Glue flowers to the dress (bottom, sleeves, center).
The result was angels in pleated dresses.

A similar version made from accordion paper is shown in this video:
Option 7
We will form an accordion again. You just need to glue three halves of a white sheet lengthwise.
 We glue the accordion into a tube and cut out the silhouette of the upper half of the body.
 Lubricate the bottom of the silhouette with PVA glue and place it in the center of the accordion pipe. We coat all the folds with glue and fix them with a napkin so that they stick together. Then you get a fluffy pleated skirt.
 All that remains is to glue the handles and wings. You can also cut out a candle and make a small book out of paper.
Now our angel reads a prayer or sings a Christmas song by candlelight.
 These snow-white creatures will fit into the interior of any room and will become real guardian angels for those to whom you give them as a souvenir. And this is not to mention the pleasure that the process of making figures itself will bring. You can involve small children in it. They will be happy to take part in creating such beauty.
Option 8 (openwork)
Winter spoils us with magical holidays! presents the opportunity to meet friends and relatives, please each other with gifts, fulfill someone’s cherished dream and return to childhood again. And it gives an inexhaustible faith in goodness and miracles, which are sometimes so lacking in life. Let's get a little closer to the mysterious and try make an angel, bringing peace and goodness on his wings. Be sure to tell your children the history of the great holiday and its significance for all people. Then the angel will be charged with the energy of your hands and hearts and become a guardian happy life in the family!

List of materials needed to create an openwork angel figurine:
- white (colored) A4 paper;
- simple pencil;
- scissors;
- eraser;
- glue.
Prepare everything you need for the creative process. You can use white or colored paper, depending on your wishes. The figurine made of silver and gold paper also looks original.
 Fold the sheet in half. Unfold again and bend one of the halves inward to the fold line. Unfold a quarter of the sheet and fold it in half inward. Do this to find the width of the strip to create the paper accordion.
 Do the same with the other half. After this, assemble the sheet into an “accordion”, properly ironing all the folds.

 Draw with a simple pencil various patterns on the first half of the “accordion” are the future attire of an angel. Make the edge round.
 Draw a pattern on the top of the accordion - these are the future angel wings. Make the edge leaf-shaped (with a pointed end).
 Cut out a pattern at the bottom of the paper blank. Cut carefully, without haste, otherwise you may cut off excess.
 Cut out a pattern at the top of the accordion.
 If you straighten the workpiece, you will get this openwork “canvas”.
 Cut two identical strips from white paper. The length of the strips should be at least 20 cm, width 1-1.5 cm.
 Fold one of the strips four times. Cut out a random pattern across the entire surface.
 Use the second stripe to decorate your head. Roll a small ring and glue the edges. Wrap the remaining length of the strip around the first ring to form a second rounded row. Make a third round row by gluing the remaining strips.
 These are the details you should get from strips of paper.
 Let's move on to the design of the angel figurine. Calculate the middle of the accordion. For convenience, count the gathers on both sides. In the upper part, make a cut 6-7 cm deep, bend the wings. This is how you share the angel's wings.
 Glue the gathers in the middle along the angel's body to the point where the wings bend so that the figure does not fold when they rise.
 Grease the sides to adhere the wings to the garment.
 Spread your wings and angel robe.
 Glue the head in the middle of the wings.
 Glue a patterned strip from one edge of the wings to the other.
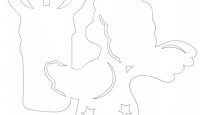
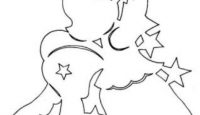
Therefore, it is often used when decorating for these celebrations. The vytynanki of Angels will help you with this. Download, cut and create a magical holiday atmosphere.
New Year and Christmas are closely related, and the celebration of one flows into the other. The styles of decorations for these celebrations are similar and intertwined with each other. This should be taken into account when preparing, weaving Christmas motifs into the New Year's surroundings.
Angels' vytynanki will perfectly complement your New Year's decoration at home, along with snowflakes, candles, wreaths and other original paraphernalia.


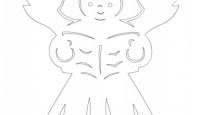
By the way, by February 14, the image of Cupid and Cupid can be replaced with his “unarmed brother”, leaving hearts unbroken. Templates of angels with trumpets, harps, bells and stars are at your service, without any bladed weapons.


Name days are also called Angel Day, so this symbol is also relevant on birthdays. It can be used as a design element for a gift, card or gift wrapping.


Cutting out protuberances of Angels and other figures is wonderful not only from the point of view of festive decoration. But also from a development point of view creativity and teaching children to do handicrafts and use tools. However, on top of everything else, this is another way to spend the evening with the whole family making crafts.
Want even more stencils? Then you will find what you were looking for!
Greetings, friends! Today we again continue the theme of creating a New Year's atmosphere by cutting out products self made from paper. That is, we will talk about again.
IN this post you can find silhouettes of fairy-tale characters, the main characters of Father Frost and the Snow Maiden, snowmen, deer, balls, snowflakes and much more. You will see ready-made window design options, and you will also be able to download and print the proposed stencils and templates. And then carefully cut them out and stick them on the windows, or decorate other corners of your interior.
But remember that window decoration is an integral part of the magical New Year holiday. You can decorate only glass with paper protrusions, or you can create an entire composition using a window sill. Use large clippings to decorate walls in rooms.
If you have very little time to create a festive interior, then cut a lot of carved ones and paste them all over the house.
So, in order to do festive windows, use plain paper, preferably not only white, but also other colors. Also stock up on sharp thin scissors, or better yet, a sharp stationery knife, and materials for sticking decorations ( toothpaste, double-sided tape, soap solution).

After you have prepared everything necessary tools and materials you will need to select paper decorations. In our case, these will be flat accessories for gluing to the glass surface, since there are also volumetric elements.

The size, shape and color of the products will depend on the area of the room, the level of illumination and the size of the window itself. The main thing is that the decorations do not interfere with the free passage of light into the room, and the rest depends only on your imagination.

After determining the plot for the New Year's window, start creating stencils. If you know how to draw well, then you can come up with templates yourself, but if you have limited artistic skills and imagination, then take ready-made patterns, print them on paper, and then start cutting them out.
This traditional paper decor It won’t take much time and won’t require any special skills, but it will help you create a real pattern and will impress not only you, but also those around you.
An abundance of accessories is only appropriate on a large window, so don’t overdo it! And try to choose openwork decorations.
After cutting out the decorations, decide on their placement on the glass. You can use symmetrical, central or asymmetrical placement.

Well, then choose a method for attaching the decorations and, in fact, glue them. This is how you can decorate a window quickly and easily.
Now I suggest you watch a video about how to correctly cut out accessories for decoration.
Well, samples of New Year's window design.


Window decorations for the New Year 2020 (templates inside)
Well, let's get down to choosing and creating flat paper toys. To begin with, the most popular characters are Father Frost and Snow Maiden.


Of course, don’t forget about funny snowmen.


You may also need an image.


And don’t leave your loved ones aside.


Even from these elements you can already create a fairy tale on the window.
Jewelry stencils for cutting out in A4 format: can be downloaded and printed
I want to say that many flat accessories can be cut not only according to a template, but also according to a symmetrical pattern. This, for example, applies to Christmas tree decorations.
Another great idea would be backlit cutouts. Just with inside glue translucent paper, such as tracing paper, and carefully pull a small garland (one of the lights) through it. It will look something like this:

So keep a bunch of different stencils with balls, bells, cones, numbers, animals, etc.


Don't forget about the symbol of the upcoming New Year 2020 - mischievous little mice.


Pigs from last year.


And I want to make a separate thematic selection of paper decorations for educational institutions. After all, our children rejoice most of all at the coming of the holiday. So schools and kindergartens should not only organize matinees, but also magically decorate the premises.


I hope that with the help of the vytynankas I have proposed, you will be able to create an unforgettable and wonderful atmosphere in your home. Involve children and the whole family in creativity. Let there be a holiday in every home! With coming!
The article will provide options for decorating windows for the New Year, the necessary templates and master classes.
New Year - magical holiday, which everyone around the world is looking forward to. On this day, even the most gloomy hearts are filled with faith in something miraculous. For children, this holiday is especially important. To give your home a festive feel, decorate it. You can start with the windows.

In the New Year, they become the main object of decoration. Through them you can see the street where the snow is swirling.
There are many ways to decorate the windows in your home.
- The simplest one is to hang an electric garland on the eaves. Buy only high-quality products that are reliably insulated. And turn off the garland before going to bed.
- Snowflakes. They have been familiar to us since the days kindergarten when in class everyone unanimously cut out these attributes winter days. You can cut out snowflakes with your children using templates or diagrams.
- Decorating with stencils is a fun, but more time-consuming option for decorating windows for the holidays. With stencils, a real picture will appear on the windows, which will evoke a feeling of celebration.
- All kinds of garlands, tinsel, rain and Christmas tree decorations. You can always decorate windows and other parts of the room with them if you’ve run out of ideas.
Think in advance where and how you will decorate the apartment. This will help you prepare all the necessary materials and not make the decor cluttered.

Stencils for painting windows for the New Year
There are several ways to use stencils for the New Year. Let's look at a couple of them.
Decorating with stencils and artificial snow
- For this method we will need a printed stencil, a stationery knife and a can of artificial snow. This snow is sold in Christmas tree departments before the holidays and comes in a variety of colors.
- Print out the stencil and cut out the inside.
- We mark on the window where the snow patterns will be placed. It is better to mark these places with a small piece of tape or stickers.
- Now lightly wet the stencil. This is necessary so that it fits tightly to the window.
- Now we attach it to the intended place. Remember, it’s better to check how evenly the stencil is placed a hundred times than to correct everything later.
- Using the instructions on the can, apply snow to the stencil. Make sure that drops of the product do not fall on the area around the stencil.
- If the product gets on the glass in an unnecessary place, remove it with a damp cloth.
- The pictures below show stencils for cutting.
Artificial snow can be toxic. Therefore, do not use it with children.


Stencil for artificial snow


Decoration using painting
- Painting windows is a more labor-intensive process, it takes a lot of time and requires patience. But the result is worth it.
- Firstly, painting on windows lasts a long time.
- Secondly, this method is safe and you can decorate the windows together with your child.
- To make painting easier, you can use stencils.
- In good weather, during the day, attach the stencil to reverse side windows. So that it is behind the glass. This can be done using tape.
- Now close the window and start creating. You can paint a window using acrylic paint, gouache, and children's stained glass paints. The paint can then be removed with water or solvent.
- Below see the drawing and stencils for drawings on glass.


Patterns for paper windows for the New Year
Another simple way to decorate windows is with paper patterns.
- Print out the pattern you like
- Cut it out with a utility knife
- Now we attach the finished pattern to the glass
There are many ways to attach. Choose the one that suits you
Methods for attaching paper patterns to glass:
- Regular water. If the pattern is not large, it will last a long time.
- Scotch tape. However, it may not be easy to wash it off the glass.
- Soapy solution. It holds better than water and can be used for larger designs.
- Glue stick or PVA. They are easy enough to clean with window cleaner.
- The pictures below show patterns for cutting out and sticking on windows.

Window pattern

Window pattern

Window pattern

Window decorations for the New Year with garlands
Let's make a simple garland to decorate windows for the New Year
- We need: Christmas tree decorations, colored ribbons, hot glue, tape
- We cut ribbons of various lengths. Attach to one end Christmas tree toy. To prevent the tape from unraveling, it must be fixed with hot glue.
- We attach the tapes to the cornice with the other end. You can simply tie them. To prevent them from moving, secure them with a small piece of tape.
- This garland can be changed at your discretion. Instead of toys, use figurines, fruits, candies or gingerbread cookies. Instead of ribbons - rain, tinsel or garlands.
- See the pictures below for examples of window decoration with garlands.

Decorating windows with garlands for the New Year


Drawings on windows for the New Year
If you want to make drawings on windows for the New Year, then you will probably be interested in the question of what paints are best to use.
- Draw on the windows not recommended by professionals stained glass paints. Yes, they are designed specifically for drawings on glass. But they hold up great, and New Year's drawings Few people need them all year round.
- Watercolor is also not a good paint. It spreads. And even if you manage to apply a pattern, it will not be easy to wash it off.
- From the colors that you can draw For temporary drawings, it is better to use gouache or finger paints. Acrylic paints are also suitable.
- In addition to paints, you can make drawings on windows with toothpaste or artificial snow. These materials resemble real white snow and can be easily washed if necessary.
- There is another way to decorate windows for the New Year - these are special sticker designs. They are sold in stores already in finished form. All you need to do is attach the drawing to the right place.


Vytynankas for the windows for the New Year
Vytynanki can be made using a template. Here are a few interesting ideas in the pictures below:

Vytynanka on the window

Vytynanka on the window

Vytynanka on the window


Window decorated for the New Year
Window stickers New Year
- Window stickers are sold ready-made. They have a special adhesive base that adheres tightly to the window. At the same time, they are easy to remove and do not leave marks on the glass.
- There are a variety of stickers, the most common being vinyl stickers.
- For window stickers to look attractive, they should not have a reverse side. In this case, they will be clearly visible both inside the apartment and from the street.
- Stickers come in colored and white. Usually, sticker manufacturers have a very wide range of products before the New Year holidays.
- These stickers can be purchased at office supply stores or online stores.


Paper figures for windows for the New Year
Paper figures that can be placed as decoration on windows:
- Snowflakes. This is perhaps already a classic. In almost every home or government institution, New Year's snowflakes hang on the windows.
- Father Frost and Snow Maiden. These New Year symbols will be quite difficult to cut out. But they will delight the household throughout the holidays.
- Santa Claus' reindeer. You can have one, or a whole team.
- New Year tree with toys. Or just toys that seem to hang from the ledge.
- The animal is a symbol of the New Year. It is known that every New Year has a patron animal, according to Eastern calendar. To bring you good luck on New Year's Day, you can place this animal on the window.
- Other holiday attributes: candles, New Year's gingerbread cookies, snowmen, gift boxes, stars and much more.


Window clippings for the New Year
It is better to make cuttings not from too thick paper. This paper will stick better to windows. Therefore, if the pattern is large, it is better to divide it into several parts, and only then print it and glue it to the glass.
- The picture below shows cuttings that need to be made in 2 pieces, or on 1 sheet folded in half.
- Glue the two halves together on the window.

Snowflakes for the New Year on the windows
Making a snowflake is very simple:
- First, make a square from a piece of paper. Fold this square in half, diagonally.
- Fold the resulting triangle in half again.
- Notice how the new triangle is formed. This is done by eye. The main thing is that one side of the triangle touches the opposite fold.
- Cut off the bottom of the shape and you can draw an outline along which you will further cut.
- For photo cutting instructions and examples of snowflakes, see the pictures below.


Beautiful window for the holiday
Video: How to make a drawing on a window?


