Embossed stitch is one of the voluminous types of crochet. The result is not a flat surface, but a convex one. There are front and back embossed stitches, which can be single crochet or double crochet.
Purl relief columns And front relief columns used to create beautiful patterns. Both complex and simple.
What is the difference and how to knit a raised stitch? The point is that the columns are not tied to the loops of the previous row, but to the very base of the column.
Facial embossed single crochets
1. It is impossible to knit embossed columns in, so I made a row of them in advance. Executing exactly the row with single crochet stitches is not important. If you try with me, you can also do single crochets; I need double crochets for clarity.

3. And now the most important thing! We thread the hook into the gap between the posts of the previous row and it comes out wrapping around the post. Please note that we do not thread it through the loops on the top of the column, but between the columns, if you pull the knitting too hard (do not overdo it) different sides, then you will see these holes


6. We pick up the working thread and pull it through two loops on the hook, as when doing a regular single crochet, ready


Purl embossed single crochets
1. We insert the hook from the wrong side into the hole between the current and next stitch


By alternating the front relief single crochet and the back relief single crochet, you get this pattern, it can be used as an elastic band! 🙂

Please note that the previous row takes the form of the one above and also makes up one part of the elastic band. But it is wider, so when knitting this way it’s better to finish with an elastic band! We knit the third row in the same way, alternating, and make sure that if you have closed knitting and just go up to the next row without turning, then above each front embossed column of the previous row there will be a front one in the current one, and a purl one above the purl one. If, as in my case, we turn the knitting and perform the next row, then above the front embossed column of the previous row there will be a purl in the current one and vice versa. It’s easy to get confused in the description, it’s easier in practice, just look, if the stitch around which we are knitting the current embossed stitch is fed to us - we knit a knit stitch, if it hides back, then we knit a purl stitch.

Thank you for your attention!
Well done!
Stay informed! Be the first to know about new lessons!

They also have the name of relief columns, and they are also popularly called front and back relief columns. The name itself already suggests that such columns differ from ordinary ones in their shape. Using these columns we get beautiful patterns, braids, elastic bands. These posts are attached differently than regular ones. This is what we will talk about below.
Video master class on crocheting concave and convex columns:
Description of the process of crocheting embossed columns:
There are two types of relief columns:
- Convex or embossed “facial”;
- Concave or raised “purls”.
Important! When knitting an elastic band, these stitches cannot be knitted in a chain of air loops; they are knitted only from the second row. The first row is usually worked with double crochets. The embossed columns themselves are knitted not by the loop, but by the columns themselves of the previous row. You can learn more about this from the lesson.
How to knit a convex (front) column
Next row we begin to knit embossed columns. We do not knit in the base loop. We insert a double crochet hook on the front side (from right to left), behind the double crochet of the previous row, pick up the thread, and, pulling out the loop, knit a double crochet. We knitted the first convex double crochet.
How to knit a concave (purl) stitch
The 1st row needs to be knitted with double crochets.
Next row we begin to knit embossed columns. We do not knit in the base loop. We insert a hook from the wrong side of the fabric (from right to left), in front of the double crochet of the previous row, pick up the thread, and, pulling out the loop, knit a double crochet. We knitted the first concave double crochet.
In the same way, embossed single crochets, embossed half double crochets and others are knitted.
Do not confuse a convex double crochet with a raised convex double crochet or a raised convex double crochet.
The convex column does not fit under the column of the previous row, but is made under both walls of the loop of the previous row and in a completely different way.
To begin, knit a chain of chain stitches as usual. Crochet the first row with double crochets .
Make two lifting chain stitches and turn the knitting over.
1. Insert the hook under both walls of the loop of the previous row, grab and pull out the working thread (Fig. 1).

Rice. 1.
2. Yarn over the hook (Fig. 2).

Rice. 2.
3. Insert the hook under both walls of the same loop of the previous row, grab the working thread and pull it out (Fig. 3).

Rice. 3.
4. Grab the working thread and pull it through the three loops on the hook (Fig. 4).

Rice. 4.
5. Grab the working thread again and pull it through the remaining two loops on the hook (Fig. 5.). There will only be one loop left.

Rice. 5.
The convex column is completed. Next, knit in the same way until the end of the row (Fig. 6).

Rice. 6.
Convex stitches are suitable for knitting a whole product, since such knitting looks the same on both sides.

Rice. 7.
We continue our series of articles about the basic elements of crochet. All of them can be found in the section. If you have your own comments on the technique described in the article, leave them at the end of the article.
Convex embossed crochet post
This type of crochet is used if you want to make relief patterns or dense products, and also if they want to knit different chains and braided stitch patterns. The column turns out to be convex.
Embossed double crochet or with two crochets they do this: the hook is inserted from the right to the left side, wrapping around the column of the previous row in front, and the corresponding column is knitted.
Relief crochet post concave
The patterns made with such columns resemble patterns knitted with rise and recess (front and back row).
To knit a recess, the hook is inserted from the back from the right to the left side, wrapping around the column of the previous row, and a column is knitted with one or more crochets.

- interesting selection for the site!!!
- Basic simple models crochet shawls for beginners

The outer edges of the product are tied with such patterns. Formed by three or more, connected in a ring with a half-column or double crochet.
Knit three air loops, or any other required number of loops. Insert the hook into the main loop as shown in the picture.
Place the yarn over the hook and pull it through all the loops on the hook to close the picot.
Entwined post
To form a twisted column, the thread is wound around the hook shaft several times (usually 7-10 times), i.e. make numerous yarn overs. Then the thread is thrown back onto the hook and pulled through all the loops on the hook.
Wrap the thread (not too tightly) around the hook several times. Insert the hook into the loop of the previous row and pull up a new loop. Throw the yarn back over the hook and pull it through all the loops on the hook. Loosen each stitch before knitting it. Instead of pulling the yarn through all the loops at once, we recommend knitting each loop separately.
Very often in diagrams and descriptions of patterns there are embossed or concave columns. I am often asked what it is and what it is eaten with. From this lesson you will learn how to crochet embossed columns.
The name of the column speaks for itself - these columns are used to create a relief of a knitted fabric; they are often used to knit elastic bands or braids. The difference between a relief double crochet and a regular double crochet is in the method of fastening relative to the columns of the previous row. With the help of relief stitches, you can change the texture of the main loops and create beautiful relief patterns on your knitted items.
There are two types of relief columns:
- raised facial or “convex”
- embossed purl or “concave”
Let's look at both options using examples:
It is important to note that embossed columns cannot be knitted in a chain of air loops; the initial row must be connected with any other loops. The columns are not knitted through the loops of the previous row; the hook is inserted under the columns themselves.
I have already prepared a sample and knitted two rows of regular double crochets. Let's start knitting a relief stitch, so we yarn over the hook,

insert the hook from the front side from right to left, under the double crochet of the previous row

grab the thread
and pull out a new loop (there will be three loops on the hook),

When crocheting a double crochet “before work”, such a stitch is called a raised knit stitch or “convex” stitch.
 Its designation on the diagrams:
Let's consider knitting a raised purl ("concave") double crochet. Yarn over


clasping the leg of the double crochet of the previous row,
grab the thread
and pull out a new loop.

We knit the loops in pairs in two steps, as when knitting a regular double crochet, i.e. grab the thread and knit 2 loops, grab the thread again and knit the remaining 2 loops.

When crocheting a double crochet “at work”, such a stitch is called a relief purl or “concave”.
 Its designation on the diagrams:
Similarly, embossed single crochets, embossed half double crochets, etc. are knitted.
Concave single crochet stitch.
To make a concave double crochet, the crochet hook is not inserted into the base loop, but is passed in front of the double crochet of the previous row. Having grabbed the working thread, knit a single crochet.

Convex single crochet purl.
To make a convex double crochet, a double crochet hook is inserted behind the column of the previous row and a single crochet is knitted.

|
In order to start knitting a relief elastic band, make a chain of chain stitches and knit the first row with double crochets. Next, make 3 lifting chain stitches and turn the knitting over. Let's start knitting a relief elastic band. Knit one front relief double crochet (Fig. 1): Rice. 1. Knit one double crochet stitch. Next, knit one purl embossed double crochet (Fig. 2):
Rice. 2. Purl one single crochet stitch. Rice. 3. One row, knitted with relief elastic. To move to the next row, perform three chain stitches and turn the knitting over.
Rice. 4. Relief elastic band. |
 Embossed elastic is made by alternating the front relief double crochet and the back relief double crochet.

The relief of this pattern is formed by convex (relief) columns. For the sample, cast on the number of loops in the initial chain that is a multiple of 3, plus 2 loops for symmetry of the pattern.
1st row: double crochet, the first stitch is knitted in the 5th loop from the hook;
2nd row: 3 lifting loops, 1 raised double crochet before work, * 1 double crochet, 2 raised double crochets before working *, 1 double crochet in air loop previous row;
3rd row: 3 lifting loops, * 2 double crochets, 1 raised double crochet before work *, 2 single crochets.
Knitting pattern
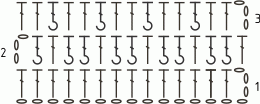
|
Symbols for the knitting pattern
|
Air loop. 8. 9. 10. 11. 12. 13. 14. 15. |


