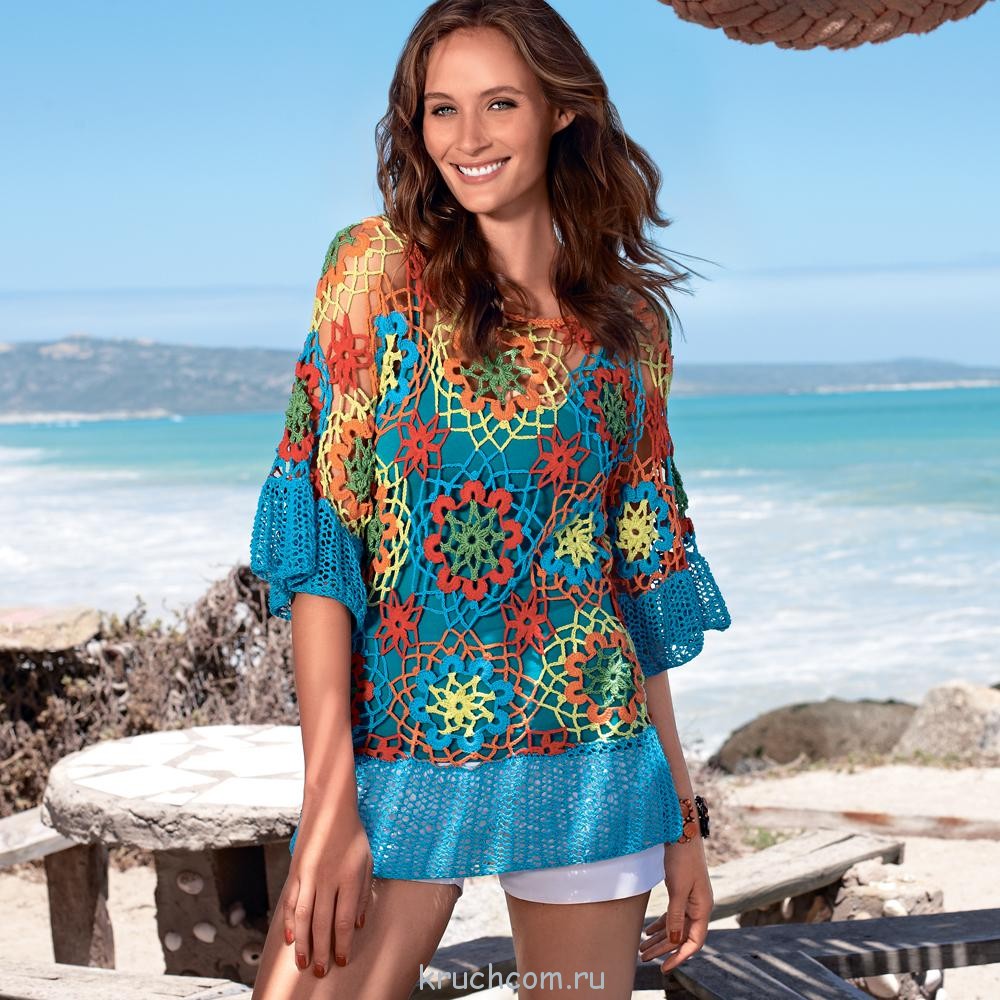
Girls from the cradle should be instilled with a love for beautiful things, don’t you agree? Young princesses deserve adorable and unique outfits, and crocheting them is a great idea! Today I will tell you how to crochet a tunic for a girl and tell you about all the subtleties and tricks of this process.
“Mom, I want it too!” - babies often ask to try on their mother’s dress, because they want to follow her example. This is great, and even better when the girl has more of her own outfits, knitted by caring hands. I'm sure the little lady will love this wonderful tunic and she will be happy to wear it (you can experiment with colors and choose the shades of thread that the child likes best). The pattern only seems complicated, but in fact you will quickly cope with this task. Don't believe me? Let's try it!
In the master class you will find detailed photos, videos and, of course, a step-by-step description of the process of crocheting a tunic for a girl. I tried to describe everything in as much detail as possible, but if you have any questions, ask them in the comments. I will also be sincerely glad if you share your successes and show what kind of tunic you turned out!
I am knitting a tunic for a girl from 1 to 2 years old with a chest circumference of 48-50 cm. You can knit it in any size.

Take a hook, thread and a good mood. Let's begin!
I knitted a tunic from Pekhorka “Children’s New” yarn (composition: 100% high-volume acrylic, 50 g/200 m), I needed 2 skeins of turquoise yarn and some gray and white yarn, I crocheted No. 2.5 mm.

Knitting density:
10 cm - 26 loops (double crochets)
1 cm - 2.6 loops
1 repeat = 6 loops = 2.3 cm
The width of the front and back is determined as 1/2 of the chest circumference (BC) + 2-3 cm for a loose fit. I have (48: 2) + 3 = 27 cm.

Let's determine the required number of loops for knitting a tunic, taking into account the pattern repeat.
1 cm - 2.6 loops
54 cm - 140 loops. (54 cm is front width + back width)
The number of loops for knitting a pattern should be divisible by 6; 140 is not divisible by 6. Therefore, the number of loops we need for knitting a tunic is 138 loops (divided by 6).
IMPORTANT POINT! The number of rapports must be even! We check the parity of the rapports, i.e. 138: 6 = 23 rapports (odd number). If you get an odd number, you need to subtract or add 6 loops to the number of loops that we counted, I decided to add 6 loops to 138 + 6 = 144 loops (24 repeats).
Let's build a pattern. I chose the width of the armholes, the width of the straps and the width of the neckline in accordance with the repeat pattern (3 repeats for the armholes, 2 repeats for the straps and 5 repeats for the neckline).

Especially for this master class, I prepared a complete pattern for crocheting a tunic for a girl (the pattern can be enlarged by clicking):

So, we have decided that to knit a tunic of the size we need, we need 144 loops.
We start knitting with an elastic band made of single crochets, knitted behind the back wall of the loop.
We need to knit an elastic band 1 row less than the number of loops we need 144 - 1 = 143 rows.
Let's get started. We knit a chain of air loops equal to the height (or width) of the elastic band. My elastic band is 7 cm wide. I cast on 21 chain stitches.

Insert the hook into the second loop of the chain from the hook and knit a single crochet.


At the end of the row we knit 1 air loop, turn the knitting over and knit the first loop of the base with a single crochet.

We will knit the next single crochets behind the back wall of the loop, 1 single crochet in each loop, except for the last loop.

In the last loop we knit a single crochet on both sides of the loop.

We knit all the following rows in the same way. We knit 1 air lifting loop, turn the knitting over, in the first loop of the base we knit a single crochet for both walls of the loop, then in each loop we knit 1 single crochet for the back wall of the loop, we knit this way until the end of the row and in the last loop we knit a single crochet for both walls of the loop.

This way I knitted 143 rows.

We connect the edges of the elastic using connecting stitches, knitting 1 stitch in each loop.


Turn the elastic right side out and knit according to the pattern. Fragment of the diagram (can be enlarged by clicking):

1st row: we knit 1 chain lifting loop, insert the hook into the same base loop and knit the first single crochet, then insert the hook into the columns of each row and knit 1 single crochet, we will get 143 single crochets + 1 single crochet, which we knitted into the connecting stitch row. In total we will have the 144 loops we need.


2nd row: we knit 3 air loops of lifting and in each loop until the end of the row we knit 1 double crochet.

We close the row with a connecting post into a 3rd lifting air loop. After this, the turquoise thread can be cut.

3rd row: attach a gray thread, knit 1 lifting chain stitch, knit a single crochet into the same base loop, then knit 1 single crochet into each loop until the end of the row.

We close the row with a connecting stitch in the first single crochet of this row. In this row we should also have 144 columns. The gray thread can be cut.

4th row: attach a white thread and knit 2 chain stitches and in the next 2 loops we knit 2 double crochets with a common top,


*in the next 3 loops we knit 3 double crochets with a common top and 2 chain loops*.

We knit like this from * to the end of the row. We close the row with a connecting post and insert the hook into the common top of the posts.

5 row: we knit 3 air loops for lifting + 1 air loop for the arch (i.e. we knit 4 air loops in total), and we knit a single crochet into the same base loop,

at the next common top of the columns of the previous row we knit a double crochet, 1 chain crochet and 1 more double crochet,

*at the next top of the columns of the previous row we also knit a double crochet, 1 chain crochet and 1 more double crochet*.

We knit from * to the end of the row and close the row with a connecting stitch in the 3rd lifting air loop.

6th row: to switch to knitting from an arch, we knit 1 more connecting stitch, then we knit 3 lifting air loops

and 2 double crochets in the same arch,

in the next arch we knit 3 double crochets.

In each subsequent arch to the end of the row we knit 3 double crochets.

We close the row with a connecting post into a 3rd lifting air loop. The white thread can be cut.

7th row: attach a gray thread, knit 1 lifting chain stitch and in the same base loop we knit the first single crochet, then in each loop until the end of the row we knit 1 single crochet.

We close the row with a connecting stitch into the first single crochet. We cut the gray thread.

8th row: attach a turquoise thread over the top of the middle double crochet, knitted with a white thread and knit 3 chain stitches,

In the next loop we knit a double crochet,

knit 3 air loops,

We skip 3 loops of the base and knit 1 double crochet into the next 3 loops,


*again we skip 3 loops of the base and in the next 3 loops we knit 1 double crochet, then we knit 3 chain loops*

We knit from * to the end of the row. At the end of the row, having knitted 3 air loops, we skip 3 base loops and knit a double crochet into the last loop.

We close the row with a connecting post into a 3rd lifting air loop.

9th row: we knit 1 lifting chain loop and in the same base loop we knit a single crochet,

knit 3 air loops

we knit a single crochet into the arch,


and we knit a single crochet at the top of the middle double crochet of the previous row, then 3 chain stitches,

in the next arch we knit a single crochet and 3 air loops,

So we will knit from * to the end of the row * in the middle double crochet of the previous row we knit a single crochet, 3 chain loops, in the arch we knit a single crochet and 3 chain loops*.

We close the row with a connecting stitch in the first single crochet of this row.

10th row: we knit 2 connecting stitches (this is how we move to the middle loop of the arch), 1 air lifting loop and a single crochet in the arch,


again we knit 3 chain stitches and a single crochet into the next arch,

So we knit until the end of the row * *.

At the end of the row we knitted a single crochet into the last arch,


11th row: we knit 3 chain stitches and 2 double crochets in an arch,


in the next arch we knit 5 double crochets,


*in the next arch we knit 5 double crochets, then we knit 1 chain stitch, a single crochet in the next arch and 1 chain crochet*

Repeat from * to the end of the row.

We tied the row to the end, knit 2 more double crochets into the first arch and close the row with a connecting stitch in the 3rd chain lifting loop.

Row 12: we knit 3 lifting chain stitches, in the next loop we knit a double crochet,


we skip the first vertex of the column of the previous row and starting from the second vertex we knit 3 double crochets (1 double crochet in each loop), then 3 chain loops,

*again, starting from the second top, knit 3 double crochets and 3 chain stitches*

We knit from * to the end of the row.

At the end of the row, we knit 1 more double crochet into the second top of the double crochet of the previous row and close the row with a connecting stitch in the 3rd chain lifting loop.


These are the 3 rapports.

First we will knit the front of the tunic. Fragment of the diagram (can be enlarged by clicking):

We detach the first marker (the seam should be at the back), attach the thread to the middle double crochet of the previous row.
1st row: We knit 1 chain lifting loop and a single crochet into the same base loop.

Next we continue to knit according to the pattern (like row 9). We knit 3 air loops and knit a single crochet into the arch, then we knit 3 air loops and we knit a single crochet into the middle double crochet of the previous row.

In this way we knit up to the loop, which is marked with a marker.


2nd row: at the end of the row of the first row we knit 3 air loops for lifting and 1 air loop for the arch (i.e. 4 air loops in total), turn the knitting over

and in the first arch we knit a single crochet, then we knit according to the pattern (like row 10): * 3 chain stitches and a single crochet in the next arch*. We knit from * to the end of the row.

at the end of the row, tying a single crochet into the last arch

We knit 1 chain stitch and double crochet into the single crochet of the previous row.

3rd row: we knit 3 chain stitches and 2 double crochets in the first arch,


At the end of the row, we knit 2 double crochets into the last arch and we knit another 1 double crochet into the 3rd chain stitch of the previous row.

4th row: knit 3 chain stitches and a double crochet in the next loop,


At the end of the row we knit a double crochet from the second top of the column of the previous row and we knit another 1 double crochet into the 3rd chain lifting loop.


One front strap is ready. We cut the thread.

We attach it from the front side to the top of the middle double crochet of the previous row, which is marked with a marker, we knit 1 chain lifting loop and a single crochet into the same base loop and we knit the second strap in the same way.


We cut the thread.

Let's start knitting the back. Fragment of the diagram (can be enlarged by clicking):

In the same way, on the front side of the product, we attach the thread to the middle double crochet of the previous row, which we have marked with a marker, we knit 1 chain loop and a single crochet in the same base loop. Next, we knit the back in exactly the same way as the front, only we knit the back not with such a deep neckline.

After one back strap is knitted, turn the product inside out and connect the 2 straps using connecting posts.

We cut the thread and knit the second back strap. We connect 2 parts in the same way.

Ready! When knitting a tunic, make sure that the head goes through the neckline (keep in mind that we will also have a binding). You can make the back neckline a little deeper than mine or skip the shoulder seams and make the straps with buttons.

All that remains is to tie the armholes and neckline. Here is the complete diagram of my harness.
For the armhole (by clicking the diagram can be enlarged):

And for the cutout (by clicking, the diagram can be enlarged):

You can see more details about how I tied the armholes and neckline in the video.


The tunic is ready!

You can decorate it with a lace made of air loops.


And now a video on how to crochet this tunic for a girl!
If you want to receive the latest articles, lessons and master classes from the site to your mailbox, then enter your name and e-mail in the form below. As soon as a new post is added to the site, you will be the first to know about it!
Size: 2-3 years
Materials:
200 g yarn ("SUMMER"; 70% cotton, 30% viscose; 350 m/100 g)
hook No. 2.5
1 button
80-100 cm narrow satin ribbon
nylon finishing lace.
Knitting density: 21 p. x 12 r. = 10 x 10 cm.

The tunic is knitted from top to bottom.
Cast on a chain of 90 air. p. and knit with double crochets in straight and reverse rows, distributing the loops as follows: 15 back sts, 2 air. p., 15 p. sleeves, 2 air. p., 30 p. front, 2 air. p., 15 p. sleeves, 2 air. p., 15 p. back.
This will create a cut on the back for the fastener.


After 6 cm from the beginning, close the knitting into a ring and continue in a circle.
After 11 cm from the beginning, leave the sleeve loops. Close the front and back loops into a ring (= 96 sts), continue knitting in the round st. s/n and perform 1-2 rows.
Continue with the pattern according to the pattern below (= 16 repeats in the circle) and knit 1-2 repeats in height depending on the desired length of the skirt.
Finish with a border, completing the last 3 rows according to the pattern.

Along the edge of the sleeves, tie a border with a pattern according to the pattern:


Along the edge of the neckline, knit 3 rows of st. b/n and sew on finishing lace.
In the corner of the cut, form a loop from a chain of air loops, sew a button on the opposite side of the cut.
Pull the ribbon through the holes of the first openwork row of the skirt, tie it with a bow in the center of the front.
Mothers always dream of their children being beautifully dressed. Every mother wants to see her daughter the most beautiful. And a tunic knitted by mother’s hands will carry a piece of mother’s love. To give joy to both the daughter and the mother, who crocheted a tunic for a girl with her own hands. Today there will be a master class with a description, and it will be suitable even for beginner knitters.
Let's start creating
This is the lovely pattern we will be knitting today. It is suitable for a 2-year-old girl, older children, and even younger ones; to knit such a miracle you will only need to measure the volume of the head.
We start knitting a tunic with a yoke. It is knitted from flowers. It is very important to note that we must have an even number of flowers in the yoke, i.e. 10, 12, etc. And each individual flower must have 12 petals. This is what the floral motif looks like in the original, but we modified it a little in our master class (more on that a little later):

First row: we knit 24 single crochets into an amigurumi ring.
Second row: work 3 double crochets (dc) with one top of 3 single crochets. The diagram shows that the first double crochet is inserted in the same place where the last of the three double crochets of one group ended.

Third row: knit 2 sc, then 3 ch, then 2 sc. The motive is ready.
In the further process of knitting, we should not knit each flower separately, but will immediately attach the next one to the first flower.
Attach according to this principle: tie 2 sc into the arch, then 1 ch, join, 1 ch, 2 sc.

In this photo, white dots indicate the junction of the flowers. We need to have 3 vertices, we fasten them, 2 vertices are free, again 3 vertices are fastened and 4 vertices are free again.

Perhaps you will like the original execution of the floral motif, but in this master class the floral motif is slightly changed. And this makes the central hole look smaller.
The motive here is connected in this way. In an amigurumi ring, 12 single crochets (SC) are knitted, then the next row is knitted with 24 SC, in the 3rd row from 2 SC of the previous row, 2 double crochets (SC) are knitted at one vertex, then 3 chain stitches (in. p.). The result is the following motif (next to it is the original one for visual comparison):

First, let’s knit 10 flowers and try to see if our child’s head will fit. If it doesn’t work, then we knit 2 or 4 more motifs. Remember about an even number of flowers! The floral yoke should lie flat on the shoulders so that there are no folds, but you also need to take into account that there will be a binding on the inside.
You can calculate the diameter of a circle by knowing the circumference of the child's head. For example: the girth of the head is 50 cm. Divide by 3.14 - the number Pi and get 16 cm. This will be the minimum diameter through which the head will fit 50 cm. Based on these calculations, it turns out that 12 flowers are needed.

The diameter of the circle can be changed by changing the size of the hook, changing the threads, or, for example, tying double crochets in a flower. After all the calculations and the resulting yoke of flowers, we begin to knit further.
Here is a diagram of our tunic:

The diagram is read from bottom to top in this case.
Main mating
We tie our flower circle. The first row consists of air loops: for a small arch it will be 3 loops, for a large arch it will be 9 loops.

Next round: knit sc, constantly look at the pattern. It turns out that in the first arch there will be 3 sbn, and in the large arch there will be 9 sbn.
If, as in this master class, you initially have 12 flowers, then there will be 72 ticks, if there are 10 flowers, then there should be 60 ticks, if there are 14 flowers, then there will be, respectively, 84 ticks.

When knitting 12 flowers at this stage you will get 36 repeats.

Divide the knitting into front, back and sleeves. But you can knit more; in the original version, 6 more rows were knitted.

How to divide a tunic into parts:
- 12 flowers (36 repeats), we get: 10 back, 8 sleeve, 10 front, 8 sleeve;
- 10 flowers (30 repeats), we get: 9 back, 6 sleeve, 9 front, 6 sleeve.
You can divide it based on your own discretion.
We knit the appendage on the back of the tunic. When the required number of rows of our yoke are knitted, let's turn it. We will knit the purl row with the main pattern, then turn and knit the front row again.


At the end of the row, finish with a chain of air loops. Such air loops should end both processes on the back of the tunic and in front. In the original pattern there are 12 air loops, but in this master class there are 8 loops.


When we attach a chain of air loops on the front of the tunic, the thread needs to be broken, but the attached chain on the back of the tunic will become the beginning of a new row, from where we will knit in the round, and in this place we will have a joining.

In the event that there are 8 air loops, and, for example, 16, you need to add 2 repeats.
After all the steps, we continue knitting in a circle according to the pattern until the desired length.

In the original, additional rows must be entered every 2 rows. But in this master class, only two additions were made to the front and back of the tunic.

The completion of knitting in the original pattern looks like this:

For a sleeve where arrows are added 2 repeats:

Optional length:

This is how we will tie the neckline:


The tunic for my daughter is ready.
Video on the topic of the article
Tags:
Boho is a relatively new trend in fashion, which has smoothly migrated not only into a truly free style of clothing, but also into a unique way of life. Today, boho style is at the peak of popularity, and both ordinary representatives of the fair sex and many world-class stars are involved in it.
Tags:

The tunic is that item of women’s wardrobe whose relevance will never be lost. In short, a tunic is an elongated blouse, usually reaching mid-thigh. Its main secret is a loose cut, thanks to which the advantages of the figure are emphasized, and minor flaws, on the contrary, are neatly hidden.
Tags:

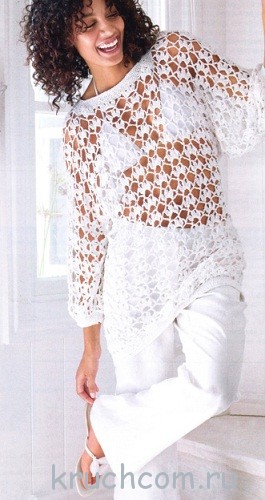
A classic and yet timeless theme, snow-white crochet will complement your bronzed tan and look simply irresistible! The length of the tunic allows it to be used as an elongated top or a short dress.
Dimensions: 36/38 (40/42) 44/46
You will need: 450 (500) 550 g white Meloa yarn (59% cotton, 41% viscose, 105 m/50 g); hook No. 4.5.
Arches pattern: the number of cast-on stitches is a multiple of 10 + 2, Knit according to the pattern. Start with loops before repeat, repeat repeat loops, end with loops after repeat; The starting and ending loops are calculated in the instructions for 1 repeat, respectively. Perform 1 time from the 1st to the 4th row, then repeat the 3rd and 4th row.
Knitting density, pattern of arches: 22 cast-on stitches and 9.5 r. = 10 x 10 cm.

A charming tunic with a lace flounce is knitted from a thin woolen thread in a delicate gray shade, which makes it elegant and elegant.
Size: 36/38
You will need: 350 g gray yarn (No. 09) Alpina ALPACA TWEED (90% alpaca wool, 7% acrylic, 3% viscose, 300 m/50 g); hook number 2.
Openwork pattern: knit according to pattern 3.
Shell pattern: knit according to pattern 1.
Mesh pattern: knit according to pattern 2.

Cheerful green will bring a charge of positive emotions to your wardrobe! The top of the tunic is knitted, and the lace skirt is crocheted.
Dimensions: 36/38 (48/50)
You will need: 650 (800) g green Big Size yarn (50% cotton, 50% polyacrylic, 50 m/50 g); hook No. 6; straight and circular knitting needles No. 6.
Attention! The arrows on the pattern indicate the direction of knitting.
Main pattern: the number of loops is a multiple of 26 + 6. Knit according to the pattern. Start with loops before repeat, perform repeat loops 1 (2) times, end with loops after repeat. Perform 1 time from 1st to 20th r., 1 time from 3rd to 11th r. = only 29 rub. Garter stitch: knit. and out. r. -persons p.


Circle after circle gather together and captivate with their original and unusual appearance. With a matching underdress or skinny trousers, the style can easily be transformed into a loose-fitting tunic.
A snow-white crocheted tunic is a must-have in your summer wardrobe. On a tanned body it looks simply amazing.

Competition entry No. 45 – Sundress-tunic for 1.5-2 years
Hello! My name is Olga Tarasova. I have loved knitting since childhood, and especially crocheting. This is my first time participating in the competition. I offer two jobs.
Knitted with Pekhorka “Pearl” threads.

Dimensions
104/110 (116/122) 128/134You will need
Yarn (100% cotton; 335 m/50 g) – 100 (150) 150 g red and 50 (100) 100 g peach; straight knitting needles No. 2.5; circle. knitting needles No. 2.5, length 60 cm; hook No. 2.Patterns and schemes
Facial surface
When knitting in forward and reverse directions, knit knit stitches in front rows, and purl stitches in purl rows.In circular rows, knit all stitches in all rows.
Garter stitch
When knitting in forward and reverse directions, knit all stitches in all rows.In circular rows, knit one row with knit stitches and the other with purl stitches.
Decorative reductions
Right edge: chrome, knit 2 stitches together. with a slant to the left (= 1 stitch removed as knit, knit the next stitch and pull the removed stitch through it)Left edge: knit 2 stitches together, knit edge.
Increases
Knit knit 1. cross. p. from the broach between p.Alternating stripes
Alternately 2 rounds. r. peach, 2 circle. r. in red.Square A
Crochet No. 2 in the round. Knit 6 squares in total.Start each circle with 3 ch. lifting instead of 1st st. s n. and close the circle 1 connection. column of
last v.p. rise.
1st circle. r.: use a red thread to tie a ring of 6 vp, close 1 connection. Art. in a circle Then knit 3 ch, 2 tbsp. s n. from the ring, 3 p.p., *3 tbsp. s n. from the ring. 3 ch, repeat 2 more times from *, conn. Art.
2nd circle. R.: W v.p., from the arch v.p., 2 v.p., * from the next. arches, 2 v.p. Repeat 2 more times from *, conn. Art.
3rd circle. R.: 3 v.p., on the corner from the arch in. p., v. 2, skip 3 tbsp. s n., 3 tbsp. s n. from the arch to. p., 2 vp, * from the arch at the corner, 2 vp, skip 3 tbsp. s n. and knit 3 tbsp. s n. from the following v.p., 2 v.p. Repeat from * 2 more times, conn. Art.
4th circle. r. (peach color): 3 v.p., from the arch v.p. on the corner, * ch 2, skip 3 sts. s n., 3 tbsp. s n. from the following vp, 2 vp, repeat 1 more time from *, ** from arch vp. on the corner, 2 ch, 3 tbsp. s n. from the following vp, 2 vp, repeat 1 more time from **, conn. Art.
5th circle. r.: knit as the 4th round. p., but between the corners knit 3 times.
For size 116/122, knit another 6th circle. p, for size 128/134 - 6th and 7th circle. r. square in peach color, with each new row knitting one more group.
Square B
Knit 4 squares.Knit like square A, but with a different color distribution:
1st (1st - 2nd) circle. r. – red;
2nd+3rd (2nd+3rd) 3rd circle. r. – peach;
4th+5th (4th - 6th) 5th - 7th circle. r. – red.
Knitting density
26 p. x 47 r. = 10 x 10 cm, knitted persons. satin stitch with knitting needles No. 2.5;square of 5 circle. r. = 6.5 cm x 6.5 cm, crocheted No. 2.
Attention!
The model consists of two yoke parts made from 5 squares, then a skirt is knitted under the yoke on knitting needles, and raglan sleeves are sewn to the outer part of the yoke.The arrow on the pattern indicates the direction of knitting.
Pattern

Getting the job done
Yoke
Knit 5 squares for the front and back.For each square, use a red thread to make a chain of 6 chain stitches. and close 1 connection. Art. into the ring.
Use a knitted seam to connect 5 squares for the front and back according to the pattern.
Skirt
Cast on a circle along the bottom edge of the front and back yoke. knitting needles No. 2.5 sts. red color next. way: starting from the side seam, 20 (24) 28 stitches from the edges of the squares and 1 stitch from each acute corner = 246 (294) 342 stitches.Close the st into a circle, mark the beginning of the circle and knit 1 circle. r. persons p., while at the junction of the squares, knit the last p. of the square with the 1st p. next. square together faces. = 240 (288) 336 p.
Next, knit in circles. stitch and for a jagged pattern, make a trace. techniques:
1st circle. row: *knit 1, knit 2 stitches together, knit 17 (21) knit 25, increase 1, knit 1, knit 1 increase, knit 17 (21-25), knit 2 stitches together. with a tilt to the left. Repeat from * to the end of the circle. r.
2nd circle. p.: all stitches knit faces.
Repeat these 2 rounds constantly. r.
For bevels, perform 1 circle 6 cm (= 22 rounds) from the set. r. no reductions. Because of this, the number of stitches between increases/decreases will increase by 1 stitch in each repeat. Repeat such increases (do not knit sts together) 2 (3) 4 more times in every 22nd round. r.
After 26 (31) 37 cm (= 98 (120) 142 rounds) from the yoke, knit alternating stripes, continuing the jagged pattern.
After the 18th lap. r. alternating stripes, knit for the bottom bar in red for another 2 rounds. r. purl stitch, then bind off st.
Sleeves
Cast on 50 (58) 64 stitches using knitting needles No. 2.5 in peach color and knit 4 rows for the placket. handkerchiefviscous. Then continue persons. satin stitch, while for raglan bevels, make 1 decorative decrease on both sides, then in every 2nd r. another 11 (13) 15 times on both sides, 1 decorative decrease = 26 (30) 32 p.
After 10.5 (11) 12 cm (= 50 (54) 58 r.) from the bar, close all sts.


