The car is a simple origami model. Unfortunately, for children 4-5 years old, it is very difficult to find a simple craft using the origami technique. And this model is doubly valuable, since it is mostly a craft for boys. You can simply play with ready-made paper cars. Or you can make a big application with them, sending these vehicles to the streets of a paper city. This solution is especially interesting for kindergarten or schools. First, you can make an application “City Street”, and in the next lesson you can “settle” cars in your city. Each child can do the work individually, but it is quite possible to do it teamwork. A simple craft origami for kids can be made from any colored paper - either colored on one side or double-sided. For preschool children, the squares should be large enough. No less than 12X12 cm.
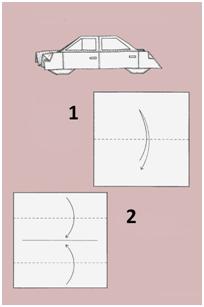
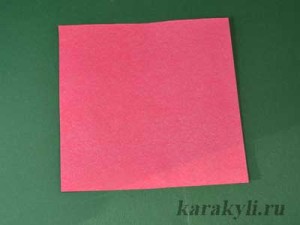 For the typewriter you will need a square of paper. It's better to take paper so that it is different colors on both sides.
 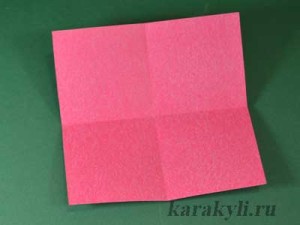 Fold the square of paper in half twice, marking the center lines, and open the workpiece.
  Bend the bottom edge of the sheet towards the center line.
 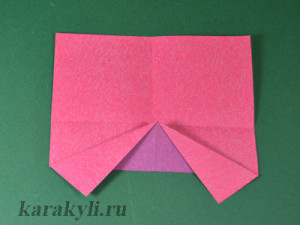 Bend the corners down.
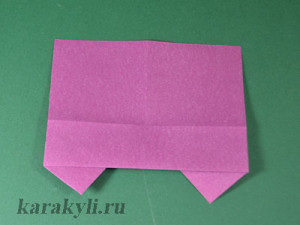
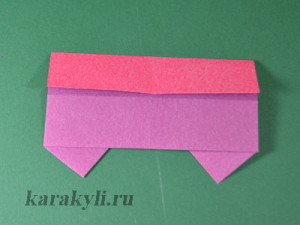 Turn the workpiece over and bend the top part towards the center line. At this point you can vary the height of your car.
 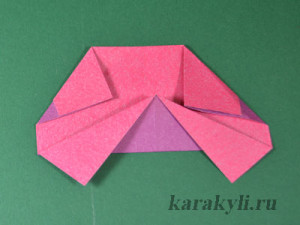 Turn the workpiece over again and bend the top corners towards the center. At this stage we make the contours of the car, and they can be anything.
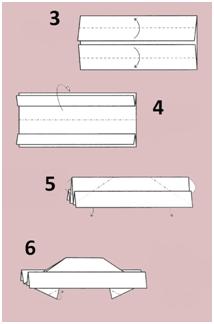
 Draw windows for your car.
The lower corners of the wheels can be turned back a little.
The machine - simple origami for kids is ready.
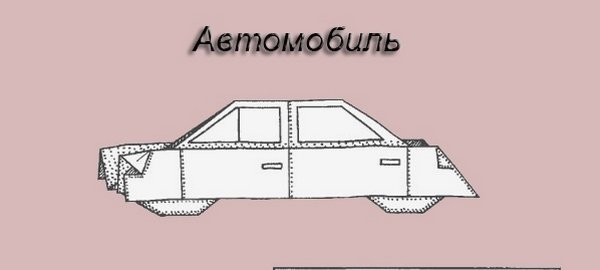
Surely, many of you know how to make boats or airplanes out of paper. Even those who have never been interested in the art of origami quickly master these models in childhood, and then tirelessly build entire flotillas from notebook leaves. Despite the fact that making a tiny car using the origami technique is also very simple, this model is slightly less popular. That is why in this article we want to tell you in detail how to make an origami machine out of paper according to the diagram.
Four simple models
Of course, a logical question arises: what kind of car will we make? After all, visually different types cars are very different and a truck, for example, does not look at all like a convertible, and an SUV does not look like a limousine. We have chosen four simple models, representing ordinary passenger cars, a gazelle and a typical racing car.
Scheme for making a car using origami technique No. 1
To make a figurine we need 1 square sheet of paper. It is better to choose special thin double-sided paper for origami, although notebook paper will also work.
Let's start making paper car No. 1
1) Bend a sheet of paper in half and bend it back. Fold the top and bottom edges of the square to the center line.
2) We bend the top layer to the top and bottom of the square, respectively. Bend it in half away from you.

3) We push the right and left corners inward so that we get a car body. We bend the lower corners (these will be the wheels) inward, giving them shape.
4) Bend the bottom corners back, slightly “rounding” the wheels. Place the corners in the back of the machine, and make “headlights” in the front.
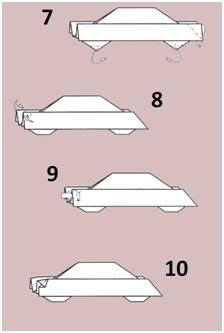
5) Our car is ready! Now you can color it with paints or felt-tip pens.
Scheme for making a passenger car using origami technique No. 2
The author of the second paper dove pattern is the famous Japanese origamist Fumiaki Shingu. To make a figurine we need 1 square sheet of paper and scissors. It is better to choose special thin double-sided paper for origami, although notebook paper will also work.
Let's start making paper car No. 2
1)Fold a square piece of paper in half. Bend the bend well in both directions.
2) Fold half of each half towards the middle axis. Also bend the bend well in both directions.
3) Fold the corners in reverse side so that you get four identical right triangles.
4) Bend the right corners of the triangles a few millimeters - these will be the wheels of our passenger car.
5) Fold the sheet in half and bend one of the right corners of the top of the rectangle inward.
6) From the other right angle, make a small oblique cut (this is where scissors come in handy!) and bend the cut part inward.
7) The car is ready!
Scheme for making a gazelle using the origami technique
To make a figurine we need 1 square sheet of paper. It is better to choose special thin double-sided paper for origami. A format of 15 cm by 15 cm is ideal.
Let's start making a paper gazelle
1) Fold the square horizontally and unbend it. We fold it vertically and unbend it again. Fold the bottom part towards the center line
2) Bend the corners down to make wheels
3) Fold the model in half, along the horizontal center fold line.
4) Bend the bottom edge up
5) Now you need to bend the upper right corner to make a gazelle cabin. The figurine is ready!
Scheme for making a racing car using origami technique
In some origami books, this racing car design is also called a "boat". And indeed, made of thick paper, it floats quite well on the water. To make a figurine we need 1 rectangular sheet of paper. It is better to choose special thin double-sided paper for origami, although notebook paper will also work.
Let's start making a paper racing car
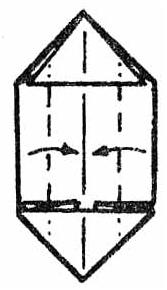
1) Place the sheet vertically and fold it in half.
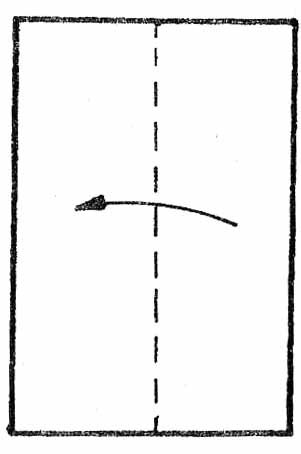
2) It is necessary to outline the folds in the top and bottom parts, and then perform the basic “Double Triangle” technique.
3) We fold the sides towards the middle axis.
4) Now you need to lower the corners to the center line.
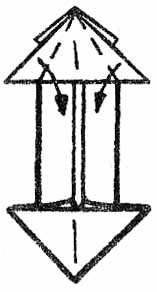
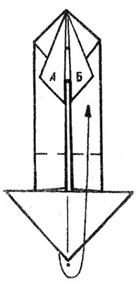
5) Connect the dots to each other, simultaneously inserting the corners inside the lower part.
6) This is what should happen.
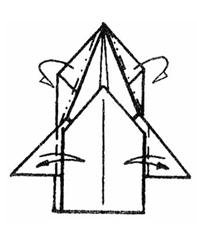
7) Form the wings.
8) On the upper flat part, three lines must be marked in accordance with the diagram.
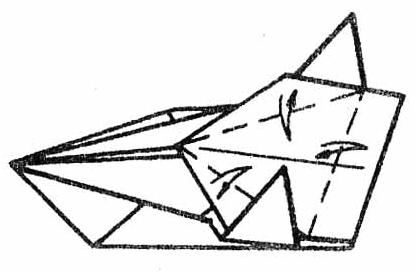
9) Our racing car is ready!
Children will definitely enjoy making such figures. After all, the game does not end only at the stage of folding origami. After this, you can paint the car and draw a seated driver in it. To make the game even more fun, we suggest building a whole fleet of vehicles and organizing a fun race. And for each car you can build a garage out of a shoe box, a technical inspection station... There are no limits to your imagination.
Video on the topic
Attached below detailed videos, which demonstrate step by step how to make a paper machine yourself.
Traditionally it is believed that doing various types Girls should do handicrafts from childhood. But this is a misconception, since production various crafts, drawing, creating panels and other types of creativity develop imagination, fine motor skills, help children learn the world around us and instill a love of art, all depending on the gender of the child. Of course, it can be more difficult to get boys interested in such activities, but even them can be interested in needlework.
For example, excellent option will invite the child to assemble a collection of origami cars from colored paper. He will definitely appreciate the opportunity to fold the model he likes in any color, especially since in the future you can play with such paper cars in the same way as regular ones. Following step by step instructions and diagrams, even novice handicraft parents will be able to explain to their child the principle by which the origami machine is folded.


Origami racing car
One of the most popular car models in this technology is considered racing car origami. The MK below is suitable for school-age children, since it is necessary to carefully monitor the order of folds.
Detailed master class with step by step description assembly of this model with photo. Take a sheet of A4 paper and fold it in half lengthwise. Now we create exactly the same folds for the strip as in the diagram below. A double triangle should form on each side of the strip.

Next, along the folds, we fold the ends of the paper blank so that two triangles are formed with the vertices outward. Here we bend the side stripes along the lines towards the center. Now the corners of the workpiece are bent towards its center line.

At this stage you need to be especially careful. We connect the points along the arrow in the diagram, while inserting the corners into the pocket formed at the bottom of the workpiece. After these manipulations, the origami machine should look like this.
![]()
Now we mark the folds along the lines. Mark three more folds on the back of the machine.
We bend all the parts of the origami machine into the desired position.
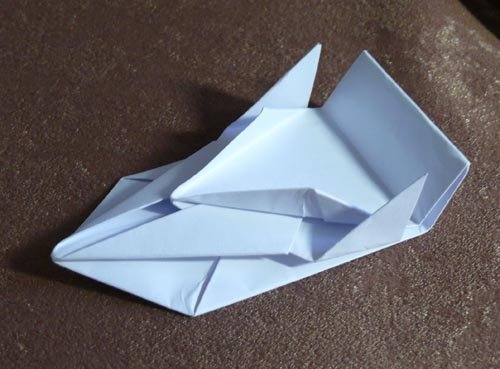
In the end, you should end up with a racing car that looks something like this.


If you find it difficult to navigate the graphical assembly diagram, we recommend watching a video with a step-by-step explanation of each step.
Video: Making a racing paper car
A simple origami car
We offer one more, more easy master class, which is ideal for beginner handicrafts. Such a machine can be made immediately from colored paper or painted after.
![]()
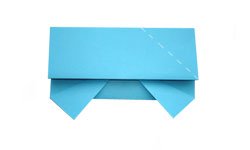
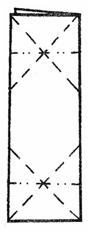
Instructions on how to assemble a paper model of a car with your own hands. Fold the square sheet in half. Now we unfold the sheet and bend its edges to the resulting fold in the center.
We bend the edges of the sheet again, but in the opposite direction. And bend the sheet in half. We turn the workpiece over and mark two oblique folds, as in the diagram, and then bend the resulting triangles inside the workpiece. The body of an origami machine should look like this. We also bend the triangles sticking out from below inward.
We bend the sharp corners of the wheels back to give them a more realistic shape and stability. At the same stage, we form the back part of the origami machine by bending the corners on the right side inward as follows. We bend the corners on the other side of the machine to form headlights. Let's straighten these corners. The end result should be a car like this.
You can make figures and models of any complexity from paper. For example, large machines can be assembled using technology modular origami or using ready-made cut-out templates. Using these methods you can create a fire truck, motorcycle or boat. And various photo and video lessons explaining the assembly process will help you and your child bring such ideas to life.
Video: Origami toy car


