Probably all schoolchildren love to do crafts at school and at home. It is worth saying that a wide variety of materials can be used for crafts today. But quite often schoolchildren make crafts from cardboard and colored paper. Why does this happen? Yes, then that's what it's all about best material, which is convenient to work with. Today our article will tell you about what paper crafts there are for schoolchildren. You will definitely like these crafts and you will probably want to make them for some holiday or just for a good mood.
Simple paper crafts for schoolchildren
Applications.
First graders and students primary classes, of course, they won’t be able to make complex crafts. And the teacher should invite them to make easier crafts. For example, you can make cute appliqués that kids can give to their mothers or grandmothers. There can be many options for applications. You should just turn on your imagination and try to make something unusual and at the same time cute. The applications are very easy to make. Just look at the beauty you can create with your own hands.
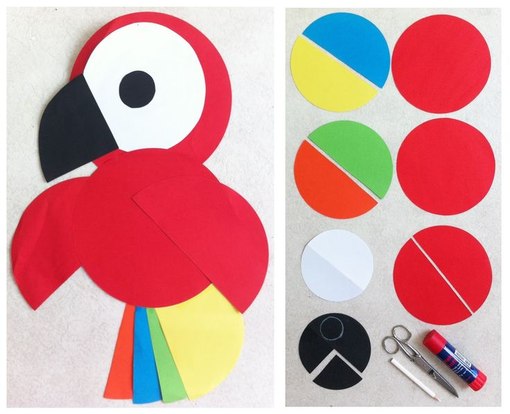
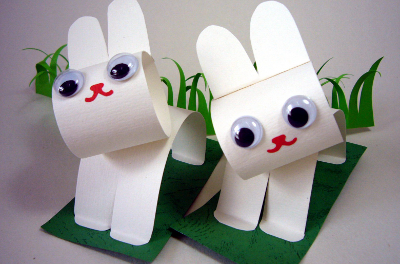
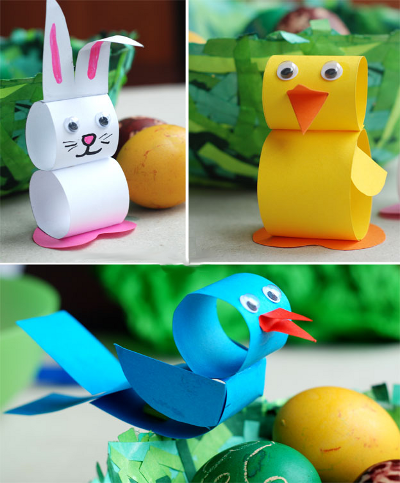
Figures made of colored paper.
If you would like to see all paper crafts for junior schoolchildren, then this article will help you do it. In addition to paper applications, you can make cute little animals. However, in this case, for decoration it is worth using additional details that will imitate the eyes and other parts of the animal’s face.
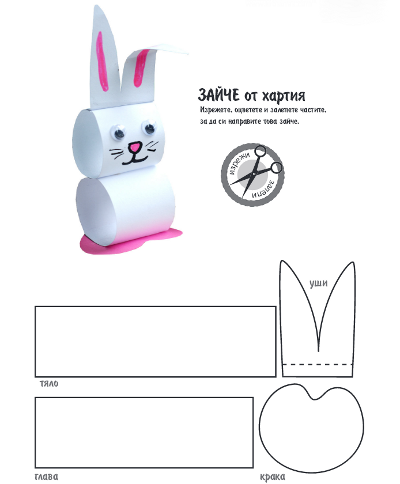
And if your child is not yet a first-grader, but is just getting ready for school and it is difficult for him to cut out all the parts exactly, then print out a template for him.
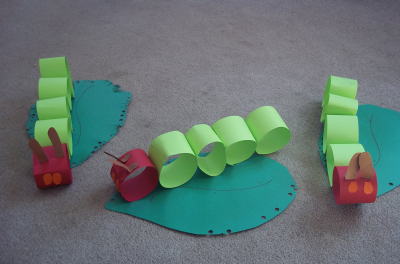
You can make caterpillars from strips of colored paper. To do this, use a bright colored paper and create such interesting crafts.
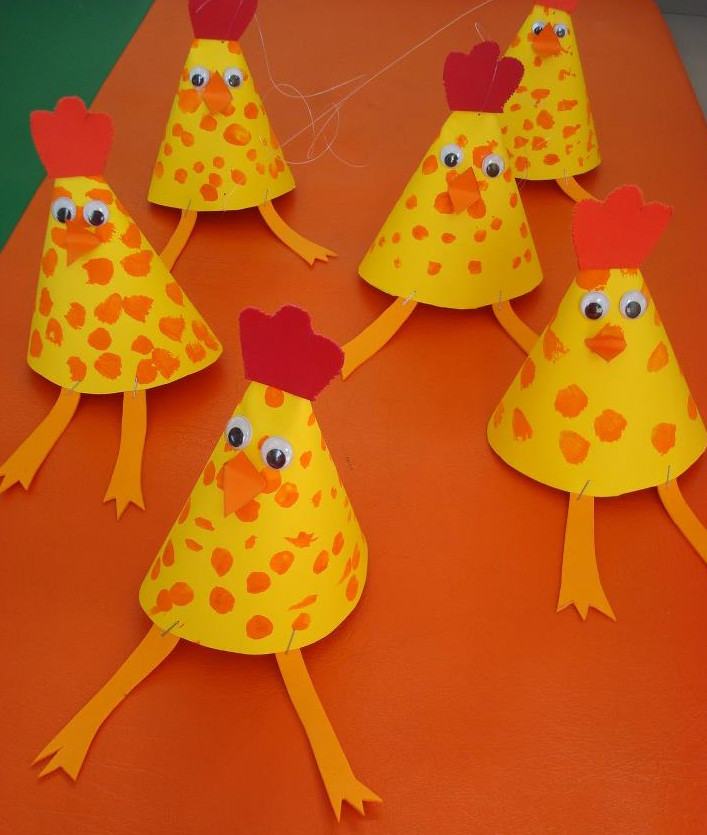
See what funny chickens you can make from bright colored paper.
Show the children how to make a fan and a paper rose. Together with them, make a sakura branch from the same material and place it in a paper vase.
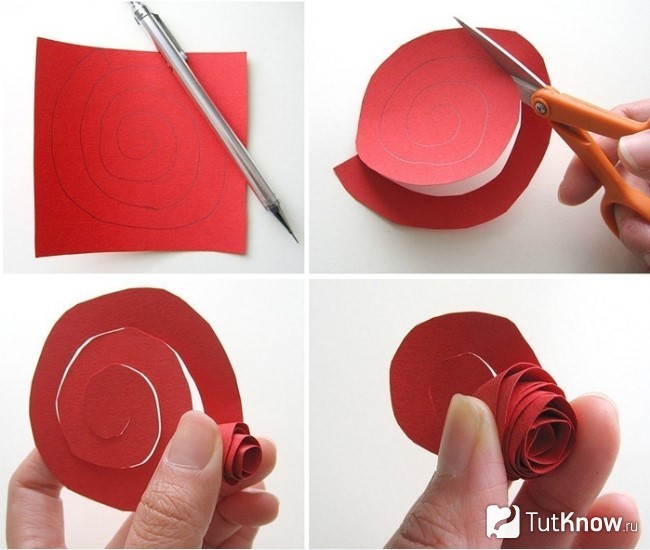
DIY paper rose - 2 designs
Such a flower can quickly transform a room and decorate a banquet table. You can twist several roses and make an artificial garden from them.

Show your child how to make their own roses using one of the most simple ways. For this craft you will need only 4 things:
- colored paper;
- pencil;
- scissors;
- office glue.
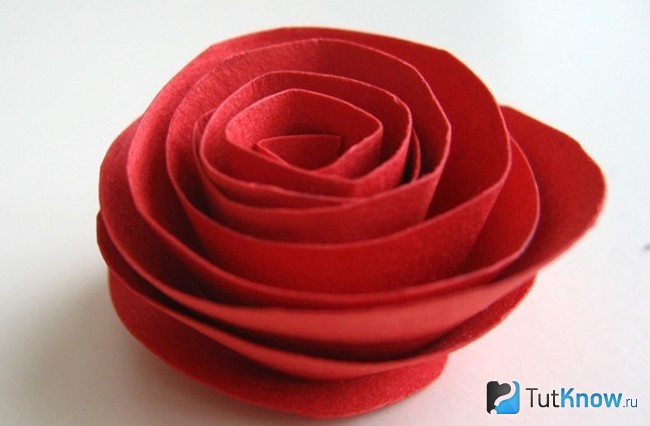
This is such a wonderful paper rose, made with your own hands or with the palms of a baby.
Wonderful artificial plants are also made from soft thin paper. Here's how to make ruffled roses.
Before you start creating, prepare:
- green and red corrugated paper;
- electrical tape or glue;
- wire;
- wooden stick.
To make making petals easier, fold the paper into a stack several times. Then you will make several elements at once, rather than cutting out one petal at a time.
Draw a heart on the top sheet of the stack and cut out the petals along this outline. They need to be given volume; to do this, you need to place the thumbs of both hands on the right and left sides of the petal and press. Now each workpiece needs to be folded over the left and right edges. To do this, bring the part to the stick, use this simple device to twist one and the second upper edge of the petal back.
Wrap the stem with a green strip corrugated paper, gluing it at the same time. Cut out paired blanks for leaves from the same paper. Place 1 sheet face down on the table, coat the backside with glue, place the wire here, and another sheet blank on top, face up.
Here's how to make a crepe paper rose next. Take a stem, coat its top with glue, and tightly wrap the first petal around its top. Lubricate the lower part of this petal with a small amount of glue, and wrap the second petal. In this way, decorate the entire flower, gluing the petals.
Cut a strip of green corrugated paper and use scissors to make one long side of it zigzag. Screw this element onto the bottom of the flower, positioning its teeth towards the bud.
Making a fan with your own hands
It can also be made from paper. This device comes in handy when it’s hot and you can make one like this useful thing you can literally do it in 10 minutes.
If the child is small, then show him a simple manufacturing option. For this he will need:
- colored paper;
- figured hole punches;
- satin ribbon;
- glue.
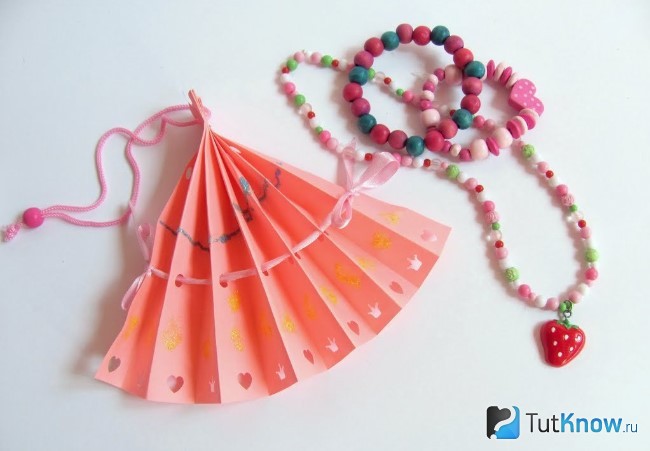
Here's how to make a paper fan for your baby. An older child may use more difficult option. Here are the materials needed for needlework:
- A4 sheet of paper;
- scotch;
- wooden sticks;
- beads;
- rubber.
To make the handle of the fan by which it will be held, screw adhesive tape 2.5 cm wide here. Also use this adhesive tape to attach wooden sticks to the lower right side of the product. To make the fan foldable, cut a strip of elastic to the required length, string beads onto it, and tie two knots. Place a rubber band on the bottom of two wooden sticks.
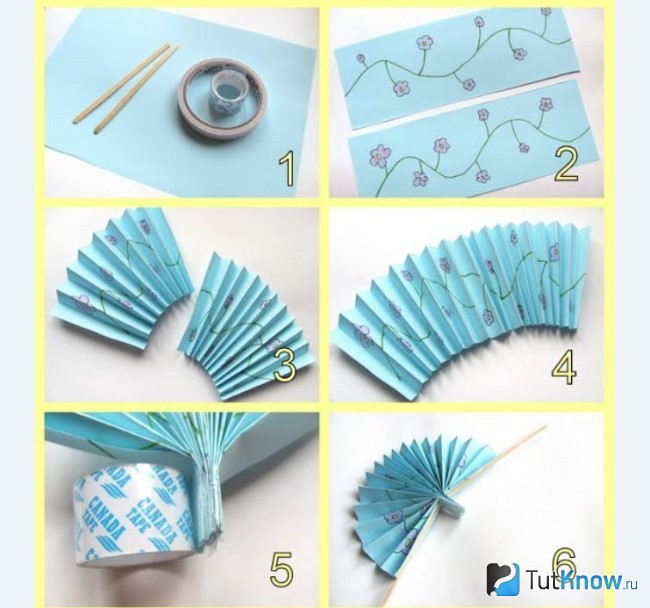
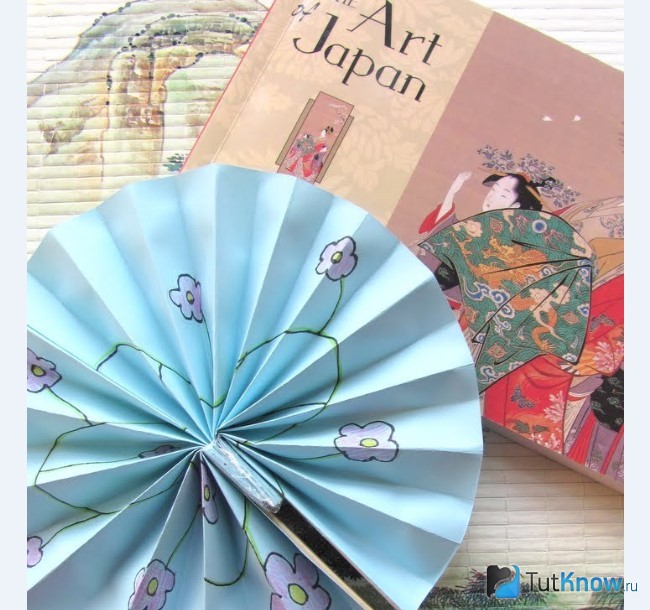
Here's how to make a Japanese-style paper fan.
How to make a pinwheel?
It is also made from very affordable material. If you show your child how to make a pinwheel, he will be happy to do an interesting craft.
Look how much various options There may be such wind blowers.
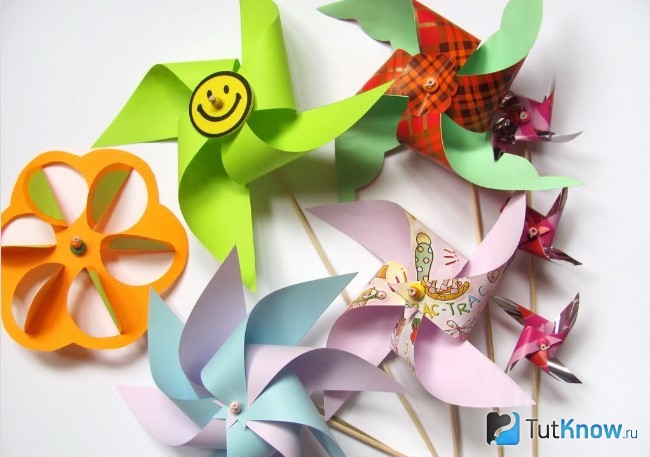
The child will enjoy playing with the pinwheels, and you can place them in your dacha, thus decorating your suburban area.
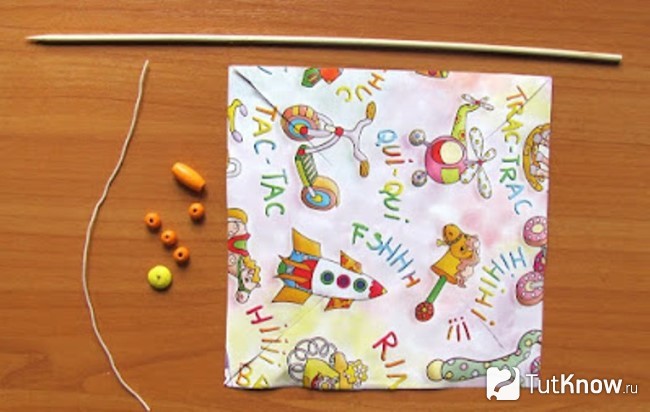
For production it is taken:
- a sheet of double-sided paper or two single-sided ones, measuring 14x14 cm;
- bamboo skewer;
- beads;
- awl;
- wire;
- Ruler and pencil;
- straws for cocktails.
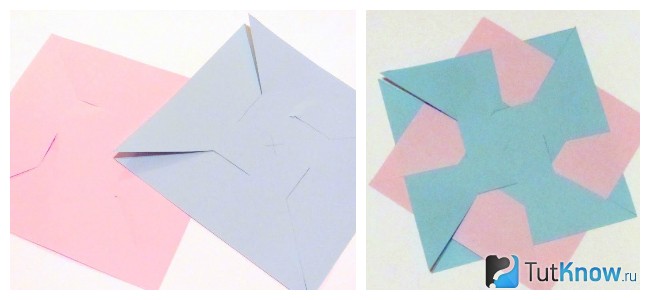
If you have two sheets of single-sided colored paper, glue them together with the wrong sides facing each other. Diagrams will help you better understand the principle of creating a product.
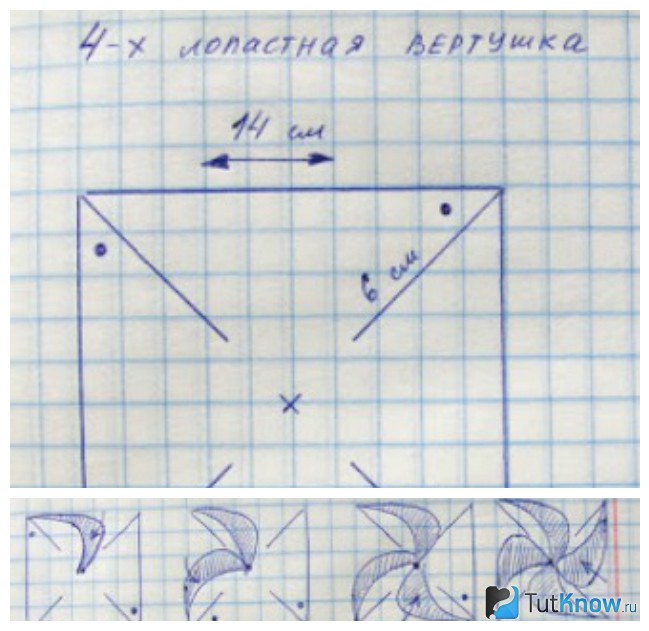
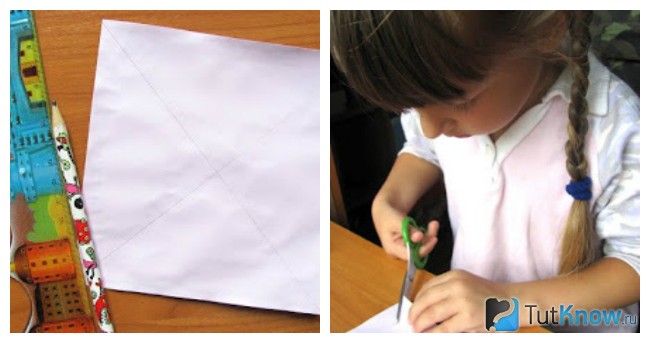
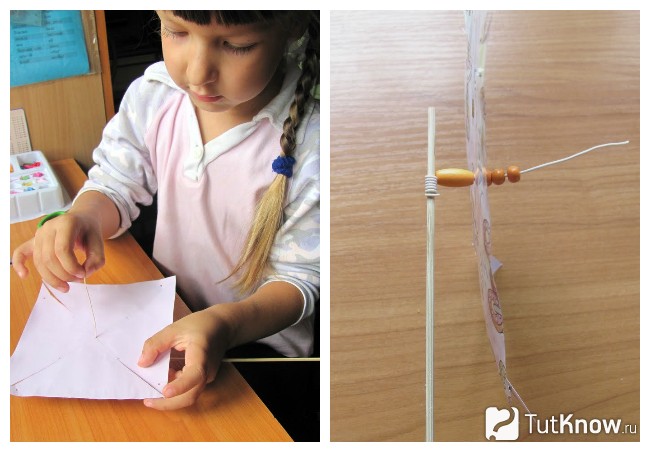
Have your child use a ruler and pencil to draw a square piece of paper diagonally. Then, not reaching the center 6 cm, he will cut along these lines.
Take on the next stage of work yourself. Use an awl to make a hole in the center, as well as at the top, through the corner. The diagram shows exactly which areas need to be treated in this way.
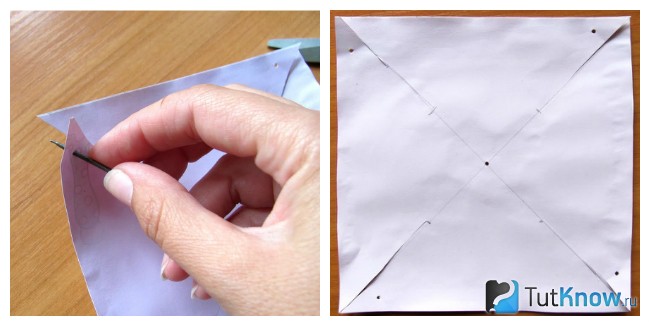
Now the child can take up the work again, to whom you will explain how to make the pinwheel further. Let him wind a wire around a stick and string a bead on it, which is used as a limiter.
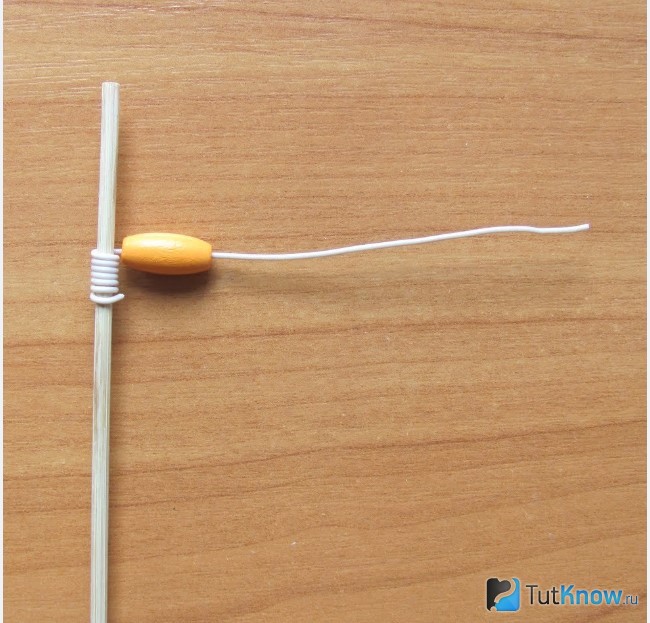
After this, the wire must be threaded into the central hole of the paper square, and secured on the other side with beads.
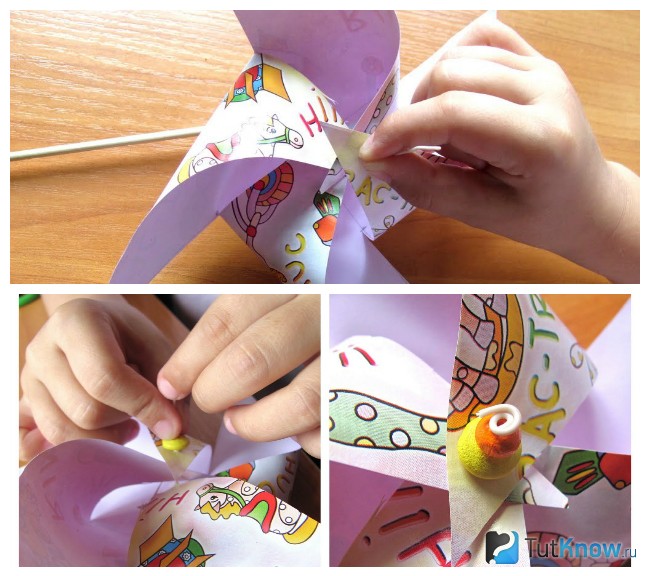
All that remains is to place the edges of the paper square on the tip of the wire one by one and secure these blades with beads. Make sure that they do not overtighten the main element and that it rotates well.
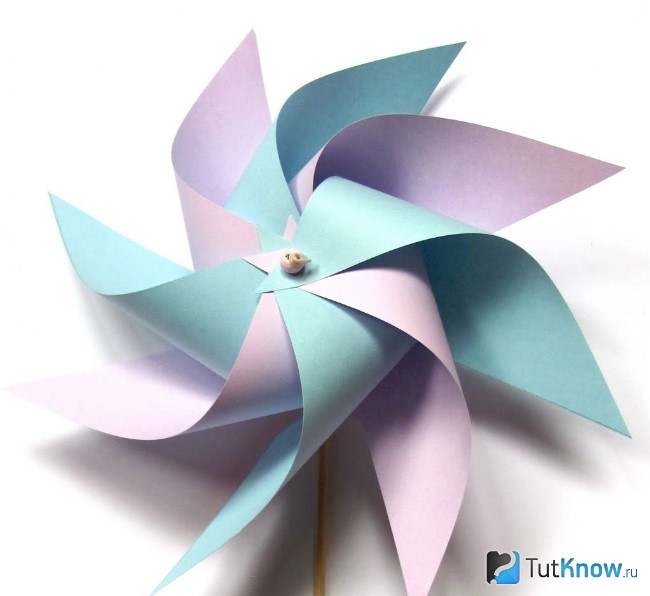
If a child has easily mastered this technique and wants to know how to make an eight-bladed pinwheel, tell him that it is made using two four-bladed ones, but the grooves are made in a slightly different way.
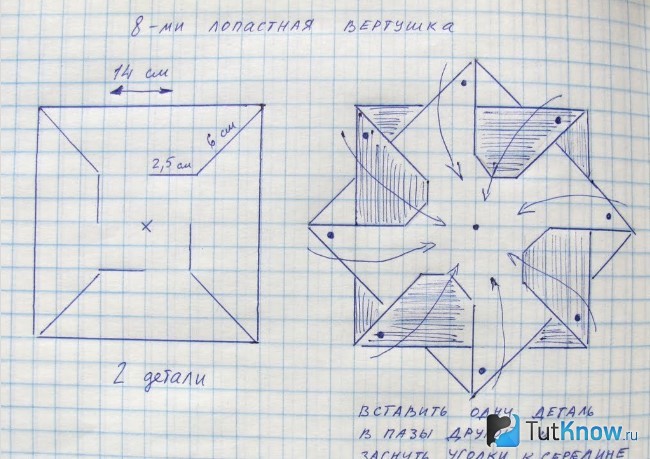
Based on the diagrams, cut out two such blanks from two square sheets and insert one into the other.
The diagram shows where to make holes in the center and on which top edges. Make holes, secure the pinwheel to the stick with wire, following the previous description.
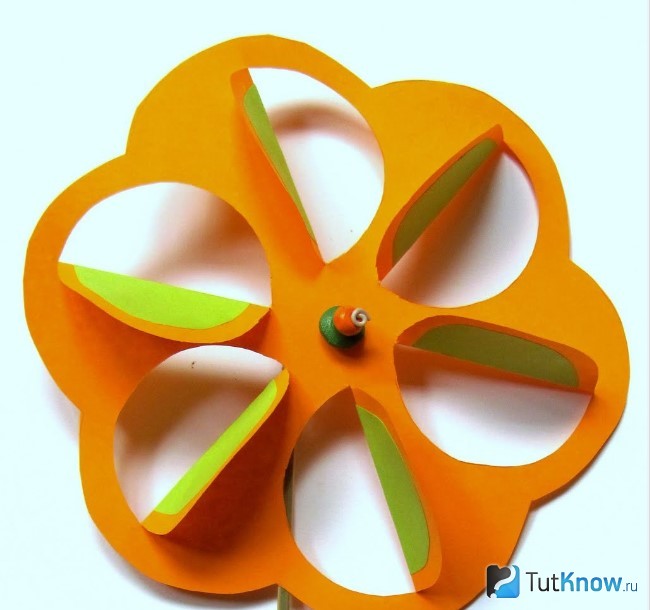
A paper pinwheel in the shape of a flower also looks great and performs its functions. It is also cut out from a square sheet with sides of 14 centimeters, only the edges are made semicircular.
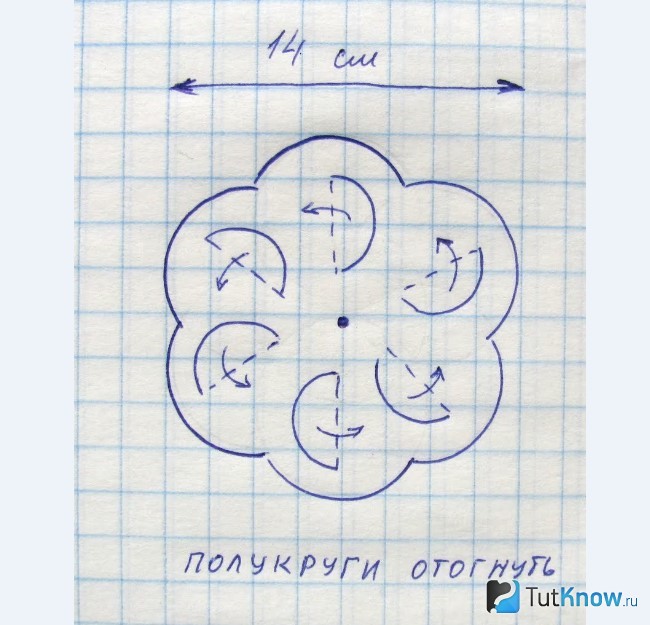
Looking at the diagram, it will not be difficult to make internal slits and bend these elements as shown in the photograph.
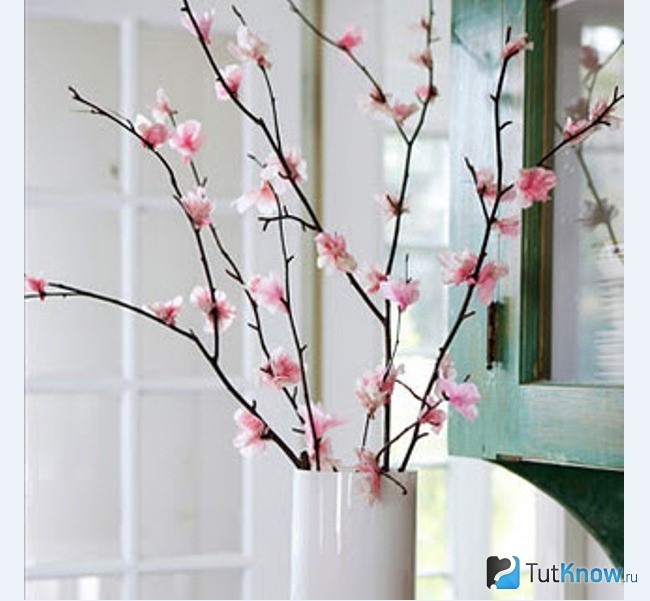
If you want to return to the floral theme, learn how to make a sakura branch from paper, read about it right now. Stocking up on what you need will help you create it quickly. elegant decoration Houses.
DIY sakura branch
It will resemble Japan in the spring and will never wither.
To make cherry blossoms live in your home for a long time, here’s what you need to make the display:
- corrugated or papyrus paper in dark and light pink;
- glue gun;
- dry twigs;
- scissors.
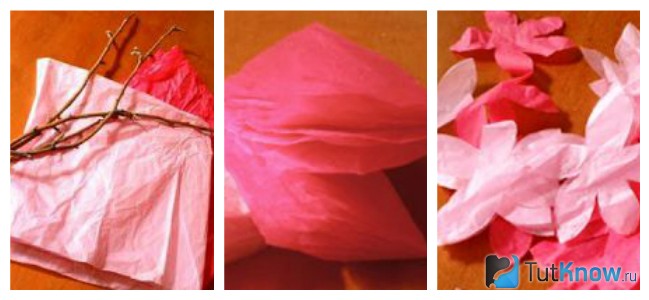
Now take the darker flower and place the light pink one on top of it, moving it so the lower contrasting petals are visible. Drop a little glue into the center and press this place with your hands wearing thin rubber gloves. Slightly crumple the blank so that the sakura flower looks like a real one.
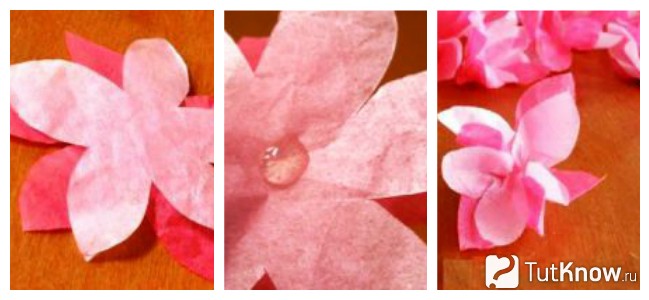
Now take a dry branch and revive it by gluing the blanks.
You can make small indentations with a knife, glue flowers there, or wrap them with floral tape or matching tape.
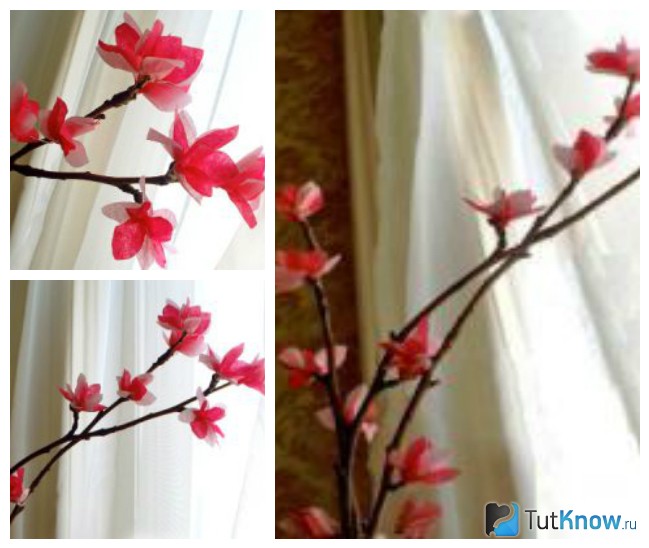
This is such a beautiful cherry blossom you made from paper. You can make not only one or several branches, but also a whole tree. If you don't have much space in your home, make it small. This decoration will fit perfectly into the room and will remind you of spring even in winter.

The sakura branch may look different. For this purpose, flowers are made in a slightly different way. First, 6 large petals are cut out from bright pink paper, and the same number from light pink paper, but smaller in size. For such a craft, you also need yellow paper, the stamens are made from it. Cut a circle out of it, cut its ends with fringe. Glue them to the top in the center of the flower.
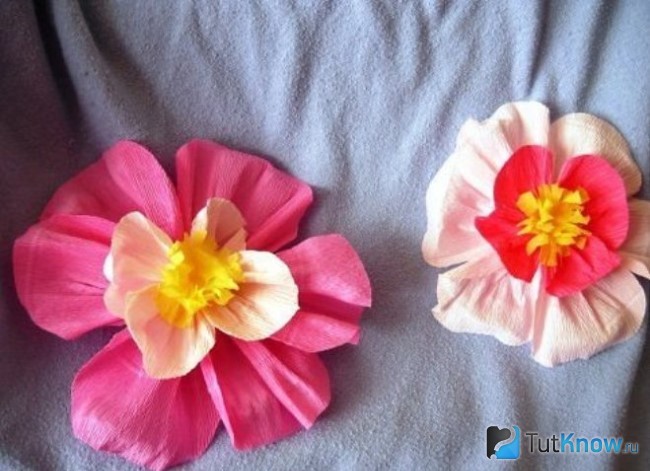
A sakura branch can decorate a large space. To do this, flowers are glued to the wall.
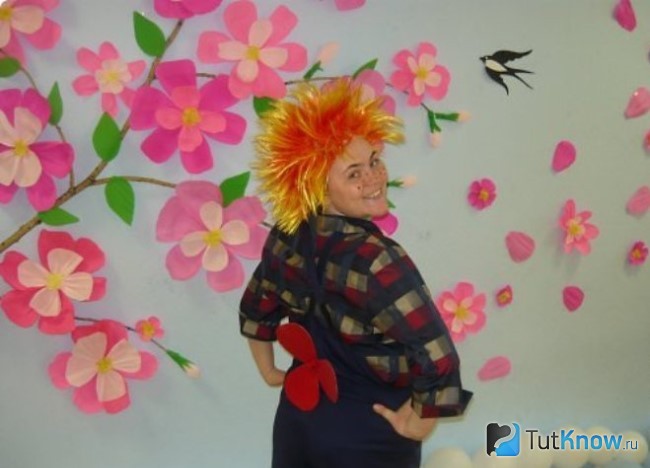
If you prefer a tabletop option, then think about where you will place the artificial branch.
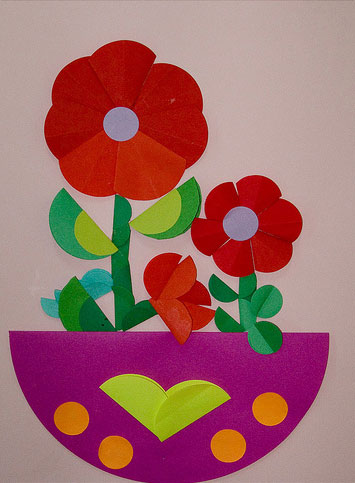
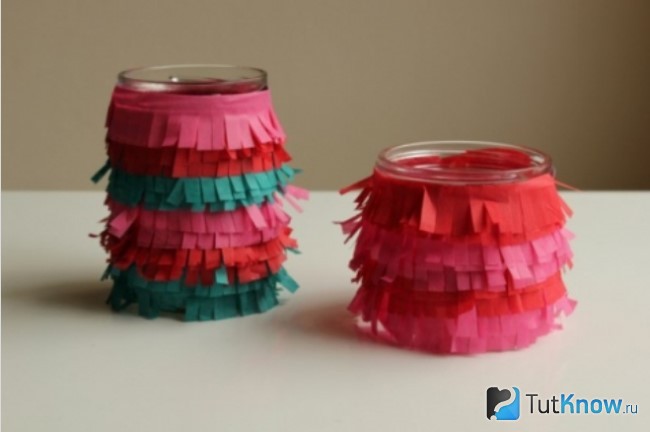
Paper vase
The composition will look great in such a beautiful container. It can also be used for its intended purpose - fill it with water and place fresh flowers.
For this useful job you will need:
- corrugated or plain multi-colored paper;
- glass jar;
- scissors;
- PVA glue.
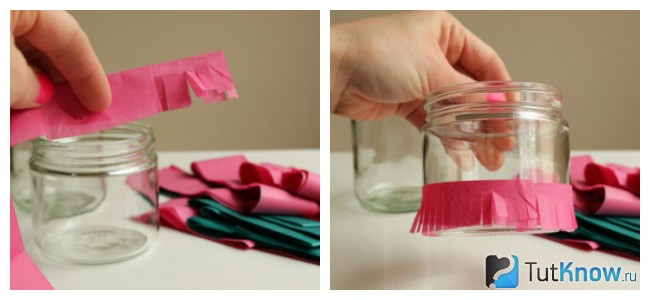
Glue the second and each subsequent one a little higher. As a result, you will get a beautiful paper vase.
Even a kindergarten age child could make this. He will be interested in learning how to make a vase with his own hands so that it turns out so original.
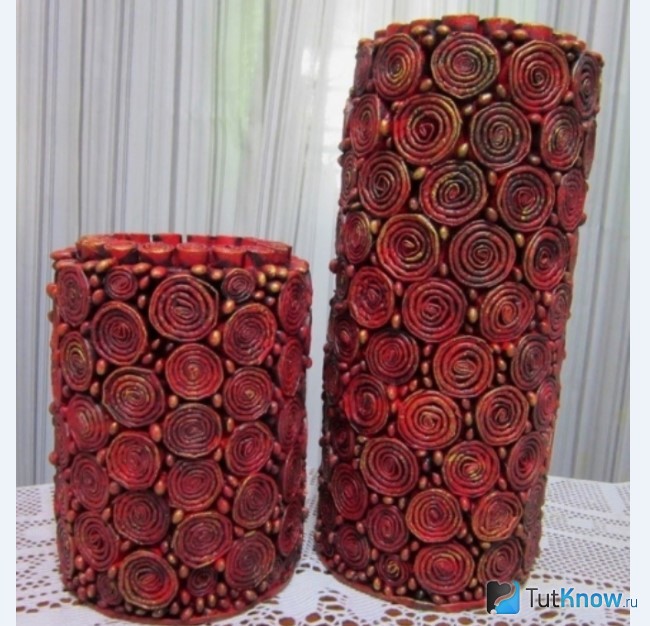
A sakura branch will stand in it and look perfect. For work, use the list of the following materials:
- cardboard tube;
- unnecessary newspapers and magazines;
- PVA glue;
- transparent fixative varnish;
- cardboard;
- golden tint;
- paint.
For the base of the vase, take a cardboard tube of medium diameter. You can buy it at a hardware store or make it yourself from 2-3 sheets of cardboard, twisting and gluing them.
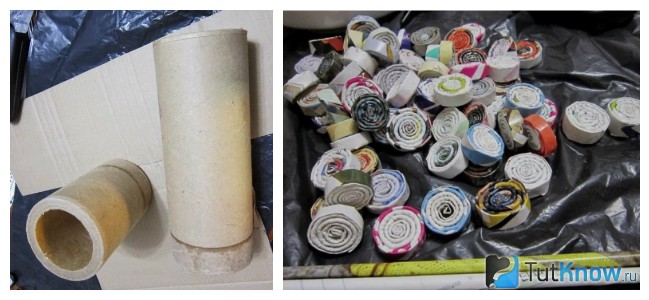
- Depending on how tall the paper vase will be, you will cut the cardboard tube to that height. Place its bottom on a piece of cardboard, trace the bottom and cut it out. Attach this piece to the bottom of the pipe with super glue.
- Cut strips from old newspapers and magazines, fold each in half, roll them into tight rolls, lubricating parts of the parts with glue so that they do not unwind.
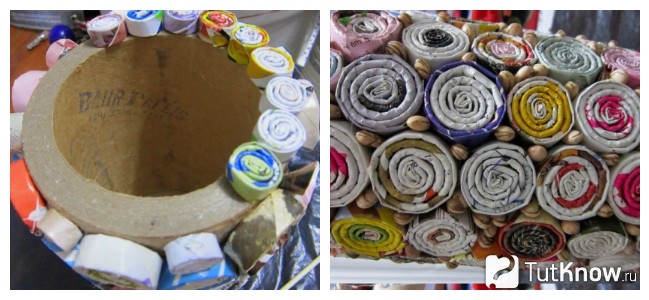
- Cover the outer surface of the cardboard tube, including its top.
- Fill the gaps between the parts with beads, beads, buttons or beans.
When the glue dries, start decorating the paper vase. To do this, first cover it with scarlet paint and let it dry. Then apply black and immediately after that, without letting it dry, wipe off the excess with a sponge. It is only needed for tinting.

Here's how to make a vase with your own hands next. When the paint is completely dry, coat the piece with translucent gold paint. When it dries, apply 2-3 layers of fixative varnish to the surface and leave to dry. After this, you can put a sakura branch, dried flowers or decorative grass in the vase.
That's how many useful things can be made from cardboard and plain paper. At the end of the article, as always, you will find interesting videos on this topic.
- This is a cheap and very easy way to keep children occupied for a while. In addition, such paper crafts perfectly develop fine motor skills children's hands, teach them to act step by step, select colors and do something with their own hands.
All boys love cars and the more racing cars, cars, trucks and tractors each boy has, the better. Therefore, today we will show you how to make a racing car with your own hands, using cardboard, bushings from toilet paper, as well as scissors and felt-tip pens.
The toilet paper roll can be covered with colored paper, or it can be colored with felt-tip pens. Cut a hole approximately in the middle between the two ends of the bushing, this will be the place for our racer.
Try cutting out 4 circles from cardboard, these will be wheels. Color them with a black felt-tip pen. You can also cut out and color a steering wheel circle for our racing car. Glue the wheels and steering wheel to the car, and you can put it inside little man. You can play with such a handmade machine, and if you make a lot of machines, you can arrange fun competitions and other games.
How to make a paper car with your own hands in 3 minutes
For girls
For girls 7-8 years old you can make it out of paper interesting view crafts - the crown of a real princess. Every girl wants to be a beautiful princess at least a little, so it’s worth giving the baby this opportunity.
Small cardboard tubes are best suited for creating crowns; using toilet paper rolls should work well for this purpose. Besides, crowns - crafts you will need to decorate with something. To do this, you can use paper of different colors, original beads and much more, everything is limited only by your imagination.
Crowns from toilet paper rolls must be cut out carefully. You can use scissors to cut out a very ordinary crown with pointed peaks, or you can cut a circle at the end of each peak, so the crown will look more interesting. These will need to be colored in different colors and attach an elastic band to the base of each crown made from toilet paper rolls.
Girls need to decorate such crafts. For children aged 7-8 years, it is important to do everything independently and with their own hands, so show the kids general schemes decorations, help them, and they will do the rest themselves.
Modular origami crown assembly diagram
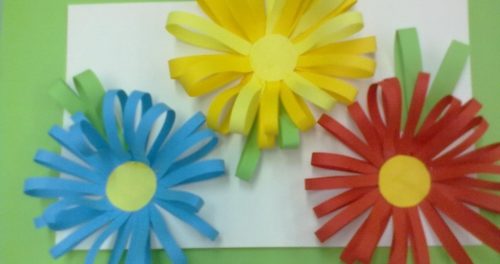
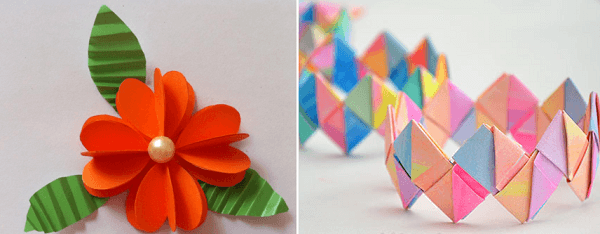
Paper flowers
The most beautiful and lightest paper flowers are made from corrugated paper. Such crafts will greatly delight children 7-8 years old, because with the help of corrugated paper, glue, scissors, a stapler, colored paper and a satin ribbon, you can make a beautiful decoration for a room or a gift.
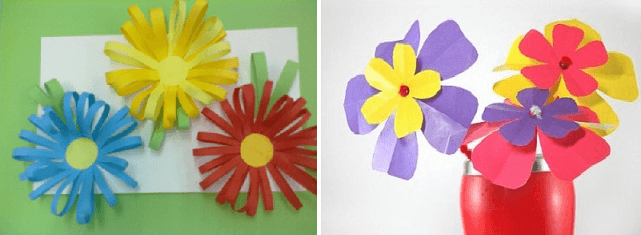
So that you can make a lot of beautiful flowers from colored corrugated paper, you can arrange a master class for several children 7-8 years old, so you will show the children patterns for creating flowers with your own hands and you can make not one, but 3-4 crafts.
So, how to make beautiful three-dimensional flowers with your own hands using scissors and corrugated paper:
- Cut 12 circles of the same diameter from corrugated paper.
- Place each cut circle on top of another and stack them in one pile.
- Use a stapler to secure the middle crosswise.
- Now, using scissors, start making cuts along the edges of the circles, be sure to leave room for the middle.
- Cut out a circle from colored paper, which will be our center.
- Now you can fluff the edges of the resulting flowers and attach a satin ribbon to the flower to hang it in the room or on a panel.
Postcard for grandmother and mother / DIY paper crafts
Master class with photos
Amazing and original crafts In the form of mosaic appliqués, children make them from colored paper. It is entirely acceptable to use corrugated paper of different colors for appliqué.
Ask the children to draw on a blank piece of paper the outline of a fish, bunny or flower, which they will make in the form of a mosaic appliqué. Prepare strips of bright, possibly corrugated paper, which we will cut into squares for applique using scissors. Try to cut the squares correctly, only then the appliques made by yourself will be neat and even.
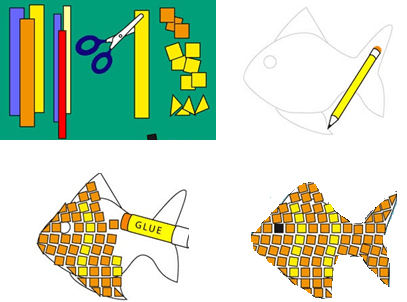
For children, it will be better to choose a glue stick, which can help stick appliques quickly and without problems. Start gluing the applique squares, trying not to go beyond the outline. For children, this task will not be difficult to cope with, and the applications will be cute and neat.
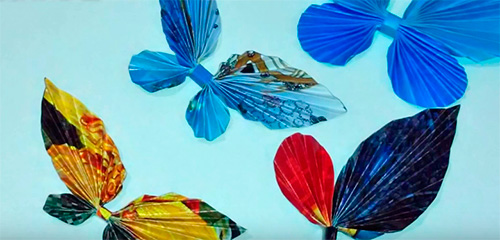
Volumetric crafts
Very cute volumetric crafts are obtained if children aged 7-8 years are interested in the origami technique. For example, you can try to make butterflies, it will be very simple and interesting. It can even be folded from corrugated colored paper, and the patterns will be very light and original:
- First we make a module, for this we fold a piece of paper in half.
- Turn over and fold the leaf in half again.
- After this we bend the corners towards the middle.
- We turn the workpiece over and bend the small corners up, then fold its entire lower edge up.
- We bend it in half again and the module is ready.
To make a butterfly, you need to make a large number of modules that will form the body and wings of the origami butterfly. At the initial stage, you need to correctly form the body of the butterfly from the modules; if everything works out correctly, then you will need to attach wings to the outer modules. In fact, it is not necessary to adhere to the exact assembly scheme; it is quite possible to fantasize and use different original steps to make your origami unique and the cutest.
Modular origami butterfly assembly diagram
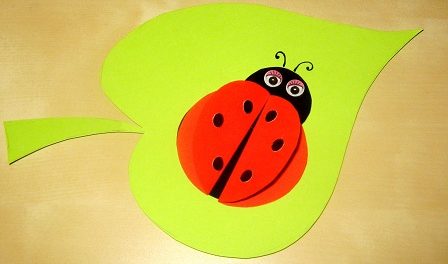
Animals
Animals are the favorites of absolutely all children, so we will try to make animal appliques using toilet paper rolls. First you need to choose what animal you will make. For example, you can choose a tiger, an elephant or a hippopotamus.
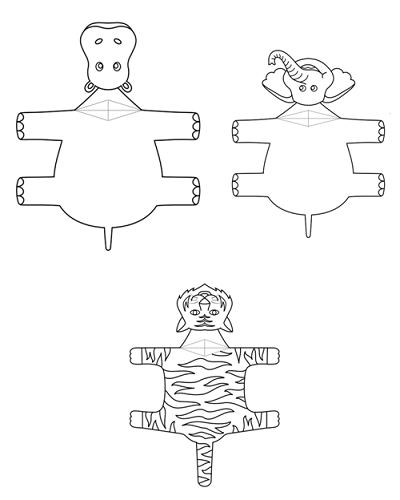
You can print one of the outlines on a piece of paper and cut it out using scissors. Children should be able to make things with their own hands, so let them work with the patterns completely on their own.
After cutting out the animals, bend them in the same way as shown in the picture. Be sure to bend the animal’s head along the dotted lines, so it will rise and be positioned correctly in relation to the body.
Under the body of the animal, after it is bent along the lines, you will need to start gluing toilet paper sleeves. Using a toilet paper tube will help make the animal's body more dense. This makes for very original toys.
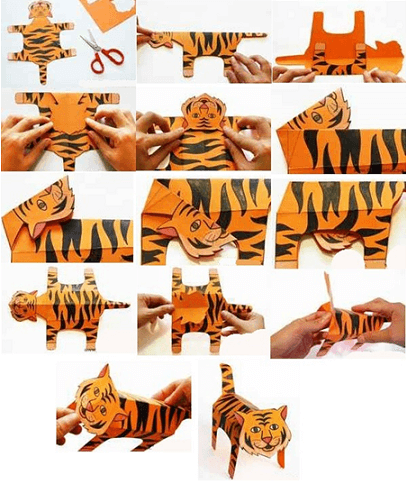
To make the toy heavier and not fall from the wind, you can print the image on cardboard, and the toilet paper tube will need to be stuffed with the same toilet paper. You can decorate the toy with a bow made of corrugated paper, which can be easily made from a rectangle folded like an accordion and tied with thread.
As you can see, a wide variety of applications and crafts made from bright, corrugated and even toilet paper will help you keep your child occupied for a long time, and it will cost you mere pennies.
A seven-year-old child is quite capable of studying independently various types creativity. He can already create various heroes from cartoons, and then organize mini-performances with their participation; he can, like comics, make various crafts from paper. True, some modern children are reluctant to engage in these types of creativity, preferring a tablet or TV.
The parents’ task is to attract the child’s attention to the development of this skill, and if the child enjoys crafting, then help him master new horizons in making paper crafts. We will try to talk about what types of techniques can be used for paper crafts children 7 years old independently or with the help of adults.
What abilities and skills does this activity develop?
Nowadays paper is the most accessible material for children's creativity. Thanks to the diversity existing species paper, its shapes, textures, colors, many techniques have emerged for creating all kinds of crafts.
This is especially true when it comes to children 7 years old. They are no longer those kids who are just making their first attempts at creativity. Seven-year-olds are able to perform more complex types of crafts both independently and with the help of adults.
Paper crafts are not easy interesting activity. They play a big role in mental, sensory, moral, labor and aesthetic education. During classes, the foundations of inquisitiveness are laid and the store of knowledge about the variety of forms and qualitative characteristics of objects in the surrounding world is replenished. The horizons expand, hand motor skills, creative thinking and artistic taste develop.
Children learn to experiment - first the child will do the work according to the model, then, based on the skills acquired, he will be able to move away from the template and come up with independent versions of crafts. In addition, children develop accuracy, perseverance, a creative attitude towards the life around them, hard work and mutual assistance, the ability to complete the work they start, overcome difficulties in work, and engage in concentrated and purposeful work.
What crafts can be made from paper for a 7 year old child?
While developing the child’s skills, parents should actively participate in making crafts themselves. For example, preschoolers are often asked to bring kindergarten any thematic craft that the child would make at home with the help of his parents.
Sometimes, parents themselves “create”, not allowing their child to help, and in vain. Such moments for creativity should be appreciated: you are not just making something together, you are showing the child how to cut out the shape correctly, how to connect the details of the craft together, in the end, you are communicating with the baby.
Types of paper crafts that a seven-year-old child can try out include the following:
- application and its varieties,
- quilling,
- openwork cutting,
- paper weaving,
- volumetric crafts (papercrafting),
- origami,
- modular,
- papier-mâché and so on.
In order for a child to want to create, parents must also be creative. In any case, at first the child will really need the help of elders, because at the age of 7 children are not yet able to learn all the intricacies of paper craft on their own. Put everything aside and devote at least an hour of time to your child. This will benefit not only him, but also you.
Examples of crafts with step-by-step instructions
Let's take a closer look at each of the above types of crafts for 7-year-old children.
Application
Applique can be called a classic type of paper art. There is not a single adult who did not engage in this simple creativity as a child. Considering that children 7 years old are already sufficiently able to work with scissors and glue, the applique will not cause any particular difficulties.
The appliqué technique consists of cutting out various shapes and elements from colored paper and gluing them onto a base to create a picture. 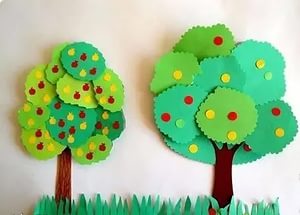
To work you need:
- colored paper and colored cardboard,
- scissors and glue,
- a simple pencil and a desire to create.
Colored cardboard is the basis of the craft, the background on which the picture is created, and the necessary elements are cut out of the paper.
The application can be created using different techniques:
- Tear applique is created from pieces of paper not cut with scissors, but torn by hand, which allows you to create textured images.
- An overlay applique is created by sequentially gluing various parts layer by layer, moving from larger elements to smaller ones.
- A modular applique is obtained by gluing elements of the same shape and size (triangles, circles, squares), creating a kind of paper mosaic.
- While creating silhouette applique children 7 years old can cut out quite complex silhouettes, both using their imagination and using a drawn outline.
Instructions:
- Select a picture for the application.
- On back side Use colored paper to draw all the elements of the applique.
- Cut out applique elements
- Glue all the elements one by one onto colored cardboard (background), starting with large parts and ending with small ones.
Collage is also one of the types of appliqué. To work with this technique, instead of colored paper, you can use clippings from illustrated magazines, postcards, posters, candy and chocolate wrappers, as well as any available materials (buttons, grains of various crops, straw, tree bark, cotton wool, etc.).
A new direction in application is called iris folding, which means rainbow folding. Colored strips of paper are twisted in a spiral, overlapping each other, thereby creating the illusion of a three-dimensional image.
Quilling
Quilling, or paper rolling, is an ancient, elegant craft. The technique of making crafts using the quilling method is simple, and any child 7 years old can handle it. 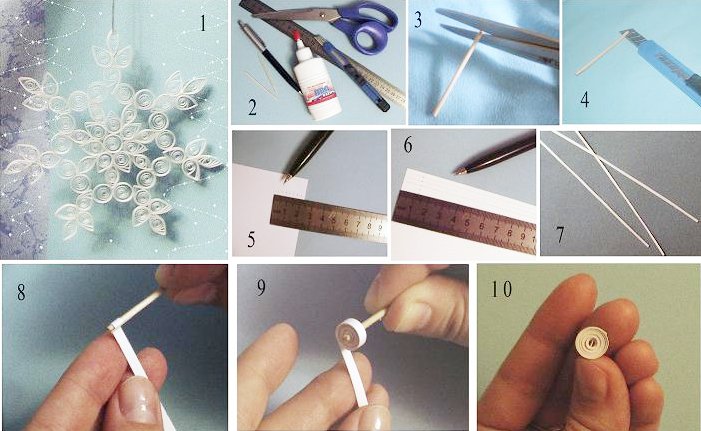
To work you need:
- quilling kit (thin colored strips of paper)
- toothpick
- cardboard for background.
Instructions:
- Make a cut at the end of the toothpick (let the child's parents help him so that he doesn't cut himself).
- Insert the end into the cut paper strip and begin to wind it around its axis, tightening it tightly around the toothpick.
- Lightly release the resulting spring so that it weakens a little.
- Remove the spring from the toothpick, seal the edge and shape the spring by pinching it with your fingers.
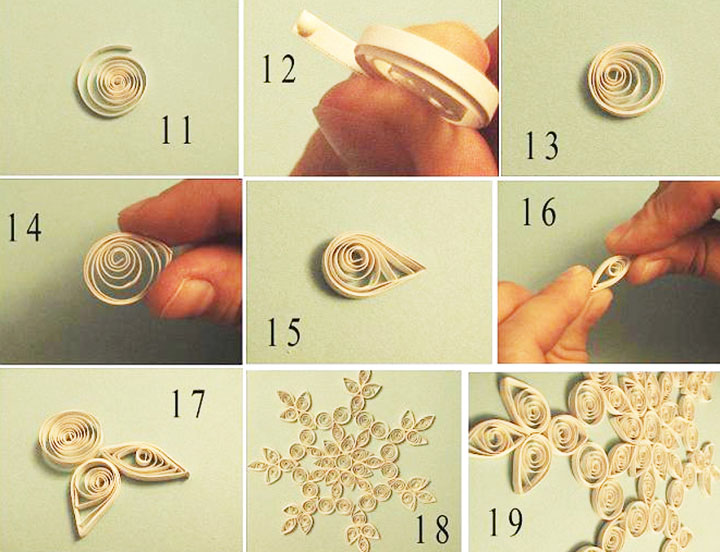
Narrow strips of colored paper are first twisted around a toothpick, and the tip of the strip is glued to the resulting kind of coil - a spring roll - so that it does not unwind. Then the twisted rolls are given the desired shape with your fingers - oval, triangle, drop, leaf, heart, crescent.
Finished parts are assembled into the intended composition by gluing to cardboard. As is clear from the description of the technique, for quilling you need scissors, glue, a toothpick, colored cardboard that will serve as the background for the future painting, and strips of colored paper 3-5 mm wide.
Currently, sets of multi-colored quilling strips are widely available. You can cut such strips yourself from office colored paper, having previously lined them under a ruler. This technique produces very good images of flowers, berries and fruits, birds and insects. And a postcard made by a child using this technique will delight every mother.
Openwork cutting (stencils)
For openwork cutting, you need paper and nail scissors - they have sharp ends and straight short blades that are convenient for cutting. It is better not to use a stationery knife, because children of seven years of age do not yet fully understand the safety precautions when working with this tool. You can use office paper - white or colored. 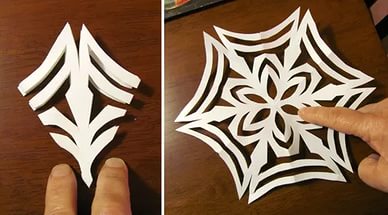
Instructions:
- For symmetrical cutting, the paper is folded in half or more.
- Take a simple diagram, the contours of which are not very narrow and small. Gradually, the child will master cutting skills and will be able to use more complex patterns. They can be found on the Internet and printed or redrawn from a book.
- Cut-out figures and elements can be pasted onto colored cardboard, or can be used as an independent element for decorating, for example, an interior.
On New Year's Eve, it is very popular to cut out snowflakes, Christmas trees and other figures that decorate windows and walls of rooms to create a festive atmosphere.
Paper weaving
Paper weaving requires a certain perseverance and patience, and sometimes the help of an adult. 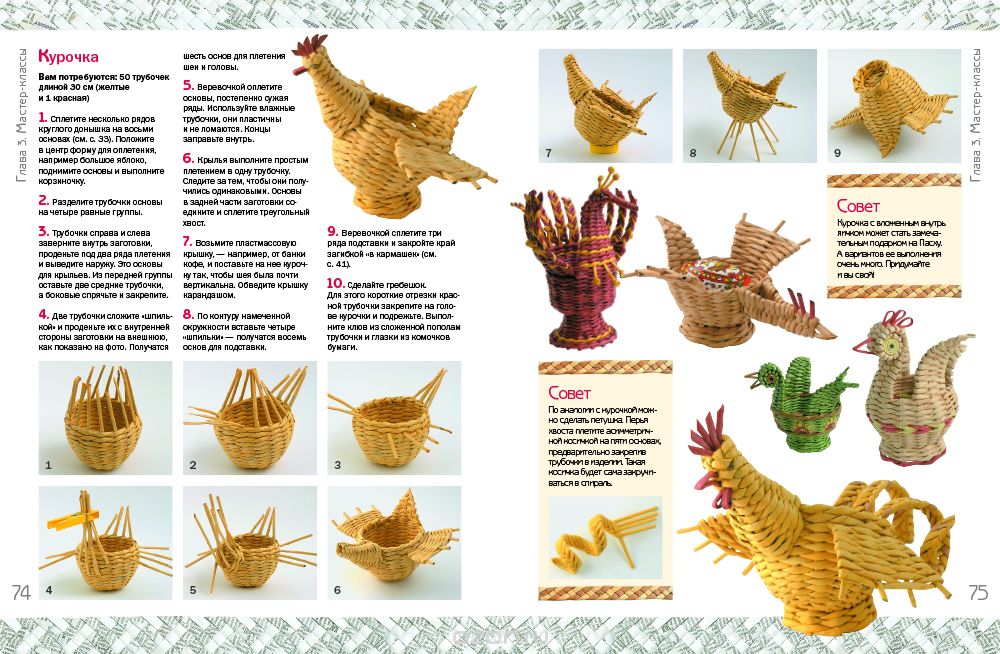
To work you need:
- colored paper
- scissors
- glue or tape
- ruler
- pencil
Instructions:
- The paper is cut into strips of equal width and length. You can also use any cellulose: newspaper, illustrated magazines, wrapping paper.
- Roll strips of paper onto the pencil, holding the paper at a slight angle so that it overlaps.
- The pencil is carefully removed, and the edge of the paper strip is fixed with glue or tape.
- You can weave various crafts from ready-made tubes using patterns from the Internet or books on applied arts.
It is better for children 7 years old to try weaving with this technique. flat figures: rug, heart, bookmark.
Volumetric modeling
Papercrafting, or three-dimensional modeling, is a simple and exciting activity. Its essence lies in cutting and gluing ready-made templates printed on paper. The result of the work is a three-dimensional model. It could be a bird or an animal, a cartoon character or a movie character, a car or a ship, or anything. 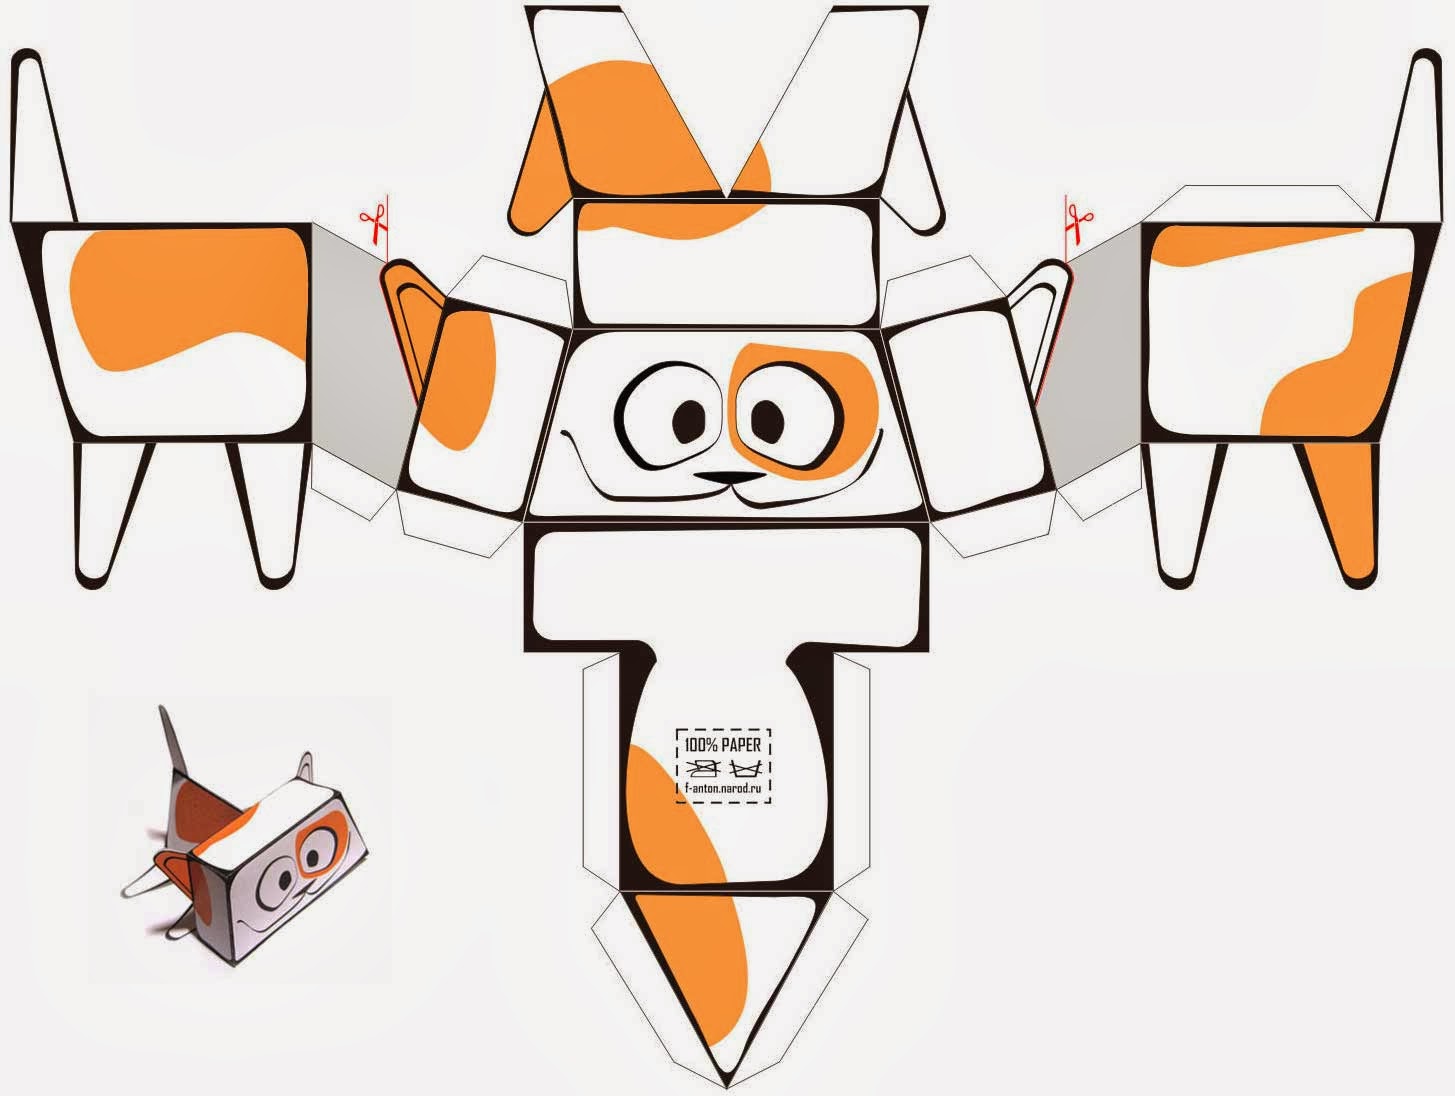
On the Internet you can find and print any template you like on a color printer. The child’s task is to carefully cut out the template along the contours using scissors. Then, along the marked lines, the template parts are bent and glued to each other.
3D modeling will allow your child to create his own collection of his favorite characters or pieces of equipment, which he can also play with in his free time.
Origami
For origami, office paper of different colors is used. To work, you will also need a ruler, pencil, scissors, glue in some models, and a diagram according to which you will create the craft. 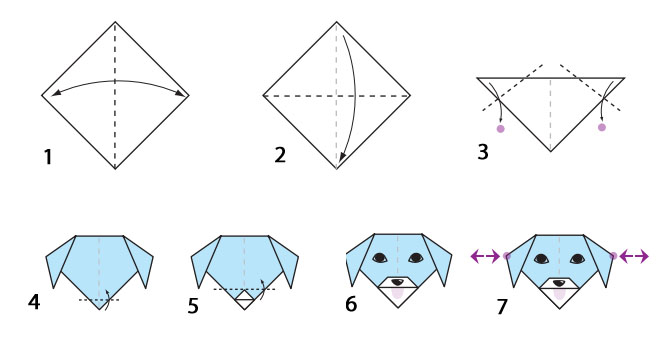
Origami patterns can be found on the Internet or in printed publications - quite a lot of books are published on this type of creativity. Origami is interesting for children as a way to create with their own hands figurines of plants, flowers, animals, birds and various objects of the surrounding world. The well-known paper airplanes and boats are a classic example of origami. 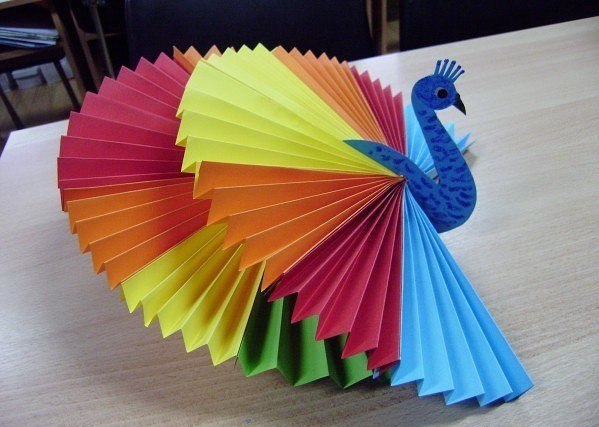
Modular origami, although it is a variety simple origami, but it is worth highlighting separately. Required Tools- The same. The essence of this technique is that you first need to prepare the required number of special identical parts of the future figure - modules that have a triangular shape. And then the finished modules are stacked one on top of the other according to a certain principle or pattern. Scheme modular origami or master classes with detailed step by step instructions can be found on the Internet.
Papier mache
Children aged 7 really like working with papier-mâché. Using this technique, seven-year-old children create simple crafts and figurines, but having mastered it in childhood, they will be able to develop spatial thinking and learn to create complex crafts and paper sculptures. 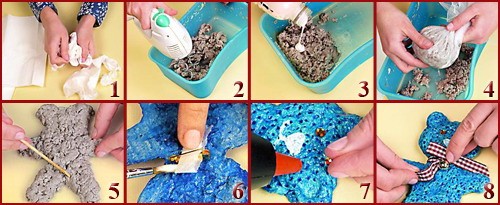
The following items will be useful for your work: newsprint, paints, glue (PVA or wallpaper) and a base for pasting. Such a base can be an inflatable ball or an ordinary saucer with a glass. The papier-mâché technique involves smearing the chosen base with Vaseline.
Instructions:
- Newspaper is torn into small pieces by hand, and these pieces cover the base of the future craft in one layer.
- Then the resulting first layer is smeared with glue and a second layer of pieces of paper is applied to it.
- This is how 2-3 layers of paper are applied, coated with glue, then the part is dried. Then another 2-3 layers of paper, and drying again. This is done so that the future craft does not become distorted or warped.
- When the craft reaches the required thickness and dries, it is removed from the base and primed with water-based paint or gouache. /li>
- After the primer layer has dried, the finished craft can be painted with any paint.
By making paper crafts, the child develops fine motor skills, logical thinking, perseverance and accuracy. All this will have a good effect on the formation of his personality, at school, and the development of his creative potential.
Instead of a conclusion
The choice of DIY paper crafts is very large. A child can create a picture or a postcard, a ball or a snowflake, a garland or a transformer, a rose or a spider, a bookmark or even a Lego constructor. The main thing is that this creativity should be a joy for him.
Young inventors really enjoy making paper crafts made by children. This material allows them to develop their abilities, as well as unleash their creative potential. Before making your first paper craft, let's understand the basic materials and the main rules for working with paper. So, what materials do you need to prepare for the job?
Paper. Depending on the quality, the paper can be quite thin - tissue paper, medium or thick - metallized.
To create a paper mosaic you will need colored or white paper, such as newspaper;
- it is best to use thick colored paper that absorbs moisture well;
- to create volume you will need soft and thin paper (paper napkins, tissue paper);
- to make origami, you need paper that gives clear lines when bent (coated paper, polished notebook sheets);
- cardboard is needed for the base of toys and three-dimensional products;
- in addition, you will need foil, wallpaper scraps, candy wrappers, carton boxes etc.
Glue. To work with paper, you will need 2 types of glue: a glue stick and liquid PVA glue. PVA glue is needed for gluing parts that require great strength. An adhesive pencil is used to create appliqués and also for gluing small parts. When working with glue, you must remember the following rules:
1. Cover the work surface with oilcloth, wrapping paper or newspapers. Thus, after work you will not need to wash the table from hardened glue.
2. To apply glue, use a tube of folded thick paper or a special brush.
3. If the glue is stored in a large container, pour a little into a lid or flat jar.
Scissors. To work with paper you will need 2 pairs. One pair is small scissors with straight blades, which will be needed for notching and cutting through internal parts, and the second pair is scissors with rounded tips for cutting paper.
Pencil and ruler. Using a pencil, you can give the desired shape to a piece of paper. If you want to make a tube, wrap the pencil in paper and iron it between your palms. Remove the pencil and the paper becomes curled. To give small details a convex shape, place the cut out figure in your palm and press the tip of a pencil into the middle of the figure. As a result, you will get a convex part.
You will need a ruler not only to draw straight lines, but also to evenly tear off the required strip of paper. Place the ruler against the sheet so that the paper protrudes slightly from under the sheet. Press the ruler firmly with your left hand, and with your right hand, grab the upper right corner and lift it to the level of the ruler. Pull the sheet towards you with a strong movement. The desired cut will go along the ruler. Using a ruler and scissors, you can make a paper spiral. Take the tip of the piece of paper with your left hand. Using the thumb of your opposite hand, press the strip to the end of the ruler or to the tip of the open scissors. Using a sliding motion, pull the entire length of the paper towards you.
Basic rules when working with paper.
1. If you need to tear paper into strips, consider the direction in which the fibers are located. If you tear crosswise, you won’t get a long strip, but if you tear the paper along the grain, the tear will be even and long.
2. Try to make all bending lines clearly, ironing them well. It is best to iron the bend area with closed scissors so that no stains remain on the surface. You can also use another sheet of paper instead of scissors.
3. If you need to glue a part onto a flat sheet, then you need to smear glue on the part that you will glue. If you smear a base sheet and place a part on it, then as a result it will not remain smooth and even, folds and wrinkles will appear on it.
4. Press the piece firmly using a piece of flannel or a sheet of white paper. Lubricate the part with glue, place it on the base sheet and press it a little in the center, straighten it blank slate paper, smooth it out.
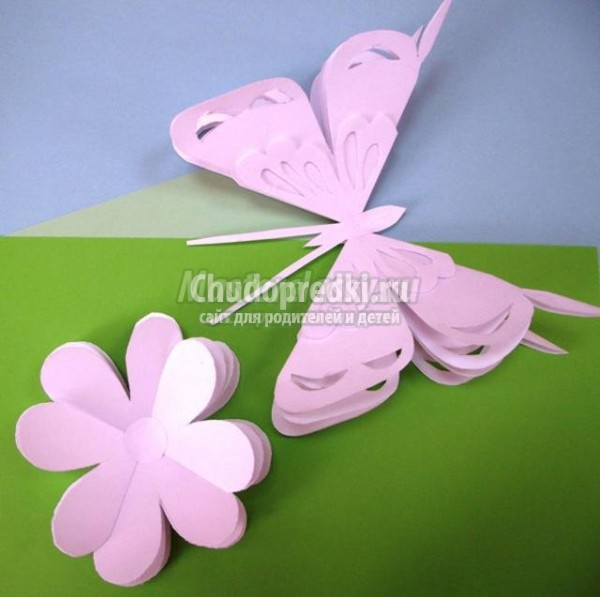
Children's crafts, paper flowers.
Paper butterfly.
Materials for work:
- pencil
- White paper
- glue
- nail scissors
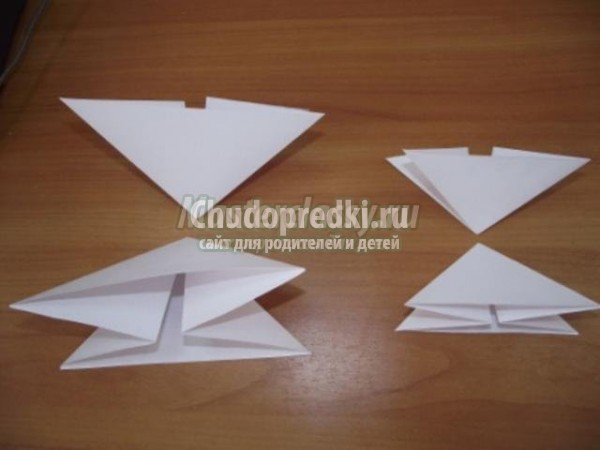
Manufacturing process:
1. Take 2 sheets of paper and fold the squares. One square should be small, and the second should be large. These will be the butterfly's wings.
2. Fold the square diagonally. Take turns from two corners. You should end up with triangular envelopes.
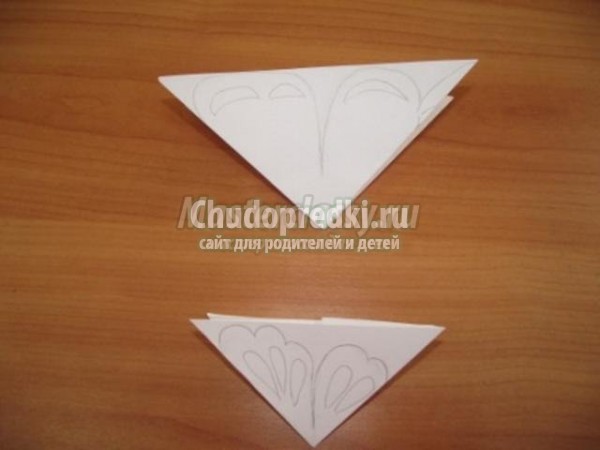
3. On the resulting triangles, draw patterns for the wings.
4. Take scissors and cut out the wings.
5. Insert the small wings into the large ones.
6. Cut out the abdomen and antennae and place the butterfly on a flower. ready!
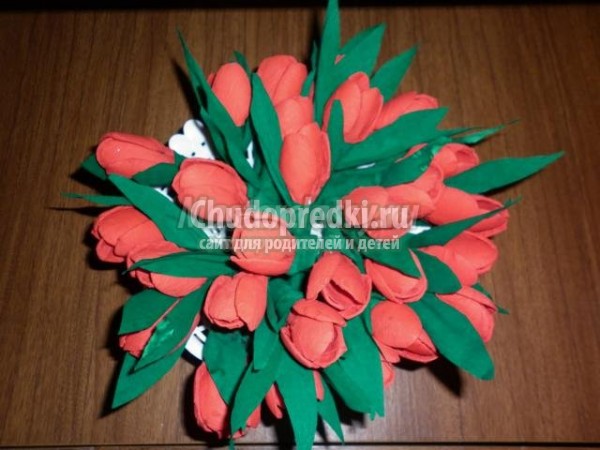
Children's crafts made from corrugated paper. Tulips.
To work you will need:
- scissors
- corrugated paper
- PVA glue
- disposable spoons (their size should be selected depending on the size of flowers you want to get as a result).
Manufacturing process:
1. Cut squares of red crepe paper large enough to completely wrap around a spoon.
2. Cut strips of green paper 30 cm long and 1 cm wide.
3. Prepare the leaves, give them shape, curl the ends. For each flower you need to prepare 2 leaves.
4. Wrap the edges of the spoon with red squares. For each flower you will need 4 spoons.
5. Fold the spoons so that a bud is formed.
6. Wrap each bud with green stripes.
7. Attach 2 leaves to the middle of the stem on two opposite sides, glue the edges with PVA. One tulip is ready! Make a few more flowers and put them in a vase! ready!
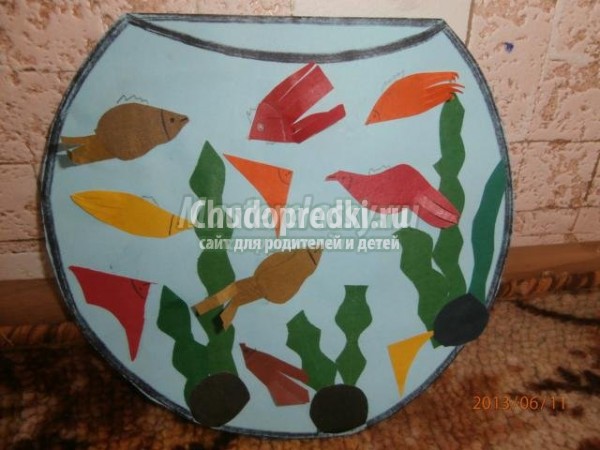
Children's crafts made from colored paper. Aquarium.
To work you will need:
- scissors
- colored paper
- PVA glue
Manufacturing process:
1. Take a sheet of blue paper and scissors and cut out the aquarium.
2. From a sheet of black paper, cut out pebbles - small black circles.
3. Cut out seaweed from a sheet of green paper.
4. Select several sheets of bright colors and cut out fish from them.
5. Take PVA glue, glue pebbles, seaweed and fish.
6. The “Aquarium” application is ready!
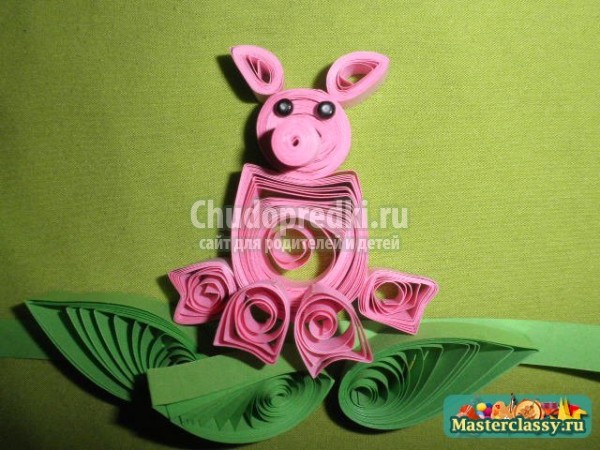
Quilling "Pig".
To work you will need:
- pink and green quilling paper
- toothpick
Manufacturing process:
1. Torso. Make a “ring” out of pink paper (wind it around a toothpick), “unravel it”, and secure the tip with glue. Squeeze with your finger on one side and give the desired shape.
2. Head. The head is obtained from the “oval” blank, and the ears from the “droplet” blank. In order to make it, you need to twist a ring and make a drop out of it. Make a piglet out of a circle too, but you don’t need to unravel it.
3. Legs. First, make a “ring” blank, and then make a “rectangle” shape from it. Squeeze one edge inward to create a “hoove.” Glue all the parts together.
4. Make the grass from curls and “droplets”.
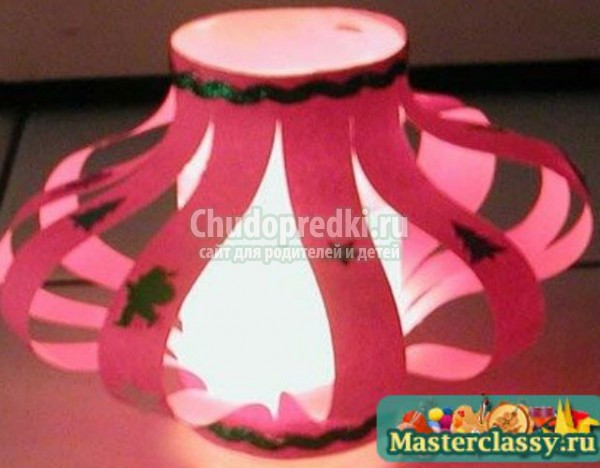
Openwork paper lanterns.
To work you will need:
- scissors with round tips
- felt-tip pens
- glue
- 2 rectangular sheets of paper (you can take metallized paper or foil).
Manufacturing process:
1. Fold the first sheet of paper into a cylinder and glue it along the seam.
2. Fold the second sheet in half, make cuts on it at equal intervals, but without reaching the end.
3. Unfold the cut sheet and glue it onto the finished cylinder in a bent state.
4. The hanging strip is glued in the same way.
5. Make a bottom in a glass, insert a glass with a candle into it.
6. Using felt-tip pens, apply an ornament or design to the flashlight.
If you liked our site, express your "thank you"
by clicking on the buttons below.


