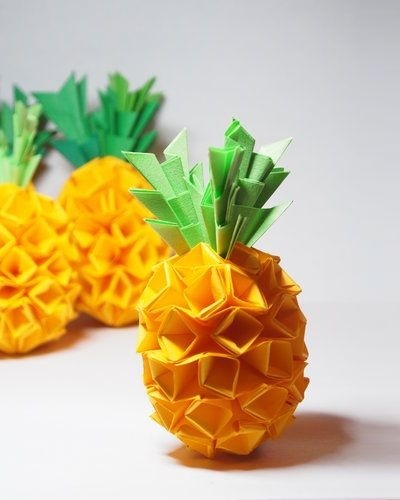
Origami. Its roots go back to antiquity, and the history of the technique of making paper figures goes back several thousand years. In the past, the process of creating crafts was accompanied by lengthy rituals, many of which are no longer known today. Meanwhile, children and adults alike love to create original paper models to decorate the interior of the house or just for fun. Consider what a beginner should figure out before starting work, and also get acquainted with one of the options for creating beautiful and bright origami flower arrangements from paper. The beginner schemes presented in this article are simple and accessible to work for both adults and children. preschool age... To fulfill a beautiful flower arrangement, you have to be patient. The result will definitely meet all your expectations.
The history of origami art
Schemes of flowers, animals and birds, made by folding paper, began to be invented in the distant past. Nobody knows the exact date of this interesting technique. Some believe that this art is older than paper itself. The first figurines were created from scraps of fabric and were used to drape Japanese clothing. Others associate origami with pagan cults. In ancient China and Japan, paper was often used for various religious rituals. For example, at a funeral, it was customary to burn all the clothes and household utensils of the deceased. Later, they began to burn only the names of objects written on paper. Even later, some things useful in everyday life began to be folded out of paper. Such figurines are most widespread in Japan. The paper was used there for the production of lanterns, umbrellas, screens, and even for the production of clothing. Gradually, the art of origami, the scheme for assembling simple figures and things useful in everyday life, improved. Paper models became more and more expressive and graceful. Origami ceased to have a religious connotation and moved into court art. At that time, only a select few could be engaged in folding paper figures, since paper was considered a very expensive pleasure. The ability to make a figurine from a leaf was considered a sign of refined taste and excellent education. Today, when anyone can buy paper, the origami technique has become generally available. Now everyone can try their hand at creating bright and unexpected compositions.
Origami paper for beginners
It turns out that making beautiful figures is not so difficult. It is enough to purchase necessary materials(usually white or colored paper) and be patient. Beginners should start by familiarizing themselves with the basic schemes for creating the most simple models... These are flowers and animals. You can read special literature and collect elementary diagrams. At first, you need more patience and self-confidence. You should practice folding the origami creations of which are presented in this article, just suitable for those who are just starting their journey of acquaintance with this ancient Japanese art. The work will not take much of your time. The main thing is to do everything sequentially, carefully following the instructions.
Origami paper composition
Flowers, the schemes of which we will master today, are prepared according to traditional technology. One model has five petals. Each petal of the bud is done separately. Then they are all held together with PVA glue. Having mastered the technique of making one petal, you can easily cope with all the rest of the work. If you wish, you can create a flower arrangement and decorate your home for the arrival of guests.
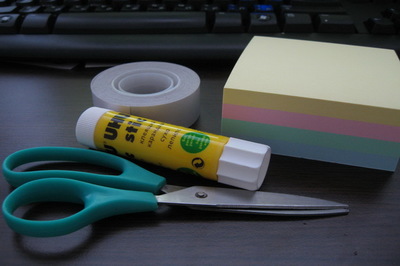
Materials (edit)
You will need simple equipment that can be found in the home of any modern person. If something is missing, then buy everything you need at your local office supply store. So, to create one flower, you will need 5 sheets of colored paper. You can choose the color according to your wishes. Accordingly, if you have the patience to create a whole bouquet, then stock up on 30 sheets of paper. The size of each square will depend on the volume of your bouquet. Optimally cut into squares with a side of 10-15 centimeters. You will also need glue to form the buds. It is better to take PVA, as it does not stain or deform the paper. You can use office sticky paper that has already been cut into even squares.

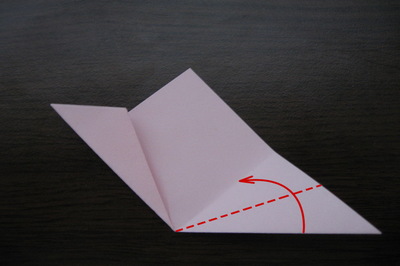
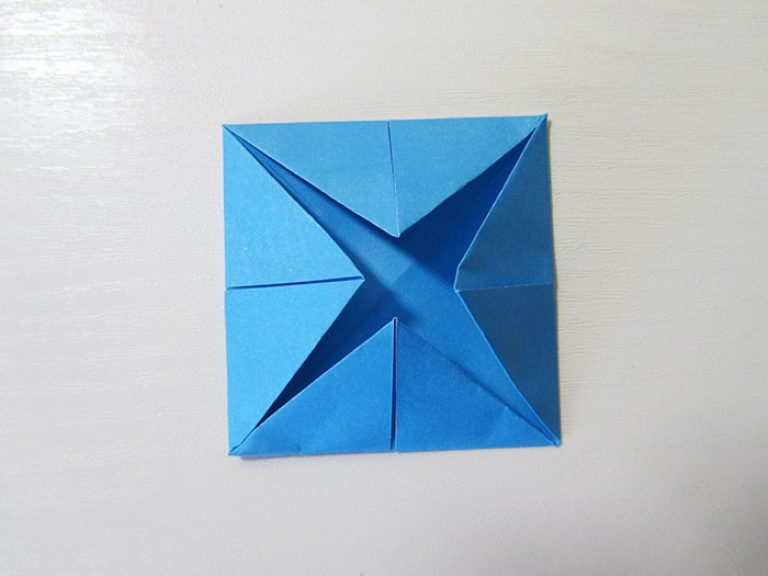
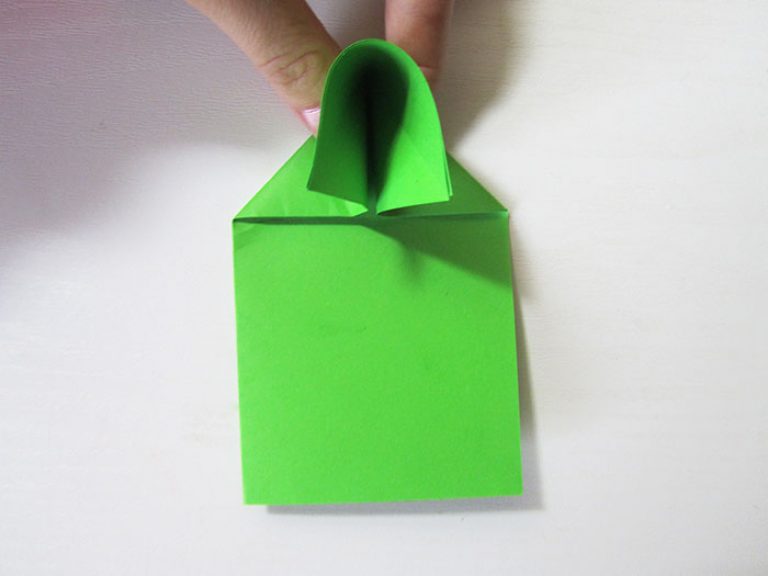
Making the first petal
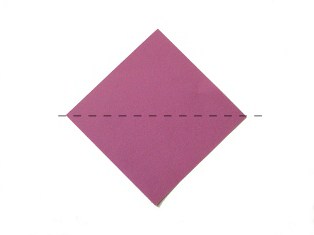
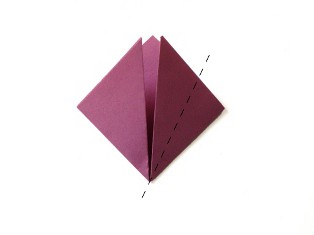
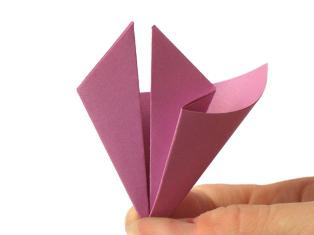
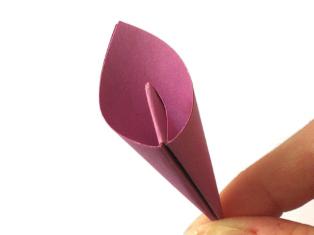
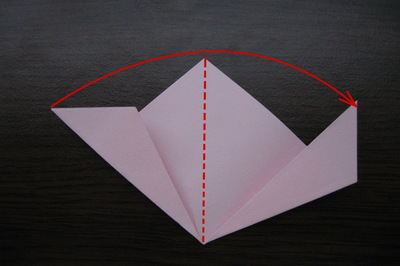
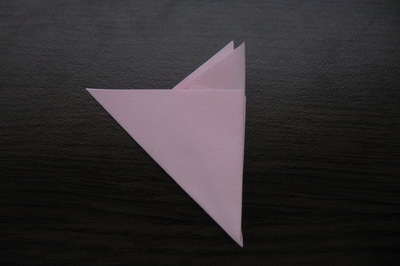
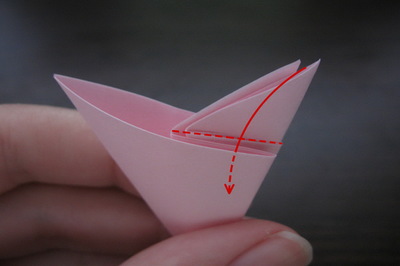
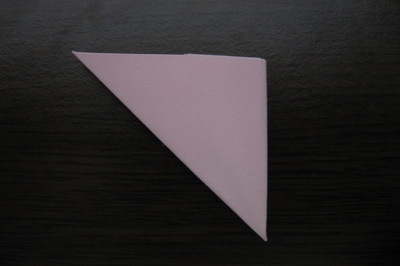
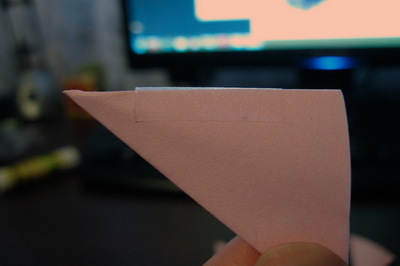
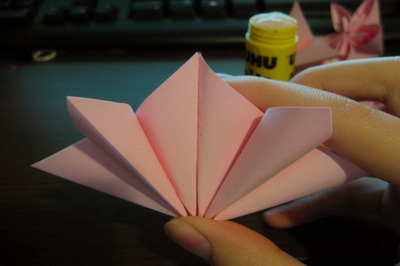
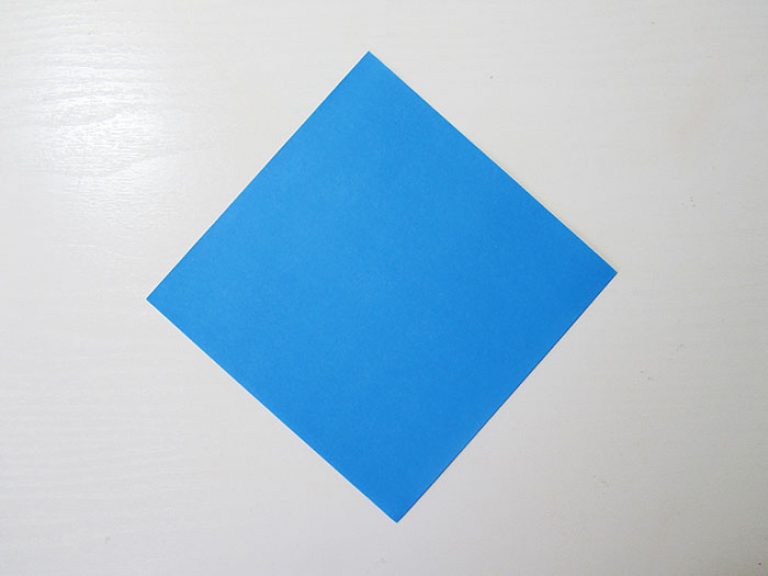
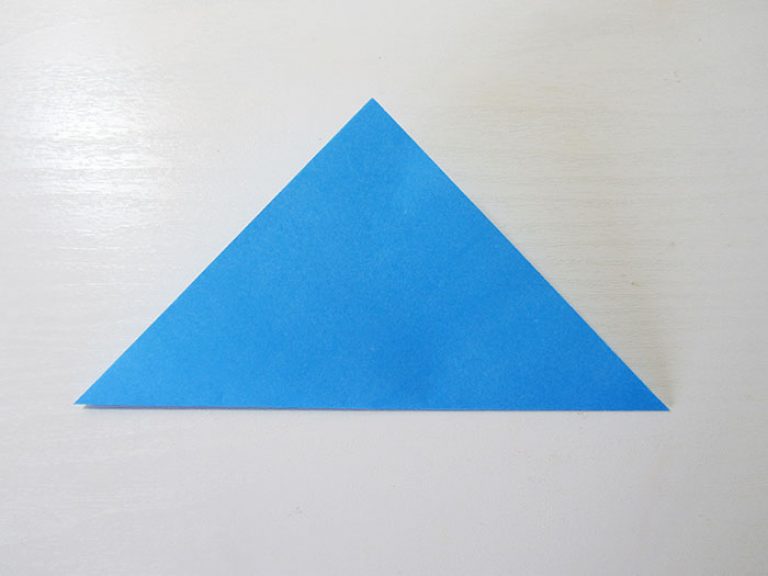
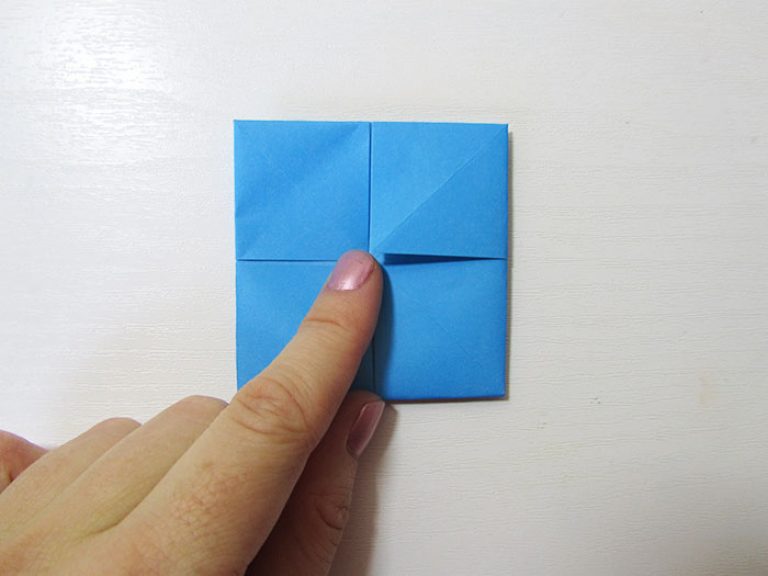
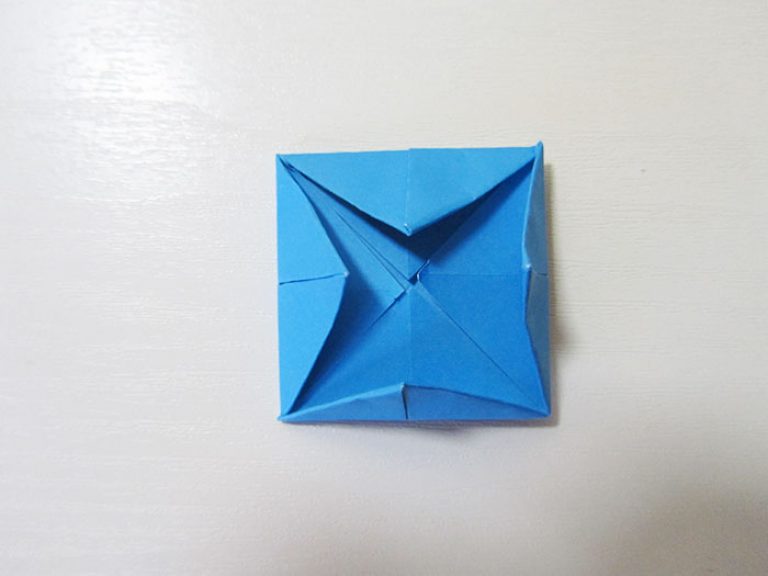
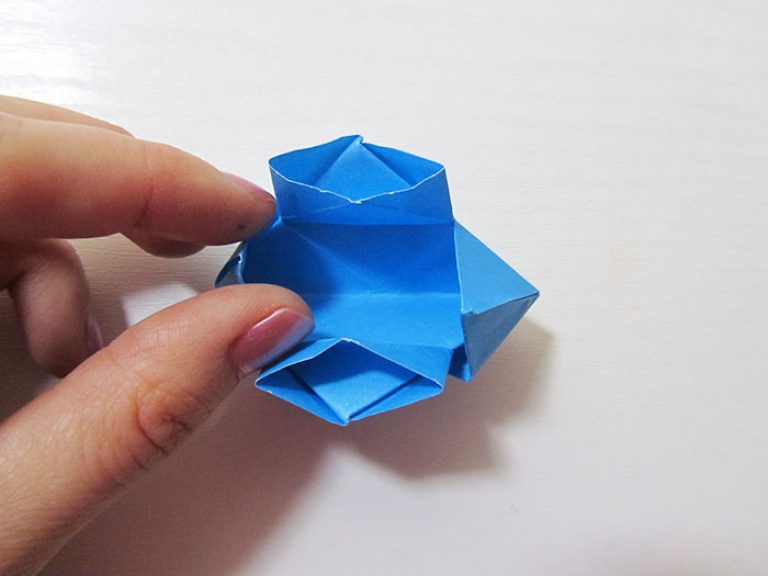
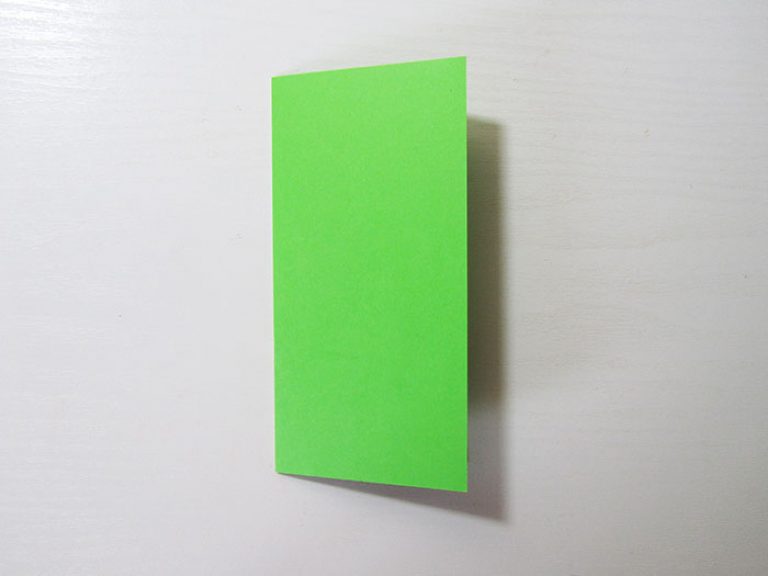
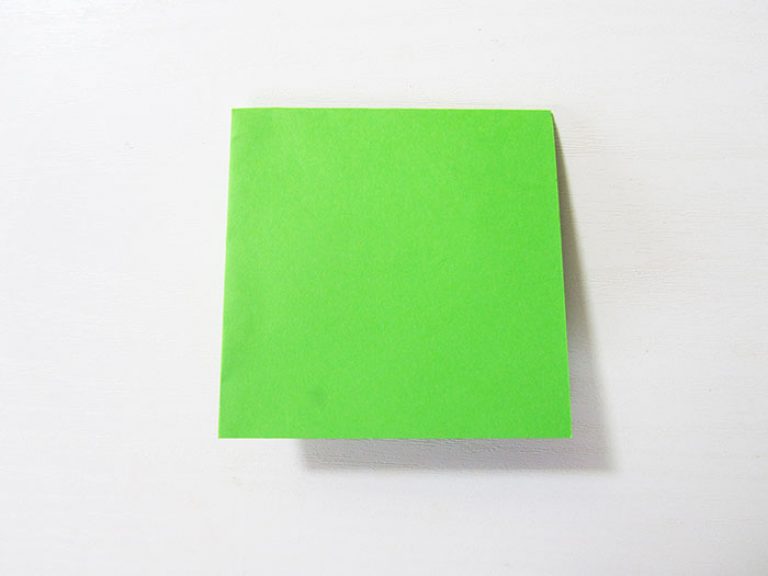
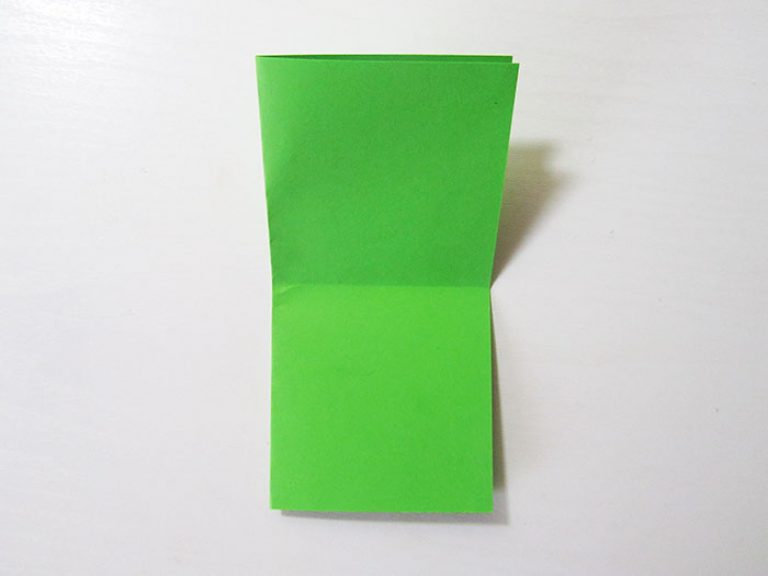
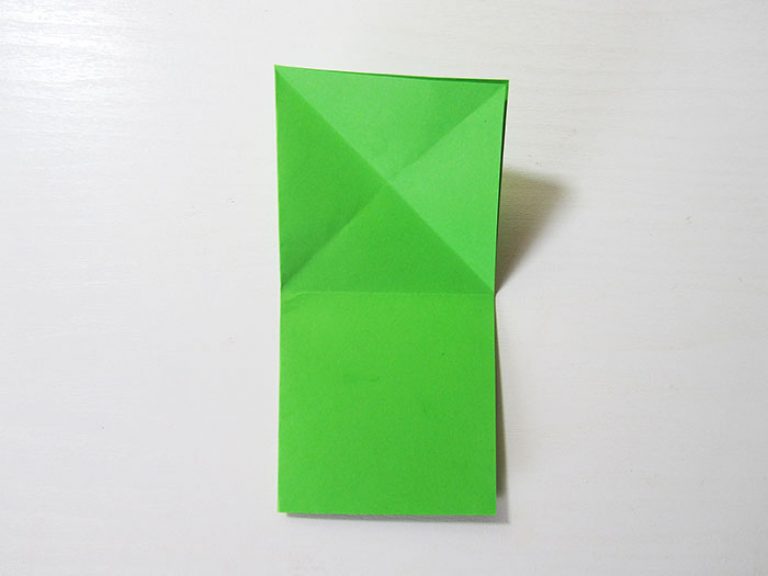
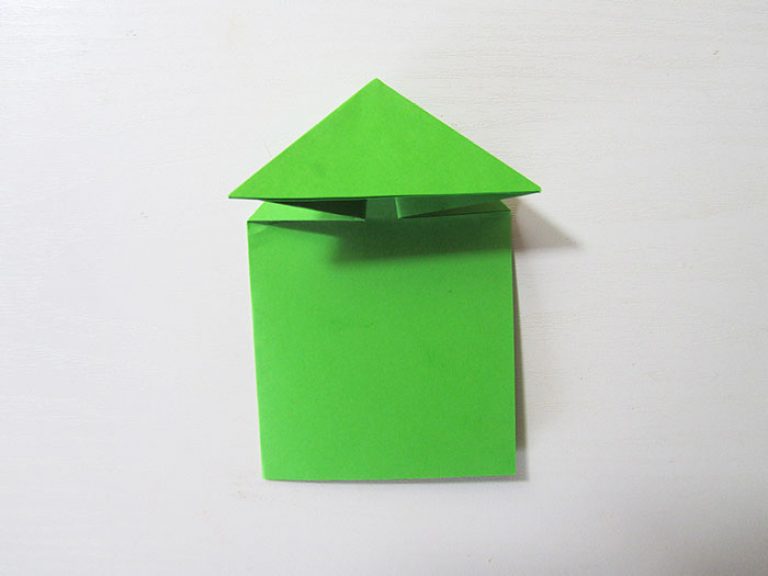
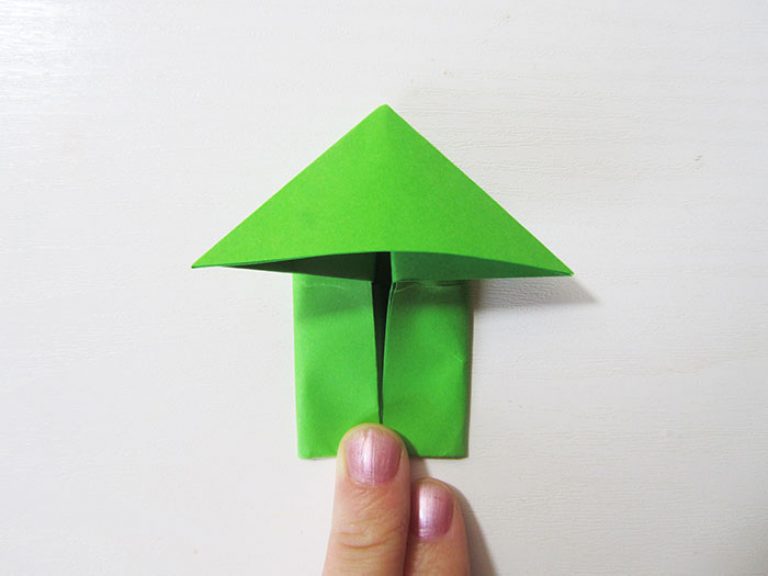
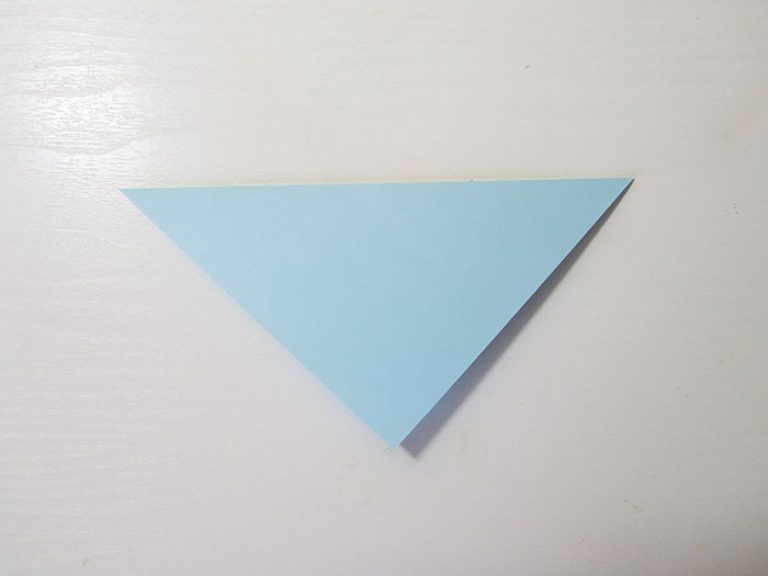
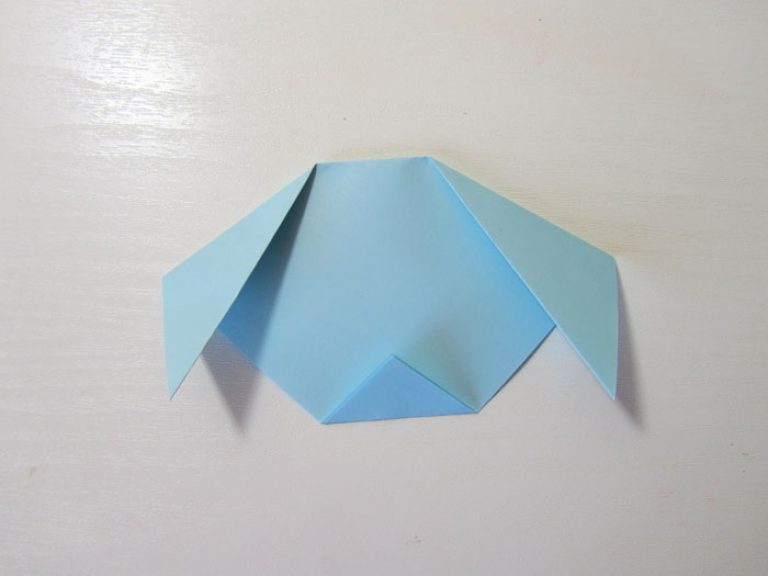
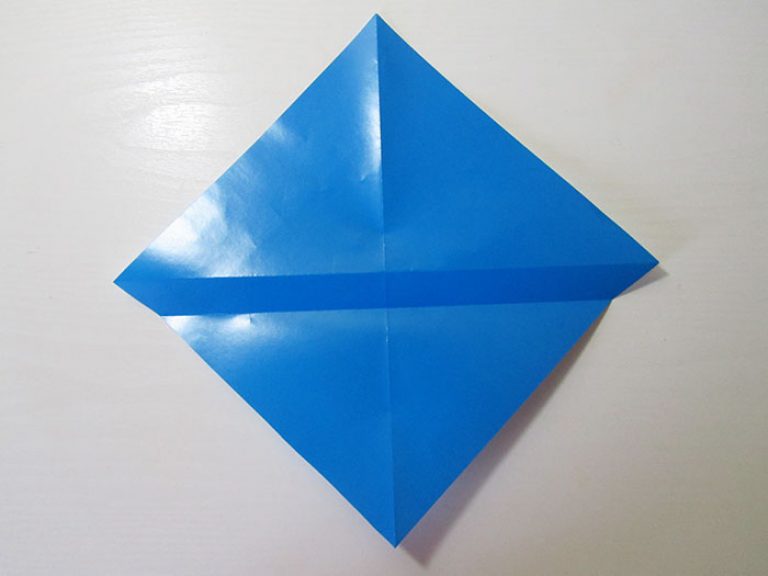
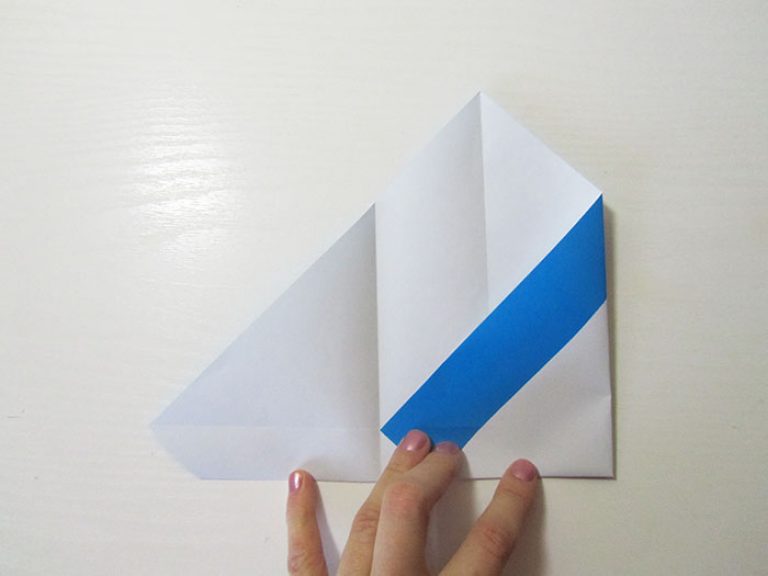
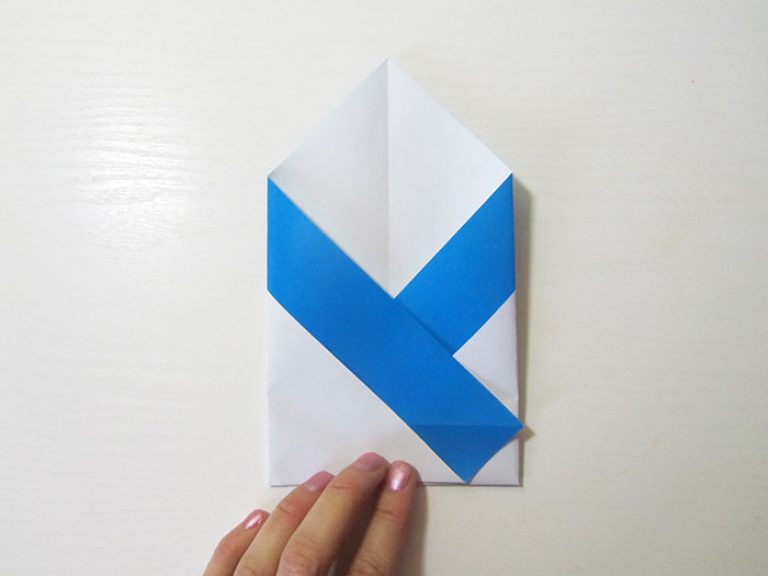
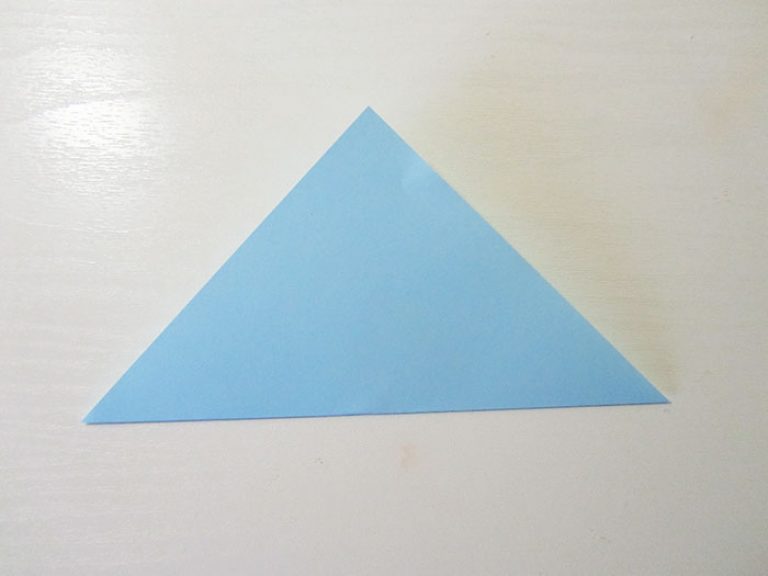
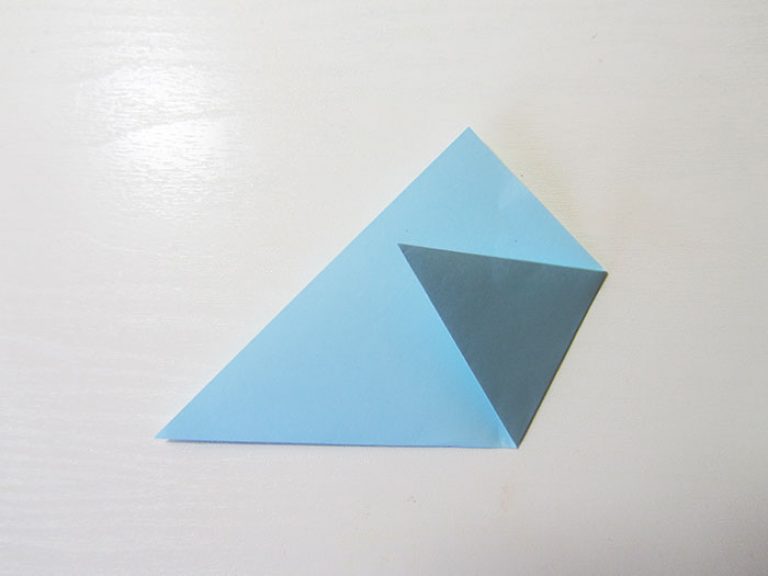
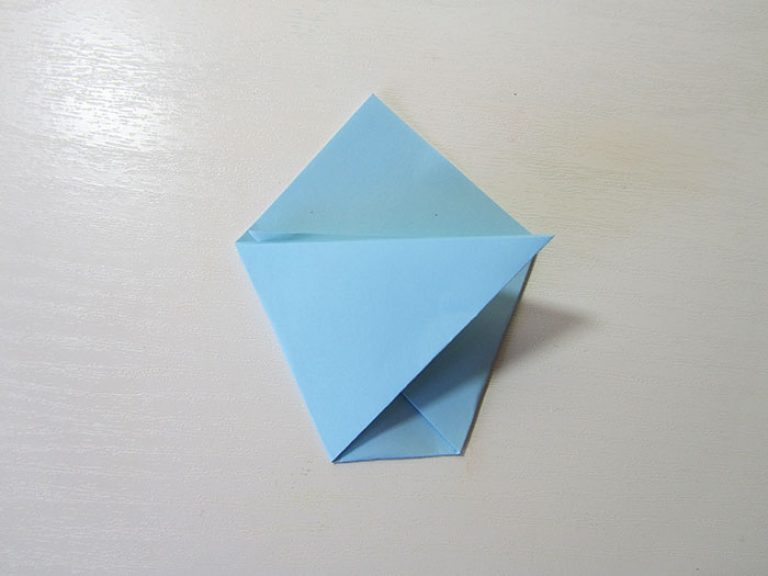
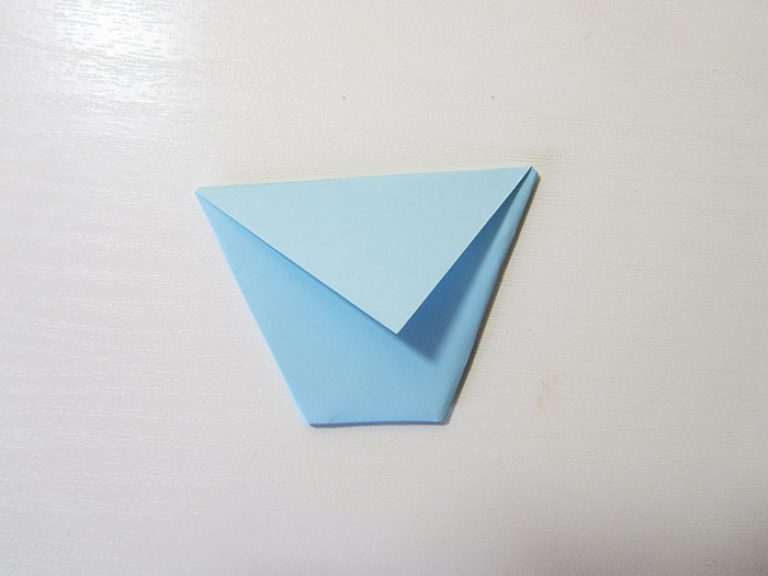
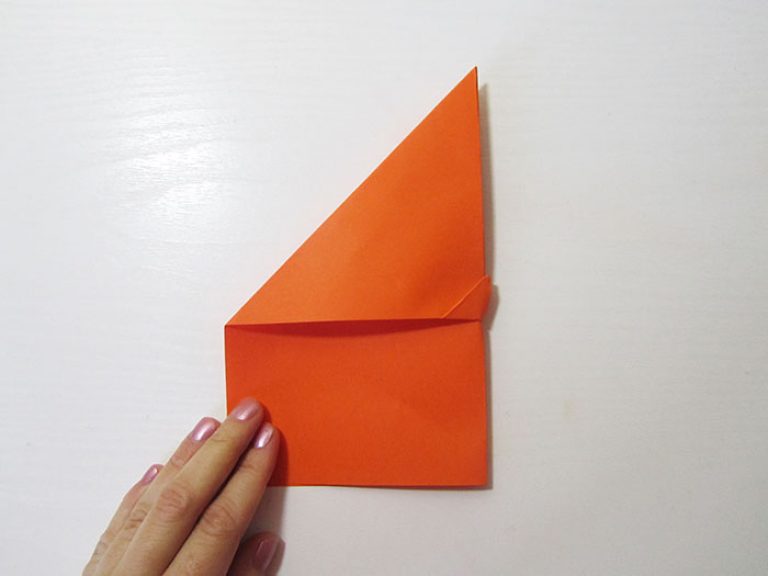
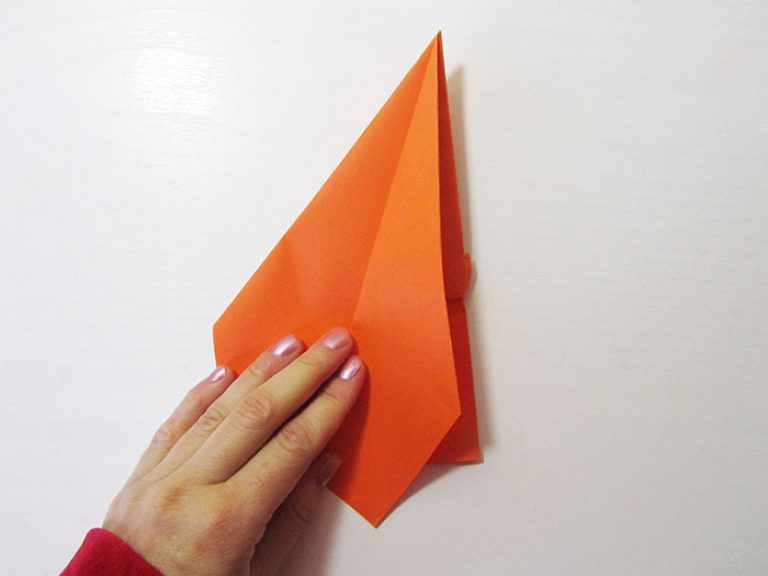
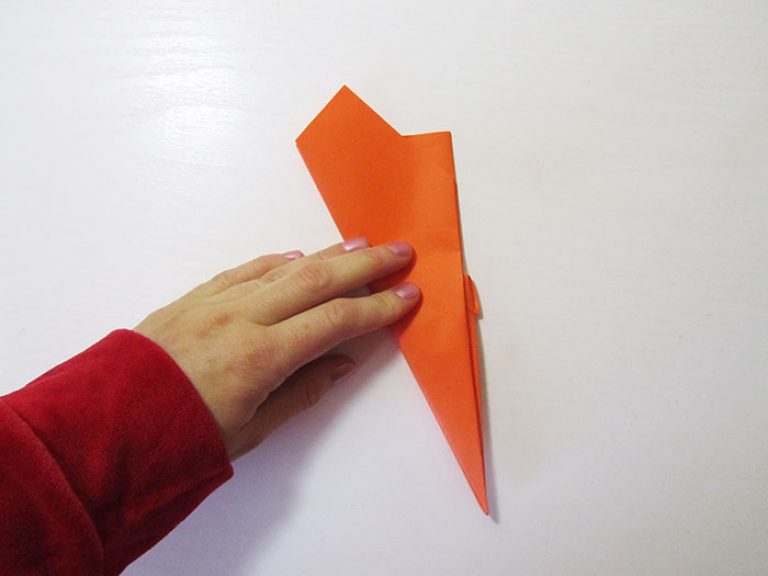
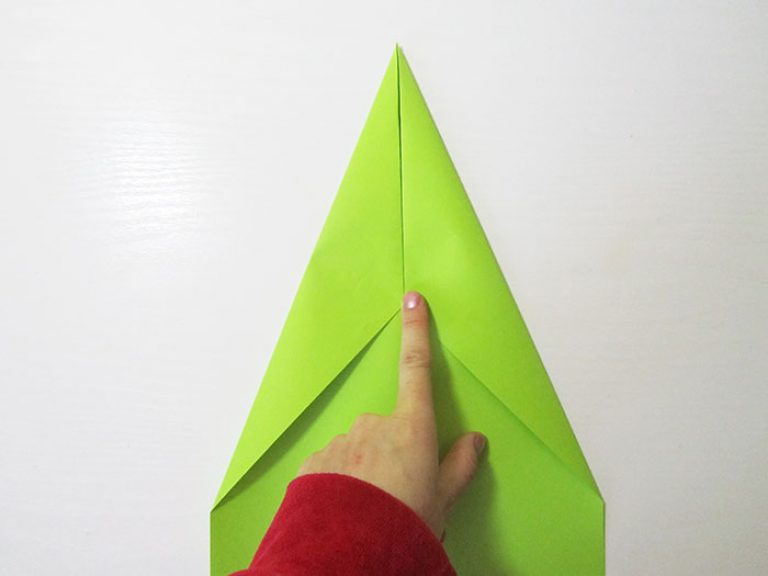
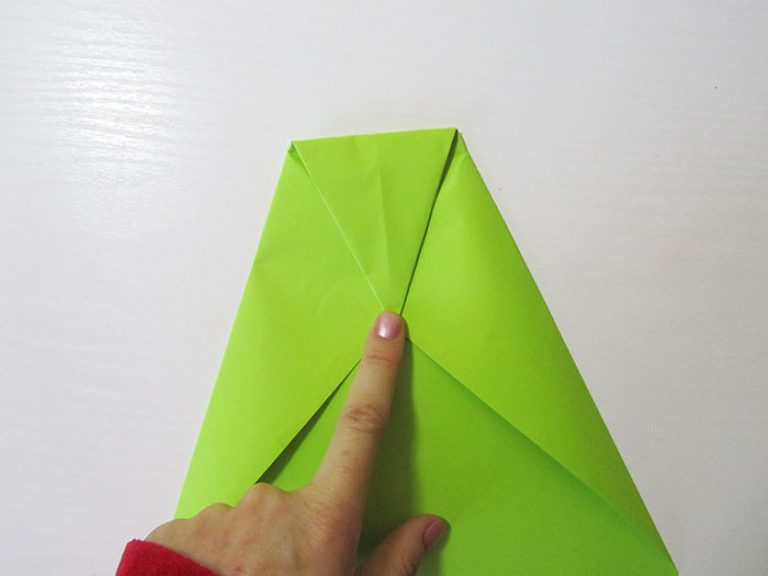
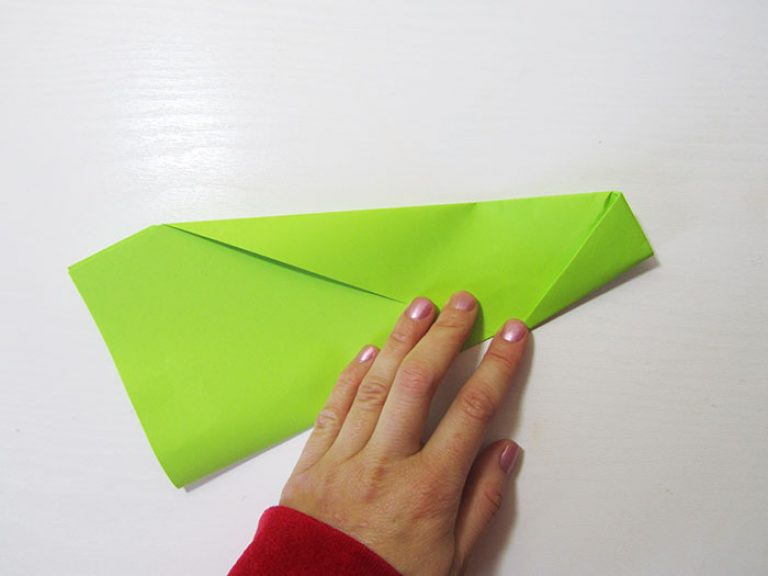
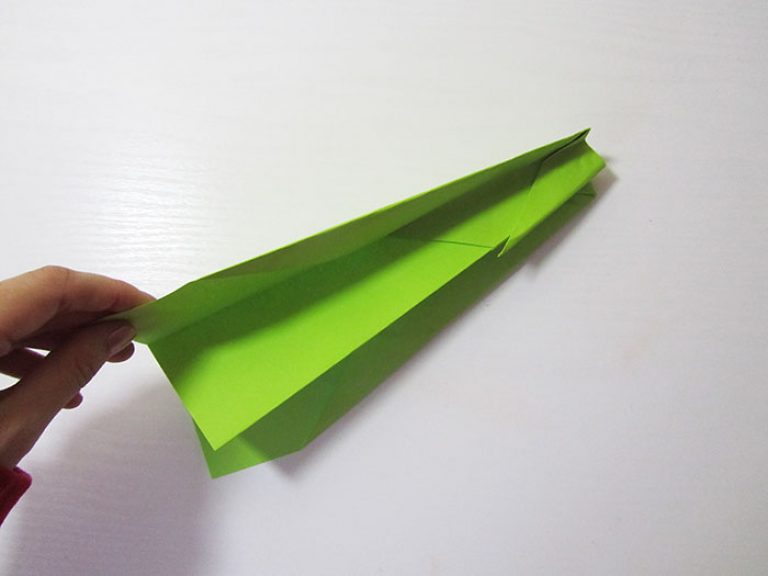
So, let's take the first square and start preparing an easy origami for beginners. The flower will consist of five petals, each of which is done separately. First, fold the square diagonally, carefully ironing the fold. Place the work with the corner up in front of you. Now bend the right and left corners up so that you get a rhombus, and the bases of the triangles are closed. Next, visually divide the right triangle in half and fold it down along this imaginary line. Do the same with the left side. Now take the two protruding triangles with your fingers and close them. Your petal should turn into a tube. The former bottom corners should be at the top. They should be bent downwards and shoved into a small "pocket" formed by bending the rhombus. Thus, your petal is held tightly thanks to this design. It remains to carefully iron all the corners so that the model becomes neat.
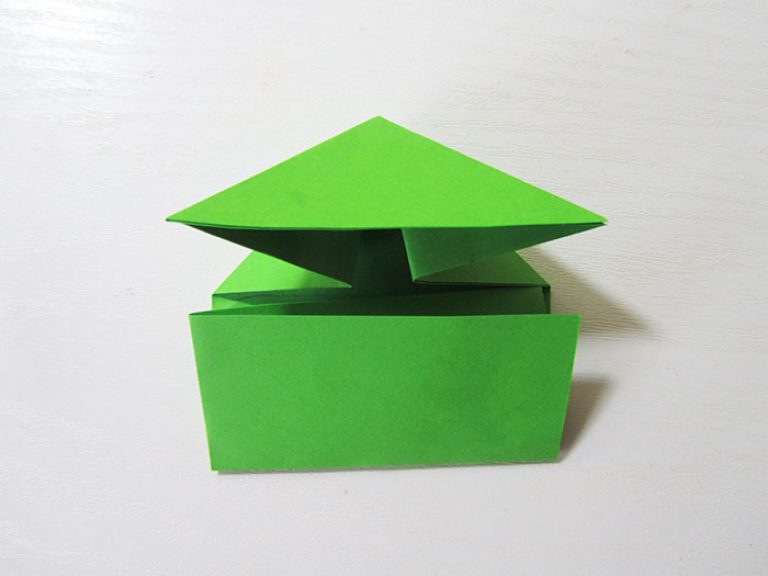
Form a bud
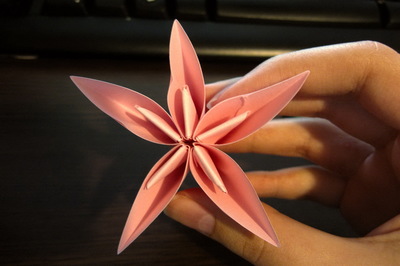
We continue to make our paper origami product. Schemes for beginners are usually simple and of the same type. At this stage, all the most difficult is over. Now you should repeat everything that you have already done. That is, for one bud, you need to design four more of the same petals. Once you're done, apply glue to the center seam of each piece. Carefully begin to glue the petals to each other, aligning the length of the structure. Continue working until all five petals are glued. Hold the place where the petals are glued until the glue dries.
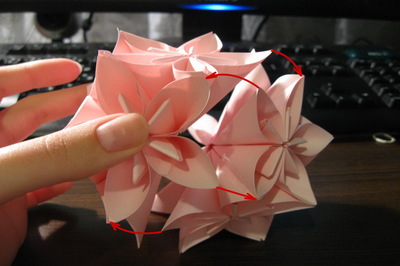
Create a bouquet
If you have successfully coped with the previous stage, then you have already mastered the technique of making origami from paper. Beginner schemes are usually described in great detail so that the beginner does not get confused. Therefore, you should not relax if you are ready to create a whole bouquet. Make five more buds, gluing each one neatly. Now you should correctly combine all the flowers into one large and beautiful bouquet... Everything needs to be done so that the glue is not visible, so it is important to be very careful. Glue the first two flowers together first. It is important to correctly determine the place of gluing. It should be two leaves next to each other. Glue the third flower to the second, also on two leaves. Do the same with the remaining two colors. Only one leaf from each bud on the outside of the bouquet should not be touched by the glue. Thus, you should have a ring of five crafts. Now it remains to insert the last, sixth, bud on top to complete our paper origami design. Schemes for beginners, as you have seen, are very easy to follow if you do the work carefully and slowly.
Conclusion
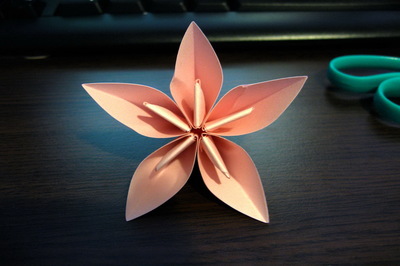
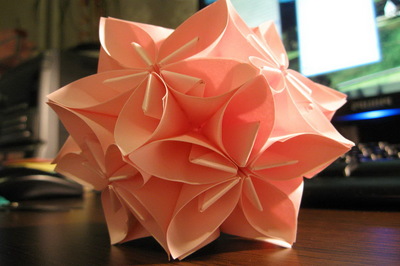
So, your craft is ready. Now you can use it to decorate a wedding table or living room interior for the holiday. You can make several of these bouquets and lower them into the pool before the arrival of guests. Beautiful floating bouquets will not leave indifferent any guest. And your holiday will surely be remembered for a long time by all those present.
Origami is an ancient Japanese art of folding various paper figures. To captivate children 7-8 years old with this activity, you will need to prepare thick paper, you can use multi-colored paper. In addition to good leaves, you will need scissors, glue, a ruler, a pencil, as well as elements for decoration. To start collecting origami, you will also need to find suitable patterns for beginners.
- Folding paper figures trains fine motor skills hands of children 7-8 years old.
- Promotes the development of lateral thinking, logic and memory.
- Develops mathematical abilities, spatial thinking, logic and the ability to seek solutions to complex problems.
- Origami has a calming effect and develops perseverance and concentration.
Swan scheme
In order to make origami a swan out of paper, for children 7-8 years old, you will need to use step by step diagrams... If you use the most common and common paper schemes, then you can easily and easily make a swan with your own hands.
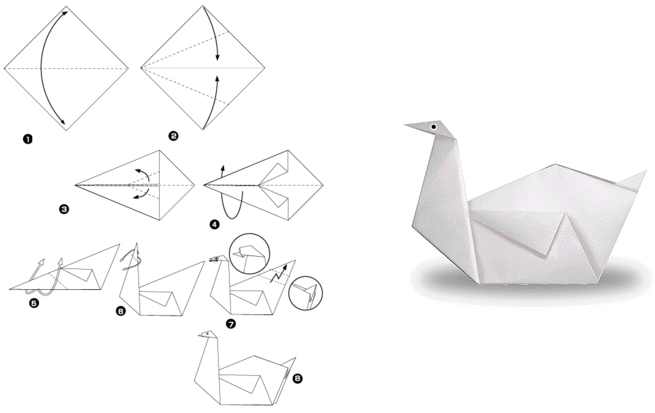
- Fold a square sheet in half, marking a fold diagonally.
- We fold the two sides of the sheet to the resulting fold.
- The sides will need to be folded one more time.
- Let's fold our craft in half.
- Bends the neck of the swan inside the craft. The bend point should be around the middle of the craft.
- At an arbitrary point at the tip, we bend our head and now our swan is ready.
The modular origami in the form of a swan looks good, it is just suitable for beginners, since the schemes are very simple and it will not be difficult to make such a toy from modules with your own hands. Crafting from modules is simple enough, it is easy if you understand correctly how to install modules one into another. Very quickly you can fold a swan, which will be a beautiful decoration for an exhibition, a nursery or a great gift for a holiday.
Origami swan. How to origami a swan
Animals
It will be very easy to make origami in the form of animals for beginners and children of 8 years old. You will need to use diy folding schemes for cats and dogs. These easy and step-by-step schemes will help you make amazing toys for children, because paper can be used not only white, but also colored.

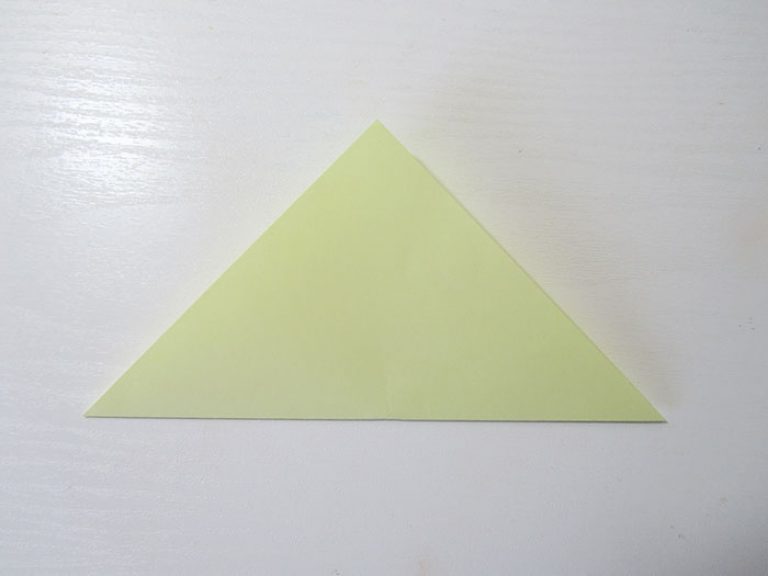
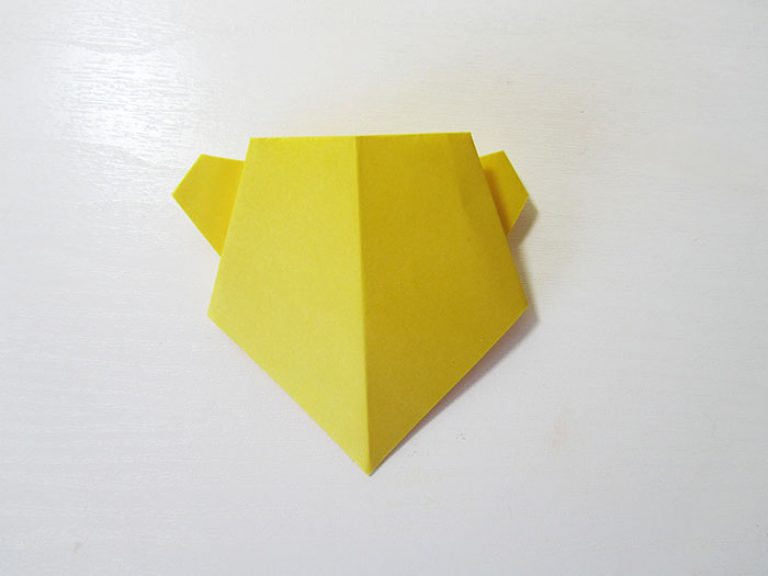
To make a dog's face, you will need to take a square sheet of paper:
- Fold the sheet diagonally across the floor.
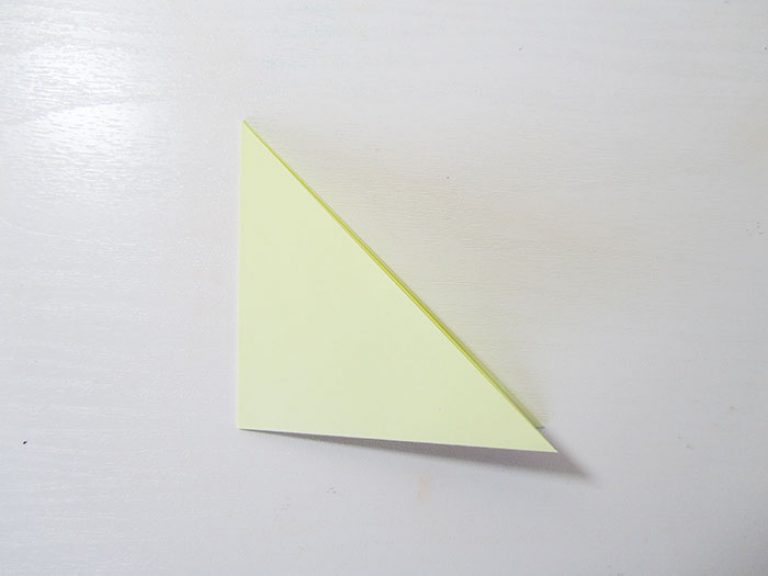
- Bend the edges of the resulting triangle to the center, but the upper lines should not match, lower them a little lower.
- Now the bent triangles need to be unbent again and laid in the shape of dog ears.
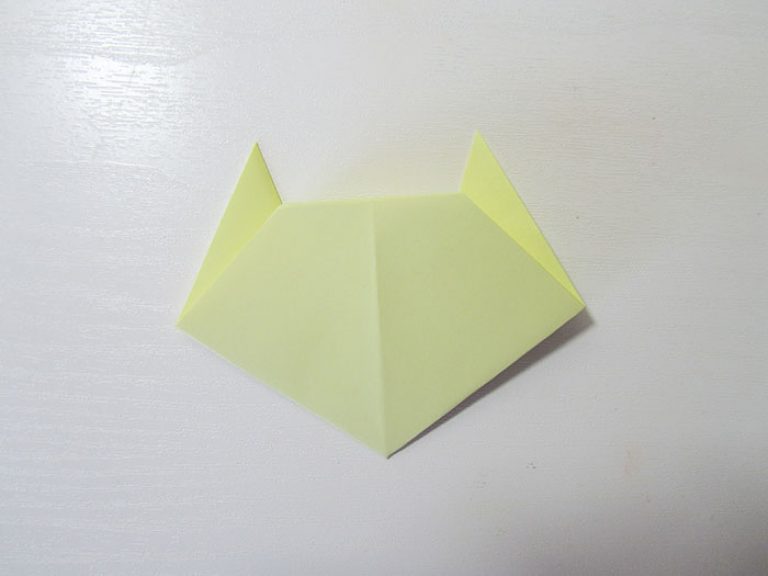
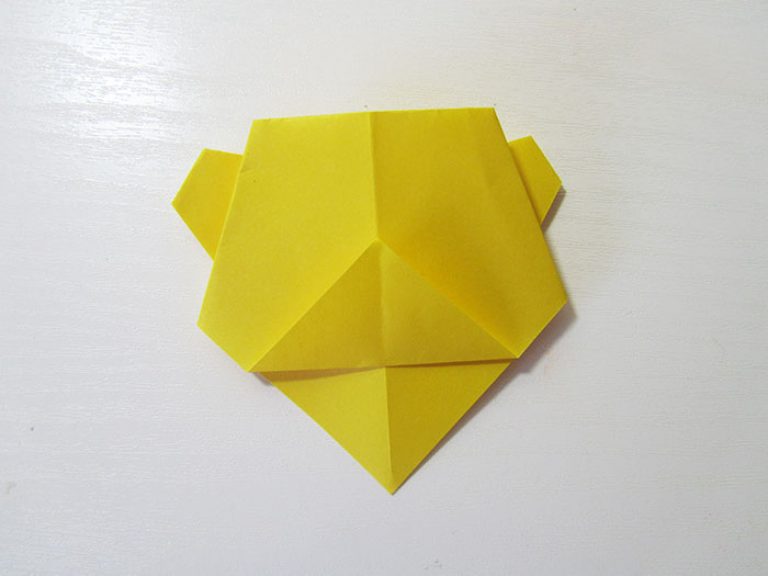
- Flip the craft over and take it to the bottom corner.
- Unfold the corners and fold them inward to form the bottom of the dog's muzzle.
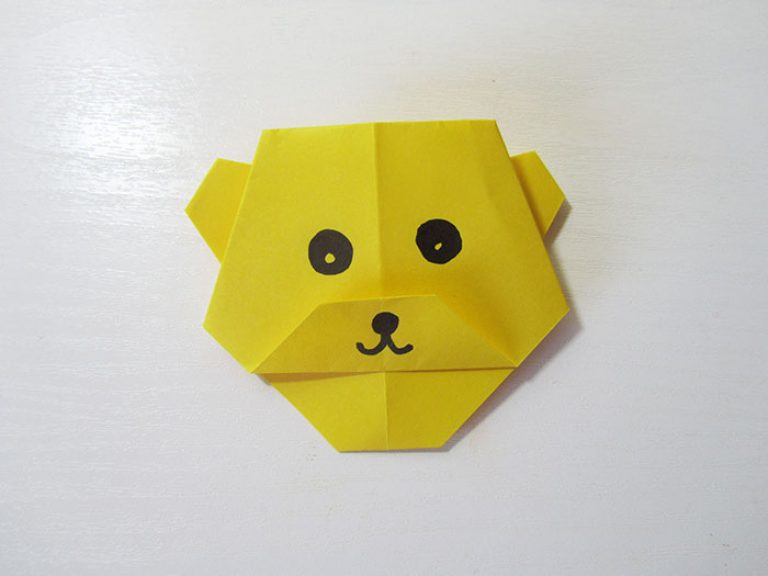
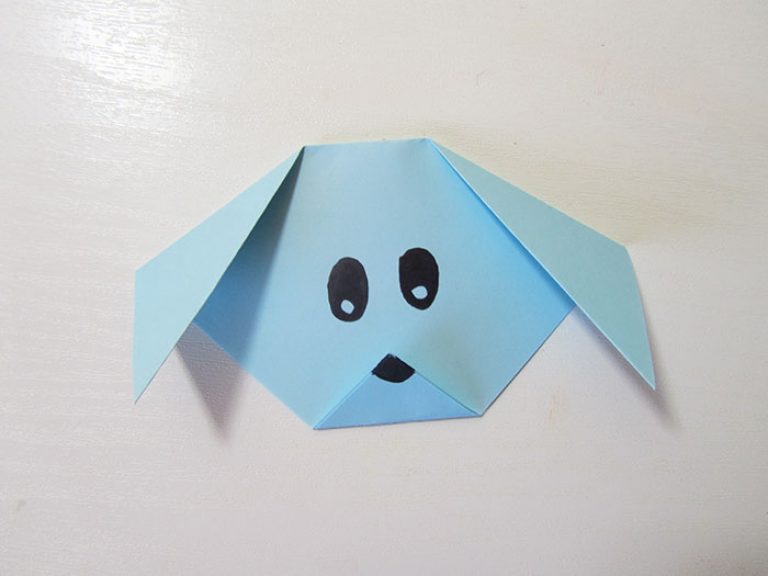
- Draw the eyes and nose, so your dog is ready with your own hands.
This simple instruction can be done even for children of 8 years old; they can make such a toy with their own hands if they adhere to the scheme.
A simple instruction for folding a paper toy is perfect for folding a fox's face with your own hands.
- Fold a square sheet in half.
- Point the corner of the resulting triangle up and bend the corners up to form the chanterelle ears.
- Turn the craft over and fold the corner.
- Flip it over again and draw the eyes, nose and antennae of the chanterelle.
When the child has mastered the simplest crafts, then you can try to start making modular origami with him. For example, you can collect a bunny for children. Its schemes are different, but the simplest is this:
- Modular, consisting of three rows of 24 standard modules.
- We turn the craft out and make 6 more rows, this will be the modular body of the bunny.
- The head will be folded from thirty modules, which are inserted with the other side to the body.
- Next, we set 7 rows as standard, just as we did when assembling a modular body.
- The ears are assembled from modules, which we install the other way around. We form a modular ear from 6 modules, then 5, then 6 again, then 5, again 6, 5 modules and 4. Here is the modular ear and you're done.
Origami dog
Ship
Using clear schemes, it will not be difficult for children 8 years old to make a boat with their own hands.

- To assemble the boat, you will need to bend a rectangular sheet in half.
- After that, bend it again in half vertically, marking the middle.
- The upper edges of the resulting sheet will need to be folded towards the middle, forming a corner from above.
- Bend the rest of the bottom to the top, bending the edges behind the triangle and in front and behind.
- Slip your fingers under the edge and unfold the triangle, making a hollow cone.
- Fold the paper so that the edges that are not touching, but opposite, touch.
- Fold the corners up.
- Expand the craft to the sides, and your boat will be heads.
After the child has mastered such a boat, you can offer him modular folding boats.
Easy ORIGAMI. SHIP from paper for beginners
Rocket
Boys are always interested in technology and a wide variety of rockets and machines. We offer you an origami rocket, for which there is an instruction on how to make one out of paper for beginners who are not at all experienced in folding techniques.
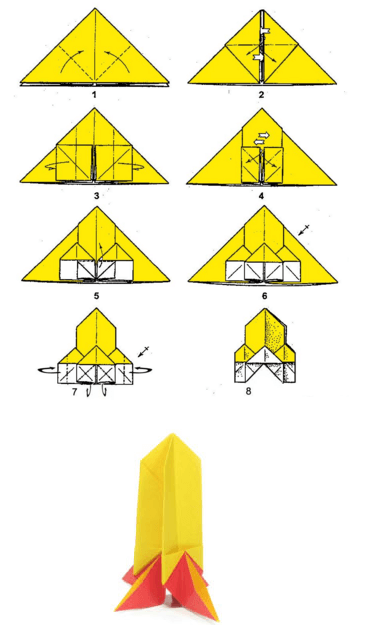
- Bend the square sheet so that you have a fold, dividing it into four equal parts.
- We work with the upper two parts, for this they need to be divided in half. Fold the upper parts in half.
- We turn the sheet over and bend the corners to the middle, forming a corner at the top.
- We bend the sides to the middle.
- After that, we unbend them so that a fold forms closer to the outer edge.
- Flip the craft over and your rocket is ready.
You can also try modular folding rockets, but first you should master the lighter and simpler options.
Flower - Rose
For children 8 years old, it will be interesting to make a rose flower out of paper with their own hands. Using step-by-step schemes, and exactly following all the prescribed movements, the child himself will very quickly be able to fold a beautiful rose with his own hands. Later you can try modular folding roses.
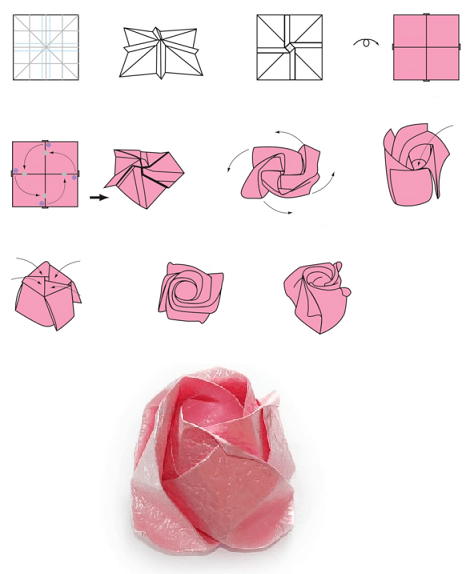
- Fold a square piece of paper diagonally across the floor so that it divides into 4 equal pieces.
- Lay the sheet in front of you in a diamond shape and fold the corners towards the center.
- Repeat step 2 again.
- Begin to unbend the corners to form the petals. Repeat this step twice. Your beautiful rose ready.
Simple paper crafts can be made from a regular square cut from an A4 sheet. Before starting work, you need to choose the right paper and master the basic techniques. Most often, paper origami for beginners is presented classic models animals, vehicles, amazing structures, natural forms, plants and people.
Choosing origami paper
You can fold beautiful figures from almost any type of paper: the thinner one is used for simple shapes, and the dense one is used for wet folding. Some manufacturers are ready to offer special origami paper that has a minimum thickness and a square shape. It differs in that one of its sides is painted in some color, and the other is white.
Most often, origami is made from square sheets, but it is possible to use rectangular, triangular, pentagonal, hexagonal and octagonal blanks.
Children are the most fun and laid-back people to be captivated various crafts... Origami will distract them from pampering and turn them into real wizards. Most often, they are represented by the simplest and most beautiful figures that any child can fold. This way of spending time will develop fine motor skills of the hands, thinking, dexterity, attention, artistic taste and patience.
Origami paper for beginners - flower ball workshop
Let's create volumetric origami ball for beginners made of many colors. It is quite simple to make such a ball, the main thing is to follow the description of the master class and be patient.

Such an original decor can be used to decorate rooms, for table setting, or as a Christmas tree decoration.
You will need:
- Note paper;
- Double-sided tape or glue;
- Scissors.
Manufacturing:

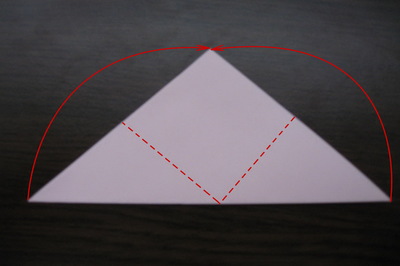
Then we fold the entire model in half.

Fold the protruding part of the triangle along the dotted line and tuck it inward.
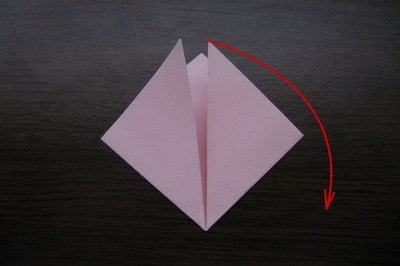
The model is ready. Now add 4 more note sheets in the same way.
All of them should turn out to be even and the same.
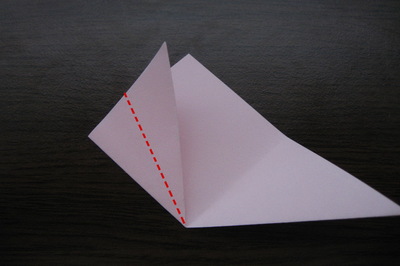
We connect together the resulting leaves from the previous steps using tape or glue.
We straighten the middle of each triangle and get a volumetric flower.
We start making the next flower - we do it in the same way. Now we glue the two volumetric flowers together.
![]()


Add flowers by gluing them to each other (11 in total) until the ball closes.
Origami ball in the form of a volumetric flower for beginners is ready!
Modular paper origami for beginners
Using this technique, you can get a three-dimensional figure, for the creation of which you will need single modules. Each of them is folded according to all origami rules and joined by nesting into each other. Modular origami allows you to experiment and get all kinds of garlands, sculptural compositions (for example, a swan from triangular blanks), etc.

Kusudama
Such an interesting name was given to voluminous flower balls which are made up of single elements. Unlike modular origami kusudams are held not only by friction, but also by glue and stitching. Initially, herbal teas, dried petals and incense were placed in these balls. Today they are considered decorative elements that bring a little fabulous oriental flavor and festive spirit into the house.
This version of origami is a drawing that shows all the folds of the future product. Its folding is a little more complicated than the traditional scheme. Most often, reamers are used to develop new models. They not only suggest the stages of work, but also tell how they were invented.
This folding technique involves the use of paper moistened with water, which gives the figures smoothness, expressiveness and rigidity. It is ideal for complex objects such as flowers and animals. As a result, they look very much like the original.
For wet folding, use paper made with water-soluble glue.
Assembly sequence
People who have just started to master the origami technique should start with the simplest figures and models. To deal with it, you need to know some requirements and rules:
- Prepare the paper required size and forms, stand near the table and place the workpiece on it, all the necessary schemes.
- To get the perfect fit, sketch out the crease line. Draw it with a metal nail file, which needs to be moved along the ruler.
- Master basic shapes: rhombus, square, door, snake, etc. With their help, you can learn basic origami skills.
- Learn basic folding techniques: different types folds, petals, flattening, indentation, single (double) hare ear and bird heads.
- After learning the basics, start folding certain shapes and authoring models. For starters, try making boats, boxes, glasses, seals, pigeons, and cranes. Author's origami are considered not only difficult, but also beautiful.
Master an even more complex and interesting technique - kirigami. Scissors are used to make models: the paper is folded, cut or cut in a certain order, and from this an unusual model is obtained.
137 0Origami is a popular Japanese art of creating all kinds of figurines from a simple, usually square sheet of paper. This is the miracle of transforming a plane into a three-dimensional model. This article presents origami paper crafts for beginners, the easiest models of which can even be made by preschoolers. Just prepare a few sheets of color, preferably double-sided paper, call the children, and start the creative process.
In I told you how to make 3 types of boats from a simple sheet of paper. This time I decided to share another popular scheme for making a steamer using the origami technique.
So,
Fold it diagonally.
Unfold the workpiece and fold it diagonally again.

Now fold all the corners towards the center.

Turn the workpiece over.
Fold all corners towards the center again.
Turn the workpiece over.
Fold all corners towards the center again.
Turn the workpiece over.

Expand two opposite corners, as in the photo. It turns out "pipes".
![]()
Pull the other two corners to the side.
I got a steamer like this.
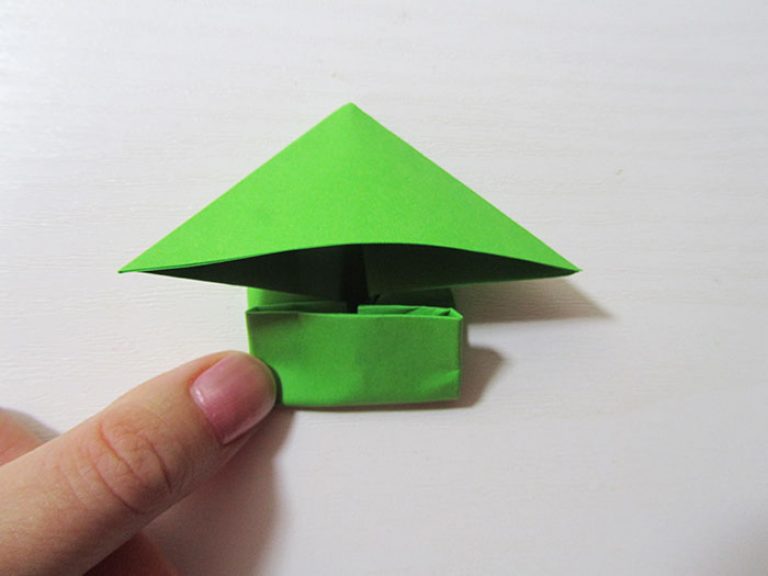
Frog
In this workshop I will show you how to make a very interesting frog using origami technique.

It is done simply and quickly, and most interesting moment is that she can jump! Usually children like this interactive toy very much.

Fold a square piece of paper in half.
Now fold it in half again.
It turned out two such squares.
Fold the top square along two diagonals. Expand.
Grasp two opposite triangles with your fingers and pull them towards the center. The figure turns around. It should look like in the photo.
Fold the bottom square in half.
Now fold the two opposite sides towards the center.
Bend the bottom figure in half.
Fold down the two top corners.

Now hold the two folds with your fingers and pull them out to the sides, straightening.

Fold the corners to form the lower legs of the frog.
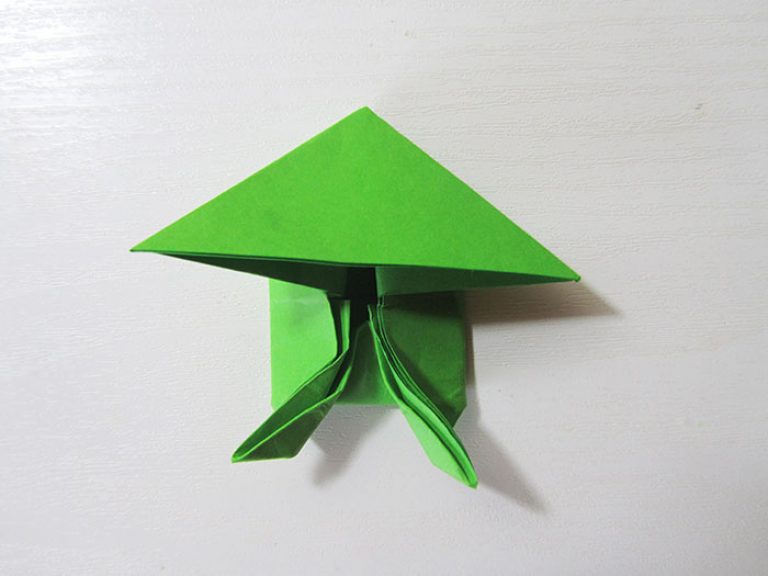
Now bend the two upper triangles to the sides - the two upper legs come out.
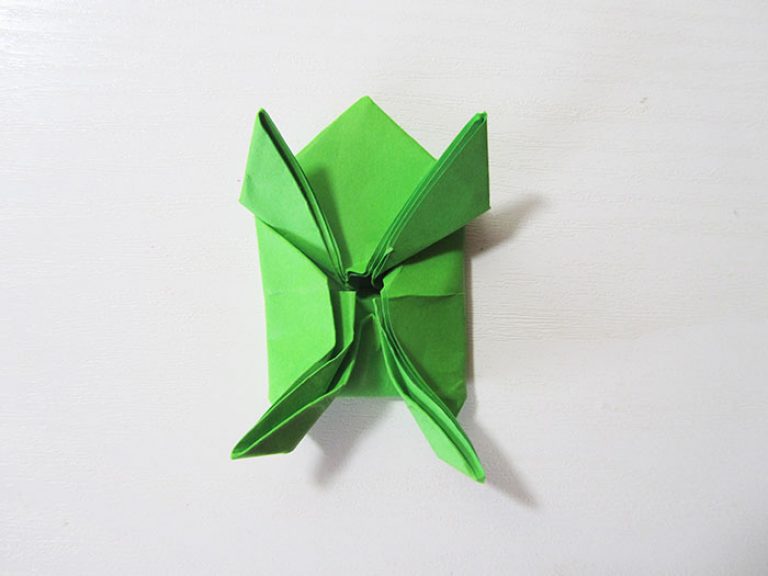
Bend the lower part of the body in half and bend it down a little. See the photo.
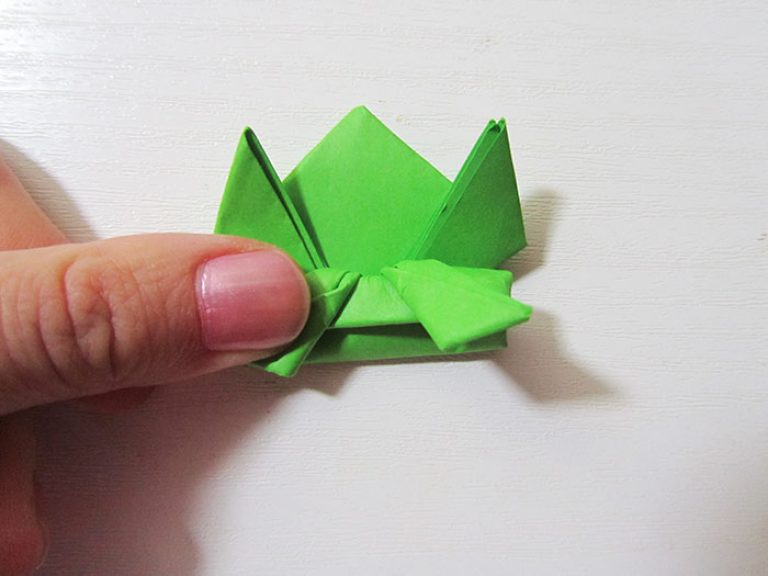
That's it, the origami frog is ready! You can also glue ready-made movable eyes to it. It's funny!
Cat
And in this master class I will show you how to make a simple cat from a square sheet of paper using the origami technique. The craft can be done with children 4-5 years old.

Take a square piece of paper.

Start by folding a piece of paper diagonally.
Now fold the resulting blank in half.
Bend two corners up along the diagonals outlined in advance (see photo).

Bend the top corner down.

Turn the workpiece over.
Draw the cat's face. Add eyes, nose, mouth, antennae to him with black marker. As a result, we have such a wonderful cat.
Bear
A simple origami bear can be made in the same way as a cat.
All you need is a square piece of paper. For this craft, it's best to use single-sided paper. But double-sided is fine too.

Fold the sheet diagonally.

Fold the resulting shape in half.

Now, along the outlined lines (see photo), bend the two corners towards each other.

Bend the two corners slightly to the sides.

Bend the two edges of the corners inward.

Turn the workpiece over.
Fold the top layer of paper up.
Fold the top and bottom corners inward.

It turns out this is the face of a bear. It remains only to paint it with a black marker. Add eyes, nose and mouth. Ready!
Dog
Another figure, like a cat and a bear, is made from a square sheet of paper. It is very simple and uncomplicated, but at the same time it allows even preschoolers to learn the origami technique.
Take a square piece of paper.
Fold a square piece of paper diagonally.
Bend the upper corners down along the pre-marked lines.

Bend the two lower corners up.
Draw the eyes and nose on the figure with black marker. It turns out the head of a dog!
Penguin
You can make a fun origami craft in the shape of a penguin from a square sheet of paper.

If there is no square sheet, you can take a rectangle and make a square out of it.

Take a square and fold it diagonally, marking additional lines.
Now unfold the workpiece.

Before reaching the center 1 cm, draw a horizontal line.

Now, along the marked line, bend the bottom corner upward.
Bend the top corner down.

Turn the workpiece over.

Bend the two sides towards each other.
Now fold the two corners outward along the marked lines.
Fold down the top triangle.

Flip the shape over.
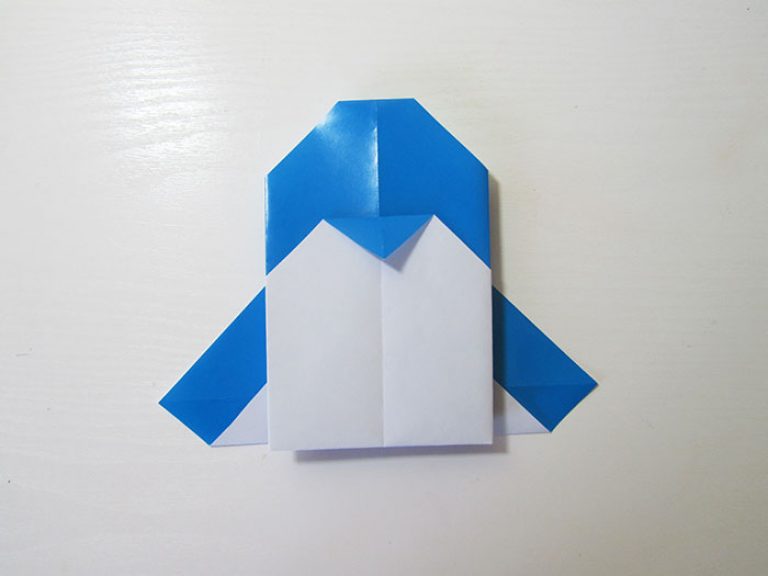
Draw her eyes with black marker. I ended up with such a funny penguin.
Father Frost
For the New Year, I propose, together with the children, to make such a simple but cute Santa Claus.
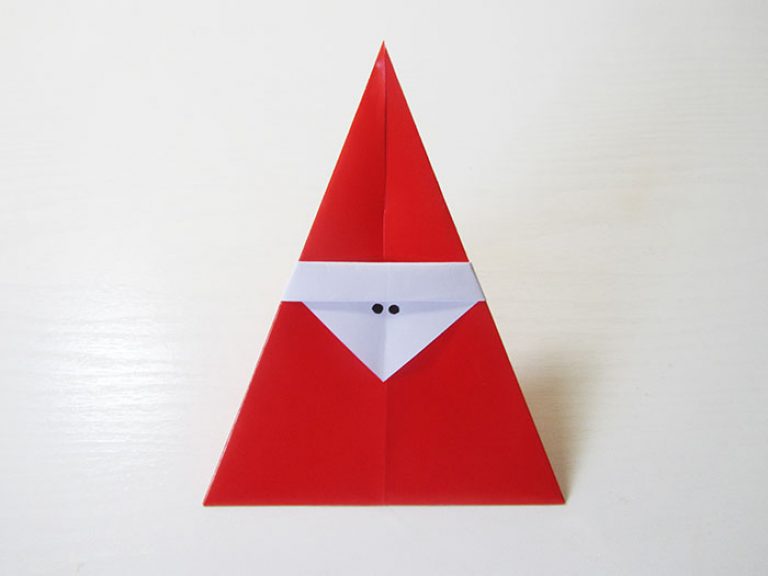
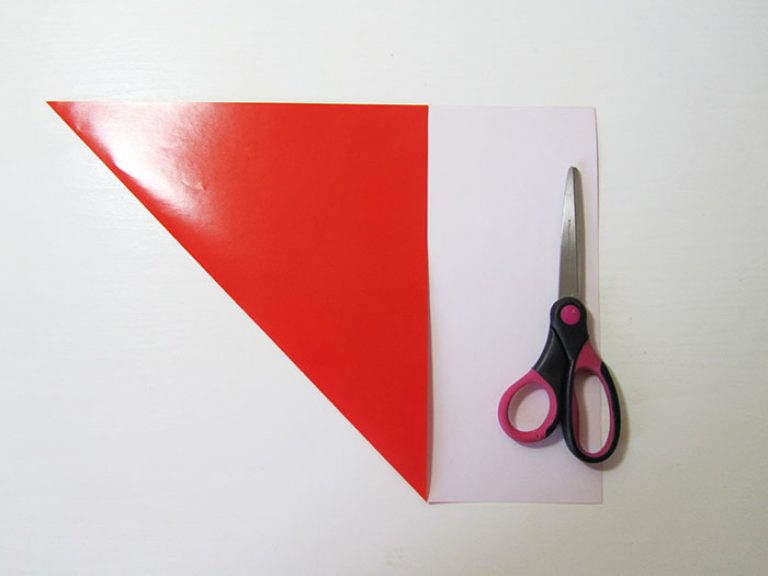
It's easy! One-sided glossy red paper is ideal for making crafts. Square paper is required. If there is none, then the square can be cut from a regular A4 sheet. How to do this, see the photo below.

And now we start making crafts. Fold the sheet diagonally first. Expand.
Fold the bottom side of the workpiece to the center line.

Do the same with the second side of the square.
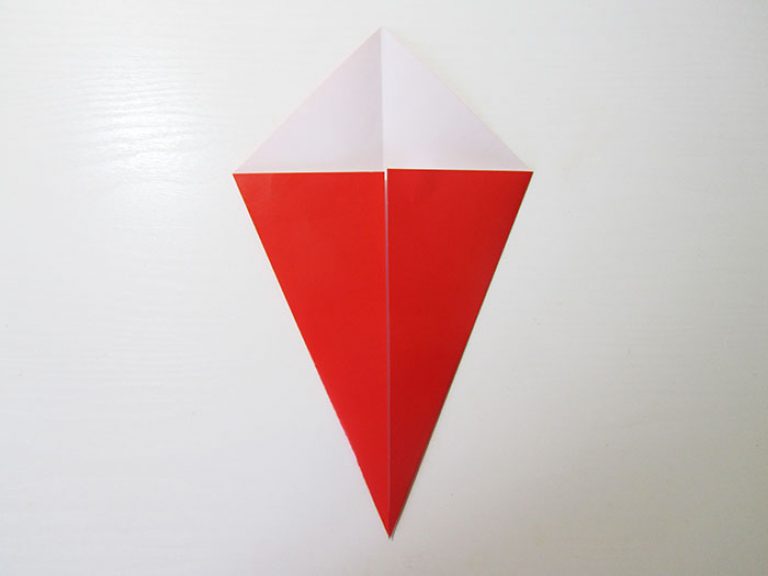
Bend the bottom corner of the triangle up.
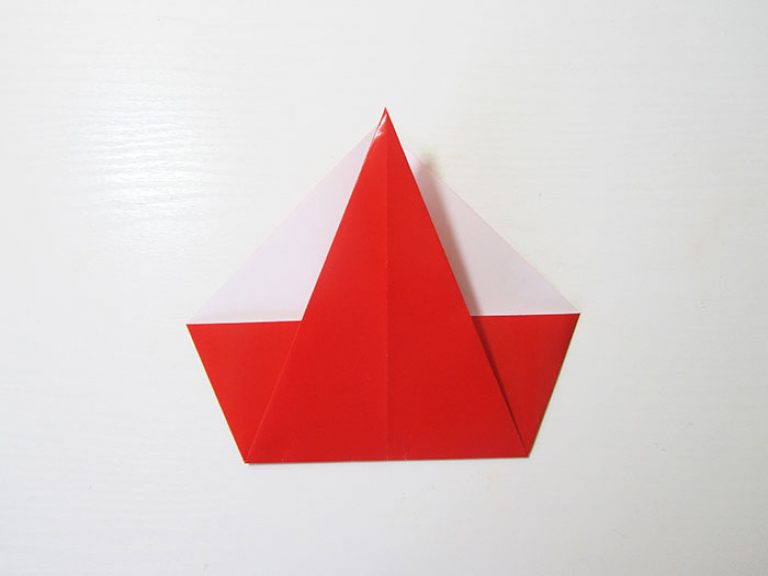
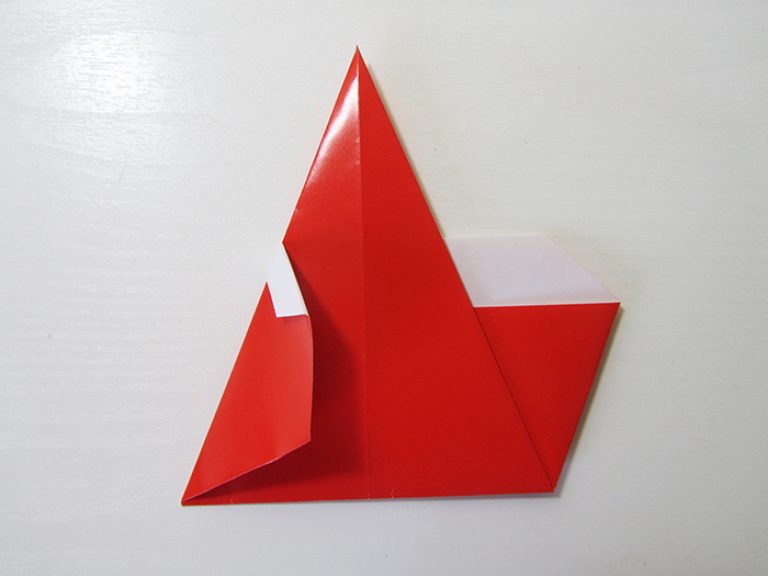
Turn the workpiece over.
Bend the top corner downward, slightly not reaching the bottom edge of the product.
Draw a line like in the photo.
Make a fold along the marked line.
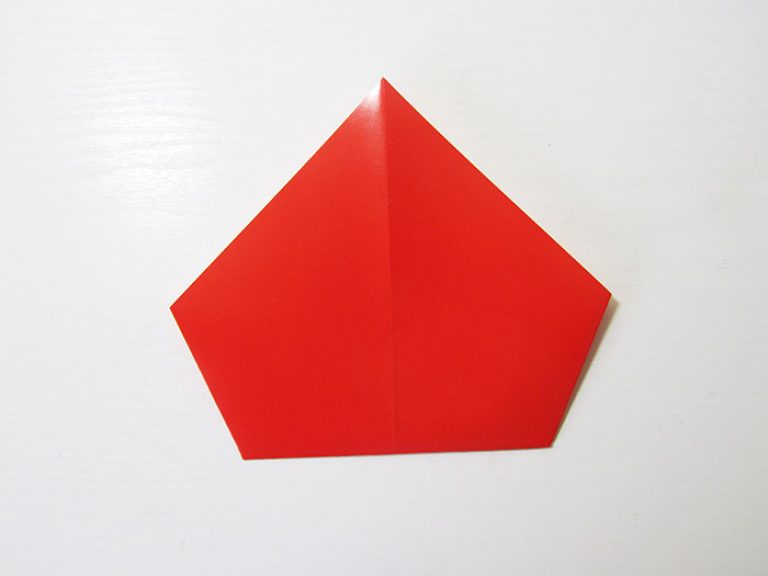
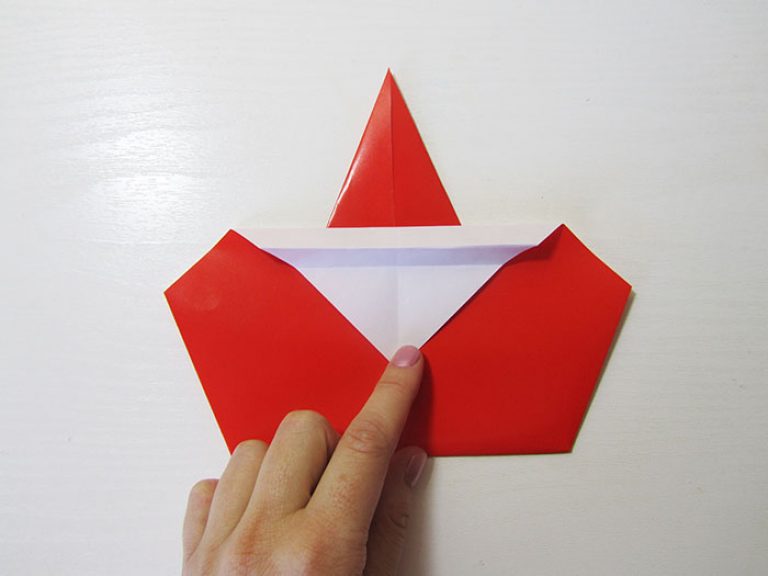
Fold the right corner inward, as shown in the photo.
Do the same with the left corner.


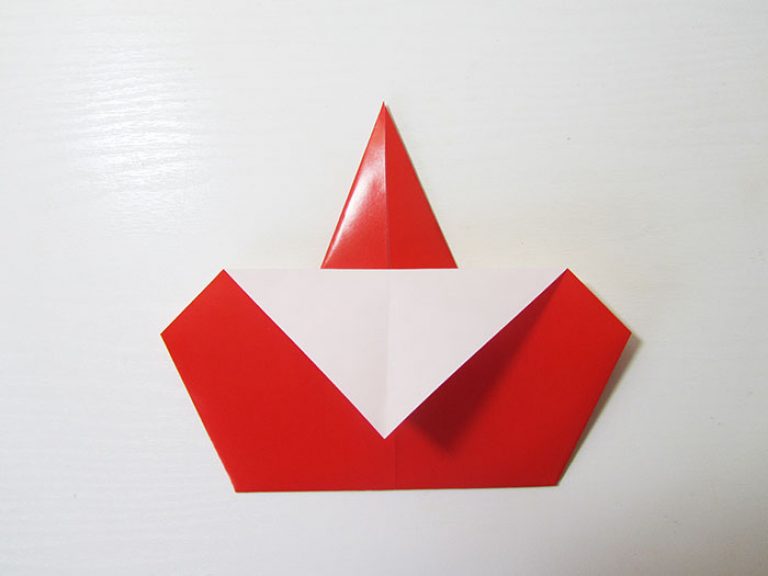
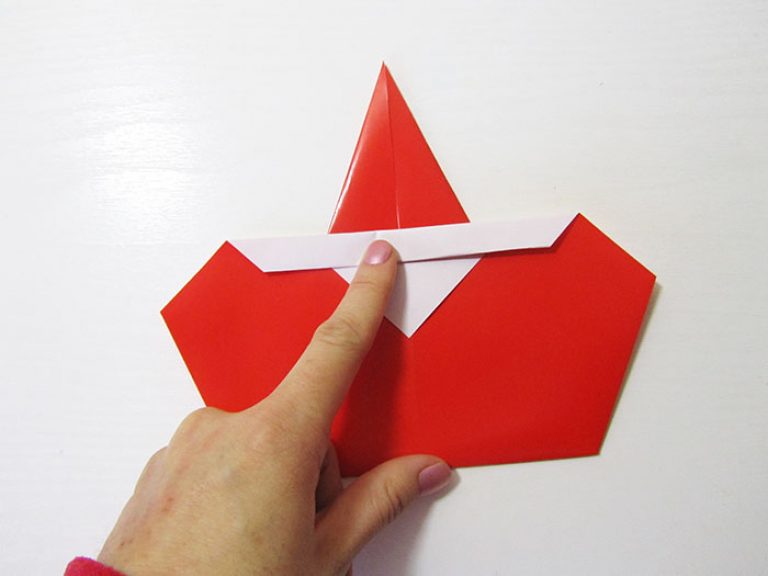
Draw the eyes with a marker.
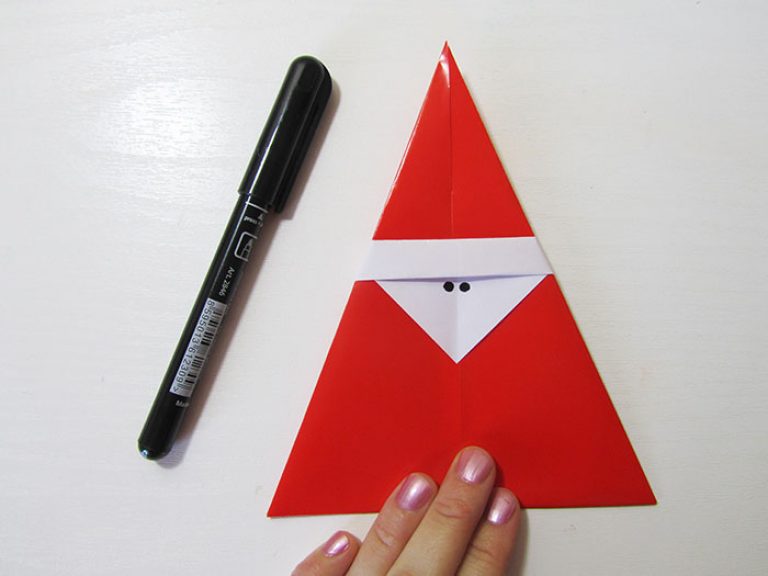
If you slightly bend the two sides of the figure, then it will stand on the table.

Here is such a funny Santa Claus as a result. It can be gifted to friends instead of new year card by signing at the bottom or on the back. And you can also write a wish at the very beginning, on a piece of paper, and then fold the craft. It will turn out very interesting!
Glass
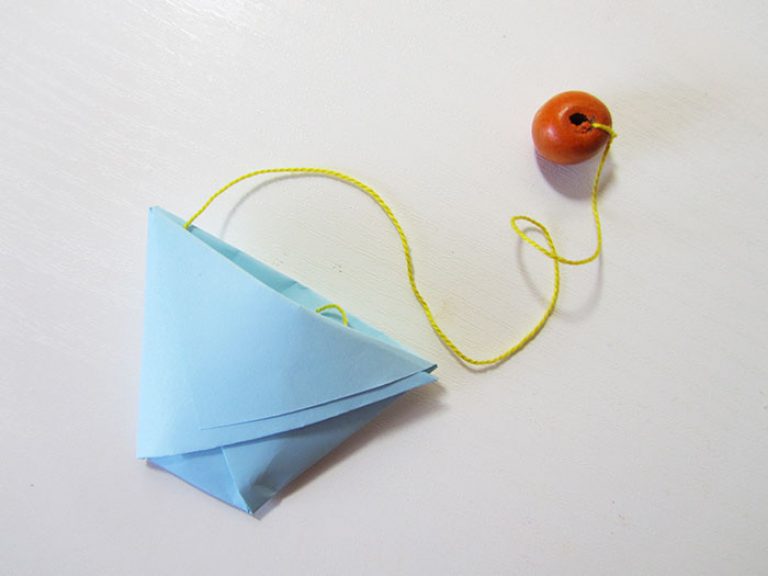
From a square sheet of paper, you can quickly and easily fold a cup.

In field conditions, it can even serve as a real cookware. So, you can pick berries in it, for example, or pour seeds. You can make such an origami craft anywhere, because you don't need scissors and glue to create it.
Take a square piece of paper.
![]()
Fold the square diagonally.
Bend the lower right corner to the left along the intended diagonal.
Do the same with the lower left corner.
Now fold the top triangle down.

V reverse side fold down the second upper triangle.
Here's a glass that turns out in the end.
Moreover, such a glass can turn into an interesting toy. To do this, attach a string to it with a tied bead at the end. Throw in a string with a bead. The essence of the game is to catch a bead in flight into a glass.
Airplane
List simple crafts origami would not have been complete if I had not given here a diagram of making the simplest aircraft.

He is probably familiar to you since childhood. And if you still do not know how to do it, then I strongly advise you to learn, and then show it to your children.
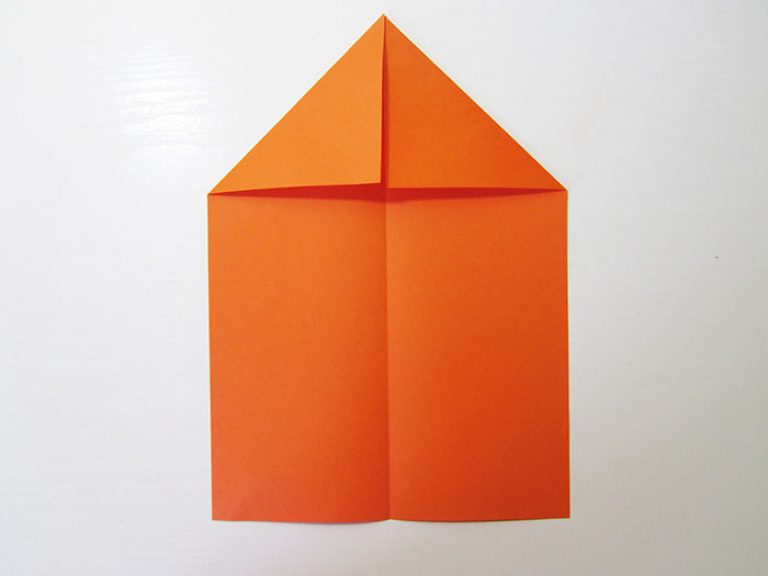
So, to create an airplane with your own hands, you will need regular A4 office paper.

Fold the sheet in half. Accelerate. This will outline an additional line in the center.

Fold the top two corners towards the center.
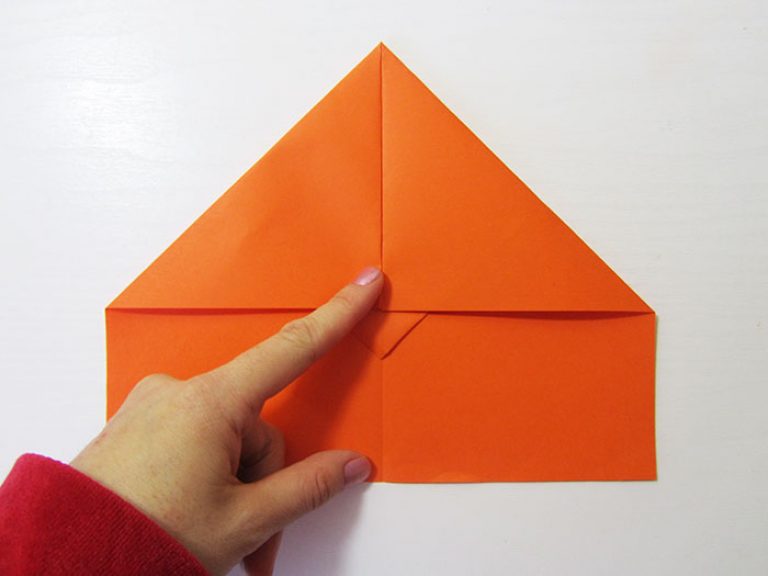
Draw a line along which you will bend the upper triangle downward.
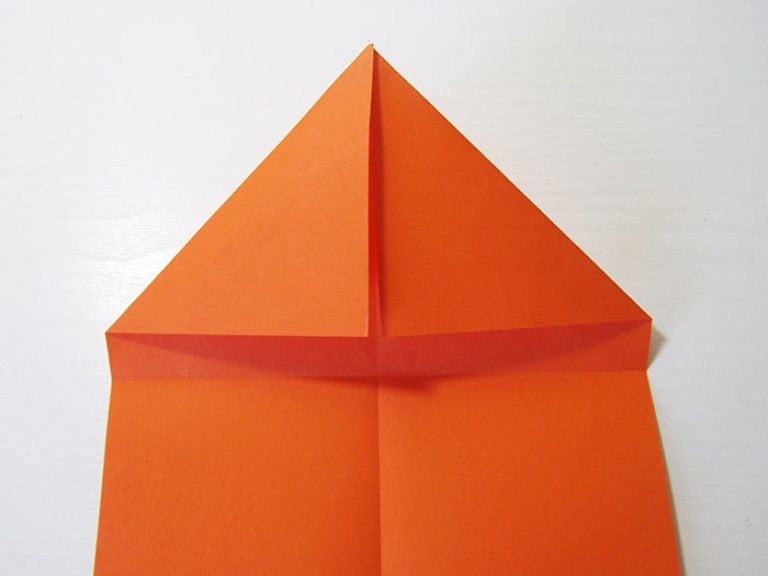
Now fold the top down.

Fold the top two corners back towards the center.

This is how it turns out.
Fold the bottom corner.

Fold the workpiece in half.
Fold the wings along the marked lines.
The airplane is ready!
And here is a slightly different scheme of the craft. Also simple and uncomplicated.

Fold the sheet in half. Accelerate. This will outline the center line.
Now fold the top two corners towards the center.

Bend two more corners to the center line along the outlined lines.
Fold the top corner to the bottom center point.
Now fold the airplane in half.
Bend your wings.
Here is such an airplane in the end. He flies great!

Now you can make a few more of these frogs using the origami technique and arrange a competition.
What is the use of such an activity as origami for children:
- folding paper figures trains attention, spatial thinking, creativity, logic and develops memory;
- for kids 4-6 years old - this is a great opportunity to develop fine motor skills of the hands;
- folding origami figures develops perseverance and concentration;
- besides, origami is just very exciting and interesting!
So now you know how to make the easiest paper origami crafts for beginners and you can teach your kids, relatives and friends! Fascinating creativity!
Origami paper is the most famous technique for making figures from paper sheets with your own hands. Intricate folding of paper using special schemes allows you to get figures with silhouettes and shapes similar to birds and animals, plants, objects.
Born in ancient China Having developed in Japan, having walked through medieval Europe, origami has by no means lost its popularity. Many modern people take an interest in this. ancient art... By the way, in Japan, origami was available only to high society.
How to make origami
Looking at the photo of the finished craft, it's hard to understand how to make origami out of paper with your own hands, how the figure is folded and why it holds its shape without glue. But thanks to our workshops, paper origami art is also suitable for children.
To do origami with your own hands, you need to understand the alphabet of special symbols (drawings with decoding of actions), and be able to read diagrams. It should be noted that most of the special characters are intuitive from pictures and do not require memorization.
Cranes, frogs, tulips, kittens, dragons, spiders, boxes, hearts, or - it's hard to list everything that can be folded out of paper with your own hands. For beginners to make origami by classical technology you only need a sheet of plain paper.
Ordinary white paper is wonderful for origami, only you yourself will need to cut out the squares from it - the basis for folding. If you wish, you can purchase special origami paper, it is thin sheets of different sizes, painted on both sides, in a square shape. For very small details, you can use square colored paper stickers.
Origami workshops
The art of paper origami has many directions, from light classics to modular designs. Origami workshops are schematic images of folding paper sheets. For beginners paper masters are necessary phased photos or pictures of the folding process. For experienced origamists, a pattern is enough.
A pattern is a sheet from which the future figure will be folded, with the drawn lines that need to be transformed into folds. Patterns are useful for complex origami models where conventional diagrams and descriptions are too voluminous.
We are pleased to show you the path to the fascinating world of Japanese philosophy by offering interesting workshops on the ancient paper art of origami.


