Many people remember that glorious time when we did not need a brand new smartphone or a modern laptop for entertainment. Snowballs, tags, Cossack robbers, tags are the childhood games of most modern parents that they will never be able to forget. One of this many amusements is to launch homemade boats through streams of water during rain or spring thaw.
Sometimes whole hordes of kids gathered over the puddles to build a boat out of paper or other materials at hand and send it to compete with others. The glory of the coolest shipbuilder of the yard usually awaited the winner! So how to make a paper boat? You will read about this in our article.
Are there puddles outside after rain? It's time to remember a fun childhood and launch a boat made by yourself or teach your own children this activity! Get off your TV and computer! For such a thing, you don’t need much, it’s enough to have a sheet torn from a notebook on hand, and you can make a boat out of paper.
If your miracle does not suit the ship like everyone else, then offer him to make his own galleon from any other material. Most materials that do not sink in water are suitable for this.
Previously, kids for this purpose could use:
- Styrofoam;
- Plastic bottles;
- Plasticine;
- Tree.
Incredibly beautiful products can turn out from this, but you should not be limited to them! Maybe you can make something amazing out of the shell. walnut or wine cork. Do not drive yourself and children into any framework and do not be afraid to fantasize! In this article, we will tell you in more detail how to make a paper ship step by step.
Methods for making paper ships
If a child comes up to you and asks you to teach how to make a paper boat with your own hands, and you have long forgotten about such games, our article will help you remember the forgotten knowledge. Read a couple of times, practice, and you can brag to your kid about different variations of your paper destroyer - from the usual notebook sheet, cardboard, milk cartons or matchboxes.
Classics of the genre - origami
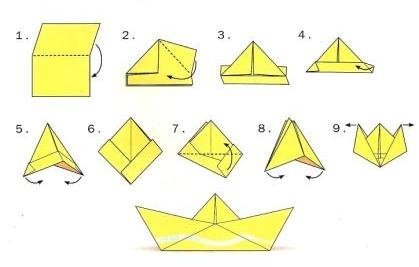
This is the classic version paper ship. Most of the guys made these toys during boring school hours. If you forgot some points - look at the picture, this is a diagram of a paper boat. Remember!
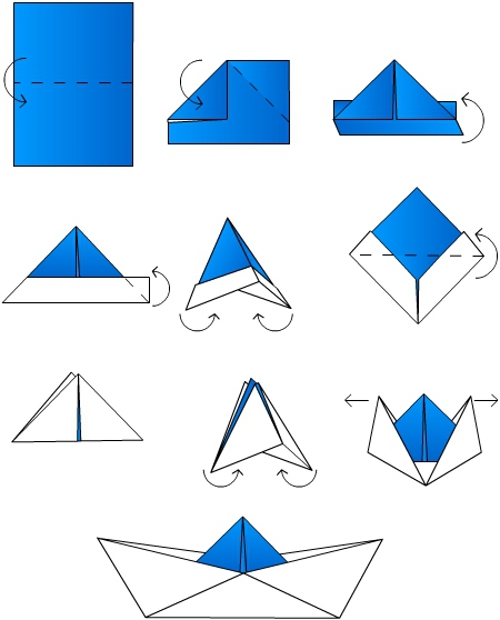
Production plan:
- You will need a rectangular piece of paper. Suitable as an ordinary sheet from a notebook, and printer paper.
- It needs to be folded in half and the tops bent to the center at a right angle.
- Bend the remaining edges of the sheet up (on both sides).
- We wrap the free corners inward. The result should be a triangle.
- We reduce the corners of the base of the triangle in such a way that we have a square.
- Bend the bottom corners up (both sides). You should now have a triangle again.
- Flatten the corners of the base of the triangle. You have a square again, take it by the corners and stretch it to the sides.
- Drag until you have the ship shown in the last picture. Flatten the sides, this will make it more stable.
Happened? Now you can do simple origami paper boat for kids Repeat the experiment a few more times and you can safely teach your baby! At the end, the finished product can be decorated and, depending on the desire of the child, floated on water or placed at home in a conspicuous place - a shelf in a nursery or a sideboard in the living room are perfect for this role.
Two-pipe paper boat (motor ship)
Let's say you and your children can already make a paper boat yourself. If you are no longer satisfied with such a primitive vessel, it's time to start exploring new options. This article presents several ways to fold the original boat. Below is written step-by-step instruction paper boat. It differs significantly from the previous appearance, and if the children liked it, hurry up to start studying!
The procedure for assembling a two-pipe paper boat:
Now you know the second way, how to make an origami boat out of paper. If a piece like this is going to be swimming, try dipping it in beeswax or paraffin to make it waterproof. You can also use paper, which does not soak up water so quickly, so that the ship stays afloat for as long as possible. For this purpose, fit, for example, cardboard. Ready? Launch your frigate!
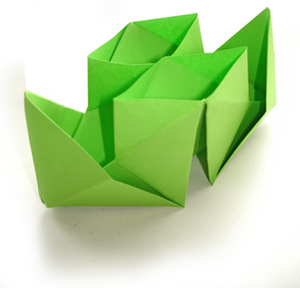
The third version of a beautiful paper boat for children and adults. Why for adults? He's very attractive! Such a ship can be made of any size, and it will become the highlight of your interior.
However, unlike the two previous options, you should not send it to the voyage. When it hits the water, the boat falls on its side, which reduces its chances of further use as a toy.
After all, what child would want to watch their ship sink? If you decide to make a sailboat as an interior element or a land toy, we will help you!
The procedure for assembling a sailing boat out of paper with your own hands:
- You need a square sheet. You can take an ordinary A4, fold it in half and cut off the excess strip.
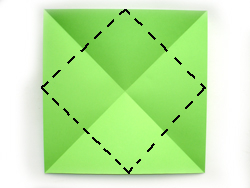
- Fold the paper diagonally twice. Now in front of you is a square with clearly defined lines and a center.
- Bend the top of the sheet at an angle to the middle.
- Repeat this with two more tops to make an envelope.
- Bend the bottom corner to the other side, stepping back about 1 cm.
- Fold the workpiece in half so as to break the middle diagonal in the opposite direction.
- Now the most difficult thing: you need to fold the product so that the center is inside.
- It remains to tuck the lower edge of the sailboat so that it can stand.
- Decorate the craft as you wish.
So you learned another scheme of a paper boat. If a child likes origami, then several hours of fun are guaranteed!
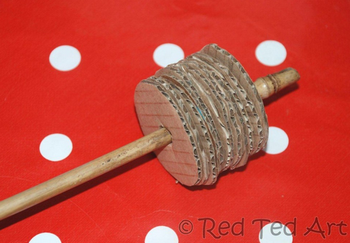
We present to your attention another way to make a paper boat for children, in which we need: matchboxes, cardboard, PVA glue. This option is more laborious, but the result is appropriate!
Scheme of a boat from matchboxes:
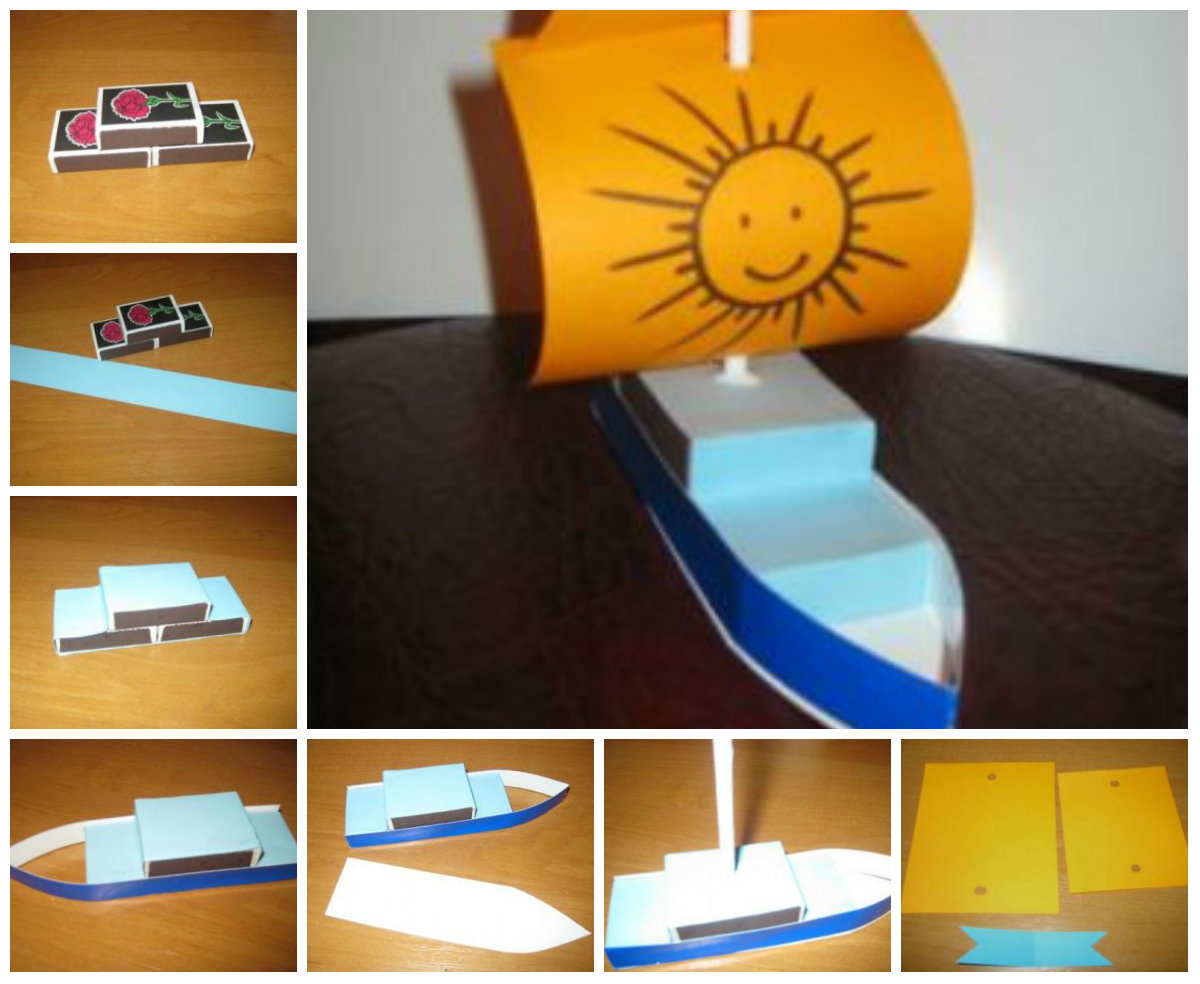
- You will need three boxes. Glue them - two together, one on top. You can use almost any glue, but it is better to use ordinary PVA.
- Now take an A4 sheet and cut a strip across the width of the box along the long side of the sheet.
- We glue our workpiece with a cut strip.
- We take a sheet of cardboard and cut off a strip a little more than 1 cm wide along the long side.
- We bend this strip in half and glue it to the boxes, forming the bow of the ship.
- Lay the ship on cardboard and draw an outline. This is the bottom of our ship - cut it out.
- Glue the bottom to the ship.
- Almost everything, but the ship needs a mast! Take an A4 sheet and roll it tightly diagonally.
- In the upper box you need to make a hole, coat the mast with glue and put it in place. Wait one minute for it to stick.
- Sail. To make them beautiful, use a sheet of colored paper. Make two holes each (you can use a hole punch or a clerical knife) and let the child decorate the sails as he wishes.
- Put on the sails and glue the flag, it will not let them slip out.
And another ship in your harbor. What to do with them - decide for yourself, and in the meantime we will share a few more options for such ships.
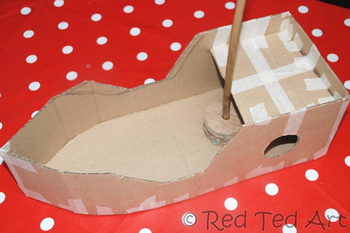
cardboard ship
A cardboard ship can be of various sizes. You can make it miniature for spring fun, or you can make it huge for any other purpose. Such a boat turns out to be incredibly beautiful, and a minimum of consumables is required to create it.
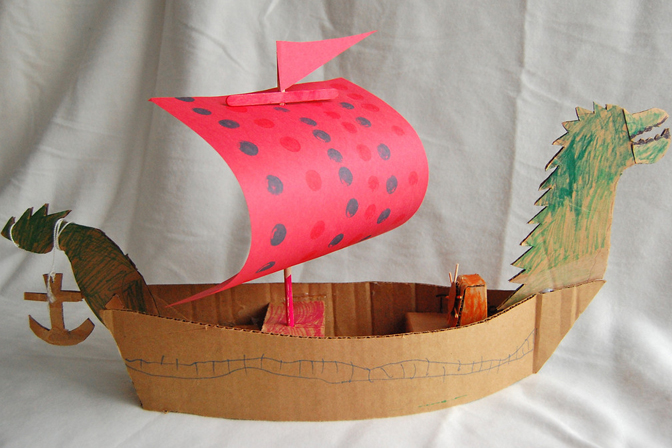
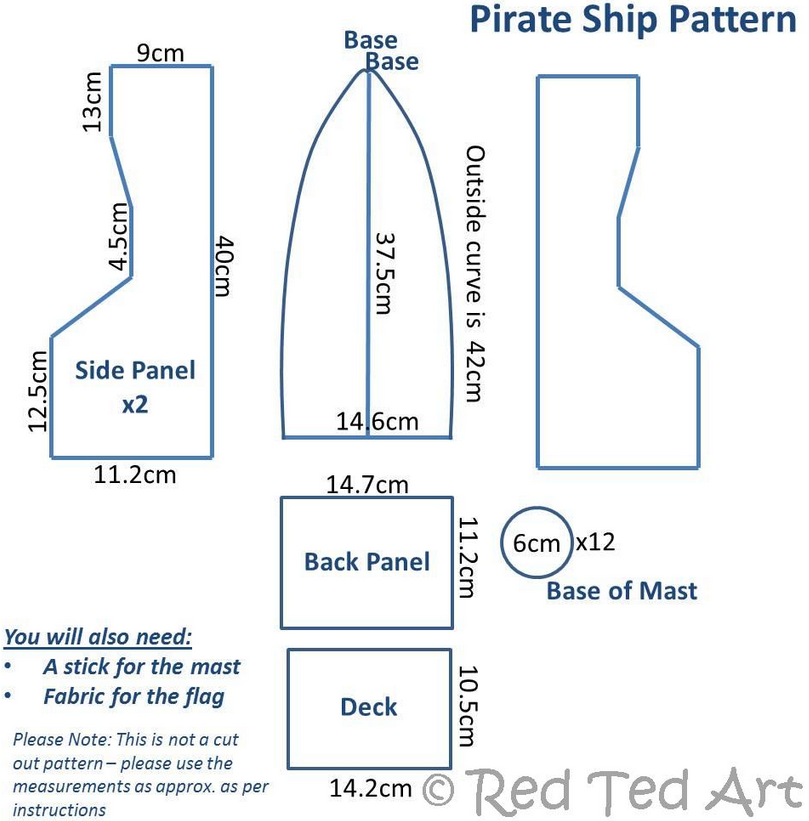
pirate ship
So, the list of everything you need:
- Cardboard;
- Scotch;
- Glue;
- Paper;
- Two thin sticks;
- Water;
- coarse thread;
- Fabric and scissors;
- Brush and paints.
Feel free to get to work!
It is not necessary to strictly follow the instructions, repeating the design one to one! Create as your imagination allows you.
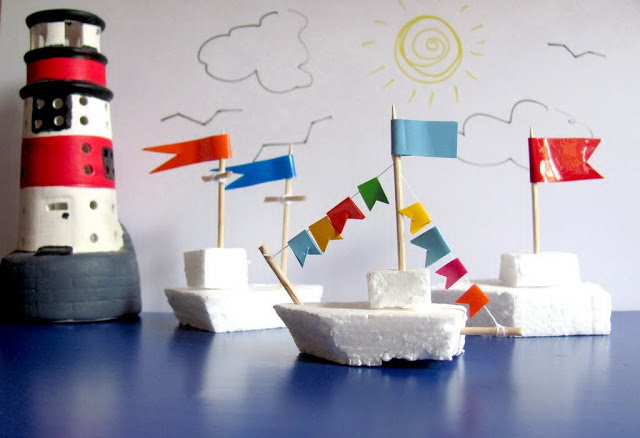
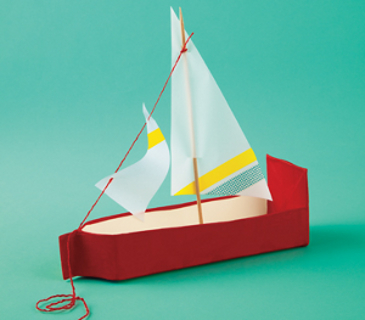
cute sailboat
Ships can be very different. For example, here is another idea for inspiration!
For its manufacture, even more will be required less materials than in the previous version. Only needed:
- Cardboard;
- Scissors;
- Glue;
- colored paper;
- Pencils;
- Scotch;
- Ruler.
Order of execution:

The simplest option. All he needs is an empty milk carton colored paper, thread, stick, fabric, thread.
Order of execution:
- Buy milk at cardboard box, drink it.
- Trim the box so that the rest resembles a boat.
- Cover it with colored paper.
- Attach a stick (mast) to the middle of the boat.
- Attach the sail to the mast and tie it with a thread to the bow.
As a result, you might end up with something like this:
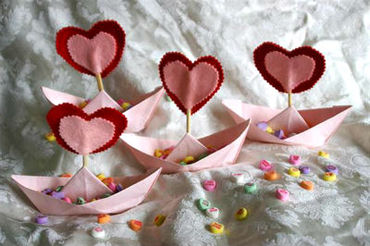
You already know how to make a paper boat, but how to decorate it? This is especially true of origami boats, because they look quite simple without embellishments. Alternatively, let the child paint the craft with colored pencils, paints or felt-tip pens.
Otherwise, you can try using professional origami paper (patterned, foil, painted, etc.) or improvised materials.
On a note! When choosing a material, take into account its weight, otherwise your vessel will simply lose balance. In this case, it’s not only that you won’t let it go through the water, it won’t even be able to stand straight.
Another idea is to decorate origami in the following ways:
- textiles;
- Painted paper;
- colored napkins;
- Tree leaves.
It might turn out something like this:
Perhaps you will come up with something more interesting, it all depends on your mood and flight of fancy. Good luck in creativity!
As children, many of us did paper boats and launched them in puddles, basins and bathtubs, getting incredible pleasure. Unfortunately, today this children's fun has been replaced by a variety of purchased plastic toys, and simple children's joys are a thing of the past. We offer to change the situation and remember how fun it was to play with handmade toys! And a child who independently assembles a boat, decorates it and gives it a name, will not only be happy to have fun with it, but also be proud of its own small success. For you, pictures of boats from childhood. Let's remember how it was. And now step by step instructions on how to make a boat out of paper. To do this, you only need a suitable A4 sheet, five minutes of time and knowledge of the basics of origami.
Manufacturing scheme
To begin with, let's roll up the most ordinary boat, which, at the same time, will keep well on the water. The art of folding interesting figures from a sheet of paper is called origami. That is what we will deal with.
First, study the diagram and remember how such a swimming facility is made.
If it is not completely clear from the diagram how to fold the sheet to make a boat, let's analyze it in stages.
- Take a sheet of A4 paper. It is denser than ordinary colored paper and the finished product will float better on the water;
- Fold the sheet in half;
- Lay it with the fold up and bend the right and left corners towards the center, as in the manufacture of an airplane;
- Under the bent triangles there was paper in the form of a rectangular strip. Fold its top edge up to close the triangles. Do the same on the other side;
- Now we have to bend inward the corners of the strips that we bent. You have a kind of triangular cap;
- Take the product by the edges with folded corners and bend in half to the other side. It turned out a rhombus;
- From the side on which the corner is not solid, bend the upper part down, then bend the part on the other side;
- Turn the shape 90 degrees again and bend;
- It remains to deploy the boat, pulling the corners in different directions;
- Straighten the bottom of the boat and you can set it sailing! But do not forget to let the child decorate the boat and put a name on it - this is the most interesting and responsible part.
Double-pipe boat
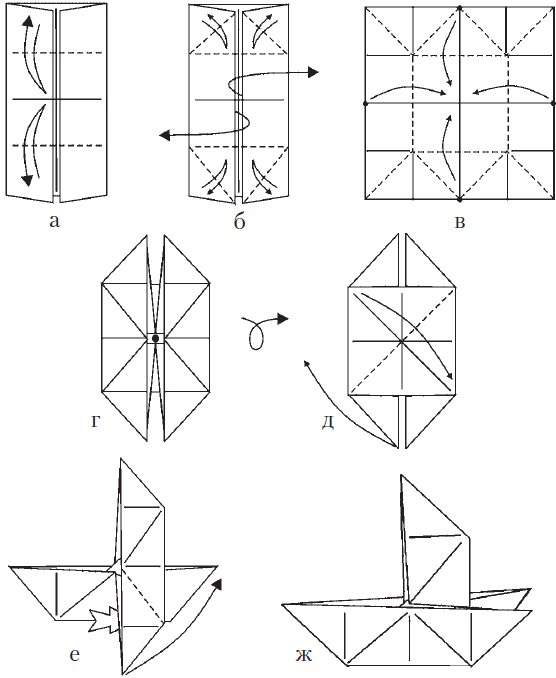
Now let's assemble another boat, which also evokes pleasant childhood memories - a two-pipe boat. Its layout is below.

- Cut out a square from an A4 sheet. You can use special thick paper.
- We form two diagonal folds on the square by folding. We turn back.
- Now all four corners of the square must be evenly bent towards the center.
- Flip the resulting square to the other side.
- We repeat the action - we add all four corners evenly to the center.
- Turn the square over again and do the operation to bend the corners a third time.
- After flipping, you should get a square consisting of 4 small squares.
- We unbend one of them, we also unbend the second, which is located opposite.
- The corners remaining from the sides must be raised.
- We combine the resulting pipes together.
- We iron the edges of the ship and you can set sail.
The boat with two pipes is one of the most popular models and now you can create it yourself and also teach children.
These are simple ways to fold the most simple boats from paper. But from it you can make real sailboats, military cruisers and huge ships. You will learn how to create a military cruiser by watching the video master class below. And now we will reveal the scheme for building a sailboat.
Other boat models
In addition to these common boat models, there are a large number of others. If you would like to create your own navy, you can do this using the following diagrams.
- Yacht.
To begin with - a scheme for the manufacture of this shipping model.
Using it, you can make a yacht. To make this model, you will also need a sheet of A4 paper. You can use special paper for origami, then the product will turn out to be more durable, bright and will confidently float on the water.
- Boat
Assembling the boat is easy. The picture shows a detailed diagram.
- sailboat
The sailboat is also made from a sheet of A4 paper or origami paper.
Video: how to quickly fold a paper boat
If the diagrams and descriptions seem complicated to you, then video master classes can help in assembling the boat. You can watch them with your child and immediately repeat them by folding a real military cruiser or a simple fishing boat out of a sheet. Have fun sailing!
Today we will continue the topic of making paper crafts. In this article, we will make ships out of paper.
Paper boats float beautifully in puddles and spring streams. They can be run on a river or a pond. Paper decomposes very quickly in water and therefore the launch of homemade paper boats does not cause any damage to nature.
How to make a simple paper boat
Look at the picture below, it shows the whole process of making a ship from a notebook sheet or printer paper.Take a sheet of printer paper or tear out a notebook sheet.
Fold the sheet in half, and then fold the top corners at a right angle to the center.
Now we bend up the free edges of the sheet on both sides
Carefully tuck the free corners of the sheet inward so that you get a triangle
Now fold the corners in such a way that we get a square.
We bend the lower corners from two sides up and thereby make a triangle.
Now we need to bring the corners of the base of the triangle together and the triangle will turn into a square.
Now we need to expand our origami into a paper boat, for this we take a square by the upper corners and spread them apart.
That's all! A paper boat from a notebook sheet is ready and you can send it sailing through the expanses of water.
This is a very easy way to make a paper boat with your own hands. But there is something more difficult.
How to make a sailboat out of paper
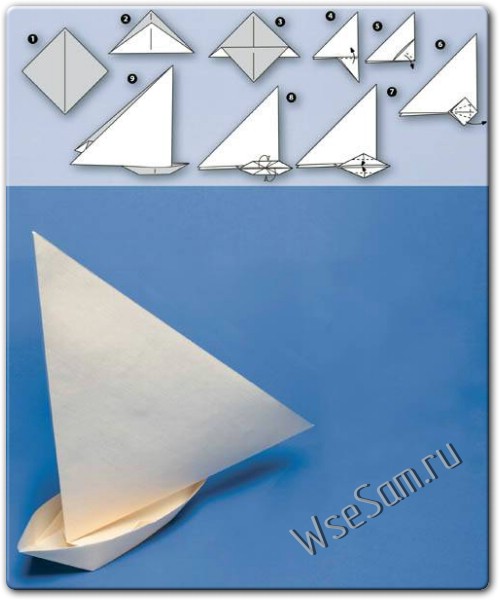
Now let's complicate the task and make a real sailboat out of a paper sheet.
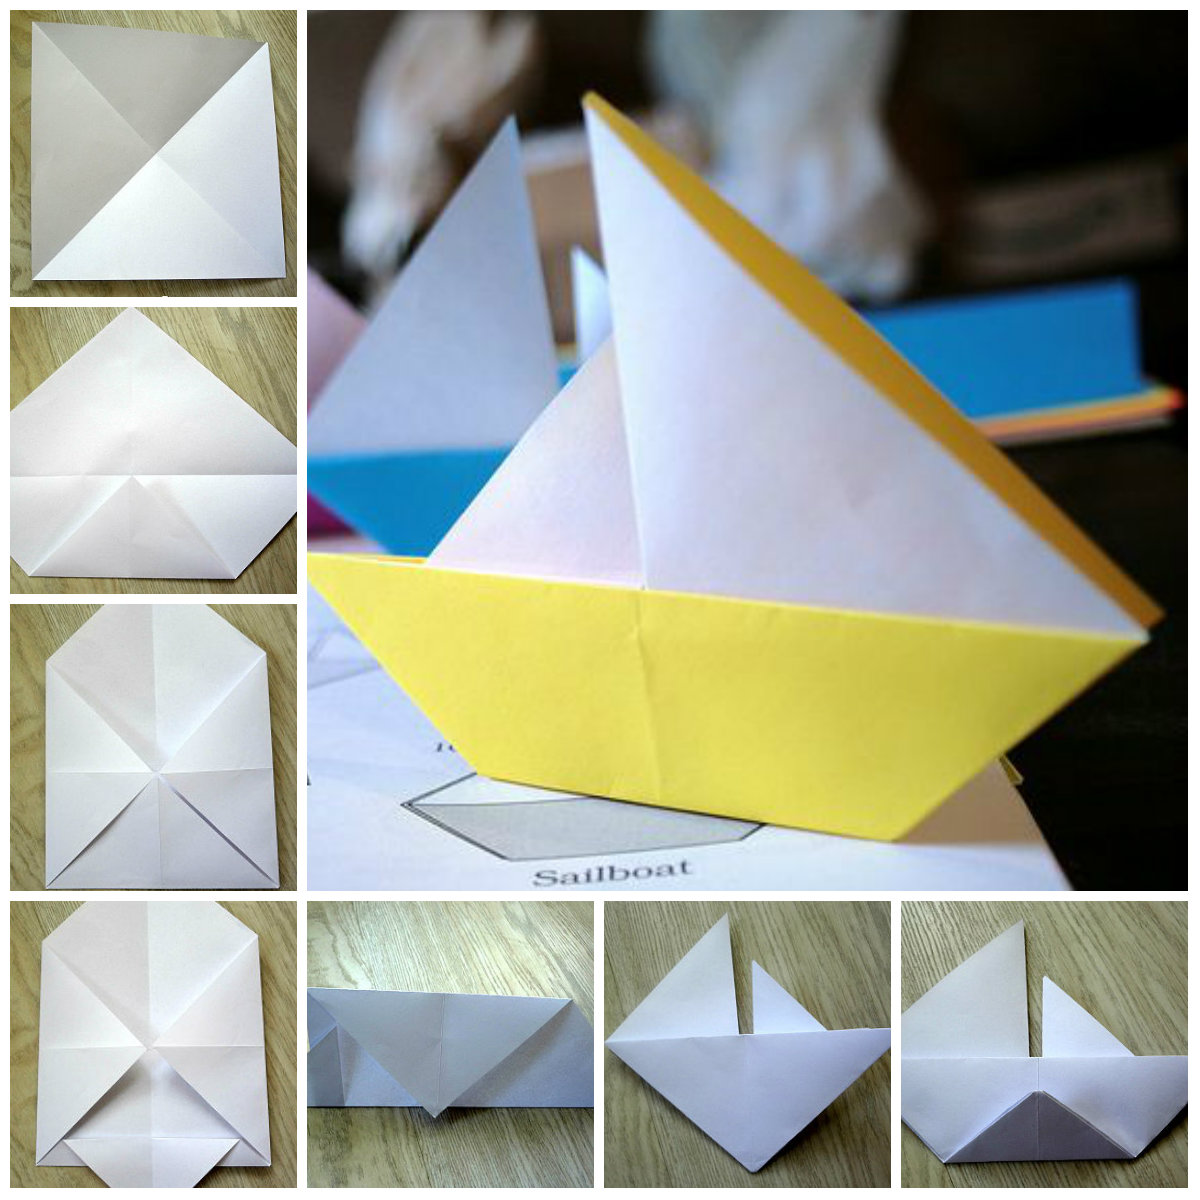
Look at the picture above and follow the drawn steps.
For manufacturing, you need a square - just fold the paper obliquely through the corner and cut off the excess - that's a square sheet.
If you load the sailboat with plasticine, then it can be launched on a windy day. Plasticine will play the role of ballast, like on a real ship, and the wind will not be able to overturn your homemade paper boat.
By the way, I specifically found for you to make a paper boat video:
Don't forget to glue the ship's tank with a dab of glue to seal the hull before launching the sailboat on the water.
However, a sailboat is not the crown of creation! Let's make a paper boat!
How to make a paper boat
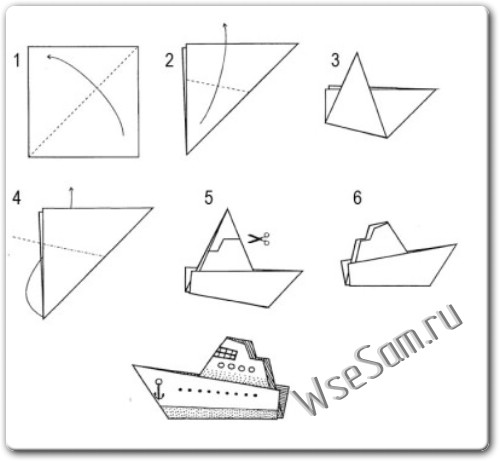
Like the previous paper boat, the paper steamer is made from a square sheet.
The very first action you fold the corner, when using A4 paper from the printer - cut off the excess, what will protrude beyond the square.
Making a paper boat will require not only careful folding and unfolding, but you will also need to use scissors to give the paper boat the silhouette of a steamer.
In addition, use a permanent marker or ballpoint pen to mark the paper boat with images of the wheelhouse, the name of the vessel and other inscriptions. A paper model will only benefit from such decoration!
How to make a paper model of a catamaran

Let's make another paper boat, this time a catamaran.
The catamaran is a very stable vessel. The paper catamaran inherited this quality from its big brother and is just as stable on the water.
Look at the picture - everything is simple there! We fold a paper sheet, bend it, unfold it and get a paper boat - a catamaran!
And finally, a short video - how to make a paper canoe boat.
Good luck making paper boats and launching them on the pond!
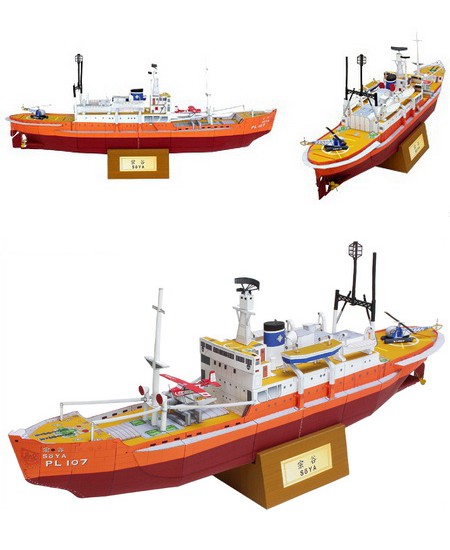
Soya is a Japanese icebreaker, the ship was built in 1938 by the Matsuo company under the name Volochaevets.
Model for your collection.
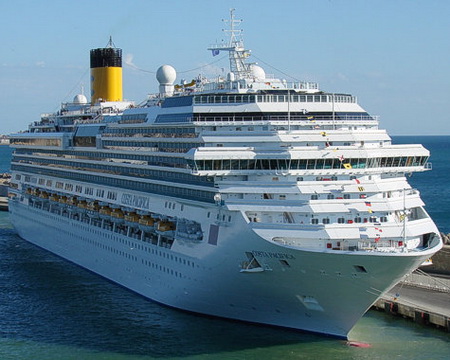
Cruise liner Costa Pacifica, is an absolute copy of Costa Serena and Costa Concordia, built in 2009 in Italy by order of Costa Cruises.
Model for your collection.
The beautifully shaped and art deco interior, which was contemporary for the time, plus the excellent service on board, made her a favorite ship for famous people who crossed the Pacific.
Print on a printer, on A4 sheets of matte thick paper, cut and glue.
 Model for your collection.
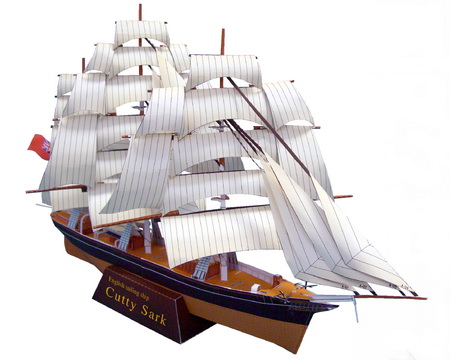
Cutty Sark was built in 1869. It is currently in dry dock at Greenwich, UK.
The ship was seriously damaged during a fire on May 21, 2007 and is currently under restoration.
Print on a printer, on A4 sheets of matte thick paper, cut and glue.
 Model for your collection.
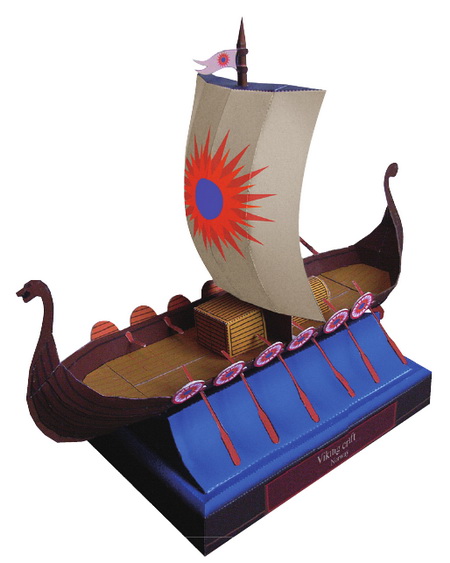
Viking craft - the ship of the ancient Vikings.
Print on a printer, on A4 sheets of matte thick paper, cut and glue.
Model for your collection.
The barque Sagres II (Sagres II) is the third of six barques of the Gorch Fock class, but belonging to the "large" class, like the Needle, in the past Horst Wessel.
Print on a printer, on A4 sheets of matte thick paper, cut and glue.
 Model for your collection.
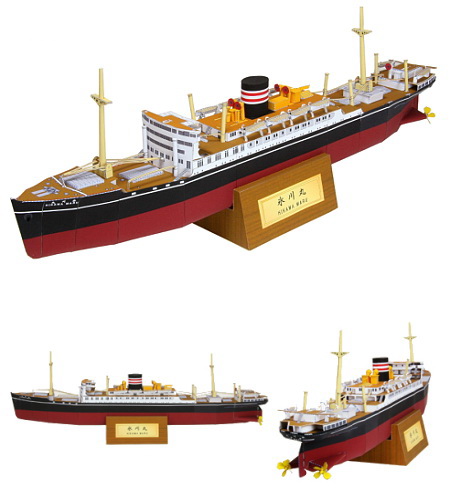
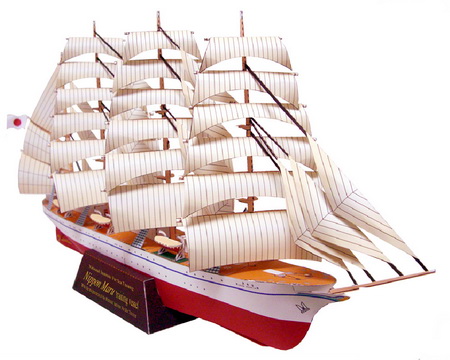
The four-masted barque "Nippon Maru" is the most famous and famous sailing ship in Japan, whose history began at the beginning of the 20th century.
Print on a printer, on A4 sheets of matte thick paper, cut and glue.
 Model for your collection.
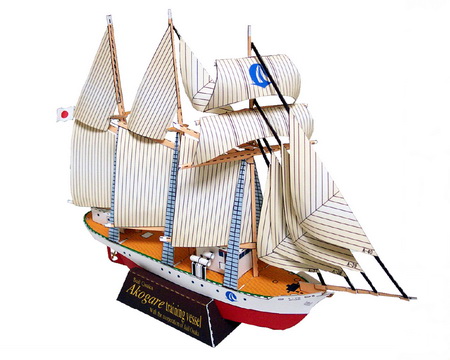
Akogare was built in 1993 as a training ship for the city of Osaka for use in international maritime training.
Print on a printer, on A4 sheets of matte thick paper, cut and glue.
 Model for your collection.
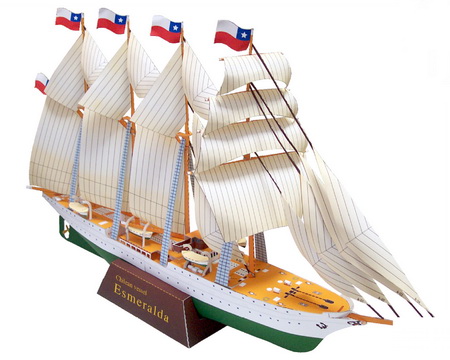
"Esmeralda" (BE-43) is a 4-masted barquentine (a barquentine is a three- or more-masted vessel carrying straight sails on the foremast (first from the bow) and oblique sails on all others) with a steel hull, a sailboat of the Chilean fleet .
Print on a printer, on A4 sheets of matte thick paper, cut and glue.
 Model for your collection.
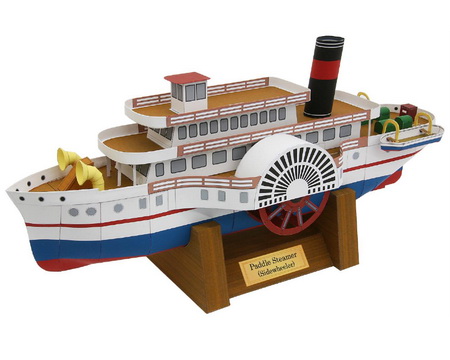
A paddle steamer powered by a steam engine.
Print on a printer, on A4 sheets of matte thick paper, cut and glue.
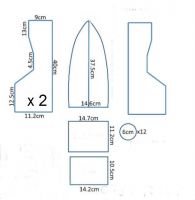
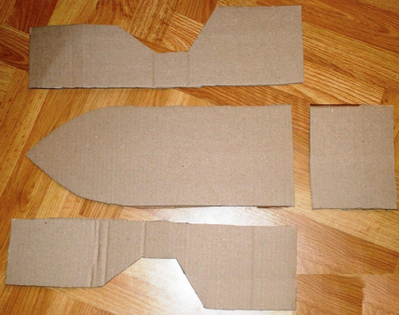
A good gift for dad or grandfather by February 23 can be a boat made by a child with his own hands. Of course, this ship does not have to be a holiday gift at all. It can be a simple cardboard craft on a normal day off or a craft made in a craft class. In general, it doesn’t matter what this ship is intended for, the main thing is that your boy, or maybe a girl, wants to make such a miracle sailboat out of cardboard with his own hands. Your child may need your help to make a ship of their own. Find this time for the child and help him in his creative impulse if, due to age, this craft is difficult for him.
Use the patterns to cut out the sides, back, bottom, and deck of the ship from cardboard. Glue them together with tape.
After that, you need to tear or cut into small pieces of paper. It can be either regular paper for printers or special paper. corrugated paper for children's crafts. Dilute PVA glue with water in a ratio of 1: 1. Then, dipping each piece in diluted glue, attach it to the cardboard. Thus, cover your craft with 4-6 layers of paper. Once the glue is dry, color and decorate your craft. Make sails out of fabric or cardboard from used toilet paper rolls.