June 19, 2016
Making three-dimensional paper crafts will be fun and it will be very useful for children to learn how to make something with their own hands from colored paper or thin cardboard. There are a variety of interesting and simple circuits folding origami and appliques, which children will be quite capable of.
One of the most popular origami is the swan. You can make a swan from thin cardboard or colored paper using an origami pattern. We will tell you how to make a swan with your own hands step by step; even children 4-5 years old can do it:
Fold a square piece of paper in half diagonally.  Fold the top and bottom corners towards the middle.
Turn the corners towards the middle outwards.
 Turn the craft over.
Fold the thin end of the swan craft from colored paper into the shape of a swan's head.
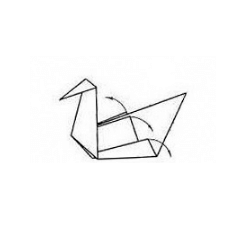
Fold the thick end into a tail, making two folds on the paper.

Such beautiful three-dimensional paper crafts can be an excellent exhibit for an exhibition, as well as decoration for a child’s room.
Master class

From colored paper you can easily make things like multi-colored mice. To create such a craft, you can use very simple patterns and a minimal set of tools. For children 4-5 years old, it will be very easy to make beautiful mice with your own hands step by step. So, to make mice from cardboard or colored paper, children will need:
- Pieces of cardboard or colored paper.
- Glue.
- Scissors.
- Pencil.
- Ruler.
As for the work scheme, everything is quite simple. To make mice from colored paper with your own hands, you will need to take a sheet and cut a not very long strip from it. Have children fold the strip in half and glue both ends to each other. Now you will need to cut out two ovals from cardboard and glue them there, to the place where the ends are glued.
Cut a thin strip out of colored paper; this will be the tail. Glue it to the opposite end of the craft. Such beautiful mice are wonderful three-dimensional paper crafts that can be used in games and a wide variety of installations.
Applications
For anyone beautiful applique You definitely need to have a set of colored paper for children, scissors, glue, a piece of cardboard on which the applique will be glued, and also a little imagination. It will be very interesting for children to create paper pictures with their own hands using simple or slightly more complex patterns.
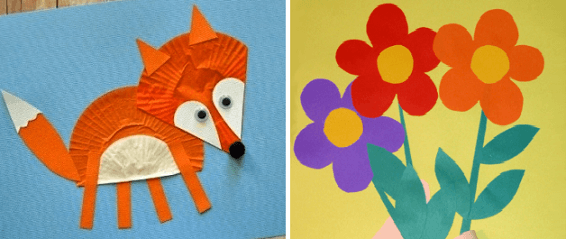
Of course, you can use a variety of ideas in the plot of the craft, cut out and paste animals, flowers, scenes from fairy tales and much more. But you can make the application a little more interesting by using the principles of mosaic, when pieces of colored paper are cut into small pieces and the animal or flower that you wanted to depict is formed from them.
You can first cut out the animal, and only then cut it into small parts and stick it on a piece of cardboard. Children will really like using this pattern to create a beautiful applique with their own hands.
Ladybug. Application made of colored paper and plasticine. Crafts for children
Crafts made from paper and cardboard

In order for the child to develop correctly, and his imagination and imagination to develop along with him, try to interest your children in various ideas for crafts, including. We offer you five wonderful ideas, using the schemes of which you can keep children occupied for even an hour.
- a good way to get your child interested in creating volumetric crafts. First, choose a simple version of the diagram so that your child can properly understand the principle of folding such origami. It could be a simple bunny or a star.
As soon as the baby has mastered the skills of working with modular origami, you can offer him folding patterns of medium complexity and so, gradually increasing the level of complexity, you can ensure that in a very short time the baby will fold large and beautiful modular origami. By the way, when folding such origami, you can use colored paper or paint white paper after assembly.
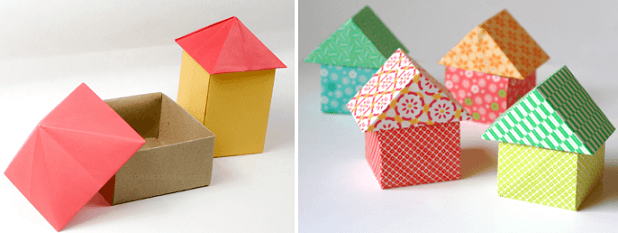
It will be very interesting for girls to make a cardboard house in which the dolls will live. It is desirable that the cardboard is thick, then the house will be durable and will stand well. The walls of the house can be glued to each other, or you can use the principle of grooves, then the structure will be stronger. In the house you will need to make doors and windows to suit the height of the dolls, and you can also arrange cardboard furniture.
Fish from paper baskets - beautiful craft, which will be very simple to perform. To make a fish, you will need to take a sheet of paper and draw the outlines of the fish on it. Let it be large, it will be more convenient for children 5-6 years old. Now take the colorful cupcake baskets and fold them in half. Glue them so that the baskets form the scales, tail and fins.
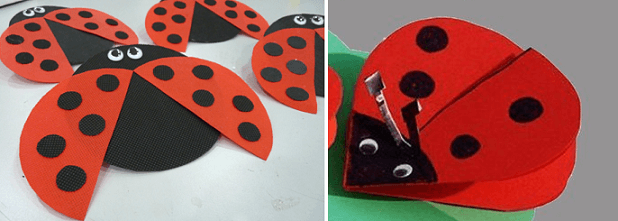
Origami ladybug- a very simple way to make a beautiful ladybug with your own hands. You just need to take a square of paper and fold it twice diagonally. Fold the opposite sides inward so that you get a triangle. Cut the bottom of the triangle to make a semicircle and paint the craft to look like a ladybug.
Cardboard cactus too interesting craft And good way make a beautiful room decoration with your own hands. You will need to take two pieces of cardboard and draw the outline of a cactus on them. Next, using the principle of grooves, make sure that the halves of the cactus can be placed.
If you look at such a cactus from below, it will form a cross. You definitely need to paint the cactus, draw a pot on the bottom, and draw the edges of the flower and its spines on top on a green background. Using this pattern to make a flower with your own hands will be very simple and easy.
Paper flower / Origami crafts for kids
A fun and at the same time useful pastime for both adults and children - folding various crafts from paper. In the process of working on crafts, the child develops logic and spatial thinking; in addition, the child, due to the fact that this activity is quite painstaking, becomes observant, attentive and assiduous. In order to teach how to make paper crafts, it is advisable for children to select simple patterns at the first stages, and then complicate them over time.

How to make paper crafts easily and simply
The selection of videos presented below will show master classes on making crafts of different levels of complexity, from simple works to more complex ones. Each master class will show you step by step how to make a paper craft.
What crafts can you make with children of different ages?
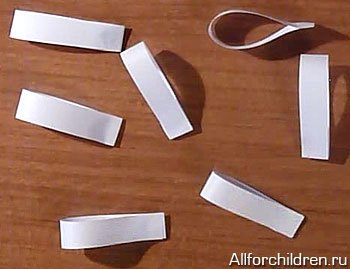
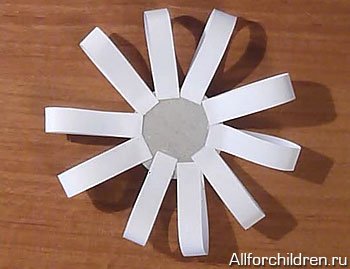
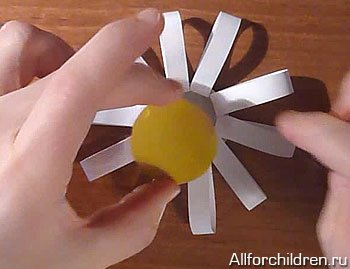
Children 3 years old can be taught to do simple crafts made of paper, for example a daisy figurine. To work you will need a sheet of white paper, a sheet of yellow cardboard, as well as scissors and glue. Due to the fact that the child will have to use scissors and glue in the work, the child should do the craft only under adult supervision.
First, you need to cut two circles with a diameter of about four centimeters from a sheet of yellow cardboard, then you need to cut about ten strips from a sheet of white paper, the length of which will be eight centimeters and the width will be one centimeter. Next, you should make a loop from each strip of paper, i.e. connect and glue the ends of the strips. Then the resulting loops must be glued to the previously cut circle with reverse side. Then the second yellow circle must be glued on top, then the craft will turn out double-sided.
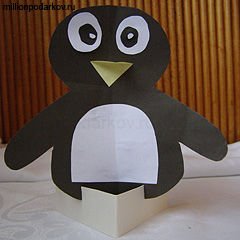
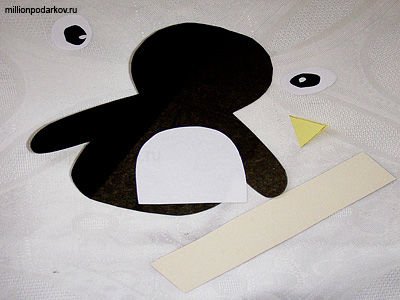
For children 4-5 years old, a paper figurine of a penguin will be affordable in terms of execution. To work you will need sheets of colored paper, scissors and glue. First of all, you need to cut out the necessary elements from sheets of colored paper: from a sheet of black paper - the silhouette of a penguin, from a sheet of yellow paper - a beak, from a sheet of white paper - eyes and a tummy. Then glue all the parts, make a stand out of cardboard and place the penguin on it.

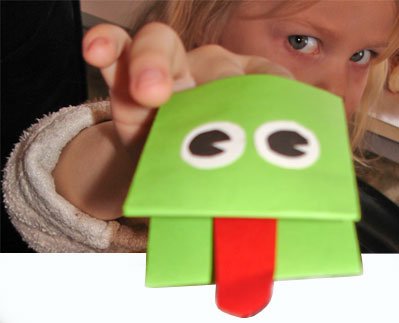
A child who is 7 years old can be asked to make a frog figurine out of paper. To work you will need a sheet of green paper, as well as a small amount of red, black and white flowers. First of all, you need to divide a sheet of green paper into three parts and bend the side parts towards the middle, then bend the resulting figure in half. Next, you need to bend the rectangle in half and make an accordion, that is, bend the lower edges up on both sides. Then you need to glue a tongue cut from a sheet of red paper and make eyes.

Children 8-9 years old can perform more complex craft made of paper, for example voluminous fish. To make a craft, you will need sheets of colored paper, scissors and glue, as well as a sheet of cardboard that can be used as a background and stick crafts on it to create a solid picture. First, you should cut out small squares from sheets of colored paper, then fold each square diagonally, then fold two triangles along the marked lines. Next, on one side, you need to bend the side parts to the middle, then you need to glue or draw eyes and the fish can be considered ready. Similarly, you can make fish from sheets of colored paper of a different color, and also cut out pitfalls and algae from paper, then glue all the details onto the base and the work can be considered complete.

![]()
“Mom, mom, look at what a miracle I did!” - rushes out of the group kindergarten a three-year-old creator with a craft at the ready to meet his mother who came for him. There is so much joy and pride in the baby’s eyes. Of course: he himself made something new with his own hands, something that didn’t exist before, and he succeeded! Children love to create. Handmade crafts for a 2-3 year old child are very important: this is both a way to express oneself as an individual and to gain knowledge of the world. And if something suddenly breaks (disassembled toys: dolls left without arms, and cars without wheels) - then this is also creation, because in order to do something, you need to find out how something works. This is how the world is known. With the participation of adults and, first of all, parents, he learns faster.
Features of young children
Remember the song from the funny children's cartoon "Beware of the Monkeys"? It perfectly characterizes those who “came out of the diapers”: two-three-year-old little people. Hyperactivity and the inability to concentrate attention for a long period on something specific at this age is the norm. After all, a child’s mental processes are still involuntary. Therefore, when planning an activity with your baby, choose simple crafts. For children 2-3 years old, handicrafts should not exceed 15 minutes. Time is given with a reserve, because concentration of attention at this age is possible only for 3-5 minutes.
What crafts are best for a 2-3 year old child?
1. Not requiring sitting in one place for more than 15 minutes: We must remember the line from the song mentioned above about half a kilo of explosives.
2. Easy things to do: relying on the proverb about perseverance and work is still premature.
3. Those that can be finished within 15 minutes. Choose a craft that you can do in this period of time, so you can teach your child to finish the job.
4. Choose a work option that will probably be interesting, and the end result will impress the baby.
5. Educational crafts for children 2-3 years old - ideal. Therefore, try to combine handicrafts with the development of speech, logic, and self-care skills.
The main condition for engaging in creative work is that the child should do the work mainly; the mother only prompts and guides.
Drawing
Creating masterpieces with help is an exciting activity for a child. When the child learns not only to stain himself with paint, but also to move his finger across the paper, his hands become stronger, give him a thick (for convenience) brush. By the age of 2, we already have an experienced artist who has gone through the stage of scribbling and arrived at the stage of scribbles and lines. You can safely start drawing little men from the song “Dot, dot, comma - a crooked face” with his pen. By the age of two and a half to three years, the baby will be able to draw his first cephalopod himself.
![]()
Modeling
All mothers know how important it is to develop their child’s hands. Modeling is one of the ideal activities for its development. It is best to start introducing your child to sculpting when he is one year old. First, introduce the baby to the modeling material. Yes, by the way, it’s worth paying attention to the optimal choice of what you need to make crafts from with your baby. For a 2-3 year old child, the ideal material is dough. You can prepare it yourself, or you can buy it in stores that specialize in selling children's products. There you can also buy for modeling: a rolling pin, stacks, stamps and molds for cutting out figures.
So, we begin our modeling lessons with simple tasks: knead the dough, roll it into a bun, pinch off small pieces from it.
Prepare a template with a simple design for class. For example, a tree, and a child will be happy to stick leaves on it.
By the age of three, your child will be fully accustomed to the role of a sculptor and will be able to sculpt simple figures from three or four separately made parts.
Application
For classes you will need ready-made parts that need to be glued, a base and glue (ideally starch or flour paste). The option of applique with tree leaves is possible if you are doing autumn crafts. For children 2-3 years old, classes should be conducted in order of increasing difficulty.
The first stage is to introduce the child to glue, its properties and operating algorithm: first we smear the part with glue, then we apply it to the paper and press it.
It is important to immediately draw the child’s attention to the fact that he holds the part that he is lubricating with glue with one hand.
When all the difficulties of the gluer's craft have been overcome, you can begin a more creative process: composing compositions from elements pre-cut by elders.
Construction
The activity is very useful because, in addition to the small ones, it develops the child. Of course, the baby himself cannot cope with the role of a designer. But there is always a mom and dad who will help you do something interesting. There are ready-made kits- crafts for a 2-3 year old child, allowing you to assemble figures from several large parts.
But you can do without them: collect chestnuts and pine cones on a walk and make a funny little man. Conduct an unplanned activity while walking.
Other things at hand are also suitable for construction: balls of thread, cardboard bases from rolls toilet paper, all kinds of boxes and boxes. You just have to show your imagination.
Conclusion
At the age of 2 to 3 years, children’s thinking develops visually and effectively, which is why creative activities are so important, during which the child gains skills in handling objects, labor, self-service, and speech.
The main thing is not to forget the rule: the child should like what he does.
Our children. With what trepidation and enthusiasm they prepare for New Year's holidays. On the eve of the magic, kids try to please their parents: songs and poems, round dances around the green forest beauty - the Christmas tree and, of course, wonderful crafts. And this is another advantage of the pre-holiday bustle. After all, what could be better than children's creativity? Except when the whole family is working on creating the next masterpiece.
If you are also planning to diversify your family leisure time and make an original New Year’s craft with your child, we will offer you some interesting ideas.
Master class on New Year's crafts for children 4-5 years old
Example 1
There are only a few days left until the New Year, but your apartment is not decorated yet? It's time to correct the situation and involve the smallest family member in the process. Children's crafts in the form of a New Year tree made from the palms of family members will quite cope with the role of a decorative element. And you can do it in a matter of minutes. Let's get started.
To make such a wonderful Christmas tree, we will need: several sheets of cardboard, green colored paper, glue scissors, glitter and sequins.

Example 2
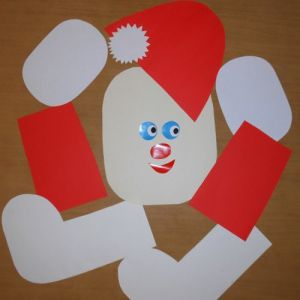
A wonderful children's gift - Santa Claus made from children's palms - can be a memorable gift for grandparents.
Example 3
As you continue to prepare crafts for the New Year with your children, pay attention to the wonderful natural material– There are actually a lot of ideas for using them.
One of the most simple options is a small owlet that can be used as a Christmas tree decoration. Take a small cone and pieces of multi-colored felt.
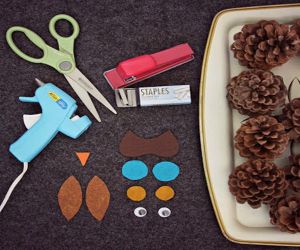
Here's another simple nursery New Year's craft from cones, which you can make with your own hands. Christmas tree decoration- Father Frost.
To make it we need a white cone polymer clay, ribbon, acrylic paint with glitter, a small piece of wire to make a hole for the ribbon.
Everyone good afternoon! Today I will show you some of the most interesting, in my opinion, ideas for children's creativity.
All these crafts were made by my son between the ages of two and three during classes at the development studio, where we have been going for more than a year and a half. I had a whole box of crafts accumulated, so I decided to sort it out and throw something away. and show you something. I'll leave a few comments to make it clear what's what.
I hope that you like it and take something into your arsenal.
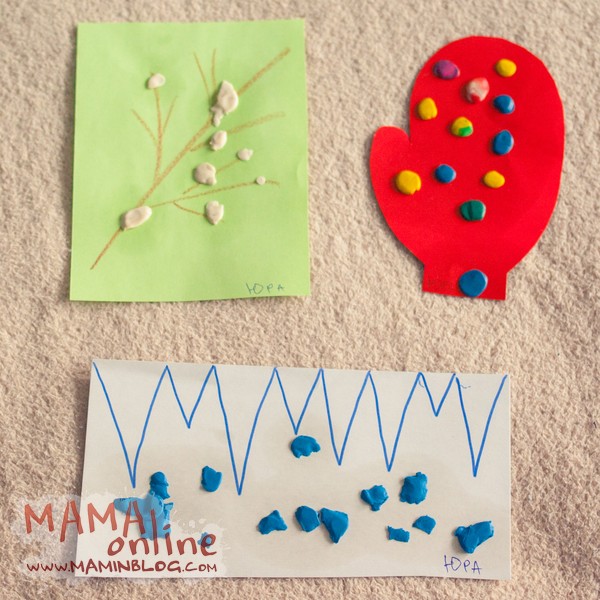
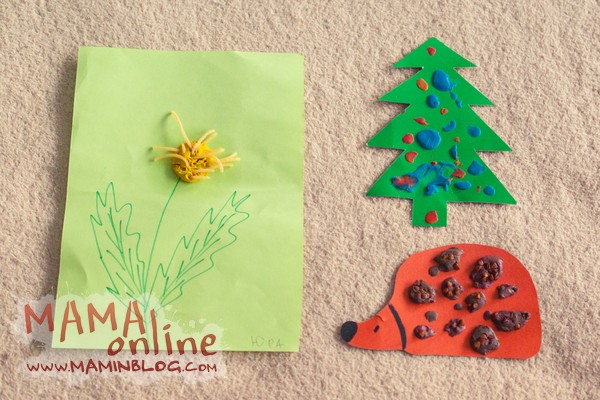
Applications made using plasticine, salt dough, and modeling mass are simple to make and interesting for children. In addition, you can use additional natural material to give the craft a more original look. Maple seeds are feathers for a bird, halves of pea seeds are scales for a fish, cereals, seeds, grains are decorations for a cake (Yura and I did a similar activity at home, see.)
There is room for imagination and creativity to run wild. Main, . On the crafts below: snow on a branch, a bright mitten, drops. Next is dandelion (from vermicelli), christmas tree, a hedgehog with buckwheat spines.
Yura had quite a few classes where he was asked to make some kind of appliqué. Complexity: from simple gluing of identical elements to a prefabricated application.
Simple applications: decorate a doll’s dress, a bag of candies. More difficult option- pyramid. You need to glue the elements to size. There is a rug in the upper left corner. Here the children were given the task of sticking circles between the sticks. Actually, Yura managed it, although the sticks are not entirely parallel, but this is not the main thing. The main thing is that the circles are inside.
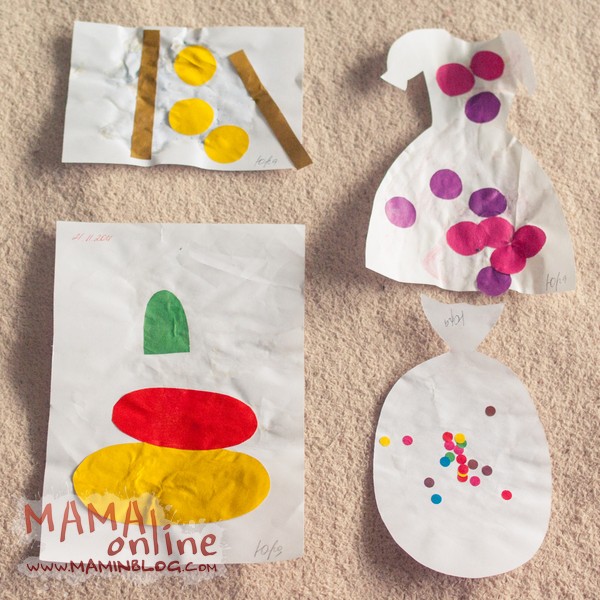
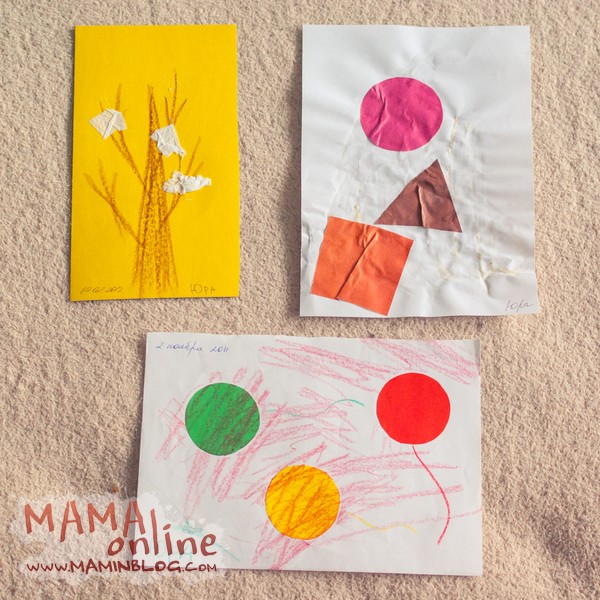
Often in the studio they made appliqués while studying geometric shapes. They also had to be glued in a certain order. I was pleased with the simple applique - balloons, to which I then had to draw strings of the appropriate color. True, our Yura sketched everything out of habit. Also included here is an applique made using ordinary paper napkins- This is a version of tear-off appliqué.
![]()
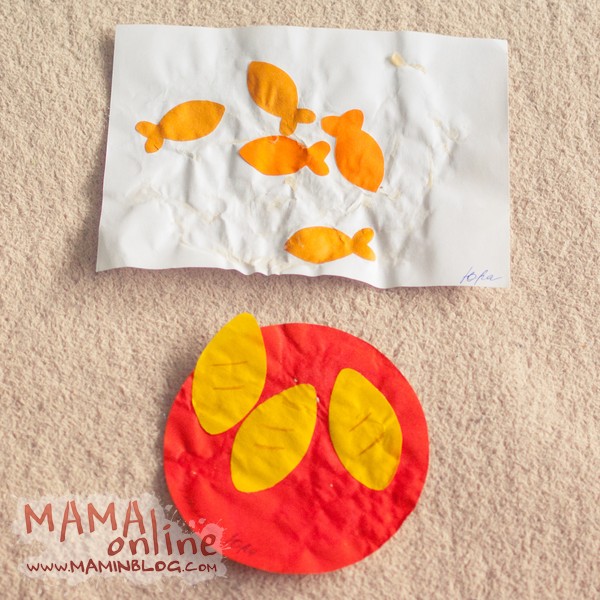
Continuing the theme of applications. The next photo above is a rolling pin that needed to be assembled correctly. Application based on the fairy tale “The Fox with a rolling pin.” I think it’s clear with chamomile and tulip. To the right of the tulip is a ladybug and beads that had to be assembled correctly, alternating colors.


