February 25, 2013.
Outside the window, cheerful drops have been sounding for a long time, our brisk river is babbling nearby... spring has not yet begun, but outside the window it is shining brightly and the spring mood is gradually penetrating into our house! The other day my little son asked me to tell him and show him how to make a paper boat with his own hands. Remembering school years and recalling in my memory various schemes for making boats, boats and steamships out of paper, I laid them out on a large desk colored paper and together with my son I started making paper boat...
Preschoolers and students junior classes They love to do origami - fold paper figures. The process becomes especially interesting when parents participate in it. But such activities have a beneficial effect on the development of the child. We will tell you in detail below how to make a paper boat or a paper steamer with your own hands, and with the help of master classes with photos you can easily make beautiful paper boats to launch in the nearest body of water.
Creating jewelry, decorative elements and various toys can captivate any restless person when he sees how paper comes to life in his hands. Don't forget to allocate a shelf for finished products so that they can be shown to friends and all guests.
We were all once children and loved to make paper boats with our own hands. Years have passed, now the time has come to teach this art to the next generation, and at the same time return briefly to childhood and remember the happiest and most carefree period of life. Some made snow-white paper ships that looked like large steamships, others preferred red or blue motor boats, some girls painted the top of a white paper boat pink, and scarlet sails appeared on it.
For the first time, the child needs to be shown how to correctly fold a paper boat (or it is better to immediately teach him how to work with a paper craft manufacturing scheme). If you cannot remember the sequence of necessary actions, use the proposed paper boat diagram (below). When the watercraft is ready, you can play with your child.
Origami allows you to spend time fun and usefully. The baby develops imagination, he realizes that for good mood You don’t have to run and jump, you can sit quietly and do something very exciting. Folding paper with small fingers is painstaking work that improves fine motor skills hands
Paper crafts can reveal the creative personality in a child and give rise to new achievements in this area. Even if the subsequent hobby is not related to origami, the first impetus may be given by simple boats.
The process does not end once the boat is ready. You can fold several boats, a steamboat, ships and go for a walk with your child to put them on the water. Taking into account the parameters of our watercraft, we conclude that a puddle, a ditch and other similar bodies of water will serve as an excellent sea for them. It will be great if the weather pleases with sunshine and a light breeze that will push the boat to set off on a long voyage. Forget about your worries for a moment, go back to childhood and play with your child. Sending paper boats on a voyage, even if not very far, is very funny and fun. Children are delighted with such entertainment.
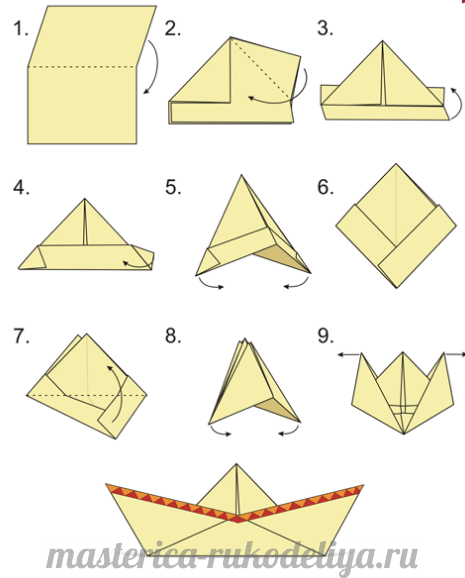
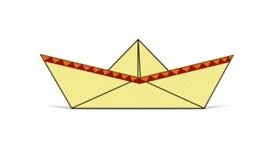
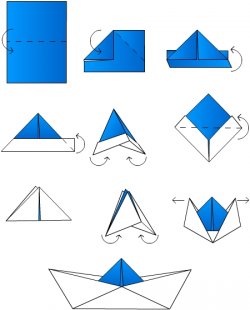
Next you will find step by step diagrams with photos, as well as explanations on how to make a paper boat with your own hands quickly and easily. But from paper you can make not only a classic boat, but also a paper steamer or boat. When you look at the diagrams with photos of the stages of work, pay attention to the fold lines so that our paper boat turns out smooth and without unnecessary dents. On the pages of our website you will find many lessons and master classes on making paper crafts using the origami technique, as well as other materials on how to quickly make a beautiful paper boat with your children.
How to make a paper boat
How to make a paper boat
How to make a paper steamer
INTERESTING FOR WOMEN:
| Comments |
|
| Answer | |
Grandparents did not know about the Japanese origami technique, but, without knowing it themselves, they easily made at least three such crafts with their own hands. Origami is the art of making a variety of craft figures with your hands by folding paper without using scissors or glue. Using the modular principle in origami technique, when figures are assembled from many separately assembled paper parts, oriental masters make anything - from small birds to huge dragons.
- The Japanese make them from special paper, and our parents took for these origami crafts, the most popular in Russia, any piece of paper that came to hand with notes and folded an airplane or a boat for the children. This skill is still in demand today.
- In spring, when children are delighted by the first streams and puddles, in winter, when any basin at home can be turned into a pond, not to mention summer and autumn, a paper boat will help entertain the child and turn slush into a fairy tale. A child is willing to learn from mom and dad how to make a simple paper boat with their own hands in one lesson. This skill develops fine motor skills, spatial thinking, and the ability to read diagrams will also always come in handy.
- For beginners, it’s better to make a simple origami paper boat for children, especially since step by step instructions according to the diagram it will be in front of you below. When you master this option, you can use photo lessons, diagrams and videos on the Internet to learn how to make an origami boat out of paper with pipes or under a sail. Such paper ship easy to put in your pocket when going for a walk.
Easy Origami. Paper boat for beginners.
A child can easily master this classic paper boat under the guidance of parents. senior group kindergarten. Any paper will do to create a classic, simple paper boat, but if you want it to be easy for your child to bend, don't use something too thick, like craft cardboard. At the same time, if the paper is too thin, your ship will soften too quickly and fail, so it is better to take a sheet of medium thickness.
Usually in A4 format, but if your child wants to have a BIG ship at the end, then choose a larger format, the main thing is that the sheet is rectangular, and the steps according to the diagram will be the same as in the instructions below.
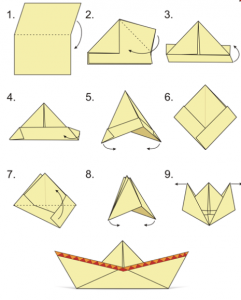
So, look at the photo and start the lesson:
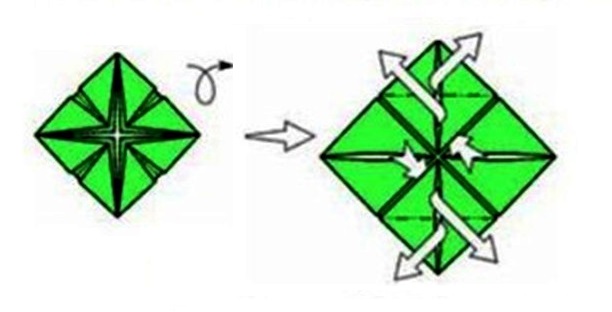
 We bend the lower corners of our rhombus up again, each on its own side, transforming it into a new triangle.
 We carefully iron the folds of the resulting diamond and get ready to move on to the next transformation.
Now we take these corners and bring them together, resulting in a new shape - a rhombus.
We bend the corners of the wrapped strips from each edge towards each other so that the craft blank finally takes the form of a triangle. 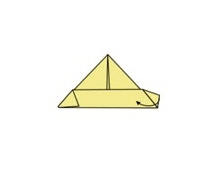
 We bend the remaining edges-strips below the resulting triangle upward, each to its own side.
 Along the fold line, we take the edges and bend them down towards the center so that we get a triangle at the top.
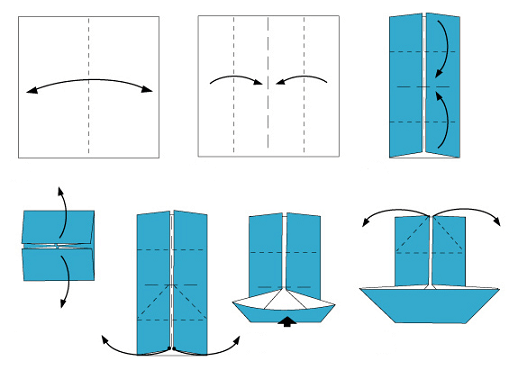
Take a sheet of A4 format and fold it in half.
 We repeat the technique from step 4: holding the opposite edges, we bring them together, again, like in a fairy tale, turning the triangle into a rhombus.
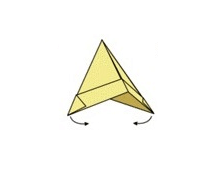
 The most crucial moment in our fairy tale is coming. We take the upper corners with our hands and slowly open the diamond, turning it into a boat.
If you want the boat to be beautiful and unique, you can make it from colored paper or paint it with wax crayons.
You can add a flag to the center, but any additions to the ship must be lightweight so that it does not become unstable. On the Internet you can see many photos of boats assembled according to this scheme, thanks to interesting paper and small additions that have become a real decoration of the children's room.
If you want the ship to last longer and not be afraid of water, dip it in melted paraffin. Or, according to these instructions, your child can make a postcard with a congratulation for his dad or grandfather out of beautiful paper boat with his own hands.
A simple paper boat assembly diagramNow that you have mastered assembling a simple classic origami boat, you can try to make a steamboat according to the instructions.
Look at the photo below, follow the bending instructions indicated by the arrows, and you will be able to do everything yourself.
It’s easy to find video tutorials on the Internet on how to create boats with two pipes, so that, having mastered the video instructions, a child can build a whole flotilla of steamships with one pipe, two pipes, simple boats and sailboats.
Complex scheme with a sailTo create a sailboat, as in the diagram below, you will need special origami paper, or simply cut out a square from A4 format, otherwise nothing will work.

DIY multi-colored origami paper boat. Instructions in verse for children!
Making paper figures is fun for both children and adults. With the arrival of spring, children quickly run outside to launch their ships, made with small hands from materials found at home, along streams or puddles. The simplest and most affordable option is a paper boat. Every child has a question about this: how to make a paper boat yourself. There are several the best ways modeling ships from paper. All paper crafts can be made from. To make the boat float on the water longer, it is better to make them from coated magazine paper.
Method 1. A simple paper boat. Step-by-step production.To solve the problem of how to make a paper boat according to step-by-step instructions, you need to follow these steps:
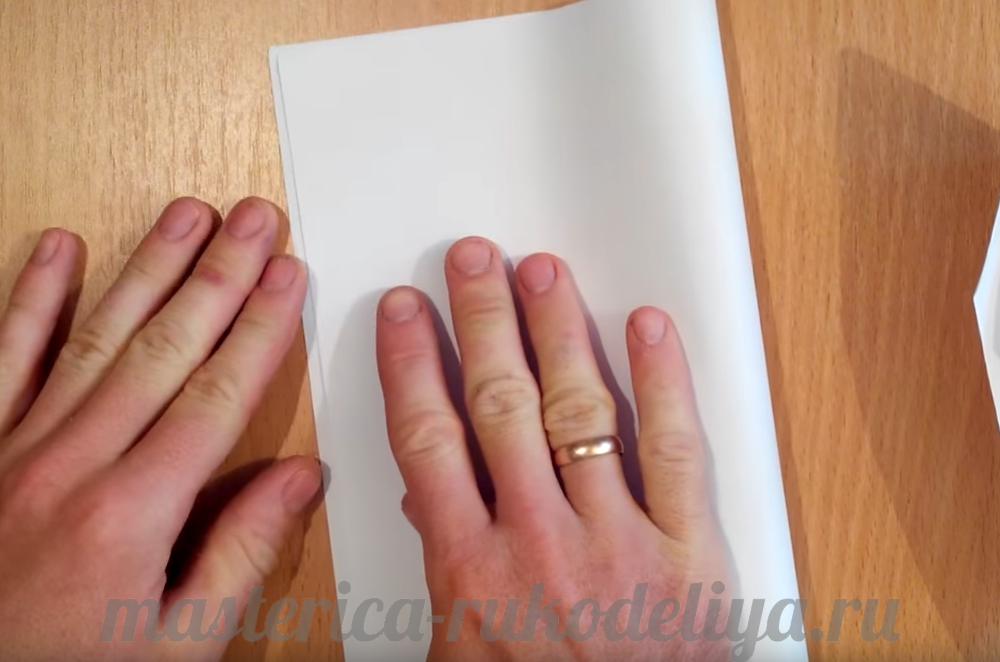
Step 1. Take a landscape sheet, most often it is in A4 format. This material is denser than ordinary paper, so the product will have a rigid shape and beautiful appearance. We bend the sheet in the middle along the narrow side.
Step 2. Fold the resulting workpiece again along the short side. Let's turn it back.
Step 3. We connect the corners where the folded sheet is folded together.
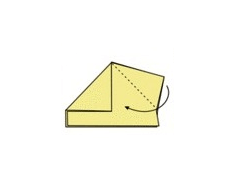
Step 4. Bend the rectangle upward at the bent corners.
Step 5. Turn the workpiece on the other side and bend another rectangle. We bend the corners of the folded strips on both sides to form a triangle.
Step 7. Bend one of the separate corners up. We perform similar actions with the other angle to form a triangle.
Step 8. Open the bottom again and connect the opposite corners. Now you need to pull the corners at the top of the triangle to open the boat. To do this, one hand takes one bent end, the other takes the second.
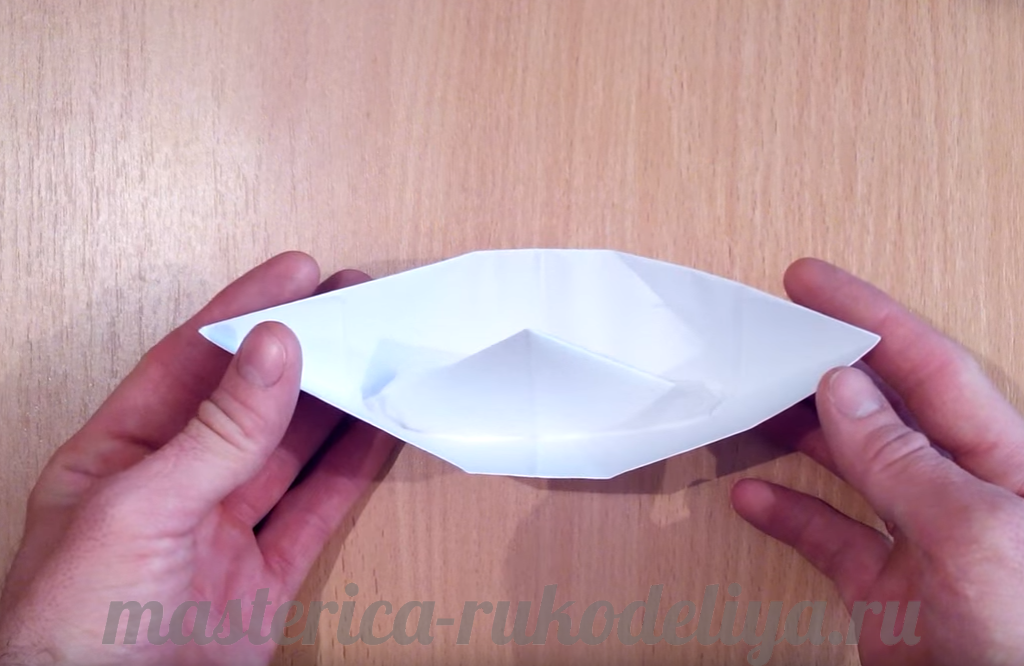
Step 9. For stability, you can slightly expand the base of the paper boat. The amazing paper ship is ready!
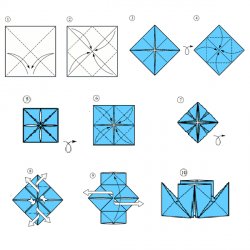
Step 2. We bend the corners of the square again towards the middle to get another square. We turn the workpiece again and bend the corners to the center again.
Step 3. Turn the square over one more time and perform similar actions with the corners.
Step 4. Turning the paper ship over one last time, straighten the two opposite corners until you get a rectangle. The result will be a kind of ship's pipes.
Step 5. We take the workpiece by the remaining corners and unfold the boat, while the pipes are connected.
A steamer with two funnels is ready to set sail. A more detailed diagram of how to fold a paper boat can be seen in the video below.
Method 3. Making a boat from paper.
To answer a child’s question of how to make a paper boat with your own hands, you also need the best step-by-step instructions.
To work you will need a square sheet of paper. You can take a regular landscape piece of paper and make a square out of it. To do this, connect the top of the sheet to the left side, and cut off the remaining part. We then follow the instructions:
1. Bend the square in half, connecting the top and bottom of the workpiece.
2. Now we bend the free edges of the workpiece towards the middle to make a rectangle like this.
| These are the paper boats you can make (pictures are clickable) | |||||
 |
 |
 |
 |
||
A paper boat is a wonderful craft! It develops fine motor skills (if you fold crafts carelessly, you won’t get a boat), it trains spatial thinking wonderfully, and besides, you can go outside and play with the resulting boat! Alone, in the company of friends, with parents. Organize a sea expedition or speed race. Ships can be made from colored paper, painted and painted, and a crew can be selected for them from small toys. In bad weather, you can launch boats in the bathroom, and in the country - in a basin... In a word, practice with these schemes, and you won’t regret it!
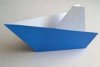
Simple paper boatThis is exactly the kind of boat that most dads, and many mothers too, can make out of paper. And if you make it from a sheet of newspaper, you will get a quite tolerable headdress!
During the Soviet Union, these were popular among finishing workers - they provided excellent protection from lime splashes, and after the end of the working day they were simply thrown away. Well, the design of such boats is very, very simple!
If you weren’t into origami as a child and now look at the diagram of a boat with bewilderment, here’s a video for you: detailed, visual, accessible.
Steamboat with two pipesThe second most popular diagram of an origami boat is “from childhood”. Without any doubt and without a diagram, you will remember how to make it, but, just in case, we are still posting the diagram and video.
(Click on diagram to enlarge)
An interesting detail is that this particular origami pattern does not seem to be found at all on foreign sites dedicated to children's crafts.
So perhaps this is our Russian steamship! And with two pipes!
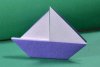
Ship with sailsBut such a boat, on the contrary, for some reason is not popular among Russian children. Making a romantic boat with sails is not at all difficult; moreover, we have found two ways that lead to the same result. It should be noted that such a boat does not sail very well, but it looks beautiful, and on our streams it is also fresh and unusual! "Tricky boat" sounds a little like the word "trick". The name can indeed be translated as “cunning, tricky, confusing.” Well, it’s not for nothing that it got such a name! After sitting over the diagram for a good half hour, the author was still unable to fold the boat.
(Click on diagram to enlarge)
Fortunately, a video was found on the Internet, and the complex immediately became simple. We must warn you, for the first minute and a half the piece of paper is simply crumpled and smoothed in all directions (apparently this is a necessary condition for performing an ingenious trick), but then the real magic begins!
Ocean linerSimple, but beautiful diagram not a boat - a liner. Ideal for the little ones - no multi-way ingenious additions, but it is advisable to paint the boat and embellish it in every possible way - it’s a liner!
(Click on diagram to enlarge)
Speed boatEspecially for mothers of restless boys, we looked for a diagram of a speedboat, but, unfortunately, we did not find it. But we found a video where everything is done slowly and, in general, clearly. If your brave pirate is between 7 and 10 years old, you can safely sit him with a stack of paper in front of the monitor - let him repeat, with such a flotilla he will win all the sea battles in the yard!
Prepared by Ekaterina Ershova
Good afternoon, dear needlewomen!
Many will remember unforgettable moments from childhood - how cool it was to make paper boats and launch them along a river or at least a puddle! Years have passed, and now your hands have forgotten how to make boats. Now that you have your own children, it’s time to remember and introduce your child to this exciting spring activity - making paper boats and putting them on the water!
You can come up with a game: put together several boats with a child and send them to the river for a bet: whose boat floats the longest is the winner.
In this article you will learn how to make a paper boat with your own hands, and also watch the video instructions.
How to make a paper boatDid you know that the origami technique is useful for a child because it develops thinking, attentiveness, logic and fine motor skills? Therefore, arm yourself with a piece of A4 paper and start crafting. For work, you can take a white sheet, which you can later repaint in any way you like, and it is also better to take paper that will not get wet after 30 seconds spent in water. There is another secret of “survivability”: a paper boat can be coated with melted beeswax or paraffin, this will make the paper moisture resistant.
First, we will introduce you to the diagram of a paper boat, then we will proceed to step by step photos and video.
Paper boat folding diagram
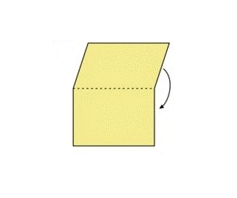
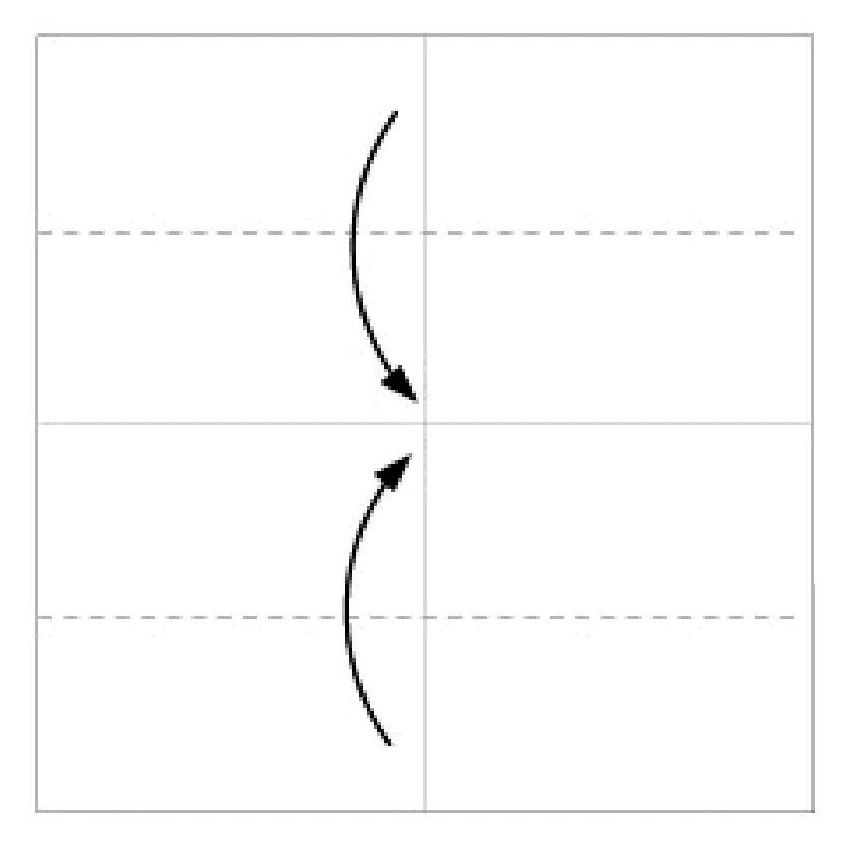
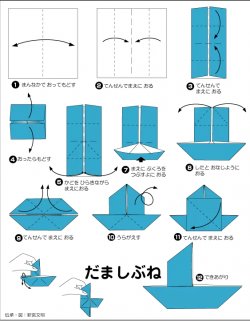
1. Fold a white sheet of paper in half. (Fig. 1) Bend the two upper corners of the rectangle at right angles to the center point (Fig. 2)
2. We bend up on both sides the free edges of the sheet on both sides (Fig. 3)
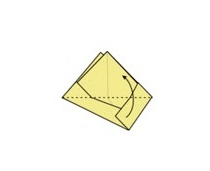
3. Tuck the corners as shown in Figure 4 so that the overall composition forms a triangle (Figure 4)
5. Bring the corners of the bottom of the composition together (Fig. 5) so that we end up with a square (Fig. 6).
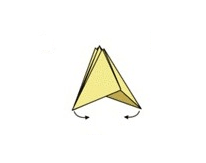
6. Fold the bottom part up to form a triangle again (Fig. 8)
7. Hold the composition by the corners and carefully place it into a square.
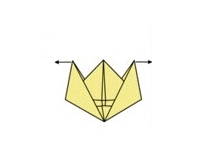
8. Pull the corners until you get a boat, do not forget to align all sides of the ship well, this will give it stability and neatness.
Paper boat.Perhaps every boy folded paper boats in childhood, and most likely, upon becoming a parent, not everyone will be able to fold a paper boat just once or twice. Let's refresh our memory and origami technique and fold a boat with our own hands together with
As we have already said, make a craft from thick paper that will retain its appearance on the water longer. Beeswax or paraffin will increase the boat's moisture resistance.
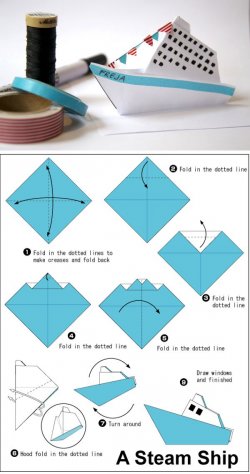
How to make a stable and beautiful ship, and how to decorate it? You can decorate the boat, firstly, with acrylic paints, and secondly, from toothpicks and fabric, napkins or paper, you can make a flag for the ship and attach it so that balance is maintained.
Now let's move on to the paper boat folding technique.
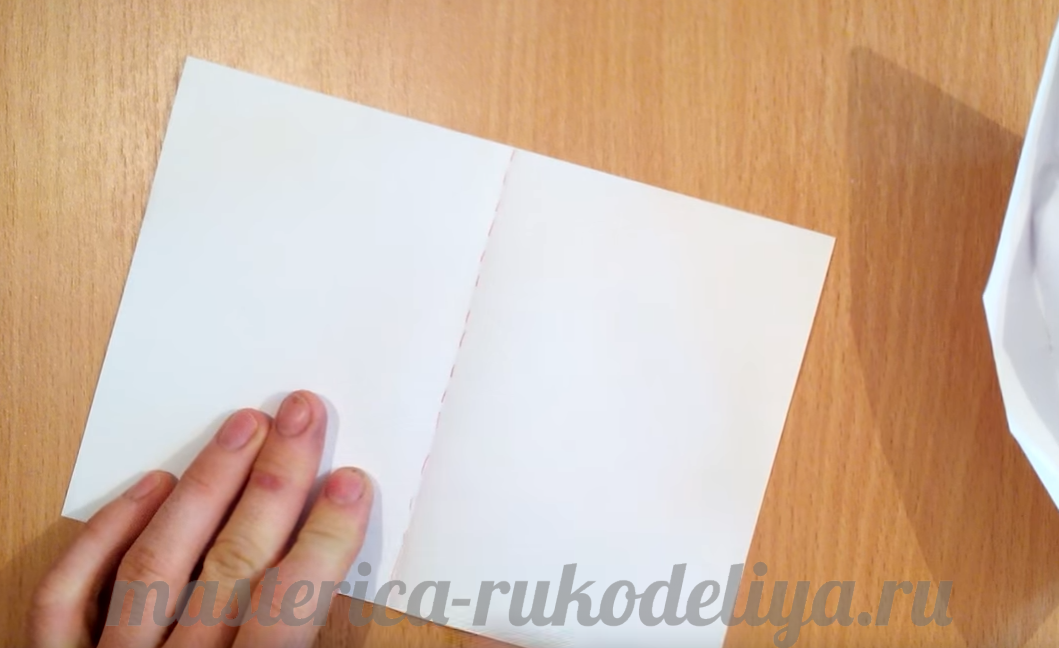
We only need a sheet of A4 paper.
Fold the sheet in half.
And again in half - to make a fold line.
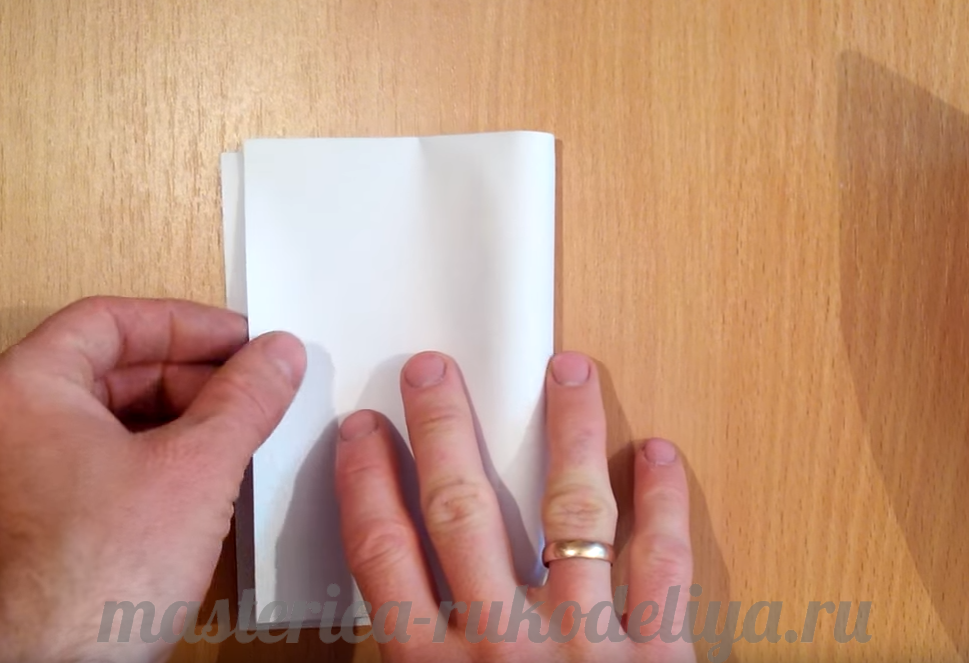
Unfold the last fold.

We will schematically denote it with a dotted line.
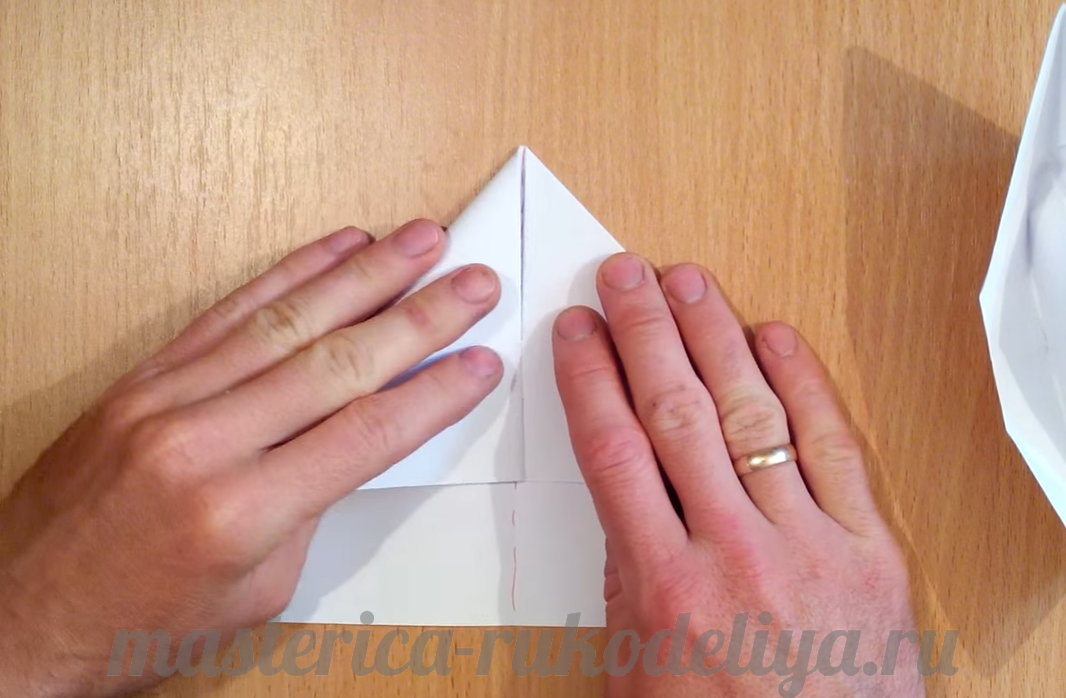
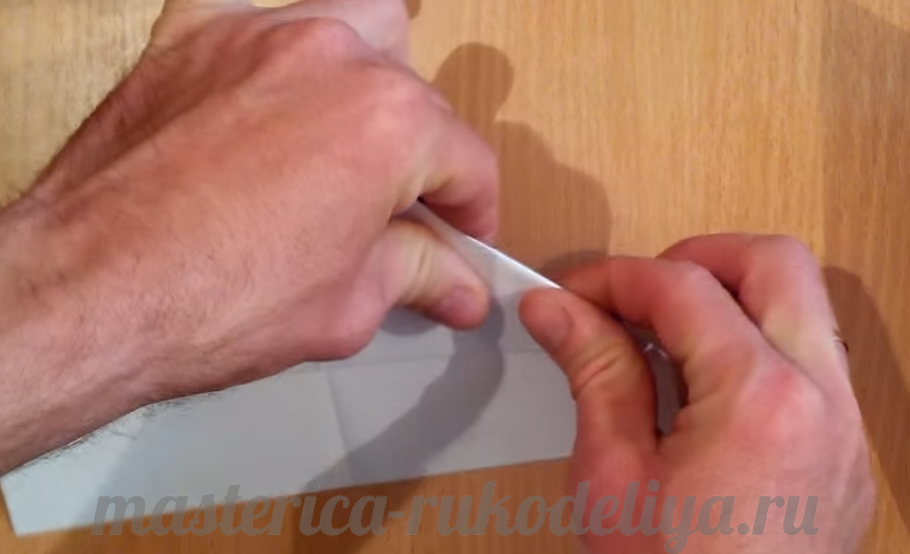
We bend the upper corners to this dotted line.

Be careful that both ends are symmetrical and meet in the middle of the craft.
Bend the lower free ends upward on both sides.

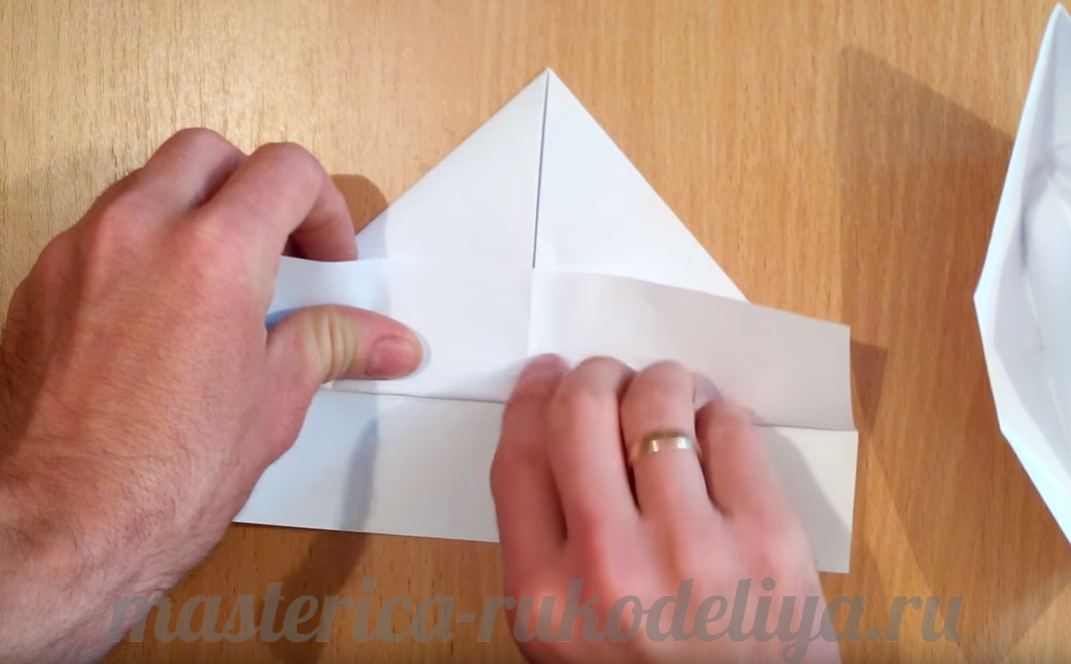
Carefully bend the protruding corners.
This is what happened on one side.
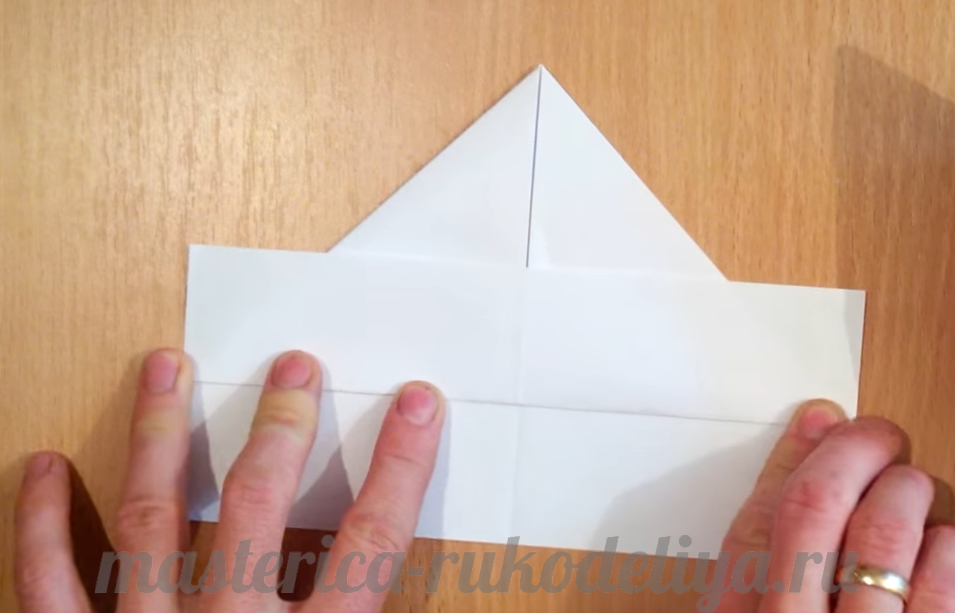
Do the same on the other side.
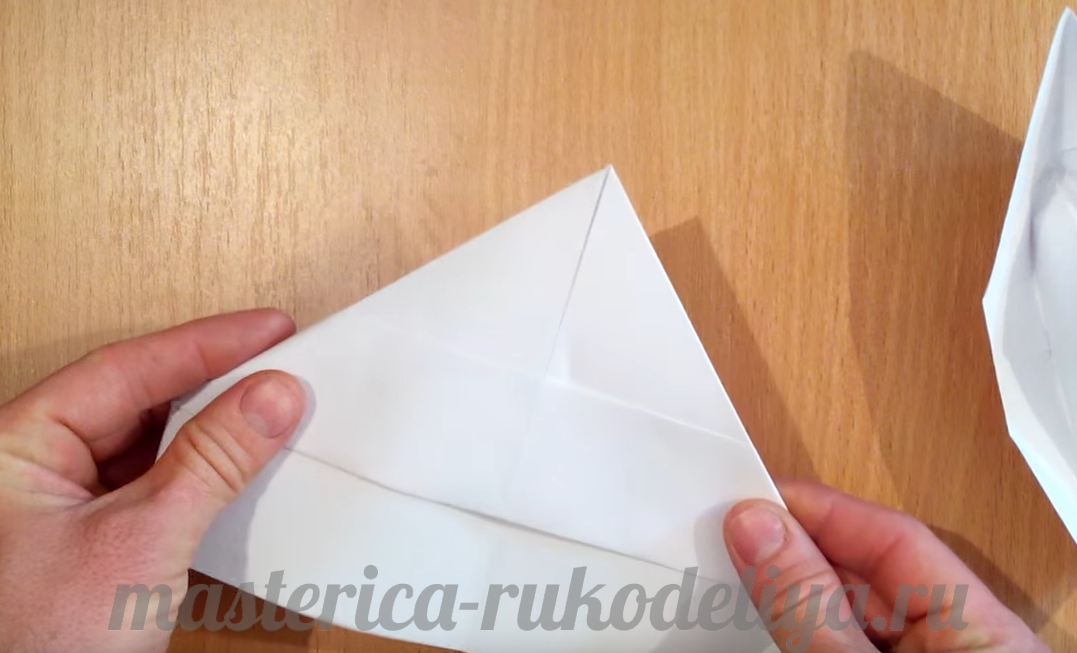
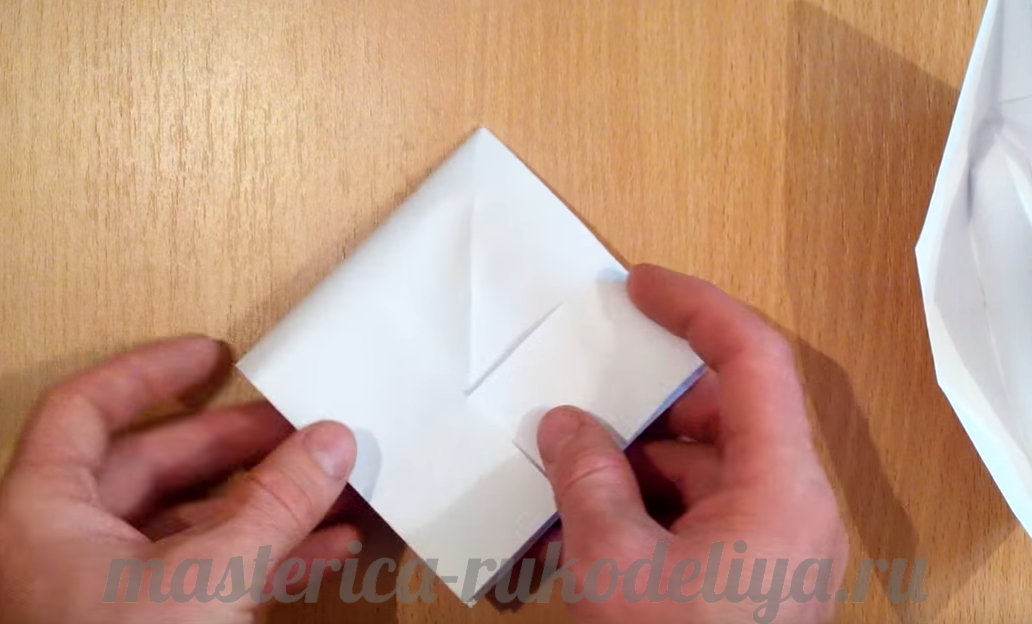
Fold the workpiece crosswise, as shown in the photo.
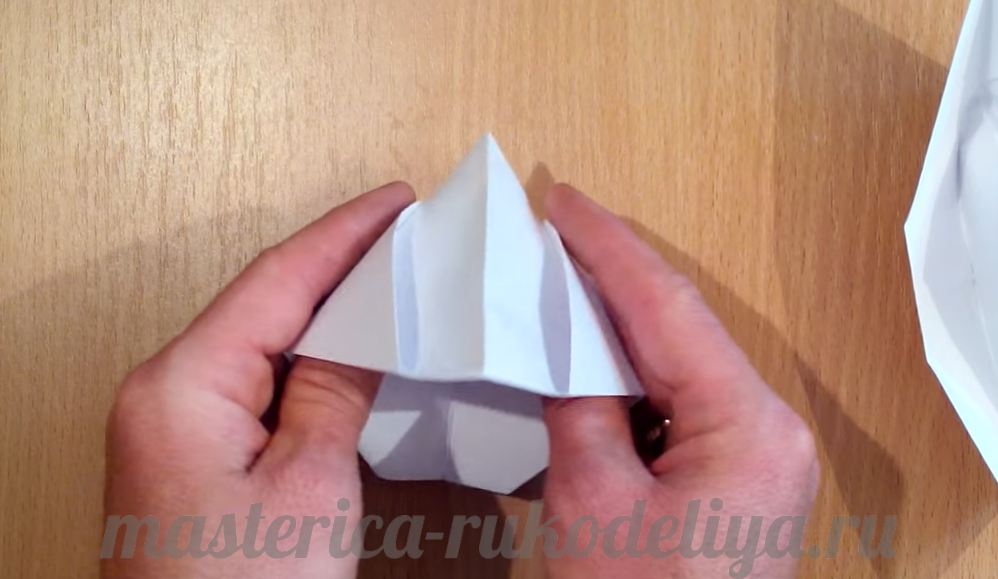
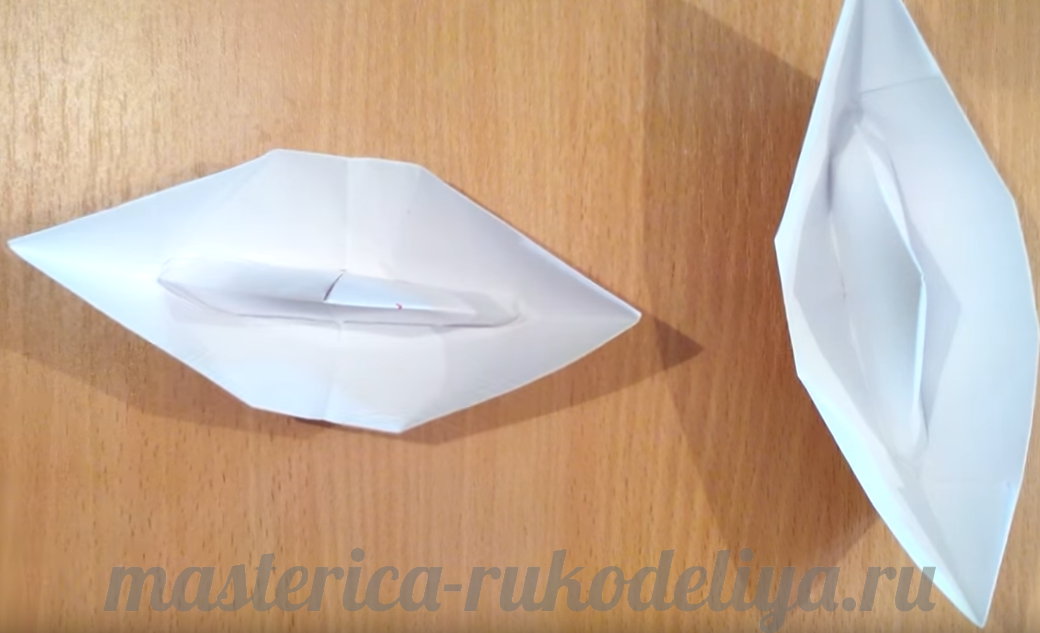
Open the boat to make a diamond shape.
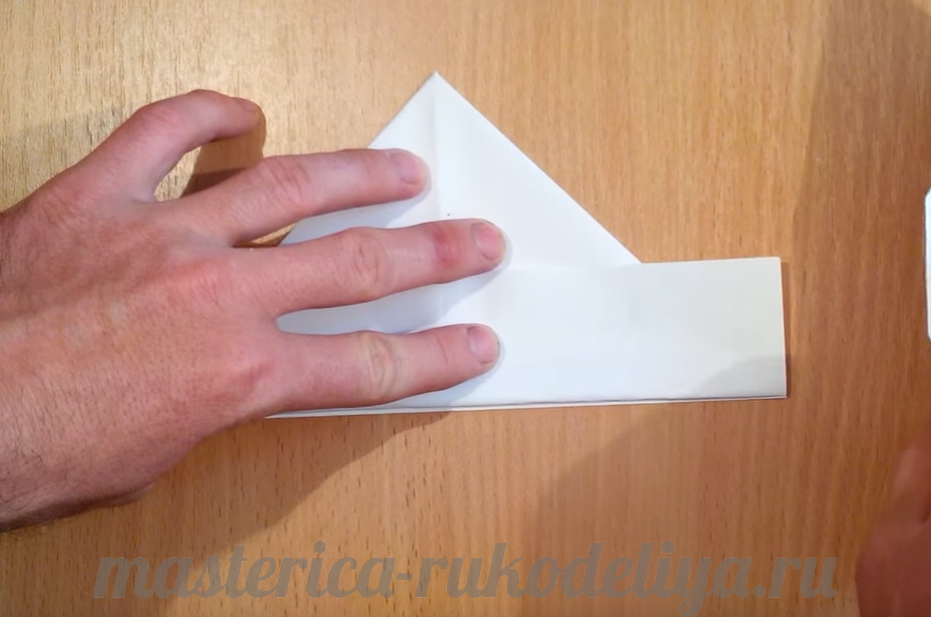
Measure a short distance from the top corner, mark it or eyeball it. Fold the bottom edge to this point. 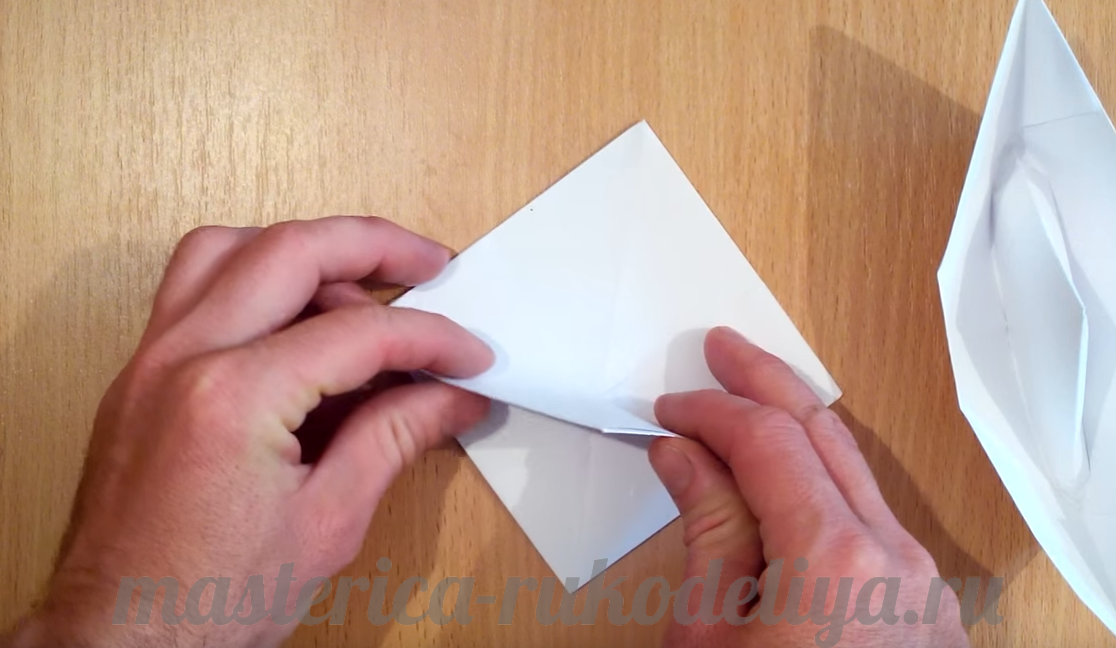
We do the same on the second side.
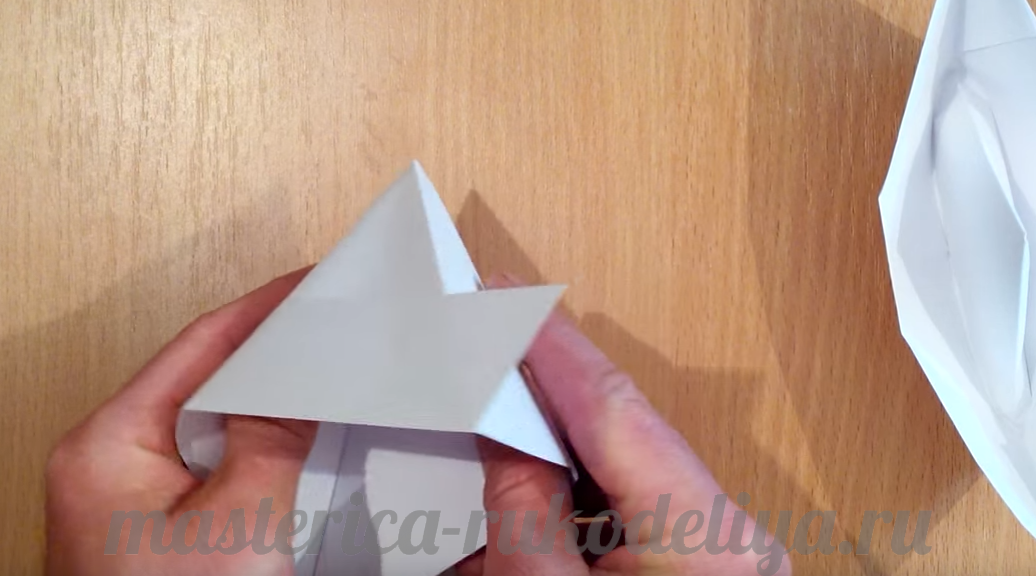
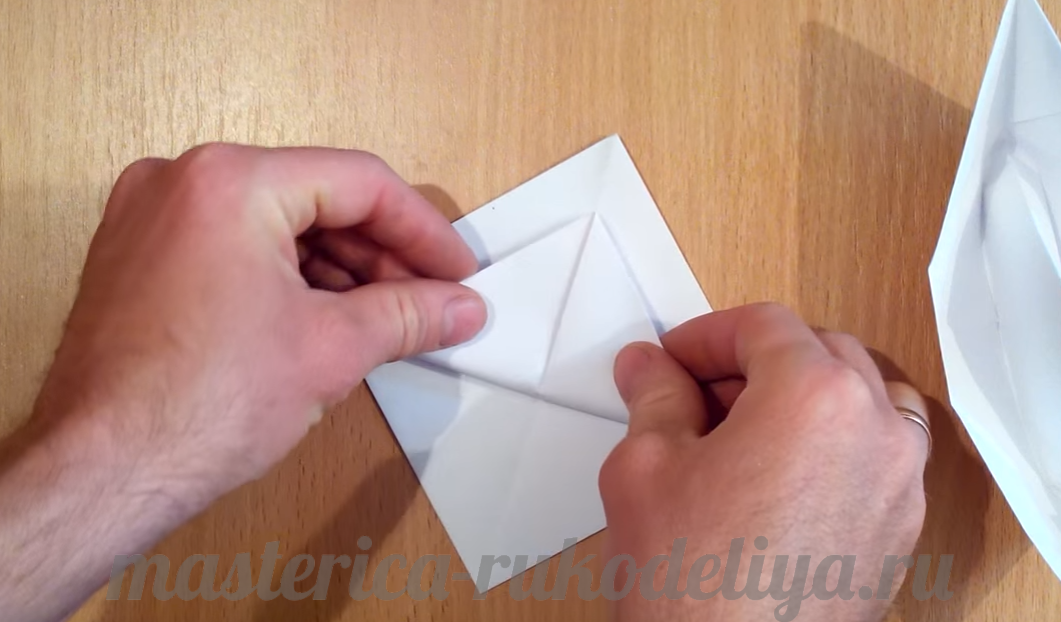
Now we need to open our paper boat again. A little more and it will be ready!
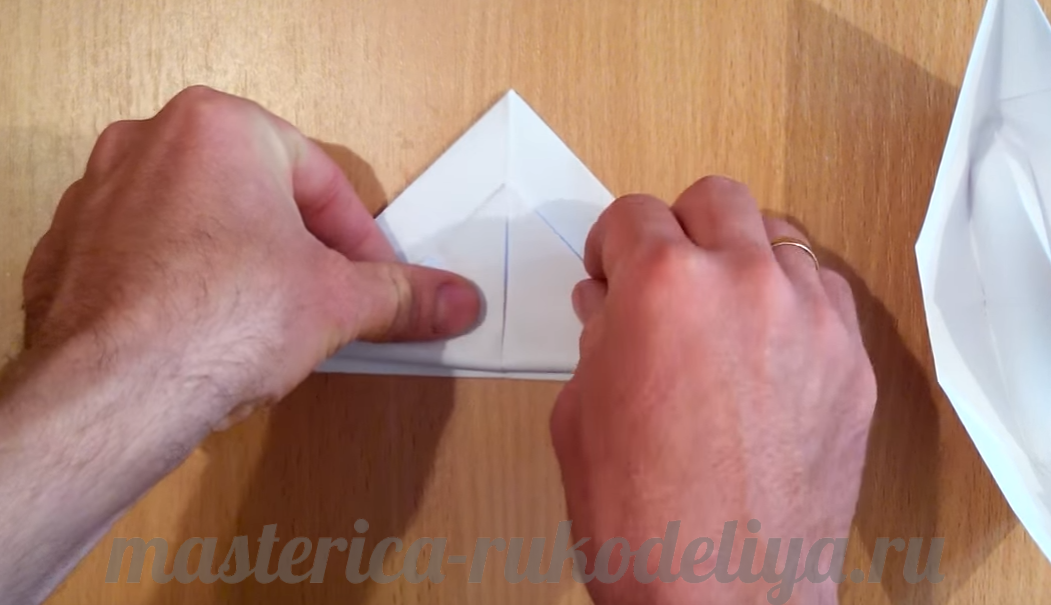
Now grab both sides of the ship with your fingers.
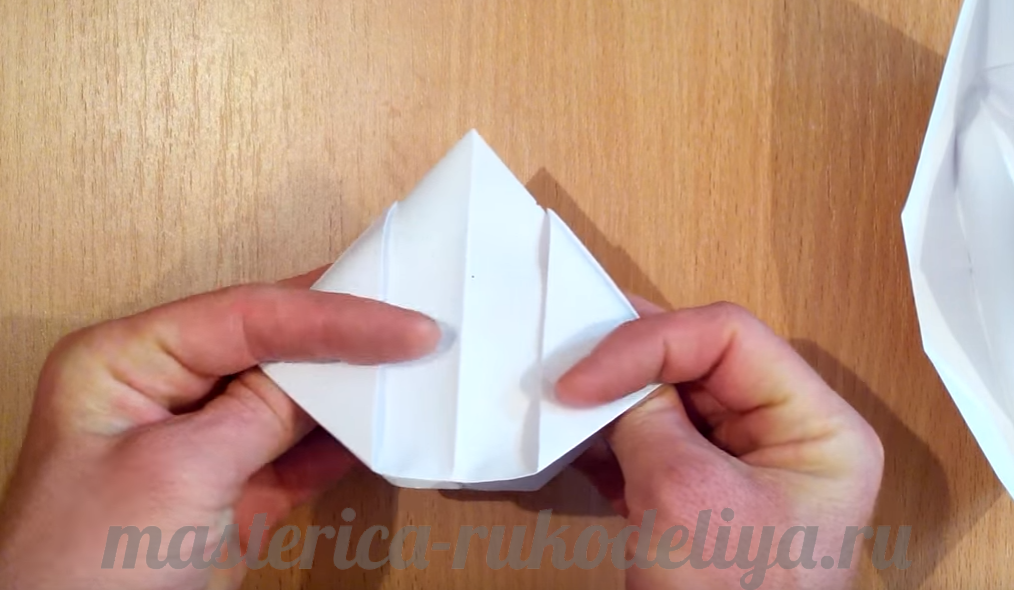
Pull them and open the boat.
![]()
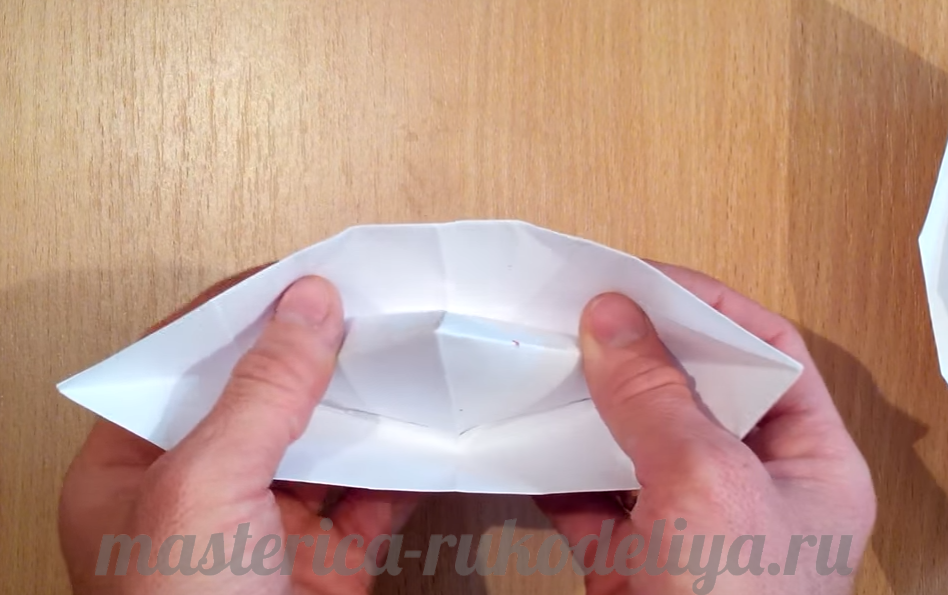
This is how it should turn out. Now we need to straighten the boat well.
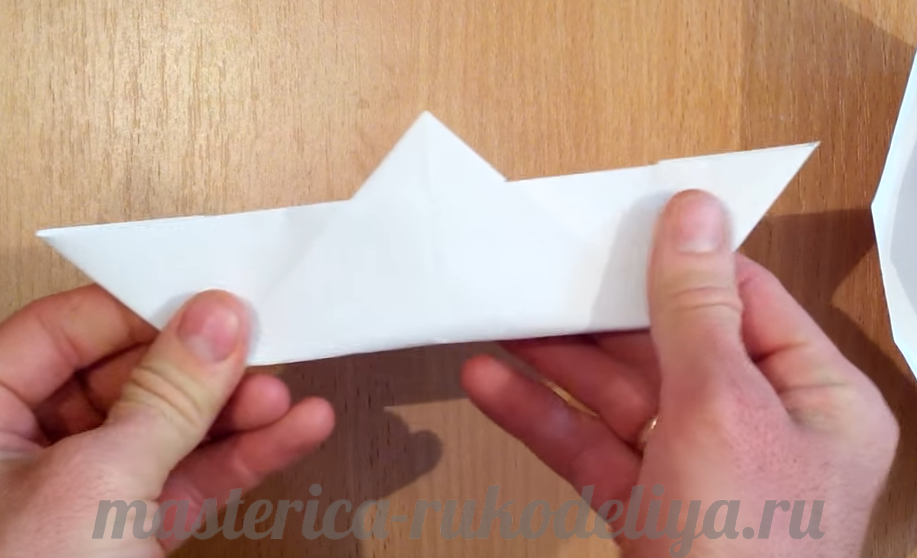
It is important to properly straighten the boat, otherwise it may lie on its side in the water; pay special attention to the bottom.
Learning how to make a boat out of paper is simple, you probably became convinced of this by looking through the instructions. Systematic folding of paper using the origami technique develops creative thinking, logic, hands, outlook and eye. Using the origami technique you can make anything: boats, airplanes, flowers, animals - whatever your heart desires!
Therefore, a paper boat is just the beginning! Next, make a paper boat, a paper cruiser, and so on with your child! Below are video tutorials on how to make them.
How to make a paper boat video How to make a boat out of paper video How to make a sailboat out of paper videoText prepared by: Veronica


