Handmade soft toys are filled with special warmth and care. They will bring comfort and harmony to any interior like nothing else. A fabric toy can become an original design solution and at the same time - a great gift child. To make the coming year full of good luck, try sewing its symbol. A simple fabric rooster pattern will help with this. Bright and cheerful, it will create a special festive atmosphere.
What will you need?
To make a fabric rooster, we will need:
- Bright cotton, silk or satin (for making combs);
- Small motley shreds (scarlet and emerald must be available);
- Filler (holofiber, silicone, padding polyester);
- Glue (it’s more convenient to work with a gun);
- Multi-colored buttons (on legs);
- Threads (choose the shade taking into account the color of the fabric);
- Transparent thin fishing line;
- Button eyes for a future toy.
Of course, to make a funny rooster out of fabric with your own hands, you will need the patterns shown in the picture. The templates represent: the body of the New Year symbol; scallop, beak. Both parts are easy to cut out of paper.
View pattern
Master class: a bright symbol of the year made of fabric
First, we make fabric blanks. Lay the fabric over the patterns and trim around the perimeter of the pieces. For convenience, you can pre-fix the material with invisible pins to paper templates. Draw a contour around it using dry soap, a regular pencil or chalk. You can make a small allowance of 0.4–0.5 cm.
Fold the resulting parts together with the wrong side out. Sew using a regular U-shaped seam. Leave a small gap in the upper part of the body: it will be needed to fill the toy with padding polyester or cotton wool.
Turn the sewn parts out. Carefully arrange the elements.
Now we move on to filling it with padding polyester. Try not to leave empty spaces in the future toy. Carefully sew up the gap using a thin fishing line.
When the blanks are ready, start decorating the toy. Use the rooster pattern and make a scarlet beak and red beard from the fabric. Add a pair of mischievous eyes to the details and attach with glue to the front part.
Decorating a soft toy
To decorate a DIY rooster, you can make flowers from fabric. It won't take long.
Take colorful scraps. Cut a circle out of them with a total diameter of 4–5 cm. Gather the circle along the edges with thread, and sew a button in the center.
Make petals from emerald or green fabric. To do this, cut out several oblong pieces of material. Their edges can be trimmed unevenly or using curly scissors.
Using glue, attach the leaves and flowers on top of them. A couple of stitches and your own fabric rooster is ready! The master class on making toys is simple and even children can do it.
To complete the composition, you can place the cockerel in the “nest”. Take a small flower pot, add colorful sisal and flowers to it. Place a cockerel on top. You can sew eggs from waste fabric. To do this, make 4 identical petals and sew them together from the wrong side. Through a small gap, turn it inside out and stuff it. Sew up the filling hole. If you used fabric white, then decorate the eggs on top with multi-colored braid or buttons.
If you sew a small loop to the symbol of the New Year 2017, you will get an excellent New Year's toy.
A festive rooster made of fabric will serve as a wonderful interior decoration and a nice gift. Remember that a toy made by yourself carries a certain energy: positive attitude and care will definitely bring joy, happiness and fulfill all your cherished dreams!
2017 is already upon us with snowballs. New Year's festivities will begin soon and naturally we are waiting for gifts. We are ready to tell all craftswomen how to sew a rooster out of fabric with their own hands. We are sewing this particular bird, since next year it will be protected by Fire Rooster or Red Rooster, as follows from the Chinese calendar. Sewing will not be difficult for a beginning needlewoman; we have amazing fabric rooster patterns that will make a cute symbol of 2017.
The rooster is the bright leader in any yard, so our bird will be colorful. Therefore, the material for the toy will be appropriate. We recommend using the site for the “Crooster made of fabric” toy:
- fleece,
- brocade,
- colored cotton,
- any fabric that looks rich.
For stuffing, we take padding polyester (from an old jacket or pillow), ordinary cotton wool will also do. If you want to make the cockerel “stand confidently on its feet,” prepare an elastic wire for the frame inserted into the legs and body.
DIY fabric rooster patterns
Choose the pattern you like according to your taste. We will sew according to 1 piece provided, it is simple and does not take much time.
DIY fabric rooster pattern
To enhance the effect and create a more “LIVE” betta, resort to using colored faux fur or feathers. Glue them on the wings and tail, the effect is amazing. Here is the pattern for a rooster with fur inserts.

Do-it-yourself fabric rooster with fur pattern
If the patterns are small, you can enlarge them in Photoshop or any other image editor. Then print enlarged copies and create roosters in real size. According to my pattern, the rooster will be 25 cm tall, quite enough for a souvenir.
Instructions on how to sew a rooster with your own hands:
- Glue the paper pattern onto thick cardboard, then trace the details onto the fabric. We make allowances of 2 cm, more or less is not necessary. Do not forget that the wings and paws must be made of the same fabric for symmetry. The second steam room will be mirrored, this is normal.


- We check and cut out the blanks.
- We sew the parts of the toy from the inside out, leaving 4 cm holes for stuffing. If you are doing it with a frame, insert wire. We turn the workpiece inside out, stuff it with padding polyester (in my case) and sew it up. Please note that we do not stuff the rooster's eye pads; they look more aesthetically thin.
- If you want to make the wings move, then do not sew them on, but fasten them with large buttons (from a coat).
- We don’t stuff the legs, then the cockerel will “sit” with its legs dangling. If the rooster is standing with a frame, form the desired position by bending the wire.

- Eyes - I made them from 4 buttons of different diameters - large at the bottom, small at the top. As an option, eyes are drawn with gel pens. You can use a bright piece of fabric and sew or hot glue the eyes.

An extraordinary symbol of 2017 - step-by-step production of a cockerel from fabric - fur
No less magical is the second option for making a cockerel with your own hands from fabric-fur on a wire frame.
A set of materials will be needed as in the first case, only the fabric will be different. The manufacturing process is similar to a fabric cockerel, only it will be connected in a different sequence.
So, let's start making a rooster step by step:
- Having repeated the first steps from the above, we begin to connect the blanks. First, we sew the breast, abdomen and body from the inside out, and then turn it onto the face.
- Sew both halves and wings. Don't forget to leave a gap under the padding polyester.
- Insert a thick wire (I used copper 10) into the finished body, leaving the ends for the tail and wings. Choose your size.
- We stuff the future symbol of 2017 and sew it together, leaving the wings empty, you can only fill them a little. We sew the body with the wings.
- Sew on the beak in two parts and the beard.;
- We make the tail from strips of fabric, sew them on one side on the front part.
- We thread the tail onto the frame along the way, making it fluffy.
- We simply create the paws by tightening a wire blank.
- I wrote options above about creating eyes. After which the toy will be ready.
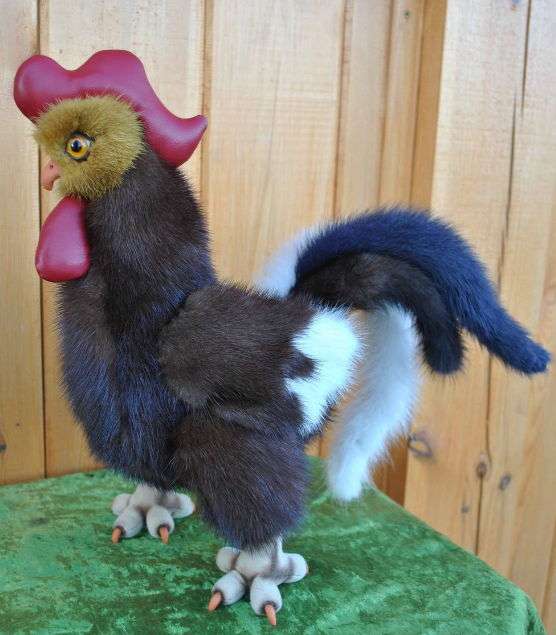
Mink cockerel
Felt cockerel patterns
When you want a bright bird, sew it from pieces of felt, additionally stitching along the indicated lines. Such a gift will look interesting and will be remembered for a long time.
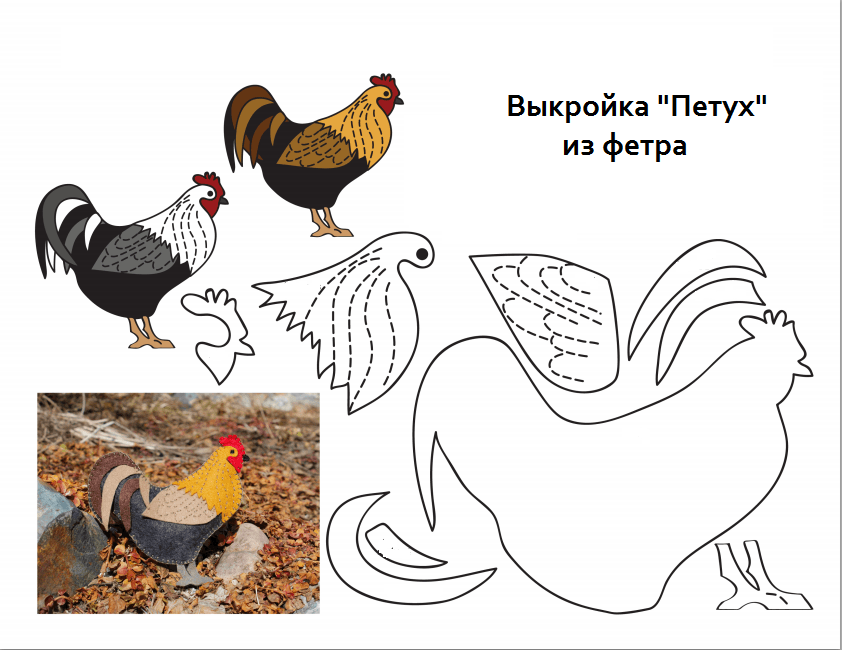
Felt rooster pattern

Ready-made felt cockerels - for inspiration
Every time on New Year Colleagues and friends give each other various souvenirs that are a symbol of the New Year. 2017 is no exception. This year will be under the auspices of the Rooster. Therefore, for this occasion it is worth giving rooster souvenirs to your loved ones and colleagues. You can buy them. But the gifts that are most valued are those that were created with your own hands. Most best option in this case, it is a rooster that was sewn with your own hands. Therefore, in this article we will talk about how to sew a rooster from fabric?
Rooster made of fabric. How to sew
A simple version of a rooster.
If you don't have sewing skills or don't have time to sew a complex toy, then you should take a closer look at a simple craft. This cockerel looks incredibly cute. And it's very easy to sew. To sew a cockerel, prepare:

- dense fabric - it can be calico or flannel;
- small pieces of felt that will be used for sewing: comb, beak and tail;
- rhinestones and buttons,
- padding polyester
Work progress:
In order to sew one cockerel, you need to take a piece of fabric that will measure 21x11 cm. Fold this fabric into a triangle.
Sew the cockerel. The seams should be on the wrong side. The side seam, which will be the last, should be sewn by hand. The work should be done after you fill the toy with padding polyester. Place the comb, tail and beak of the cockerel inside the seam.
Now decorate your toy. In this situation, you can show all your talents.

Felt rooster.
Toys that are made from felt are very popular today. And there is no need to be surprised by this. After all, it is very easy to sew a variety of products from such material. Therefore, the next rooster craft that you sew with your own hands from fabric will look interesting. In this case, you should use felt material. In order to sew the symbol of 2017 you should prepare:
- Felt,
- padding polyester,
- glue,
- scissors,
- needle and thread.
Work progress:
- It is worth making a pattern of all the details on felt.
- Every detail for a rooster must have a pair.
- In order to receive beautiful toy It is recommended to use material of various colors. For example, make the paws yellow and the comb red.
- Glue small parts of the toy to the toy using glue. That's it, your toy will be ready.

Another option is the cockerel.
If you like to sew, then you probably have pieces of fabric at home. It is worth saying that there is no need to get rid of them. They can be used to sew a wonderful cockerel. A toy like a rooster looks interesting. And now we will tell you how to sew it from fabric step by step.

Our cockerel will have a beak and a comb. It is recommended to sew these parts from felt. These small parts are sewn first. The beak and comb should be sewn from two pieces of felt. You must cut them out, sew them together and iron them well. To sew a beard, take a couple of separate pieces from thin fabric. As a result, you will get a double one. Felt brown or any other thicker fabric of a similar color will be suitable for sewing rooster legs.
The body of the rooster itself can be sewn from any piece of fabric. Your rooster can be polka dot or checkered. And in this case, floral fabric is suitable.
In addition to the fabric, you will need padding polyester for filling and a couple of beads for the eyes.
Pay attention to the patterns. You need to cut them out. Then use pins to pin individual parts of the cockerel to the body. These two parts must be turned towards the fabric. In other words, they need to be wrapped inside.

Then place a second piece of fabric on top, which will be the upper part of the body. Sew the details. Start at the front of the neck and work your way up to the tail.
Turn the head inside out and straighten the beak and comb.

Then take the part of the lower torso. It should be connected to the upper part. To be neat, the part is first pinned and then stitched. Leave a hole where you can place the stuffing. You must stitch the corners carefully.
Once you have sewn all the pieces together, turn the rooster inside out. Stuff the toys with padding polyester and sew up the hole.

Now move on to the rooster's wings. For them it is worth cutting out 4 parts. To make the second wing, turn the pattern over to the reverse side.
The wings are sewn together as follows: fabric - padding polyester - fabric. When creating wings, be sure to make longitudinal seams.
Sew these wings to the cockerel.

Be sure to make a rooster's paws. For this purpose, use brown felt. Place a thin padding polyester between the material. Sew around the edge and take two steps down the middle. This must be done in order for membranes to appear. Sew the legs to the cockerel.

Attach pearl eyes to the cockerel.

In conclusion
In this publication we have listed several options for sewing a cockerel toy. We hope you will choose the best sewing technique for yourself and create a wonderful gift.
Required materials:
Scissors
- a set of colored paper
- box
- PVA glue
Stages of work:
Prepare boxes of various sizes. Cut off the part that covers the box from the box, make cuts along the fold lines (they should be ½ the height of the box itself). Bend the parts of the box along the cuts. The two opposite parts will be the wings, and the rest will be the tail and head. Round the wings. Cut the tail down to the very base. Cut the head, moving from the top to the very base, to create a triangle shape. Decorate the craft: make earrings and a comb.
DIY cockerel craft
You will need:Plastic bottle – 3 pcs.
- yellow ball from a dry pool
- red and yellow plates
- red and yellow disposable cups
- black marker
- stapler
- simple tape
- double-sided tape
Work process:
Cut off the top parts of 3 bottles and fasten them together with tape. Cut disposable cups along the edge. They must be attached to the rooster's neck using tape. Colors must be alternated. Cut off the edge of disposable plates, make cuts with inside. As a result, you have feathers. Gather the tail and feathers with a stapler. Insert the tail into the cut. Cover the connection area with wrapping paper. Wings also need to be cut from disposable plates. Attach the head with double-sided tape. Cut out the comb, beak and beard from red disposable plates. Insert the cut pieces into the cuts on the head. Eyes are also created from disposable plates.
DIY Cockerel 2017
You will need:Beads for eyes
- hot glue
- egg cartons
- primer
- acrylic paints
- balloon
- old newspapers
- scissors
- 2 beads
- PVA glue
How to do:
Cut two cones from the egg tray and cut one side of each cone. Connect the cut cones with the cuts facing down. You will end up with one large cone with 4 petals. To create the neck and head, connect 5 cones together. Towards the top they will expand and become larger in size. Cut a comb from the side of the tray. Cut out a beak from the lid, which will consist of two parts. Feathers are also created from cones. They are fixed on top of the cardboard with hot glue. The length of one wing is 15 cm. Make blanks for the tail in a similar way.
The next stage is creating the paws. Bend the shape of the legs from copper wire. In order to give the desired effect, twist the corrugated tube. Insert the remaining tail between the corrugated and metal tube. For strength, fill the lower part with glue. Cut the claws from the bottom. They should be long and narrow. They need to be secured with glue. Paint the legs and torso with spray paint.

Prepare a utility knife and construction foam. All cuts should be neat and even. You can cut out the parts separately. Finally, glue them together with glue. You can bring it to the desired shape with sandpaper. Additionally, treat with acrylic putty, wait until it dries completely, plaster again and treat with PVA glue. This will allow the paint to adhere better.
Start coloring from the head. Glue the eyes on the head. To create a beautiful scallop, make a pattern on paper, transfer it to polystyrene foam, cut it out, and glue it to a suitable place. Start preparing the mold for the wings. Leave the back open. Cover the upper part of the wings with feathers made from corrugated bottles. Fold the last row inside the wing. Paint over it, leave to dry, attach with perforated tape and a self-tapping screw. Make a tail. Take the mesh and bend it. Cut feathers from bottles. Paint them separately on both sides. Apply black first, and then a little blue. Attach the feathers with wire to the mesh. Once the paint has dried, cut the feathers into two more pieces to make the tail appear even fuller.

You will like it too.
For the back, cut feathers from a clear bottle. The width of one feather should be approximately 2-2.5 cm. Attach them to the back, 3-4 pieces at a time. Use self-tapping screws for fastening. When you fix the feathers on the neck, cut off the top part. Glue the last row of feathers to hide the screw heads. Glue smaller feathers in the back of the head and on the side of the crest. Cover all parts that you painted with construction tape and bags. First apply the yellow paint and let it dry. Add a few orange stripes.
The finishing touch is blinders. Cut 2 strips, make a cut with a stationery knife. Insert them between the metal-plastic and corrugated pipe. Paint the craft with yacht varnish.
How to sew a cockerel with your own hands
You will need:Cardboard
- threads, scissors
- orange, blue-green, black and white fabric
- tweezers
- cotton wool
- scotch
- glue
- colored paper

Draw a sample of the toy on a piece of cardboard and cut it out. Draw the wing separately, cut it out, and see how they look. Cut the sample into separate parts so that it is more convenient for you to work further. Match each piece of the sample with a separate piece of fabric, cut out each piece in turn from the fabric. There should be 2 of each part. Cut out the head from white fabric, the upper part of the wing and body from blue-green fabric, and the lower part of the wing and tail from black fabric. Make the beard, paw, beak, comb and eyes from colored paper. Sew all the details for the head. Sewing the comb can be a little difficult. The fact is that it is wider than the head. It is better to sew it on the outside. Glue the eyes from colored paper.
DIY cockerel costume:

For the body, make allowances of 1.5 cm. Connect the parts from the inside. Sew the tip of the foot inside. Sew the wings on the outside, put soft filling inside. If you don't have it on hand, regular cardboard will do. Sew the bottom half from the outside, sew it to the body, and connect it through the cardboard with a seam. Try the torso to the head. Sew the neck to the body. Fill the connected parts with cotton wool. You need to fill it through the hole in the tail. The hole is very small, so you need to fill the craft with cotton wool in small portions. You may need to use tweezers. Sew the details of the tail using an outer seam and fill it with cotton wool.
The paws can be made from cardboard or a piece of fabric. Choose your fabric the right size and colors, make some square pieces. Trim the ends and sew the oblong legs. Fill with cotton wool. Sew the legs, wings, and tail to the body. Cut without touching the seams. The do-it-yourself cockerel toy is ready.


This is the easiest way to create crafts. There are several ways. You can use the techniques of origami, quilling, cutting with scissors, etc. Paper crafts can be placed or hung on a Christmas tree, glued to a window, or decorated festive table. An excellent solution is the decor of napkins. It will look quite restrained and at the same time original. If you use origami, then the napkin can be immediately folded into a cockerel shape. We will provide you with the diagrams.
DIY cockerel patterns.
The symbol of 2017 is the Rooster. In this article we will talk about how to make several options for a soft talisman. There are options where you need a toy pattern. You can also sew a rooster by drawing it yourself. Those who do not doubt their artistic abilities can do this directly on fabric.
DIY felt rooster (no pattern required)
To make the symbol of 2017 you will need:
- Thin, light-colored felt for the body (optional).
- Remains of hard felt in seven different colors.
- Red hard felt.
- A small piece of thin yellow felt.
- Sharp scissors.
- Threads of a suitable color.
- Beads or ready-made doll eyes.
- Cardboard for the pattern.
- Chalk or soap.
- Silicone glue from a gun.
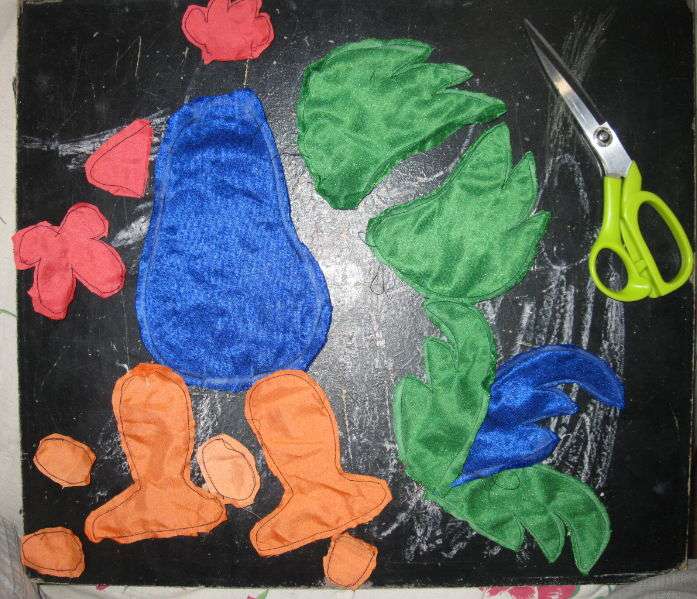
We don't need a pattern for this product. We will make a rooster from 12 hearts. They can be drawn by hand. Such a cockerel can be hung on a Christmas tree or given as a toy to a child or loved one on February 14th.
Draw 2 large hearts on paper, the size depends on how big the bird you want to sew. It can be a small valentine rooster or as big as a sofa cushion.

We draw two more hearts on paper, half the size of the body. Next we draw 5 more elements for the cockerel’s tail and two small ones for the crest. Two more very small hearts will be needed for the beak and beard. One is a little more, the other is less. The rooster pattern is ready. We cut out the elements from paper and lay them out on the fabric. We fix it with pins for convenience. Now you can cut
You can also simply use the patterns as a stencil and trace them. It is better to do this with chalk. If you trace with a pencil or pen, an unaesthetic mark will remain on the cut. That is why many needlewomen prefer to pin the pattern to felt and cut out the blanks. The best way to cut blanks will be discussed below.
So, you have cut out the elements of the future toy. Now you need to outline the eyes of the rooster. They will be on both sides. On a small product you can embroider them using a technique or sew on beads. You can glue special store-bought eyes for toys to a larger cockerel or sew on a button.
Let's move on to the wings. There are two options: glue them or sew them. Take the blank, fold it in half and attach it to the middle of the body in a way convenient for you.
Next we will make a gorgeous tail for our cockerel. To do this, take 7 pre-prepared elements. They need to be fastened together. You can do this with a thread and a needle or glue. Place one heart in the middle of the second and fix it.
Let's move on to assembling the cockerel. Take the two halves of the body and sew the edge. First, hide the knot. We sew to the place where the tail should be. We insert it and stitch it all together. Fill the cockerel with holofiber or padding polyester. There should be a little of it, otherwise it will seem that there are cracks in the felt.
Fold the small heart in half and insert the narrow side into the cockerel. This is a goatee. Make a few more stitches and secure the beak, making it from the smallest heart. It needs to be inserted between the two halves with the sharp side. Go to the place where the comb should be and insert two hearts. If you are making a Christmas tree toy, insert a ribbon loop on top.
How to cut felt
If you are interested in making toys from felt, then purchase separate sharp fabric scissors. Do not cut material with a tool intended for other purposes. Experienced needlewomen advise purchasing separate scissors for different types felt. To get a perfect hem, do not cut polyester fabric with wool scissors. This makes them stupid.
How to sew a rooster. Pattern of a fairy bird
In this master class, a pattern of a rooster from Pushkin's fairy tale will be given. Children will definitely like this toy. The “Golden Cockerel” consists of parts of the body, head, wings, and arrow. The toy can be sewn from felt or any colorful material. Cut out the pieces and sew them together internal seam. You can fill the cockerel with padding polyester, holofiber or cotton wool. Tip: when turning the arrow, it is convenient to use a knitting needle, a pencil or a Chinese stick.

Cockerel for luck and prosperity
Here will be presented the most simple pattern toys. We will sew a rooster from thick natural fabric. Linen or cotton will do. Cut out a rectangle measuring 15 by 30 cm. Fold it in half, right side inward. Sew on both sides to make a pouch. You can make a stitch on a machine or sew it with “back needle” stitches.

Let's use a little trick to get a voluminous rooster toy. We will not create patterns from a large number of elements with our own hands. To do this, the top seam needs to be pulled apart different sides. The workpiece should resemble a triangular kefir bag.
We will not sew up the last side, but will do it with Velcro. A toy can have several purposes: to amuse a child or to protect the house as a talisman. What we fill it with will depend on its function. It will be a soft filler: cotton wool, holofiber or padding polyester. We'll talk about the second filling option below.
Fold the free sides of the toy, take the Velcro and glue its parts along the inner edge of the product. Now we need to draw the comb and beard of the cockerel. You can do this directly on a piece of red or orange hard felt. Draw on the fabric with chalk, this will be the pattern. It’s hard to imagine a rooster without a chic beard and comb; it is with them that he attracts the attention of hens.
Glue the comb using a heat gun between the top seam. Glue the beard on your face. The cockerel is ready.

How to fill a cockerel so that it brings prosperity
If you want the bird to play the role of a talisman in the house, then it needs to be filled correctly. Do you want to improve your family's financial situation? Place seven coins in the cockerel, or better yet, the largest real bill possible.
If there is discord between the spouses, you need to add lavender to the bag. If you want all family members to be healthy, then put two cloves of garlic and five dried rowan berries in a bag. Chamomile and St. John's wort also bring health. For those who want to add to their family, pumpkin seeds will help.
If there are children in the house who are afraid to fall asleep at night and have bad dreams, then put five sprigs of wormwood in the cockerel. Our ancestors believed that it protected the house from evil forces.
What does the rooster symbolize?
And finally, let's talk about where to put the toy at the end of the year. You should not get rid of the product. Hang it in the hallway at the entrance to your home. Among the Slavic peoples, this bird symbolizes protection from evil spirits. It’s not for nothing that they say that they walk “until the first rooster.” According to Feng Shui, this symbol in the bedroom protects against adultery.
Sew toys with love and in good mood. Then all talismans and amulets will be powerful and will bring good luck and prosperity to your home.


