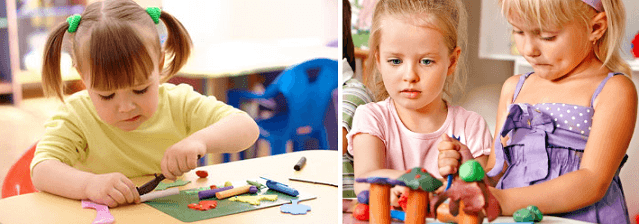
– exciting activities in which kids develop their mental functions and creativity. Modeling training is an integral component educational activities in kindergartens, clubs and development centers. The modeling technique is easy to learn and accessible to children over 2 years old. Let's look at how to help kids make their plasticine dreams come true.
The benefits for a child from modeling are very great, because during this process children learn to create something new, think creatively and fantasize. Modeling improves concentration, perseverance, memory, and develops patience.
Working with plasticine stimulates the areas of the brain that are responsible for fine motor skills. Thanks to this, new neural connections are formed in the associated speech areas. Younger preschoolers They master speech better and begin to speak clearly and correctly.
The modeling program lasts more than a year and helps prepare boys and girls for school. It includes figures and compositions, as well as plasticine drawings. A book on modeling will help you conduct each lesson at a high level, step by step photos and video instructions.
Use the templates as inspiration for your own creativity. Plasticine made from balls is suitable for very young children. Older preschoolers can make plasticine crafts with their own hands from soft Play-Doh plastic or its analogues.
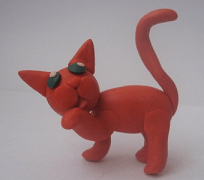
Let's sculpt a cat
Cats delight everyone with their grace and beauty. Wild tigers and lions, and cute domestic animals - cats and cats, give people inspiration. Children will love the plasticine cat that our master class describes.
Prepare hardening Play-doh plasticine in black, white, gray, green shades, a stack and two beads for the eyes.
- Using plasticine, sculpt the kitten's oval body;

- Each of the cat's four paws is made from two sausages and a small oval. Make notches with a stack in place of the claws;
- The tail is a long thin curved sausage;
- Plastic material will be needed to make the head - it is a small ball.
- Decorate it with triangular ears.
- Make eyes (beads for the pupils) and a nose for the cat from green pieces.
- A muzzle is made from white plastic, on which a mustache is drawn in a stack.
- Connect the pieces of the figurine together;
- Make a lot of thin sausages from white material - these will be stripes on the skin of the cat. Glue them in random places on the body, head and paws.
- From the remaining white plastic, fashion a shirt-front in the form of a small pancake and glue it to the body under the head in front. Use a stack to make notches on it.
Pictures of fluffy kittens and printed modeling patterns will significantly improve the creative process during class. Children will also be interested in a photograph of a real wild tiger. If you make a kitten in a different color scheme, you can easily make a tiger cub, lion cub or other similar crafts from plasticine.
Plasticine cat
We make toys from plasticine
You can use plasticine to make toys for dolls, such as food. Let's look at how to create vegetables and fruits from plasticine. A detailed master class will help you find out all the details, the goal of which is to teach every child how to sculpt beautiful and tasty vegetables for toys.
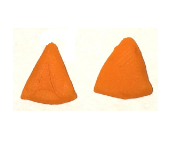
Vegetables growing in the ground are very easy to make. To make potato tubers, kids make oval or round balls brown. The carrot is an orange cone with tops in the form of thin green sausages. Beets are molded in a similar way, only the base is made teardrop-shaped and purple. Tomatoes are small red balls.
The purpose of the lesson where vegetables and fruits are made is to expand the child’s vocabulary and help him remember new names and colors. After finishing the lesson, each child will have his own garden, where he needs to place vegetables made with his own hands.
Delicious plasticine crafts can then be used in role-playing games.
You can use the templates presented above, or come up with your own way of making food from plastic (an illustrated book can also suggest this).
We sculpt animals
Allows children to get acquainted with living nature and better understand the world around us, develops attention and curiosity. Modeling book, detailed photos and video instructions simplify the manufacturing process many times over.
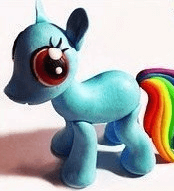
How to make a multi-colored pony from plasticine?
- To make a beautiful horse, prepare hardening plastic in three or more shades;
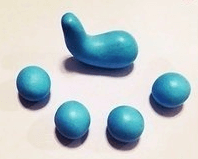
- The body and head of the pony are made in the form of two voluminous ovals;
- The neck is a small red cylinder;

- The front and hind legs of the horse are sculpted like cylindrical sausages; for the hooves, slightly flattened ovals of color are used;
- Using toothpicks, connect all parts of the figure together;
- Make small cone-shaped ears and attach them to the head;
- Create a golden mane and tail for the pony using thin yellow sausages;

- Use white and black plastic to sculpt the horse's eyes.
Modeling from plasticine for children 5-6 years old kindergarten gradually helps each child develop their creative skills, gives inspiration and game form prepares for adult life.
Let's make Little Pony Pinkie Pie
This manual presents notes on exciting activities for children aged 4–5 years on modeling from clay and plasticine in combination with a variety of materials. Classes contribute to the development of emotional responsiveness, cultivating a sense of beauty; development of imagination, independence, perseverance, accuracy, hard work, and the ability to complete work; formation of skills in modeling.
The book is addressed to preschool teachers educational institutions, tutors and parents.
Daria Nikolaevna Koldina
Modeling with children 4–5 years old. Class notes
From the author
Dear parents and preschool teachers!
Visual activity (drawing, modeling and appliqué) is one of the most important means of understanding the world and developing aesthetic perception; it is also associated with independent practical and creative activity child. In progress visual arts Preschoolers improve their powers of observation, develop aesthetic perception and emotions, artistic taste, and creative abilities. Teaching visual arts in preschool age involves solving two main problems:
To awaken in children positive emotional responsiveness to the world around them, to native nature, to life events.
To develop visual skills and abilities in preschoolers.
In this book we provide notes on exciting lessons in modeling from clay, dough and plasticine using natural and additional materials for children 4–5 years old. The classes are organized according to a thematic principle: the same theme permeates all the lessons of the week (on the surrounding world, on speech development, on modeling, on appliqué, on drawing). Thus, children study one topic in all classes during the week. In modeling, four-year-old children have one lesson per week, lasting 15–20 minutes. This book contains 36 notes complex classes, calculated for the academic year (from September to May).
Before class, read the notes carefully and, if something does not suit you, make changes. Prepare the necessary material and equipment. Preliminary work carried out before class is important (reading a work of art, becoming familiar with surrounding phenomena, or looking at crafts and paintings).
Modeling classes are structured according to the following approximate plan:
1. Creating a game situation to attract attention and develop emotional responsiveness (surprise moments, riddles, poems, songs, nursery rhymes, a fairy-tale character in need of help, dramatization games, exercises to develop memory, attention and thinking; outdoor games).
2. Modeling of the product(familiarity with the subject, sequence of actions and depiction techniques (sometimes it is advisable to let the child think for himself how best to make a craft)). It is not necessary to make a sample of the product in advance. You can examine and touch a real object or create an image from memory. When finalizing a product with additional material, you need to draw children's attention to expressive means (correctly selected colors and interesting details).
3. Review of the received work(positive rating only). The child should be happy with the result obtained and learn to evaluate his craft and the work of other children, notice new and interesting solutions, and see similarities with nature.
In classes, children 4–5 years old use the following modeling methods:
Constructive - modeling an object from individual parts.
Plastic - the details of an object are pulled out from a whole piece.
Combined - combination in one product different ways sculpting.
Children of four years old consciously approach the modeling process and strive to achieve the desired result. Children develop the ability to sculpt an object in parts, from the largest to the smallest, to convey their structure, size and shape. In sculpting, one develops the skills of rolling between the palms, changing the movement of the hands to create a ball, oval, cone, cylinder; the ability to control finger movements, the force of pressing, squeezing, pulling, pressing.
For clay and plasticine modeling classes, prepare in advance natural material (halves of walnut shells, pistachio shells, chestnut fruits, acorns, branches, ash seeds, maple wings, cones, shells, beans, peas, rice) and additional material(buttons, matches, caps from bubbles and plastic bottles, capsules from Kinder surprises).
To work accurately with plasticine and clay, each child should have a modeling board and a cloth to wipe their hands, as well as a small cardboard stand for the finished product.
You can use homemade soft and plastic dough (to make the dough you need to mix half a glass of salt, half a glass of flour, half a glass of water and one teaspoon of sunflower oil). The finished product must be dried on both sides and then painted with gouache.
Secrets of working with clay
Many educators do not like to work with clay, because they do not understand all the intricacies, and often replace clay modeling classes with plasticine modeling. To understand the secrets of clay modeling, carefully read the following tips:
The day before class, remove the clay from the plastic wrap, wrap it in a wet rag and put it in a bag.
Before class, all the clay must be thoroughly kneaded, then divided into pieces and distributed to the children.
Children bring the clay to full readiness and continue to knead it. If the clay is too wet, it will stick to your hands. It should be kneaded longer until it becomes plastic and will easily come off your hands and roll into a sausage. If the clay cracks - it is too dry - moisten it with a small amount of water and continue kneading until completely ready. If this is not done, the craft will crack when drying. Only clay that is plastic, easily sticks to your hands, and does not crack is suitable for modeling.
Have a bowl of water ready to wet your hands.
The intended object should be sculpted on a wooden plank. This is important because the plastic clay will stick too much and crack.
Be sure to moisten the clay joints with water, otherwise the craft may fall apart when drying.
Using wet fingers, smooth out any uneven surfaces on the craft.
If you did not have time to make an object in one lesson, carefully wrap the unfinished work in a damp cloth and put it away. plastic bag.
Air dry the clay product for 3-4 days.
Then you can fire the craft in a muffle furnace at a temperature of 800 degrees. After firing, the clay will turn red-brown.
The finished product can be painted with tempera, gouache or watercolor and varnished.
Children are great dreamers; they can draw any colorful pictures in their imagination: unprecedented birds and animals, colorful plants.
We need to allow them to express their emotions. Better material You won't find anything better for this than plasticine. The pliable soft texture, different shades, and the ability to mix them arouse genuine interest among children.
They always buy plasticine with a smile and take it home, imagining in advance what can be made from it. Maybe it will be, or?
From a green block you can make a realistic crayfish. Children are not prohibited from using other shades, because they should have fun. If a set of plasticine has several shades of green, then you can combine them all in one product.
How to make a crayfish from plasticine:
1. Make a rectangular shell from half a green block, making it narrower on one side.
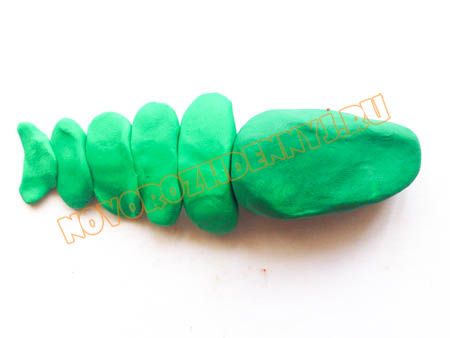 2. Make a tail from oblong cakes of different sizes. Use a match to secure each fragment. It can be inserted into the shell, and then the tail elements can be attached on top.
![]() 3. Attach thin legs on both sides of the shell. To do this, you need to roll eight sausages and then fix them on the underside of the shell.
3. Attach thin legs on both sides of the shell. To do this, you need to roll eight sausages and then fix them on the underside of the shell.
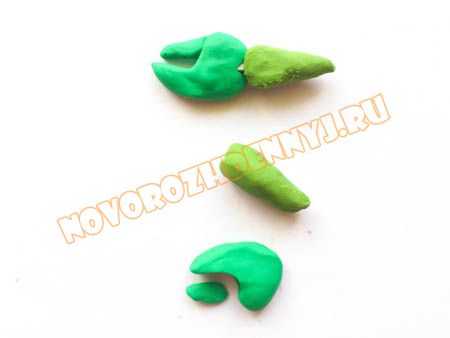 4. A characteristic feature of crayfish is their claws, the base of which can be cone-shaped. Make the necessary parts and connect them together using half a match.
 5. Attach the claws to the front of the shell.
 6. Insert two small eyes. They can be made from plasticine or beads. Using thin wire and brown plasticine, make a mustache. The plasticine crayfish is ready.
Current page: 1 (book has 3 pages in total)
Daria Nikolaevna Koldina
Modeling with children 4–5 years old. Class notes
From the author
Dear parents and preschool teachers!
Visual activity (drawing, modeling and appliqué) is one of the most important means of understanding the world and developing aesthetic perception; it is also associated with the child’s independent practical and creative activity. In the process of visual activity, preschoolers improve their observation skills, develop aesthetic perception and emotions, artistic taste, and creative abilities. Teaching visual arts in preschool age involves solving two main problems:
To awaken in children positive emotional responsiveness to the world around them, to their native nature, to life events.
To develop visual skills and abilities in preschoolers.
In this book we provide notes on exciting lessons in modeling from clay, dough and plasticine using natural and additional materials for children 4–5 years old. The classes are organized according to a thematic principle: the same theme permeates all the lessons of the week (on the surrounding world, on speech development, on modeling, on applique, on drawing). Thus, children study one topic in all classes during the week. In modeling, four-year-old children have one lesson per week, lasting 15–20 minutes. This book contains 36 notes of complex lessons designed for the academic year (from September to May).
Before class, read the notes carefully and, if something does not suit you, make changes. Prepare the necessary material and equipment. Preliminary work carried out before class is important (reading a work of art, becoming familiar with surrounding phenomena, or looking at crafts and paintings).
Modeling classes are structured according to the following approximate plan:
1. Creating a game situation to attract attention and develop emotional responsiveness (surprise moments, riddles, poems, songs, nursery rhymes, a fairy-tale character in need of help, dramatization games, exercises to develop memory, attention and thinking; outdoor games).
2. Modeling of the product(familiarity with the subject, sequence of actions and depiction techniques (sometimes it is advisable to let the child think for himself how best to make a craft)). It is not necessary to make a sample of the product in advance. You can examine and touch a real object or create an image from memory. When finalizing a product with additional material, you need to draw children's attention to expressive means (correctly selected colors and interesting details).
3. Review of the received work(positive rating only). The child should be happy with the result obtained and learn to evaluate his craft and the work of other children, notice new and interesting solutions, and see similarities with nature.
In classes, children 4–5 years old use the following modeling methods:
Constructive - modeling an object from individual parts.
Plastic - the details of an object are pulled out from a whole piece.
Combined - a combination of different modeling methods in one product.
Children of four years old consciously approach the modeling process and strive to achieve the desired result. Children develop the ability to sculpt an object in parts, from the largest to the smallest, to convey their structure, size and shape. In sculpting, one develops the skills of rolling between the palms, changing the movement of the hands to create a ball, oval, cone, cylinder; the ability to control finger movements, the force of pressing, squeezing, pulling, pressing.
For clay and plasticine modeling classes, prepare in advance natural material(halves of walnut shells, pistachio shells, chestnut fruits, acorns, branches, ash seeds, maple wings, cones, shells, beans, peas, rice) and additional material(buttons, matches, caps from bubbles and plastic bottles, capsules from Kinder surprises).
To work accurately with plasticine and clay, each child should have a modeling board and a cloth to wipe their hands, as well as a small cardboard stand for the finished product.
You can use homemade soft and plastic dough (to make the dough you need to mix half a glass of salt, half a glass of flour, half a glass of water and one teaspoon of sunflower oil). The finished product must be dried on both sides and then painted with gouache.
Secrets of working with clay
Many educators do not like to work with clay, because they do not understand all the intricacies, and often replace clay modeling classes with plasticine modeling. To understand the secrets of clay modeling, carefully read the following tips:
The day before class, remove the clay from the plastic wrap, wrap it in a wet rag and put it in a bag.
Before class, all the clay must be thoroughly kneaded, then divided into pieces and distributed to the children.
Children bring the clay to full readiness and continue to knead it. If the clay is too wet, it will stick to your hands. It should be kneaded longer until it becomes plastic and will easily come off your hands and roll into a sausage. If the clay cracks - it is too dry - moisten it with a small amount of water and continue kneading until completely ready. If this is not done, the craft will crack when drying. Only clay that is plastic, easily sticks to your hands, and does not crack is suitable for modeling.
Have a bowl of water ready to wet your hands.
The intended object should be sculpted on a wooden plank. This is important because the plastic clay will stick too much and crack.
Be sure to moisten the clay joints with water, otherwise the craft may fall apart when drying.
Using wet fingers, smooth out any uneven surfaces on the craft.
If you did not have time to make an object in one lesson, carefully wrap the unfinished work in a damp cloth and put it in a plastic bag.
Air dry the clay product for 3-4 days.
Then you can fire the craft in a muffle furnace at a temperature of 800 degrees. After firing, the clay will turn red-brown.
The finished product can be painted with tempera, gouache or watercolor and varnished.
Wrap the remaining mass after modeling in a cloth and put it in a plastic bag. If a damp rag begins to mold during storage, replace it with a new one and wash out the clay.
After work, wash your hands under the tap and tidy up your work area using a sponge.
Expected skills and abilities of a child by age 5:
Able to break off small pieces from a large piece of plasticine (clay).
Knows how to roll pieces of plasticine into balls using circular movements of his hands.
Can roll out pieces of plasticine using straight hand movements into columns and sausages.
Can press plasticine balls with his finger from above.
Knows how to smear plasticine balls on cardboard.
Knows how to pinch the edges of plasticine crafts with a slight pull.
Able to pinch small parts.
Able to flatten balls of plasticine between fingers or palms.
Knows how to smooth the surface of a sculpted figure, the junction of parts.
Knows how to apply plasticine within the boundaries of the desired contour to create a flat plasticine picture on cardboard.
Knows how to pull out individual parts from a whole piece of plasticine.
Knows how to press the middle of a plasticine ball or cylinder using his fingers.
Familiar with using stacks.
Able to decorate crafts with patterns using stacks.
Knows how to decorate a product with plasticine bas-relief.
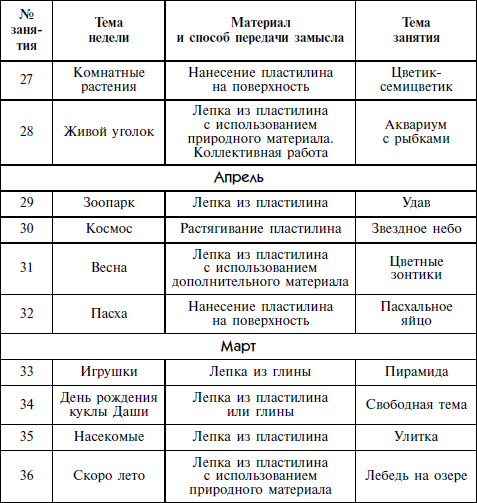
Annual thematic planning of modeling classes


Class notes
Topic of the week: “Parts of the body and face”
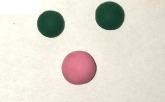
Lesson 1. Clown face(Modeling from plasticine using additional material)
Program content. Teach children to roll balls from plasticine and attach them to a given base. Strengthen children’s ability to navigate the parts of the face. Develop fine motor skills and attention.
Demonstration material. Landscape sheet with two drawn clowns with five noticeable differences (costumes different colors; hats and boots of different shapes; holding different objects in their hands; one clown is sad, the other is happy).
Handout material. Kinder surprise capsules white according to the number of children, plasticine, buttons with an eye, two small pieces of fur, cardboard stands, modeling boards.
Progress of the lesson
Show the children the drawn clowns and ask them to find the differences.
Tell the children that clowns always have a lot of paint on their faces. They specially paint themselves brighter—red nose, cheeks, huge eyes—to make it look funny.
Invite the children to make funny clowns themselves. Each child needs to sculpt eyes, a nose and a mouth out of plasticine and attach them to a kinder surprise. The button hat and fur hair need to be secured using plasticine (a hat can also be fashioned from plasticine).
Show how to attach the craft to a cardboard stand and ask the children what kind of clown they made (funny, cheerful, mischievous).
Lesson 2. Vegetables(Clay modeling)
Program content. Learn to sculpt oval and oval objects from clay round shape. Develop fine motor skills and memory.
Demonstration material. Dummy or real vegetables according to the number of children, bag.
Handout material.
Progress of the lesson
Give the children vegetables. Children take turns naming the vegetable they got. Collect vegetables in a bag. Then the children take one vegetable out of the bag and remember who had this vegetable (the previous owner of the vegetable must remain silent).
Show the children the clay. Offer to fashion any two vegetables from it. To do this, you need to break off a small piece of clay, roll it between your palms into a ball and shape it into the desired vegetable. From another ball, using direct hand movements, you can roll out an oval and shape it into another vegetable. The vegetables are smoothed with your fingers slightly moistened with water.
When the vegetables are dry, you can paint them with gouache.
Theme of the week: “Fruits”
Lesson 3. Fruits(Clay modeling)
Program content. Continue learning how to sculpt oval and round objects from clay. Develop fine motor skills of fingers and speech.
Demonstration material. Ball.
Handout material. Clay, modeling boards, bowls of water.
Progress of the lesson
Children stand in a circle, pass the ball to each other and say what fruit they would treat their friends with (“I will treat you with a yellow banana” or “I will treat you with a green pear”, etc.).
Then invite the children to sculpt their favorite fruits out of clay. To do this, you need to break off a small piece of clay, roll it between your palms into a ball and shape it into the desired fruit. From another ball, using straight hand movements, you can roll out an oval and give it the shape of another fruit.
When the fruits are dry, they can be painted with gouache.
Theme of the week: “Berries”
Lesson 4. Basket with lingonberries(Modeling from plasticine)
Program content. Learn to sculpt a hollow object with a handle. Continue learning to roll small balls of plasticine between your palms. Strengthen the ability to accompany a poem with movements corresponding to the text. Develop precision and coordination of movements.
Demonstration material. Real or painted basket.
Handout material. Plasticine, cardboard stands, modeling boards.
Progress of the lesson
Perform movements with the children that correspond to the poem:
I'll walk through the forest, I'll find lingonberries
If you don’t have a basket, I’ll put it in your palm
If I jump through a puddle, my head will spin.
And in the grass there are lingonberries, look for them here!
Ask the children:
-What did we collect in the forest? (Lingonberry.)
-Where did they put the berries? (In a basket or palm.)
Show the children the basket and explain that a basket is the same as a basket, only with a round bottom.
Offer to also go into the forest and pick a basket of lingonberries. But first, explain to the children how to make a plasticine basket: roll a large ball in a circular motion, then press on one side with your thumb to make a hole. Use your fingers to widen and deepen it, align the edges. Roll out the sausage and press it onto the top of the basket, pressing it with your fingers to form a handle.
All that remains is to fill the basket with berries. Have each child roll small red balls between their hands and place them in the basket.
Theme of the week: “In the forest”
Lesson 5. Mushroom(Clay modeling)
Program content. Learn to roll a column of clay and connect it to a flattened ball. Develop the ability to depict the words of a poem using actions.
Handout material. Clay, stacks, modeling boards, cardboard stands, bowls of water.
Progress of the lesson
Together with the children, perform movements corresponding to the poem by G. Boyko:
Cross the bridge
We need it, guys.
We'll go to the distant forest,
There are boletus mushrooms.
On the first two lines in front of the chest we make a bridge from our palms, on the third we march, on the fourth we collect mushrooms.
Ask the children:
– What parts does a mushroom consist of? (From the stem and cap.)
– What color are the caps and legs?
Invite the children to make mushrooms that they collected in the basket. Show the children how to make a ball out of clay and then roll it out into a column - this will be the leg. From another piece of clay, roll into a ball, flatten it and use your fingers to make an indentation to form a hat. Then connect the stem to the cap, lightly moistening the junction with water.
When the mushroom dries, you can paint it with gouache.
Theme of the week: “City Birds”
Lesson 6. Sparrow(Modeling from plasticine using natural material)
Program content. Learn to sculpt a bird from plasticine using a walnut as a base. Continue to learn to understand the content of the poem. Develop fine motor skills of fingers and speech.
Demonstration material. A picture of a sparrow.
Handout material. Plasticine, walnuts according to the number of children, stacks, boards for modeling.
Progress of the lesson
Read the poem by A. Barto to the children:
Sparrow in a puddle
Jumps and spins.
He ruffled his feathers,
The tail fluffed up.
The weather is good!
Chiv-chiv-chil!
Ask the children:
– Who is this poem about? (About the sparrow.)
Look at the image of a sparrow with your children. Offer to make a sparrow.
Show how to roll a ball out of plasticine using circular movements between your palms to create a head, attach it to walnut(torso), make a tail from a rolled out and slightly flattened column of plasticine. Instead of legs, you can attach a stand (roll a ball and slightly stretch it into a cone). Attach oval flattened plasticine wings to the body, and eyes and a beak to the head.
Topic of the week: “Migratory and resident birds”
Lesson 7. Duckling(Clay modeling)
Program content. Learn to sculpt a bird in a constructive way, observing the location and relationship of body parts, connect the parts, pressing them against each other. Continue learning how to use the stack. Develop fine motor skills of fingers and attention.
Demonstration material. Cards with drawn animals and birds, a toy duckling.
Handout material.
Progress of the lesson
Show the children pictures of animals. Ask them to name each one. If the picture shows a bird, children need to wave their arms like wings.
Then offer to make a duckling out of clay. Together, look at the toy duckling, determine what parts it consists of (torso, head, paws). From a piece of clay you need to separate a large one (for the body) and two small pieces for the head and paws. You need to make sure that these pieces are the appropriate size for each child.
Show how to roll a ball (head) from a small piece between your palms, an oval (torso) from a large piece, attach the head to the body, after first lubricating the joint with water. The remaining small piece needs to be divided in half. Roll the resulting parts into ovals and flatten them a little. You'll get paws. The paws are attached from below to the body.
The beak and tail need to be pulled back with two fingers. Draw the eyes with a stack or a match. You can draw wings on the sides of the body using a match.
When the clay is dry, invite the children to paint the duckling with gouache.
Theme of the week: “Autumn”
Lesson 8. Sun in the clouds(Plasticine applied)
Program content. Continue learning to roll small balls of plasticine, flatten them with your finger on cardboard, creating the desired shape of the object. Develop the ability to solve riddles.
Handout material. Halves of sheets of blue cardboard according to the number of children, simple pencils, yellow and gray (white) plasticine.
Progress of the lesson
Give the children riddles:
Shines, sparkles,
Warms everyone up.
(Sun)
Fluffy cotton wool
Floating somewhere.
The lower the wool,
The closer the rain comes.
(Cloud)
Ask the children:
– At what time of year are there many clouds in the sky blocking the sun? (In autumn.)
Offer to draw a large cloud on blue cardboard, partially covering the sun, and then decorate the sun and clouds with small balls of yellow and gray plasticine. Show how to tear off small pieces of plasticine, roll them between your palms into balls and attach them to cardboard inside the corresponding outline.
Theme of the week: “Dishes”
Lesson 9. Cup and saucer(Clay modeling)
Program content. Continue to learn how to make a ball, press your thumb into it and get a hole, align the edges with your fingers. Roll out the plasticine into a column and attach it to another part. Learn to roll a ball and flatten it into a disk, pressing in the middle. Strengthen the ability to use a stack. Cultivate compassion and kindness.
Handout material. Clay, stacks, modeling boards, bowls of water.
Progress of the lesson
Introduce children in advance to K. Chukovsky’s work “Fedorino’s Grief.”
During class, read an excerpt from this poem to the children:
A chicken ran past
And I saw the dishes:
“Where, where! Where-where!
Where are you from and where?And the dishes answered:
It was bad for us at the woman's place,
She didn't love us
She beat us, she beat us,Got dusty, smoky,
She ruined us!”
Ask the children:
– What did Fedora become at the end of the fairy tale? (Neat, tidy.)
Offer to return the cups and saucers that ran away to her.
To do this, you need to divide a piece of clay into three parts - two large and one small. Roll the large part into a ball using circular movements of your hands, press with your thumb on one side to make a hole, enlarge the indentation with your fingers and align the edges. Roll out a sausage from a small piece of clay and attach it to the side of the cup in the form of a handle. Be sure to moisten the connection points with water. Roll a ball from the second large piece and, flattening it between your palms into a disk, press the middle, pull it off with your fingers and trim the edges - you get a saucer.
Now the cups and saucers can return to Fedora.
Theme of the week: “Food”
Lesson 10. Pie(Dough modeling)
Program content. Continue to learn how to sculpt round objects, flattening the dough between your palms, and decorate the products. Develop the ability to understand and analyze the content of a poem.
Handout material. Dough, cardboard stands, modeling boards.
Progress of the lesson
Read the poem by D. Kharms “Very, very tasty pie”, asking the children to say the missing words.
I wanted to throw a ball
And I’m visiting myself...I bought flour, I bought cottage cheese,
Baked crumbly...Pie, knives and forks are here -
But somehow the guests...I waited until I had enough strength
Then a piece...Then he pulled up a chair and sat down
And the whole pie in a minute...When the guests arrived,
Even crumbs...
Say: “The guests must have been very upset! Let's bake a new pie."
To do this, roll a ball in a circular motion, flatten it between your palms and decorate with long sausages. Sausages should be rolled out of small balls using straight hand movements.
Theme of the week: “Furniture”
Lesson 11. Table and chair(Plasticine molding)
Program content. Learn to cut elongated plasticine columns into pieces using a stack and attach them to cardboard, depicting pieces of furniture in the form of a bas-relief (the image protrudes above the background plane). Develop fine motor skills of fingers.
Demonstration material. Subject pictures depicting a chair and table.
Handout material. Plasticine, stacks, cardboard, modeling boards.
Progress of the lesson
Introduce children in advance to S. Marshak’s fairy tale “The Cat’s House.”
Read an excerpt from the poem to the children, showing object pictures:
This is the table -
They eat after him.
This is the chair -
They sit on it.
Ask the children:
-Who says these words? (Cat.)
– What happened in this fairy tale? (The cat’s house and all its furniture burned down.)
– How does the fairy tale end? (The cat, her nephews and the former caretaker built a new house.)
But there is no furniture in this house yet. Offer to make a table and chair for a cat and kittens. To do this, using a pencil on cardboard using straight lines, children need to schematically depict a table and a chair (side view) - first show the children a real chair from the side, then draw a sample. Each child must roll out long sausages from plasticine, attach them to the drawn lines and cut off the excess parts with a stack.
Furniture for the cat is ready.
This manual presents notes on exciting activities for children aged 5–6 years on modeling from clay and plasticine in combination with a variety of materials. Classes help develop a sense of beauty; development of emotional responsiveness of imagination, independence, perseverance, accuracy, hard work, and the ability to complete work; formation of skills in modeling.
The book is addressed to teachers of preschool educational institutions, tutors and parents.
D. N. Koldina
Modeling with children 5–6 years old
Class notes
From the author
For harmonious development It is very important for a child’s personality to introduce him to the world of beauty through visual activities (drawing, modeling, appliqué).
Children 5–6 years old get acquainted in visual arts classes with different types art, vividly perceive the image in painting, decorative crafts, sculpture, and graphics. Their activities become more conscious. The idea begins to outstrip the image. Previously acquired visual skills are consolidated.
In modeling classes, you should consolidate the ability to sculpt familiar objects by passing them on characteristic features; learn to sculpt human and animal figures in motion, create simple compositions. Children should be given the opportunity to use a variety of modeling techniques during classes, and combine plasticine with natural or additional materials in modeling. Children's hand movements become more confident. IN collective work children learn to plan and coordinate their actions.
In this manual, we offer notes on exciting lessons in modeling from clay, dough and plasticine in combination with natural and additional materials.
The classes are organized according to a thematic principle: one theme unites all classes (on the surrounding world, on speech development, on modeling, on appliqué, on drawing) during the week.
A modeling lesson for children aged 5–6 years is held once a week and lasts 20–25 minutes. The manual contains 36 notes of complex lessons designed for the academic year (from September to May).
Read the lesson notes carefully in advance and, if something doesn’t suit you, make changes; prepare required material and equipment.
Preliminary work is also important (reading a work of art, becoming familiar with surrounding phenomena, looking at drawings and paintings). It is advisable to conduct a modeling lesson before the children engage in appliqué and draw on this topic.
Modeling classes are based on the following approximate plan.
1. Creating interest and emotional mood (surprise moments, poems, riddles, songs, nursery rhymes are used; familiarization with works fine arts; reminders of what was seen earlier; the appearance of a fairy-tale character in need of help; dramatization games; exercises to develop memory, attention and thinking; outdoor games).
2. The process of completing the work begins with an analysis of the depicted object, the teacher’s advice and children’s suggestions for creating the work; in some cases, display of image techniques is used. Next, the children begin creating their own works. The teacher can draw their attention to a successfully started craft; direct the actions of children in need of support and assistance. When modifying a product with additional elements, children should pay attention to expressive means (correctly selected colors and interesting details).
3. Review of finished works (in this case, the teacher gives only a positive assessment). The child should be happy with the result obtained, learn to evaluate his craft and the work of other children, notice new and interesting solutions, and see similarities with nature.
The following are used in modeling classes with children aged 5–6 years: sculpting methods.
1. Constructive- modeling an object from separate parts.
2. Plastic– the details of an object are pulled out from a whole piece.
3. Combined– a combination of different modeling methods in one product.
4. Relief sculpture- a three-dimensional image protruding above the plane that forms its background.
Types of reliefs:
– bas-relief – low relief (the image protrudes above the plane by less than half (coins, medals));
– high relief – high relief (individual parts can completely protrude above the plane (walls of architectural structures));
– counter-relief – depressed relief (the image is recessed into the plane).
Let's list sculpting techniques, which can be used by children 5–6 years old:
Rolling balls (any work begins with the use of this technique): a piece of plasticine is placed between the palms and the palms are made in a circular motion;
Rolling out columns by moving your palms back and forth on a board;
Flattening or flattening of balls and columns between fingers or palms;
Pinching or pulling: pinch the plasticine between two or three fingers and pull lightly;
Pulling out individual parts from a whole piece: with your thumb and forefinger, gradually press the plasticine from all sides (you can roll out the column only on one side and get a narrowed cone-shaped shape);
Pressing a depression on the surface of the mold with your thumb;
Connecting parts into a single whole and smoothing the joints;
Flattening the bottom of the mold by tapping it on a board to make the craft stable;
Drawing on plasticine using the counter-relief method using a stack, a pointed stick;
Decorating crafts with various additional and natural materials: short sticks, straws, cut maple or ash lionfish, buttons, pennies, woolen threads etc.;
Decorating an object with small details molded from plasticine;
Mixing several colors in one piece of plasticine: take 2-3 pieces of plasticine, twist them and knead them - you will get multi-colored plasticine.
Many adults do not really like to work with clay, do not know the technique of working with it, and often often replace clay modeling with plasticine modeling in classes. The following will help the teacher successfully organize a clay modeling lesson: tips for working with clay.
1. A day before class, remove the clay from the plastic wrap, wrap it in a wet rag and put it in a bag.
2. Before class, all the clay must be thoroughly kneaded, then divided into pieces and distributed to the children.
3. Children bring the clay to full readiness - continue to knead it. If the clay is too wet, it will stick to your hands. The clay should be kneaded longer until it becomes plastic and will easily come off your hands and roll out into a sausage. If the clay cracks, it is too dry. Moisten it with a little water and continue kneading until completely cooked. If this is not done, the craft will crack when drying. Only clay that is plastic, easily sticks to your hands, and does not crack is suitable for modeling.
12. Wrap the remaining clay after modeling in a cloth and place it in a plastic bag. If a damp rag begins to mold during storage, replace it with a new one and wash out the clay.
13. After work, you need to wash your hands under the tap and tidy up your work area using a sponge.
For classes in modeling from clay and plasticine you will need:
– natural material: halves of walnut shells, pistachio shells, chestnut fruits, acorns, branches, ash seeds, maple wings, cones, shells, beans, peas;
– additional material: buttons, matches, cocktail straws, small coins, capsules from Kinder surprises.
To work accurately with plasticine and clay, you need: stacks, a wooden board, a cloth for wiping your hands, small cardboard stands for finished products.
If there is no clay, you can use homemade soft and plastic dough. You can prepare it in two ways.
1 way. Mix 0.5 cups of salt, 0.5 cups of flour, 0.5 cups of water and 1 teaspoon of sunflower oil. The dough is ready to work.