A great way to spend time with your child is to make beautiful and easy paper crafts.
Go to the store for colored paper and your children will be delighted with paper flowers, origami, 3D toys and applications.
Children's paper crafts can also serve as wonderful gifts for your relatives and friends.
Applications. Creating pictures by gluing parts of an image made from colored paper onto the surface of paper.
Origami. The art of creating Japanese paper figures by folding a sheet of paper in a specific way.
Volumetric crafts. Creating three-dimensional paper toys by gluing cut-out parts, such as garlands.
Quilling. Making paper crafts and decorations using regular paper rolling.
Unusual crafts
Design of sunglasses. Together with the children, cut out various small figures in the form of rhinestones, shells and starfish from colored cardboard and invite the kids to glue them onto children's sunglasses. The same can be done with flip-flops, a summer Panama hat, a handbag, an apron or a brooch.
Applications on pebbles. You can collect flat stones from the seashore or near railroad tracks and use colored paper and glue to make small appliqués on the flat side of the stones.
Collage of autumn leaves. In the fall, you can collect bright yellow and red fallen leaves and put them under a press. From pressed leaves, glue, felt-tip pens and a sheet of paper, you can make a bright collage, where tree leaves will replace the body of an animal, the wings of butterflies or the crown of trees in the forest.
Stylish garlands from old cards. Children will really enjoy gluing cut-out circles from old cardboard cards onto a thread, so that later their creativity can become part of the interior of your home, such as decorating curtains.
Sultans for the support group. Girls will be delighted when you show them how to make a bright, large plume from wrapping paper and thread.
How to make paper crafts with your child
Firstly In order for the process to turn into an entertaining game, it is necessary to pay more attention to the pleasure and acquisition of skills during the activity itself, and not to direct all efforts to the result.
For a child, the creation of a craft should be enjoyable, and not a paper figurine that you make yourself while the child is “catching flies.”
Remember! An imperfect craft made by a child is better than a correct one. paper ship, made by you.
Secondly, the child will pick up the paper himself if you also take up this craft. Children perfectly imitate adults, which is what their development in society is based on.
Try to do paper boat and give a piece of paper to the child so that he can do the same. Make another craft with him, step by step.
Thirdly, Your child can also do the complex steps of creating paper crafts on their own if you break it down into simple steps.
When helping children decide where to glue the pieces, you can make a small dot on the template with a black marker and say "put glue on the dot" and then "put the animal's eye on the glue" and so on. This way children learn to follow instructions and develop coordination of your own hands.
If your child is tired, take a short break. Instead of gluing together a paper toy, you can sing a song together about the object you are gluing together, such as a frog, to inspire your baby.
Simple crafts from colored paper for children
Craft from strips of paper - napkin
You will need:
- Scissors
- Scissors for decorative cutting
- Decorative materials: buttons, stickers, rhinestones, etc.
- Sheets of colored paper
 Instructions
- Cut a square from one sheet of colored paper.
- Fold the square in half.
- From the side of the folded edge and up to 1 centimeter from the end of the opposite edge, cut even slits with scissors.
- Expand the square.
- Cut out strips of colored paper that should be larger than the length of the side of your square and approximately 1.5-2 centimeters thick.
- Take one strip and pass it through all the slots of the square so that it passes above and below the surface of the paper square.
- Start threading the next strip on the opposite side to the beginning of the first strip.
- Weave the strips one by one into checkerboard pattern until the entire square is filled.
- Turn the woven square over and apply glue between the paper square and the ends of each strip.
- Fold all the edges of the strips that extend beyond the square and glue them to inside square.
- Turn the woven square over so that the edges of the strips are invisible.
- For the frame for the woven napkin, cut a square piece of construction paper using decorative cutters to make the edges of the frame wavy.
- Glue the fabric square over the cut out frame.
- Decorate the edges of the frame with prepared decorative elements: glitter, buttons, rhinestones and other materials.
Zoo made of origami animals
Your children will be delighted by a real zoo made of three-dimensional animals, which can be made using ordinary colored paper and instructions for creating origami animals.
For this you will need sheets of colored paper, pencils and scissors.
- Cut out the drawn paper animals.
- To make the animal stand, bend the cut out design in half and bend it back.
- The animal will stand on its feet if both sides are bent inward near the beginning of the legs and then straightened out.
- Fold the animal's neck so that the head and neck are completely pressed against the outside of the animal's back.
- While holding the neck, fold the animal's head in the opposite direction so that its face is visible.
- Release all the folds and fold the animal in half lengthwise again.
- Holding the fold along the middle, fold the animal's head slightly diagonally to the side so that the head faces up, as shown in the picture.
- Fold the animal's head in the other direction, also slightly diagonally, as shown in the figure.
- Fold the animal's head again in the opposite direction diagonally, but now so that the head looks down, and the previous and new diagonals on the same side form an isosceles triangle.
- Do the previous step on the other side as well.
- Open the cut out animal and along the crease of the head at the base of the neck, fold the piece again so that the head is completely attached to the outside of the animal's back.
- While pinching the folds of the triangle on the neck, press the animal’s body inward in the middle, the head should rise slightly.
- Starting at the base of your head, fold your head back inward.
- If the animal has a tail, curl it up or down and place the origami on a hard surface for the animal to stand on.

Paper mosaic
Paper mosaics will help you get your children interested in creating unusual gifts that can be hung on the wall or used as a coaster.
To create a mosaic you will need:
- White cardboard or thick paper
- Colored paper
- Pencils
- Scissors
- Glue stick
- Wax paper
- Transparent cling film
- Photo frame
Instructions

- Cut out white cardboard or white colored paper as the basis of the mosaic in the form of a rectangle, for example 14*16 centimeters. It is better to cut out a rectangle rather than a square so that the picture looks more natural and looks like a real mosaic.
- Cut strips of colored paper 1-2 centimeters thick, and then cut out small triangles, squares and other simple geometric shapes from these strips.
- Draw a simple landscape of a few trees, sun and clouds on a prepared rectangular sheet or cardboard. You can also draw a simple animal or fish. The main thing is that the drawn objects are simple and include a lot internal space, which can be filled with mosaics.
- Pre-paint parts of the drawing different colors, so that later it will be easier to choose what color and in what places to glue the prepared parts of the mosaic, in the form of triangles, squares and other figures.
- Take your time and sequentially glue the mosaic in accordance with the painted parts of the picture. The pieces of colored paper need to be glued tightly to each other so that the surface of the drawing sheet is not visible between two adjacent mosaic figures.
- Let the mosaic dry.
- You can give the mosaic as is or place it in a frame. To do this, place the mosaic between two cling films, which will provide a kind of lamination to the picture. You can also glue a piece of cardboard to the back of the mosaic and place it in a photo frame.

Children's New Year's paper crafts
New Year's crafts for children 5, 6, 7, 8, 9 years old
New Year's holiday- a joyful event for children and adults. December and the last week of the outgoing year are filled with festive bustle. People decorate houses and streets, hang light bulbs on trees, decorate Christmas trees.
Our tips and ideas will help you prepare for the New Year: decorate your apartment and make unusual gifts for friends and family. We will be making art out of colored paper using decorative materials: fabric, ribbons, yarn, etc. All toys and cards were invented by the artist-designer so that both children and adults could quickly and easily make any craft.
For convenient work:
Organize your workspace so that everything you need is nearby: a pencil, an eraser, a piece of wet paper. cotton fabric, sheets of whatman paper, ruler.
Prepare the necessary tools - scissors, a paper cutter (use only in the presence of an adult!), an awl (use only in the presence of an adult!), a medium-sized brush (bristles).
Prepare necessary materials- PVA glue, white paper, ribbons and pieces of fabric.
Adviсe:
1) If, when gluing parts, the PVA glue goes beyond the joint of the parts, remove the excess glue with a piece of damp cloth.
2) For more durable gluing, the joint of the parts must be held with your hand for some time.
3) Read carefully symbols: “cut”, “glue”, “bend”.
4) Those who are not yet very good at cutting with scissors can cut out the parts with an allowance, and then cut them exactly along the contour.
5) Decorations and toys can be supplemented with details made from holographic paper - stars and circles of a suitable size.
6) New Year's characters You can decorate with decorative details from braid, ribbons or fabric, making them into a belt, bow, or scarf.
9) For a toy to last a long time, you need:
Cut off the sheet with the parts;
Apply PVA glue evenly to the back side of the sheet;
Carefully apply a pre-ironed plain piece of cotton fabric (chintz, calico, satin), press and smooth it with your hands;
After almost complete drying (10-15 minutes), put the sheet of fabric under the press for another 30-60 minutes. You can speed up the process by ironing the sheet with an iron;
Make the toy according to the instructions.
First you need to choose the toy you want to make. Then you should look at the photo and carefully read the instructions for making the craft.
If it is difficult for a child to complete any stage of the work or he is tired, be sure to help him; you cannot leave the toy unfinished.
When the craft is ready, act out a scene with your child using it, come up with a dialogue between the characters, and help write a postcard.
After all the toys are ready, photographs of the products and explanations of the work will remain in the album. Using pre-prepared templates, you can make toys over and over again.
We wish you creative success!
DIY Christmas tree

Stages of making a Christmas tree
Perhaps the most enjoyable activity for children is creating crafts. The kids take great pleasure in creating something interesting and attractive. In this article, we decided to offer you wonderful crafts for children that will be very easy to make with your own hands. We will offer you all the new products in this area and hope that your child will enjoy making things with their own hands and get incredible pleasure from this process.
New crafts for children. Bright ideas
Interesting crafts from disposable plates.
Fishes.
To ensure a pleasant mood, you need to create something bright and at the same time unusual. Tropical fish are great option for you. To create them, you must purchase paper plates. Of course, you will need bright colors to paint them. Paint them as you wish. It could be some interesting stripes or fancy patterns. And when your bright colors dry on the plate, then glue the fins to your fish.


Aquarium.
Disposable plates are also suitable for creating an aquarium. In this case, you will already need a couple of plates that are connected to each other. Moreover, you need to cut out the bottom of one plate. Glue the underwater characters to another plate. And for greater effect, use cellophane. It is worth saying that when creating an underwater world, your child must definitely use the shells that he collected on the beach in the summer.

New Year's wreath.
Are you actively preparing for the New Year? Then an ordinary paper plate will help you make a beautiful wreath to decorate your home without unnecessary worries.

Doctor Aibolit.
It is very easy to make your favorite cartoon character - Doctor Aibolit - from a paper plate. In addition to the paper plate, you should prepare the following materials:
- cardboard pink and white,
- marker and glue,
- wire glasses,
- buttons for eyes.
Work progress:
- Of course, in creating such a craft you need to show your skills. First, draw the character's head on a piece of pink cardstock and cut it out.
- Let's start working with a paper plate. It must be folded in half and cut. One part of the plate also needs to be cut in half.
- Mark the beard on these pieces. Also don't forget about the mustache. Cut out these pieces.
- We take a white sheet of cardboard and make a hat out of it for our hero.
- Then glue all the parts to pink cardboard. Draw a cross on the hat, and don’t forget to attach glasses to your craft.

Button appliqués.
Buttons of various colors and sizes will help you create an original composition. There are a huge number of button applications. They are not difficult to create. First, choose something suitable for yourself, and only then select buttons. Make the markings, be patient, and don’t forget about the glue. As a result, you will get a lot of interesting crafts.


New crafts made from pumpkin seeds.
Crafts can be very diverse. But in this article you will only find new items. We cannot forget in this article that today there are many natural materials, which is quite successfully used to create crafts. Pumpkin seeds help create the most interesting crafts. These could be any compositions or even interesting exhibits.
For example, if you use bright plasticine, you can create interesting flowers. Place them in a vase, and the vase itself in the most visible place. The child will be very happy with such a product.

You can also make an applique from pumpkin seeds - a goose.

Pumpkin seeds can help you make an original Christmas tree toy. You simply glue the pumpkin seeds to the styrofoam ball. And finally decorate it with golden paint.

Pencil shavings for original crafts.
For their crafts, every child can use pencil shavings. It is worth noting that it can also make many interesting products. The technique for working with chips is very simple. On the sheet you simply draw a picture, but you decorate it not with paints, but with beautiful and even shavings.
Check out what craft ideas we offer you.


Simple crafts for kindergarten from paper and cardboard.
In our article, in addition to complex products, you can find crafts for kindergarten that children will make with their own hands. Of course, kids love working with paper and creating something interesting out of it. For such children's crafts, be sure to choose bright cardboard and colorful colored paper. See all the best best new products crafts for kindergarten from cardboard and paper.


A simple craft for kindergarten. Hare basket.
With a little imagination you can create interesting craft. For this purpose, take a cylinder and pink and white tape. Cut out ears from cardboard.

Cover them and the cylinder with tape. Attach the ears. Don't forget to draw the facial features of your hare.

Chicken with chicks.
Making this craft is very simple. To create it, you may need disposable cups, which you should cover with bright yellow paper. It is also worth attaching individual body parts to the chickens, such as the beak and eyes. Separately, make legs for your craft from sticks and cardboard.

Hedgehog.
The next craft is also simple in its implementation and absolutely all schoolchildren can make it. For this craft you will need ordinary plasticine and seeds. We make the base of the hedgehog from plasticine, and then we make needles from seeds.

In conclusion
As you can see, today there are a huge number of crafts, including new items. In this article for you we have collected only the most best crafts. And if you don’t know what to do with your child, then take note of our ideas and then your child will be captivated interesting activity and pleasant impressions.
A seven-year-old child is quite capable of studying independently various types creativity. He can already create various heroes from cartoons, and then organize mini-performances with their participation; he can, like comics, make various crafts from paper. True, some modern children are reluctant to engage in these types of creativity, preferring a tablet or TV.
The parents’ task is to attract the child’s attention to the development of this skill, and if the child enjoys crafting, then help him master new horizons in making paper crafts. We will try to talk about what types of techniques can be used for paper crafts children 7 years old independently or with the help of adults.
What abilities and skills does this activity develop?
Nowadays paper is the most accessible material for children's creativity. Thanks to the diversity existing species paper, its shapes, textures, colors, many techniques have emerged for creating all kinds of crafts.
This is especially true when it comes to children 7 years old. They are no longer those kids who are just making their first attempts at creativity. Seven-year-olds are able to perform more complex types of crafts both independently and with the help of adults.
Paper crafts are not just an interesting activity. They play a big role in mental, sensory, moral, labor and aesthetic education. During classes, the foundations of inquisitiveness are laid and the store of knowledge about the variety of forms and qualitative characteristics of objects in the surrounding world is replenished. The horizons expand, hand motor skills, creative thinking and artistic taste develop.
Children learn to experiment - first the child will do the work according to the model, then, based on the skills acquired, he will be able to move away from the template and come up with independent versions of crafts. In addition, children develop accuracy, perseverance, a creative attitude towards the life around them, hard work and mutual assistance, the ability to complete the work they start, overcome difficulties in work, and engage in concentrated and purposeful work.
What crafts can be made from paper for a 7 year old child?
While developing the child’s skills, parents should actively participate in making crafts themselves. For example, preschoolers are often asked to bring some kind of themed craft to kindergarten that the child would make at home with the help of their parents.
Sometimes, parents themselves “create”, not allowing their child to help, and in vain. Such moments for creativity should be appreciated: you are not just making something together, you are showing the child how to cut out the shape correctly, how to connect the details of the craft together, in the end, you are communicating with the baby.
Types of paper crafts that a seven-year-old child can try include the following:
- application and its varieties,
- quilling,
- openwork cutting,
- paper weaving,
- volumetric crafts (papercrafting),
- origami,
- modular,
- papier-mâché and so on.
In order for a child to want to create, parents must also be creative. In any case, at first the child will really need the help of elders, because at the age of 7 children are not yet able to learn all the intricacies of paper craft on their own. Put everything aside and devote at least an hour of time to your child. This will benefit not only him, but also you.
Examples of crafts with step-by-step instructions
Let's take a closer look at each of the above types of crafts for 7-year-old children.
Application
Applique can be called a classic type of paper art. There is not a single adult who did not engage in this simple creativity as a child. Considering that children 7 years old are already sufficiently able to work with scissors and glue, the applique will not cause any particular difficulties.
The appliqué technique consists of cutting out various shapes and elements from colored paper and gluing them onto a base to create a picture. 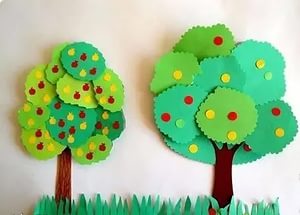
To work you need:
- colored paper and colored cardboard,
- scissors and glue,
- a simple pencil and a desire to create.
Colored cardboard is the basis of the craft, the background on which the picture is created, and the necessary elements are cut out of the paper.
The application can be created using different techniques:
- Tear applique is created from pieces of paper not cut with scissors, but torn by hand, which allows you to create textured images.
- An overlay applique is created by sequentially gluing various parts layer by layer, moving from larger elements to smaller ones.
- A modular applique is obtained by gluing elements of the same shape and size (triangles, circles, squares), creating a kind of paper mosaic.
- When creating silhouette applique children 7 years old can cut out quite complex silhouettes, both using their imagination and using a drawn outline.
Instructions:
- Select a picture for the application.
- On back side Use colored paper to draw all the elements of the applique.
- Cut out applique elements
- Glue all the elements one by one onto colored cardboard (background), starting with large parts and ending with small ones.
Collage is also one of the types of appliqué. To work with this technique, instead of colored paper, you can use clippings from illustrated magazines, postcards, posters, candy and chocolate wrappers, as well as any available materials (buttons, grains of various crops, straw, tree bark, cotton wool, etc.).
A new direction in application is called iris folding, which means rainbow folding. Colored strips of paper are twisted in a spiral, overlapping each other, thereby creating the illusion of a three-dimensional image.
Quilling
Quilling, or paper rolling, is an ancient, elegant craft. The technique of making crafts using the quilling method is simple, and any child 7 years old can handle it. 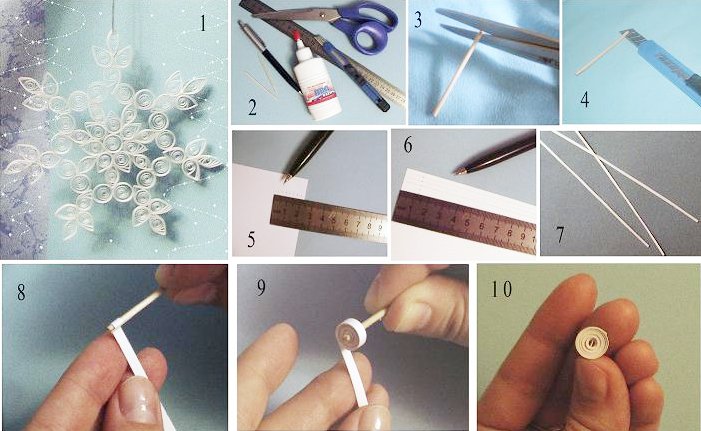
To work you need:
- quilling kit (thin colored strips of paper)
- toothpick
- cardboard for background.
Instructions:
- Make a cut at the end of the toothpick (let the parents help the child so that he does not cut himself).
- Insert the end into the cut paper strip and begin to wind it around its axis, tightening it tightly around the toothpick.
- Lightly release the resulting spring so that it weakens a little.
- Remove the spring from the toothpick, seal the edge and shape the spring by pinching it with your fingers.
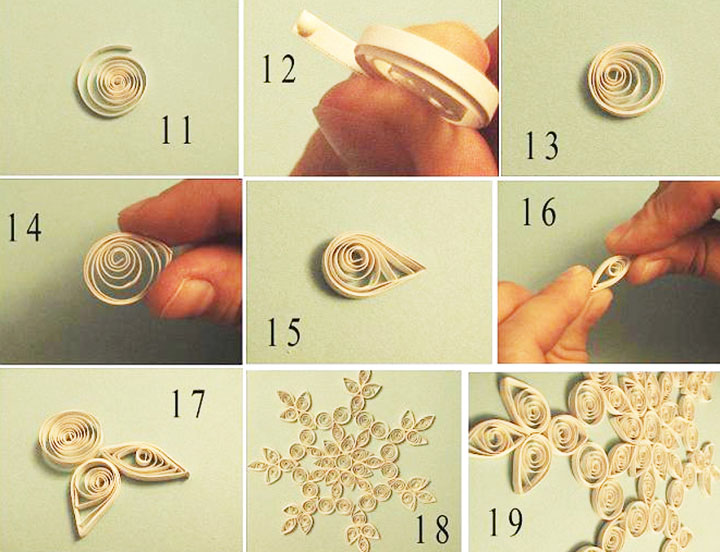
Narrow strips of colored paper are first twisted around a toothpick, and the tip of the strip is glued to the resulting kind of coil - a spring roll - so that it does not unwind. Then the twisted rolls are given the desired shape with your fingers - oval, triangle, drop, leaf, heart, crescent.
Finished parts are assembled into the intended composition by gluing to cardboard. As is clear from the description of the technique, quilling requires scissors, glue, a toothpick, colored cardboard that will serve as the background for the future painting, and strips of colored paper 3-5 mm wide.
Currently, sets of multi-colored quilling strips are widely available. You can cut such strips yourself from office colored paper, having previously lined them under a ruler. This technique produces very good images of flowers, berries and fruits, birds and insects. And a postcard made by a child using this technique will delight every mother.
Openwork cutting (stencils)
For openwork cutting, you need paper and nail scissors - they have sharp ends and straight short blades that are convenient for cutting. It is better not to use a stationery knife, because children of seven years of age do not yet fully understand the safety precautions when working with this tool. You can use office paper - white or colored. 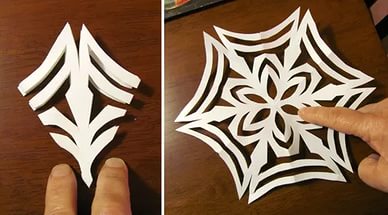
Instructions:
- For symmetrical cutting, the paper is folded in half or more.
- Take a simple diagram, the contours of which are not very narrow and small. Gradually, the child will master cutting skills and will be able to use more complex patterns. They can be found on the Internet and printed or redrawn from a book.
- Cut-out figures and elements can be pasted onto colored cardboard, or can be used as an independent element for decorating, for example, an interior.
On New Year's Eve, it is very popular to cut out snowflakes, Christmas trees and other figures that decorate windows and walls of rooms to create a festive atmosphere.
Paper weaving
Paper weaving requires a certain perseverance and patience, and sometimes the help of an adult. 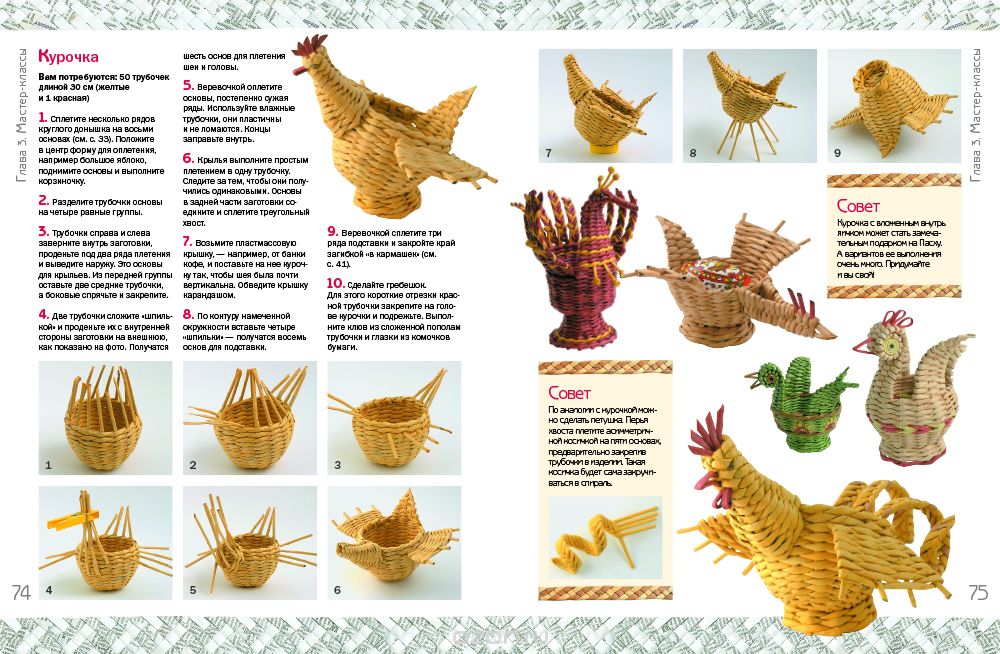
To work you need:
- colored paper
- scissors
- glue or tape
- ruler
- pencil
Instructions:
- The paper is cut into strips of equal width and length. You can also use any cellulose: newspaper, illustrated magazines, wrapping paper.
- Roll strips of paper onto the pencil, holding the paper at a slight angle so that it overlaps.
- The pencil is carefully removed, and the edge of the paper strip is fixed with glue or tape.
- You can weave various crafts from ready-made tubes using patterns from the Internet or books on applied arts.
It is better for children 7 years old to try weaving with this technique. flat figures: rug, heart, bookmark.
Volumetric modeling
Papercrafting, or three-dimensional modeling, is a simple and exciting activity. Its essence lies in cutting and gluing ready-made templates printed on paper. The result of the work is a three-dimensional model. It could be a bird or an animal, a cartoon character or a movie character, a car or a ship, or anything. 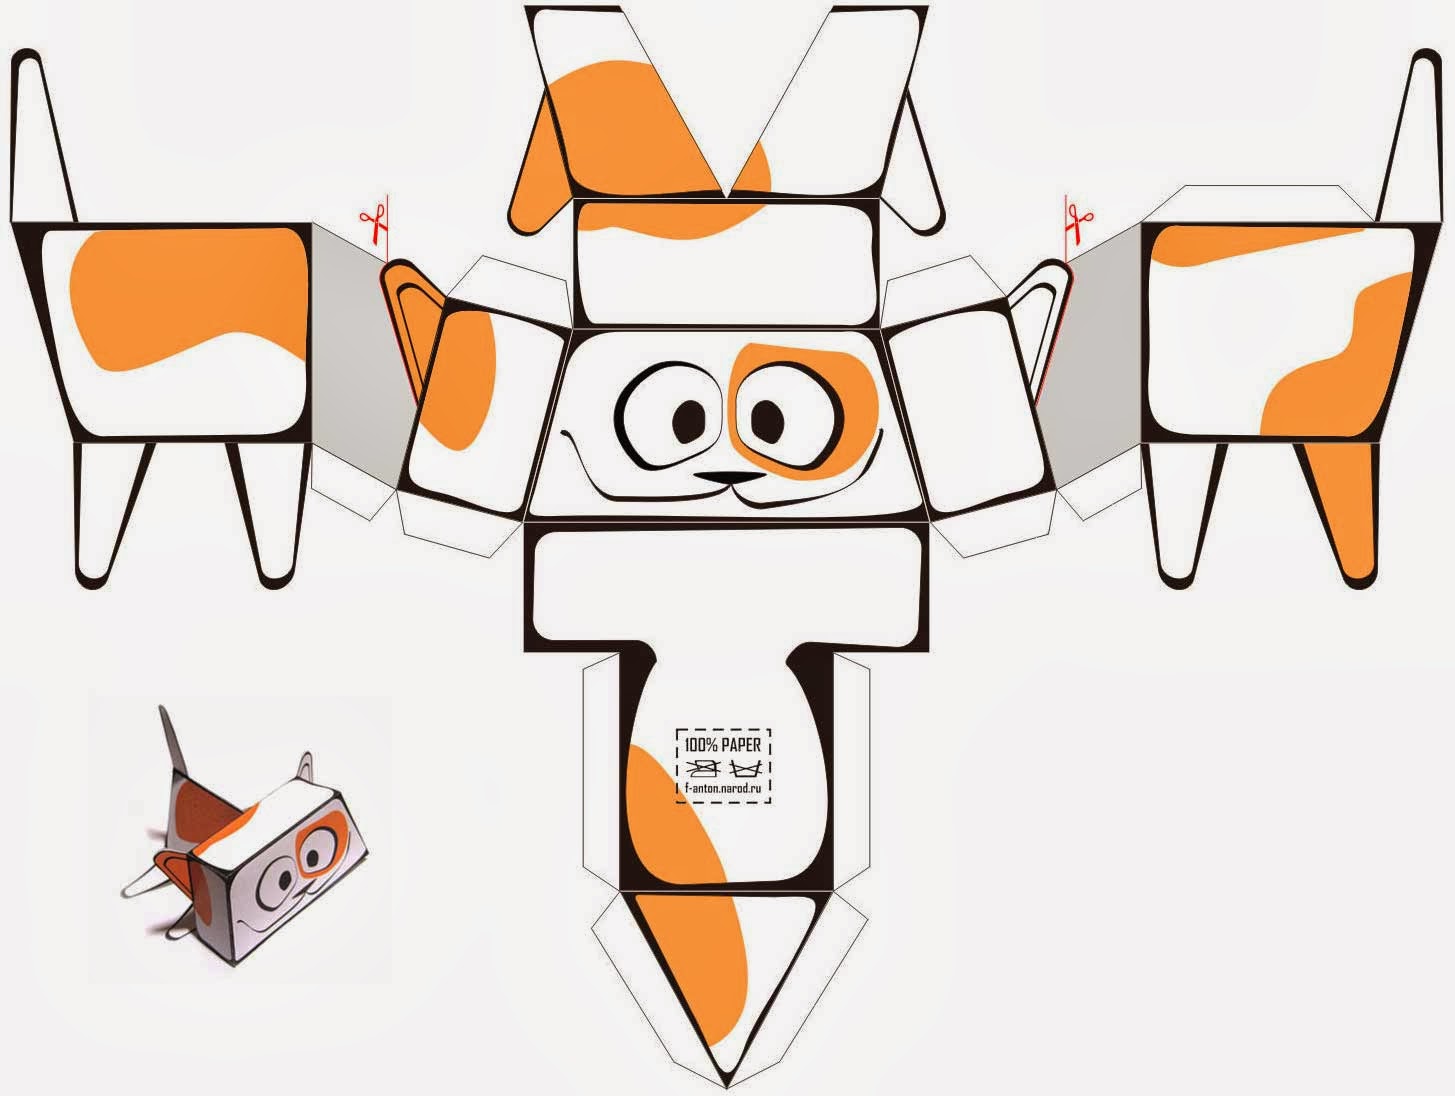
On the Internet you can find and print any template you like on a color printer. The child’s task is to carefully cut out the template along the contours using scissors. Then, along the marked lines, the template parts are bent and glued to each other.
3D modeling will allow your child to create his own collection of his favorite characters or pieces of equipment, which he can also play with in his free time.
Origami
For origami, office paper of different colors is used. To work, you will also need a ruler, pencil, scissors, glue in some models, and a diagram according to which you will create the craft. 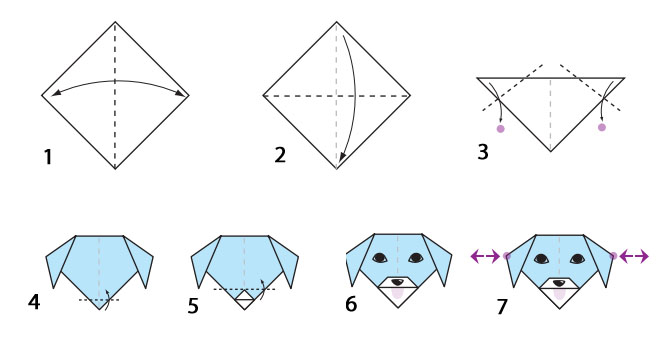
Origami patterns can be found on the Internet or in printed publications - quite a lot of books are published on this type of creativity. Origami is interesting for children as a way to create with their own hands figurines of plants, flowers, animals, birds and various objects of the surrounding world. The well-known paper airplanes and boats are a classic example of origami. 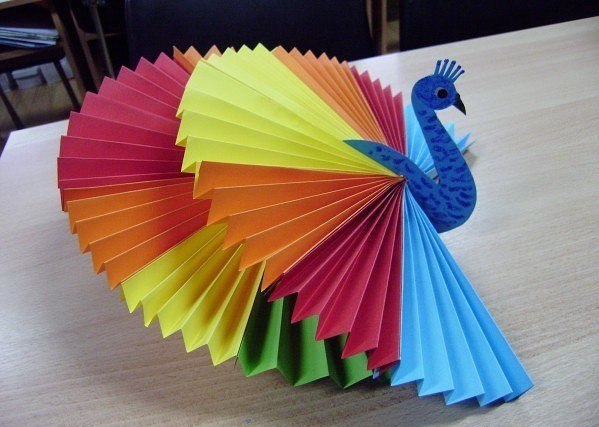
Modular origami although it is a variety simple origami, but it is worth highlighting separately. Required Tools- the same. The essence of this technique is that you first need to prepare the required number of special identical parts of the future figure - modules that have a triangular shape. And then the finished modules are stacked one on top of the other according to a certain principle or pattern. Schemes of modular origami or master classes with detailed step by step instructions can be found on the Internet.
Papier-mâché
Children aged 7 really like working with papier-mâché. Using this technique, seven-year-old children create simple crafts and figurines, but having mastered it in childhood, they will be able to develop spatial thinking and learn to create complex crafts and paper sculptures. 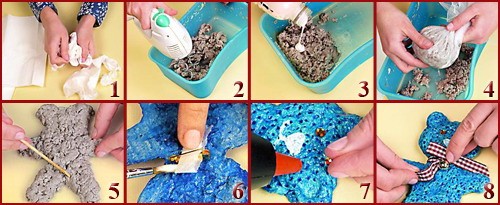
The following items will be useful for your work: newsprint, paints, glue (PVA or wallpaper) and a base for pasting. Such a base can be an inflatable ball or an ordinary saucer with a glass. The papier-mâché technique involves smearing the chosen base with Vaseline.
Instructions:
- Newspaper is torn into small pieces by hand, and these pieces cover the base of the future craft in one layer.
- Then the resulting first layer is smeared with glue and a second layer of pieces of paper is applied to it.
- This is how 2-3 layers of paper are applied, coated with glue, then the part is dried. Then another 2-3 layers of paper, and drying again. This is done so that the future craft does not become distorted or warped.
- When the craft reaches the required thickness and dries, it is removed from the base and primed with water-based paint or gouache. /li>
- After the primer layer has dried, the finished craft can be painted with any paint.
By making paper crafts, a child develops fine motor skills, logical thinking, perseverance and accuracy. All this will have a good effect on the formation of his personality, at school, and the development of his creative potential.
Instead of a conclusion
The choice of DIY paper crafts is very large. A child can create a picture or a postcard, a ball or a snowflake, a garland or a transformer, a rose or a spider, a bookmark or even a Lego constructor. The main thing is that this creativity should be a joy to him.
As children, we all made appliqués from colored paper in kindergarten, V elementary school and at home with mothers and grandmothers. Modern children also enjoy making such crafts, getting involved in arts and crafts and learning to create and realize their fantasies.
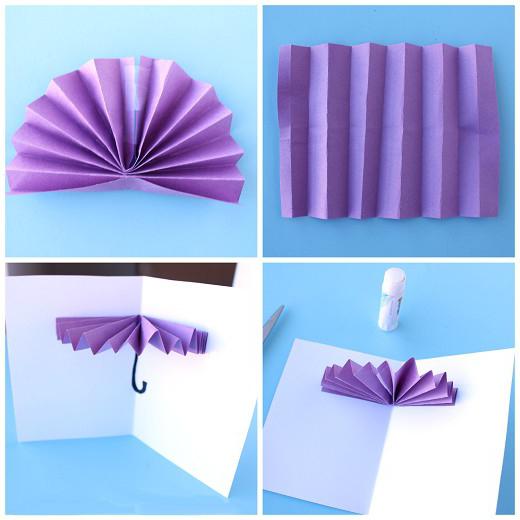
Umbrella
If you want to make a simple but original applique with your child, then we can recommend as an option a three-dimensional one in the form of a postcard with an umbrella.
For this DIY colored paper craft you will need:
- colored paper;
- “eyes” for toys;
- A4 office paper;
- glue stick;
- scotch.
Operating procedure:
- fold a sheet of white paper in half;
- on the right half, stick a triangle made of colored paper of any bright color, which will represent the dress;
- Draw a nose and mouth on a beige paper mug;
- stick the face so as to hide the upper corner of the triangle;
- complete the hair, arms and legs;
- stick on “eyes”;
- take a rectangle of colored paper measuring 5 by 10 cm;
- fold it like an accordion along the long side;
- fold in half;
- connect the edges that are on the last fold of the accordion with tape (see picture);
- glue the free edge of the accordion to the fold of a white postcard sheet;
- add a handle to the umbrella;
- depict streams of rain.
Peacock
Children always really like crafts made from colored paper, made with their own hands in the shape of animals. For example, you can easily make a three-dimensional peacock.
To do this you need:
- cut out the silhouette of a peacock from dark blue colored paper;
- glue the beak in the form of a small yellow triangle and draw or stick eyes on the bird’s head;
- cut out long strips of colored paper 1 cm wide in the amount of 8 pieces. each color (purple 16 cm long, green - 13 cm, yellow - 10 cm);
- glue the ends of the yellow strip;
- do the same with all other parts of the same color;
- glue the ends of the green strip on top of one of the yellow “drops” first, and then the purple one;
- assemble the tail from the eight parts received;
- stick the silhouette of a peacock on top;
- attach a ribbon with a piece of tape so that the craft can be hung on a wall or Christmas tree.

New Year's garland
Even 100 years ago, Christmas trees were decorated with children's crafts made from colored paper. It is very easy to make them with your own hands. For example, you can put together a garland of dancing ballerinas.
To make one such figurine, you must first make a skirt. To do this, a sheet of A4 size white or colored paper is folded to form a square. The excess part is cut off, and the square is folded three times diagonally. Cut off one of the outer corners in a semicircle and cut out small triangles, as when making paper snowflakes. Then the silhouette of a ballerina is cut out with her joined hands raised up and two protrusions at waist level. An incision is made in the center of the skirt and the dancer’s head and arms are inserted into it so that the skirt remains on the ledges and does not slide off the figure. They take New Year's rain and thread it through the ballerinas' hands. All! The garland is ready.
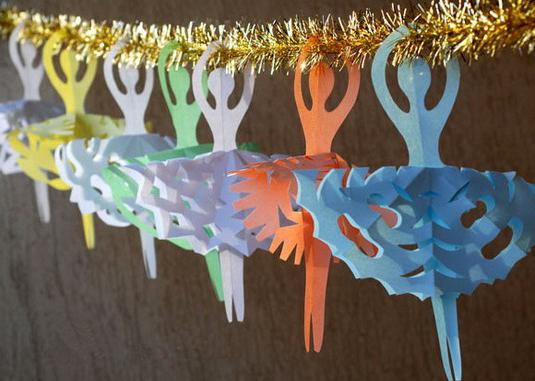
Such crafts from colored paper and flowers can be made with your own hands by the whole group in kindergarten. They are very original and will become unusual decoration for the New Year's room.
DIY colored paper crafts for beloved mothers and grandmothers
Every mother carefully preserves the simple gifts that her children gave her when they were little and tried to express their love by diligently drawing or cutting out figures and making colorful compositions from them.
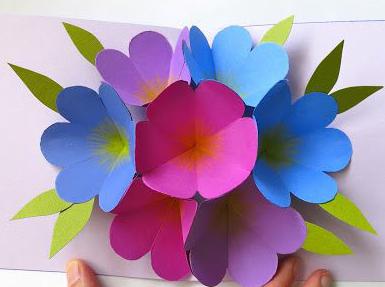
Most often, DIY colored paper crafts for March 8 are made in the form of postcards decorated with flowers.
For example, you can try to make a volumetric version.
You will need a sheet of white cardboard, several sheets of regular colored paper, a glue stick, and a yellow marker.
Execution order:
- cardboard is folded in half;
- cut out 7 flowers of different colors, each with 6 petals;
- fold each piece so that three folds are made, through the center of the flower;
- cut out several sharp leaves from green paper;
- glue the flower onto the fold of a sheet of cardboard;
- glue the remaining 6 flowers and leaves around;
- use a marker to draw flower stamens;
- fold the card so that the flowers are folded along the folds;
- The number 8 and letters cut out of paper of different colors are glued onto the cover of the postcard so that they form the word “Martha”.
Beautiful DIY crafts made from colored paper to celebrate Valentine's Day
The art of gluing paper figures was originally considered a pastime for adults. In particular, today you can see, for example, crafts on the theme of a completely “adult” Valentine’s Day.
For example, you can make very beautiful heart. You will need a piece of cardboard, PVA glue, scissors and colored paper in different shades of red.
Operating procedure:
- cut out a heart measuring 20 by 20 cm from cardboard;
- cut colored corrugated paper into many squares measuring 2 by 2 cm;
- from the middle of the first heart, a smaller heart is symmetrically cut out so that a kind of frame is obtained;
- lubricate small area hearts emulsion;
- insert a toothpick into the center of the paper square and, lifting its corners up and towards the center, glue the square onto the heart;
- do the same with all the other parts until the entire heart is pasted over so that the base is not visible.
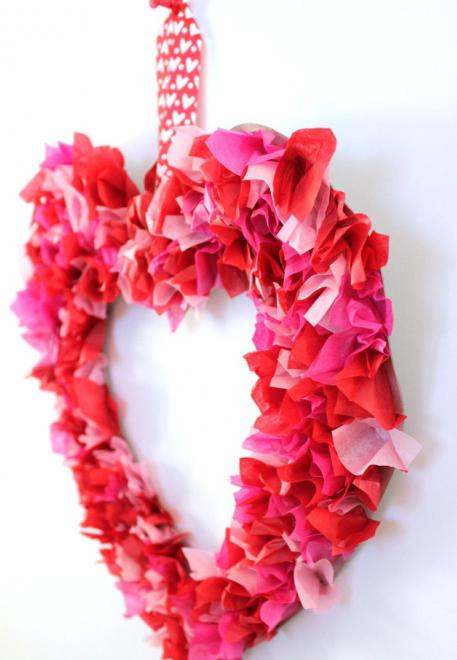
In this style, you can also design the letters that form the word LOVE, or write your names. All these crafts are suitable for decorating the hall for a wedding banquet.
Owl postcard
An interesting gift for any occasion can be made using the regular appliqué technique, which even the smallest children can master. For this DIY colored paper craft (instructions below), you only need a sheet of cardboard, scissors, a black marker and glue, as well as a printer on which you need to print an image of an owl from a children's book.
Operating procedure:
- a sheet of cardboard is folded so that in front there are two flaps converging in the middle;
- glue brown paper onto the doors;
- lines are drawn on the doors with a black marker to give the appearance of tree bark;
- cut the edges of the valves so that when folded they form a hollow;
- green paper is glued to the inner surface of the craft;
- The silhouette of an owl, eyes, beak, etc. are pasted onto a green background.
If everything is done correctly, when folded it will look like the bird is looking out of the hollow.
Tree
You can make original crafts from colored paper with your own hands (see photo below) using a regular paper bag.
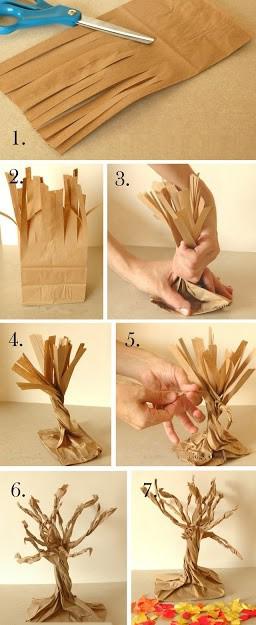
In its upper part you need to make a small fringe and roll it up so that you get a tree with branches on a square base. Next, you should straighten the branches and cut out red, orange and yellow leaves from paper. They need to be glued to the branches of the “tree” so that its crown is formed.
Now you know what various souvenirs you can make from colored paper with your children, and you can organize their useful leisure time.