Currently, products have gained unprecedented popularity self made, and it doesn’t matter what it is: soft toy or women's dress. Many people ask the question: why sew clothes when you can either buy them in a store or turn to a professional tailor for help? The answer is simple: An item made with your own hands will definitely be of high quality and unique, you can be 100% sure that no one has a second dress like this, which means the chances of meeting a double on the street are zero.
Sewing a dress with your own hands is easy and simple
At first glance, it may seem that sewing a dress is an incredibly difficult task that not everyone can do. However, taking a closer look and typing the phrase in the search: We sew our own dresses for beginners patterns You can make sure that there is nothing difficult about this and in just a couple of evenings you can easily sew a beautiful and stylish dress. Simple patterns for beginners will turn the process into a fascinating game, and the sewing process will seem not as scary as it was perceived before!
Pros of a dress made by yourself:
- Truly exclusive
- Can make custom design
- Your creative abilities develop
- Opportunity to make money from your hobby
- Significant savings in time and budget when buying new clothes.
As you can see, a dress, and in general clothes sewn with one’s own hands, has more advantages than disadvantages than store-bought ones.
How to sew a dress with your own hands for beginners? Patterns below
There is nothing better in the heat than a beautiful, bright, weightless dress. What if you sew it yourself?
But before taking on this difficult task, the amateur will have many questions: how to create a dress pattern for beginners? How to make a base pattern for beginners? Which fabric should you choose for your first product? How to sew a summer dress? We are ready to answer these many questions in order. Any dress model is a “sheath” perfectly tailored to your body, and small changes (like lowered sleeves or a slightly looser waist will make your look more interesting) don’t be afraid to experiment, because now there are a great many master classes online. However, there are several general rules which should be strictly observed:
- The fabric is always marked on the wrong side
- You can use tracing paper or plain paper as the material for the pattern.
- Before tracing the template, you should pin the cutout with pins so that everything turns out neatly.
- Spread the fabric on a large, flat surface (for example, a huge table, a large floor) this will help you carefully cut the desired piece.
- Don't forget to trim the hem and edges of the product at the end of sewing.
Taking into account all these simple rules You will end up with a light and simple dress, just what you need for hot weather.
The stores offer a wide variety of beautiful summer clothes. But the best solution would be to make the outfit yourself and get incredible pleasure from the process. The first and most important step is choosing the fabric. It should be light and flowing. Cotton or silk work great (however, silk is more difficult to work with)

- Take measurements of your figure properly (this will affect how the dress will fit you in the future). The following parts of the body are required for measuring: waist, shoulders, hips and, if desired, arms.
- Draw the pattern according to taken measurements on fabric. Building a base pattern is the easiest way for beginners = look and choose the most suitable one
- Cut out carefully.
- Sew the parts together on a sewing machine, but you can also sew by hand, in which case the process will take much longer.
- Process the edges of the finished product and steam.
This is a general algorithm for sewing a summer dress with your own hands.
Blouse patterns for beginners, easy DIY patterns?
What is the simplest dress? That's right, two sewn rectangles of fabric, with slits for the arms and head.
However, even this miracle can be made carefully and beautifully if you take standard measurements from the model, which will serve as the basis for the future masterpiece.
How to make a base pattern for beginners
BASIC MEASUREMENTS (WITHOUT THEM IT IS IMPOSSIBLE TO SEW THE PRODUCT)
- OG – 96
- OT – 75
- OB – 101

BACK MEASUREMENTS
- Dst (back length to waist) – 41
- Shsp (back width) – 35
- Shoulder width – 12
Front measurements.
- DPT (front length to waist) – 43.5
- VH (chest height) – 26.5
- CG (centre of chest) – 18
- Vhk (oblique chest height) – 24
- SH (chest width) – 37
- Gp (armhole depth) – 20
Remember that the side seams must completely match, only then you will get a neat and beautiful product.
How to sew a baby dress with your own hands for beginners patterns
If our visitors have little princesses, then closer to the holiday season the question of how to dress the young beauties becomes urgent. Typing in any search engine patterns for children's dresses for beginners, simple DIY patterns You will be surprised by the abundance of all kinds of styles, patterns and master classes; choose the most suitable option for yourself.

The algorithm for sewing dresses for girls is exactly the same as for adults, although their delicate skin requires only natural and high-quality fabric.
How to sew a floor-length dress with your own hands for beginners patterns
A floor-length dress looks beautiful and romantic; it is the best choice for young girls, because such clothing allows you to emphasize grace and lightness. For sewing, you can use absolutely any elegant fabric.

For beginners, perhaps the best choice would be viscose knitwear and, of course, a standard needlework set, as well as an overlocker, so that the edges of the finished product look as smooth as possible. Many of these models do not have a pattern, but beginning craftswomen should use a template in their work.
How to sew a sheath dress with your own hands for beginners patterns
A sheath dress is nothing more than a second skin, which must be sewn according to the unique measurements of each. This work requires a lot of diligence and diligence from the fashion designer and tailor, because it is quite difficult to get a dress to fit perfectly, but a beginner can try his hand at sewing a simple, straight dress based on exact measurements.

Dress patterns for beginners, simple DIY patterns ALL THIS is a great opportunity to try a new craft, find your hobby and possibly a new source of income, because all girls and women (and sometimes young princesses) love to dress up in beautiful clothes. Now you have expanded your knowledge base, which will allow you to make truly exclusive and good clothes both for yourself and for your friends. Patterns summer dresses simple DIY patterns for beginners
About ten years ago, we could not even imagine that we would again sew our own clothes, rather than buy them in stores and supermarkets. However, the number of people who prefer homemade items is growing.
If you are not in the mood to spend money on magazines, or prefer electronic sources of information to paper ones, you are not losing at all. By entering the following queries into the search engine:
Why sew your own clothes?
Reasons why women are once again sitting down at sewing machines, just like in the 90s and more early years, weight. Yes, as before, some housewives do this in order to save money: to use fabric that has been lying idle for a long time or to alter an unfashionable item from an even stronger material. As a rule, this is relevant for those whose budget has suffered significantly due to the economic situation in recent years.
Luckily, saving money isn't the only thing motivating women to sew in 2016. A much more common reason for this now is to create something special for yourself, unlike others. Some leave the order for such an exclusive to professional craftsmen, while others manage it on their own. The last option, of course, carries risks, but if successful, clothes made with your own hands become truly loved.

A considerable part of beautiful ladies resort to independent sewing in order to be able to wear dresses, skirts and blouses that fit exactly to their figure. After all, modern stores offer customers a variety of clothing models ( different colors, texture, style), but all of them, as a rule, are tailored for women with standard “hourglass” (thin waist with approximately equal chest and hips) and “rectangle” (the waist is not clearly expressed, the difference between the main volumes are minimal). It is more difficult for pronounced “pears” (hips much wider than shoulders), “inverted triangles” (hips much narrower than shoulders) and “apples” (have a noticeable tummy) to choose something that does not focus attention on the disproportions of the figure.
Where to start if you want to sew clothes?
Once you are convinced of the seriousness of your intentions, take care of the means of production, the main one of which is a sewing machine. If you have one, check that it is working properly and, if necessary, contact a technician. If you don't have a car, buy one. It is better to be guided not by the principles “the more expensive the better” and “the more famous the brand, the longer it will last”, but by the technical characteristics and reviews of real people.

For example, it is fundamentally important when purchasing sewing machine, understand what types of fabric you will process on it. Not every machine can handle thick coat fabric or leather. Also, not all devices are suitable for sewing knitwear, thin tulle fabrics, and so on.
Then, having selected a number of machines that suit your characteristics, read reviews about them. They can be found on specialized review sites, handicraft forums, as well as on resources like Yandex.Market.
You also need to take care of purchasing such things as tailor's scissors, measuring tape, pins, chalk, and so on.
When all the funds are ready, you should move on to purchasing materials: fabric, threads, necessary accessories. If you decide to sew for the first time, you should not take the most expensive thing. Start with budget options.
What to sew first and where to get patterns?
Perhaps, novice needlewomen should not immediately take on products with a complex cut, made from capricious fabrics: coats, shirts, trousers. Relatively simple items, such as straight or pencil skirts, as well as casual dresses, are better suited for a debut.
Patterns for future outfits can be found in several sources. For example, in cutting and sewing magazines, the most famous of which is, of course, Burda. As a rule, such publications contain not only intricate models, but also detailed instructions about how to sew a simple summer dress with your own hands for beginners. Here you will find materials about how to sew baby dress DIY for beginners, patterns men's clothing, in general, having accumulated several years' worth of magazine issues, you can get a full-fledged textbook on cutting and sewing.

Traditionally, books devoted to handicrafts are also popular. A significant part of them is dedicated to inexperienced seamstresses. Thus, on the shelves of bookstores you can find publications containing recommendations for a specific type of product: “ We sew a dress with our own hands, patterns for beginners», « DIY dress: easy and simple to sew. For beginners" and so on.
There are also thick books, almost encyclopedias, in which you can find tips on how to sew any thing from an apron to a coat. They may be called " We sew ourselves. For beginners. Patterns and recommendations" or "We dress the family ourselves: a guide to sewing all types of clothes."
If a book contains not only a description of the algorithm for making a product and small illustrations of the parts that need to be constructed, but also full-size patterns, this is usually stated right on the cover. Pay attention to the publications with the titles “Patterns of summer dresses for beginners”, “Simple patterns. Now you can sew everything with your own hands”, “How to sew a dress with your own hands? Patterns and models”, “Simple patterns for summer dresses and sundresses for beginners” or, for example, “Patterns for children’s clothing for beginners. Simple DIY patterns."
To make sure that the book actually contains patterns, you need to leaf through it. And when ordering books online, choose those stores that add photos of the contents and sheets from it to the page of each publication. By the way, such advanced trading platforms often allow you to leave reviews of books. It will also be useful to read them so as not to make a mistake with your choice.
If an article from any resource turns out to be successful about, for example, how to sew a dress with your own hands for beginners, patterns were also quite applicable to reality - don’t be lazy, save the link to the site in your bookmarks. By following this rule every time, you will be able to accumulate a whole selection of links, following which you will receive high-quality “recipes” for clothes.
Summer dress pattern for beginners
Of course, within one article it is impossible to provide as much information on cutting and sewing as a specialized website, book or magazine file can provide. However, after reading our text, you are guaranteed to benefit from it. And it will be not only theoretical, but also practical. So, we present to your attention instructions on how to how to sew a summer dress with your own hands for beginners, patterns We'll give it to you too!
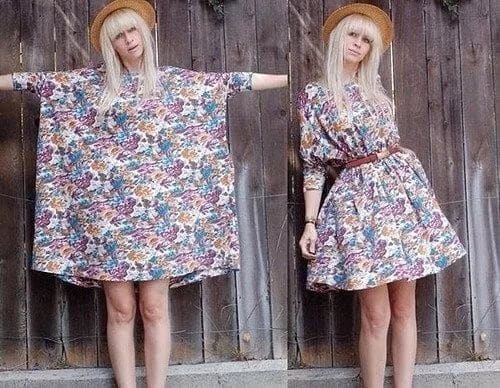
Beach clothes have always been considered the simplest cut. On vacation by the sea or river you don’t need much. Pleasant colors, a loose or semi-fitting silhouette, the presence of a small sleeve to cover shoulders that are prone to sunburn - these are the basics of a successful beach dress.
In our example, a stylish dress with a V-neck and a drawstring at the waist is made in rich yellow, but you can choose another one. Turquoise, red or young greenery are perfect.
The first thing we start with is constructing a base pattern. The easiest way for beginners- construction according to the model. In the diagram below you will see a reduced pattern of a beach dress for size 46-48 and height 160-170 centimeters. Whether you're shorter or taller, slimmer or plumper, it's difficult to how to make a dress pattern for beginners, should not arise either.
To ensure that the dress fits your figure exactly, remember that the length of the bust line (on the pattern it is 25 cm) should be a quarter of the circumference of your bust. So, a girl with a chest volume of 90 cm should set aside 27.5 cm in the drawing. The same principle applies to the waist and hip lines: their length on the pattern will be equal to a quarter of the actual volume + allowance. If you want the dress to be more spacious in the lower part of the body, instead of one centimeter, add two or three.
Try not to overdo the depth of the cutout. You can always increase it, but decreasing it can be problematic.
To make a drawstring, take a piece of fabric equal to the circumference of the dress at the waist. Sew it on the front side, tucking the edges inside, and iron it. Then make holes for the cord and stitch them. After this you can thread the cord.
When making shoulder seams, leave room for the cords and pull them through as well. This will allow you to play with the shoulder line and change the character of the dress depending on the conditions and mood.

We hope you are now convinced that sewing a dress with your own hands is easy and simple. Having successfully completed sewing a beach dress, you have learned that creating a basic pattern for beginners is not such a big problem. This means that you should look for “how to make a basic pattern for beginners”, “how to sew a dress with your own hands for beginners”, “how to sew a simple straight dress with your own hands for beginners”, “how to sew a straight dress with your own hands”, “how to cut straight dress for beginners”, “how to sew a straight dress with your own hands for beginners patterns” will no longer be necessary.
It is enough to sew a dress with your own hands once - the patterns and models will no longer seem like Chinese writing. Simple dress patterns for beginners will not cause much difficulty, which means that soon you will be able to bring your wildest fantasy from the latest magazine or book to life.
After practicing on finicky fabrics and silhouettes, you can proceed to more capricious ones: silk, wool and others.
We wish you good luck in all your endeavors! Be unique in your own made outfits!
In this article we will talk about how to sew a summer dress yourself. It turns out that every woman can become the owner of a unique outfit.
Do you want to become the owner of an exclusive summer dress, but at the same time you constantly come across the same thing in stores? Well, then the smartest solution is to sew the outfit yourself. Such clothes will be the most beloved, comfortable and unique. Well, what to do if you don’t want to bother with patterns? And here you can find a way out.
How to sew a simple dress for the summer with your own hands?
This dress will be as simple as possible, so It is recommended to give preference to bright fabrics with catchy prints. And stock up on some ready-made outfit you already have - you can rely on its outlines in order not to use a pattern.


- So, Spread the fabric on the floor in two layers. Of course, you have to work with the wrong side
IMPORTANT: Keep in mind that if you plan to make a new dress from non-stretch fabric, then the stencil dress should be the same. It is advisable that there are no zippers in the stencil either - sewing them in can be difficult for beginners.
- Now, leaning on the workpiece, cut pieces from fabric. It doesn’t matter if you want to make the new thing more magnificent - just take this into account when cutting it out
- In total, we got two pieces - the front and the back. There's just a little bit left to do - sew them together on the sides and straps. The bottom as well as the hand and head holes remain intact
- Now we designate the waist. Even the most ordinary elastic band is suitable for this. Measure your distance to your waist and mark it on the fabric. Cut a piece of elastic to suit your size
IMPORTANT: Try to choose a length so that the waist is not pulled tight, but at the same time so that the fabric does not dangle like a bag.
- Sew the elastic on the wrong side. The fabric will gather in a fold at the waist.
- Don't forget to machine the hem, sleeves and neckline- this will allow the work to look neat and the fabric not to fray
 This is the simple dress we get in the end - colorful, comfortable and light
 How to sew a simple dress with your own hands without a pattern?
If you don't want to bother with patterns, dress in greek style - an excellent solution. For this simple but effective outfit, choose something flowy like silk, satin, muslin, velvet, jersey or fine knit. In this case, you will need about 3 meters of fabric.
IMPORTANT: It would be ideal to choose a material that will not crumble at the cut site - this will help save time on processing the edges.
The easiest way to make a dress from such fabric- wrap it around the body and pin it on the shoulders with decorative pins. The waist can be belted with a beautiful ribbon. And in order to avoid swinging open at the slightest breath of wind, the open side needs to be stitched.


How to sew a simple straight dress with your own hands?
First of all, choose the right fabric, because this step is especially important when sewing without a pattern. We recommend a material that “breathes” - with cotton in the composition, with synthetic fibers - such a dress will stretch perfectly and not wrinkle. Best choice- elastic knitwear. In addition, a dress made from it will be comfortable to put on and take off.
How much fabric will you need? With an average height of up to 175 centimeters and a clothing size of about 50, stock up on material about 1.5 meters wide. As for the length, if you are planning a short outfit, 1.1 meters will be enough, if the average one - 1.3 meters, if long - 1.8 meters.
IMPORTANT: If you plan to make a dress with sleeves, you will need an additional 0.2 meters of fabric for them in the case of short sleeves, 0.4 meters - with medium ones and 0.7 meters - with long ones.

So, let's start sewing:
- First of all, iron the material with a hot iron and steam. And look for some T-shirt that fits your body best
- After something like this preparatory stage fold the fabric along the grain line in two layers. Place the T-shirt on top and outline it with chalk for convenience.


- Estimate how satisfied you are with the length - So, if you have curvy hips, you need to add tissue in the appropriate area. And remember that it is important to leave an allowance of 1-1.5 centimeters. Cut out the resulting parts
- Now cut the neck desired depth
- Take care of the sleeves. A T-shirt will greatly help you accurately calculate the size of the slots.
- Prepare two facings 5 centimeters wide
- Connect the front facing to the neckline with pins. Step back about a centimeter from the edge and stitch. Repeat the same with the facing for the back.
- Finish the shoulder seams. It is recommended to do this in a zigzag - this way the cuts are processed better
- Sew on the sleeves. If the seam allowances get in the way, you can cut them off
- Now use pins to fasten the sides of the future dress. Try to do this carefully so as not to stretch the fabric. Check the seams to match. Now flash it all


- Trying time! If the hem and sleeves are too long, shorten them. That's it - you can wear the dress


How to sew a simple long dress with your own hands?
- Prepare the fabric twice your height and a beautiful ribbon for belt
- Lay the fabric on the floor and mark the middle on it line using chalk
- And now in the middle of this line cut a hole for the head. Put the fabric on yourself
- Think about how long you want your neckline to be.- it can be traditionally up to the chest, or it can be up to the waist. In the latter case, this cutout will be intercepted across with several tapes. In any case, use chalk to mark the desired length, and then lay the fabric again on the floor, make a slit to the mark
- Now put the blank back on, pin the fabric at the shoulders using decorative pins
- Get busy with ribbons, tying them under the fabric. Either sew directly or pin together first for fitting - it's up to you
IMPORTANT: You don’t have to fuss too much with the stitches, because these tapes will have a fastening function. But on top you will have to attach more ribbons for decoration.
- Experiment with the back, finding the most interesting drapery options for yourself
- You can sew a future dress on the sides, or maybe add fancy buttons

How to sew a simple evening dress with your own hands?
You urgently need to get evening dress, and in the closet there are light scarves or stoles, which it would be a pity to use for a good cause? Then here you go:
- Turn one of your scarves into a skirt, sewing it along the edges
- Sew elastic at waist. It is highly desirable that the elastic band is the same color as the outfit, otherwise you will have to dodge with the disguise
- Take a second scarf that will serve as a bodice m, and with the shorter side, baste it to the elastic
- Pull the future bodice obliquely and wrap it behind the neck. Wrap around the neck and pull diagonally to the opposite side from the one from which you basted
- Baste the fabric on the opposite side as well.. Alternatively, you can not throw the scarf diagonally, but wrap some ends around your neck, and put the others behind your back and sew them
- Tackle the part of the fabric that is adjacent to the back of the head- sew it beautifully
- Sew fabric too in the décolleté area


Simple DIY maternity dress
Bustier dress is an ideal option for pregnant women, since it will both support the breasts and visually elongate the figure. In addition, you can make a very elegant model. And after giving birth, such a dress can be completely used as a skirt.
For such a miracle you will need 2 pieces of fabric - for the dress itself and for the bow on the chest. As for the one intended for the dress, its length should be about 65 centimeters. But as for the width, to determine it, multiply the circumference of the tummy by 1.4.
Now a few words about the fabric for the bow. Approximately its width should be 40 centimeters. But the length is equal to the width of the dress multiplied by 2.
- We start, oddly enough, with a bow. Fold the fabric in half and sew
- Now take the material intended for the dress itself. Where it is supposed to have a top, create folds
- Finish the side cuts
- Now sew on the bow to the main piece of fabric
- Fold the bottom and finish it
 A simple bustier dress without a pattern for pregnant women is a great option
 How to sew a dress for plus size people with your own hands?
In the case of a full figure, there must be some tricks- so, a triangular neckline is recommended to visually lengthen the neck, and the style itself should not be too tight.
IMPORTANT: Forget about the numerous ruffles and frills, even if they are stored in large quantities somewhere in your box. For buxom beauties, this design will not suit them at all.
- So, stock up on a rectangular piece of fabric. You choose the size yourself depending on your parameters. As for the length, the recommended option is either knee-length or below
- Cut a piece from the top of the fabric- this will be the neckline and neckline. Even if you don’t want to make a neckline, you will still have to cut the neckline - in this case it will be 4-8 centimeters. Sew the neckline
- Fold the top of the fabric and stitch it in the form of a drawstring. Thread ribbons, ribbons or strings into it. Preferably in such a way that they extend towards the neckline. Process the drawstring
- Do not forget to process the sides of the future dress and the bottom. If desired, you can sew on sleeves


How to sew a simple chiffon dress with your own hands?
Chiffon - this is just a godsend in the hot season, because it is light, drapes perfectly, and such outfits look very feminine and romantic.

- So, Take a T-shirt that fits your figure, but is not tight. Fold the fabric in half lengthwise and place the T-shirt on top. It's best to use pins
- Outline a T-shirt chalk and cut out the resulting workpiece. Remember that you need to mark the neck at the front as well.
IMPORTANT: Remember to leave seam allowances of about 7 millimeters.
- Now cut out the skirt, not forgetting about the allowances in this case. The canvas in this case should be rectangular in shape. Before the neckline, as with the bodice, fold the material in half. As for the width, calculate it by multiplying 1.5 by the width of the hips, because there will be gathers. Well, if you want fullness, multiply the width of your hips by 2
- Attach the skirt and bodice blanks to each other, check the sides. Connect the pieces using pins or light stitches
- Sew the blanks. It is best to do this with a special needle for sewing machine No. 70 or No. 80. The thing is that chiffon is very thin, and a regular needle can only ruin the fabric. Work the bodice from the shoulders first, then from the sides.
- Topstitch the skirt- this will fix the folds
- Now sew a skirt with a bodice
IMPORTANT: Please note special attention for seam processing. The fabric is thin, so tuck the edges first by 3-4 millimeters, and then by the same amount. After this you can sew. Decorate the neckline and armholes in this way.


A fashionable model is one in which the bottom is asymmetrical.. Let's see how to make this outfit:
- As in the previous case, circle the matching jersey, not forgetting about seam allowances and neckline. Also remember about armholes
- Make a flare on the back, which resembles a trapezoid
- Mark the length of the skirt with chalk, and then use smooth lines to make curves- the skirt should resemble a train
- Design a flare and on the front of the skirt


Do you like wrap skirts? Well, then you will have to sew the skirt separately:
- The length of the material on the skirt should be not less than 140 centimeters. Fold this material in half
- On the opposite side of the fold, count 10-12 centimeters- it will smell
- The length of the side opposite the wrap should be equal to the length of the skirt. Don't forget about allowances
- Now connect the smell and the opposite side with a diagonal line, equal to the length of the skirt, Process this line with scissors
IMPORTANT: The hem of the dress must be rounded smoothly. How to sew a simple silk dress with your own hands?
Silk adds to any outfit a sophisticated look, but it’s not advisable to go too crazy with the details. And one more piece of advice- make a loose dress, as silk tends to unravel at the seams.
As in previous cases, use some suitable T-shirt as a stencil. What's up this case, then working with silk has its own nuances:
- The disadvantage of silk is that it slips a lot when sewing. However, this can be easily eliminated if Pre-dilute the starch or gelatin and, using a brush, carefully apply the mixture to the fabric in the treated areas. Then these places need to be ironed through white paper.
- In the case of silk, be sure to sew a spacer according to the same parameters as the dress itself. Of course, more time will be spent on such work, but the finished product will take on the appearance of something made by a professional
You need to connect the lining and the dress wrong side to wrong side - this way the seams will be hidden
- Keep the stitches small, and also carefully monitor their direction
- It is recommended to process the gate with edging
If you wish, you can create a simple silk dress without a pattern with sleeves - just for evening out How to sew a simple dress from knitwear with your own hands?
Knitwear can make wonderful things transformable dress. And don’t be alarmed - it can also be made without a pattern, and also quickly. You will only need two meters of viscose knitwear.
- Fold the fabric widthwise and then lengthwise- there should be 4 layers in total
- Now measure the neck. Approximate dimensions: width - 7 centimeters, depth - 8 centimeters. Now cut the neck
- Trim the edges, round them. Unfold the workpiece so that it remains folded in two layers
- Measure approximately 40 centimeters from the fold. To avoid confusion, it is better to mark with chalk
- From this mark to the neck draw a line
- Cut the fabric which turned out to be superfluous. The result is a one-shoulder armhole.
This dress can be worn as a wrap dress with an open shoulder and a knot at the waist. You can also cross the ends on the chest by making a knot behind the neck.
As you can see, it is absolutely not necessary to be an experienced seamstress and tinker with a bunch of patterns in order to create an outfit for the summer. Moreover, you can dress up for any event - both for going to the theater or to a celebration, and for ordinary walks. Be bright and individual this summer!


Have you decided to sew a dress, but don't know where to start? Let's try to help. We won’t say that this matter is very simple, but it’s not that complicated! Our advice will definitely help you cope with it. It’s not the Gods who burn the pots. So let's begin.
HOW TO SEW A DRESS: WHERE TO START.
Model selection. For the first time, choose a simple dress model. Fewer connecting and decorative seams and details. Stop your gaze on laconic things. Beauty is in simplicity. Don't forget about bright and stylish accessories, they will complement the look.
Choice of fabric. The fabric must match the purpose of the dress and pay attention! easy to work with. That is, it does not cause additional difficulties when processing seams or ironing. Textured fabrics, pile fabrics, chiffon, natural silk... they are all very beautiful, but they will create a lot of unnecessary problems with the risk of throwing the failed masterpiece into the far corner. Let it be, for the first time, without a pattern that requires alignment at the seams.
Butt. It refers to all the additional materials that are required to sew your dress. These are adhesive (non-woven fabric, dublerin), edging, zippers (for the first time we advise you to choose models, preferably without it, because not every beginner can handle a zipper beautifully and correctly, and even more so a hidden one. Well , or practice on an unnecessary piece of fabric.), lining, accessories, threads, etc.
Pattern. How to sew a dress without a pattern? For a beginner, the task is difficult. Even if the dress consists of a rectangle, it is not some abstract rectangle. It is tied to a specific figure with the help of measurements, and to the dress model - with proportions and details. Therefore, a pattern is still needed!
Simple dress patterns:
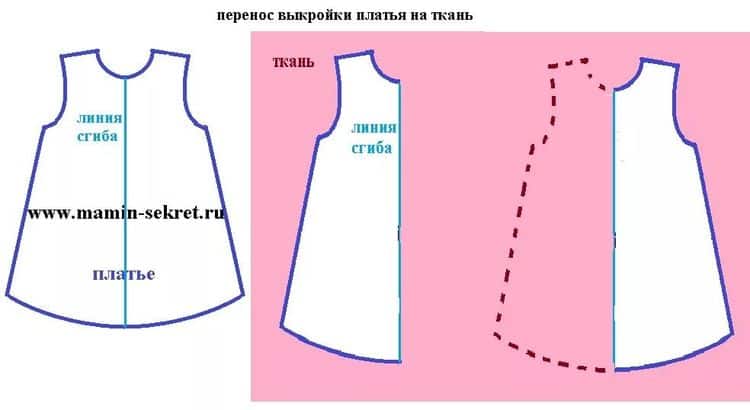
For these simple dresses, the pattern is based on a rectangle, and is based on measurements taken from the figure. The dress is quite voluminous, oversize, the sizes shown in the figure correspond to 42-50 rubles. 
Look how original the dress is! Here the fabric print comes to the fore. The dress pattern is extremely simple. There is a rule of good taste - the brighter, more decorative material, the simpler the style should be. 
For those who like a non-trivial approach to creating clothes, this solution will be interesting. The dress is a tunic made of rectangles sewn together. This simple dress looks very stylish if it is made of thin suede or suede-like material. 
READY DRESS PATTERNS.
If you have a ready-made dress pattern, then consider that you have already done half the work. A good pattern increases your chances of getting something new significantly! On our website we have clear patterns for easy to sew dress models for beginners and for those who have experience in sewing clothes.
Pay attention not only to the photo of the dress, but also to the technical drawing. It will help you more clearly understand how you can use a ready-made pattern, adapting it to suit your image. It’s no secret that dresses made from the same pattern, but from different fabrics, look different.
For example, this is an absolutely wonderful dress.
The photo shows a model wearing an off-the-shoulder dress from Fendi. Fendi is a world famous Italian brand founded in 1925. He is considered the personification of taste and style. The brand's clothing is popular on the catwalks, in ordinary life and on the set. At different times, the company's designers developed costumes for such famous films as La Traviata, Once Upon a Time in America, The Godfather and many others. We suggest sewing a similar jacket and trying on a look from Fendi! 
You can buy a ready-made off-shoulder dress pattern here. You can print it in full size on a regular printer. Available sizes for the pattern are from 40 to 52.
Sewing dresses by finished pattern and, moreover, with detailed description technology will not cause much difficulty even for a beginner. The main thing here is accuracy, accuracy and attentiveness. The result will not disappoint you, because this model is very relevant not only in summer, it can be sewn from elegant fabric, resulting in a beautiful evening dress.
The level of complexity of this model is suitable for a beginner.
Cut details:
From the main material:
1. Front – 1 piece
2. Back - 1 piece
3. Lower back - 1 piece
4. Lower part of the front - 1 piece
5. Sleeve – 2 parts
6. Frill at the bottom of the sleeve – 2 parts
7. Burlap pocket - 4 parts
8. Neck frill - 1 piece

When cutting, it is necessary to add seam allowances of 1.5 cm to the details. The average fabric consumption for such a dress is 2.5 m (with a width of 140 cm). Recommended fabrics - summer easily draped light fabrics made of cotton, viscose, silk and their combinations ( natural fabrics Before cutting, it is advisable to decatenate (wet in water), as the dimensions may change).
Layout example: 
You will also need approximately 2.0-2.5 m of elastic band (elastic band).
Sewing sequence:
1. Fold the back parts with the shelf right sides inward and, aligning the cuts, stitch along the side seams. Overcast the allowances and iron them towards the front part.
2. Also stitch the side sections of the sleeves. Iron and overcast seam allowances.
3. Fold the sleeves with the front and back along the armhole lines. Pre-baste and then stitch. Cut seam allowances to 1cm and overcast.
4. Sew the ruffle details of the bottom of the sleeves and neckline into a ring, iron the allowances once. Iron the pieces in half.
5. “Place” the finished part of the neck frill onto the neck of the dress and, aligning the sections, stitch with a 1.5 cm seam (Fig. 1, line 1). Overcast the allowances together and iron onto the frill piece. Then stitch the seam allowance onto the frill piece, 1.2 cm away from the seam (Fig. 1, line 2). Between the stitching and the seam you will get a drawstring for the elastic. Do not close the stitch into the ring, leave a distance of 2.5 - 3 cm long to insert the elastic.
6. Measure the circumference of the shoulders (each individual), subtract 4-5 cm for the elasticity of the elastic. Thread it through the drawstring and close the stitching into a ring.
7. Sew a frill on the sleeves according to the principle of the neckline. 
Figure 1
8. Place the pocket burlap pieces face down on the front side of the front panel and the front side of the back panel, align the cuts and stitch them with a 1 cm wide seam (Fig. 2, lines 1 and 1`) so that the pocket lining overlaps the line limiting the length of the entrance to the pocket, the width of the seam of the burlap pocket. The seams are overcast and pressed onto the pocket burlap. 
Figure 2
The lower section of the skirt is processed with a narrow (0.7 - 1.2 cm) hem seam. Iron the seam.
9. Fold the shelf and back parts with the right sides inward, aligning the cuts, and connect along the shoulder seams.
10. Sew the side seams of the skirt with a seam 1.5 cm wide, while simultaneously sewing the burlap pockets with tacks at the beginning and end of the pocket (Fig. 2, line 2). The sections are overcast and the pocket is ironed.
11. Sew the bodice with the skirt (Fig. 3, line 1). Cut seam allowance to 1cm and overcast.
12. Cut the elastic, measuring around the waist. Sew into a ring with a 1.5-2cm overlay seam. Sew on the seam reserve (Figure 3, line 2). 
Figure 3
A fitted knitted dress with drapery is surprisingly easy to sew and looks very stylish. Here you need to make the right choice with the choice of fabric. Let the knitwear not be too liquid, but still softly draping and of good quality, so that pilling does not form when worn (the base should be natural threads).

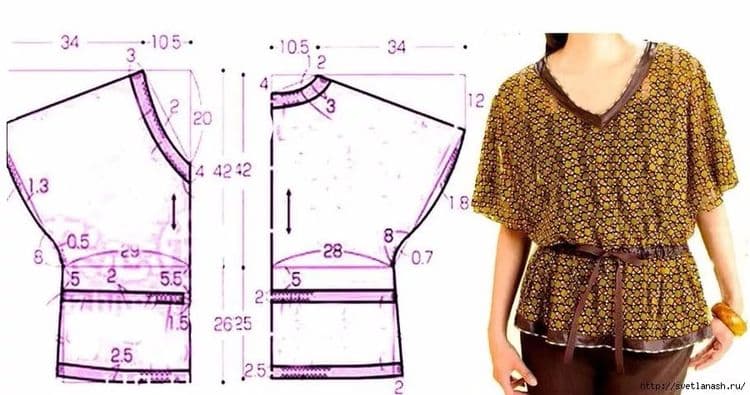
2 IN 1: PATTERN OF A DRESS AND TOP WITH A SWING NECKLINE (SIZE 40-60)


Details of the cut of the dress (A) and top (B):
Shelf – 1 piece
Back – 1 piece (with fold)

When cutting, add seam allowances of 0.7 cm, along the neckline and armholes - 1.2 cm, along the hem line - 2 cm.
The average fabric consumption is 1.5 m for a dress, 0.85 m for a top (with a width of 140 cm).
An example layout for a dress is shown on the left, for a top - on the right 
Sewing sequence:
1. Place double lines on the front along the side seam between control marks A and B, C and D, E and F (for a top - only between marks E and F) at a distance of 0.5 cm from each other, the first line along the allowances side seam, and the second along the shelf, so that they are located on both sides of the side seam line of the product in finished form. Pull these stitches with threads to the lengths indicated on the pattern, tie the ends of the threads.
*** If desired, you can place small folds along the side seam instead of gathering
2. Place double lines on the front along the shoulder seams from the neckline to the G marks at a distance of 0.5 cm from each other, the first line along the shoulder seam allowances, and the second along the front, so that they are located on both sides of the shoulder line seam of the finished product. Pull these stitches together with threads to a length equal to the length of the shoulder sections of the back between the G marks and the neckline, tie the ends of the threads.
***If desired, you can place small folds along the shoulder seam instead of gathering
3. Align the front and back along the shoulder seams, folding right sides together. Join with a stitch-overlock stitch (or simply machine stitch and then overcast). Stitching is done from the back. Remove the auxiliary stitches that tightened the assembly. Press the seam allowance to the back.
4. Process the armholes of the product. To do this, fold the seam allowances in the armhole area (between the control marks), and then sew with a hem seam with an open or closed cut (in the first case, pre-overcast).
5. Fold the front and back with right sides together, aligning along the left side seam (no gathers). Baste and then join with a seam-overlock stitch (or sew by machine, then overcast). Press the seam allowance.
6. Fold the shelf and back with right sides together, aligning along the right side seam (with gathers), observing the alignment of the control marks on the shelf and back. Baste and then join with a seam-overlock stitch (or sew by machine, then overcast). The stitching is done from the back side. The gathering should be located at the bottom, otherwise, when stitching, the foot may displace the fabric, which may interfere with the uniformity of the gathering. Remove the auxiliary stitches that tightened the assembly. Press the seam allowance.
7. Fold the neckline of the product and finish it with a hem seam with a closed cut.
8. Fold the bottom of the product and sew it with a hem seam with an open or closed cut (in the first case, pre-overcast).
HOW TO SEW A DRESS WITHOUT HAVING A READY PATTERN.
Making a pattern for it is not difficult even for a beginner. Let's take a closer look.
For modeling you will need a base pattern of a semi-adjacent silhouette. You can create it using any pattern-making method. Of course, this will take up a lot of your time, but if you plan to continue sewing for yourself in the future, then you need such a foundation; you simply cannot do without it. By the way, it is also recommended to sew a base sampler from an unnecessary piece of fabric, after trying it on, take into account all the errors in the construction by adjusting the base pattern. 
The styling is shown based on a semi-fitted silhouette specifically to preserve the bust dart.
- the side seams must be straightened,
— we move the chest dart from the shoulder line to the side seam line, under the armhole. To do this, cut along the intended line from the side seam to the top of the dart, not reaching a couple of mm, close the dart at the shoulder and it will open under the armhole. Read more about transferring recesses here. You need to sew in the dart not reaching the center of the chest by 2 cm, reducing it to nothing. Those. reduce the length of the undercut by 2 cm.
If your figure allows you to make a dress with a more flattened silhouette, then you can use a base pattern with a straight silhouette, then modeling will not be needed at all.
This dress is not difficult to sew, but finishing will require time and perseverance. You can make the braid ala Chanel, which adds a special chic to the look, with your own hands. Look at the photo. The work is certainly painstaking, but creative. And what is the result! 
By the way, having a base pattern, you can also sew yourself basic dress, which, as you know, is a must-have in any woman's wardrobe. By slightly changing the neckline or armhole, making the dress cut at the waist, adding a sleeve, you will get a model to your liking.

Now let's change the pattern a little. For example, let’s create raised lines, deepen and widen the neckline, as in the first photo.
1 step. Let's move the chest and shoulder darts into the armhole. To do this, we will outline the relief lines running from the armhole lines, through the waist darts to the bottom of the dress. Let's cut and open the grooves in the armholes of the back and front. Read more about the translation of grooves in this article.
Step 2. Let's adjust the relief lines more smoothly. Let's lengthen and narrow the dress along the side seams. Let's add a slot. Slot width 4 cm.
With the onset of warmer weather, every woman wants to at least slightly diversify her wardrobe. In stores it is often impossible to find a suitable outfit, and what you like can turn out to be very expensive. Sewing your own dress is easy and you can do it yourself. Today we will tell you how to quickly sew a beautiful summer dress!
DIY summer dress: the easiest way
It won't be difficult to sew a straight summer dress. It is recommended to choose light and thin fabrics on a natural basis. At the same time, the material must hold its shape and stretch. We suggest taking elastic knitwear.
What you will need:
- For a girl with a height of 175 cm, and about 50 clothing sizes, about 1.5 m of fabric in width will be useful; we can adjust the length of the dress ourselves: short - 1.1, medium length- 1.3-1.5, long - 1.8.
These parameters include a sleeveless outfit; if you want to add sleeves to your outfit, you need to take an extra 0.5-0.7 m of fabric.
Instructions:
- You need to prepare the fabric and iron it well (if there is a steam function, use it). Choose a suitable T-shirt that fits you well.
- Fold the fabric in half and attach the T-shirt to it. We outline the T-shirt with chalk. You need to lay the T-shirt on the fabric along the grain line.

- Next, select the length of the skirt. Remember that you need to leave 1-2 cm for the allowance. Let's cut out these parts.
If you have wide hips, you'll want to use a little more fabric in that area so your outfit isn't too tight there.
- Cut out the neck.
- Preparing the sleeves. They can be made using a T-shirt template. This will make it easier to choose the length of the sleeve and the size of the slots.
- We make 2 facings, 5 cm wide.
- Sides. Make an indent of 1 cm from the edge and stitch. We repeat the same manipulations with the facing for the back.
- We sew the shoulder seams.
- Attaching the sleeves. If seam allowances get in the way, just cut them off.
- We put the sides together and secure them with pins. If the seams match, you can sew.
If you took elastic knitwear, try not to stretch it. This may affect the final shape of the outfit.
- Now we check and look at the length of the sleeves and hem. If you are not satisfied with it, we shorten it.
- We process the seams at the bottom of the sleeve and hem. The outfit is ready!

Dress and different types of fabric
Choosing the right fabric for different dresses can play a major role in the outcome. What fabric is best for a summer dress? How to use it?
Silk dress
Silk always looks elegant and sophisticated, but to work with this type of fabric you need to take into account some subtleties. First of all, a silk dress should be loose, because this material has the bad property of coming apart at the seams. In addition, it is worth considering:
- Silk is very slippery, and this can create obstacles when sewing. There is a proven “grandmother’s” method: we dilute starch or gelatin with water and apply it with a brush to the desired areas. After this, iron the treated areas through parchment paper, and the slip will disappear!
- For silk dresses, a lining becomes a mandatory element. It needs to be sewn according to the same parameters as the outfit itself. The process may take longer, but the result will look much more beautiful and elegant.
Advice! The dress and lining are joined back to back so that the seams are not visible.
- This type of fabric is difficult to work with, and to prevent the outfit from turning out “oblique”, you need to make small stitches and carefully monitor their direction.
- It is recommended to use edging to handle the collar.
Chiffon
It would seem that the ideal fabric for a summer dress: airy, light, thin. It will be pleasant to wear even in extreme heat, and visually the material helps create a delicate and fragile romantic image. How to quickly sew a chiffon outfit:
- Choose a t-shirt from your wardrobe that is a little loose for you. Fold the fabric in half, then attach the T-shirt to it. We secure it with pins.
- Take a piece of chalk and outline the T-shirt. Don't forget to mark the neckline at the front. Cut out the workpiece.
Be sure to leave a free edge for seams, 7-10 mm.
- Next we make the skirt. To do this, you need to take a rectangular piece of fabric with a width equal to the width of the hips multiplied by 1.5. For those who want to sew fluffy dress, we take not 1.5, but 2. Also, be sure to leave a gap for the seams.
- We apply both blanks (bodice separately, skirt separately) to each other, check the sizes and sides, secure them with pins (you can lightly overcast them).
- The bodice blanks must be sewn. We start processing from the shoulders, then move to the sides of the bodice.
- We sew the skirt at the top to get romantic folds.
- The final stage is to sew the skirt with the bodice.

The fabric is thin, so you need to be very careful when turning the seams so as not to damage the chiffon. First we wrap 4 mm, then the same amount, only then we start stitching.
The asymmetrical hem of the dress is a spectacular feature for a fashionable outfit. To create this wardrobe item, follow the instructions:
- We attach a T-shirt or tank top to the prepared fabric (depending on what kind of top you want). She should be free. Similar to the first method, we attach the mask with pins and make marks with chalk. Don't forget about the neckline, armholes and seam gaps.
- We make a trapezoidal flare on the back.
- On the fabric we mark the expected length of the skirt. It should look like a train, so we make a rounded edge.
- The front part of the skirt also needs to be flared.
Wrap skirt
A wrap skirt for a chiffon dress will help diversify your look. To do this, similarly to the first two methods, we make a bodice for the outfit, and then follow the instructions:
- To make it, take a piece of fabric no less than 150 cm. Fold it in half.
- We leave the side with the fold untouched, and measure 10-12 cm on the side from the free edges of the fabric for the smell.
- It is important to remember about allowances. The length of the skirt should match the length of the side opposite the wrap.
- Use a smooth diagonal line to connect the wrap and the opposite edge of the skirt. To make the hem rounded, we process it with scissors.
- We process the lower edge of the skirt with an overlocker, and thread an elastic band through the upper edge.
Knitted dresses
A transformable dress is a convenient option for a knitted outfit. It is done very simply and without a pattern. You need to follow the instructions:
- We take 2 meters of knitted fabric. We fold it in 4 layers: once we fold it in half along the width, the second along the length (the folding sequence is important!).
- Next we make the neck. Standard size: 8 cm deep and 7 cm wide. Cut out the marked piece.
- You need to trim the free edge and carefully round it.
- Unfold the fabric so that it remains folded in half.
- With chalk we mark 40 cm from the fold. Draw a line from this mark to the chest, then cut the fabric along the line.
Now you have a finished transforming dress. It can be worn on one shoulder, on two shoulders, cross the edges on the chest, tie at the back of the head. Even make a regular skirt out of it, and tie the details for the bodice at the waist into a bow.
Simple evening dress
Now let's learn how to create an evening outfit for summer parties. If you have old stoles or light scarves, this method is for you! Let's put them to good use!
Instructions:
- We wrap one of the scarves around the waist and make a skirt out of it (sew the side seam).
- Sew elastic at the top of the skirt. We choose it to match the color of the scarves (even if the scarf is colored, a wide, plain elastic band will look beautiful).
- We use the second scarf as a bodice. Using a narrow edge, sew it to the skirt.
- Now we put the scarf obliquely behind the neck and sew the free edge obliquely on the opposite side from the other edge.
No less interesting option, this is to fold the scarf for the bodice in two (if it is long enough), and sew the folded area to the elastic band. The edges of the scarf can then be brought behind the neck and tied there. beautiful bow or sew the edges.
- If the first option was used, the fold at the back of the head needs to be sewn beautifully.
- We also process the décolleté area by stitching the fabric. The dress is ready!
3 ways to sew a dress without a pattern
For those who are not familiar with the pattern or do not want to spend time on it, there is an easier way. You can sew a beautiful outfit without a pattern, the main thing is to know how. This is exactly what we will talk about.
Bandeau dress
What is needed:
- Preparing the fabric. The type of fabric is not important, the main thing is that the fabric drapes well. We will need 2 rectangular pieces of fabric, the length corresponds to the length of the future dress. The width of this fabric is equal to the half-circumference of the hips + 1.5-2 cm so that the outfit is a little loose, and + 1-1.5 cm, this is the space for the seams.
- Instead of two pieces, you can take one large rectangular piece of fabric, which in width will be equal to the full circumference of the hips. As in the first option, the fabric should be well draped + 1-1.5 cm for the seam, and 1-2 cm for the outfit to be spacious.
- You will also need an elastic band 1 cm wide.
- For the belt we take a grosgrain ribbon.
Sewing instructions:
- We use a French seam to sew the side sections (or one central one if using a single piece of fabric).
- Next, you need to overcast the top edge, turn it 1-1.5 cm to the wrong side. You need to stitch this turn and leave a drawstring for the elastic band.
- We thread the ribbon through the drawstring. We are doing a fitting. We adjust the tape to size and trim off the excess edge. Next you need to stitch the ends of the tape.
The elastic tape can be replaced with rubber veins.
- We process the bottom edge. To do this, you can make a rolled seam using an overlocker or simply turn the bottom edge under and topstitch.
The outfit will look better with a belt. To do this, you can make a drawstring in the middle and thread an elastic band through it.
Two piece dress
What is needed:
Again we take fabric that drapes well. We will need 2 rectangular pieces, the width corresponding to the half-circumference of the hips + 1-1.5 cm for the seam and 1-2 cm so that the dress is loose and not tight-fitting.
Sewing instructions:
- All seams need to be finished (preferably with an overlocker). Leave a cut for the head and arms.
- We independently choose what shape the cutout for the head will be. This is not important: a wide slit makes the outfit more interesting; it can be worn off the shoulders or cut under the neckline; a narrow slit looks more strict and restrained.
- During the fitting, we choose the appropriate depth of the armholes in the sleeves.
- Stitch the neck edge to the wrong side.
- The side seams need to be sewn. The seam should start from the mark that was made during fitting.
- The allowances on the sleeves also need to be stitched to the wrong side.
Silk is most suitable for sewing such an outfit. You can use 2 silk scarves, then there is no need to process the seams.
If scarves are used, you need to slightly change the algorithm:
- In the upper part we still leave a neck slit, but on the sides, where the sleeves should be, the seam is made with a slight indentation from the edge (5-7 cm).
If such a dress turns out to be too short, it can be worn with trousers as a tunic.
Greek style dress
To make such a dress, you need to prepare at least 3 m of fabric. Silk, barhar, satin, muslin or jersey are ideal for a Greek outfit. Thin knitwear can also look very good.

To save yourself from the need to process seams, it is advisable to choose a fabric whose edges will not fray.
Everything is banally simple: we wrap ourselves in fabric and pin decorative pins on the hangers. To emphasize the waist, take a beautiful belt in the color of the fabric or ribbon. The slit on the sides must be sewn together so that when walking, the dress does not develop in all directions.
The beauty of this method is that you don’t even need to sew. You can experiment with the shapes of the outfit, change the length of the hem, neckline, etc. In addition, 1 piece of fabric can turn into 100 different outfits. And Greek outfits always look light, relaxed and feminine.
Summer dress for pregnant women
Maternity clothes are a real problem for many women. No one wants to spend a lot on an outfit that you won’t need in a couple of months, so you can sew a simple, beautiful and comfortable dress for a pregnant woman with your own hands.
Our option is a bustier dress. It is ideal for pregnancy: it hides the tummy, supports the breasts, and elongates the figure. Even after childbirth, it is easy to upgrade it into a skirt and continue to wear it.

For this you will need 2 pieces of fabric. One of them is necessary for the outfit itself, the second for the bow. The piece of fabric for a dress should be 70 cm in length, and the width is calculated individually (1.4 * per abdominal circumference). The width of the piece of fabric for the bow is 45 cm, and the length corresponds to the width of the dress * 2.
We sew according to the following instructions:
- Sewing a dress begins with the bow. The fabric is folded in half and stitched.
- Let's move on to the skirt. Take the top edge and create folds.
- We grind the side cuts onto the fabric.
- Sew the bow to the bottom of the dress.
- We cut off the excess length of the bottom and process the edge of the skirt.
Hi all. In the midst of a hot summer, you suddenly realize that you are missing a couple more summer dresses. Let's try to sew a dress without a pattern quickly.
Exclusive outfit
If you decide to sew a dress with your own hands, then you can give free rein to your imagination by coming up with something that you won’t see on any girl.
Let's get down to business!
First, let's sew a straight dress. You will need two lengths of knitted fabric. If the material does not crumble, the sleeves and neckline can be left untreated and the bottom can be folded.

This model can be any length.

Party outfit
You have been invited to a party, but there is no new outfit. In 2 hours you will update your wardrobe by sewing a wonderful evening dress from stretch fabric without using a pattern.
The little black dress has always been considered the most elegant outfit.
- Take 1 meter of material, fold it in half.
- Layer a tank top with wide shoulders over it.
- Outline the top, then set the desired length from the waist line.
- Then cut out and sew the side and shoulder seams.
- If the neck is small, increase its size.
- Next we sew the sleeves. We cut out 2 rectangles, making a width that corresponds to the circumference of the arm at the widest point, and the length can be taken as desired - 45-60 cm.
- Attach the rectangles to the shelves and cut along the armhole line.
- Now the resulting sleeves need to be sewn on.
Following the description, you will get a great outfit for the evening.
Festive dress in 15 minutes
- Take stretch material: length - 160 cm, width - 140 cm.
- Fold in 4 layers. Measure slightly below your waist. Round the edges.
- From the middle, measure a quarter of the measurement, draw a line up 60 cm.
- Sew very evenly.
- Cut out the neckline, 40 cm long and 4 cm deep. The outfit is ready!
Let's go on vacation!
If you are planning to spend a vacation at sea, then a beach dress is an indispensable attribute summer holiday.
Let's try to sew some beach outfits.
Drawstring dress without pattern
Draw a rectangle, the width and length of which will depend on the desired dimensions. The shelf and back of the product will be the same. The shelf can be decorated with embroidery or beads so as not to be confused.

With drapery

We take thin flowing material. It can be satin, silk, muslin, crepe. The product will only have one seam on the back.
- The length of the rectangle is 2-3 meters (it all depends on your size and the “density” of the folds).
- In the center of the rectangle we make an incision to the depth of the neckline: 5-10 cm.
- We design the upper edge as a drawstring into which we insert 2 ribbons. At the back, the ends of the ribbons are sewn into the seam on the back, and at the front we take them out of the drawstring into the slit and, when putting the product on, tie it at the back of the neck.
- We tie it under the chest with a ribbon.
Light sundress
Take the T-shirt, attach it to the fabric and do everything as shown in the picture.

Floor length dress
The long one is sewn very quickly, but it looks charming!
How to sew:
- You will need fabric: two lengths from shoulders to waist with a width of 140 cm, plus 10 cm for hem. Length from waist to floor for thin ladies.
- For the top, take a rectangle and fold it in half. You will get a length from the shoulders to the waist plus 10 cm, cut it.
- Set aside from the edge to the width of the sleeve - 25 cm.
- From the bottom up we set aside 45 cm. Between the sleeves we measure the width of the hips plus 10-12 cm for freedom of movement.
- Cut it. You will get sleeves and a front at once.
- We sew the side seams and where we made the cut for the sleeves.
- We turn the top 10 cm. We sew for the elastic, leaving a small frill. Insert the rubber band.
- We also turn up the sleeves by 10 cm. We sew for an elastic band. Insert the rubber band.
- We sew the rectangle for the skirt and make pleats or gathers at the waistband.
- Sew on the top and skirt.
- We decorate the waist with a wide belt.


This pattern will make a great summer blouse.
How to quickly sew a home dress without a pattern
A house dress should be comfortable and beautiful.
- Fold the fabric in half and attach the T-shirt.
- Circle the top of the T-shirt to the waist, then gradually begin to increase it. Don't forget to leave seam allowances.
- Cut out and sew the shoulder and side seams.
- Fold, grind the neckline and sleeves.
- For convenience, you can sew on pockets.

No one will have such a thing
Let's take measurements for sewing a tunic:
- Tunic length.
- Product width (hip circumference + 5-10 cm for freedom).
- Sleeve width (arm circumference + 5-7cm).
Transfer your measurements onto the fabric, not forgetting the seam allowances.

Rectangle tunic for large size. This product will hide figure flaws.
- Choose a light, flowy fabric.
- Fold in 4 times to cut out the neckline and put on.
- You can sew a ribbon to the bottom and tie it at the sides.

Another option for a light tunic, which is also suitable for sewing home clothes if you increase the length. Transfer the measurements to the material and start sewing!

Both the tunic and the dress! Just a few stitches and you have a beautiful piece in your wardrobe. Even a novice dressmaker can sew using this pattern.

If you decorate the tunic with beautiful lace, you will get a cute little dress.
Knitwear can make a beautiful outfit with a peplum.

- We fold the material lengthwise, put a T-shirt on it, and trace it.
- 2 parts are cut out. If the peplum will be sewn in, the waistline should be cut.
- A rectangle is cut out of knitwear, the length of which is equal to the waist circumference and increased by 2 times.
- The length of the peplum is from 10 to 20 cm. Lightly smear it on a machine with a weak thread tension.
- Fold the top and bottom parts, insert a basque between them, and grind them down.
- We process the neckline, sleeves, and bend them.
Finally, I would like to appeal to novice dressmakers: sew an outfit to try without a pattern from simple material, and then feel free to sew from whatever you want.


