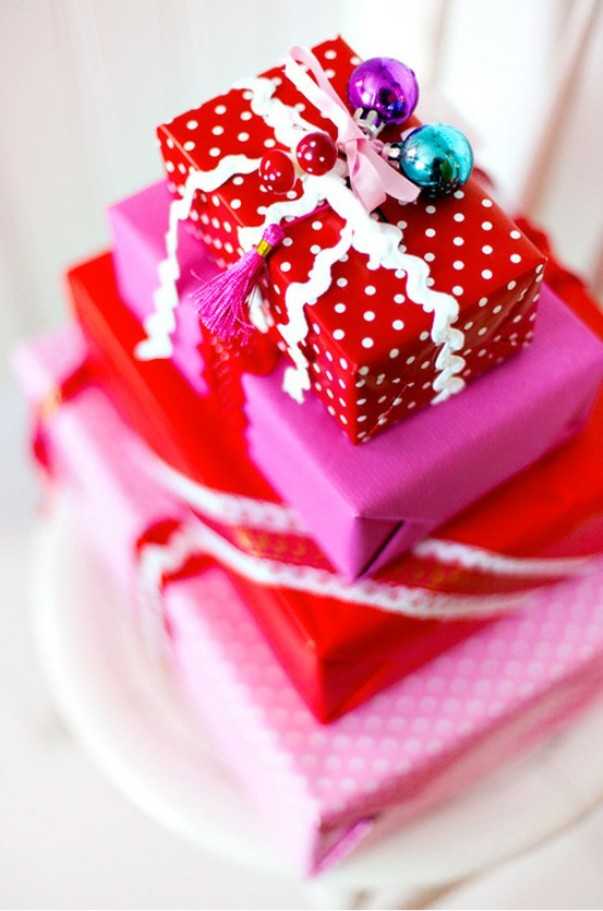
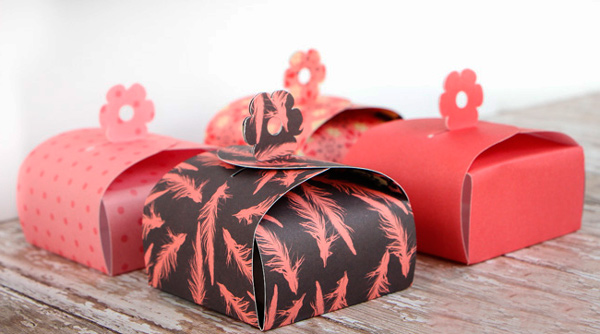
Your gift to a relative or friend, woman or man, can be highly appreciated depending on a small addition - beautiful packaging, chosen with taste and in accordance with its content. It gives safety and an aesthetic appearance to your gift, creating a festive mood on your birthday or other celebration. If the gift is packaged in an unusual way - with a bit of creativity and an individual approach, then you are guaranteed a positive impression of it even before removing the wrapper.
Packaging “according to all rules”
Modern industry offers us thousands of packaging options - soft, hard, colored, etc. However, before directly choosing how to originally pack a gift from this variety, you need to know the small nuances and “secrets” of this rather delicate matter.
Main and additional materials
The standard boxes in which the item was sold in the store, and even traditional velvet boxes, have long since become a thing of the past, looking banal and not at all interesting. Nowadays, the production of packaging materials can provide you with a lot of opportunities both in itself and for the flight of your personal imagination. These could be:
- Special gift boxes of various fancy shapes with various designs, embossing, varnishing elements, etc.,
- Polyethylene bags, decorated with printed designs suitable for the holiday - for a birthday or any other holiday - New Year etc.,
- Packaging paper, colored, plain, shiny,
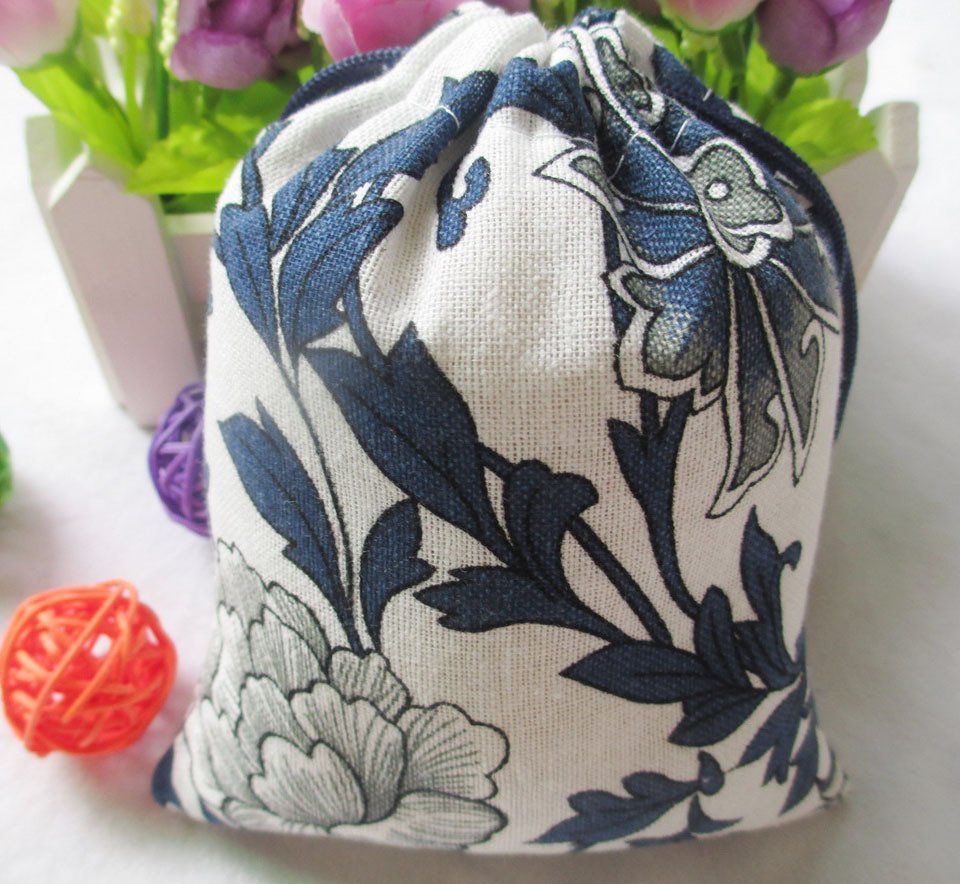
- Fabric bags of various shapes and designs,
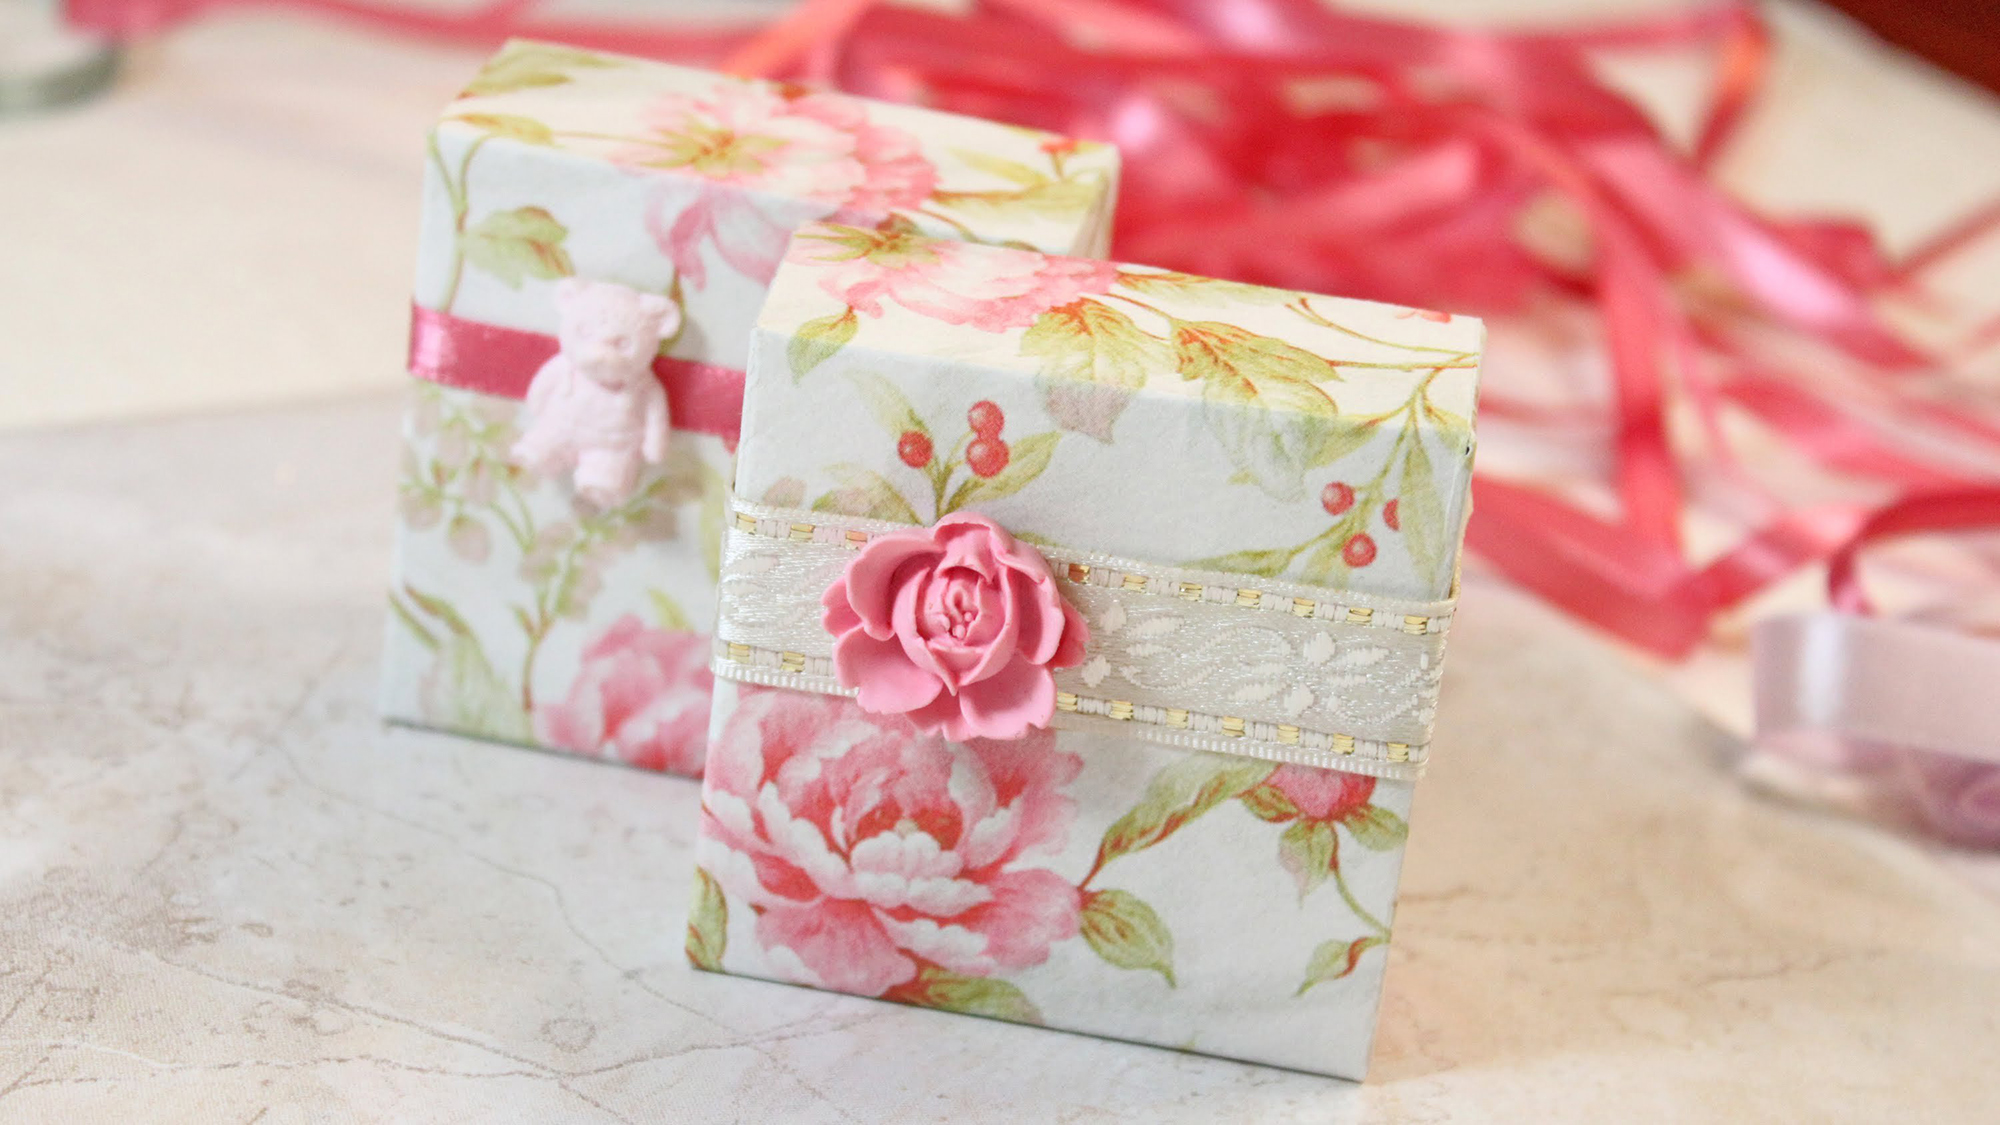
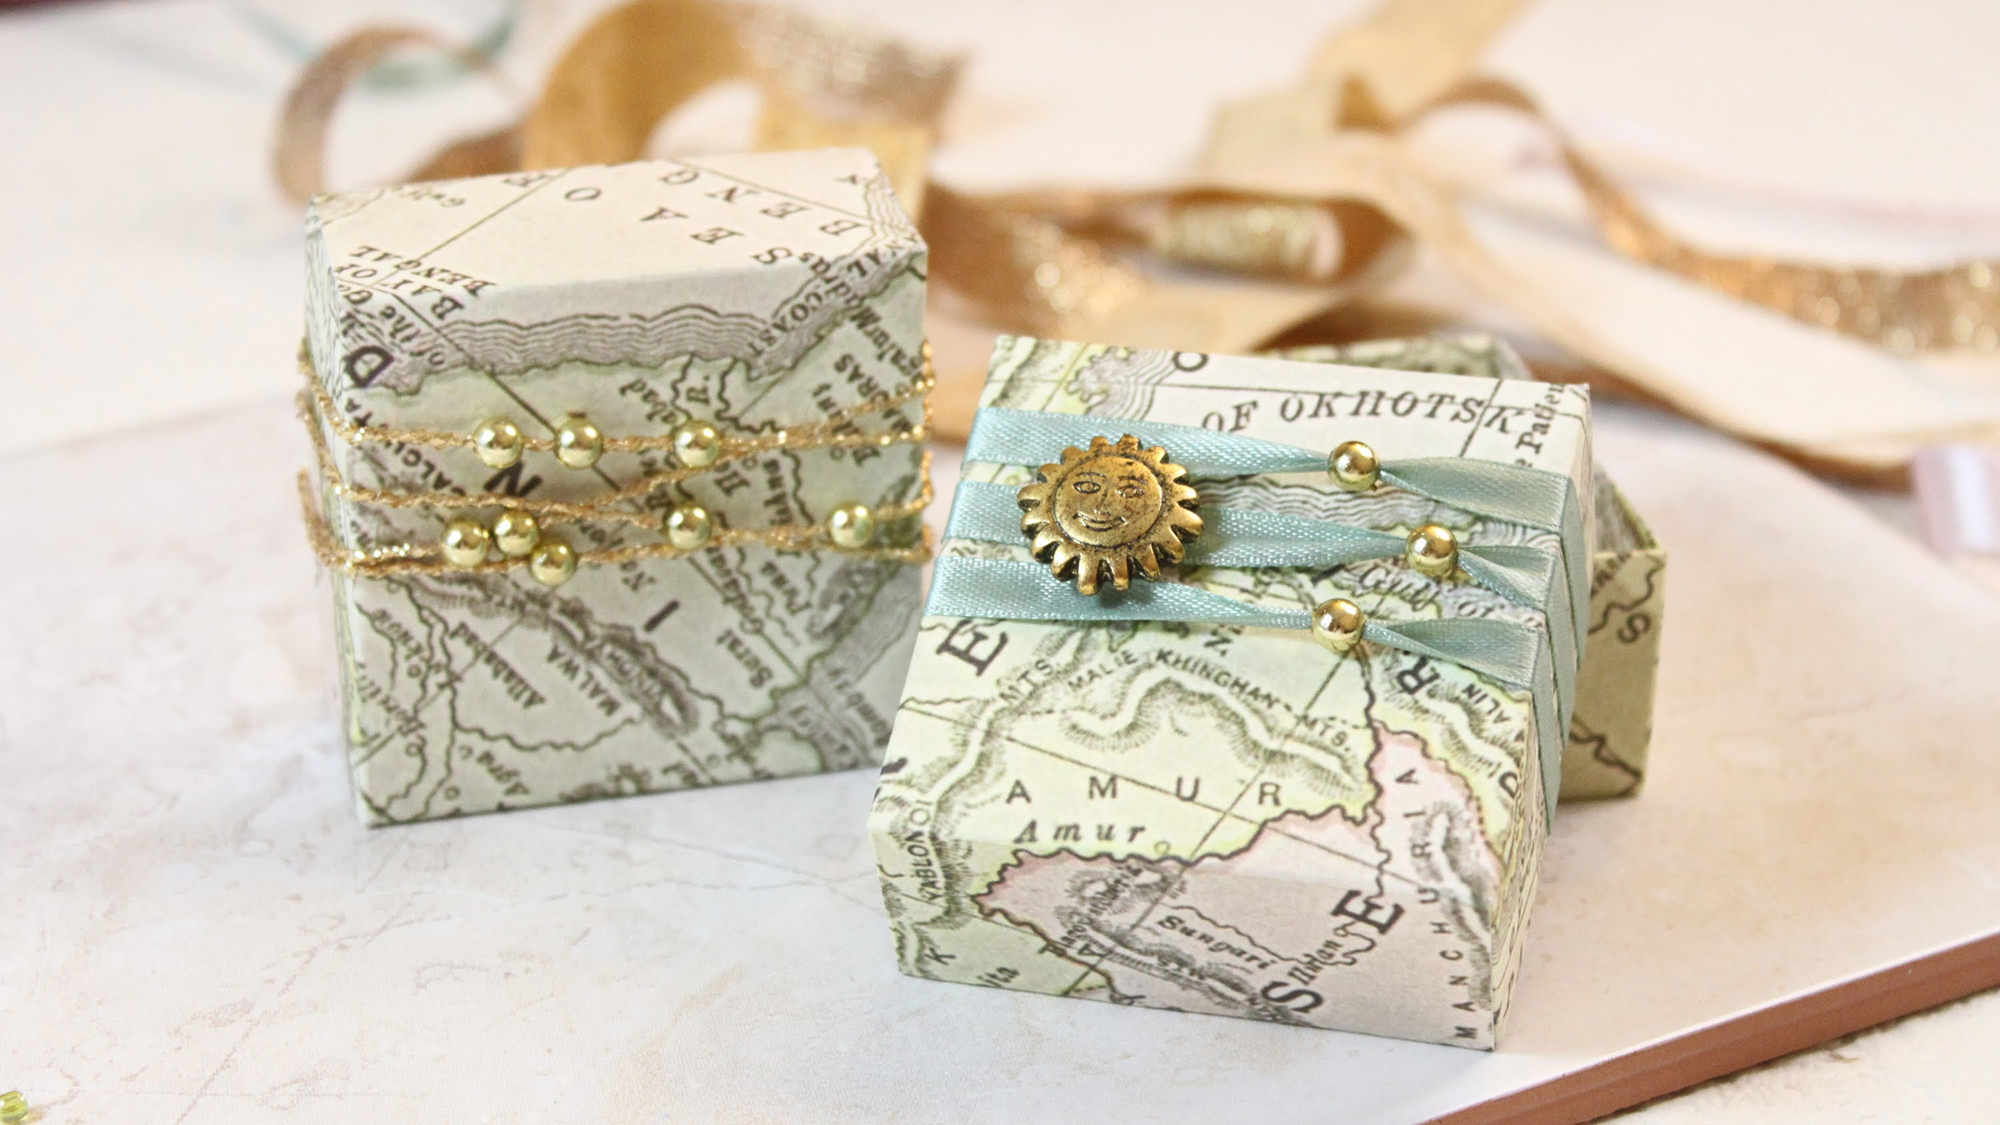
- Accessories – fabric and paper ribbons, as well as ready-made decorations in the form of flowers, rhinestones, etc.
Your choice may be on hard or soft packaging made of cardboard, polyethylene, paper, fabric in various combinations. At the same time, it is not at all necessary to do this yourself - many special workshops will be happy to offer the services of experienced packers.
ATTENTION! If you are going to give a gift to a respectable citizen, then it is better to solve all packaging issues in a special salon, but the gift to a loved one It’s quite possible to design it yourself, adding something original “on your own” to it. Such an addition will once again prove your attention to his individuality on a special day.
Features of the color scheme
The color of the box or package should not only convey a festive atmosphere, but also correspond to other features:
- Holiday traditions: Heart designs are considered a tradition for weddings and Valentine's Day, New Year involves more shiny elements, and on a birthday it is better to turn to personal preferences.
- Personality of the recipient: light colors and bright fragments are more suitable female, for a man they usually choose rigor and style, for a child - cartoon pictures and delicate combinations. For good friend You can decorate the gift in a cool way, but if you have a business relationship, then it’s better to choose a neutral style.
- The meaning of color combinations, which many people attach great importance to:
- Green and blue are considered neutral and "solid"
- Yellow gives the gift some frivolity, but it looks good only in combination with other colors, and, for example, it can be greeted with caution by the woman you love,
- Determined and ardent red is not suitable for every holiday (in particular, birthdays) and usually does not look good on large gifts,
- Purple is original, but not everyone may like it,
- Warm brown is not usually perceived as festive or formal.
ATTENTION! It is better to use gold and silver tones only as decoration elements, in combination with other, less pretentious colors.
Original do-it-yourself packaging
If you decide to pack your holiday offering yourself, you can create truly real masterpieces - you just need to apply a little skill and imagination.
Spend the evening making a dozen teabags from old newspaper? Nonsense - you say. Nowadays, at every step you can order packaging for any gift, choose the colors of the paper, ribbons and bow yourself. But those who like to give and receive something original and extraordinary will understand me perfectly. A gift chosen with skill, thoughtfully and thoughtfully, and presented beautifully... everyone’s dream! So, how can you make something inimitable out of packaging?
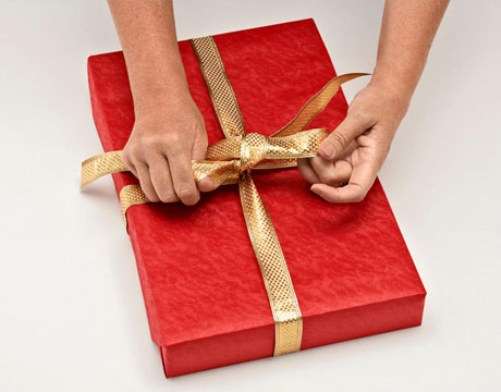
Buying a gift is half the battle. Packing it beautifully is the challenge. website I figured out how to quickly and simply wrap gifts beautifully and how to carefully wrap what I bought.
Where to buy everything you need
Bookstore
The stationery department of your nearest bookstore sells basic set: paper, bags, tapes, scissors and double-sided tape. This should be enough to wrap anything neatly. Next to the first grader's set, you can find ironic stickers with Simba or Elsa, which will decorate a nostalgic gift for a millennial.
Supermarket
For the New Year, wrapping paper and ribbons are displayed in seasonal goods areas in supermarkets. Some stores (for example, Tsvetnoy and Stockmann) offer their own packaging services for gifts purchased from them.
Gift Shop
Flower kiosk
It is worth going to the flower shop in search of transparent film, twine, crepe paper and twigs to decorate the result.
Hobby store
Artist supply stores are a reliable source of crafting materials, a variety of papers (in addition to packaging, they sell crepe and tissue paper, multi-colored tracing paper and all kinds of films) and beautiful accessories. Look for them in the scrapbooking departments: glue-based mirror stars, pompons, voluminous and not so voluminous stickers, curly scissors and hole punches are waiting for you in “Leonardo”, “Peredvizhnik” and “Red Pencil”.
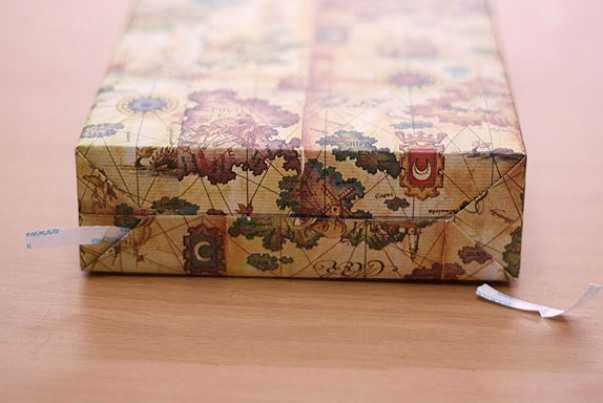
How to quickly and accurately wrap a gift yourself
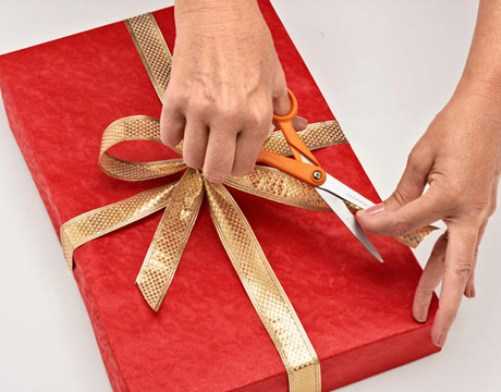
Let's start with the basics: how to wrap a box in one of the basic shapes, put a gift beautifully in a bag, or make a bag with your own hands. None of these tasks require special skills. But accuracy will certainly come in handy (and also tape, scissors and double-sided adhesive tape).
A basic tutorial on how to pack a regular box from Hallmark veterans
Now the task is more difficult - to wrap a cylindrical object beautifully. But it can also be solved if you have patience.
A lesson for those who don’t feel strong enough to manipulate tape and scissors: you can decorate beautifully even a gift that was simply put in a bag.
How to wrap a gift in an unusual way
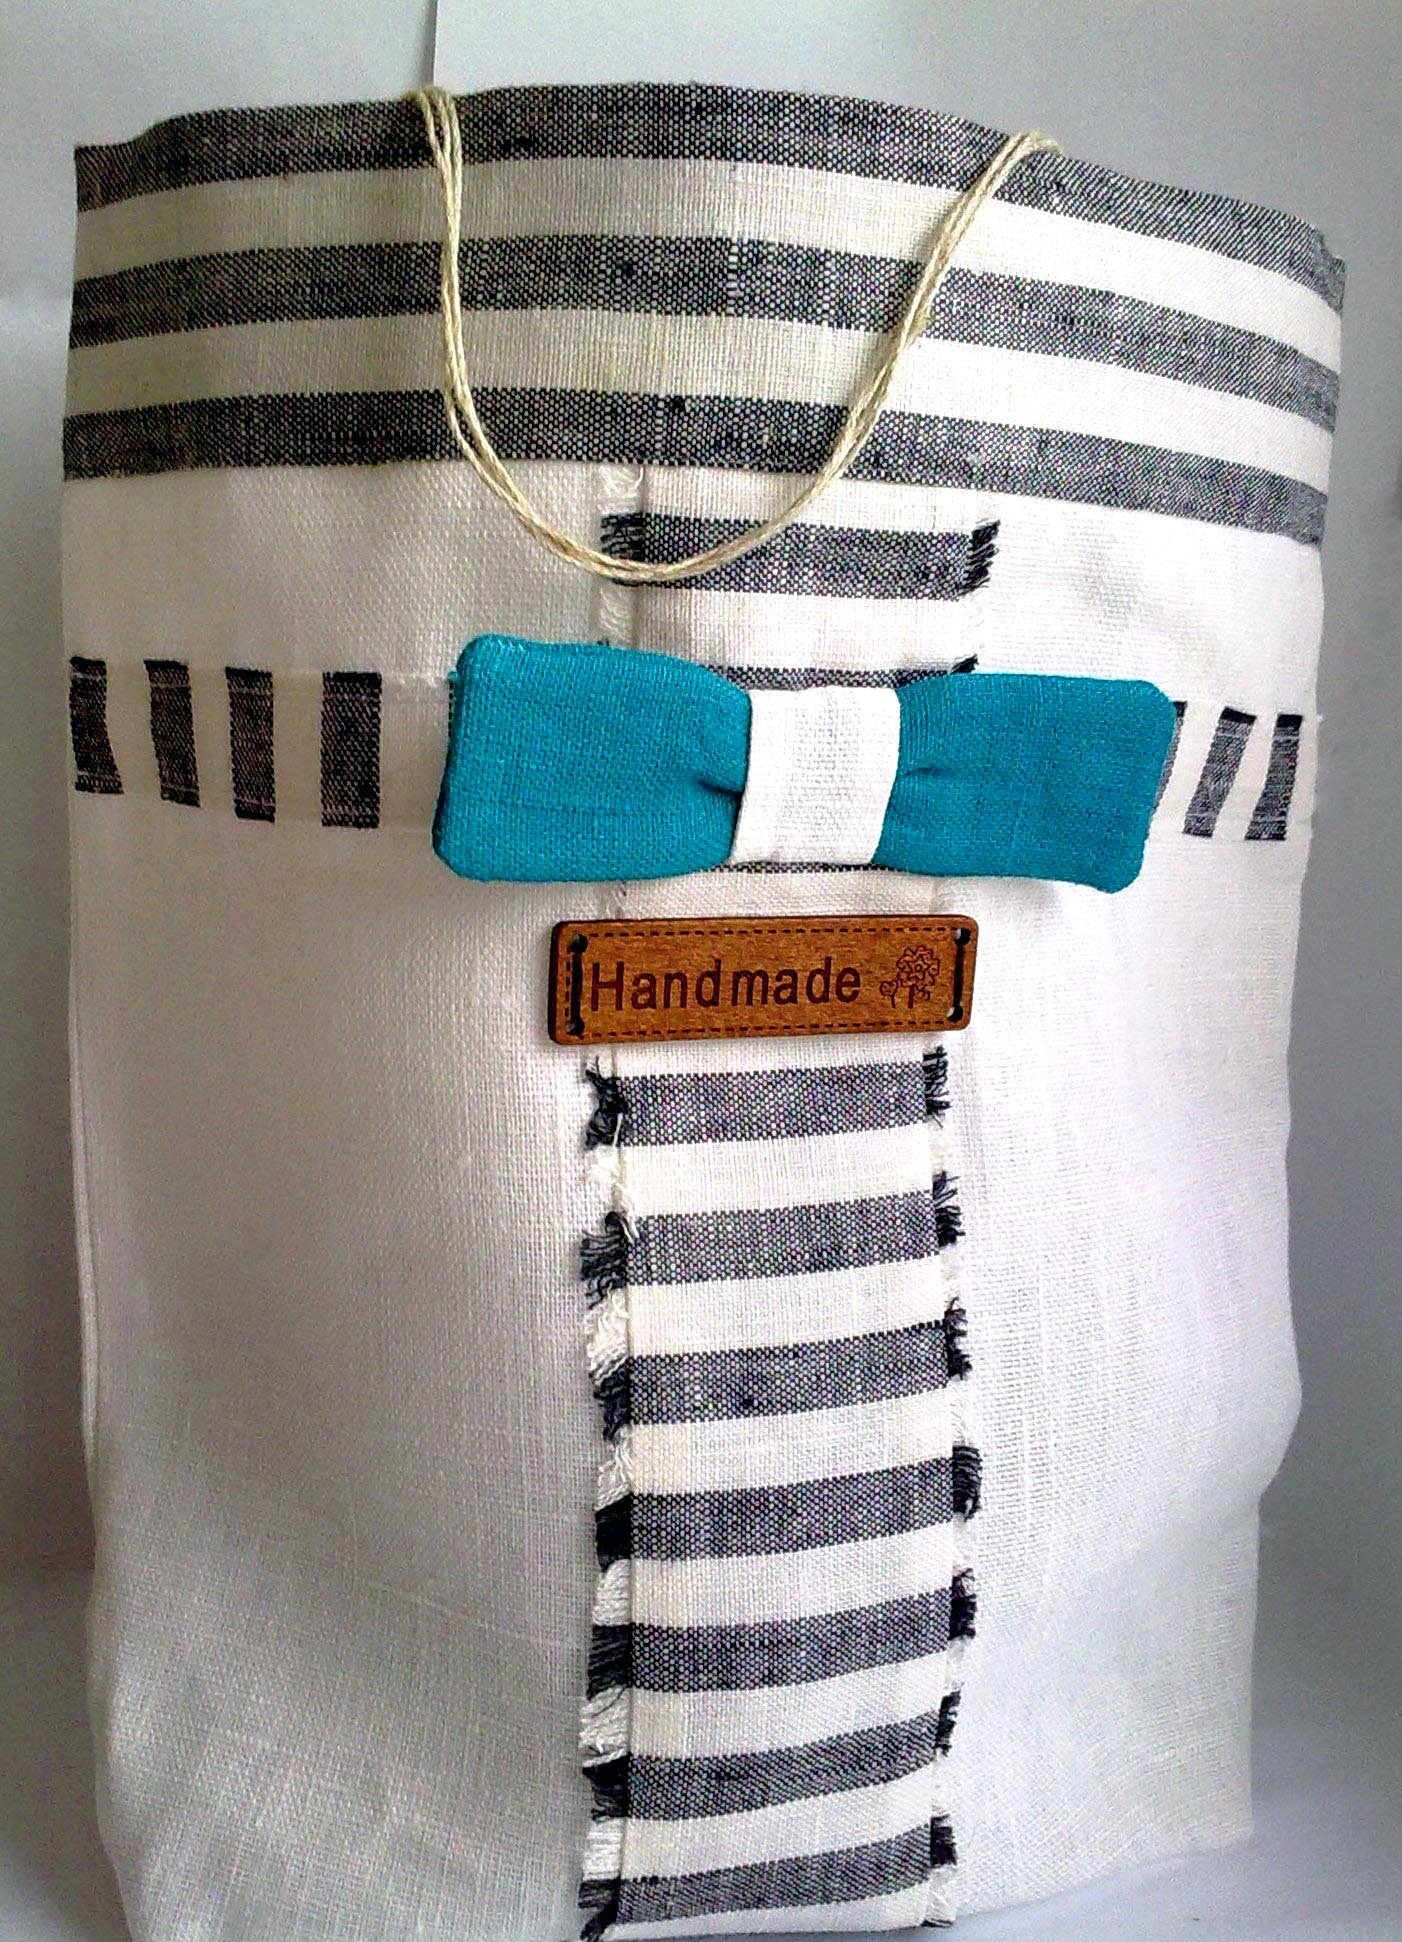
Use fabric instead of paper
For example, linen. This will save the gift from hard lines on the folds and make it very pleasant to the touch. It’s a shame to even throw away such packaging.
Instead of paper tape, use velvet
One detail, what a difference it makes.
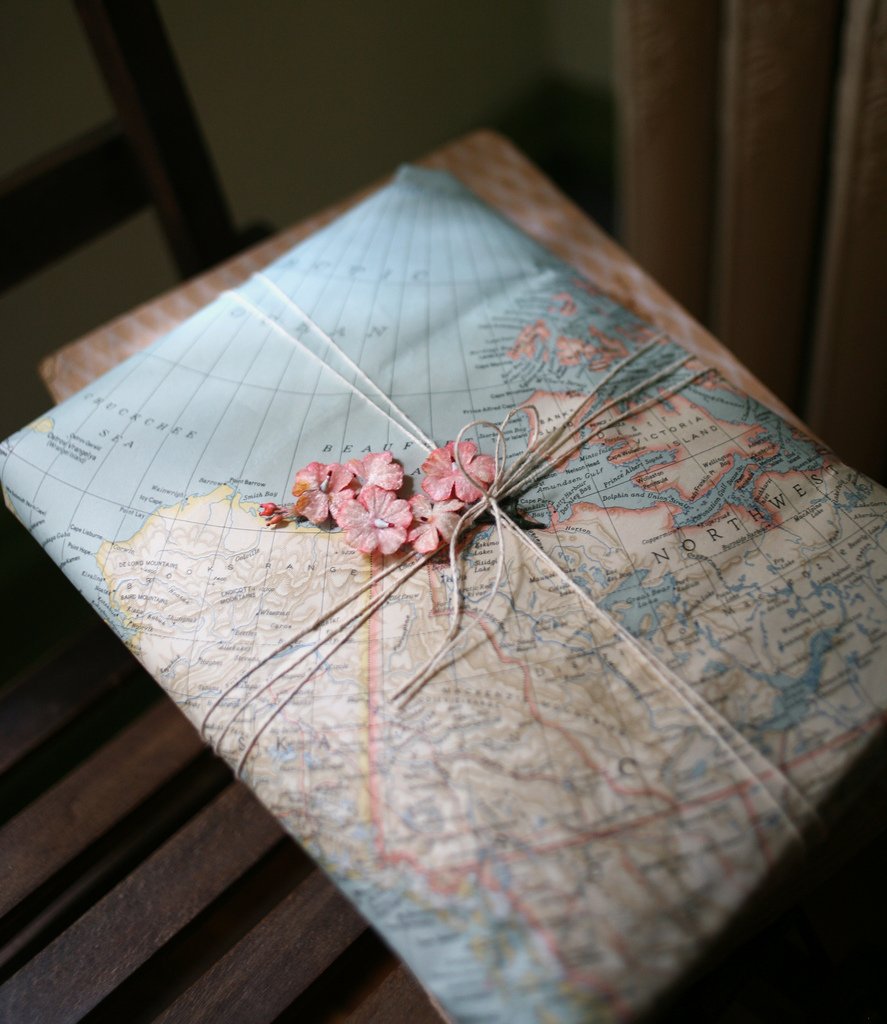
Find unusual paper
Gasoline stains, marbling, bright graphic prints - all this will free you from the need to do anything else with the gift.
Sprinkle the packaging with glitter or cover it with pompoms
Again, a very simple modification. Coat the packaging with glue and sprinkle with glitter from a hobby store.
Combine different patterns
Two different sheets of wrapping paper can look twice as impressive - if you choose the right pattern.
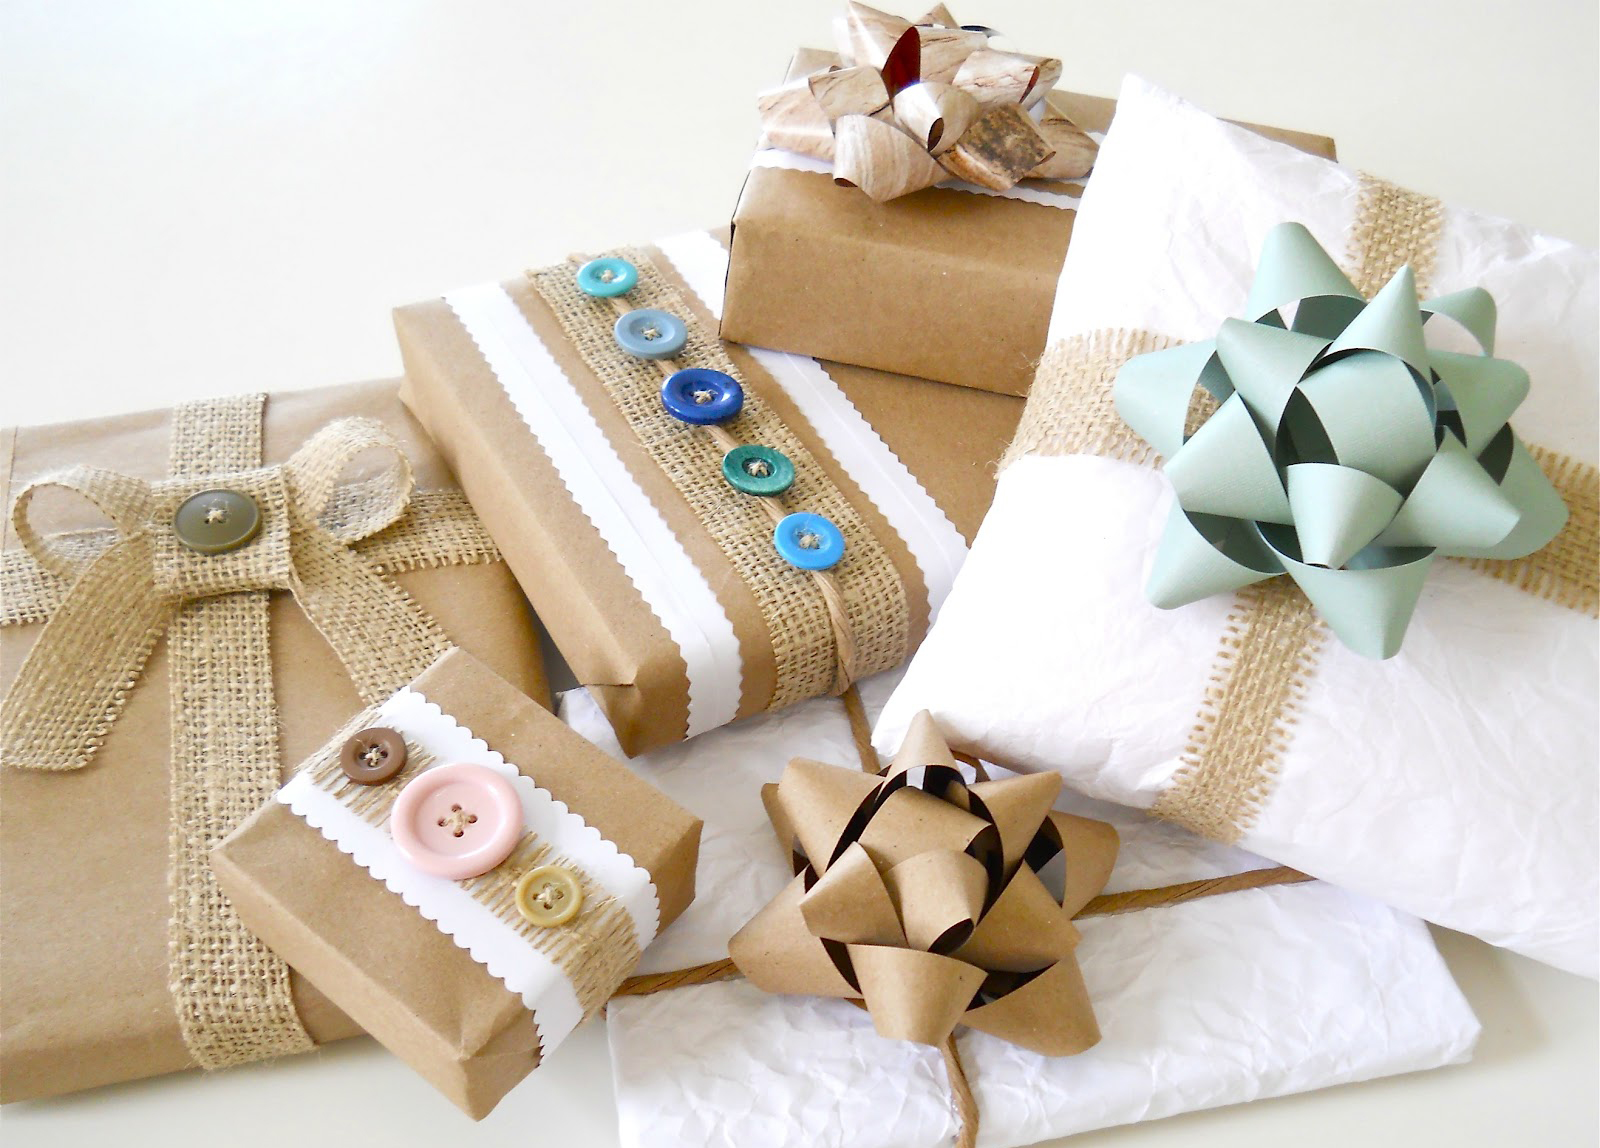
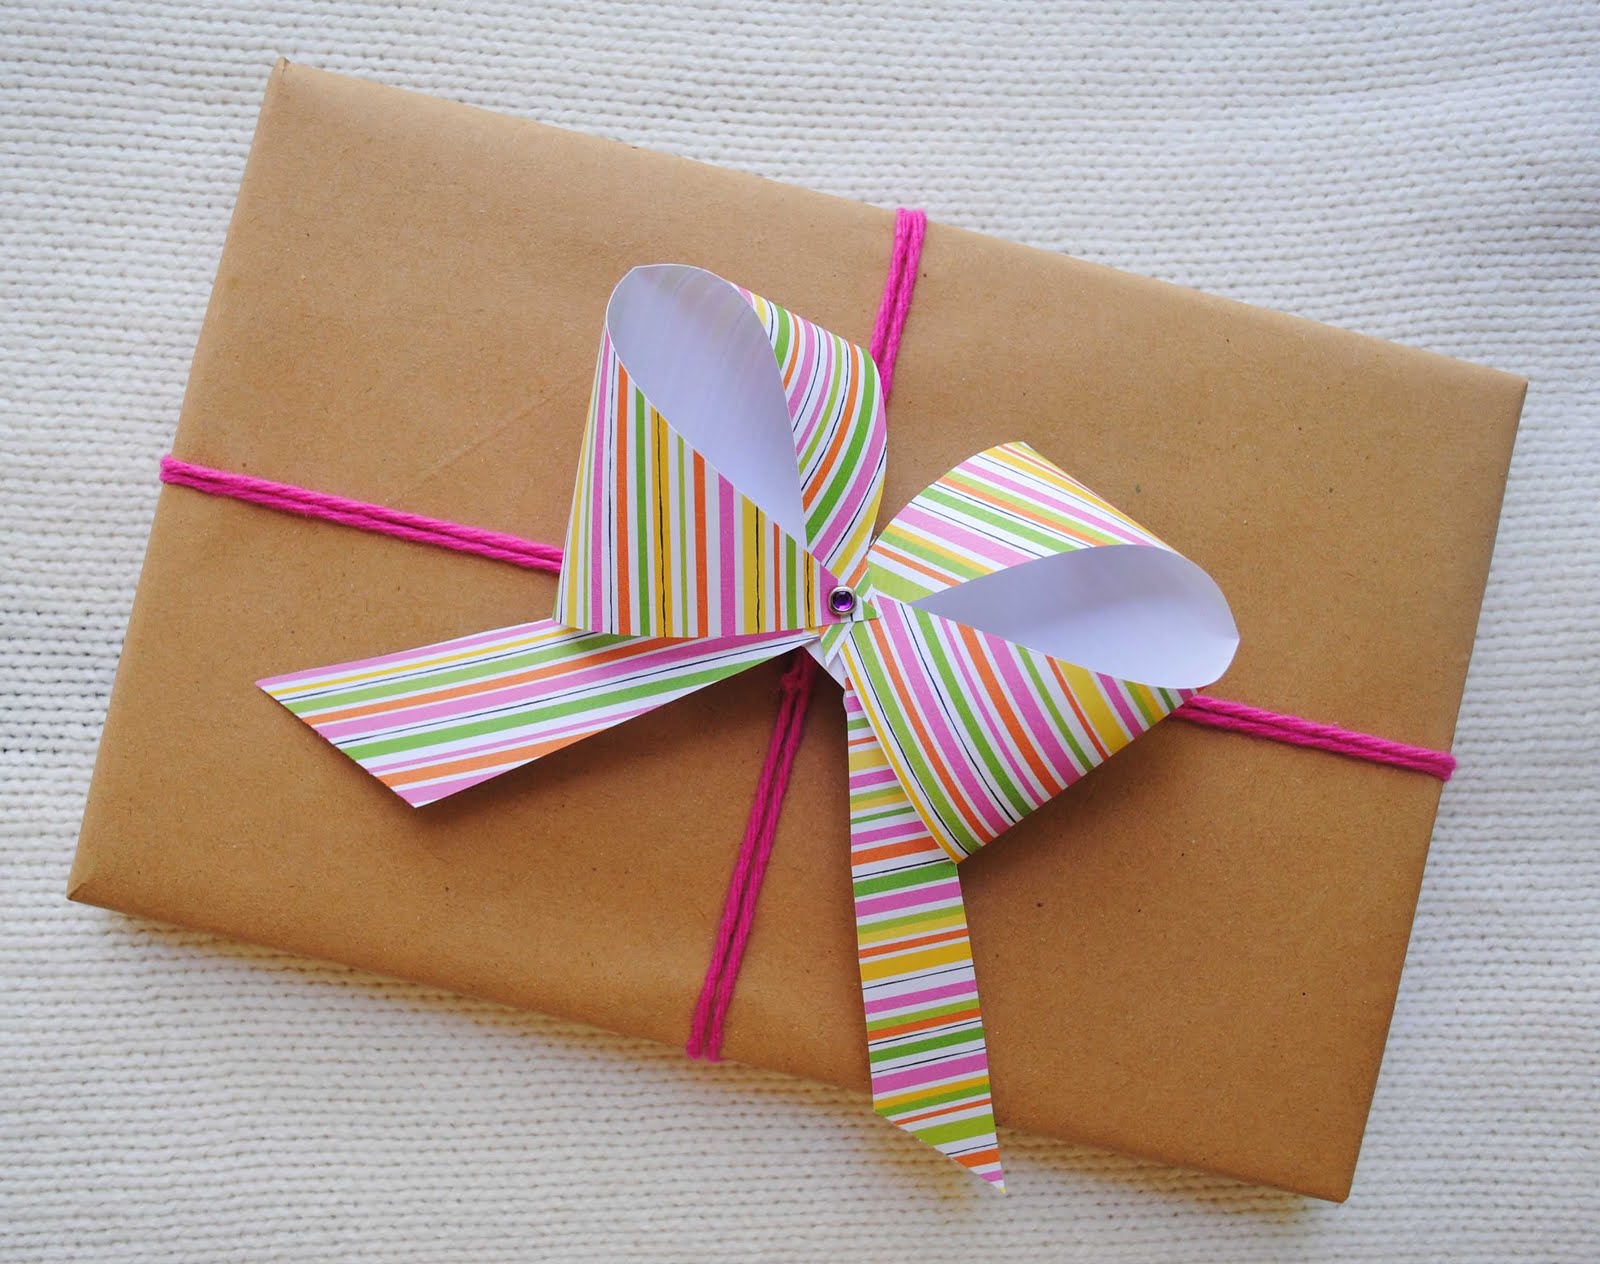
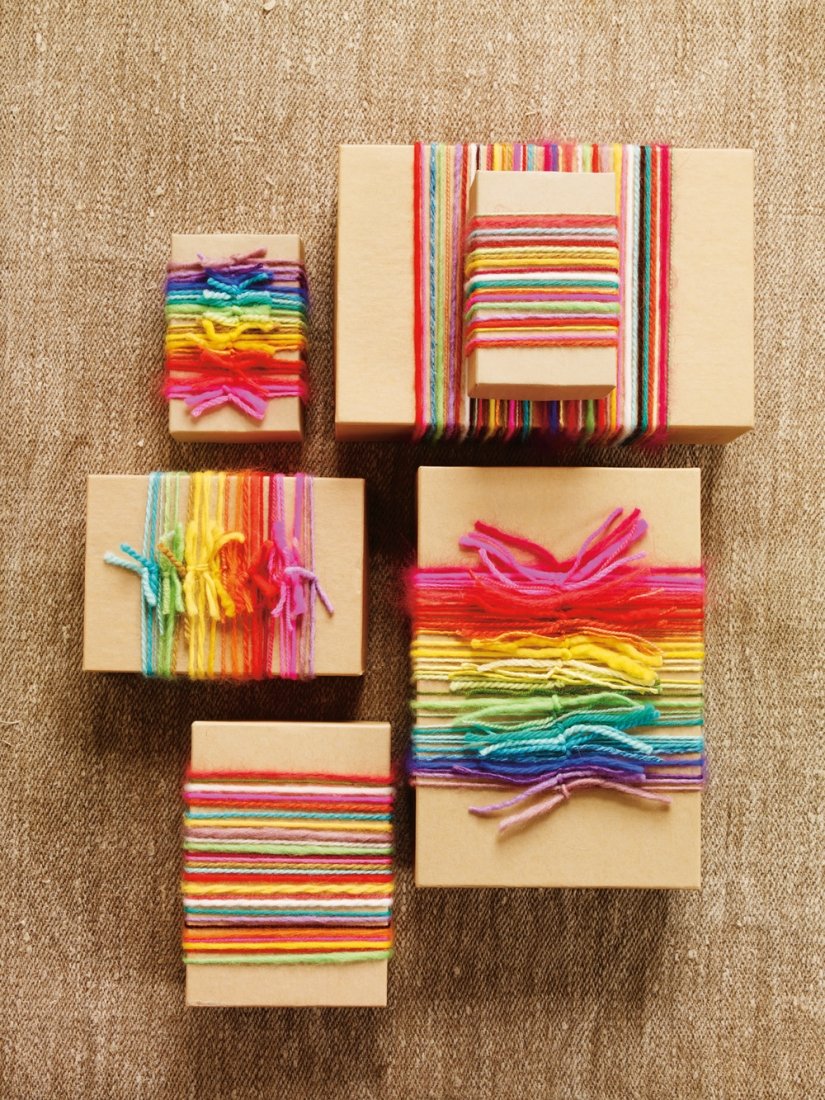
How to decorate your gift
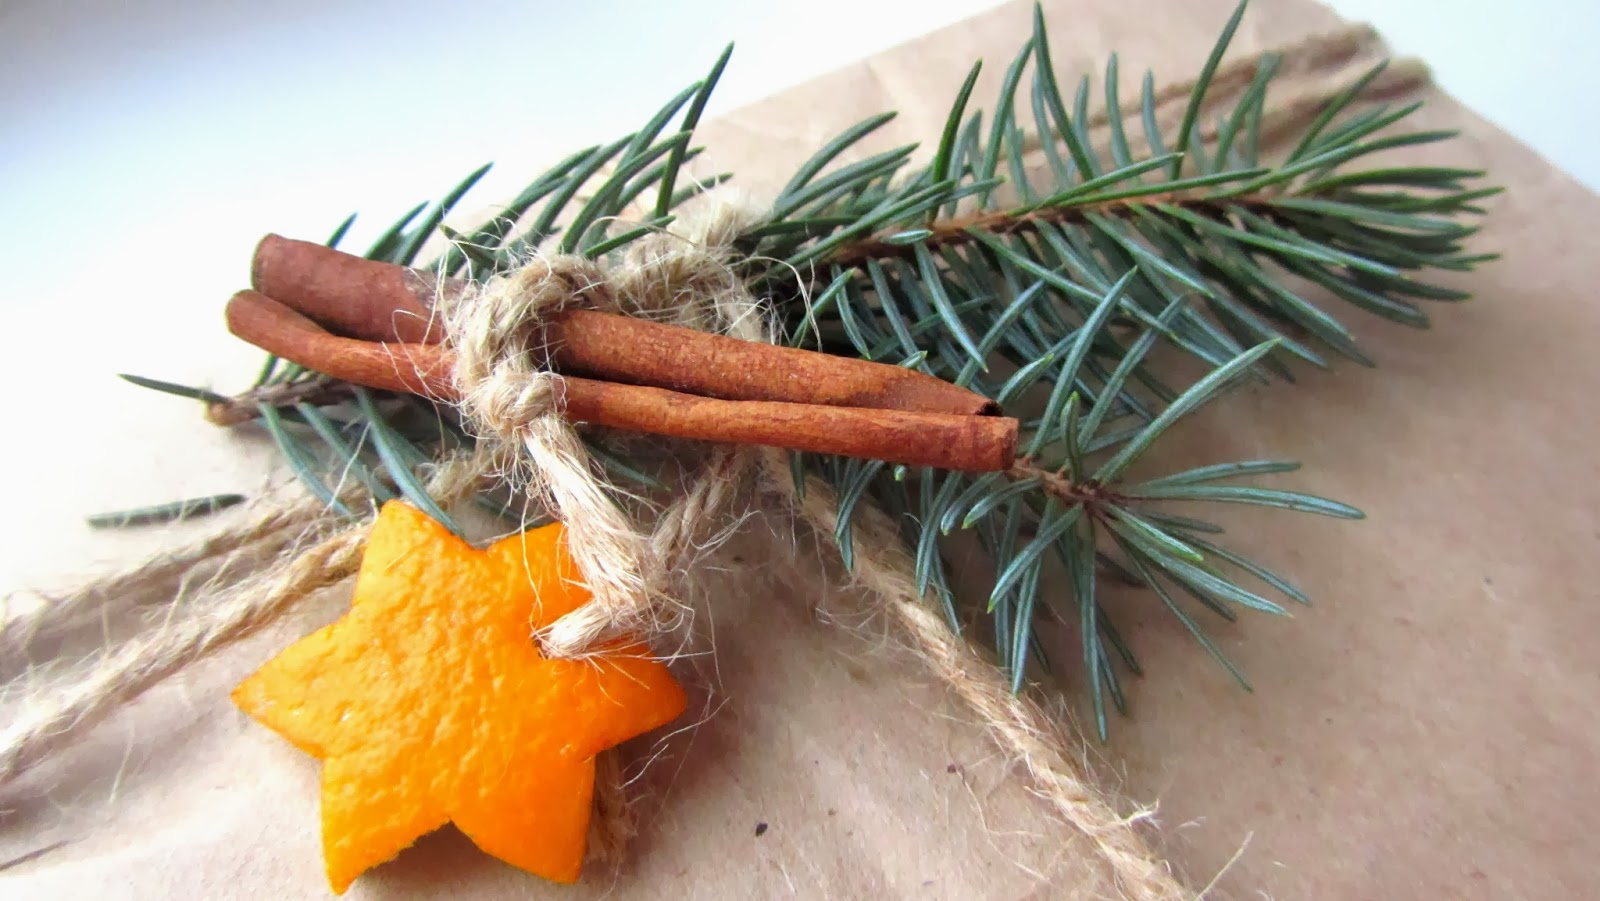
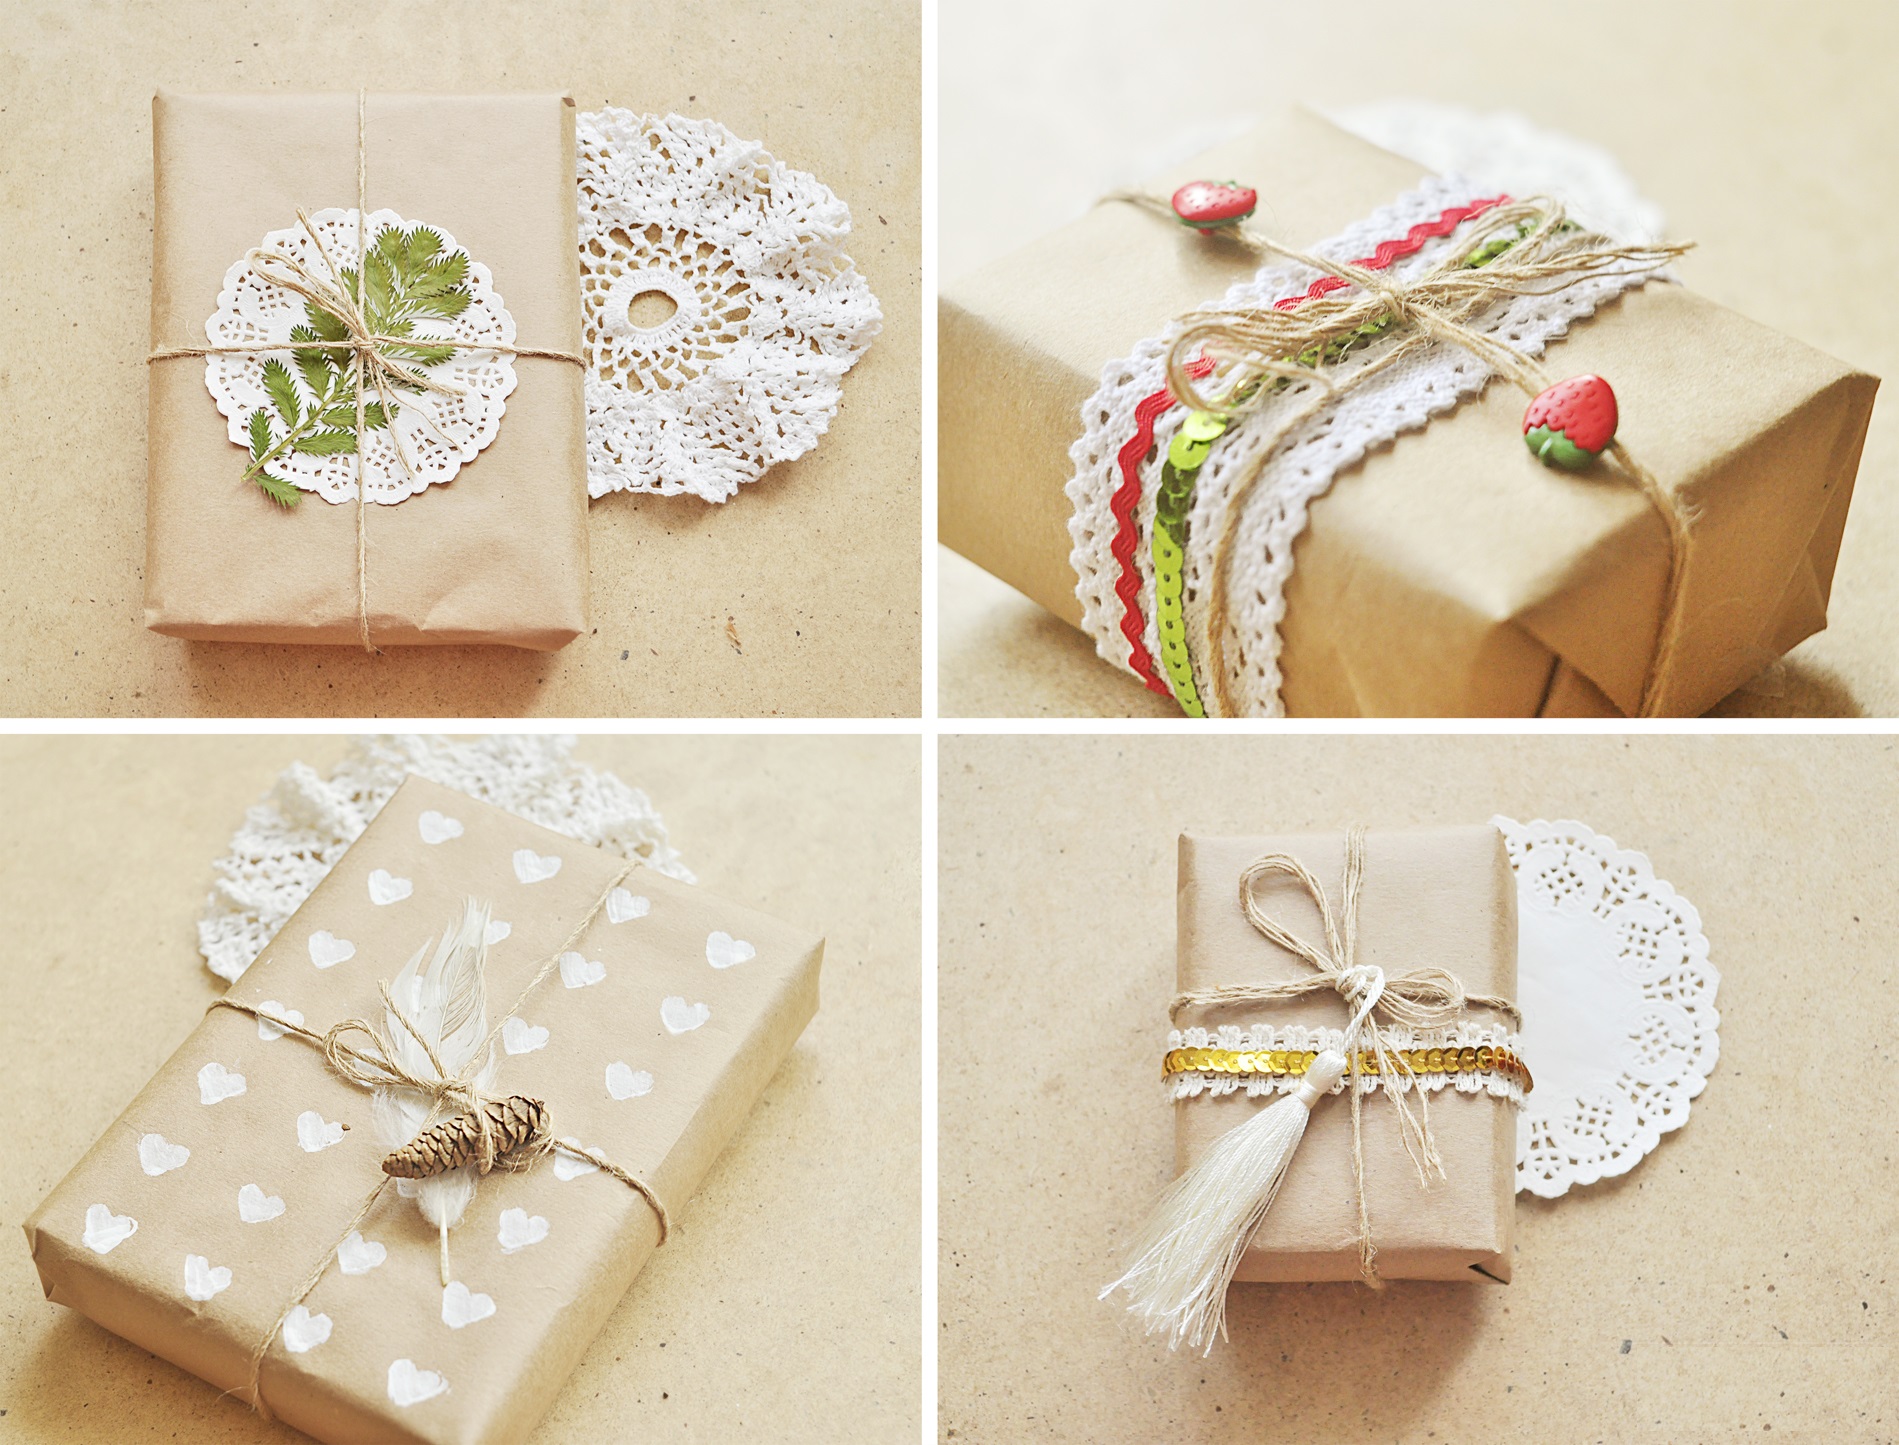
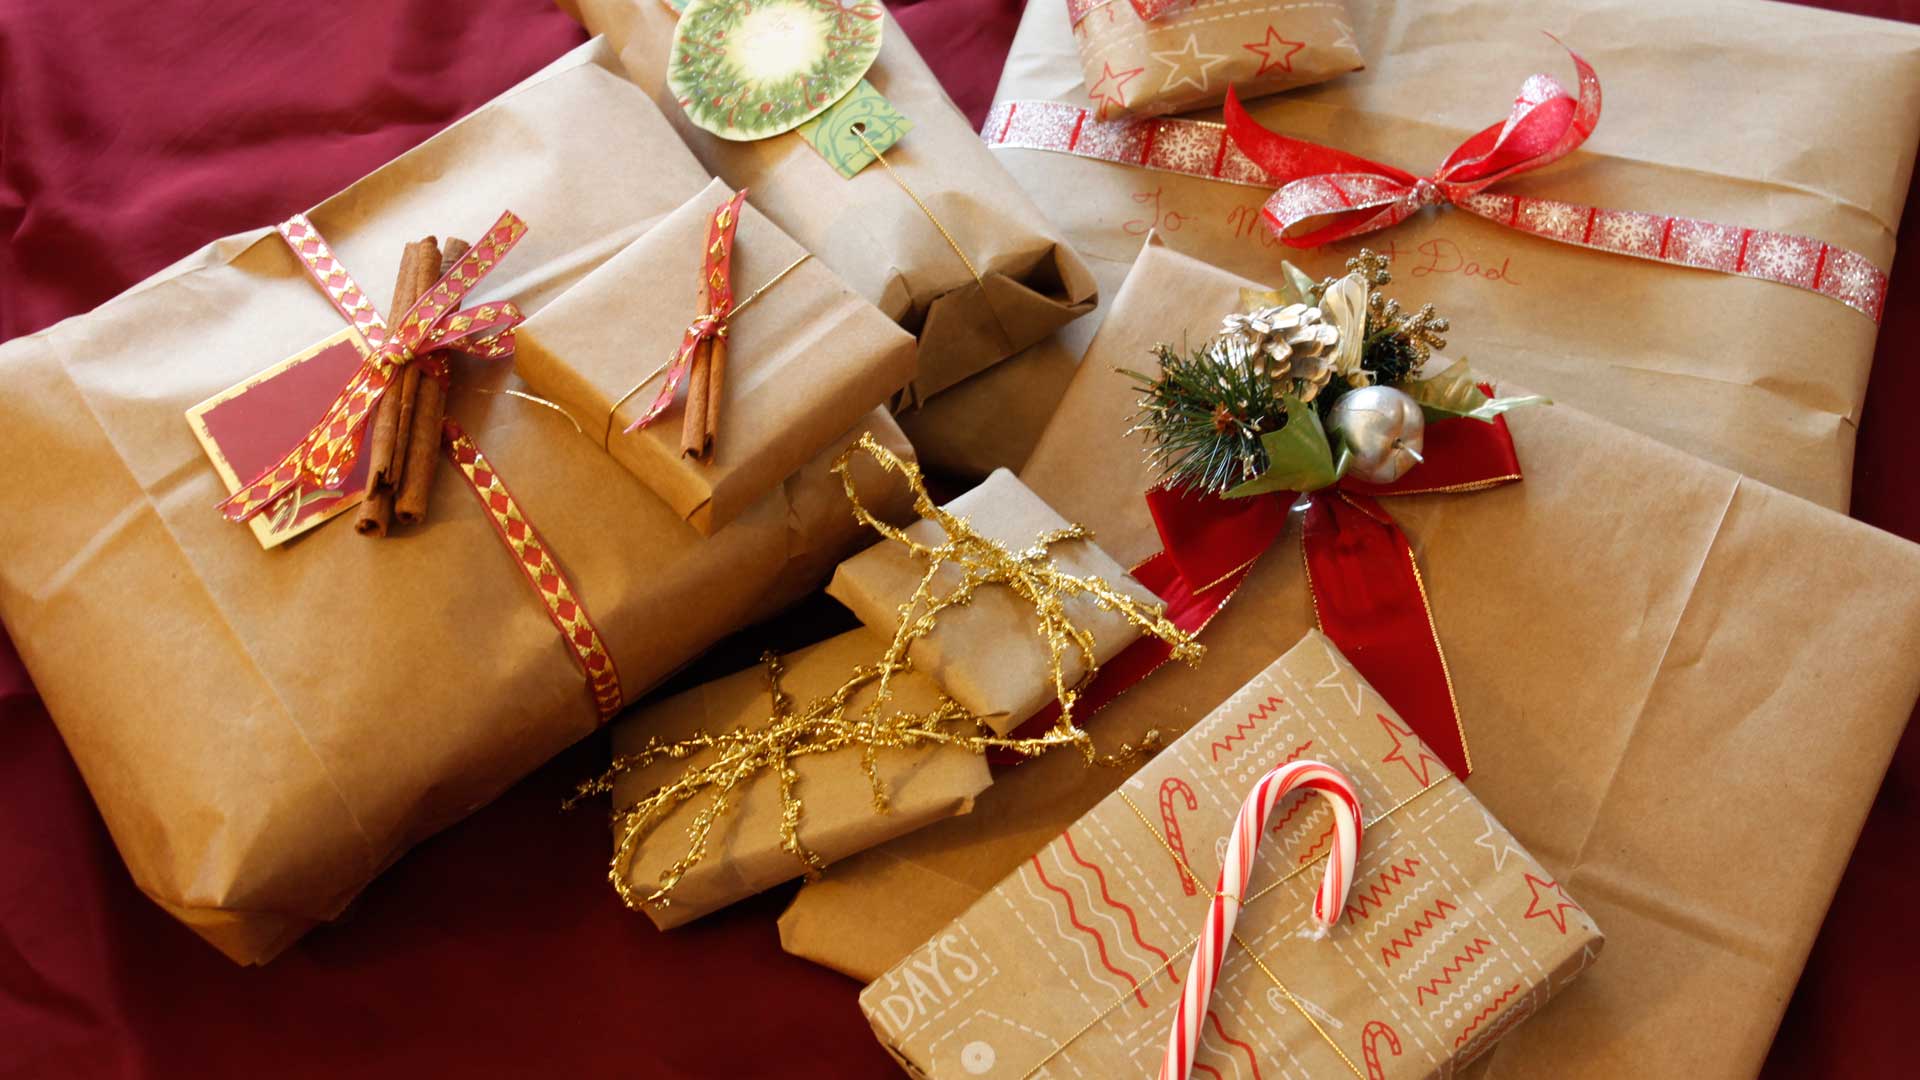
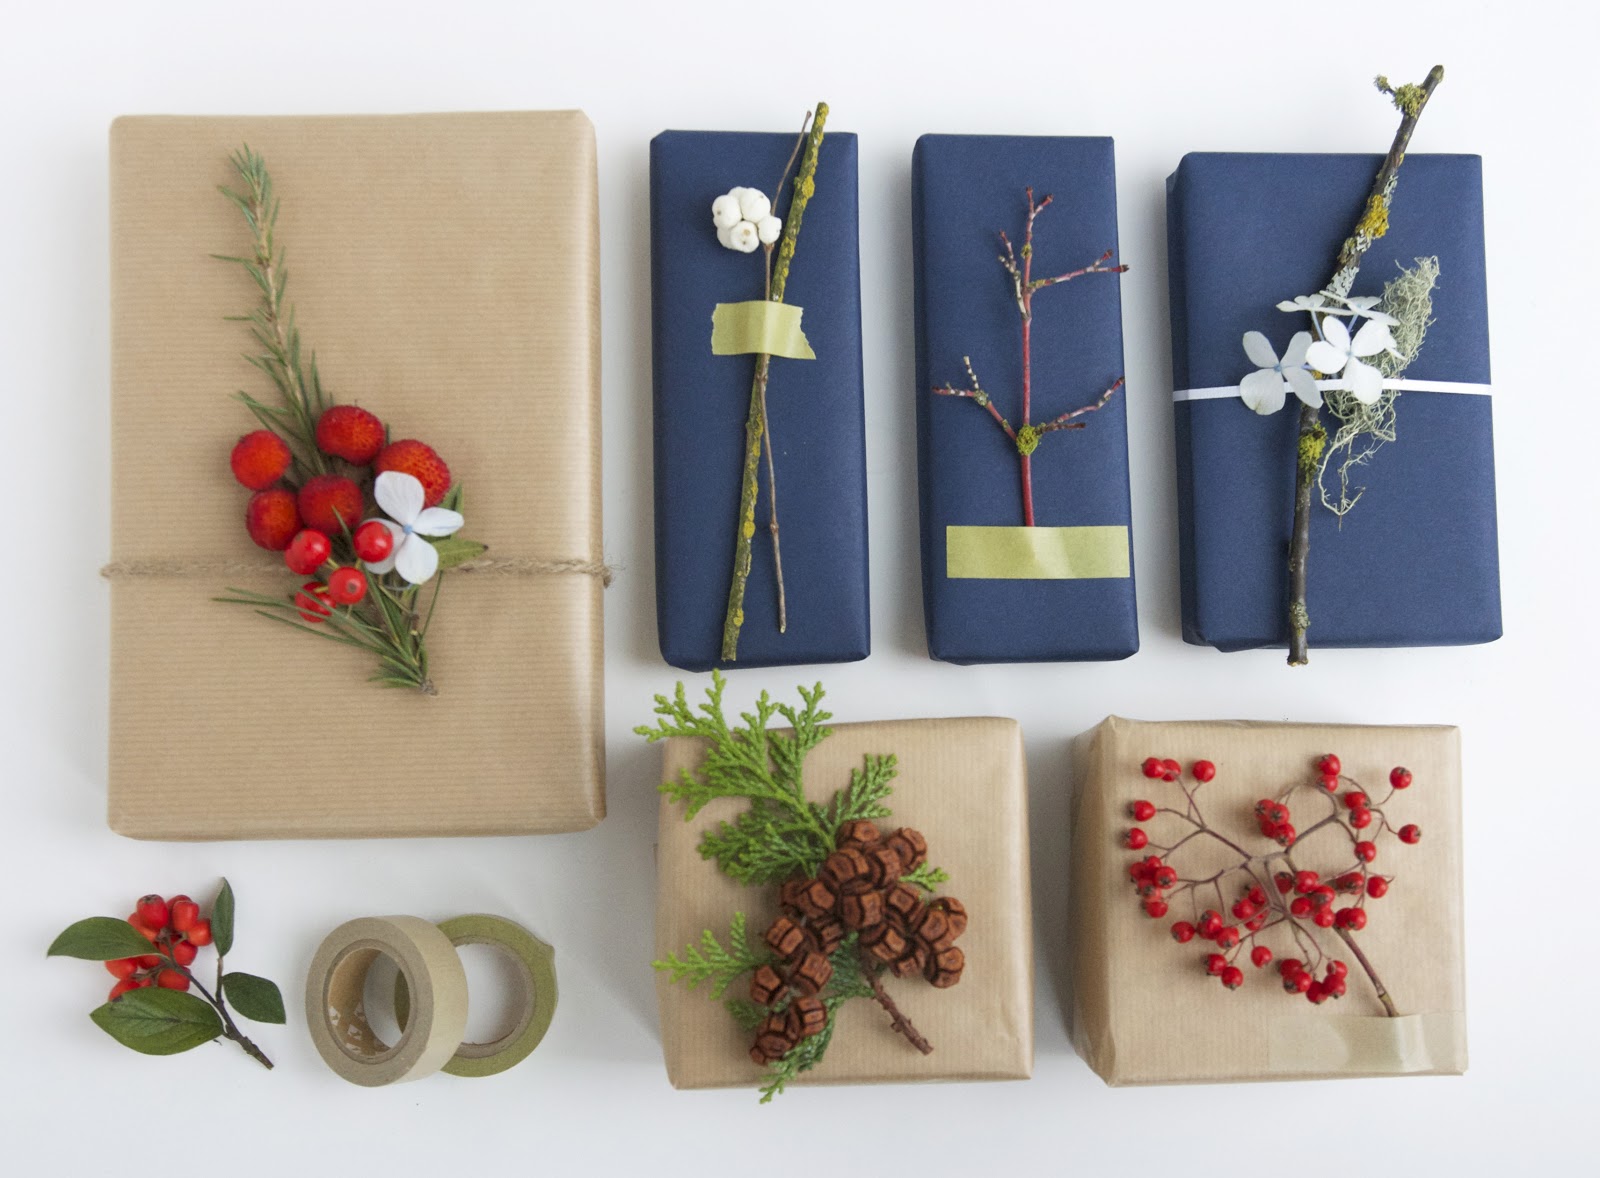
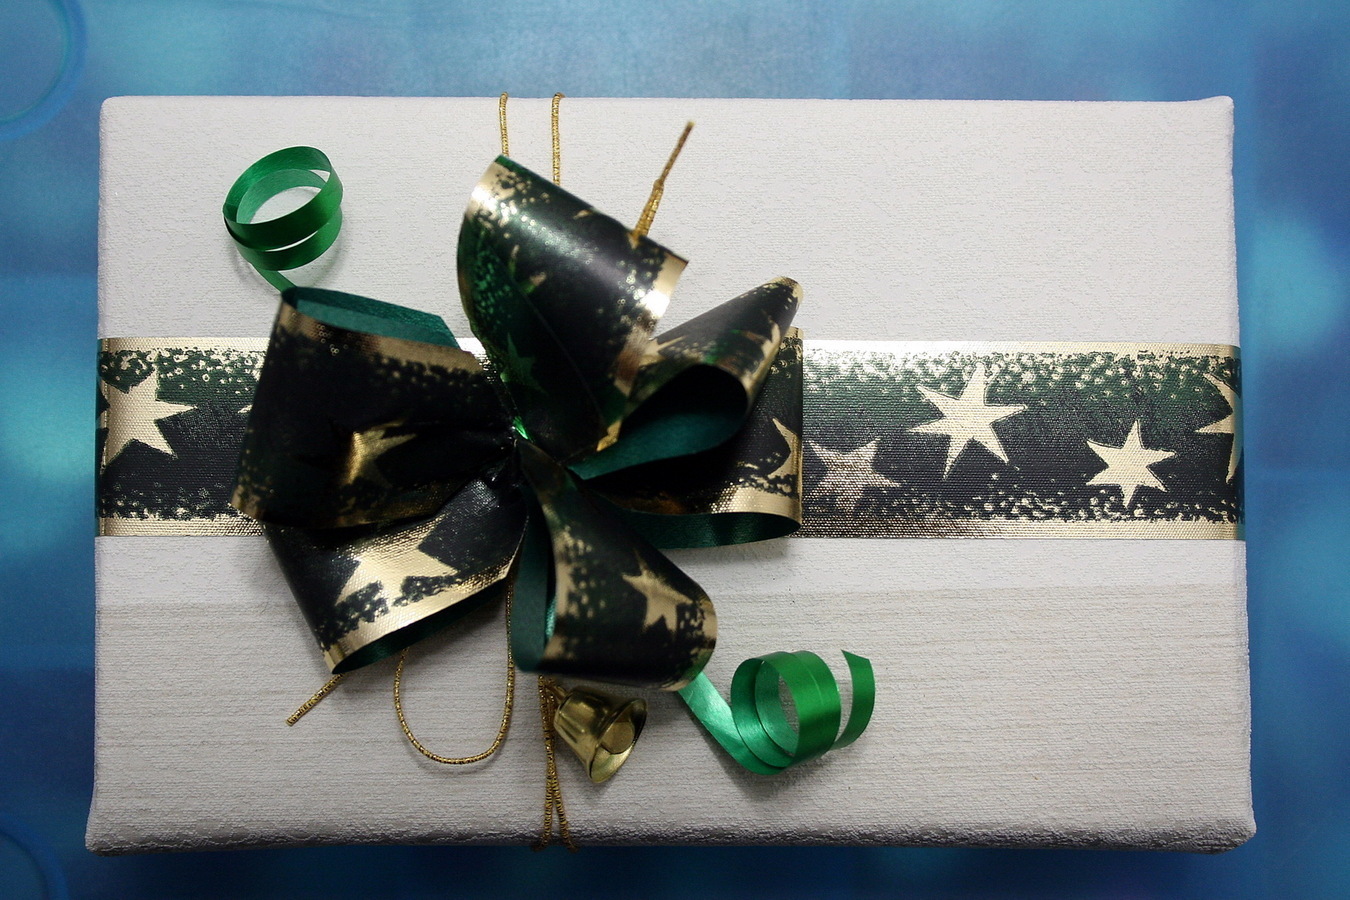
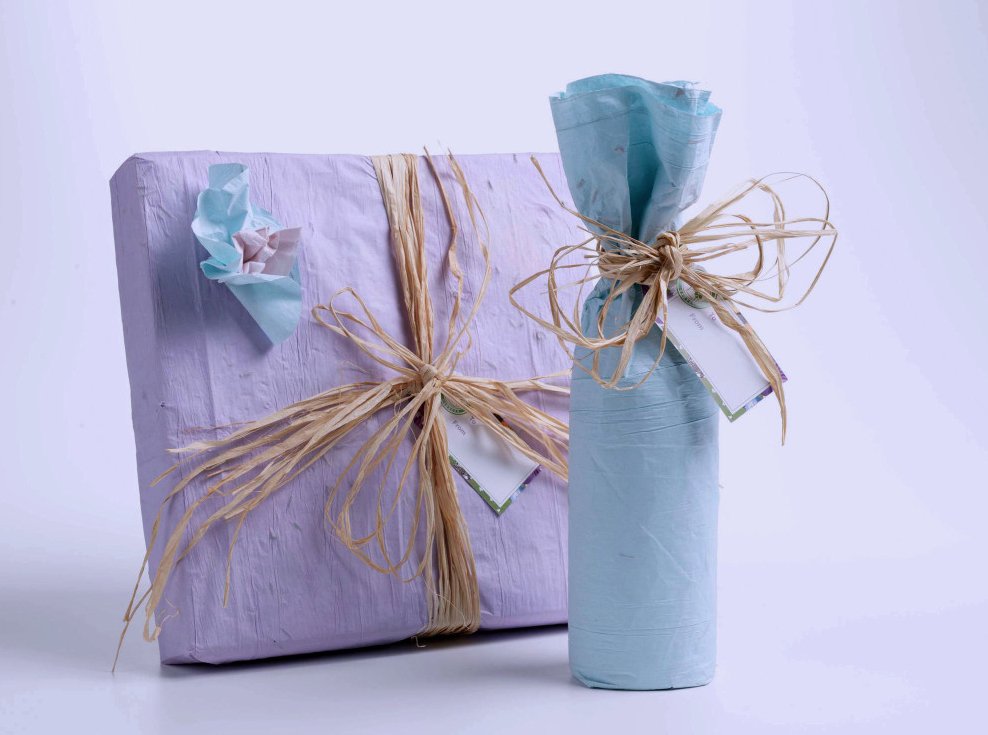
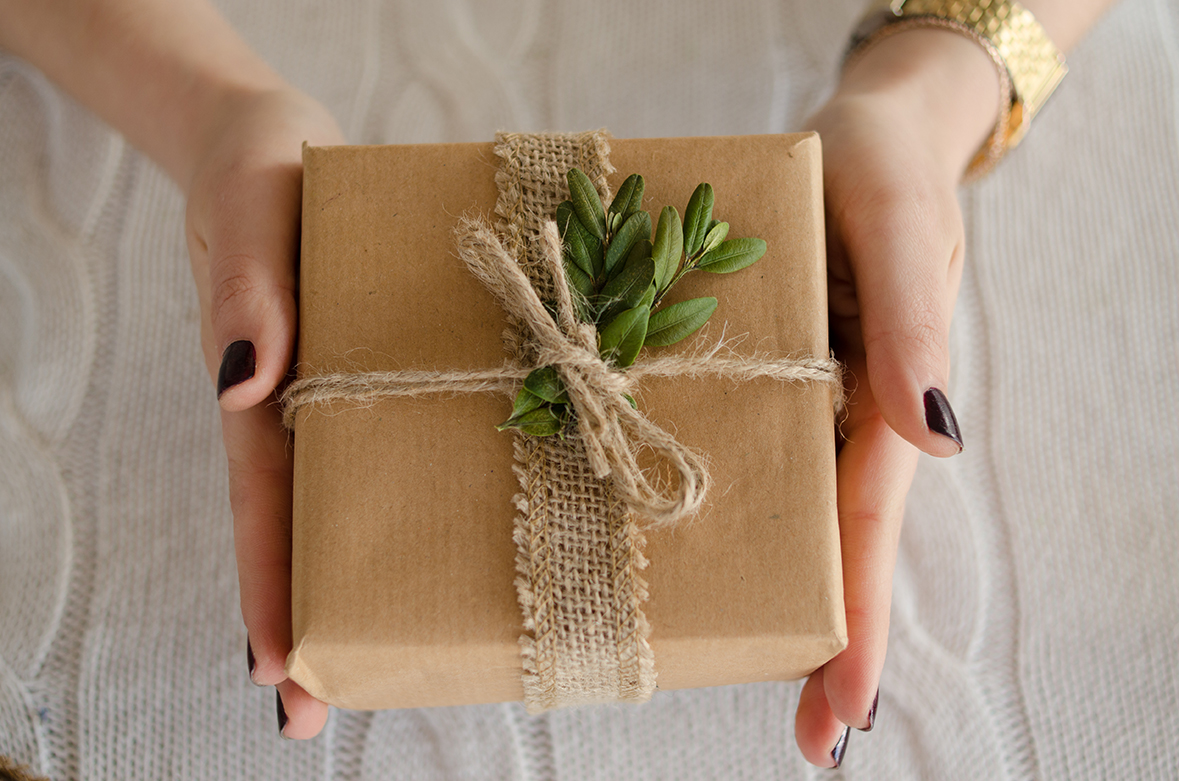
Once the gift has been carefully wrapped in paper and tied with ribbon, it can be decorated. Accessories can be purchased or homemade, with or without meaning. They can even smell - if you take dried oranges, cinnamon, star anise or spruce twigs. Here are some ideas to get you started on your journey as a professional designer.
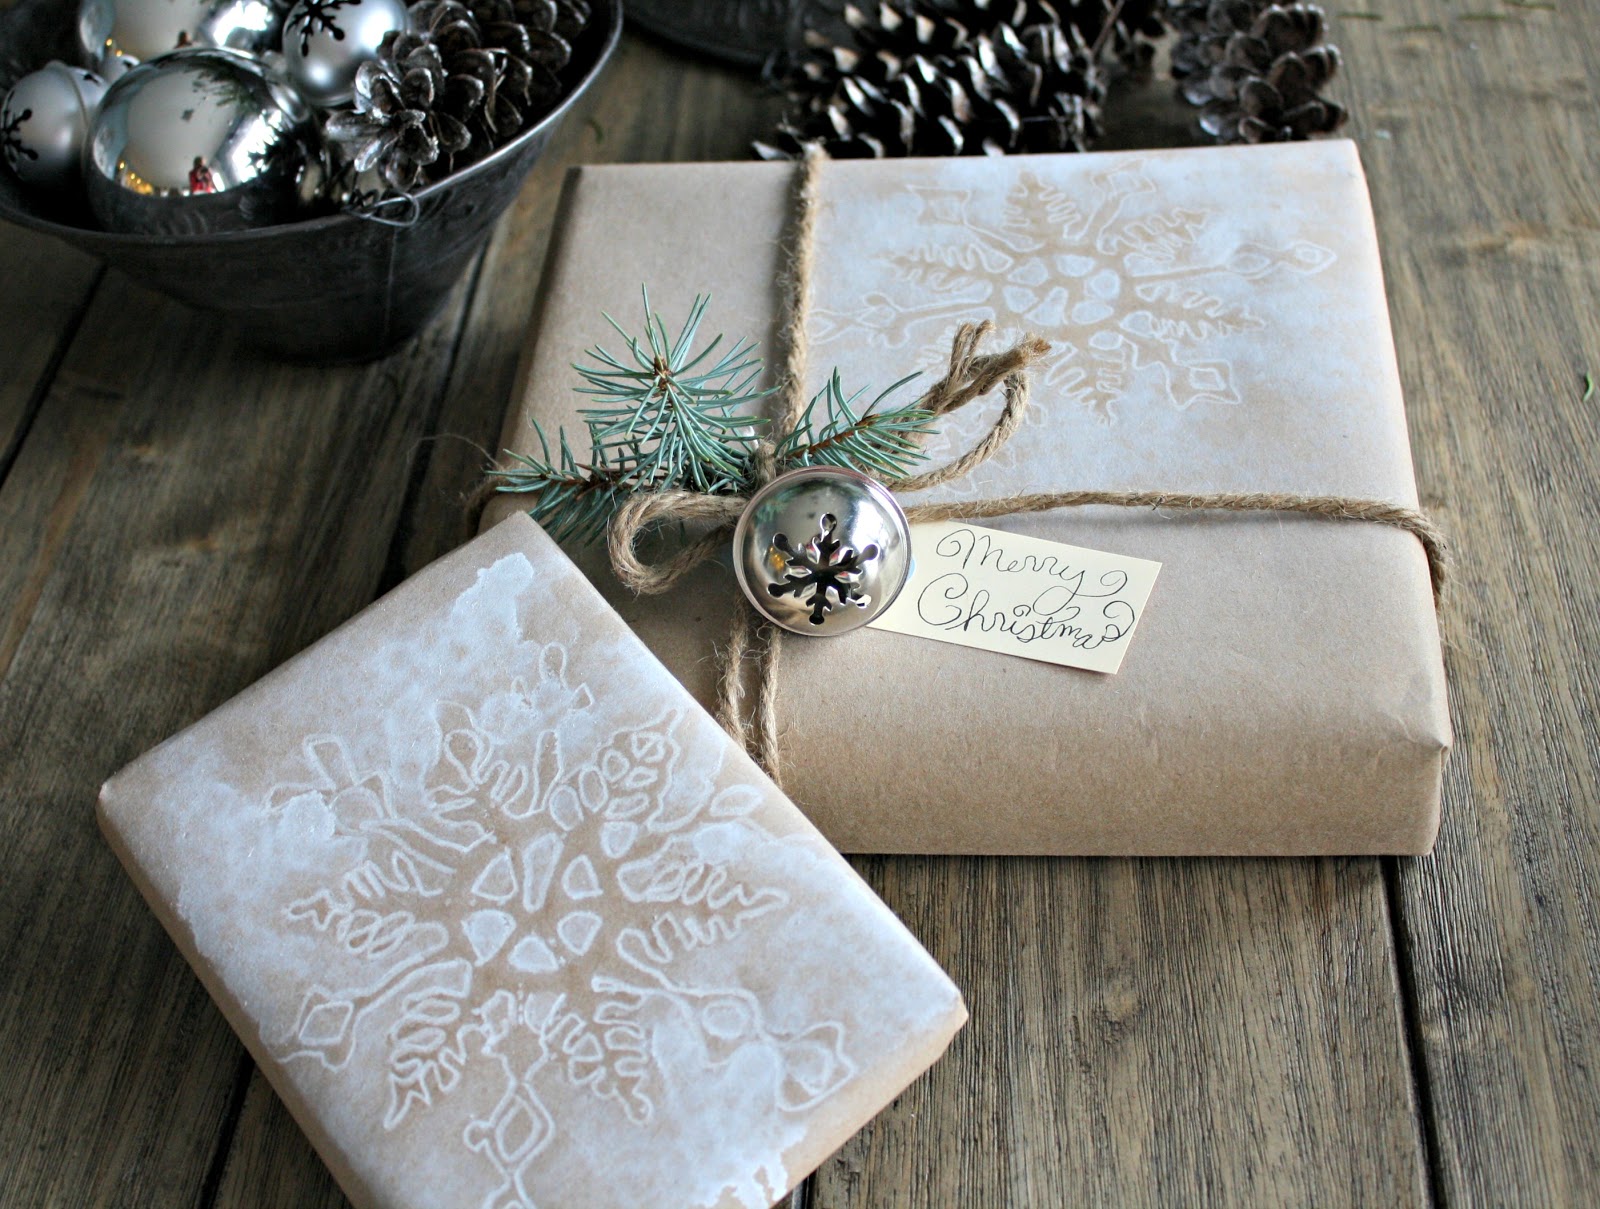
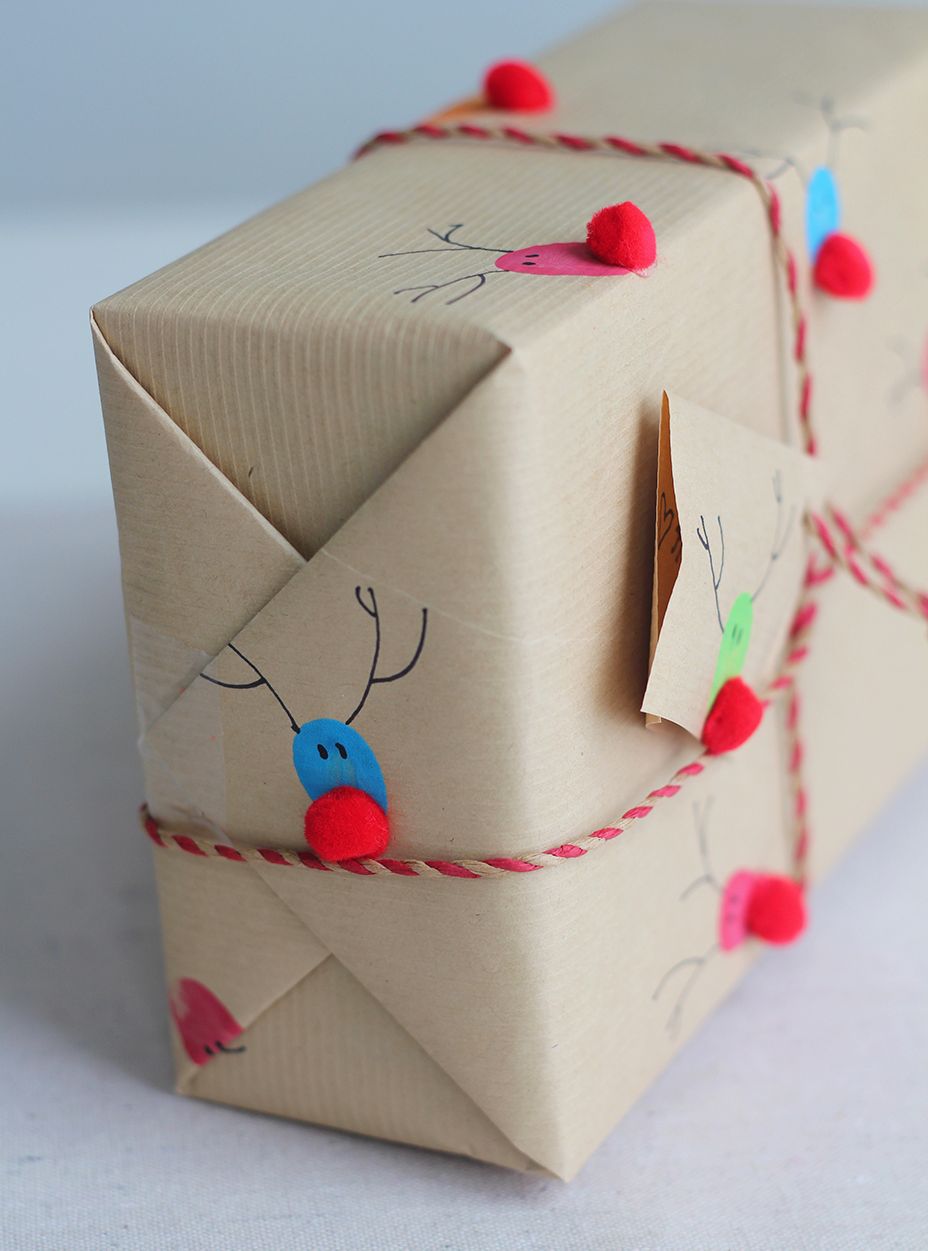
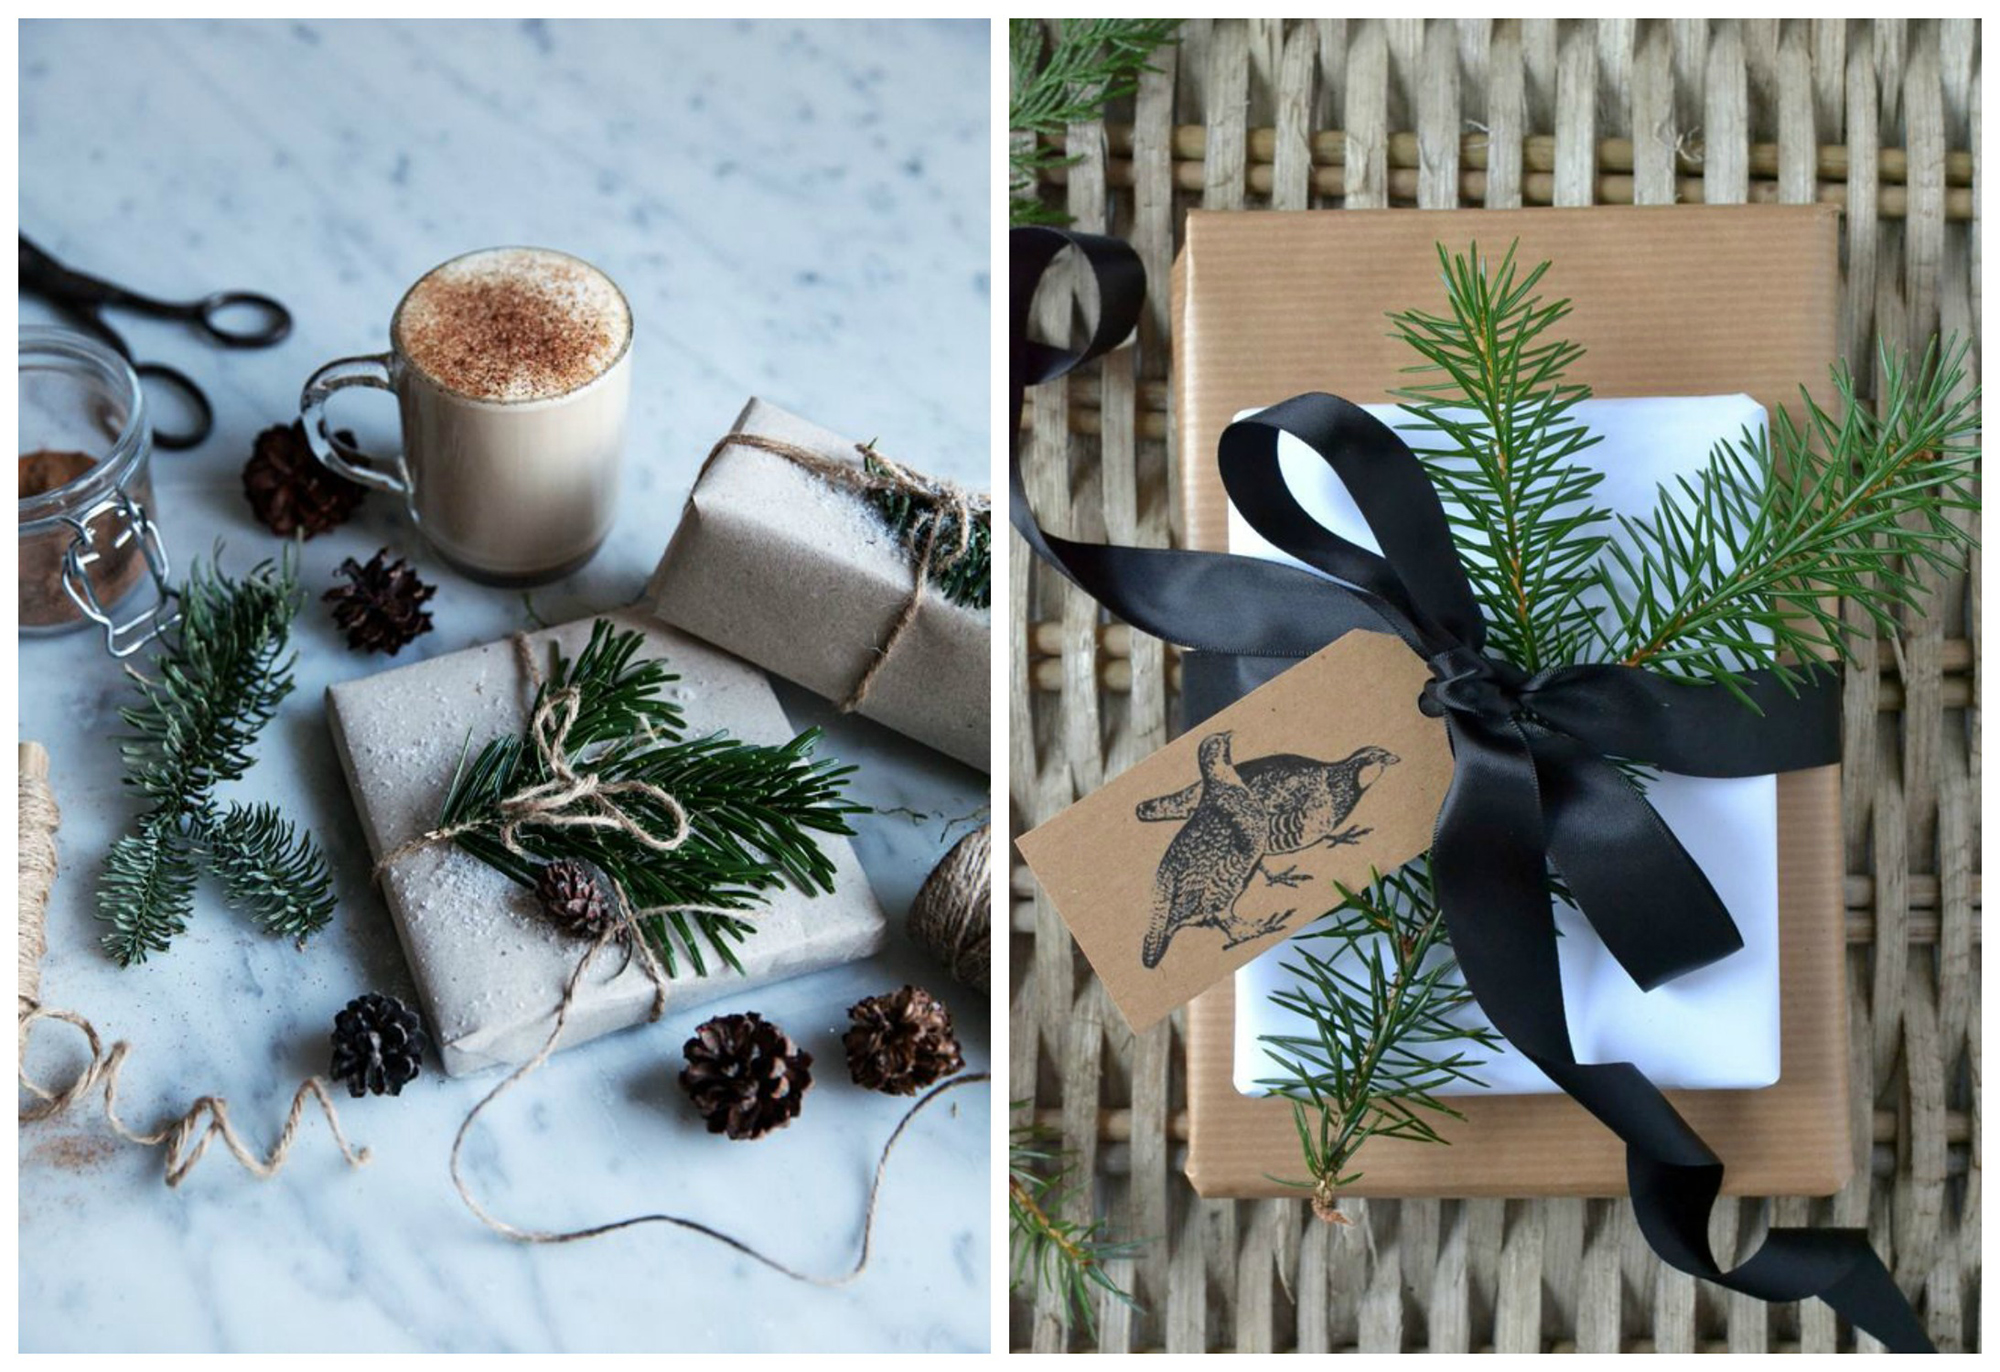
Fir sprig
A small sprig of fir, sage or a herbarium left over from the summer is the simplest and most effective way to decorate a minimalistically packaged box.
Beautiful and unusual DIY gift wrapping (50 photos)
An invitation to a holiday will inevitably raise questions among those invited - what to give and how to wrap the gift in an original way? Choosing a gift is a delicate matter. There are universal gifts:
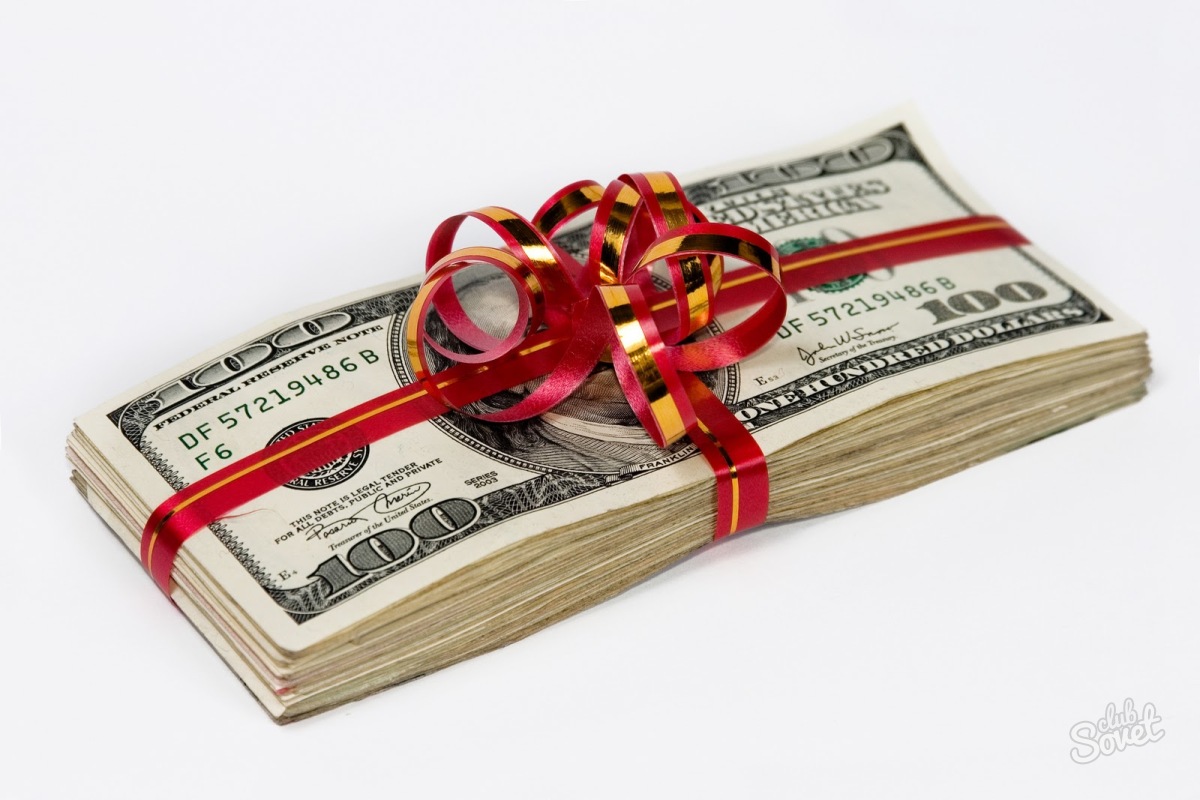
- money (for a wedding or birthday);
- a bottle of good whiskey or aged wine (relevant for men);
- large plush toys (for a child or newborn).
Popular design options are a beautiful gift bag, gift paper, or a creatively designed box. Wrapping gifts with your own hands, beautifully and unusually, is not at all a difficult task.
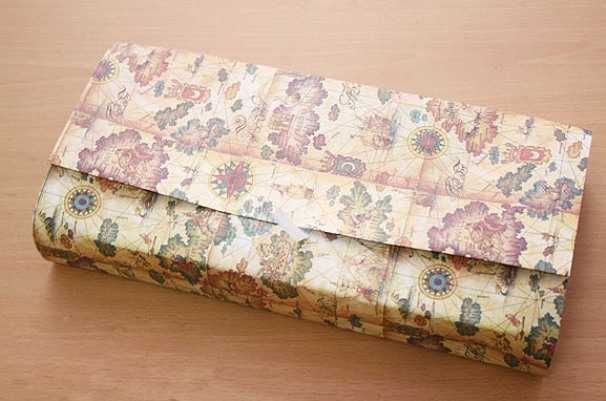
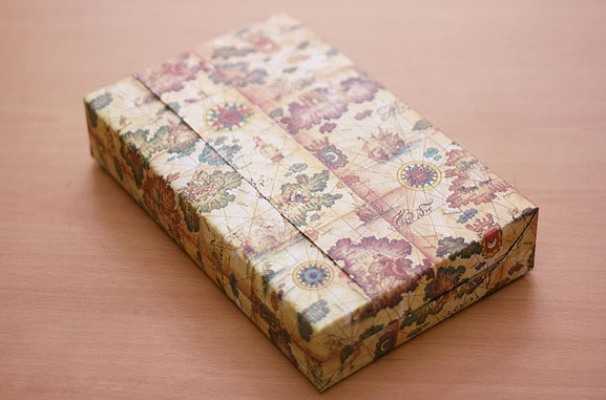
Wrapping paper
A very common option for gift wrapping is gift wrapping paper. This option is suitable for weddings, birthdays, and children's party, and if you just give candy. You don't need to have any special skills to carefully and beautifully wrap a rectangular box, book, picture or candy.
For packaging you will need:
- beautiful gift paper;
- scissors;
- tape (you can use regular transparent tape, buy a special one with a pattern, or, best of all, take double-sided adhesive tape).
The width of the paper must be no less than the length of the box folded to twice its height (a = b+2c, where a is the width of the paper, b is the length of the box, c is the height of the box). The length of the required amount of paper is the sum of the width of all sides of the parallelepiped box. It’s worth paying attention to this, because if you determine the dimensions correctly, it will be easier to pack.
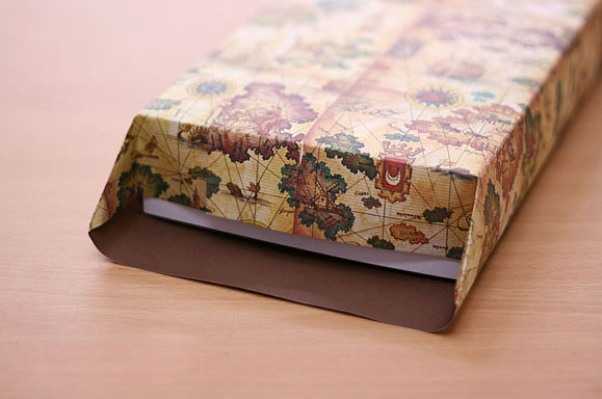
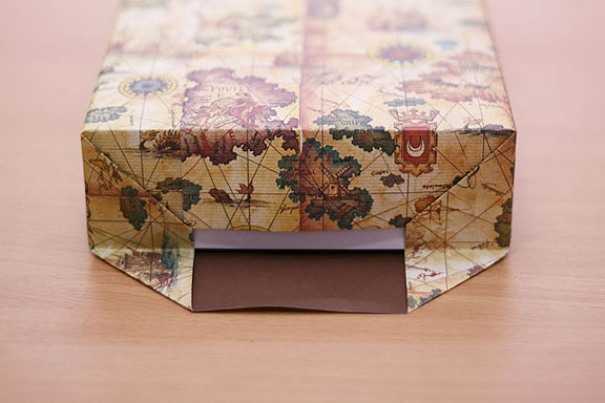
Packing process
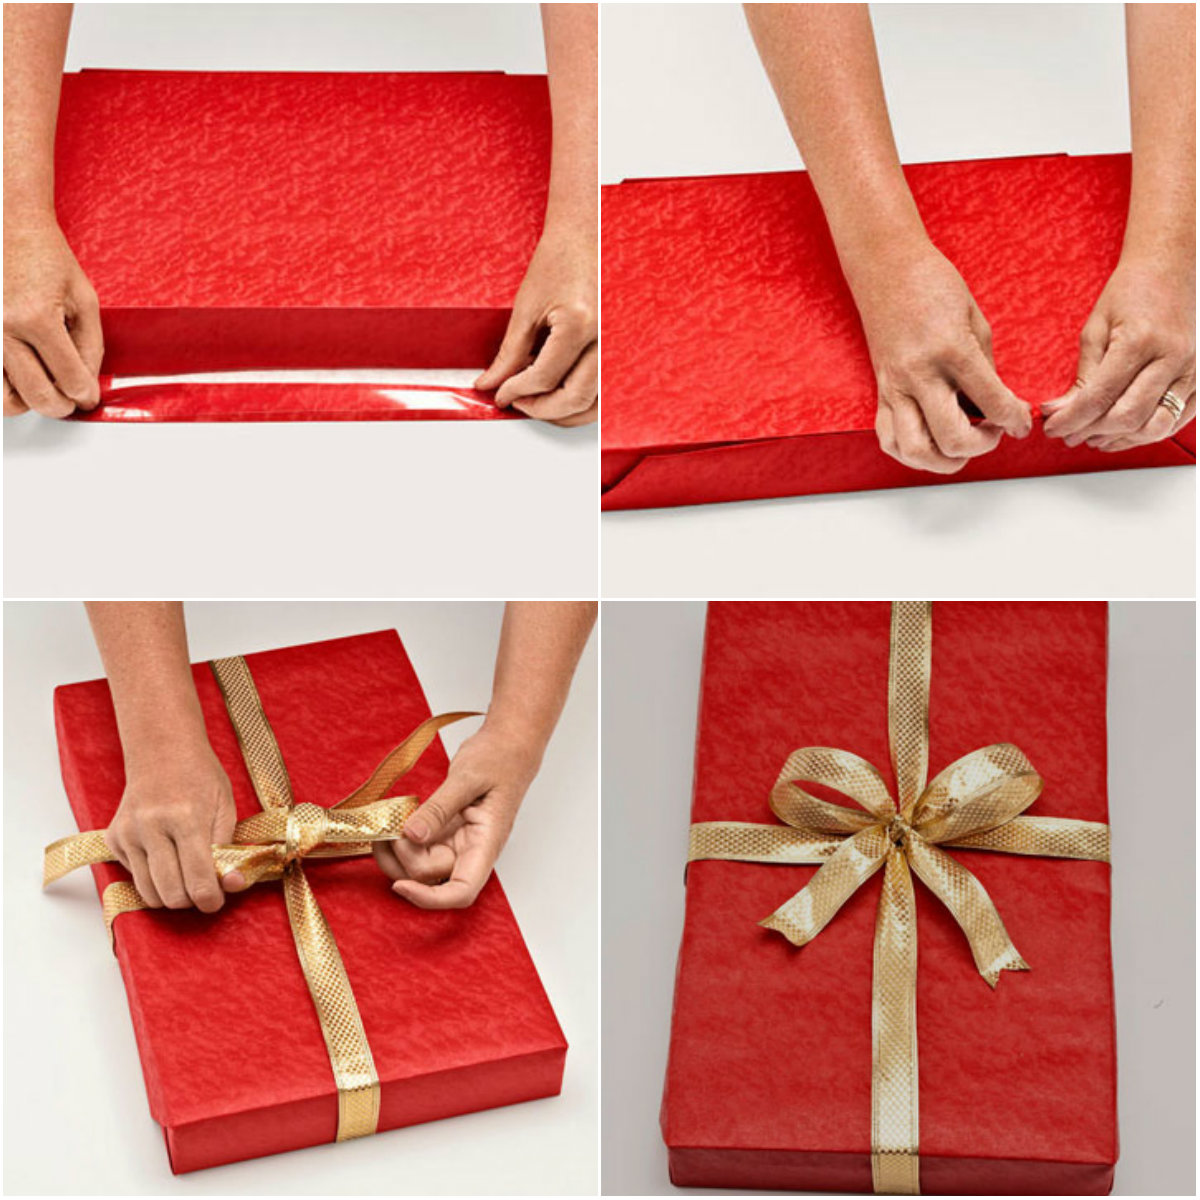
How to wrap a gift in paper:
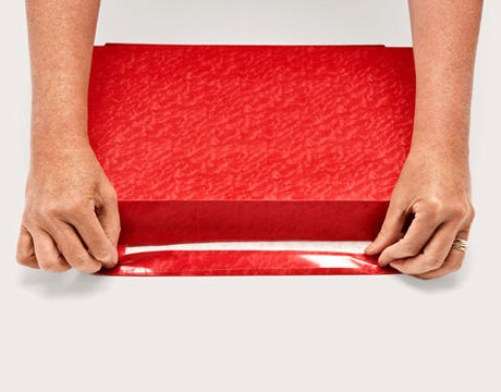
- We place a book or box with a gift in wrapping paper, across it. We glue tape to one of the edges of the paper and secure it to the box. It is better to measure in advance the amount of paper required for the wrapper and cut it off the roll, hiding the cut edge inside the package.
- Wrap tightly so that the joint of the edges of the paper is on top. We fasten the second edge of the wrapping paper.
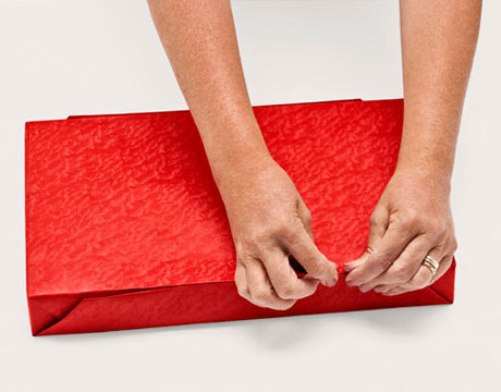
- Now we wrap the ends. Bend the top part and secure it with tape.
- Then there are two options: either we wrap the side parts, or the bottom part. The final result depends on this appearance packaging. If you use double-sided tape, then there is no problem - it will not be visible.
- Repeat the same on the other side of the box.
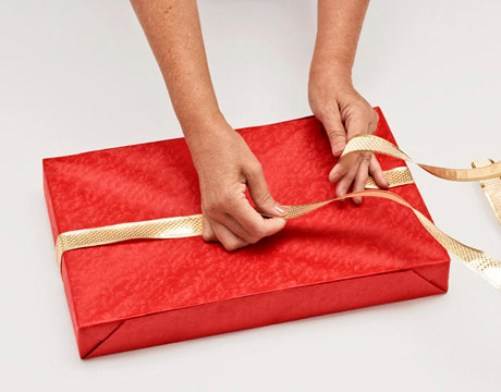
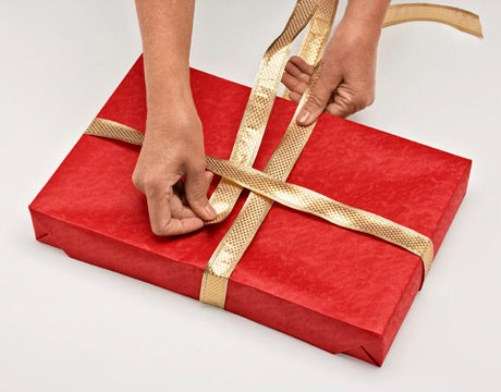
- Add decorative bows or tie with ribbon. The beautiful book packaging is ready!
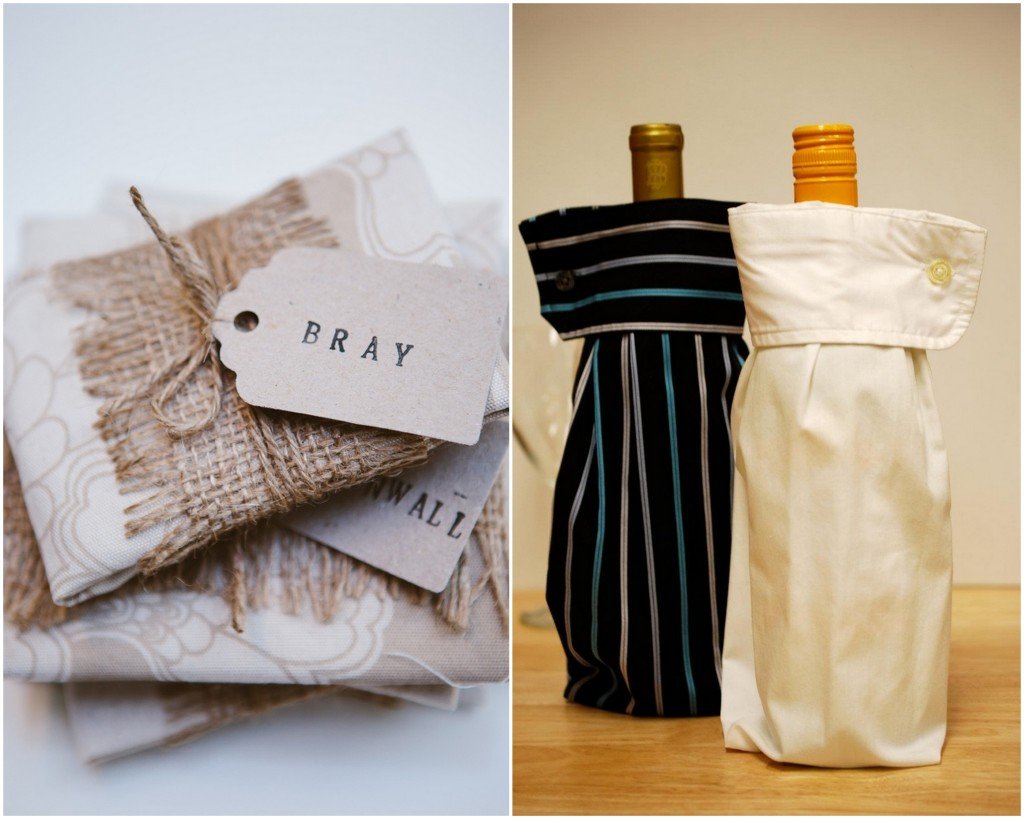
This type of packaging is good for placing rectangular gifts, such as a book, perfume or candy. If it is not possible to purchase wrapping paper or the gift is too large (for example, a large painting or a toy for a newborn), then interesting idea for packaging - use of fabric. This will be especially appropriate for gift wrapping for a chintz wedding (first anniversary life together) or for a holiday in honor of a newborn. The fabric should be used in the same way as paper; it can be secured with tape or glue.
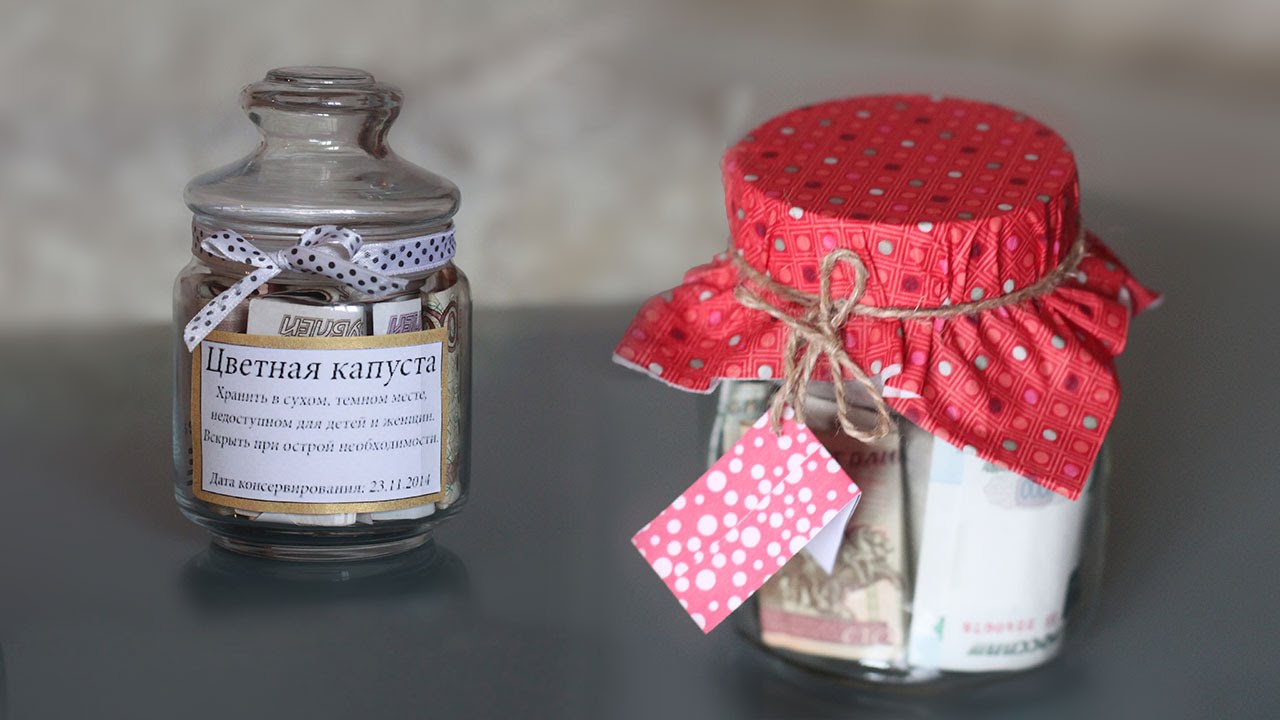
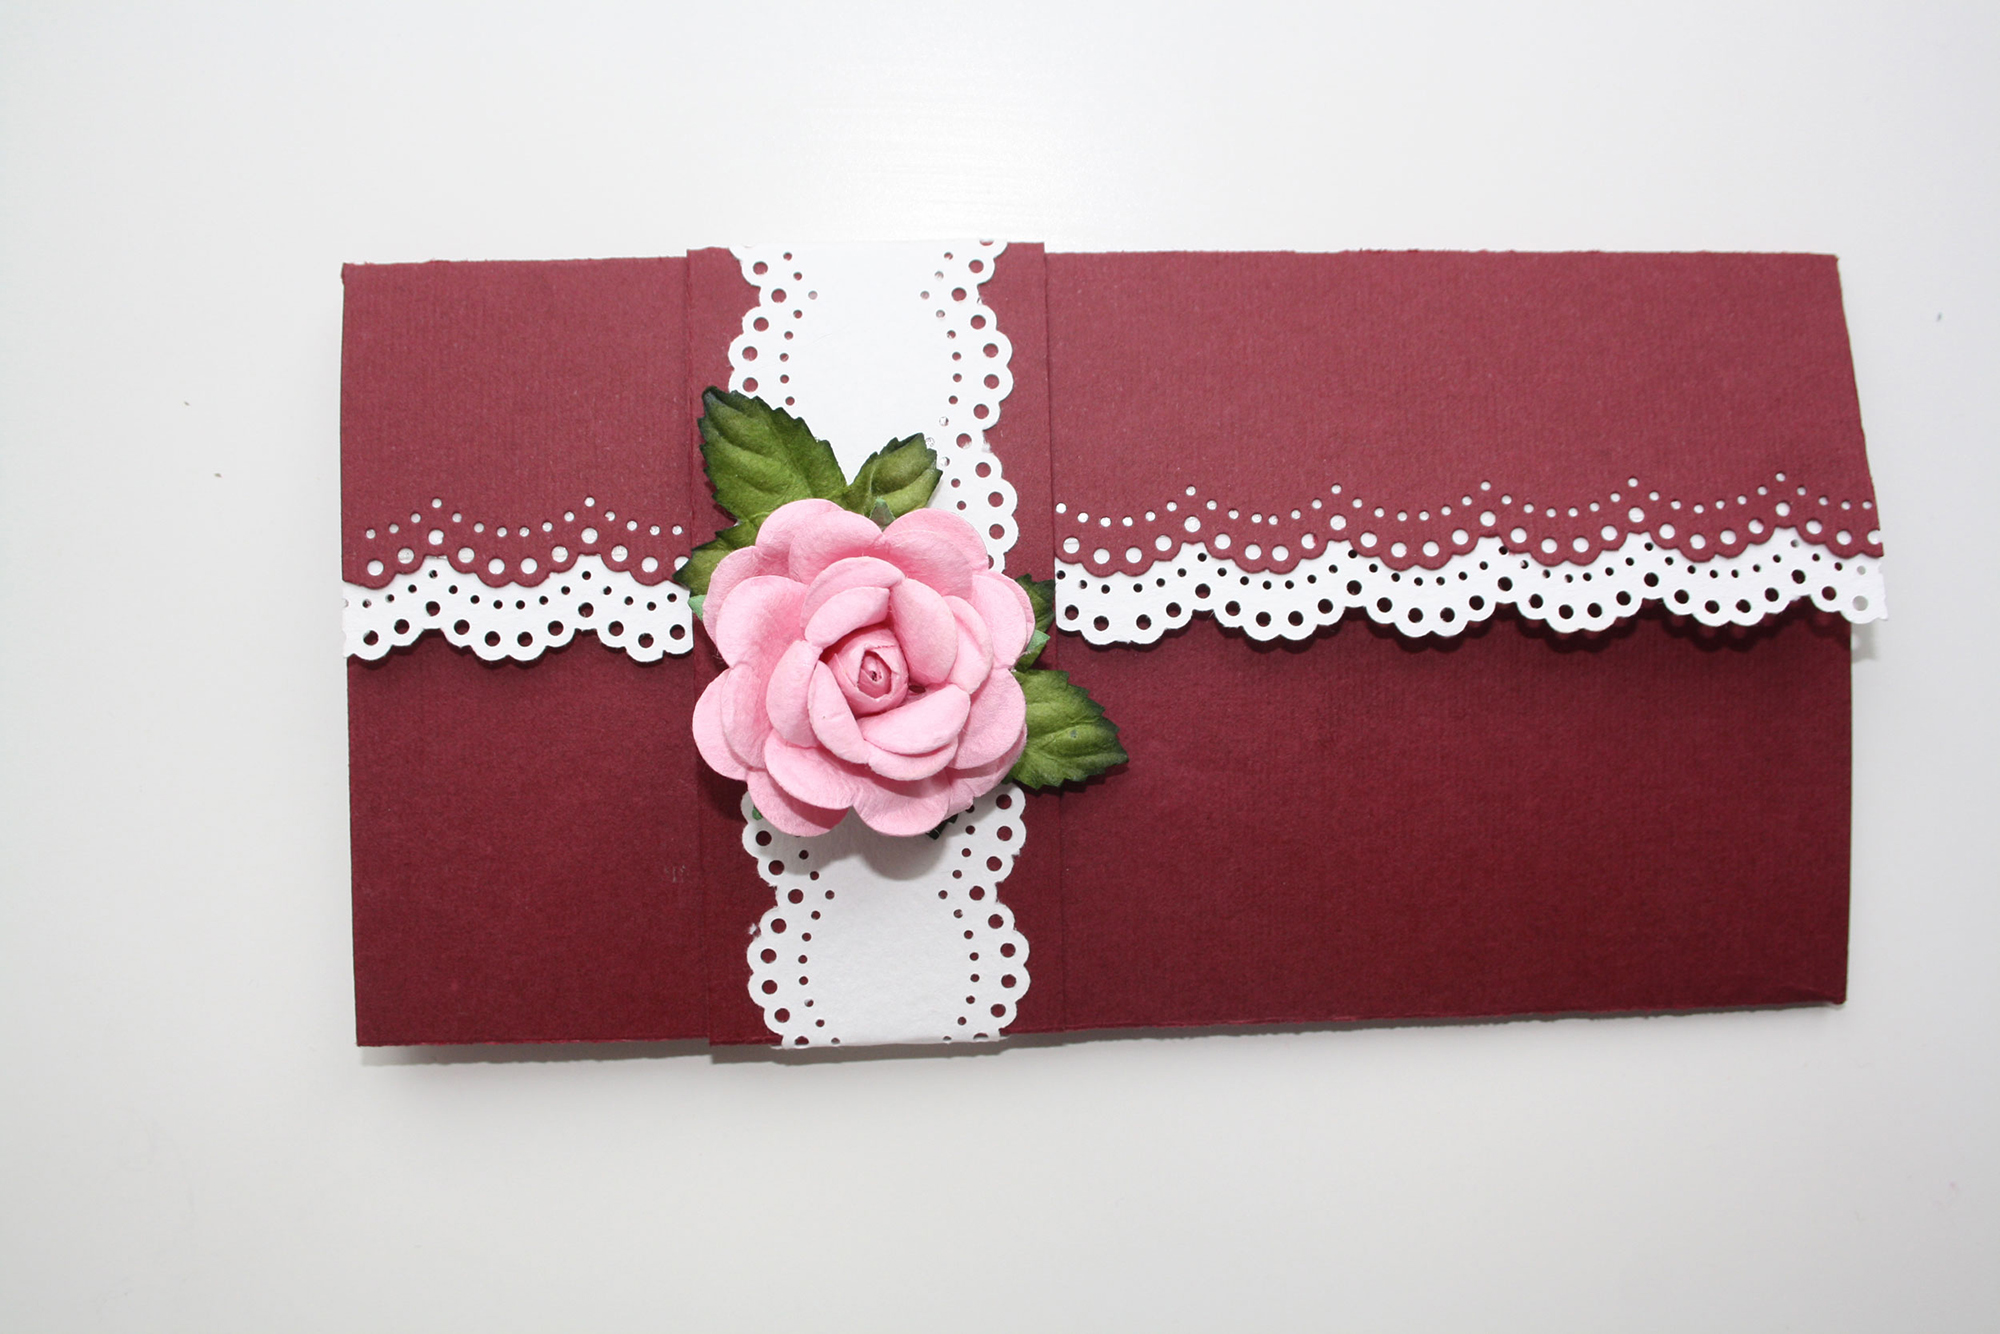
How to give money
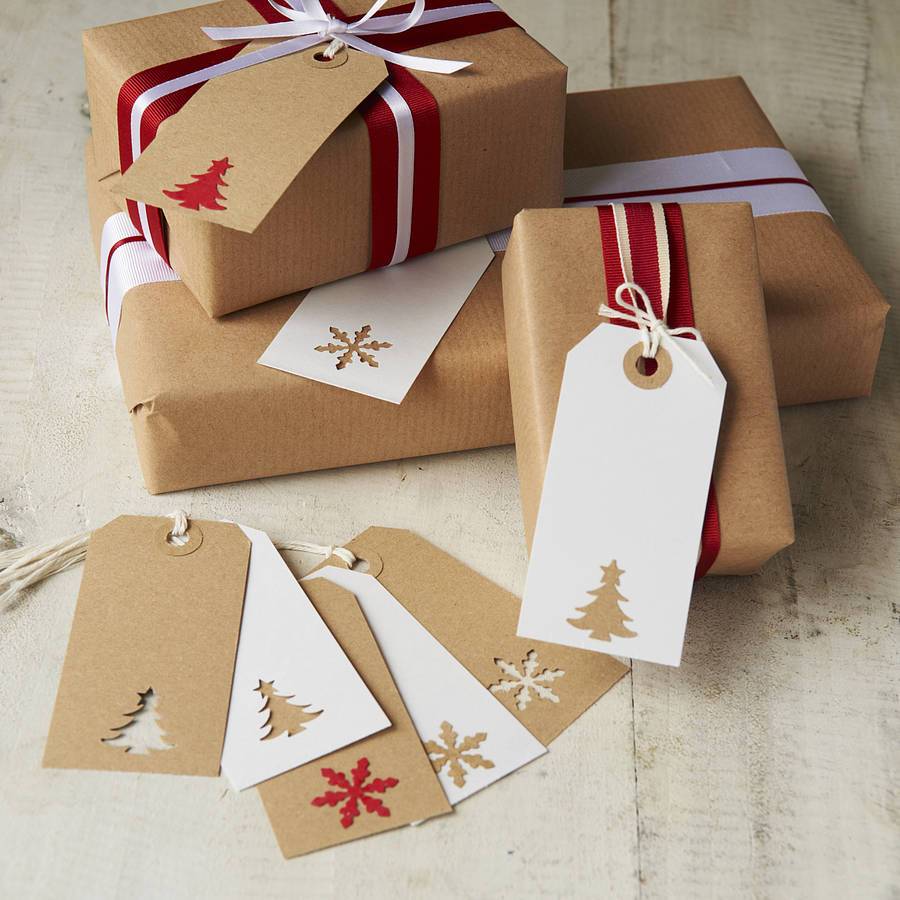
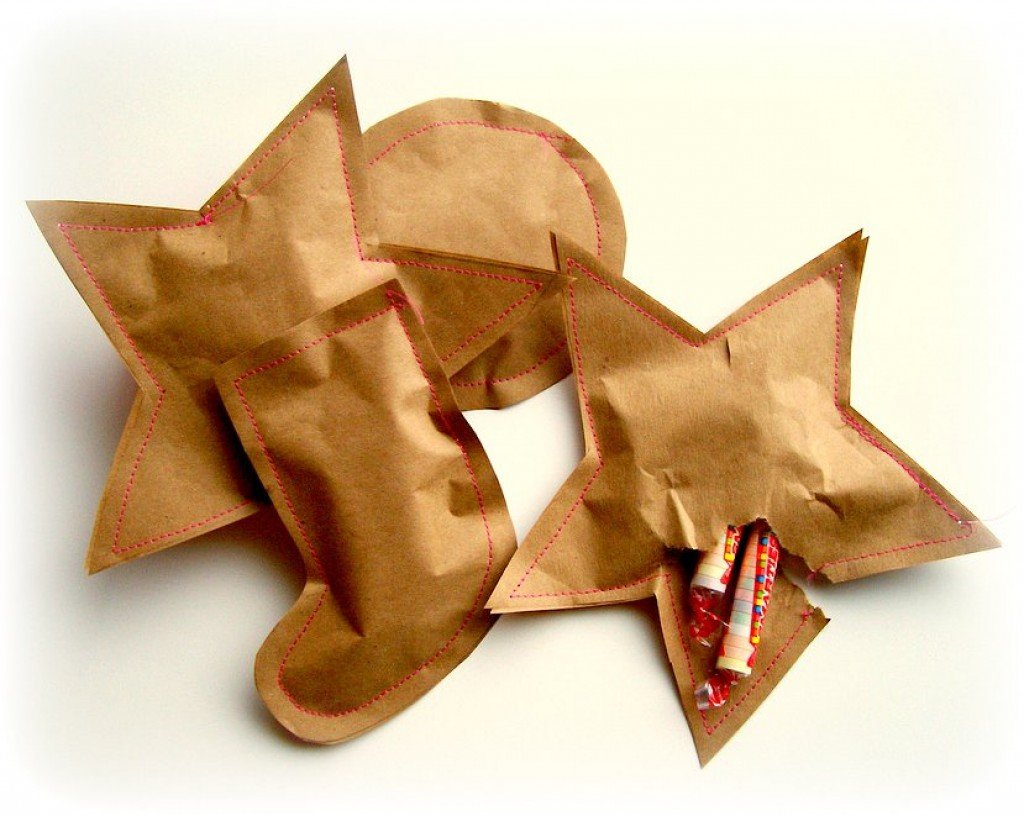
Money is usually given in an envelope that can be made at home. This great gift for a wedding or birthday! It is better to make an envelope for money from thick paper. Good idea- use of kraft paper as the basis of an envelope for money. Decorate it with appliqués, glitter or ribbons for an interesting and unique package.
DIY gift wrapping of custom shapes
To wrap gifts of non-standard shape, you need to get a little creative. Original idea for small gifts - this is packaging in a gift shirt or T-shirt:
- We put the gift on the T-shirt, in its central part.
- Alternately bend the upper part first, then the lower one towards the center.
- We also fold the sides of the T-shirt. This packaging will look unusual.
- To secure such packaging, use decorative or satin ribbon, bias tape, twine or twine. Carefully tie a bow and you're done.
If you choose a T-shirt with long sleeve(such as a sweatshirt or turtleneck), you can make a knot for fastening from the sleeves. Great option, if you want to give your friend candy and an original T-shirt.
![]()
Gift wrapping for a man
An idea for packing a shirt as a gift for your husband for his birthday is a homemade bag made of thick paper. A man will appreciate not only the gift itself, but also the effort put into making the bag. You will need:
- wrapping paper;
- scissors;
- glue and tape;
- tape for handles.
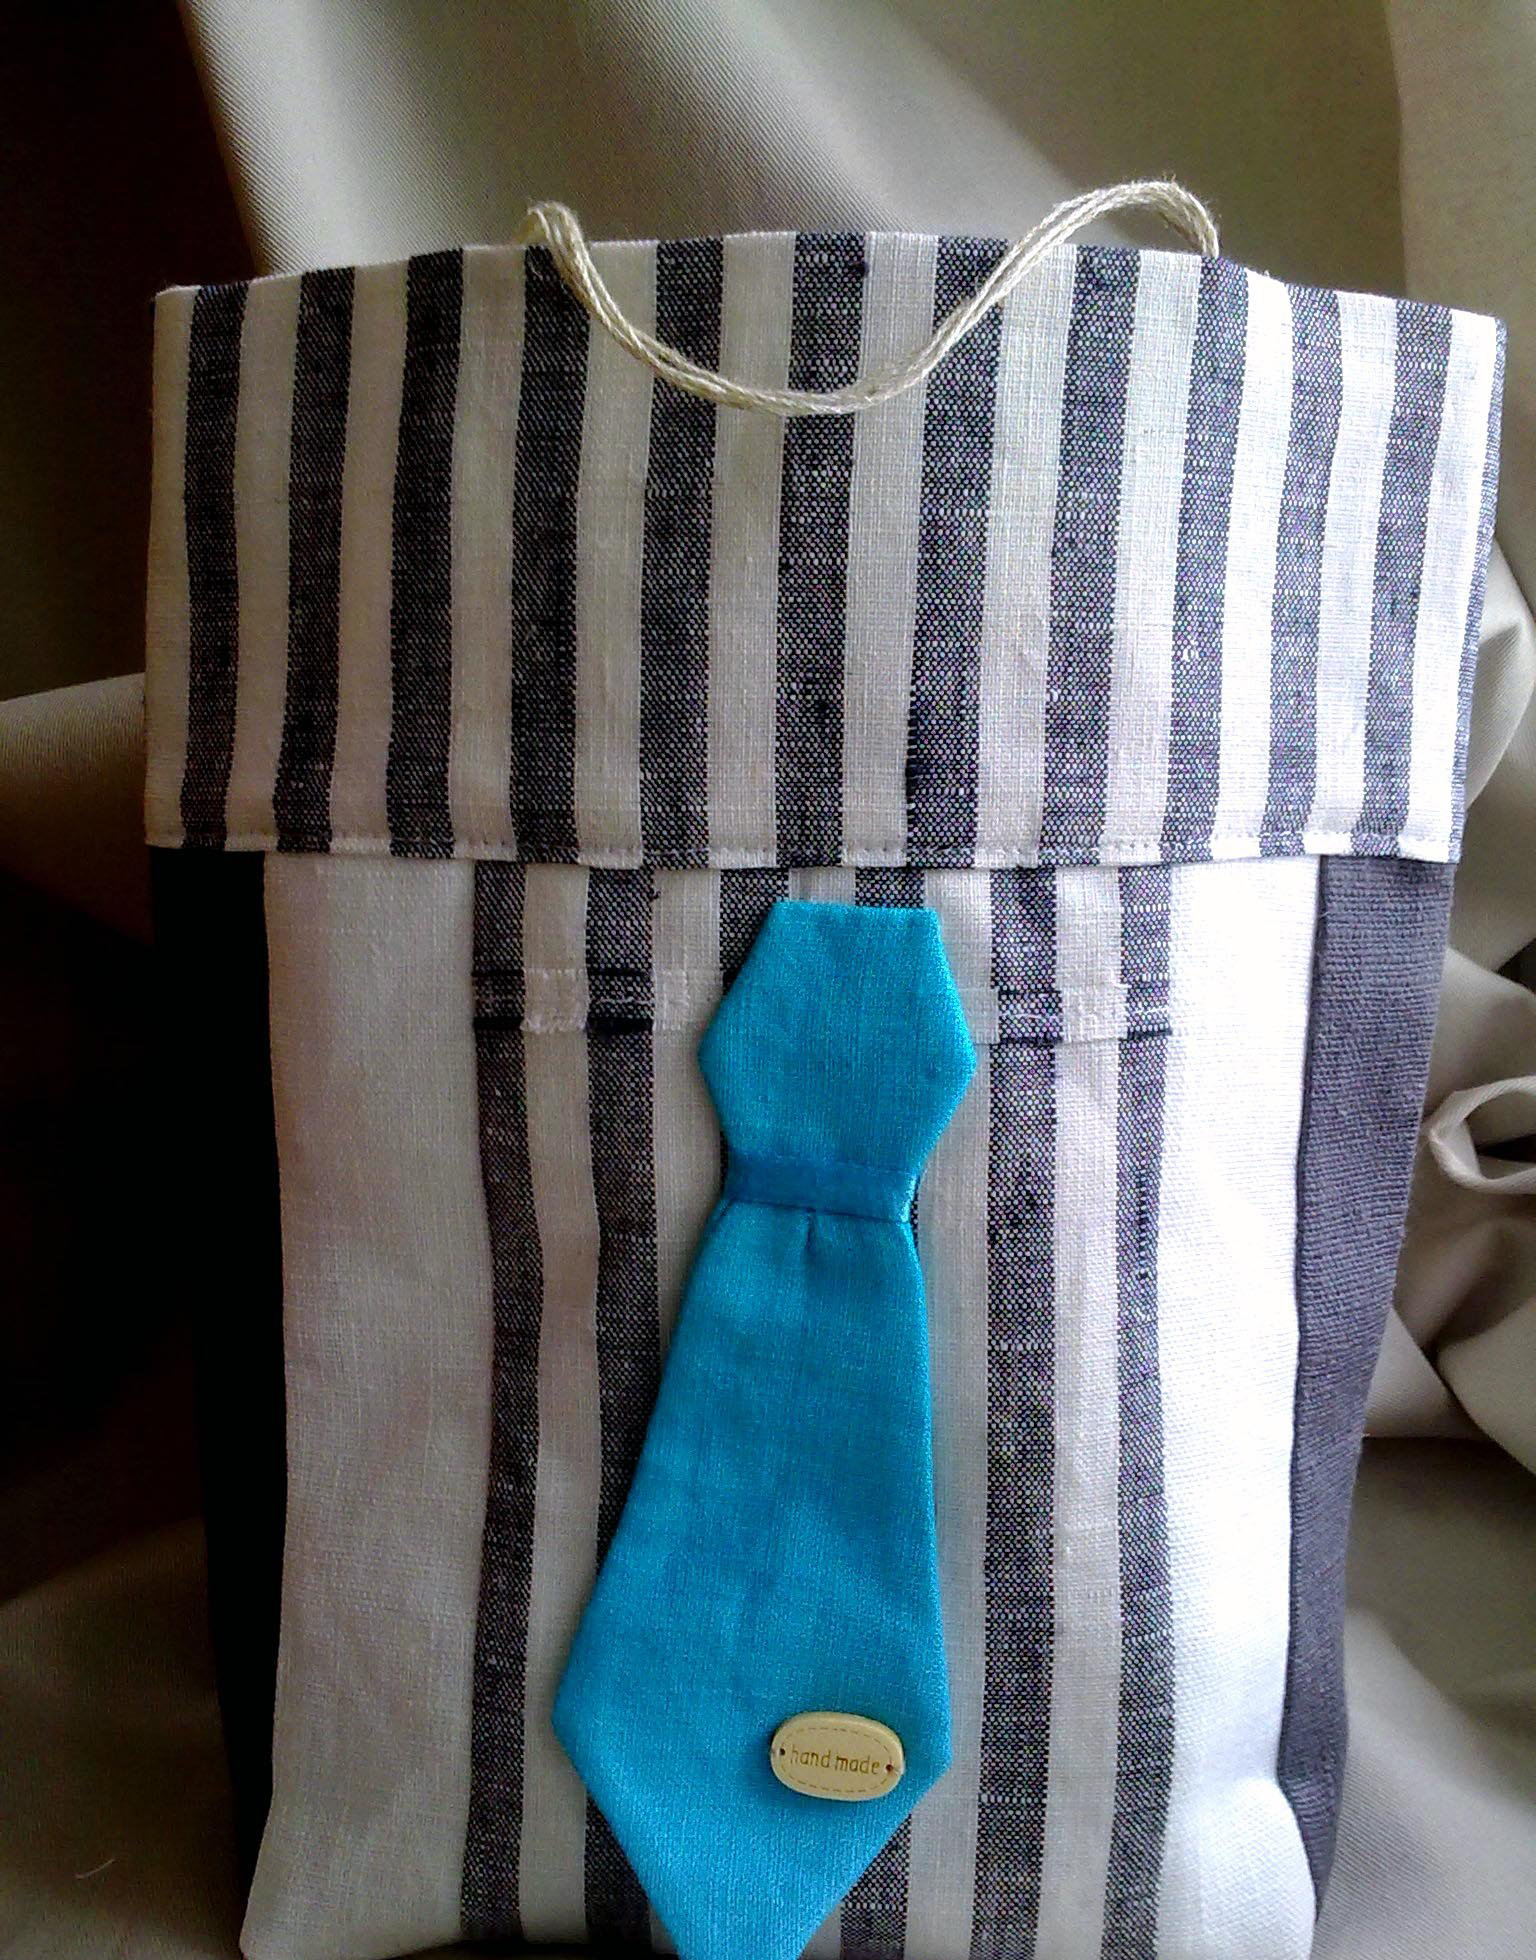
How to do:
- Fold the measured paper in half and secure the long free edges with tape.
- Place the junction of the edges not on the fold of the package, but closer to the center. We transform the lower part into the bottom of the package. Make a fold (the distance will be equal to the width of the bottom). Separate the sides of the bag, fold the corners on both sides inward, making triangles. The side fold line on each triangle should coincide with the bottom fold line. Fold the bottom and top edges so that they are in place of the main fold. We fix this connection with tape. This is the most difficult stage of making a bag.
- Take a rectangle of thick paper and glue tape-handles to it. Handicraft stores have blanks that you can purchase to significantly reduce the time it takes to make a bag.
- We glue the rectangle with handles from the inside on opposite sides of the package. We wait until everything is dry and lay the shirt down.
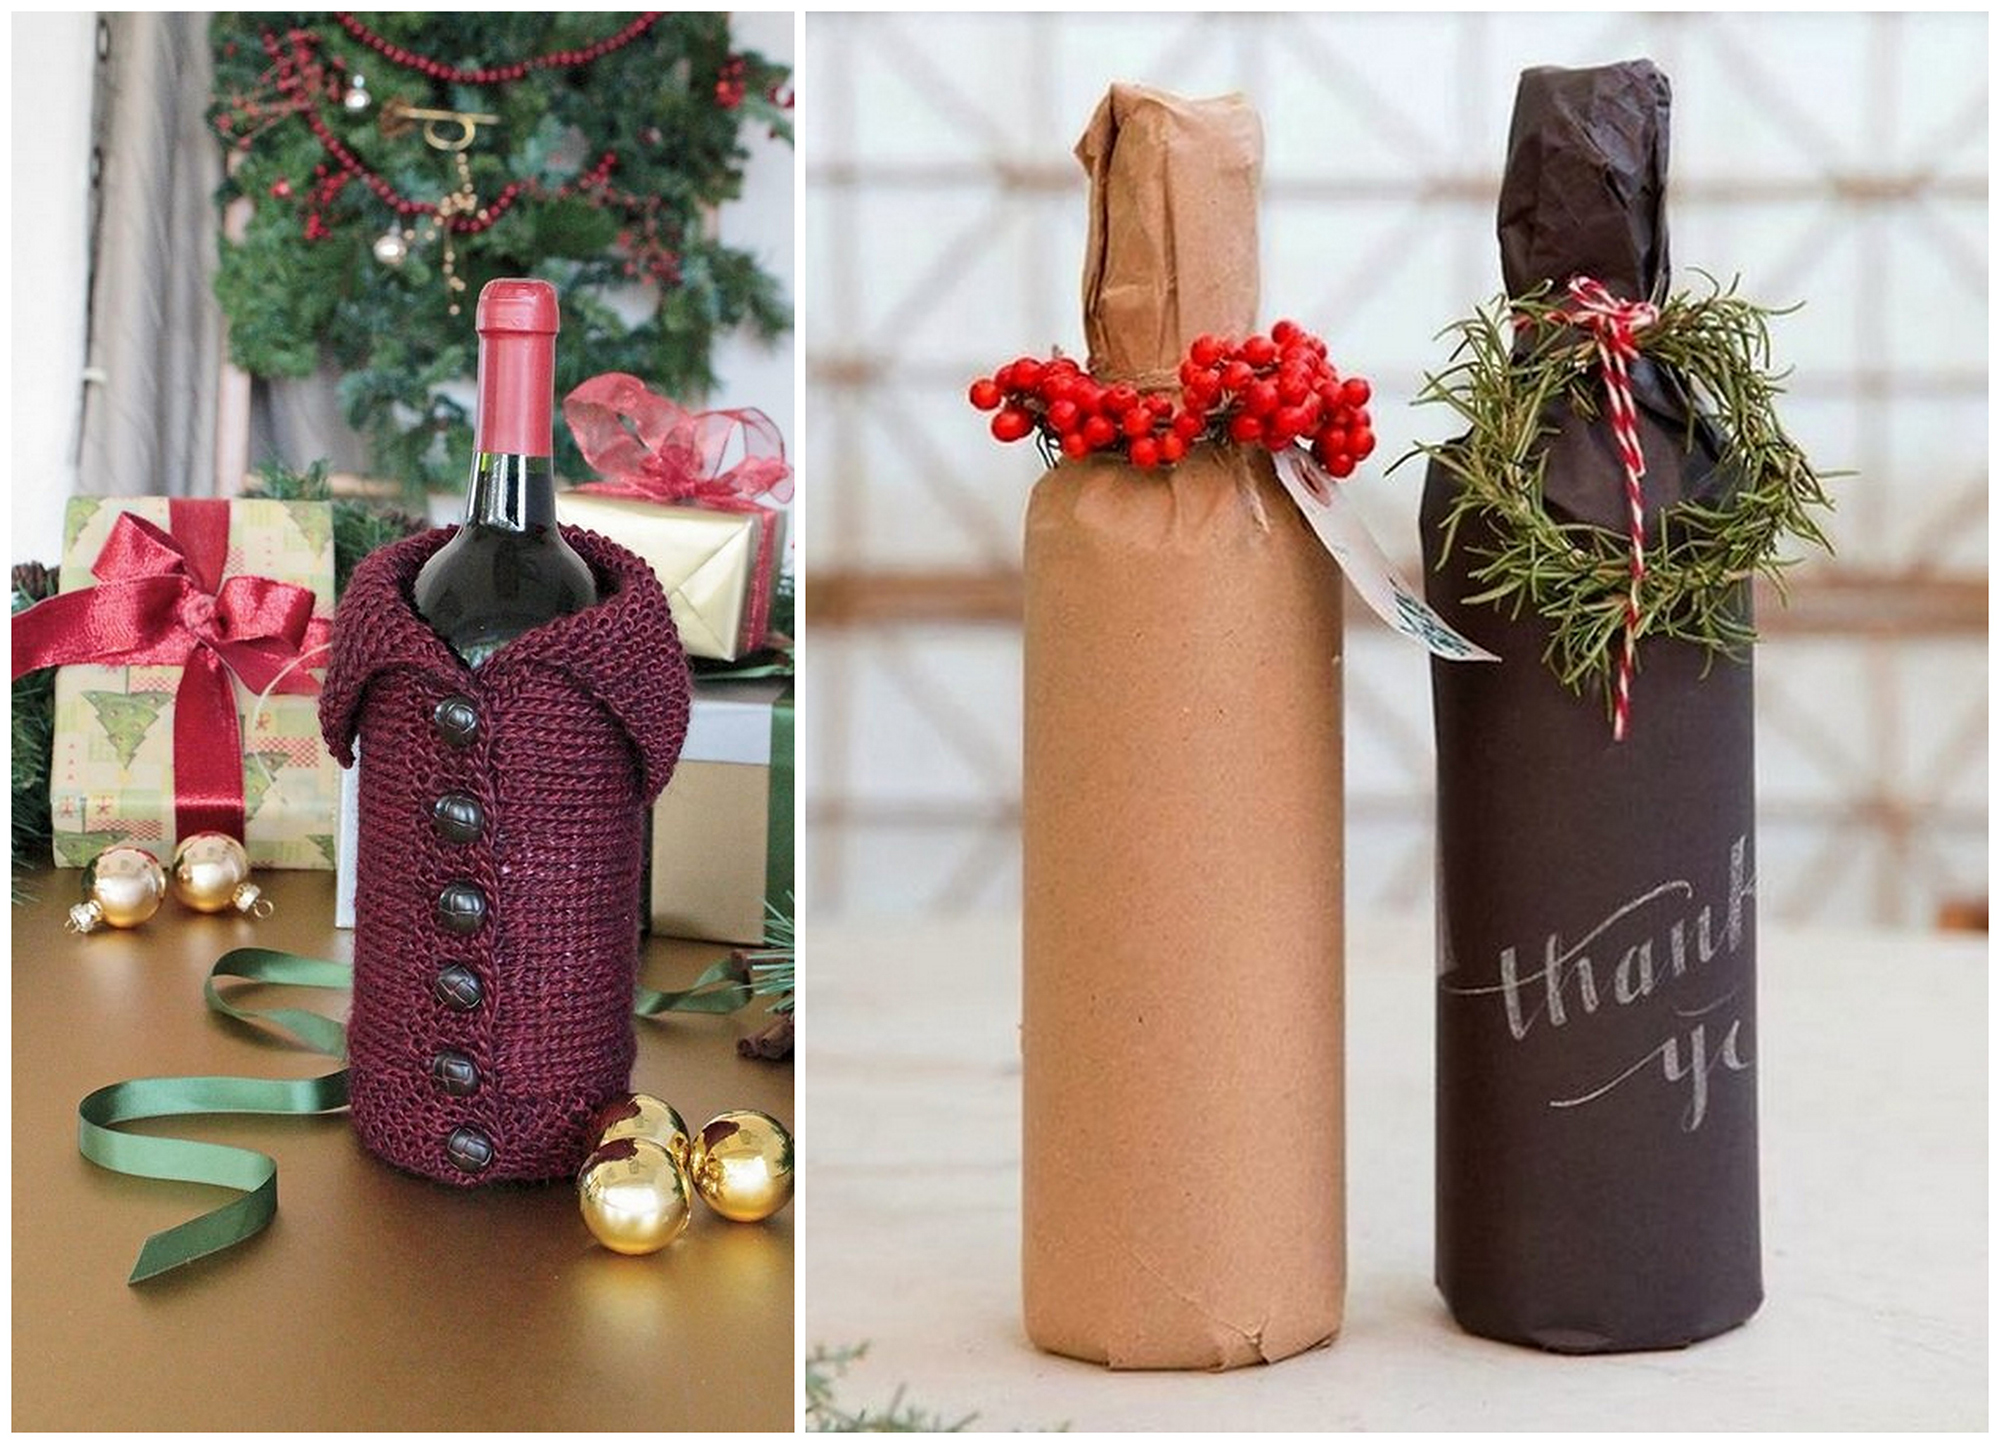
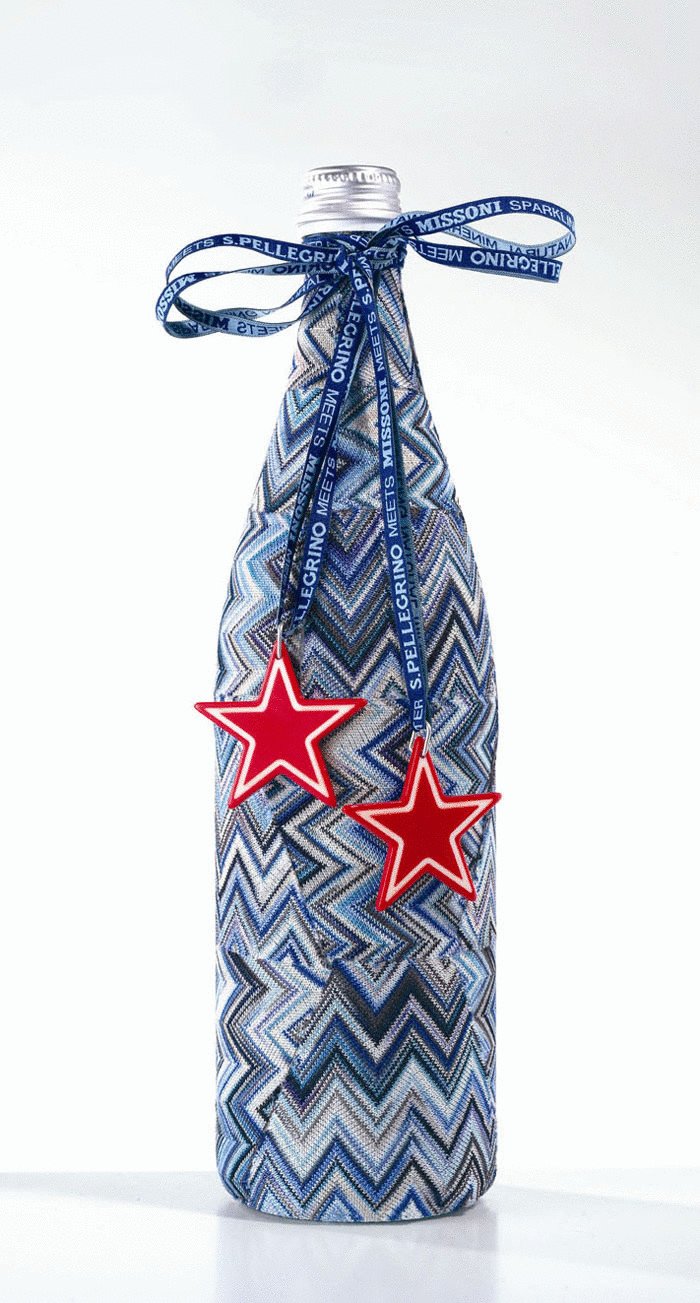
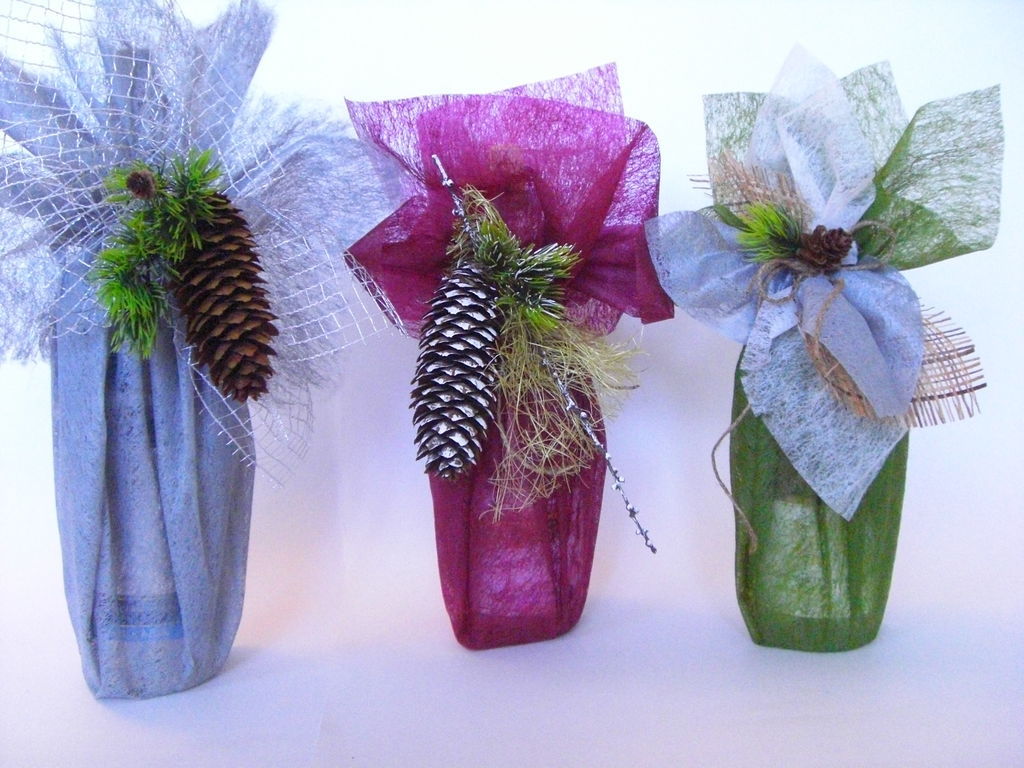
Original bottle packaging
Good alcohol is often given as a gift, especially to men. How to pack a bottle as a gift so that it looks beautiful and elegant? You can use paper.
- Cut a strip of paper to the appropriate width.
- Wrap the paper around the bottle, securing the edges with tape.
- At the bottom of the bottle you need to carefully bend the edges of the paper and secure with tape.
- Tie the neck with a beautiful ribbon. Cut the remaining paper into narrow strips and twist with scissors.
The second idea for packaging a bottle as a gift for a man is a suit. The bottle costume looks very interesting and creative.
- Take an old shirt and cut off the sleeve.
- We place the bottle in it with the neck to the cuff so that it completely covers the neck.
- Sew the edges at the bottom of the bottle. You can get more sophisticated and cut out a separate part for the bottom of the bottle.
- Place an accessory (bow tie or tie for men, mini beads for women) at the bottom of the neck. You'll get a real costume for a bottle!
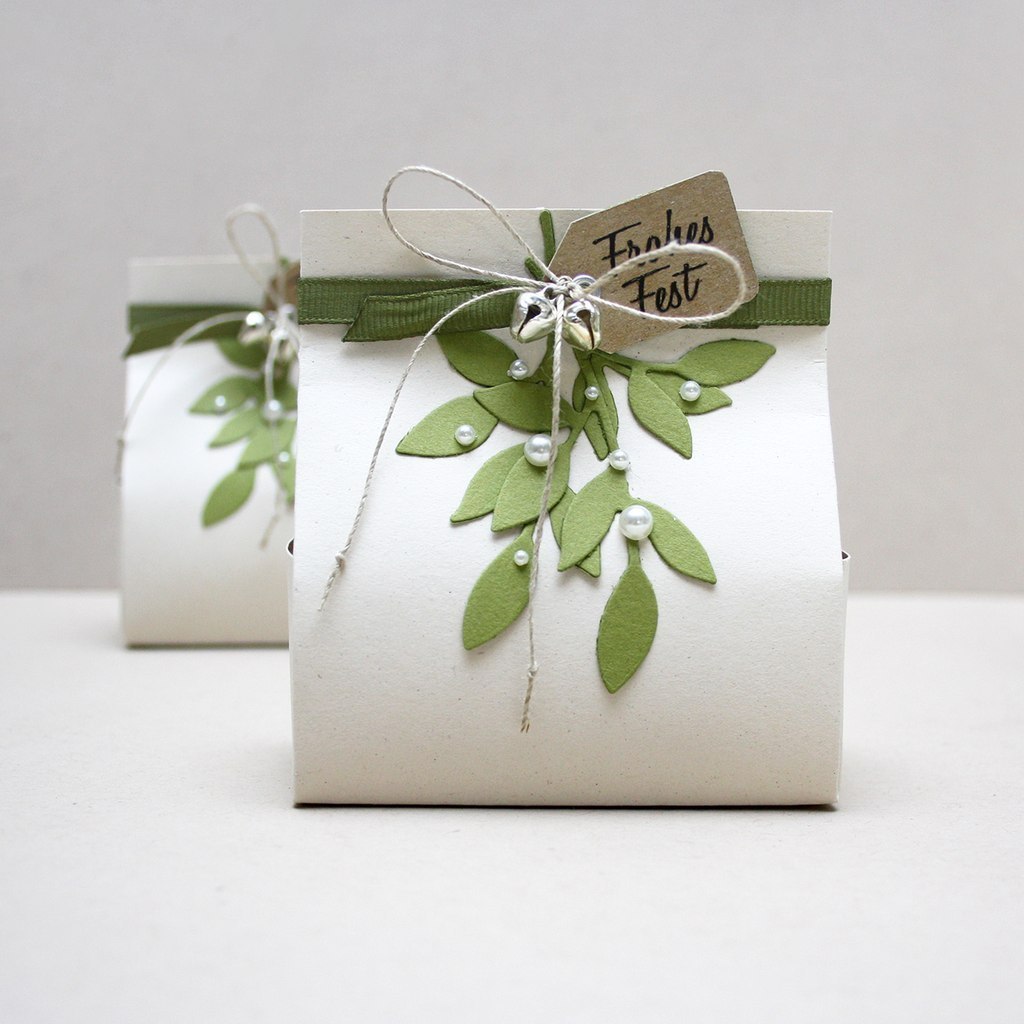
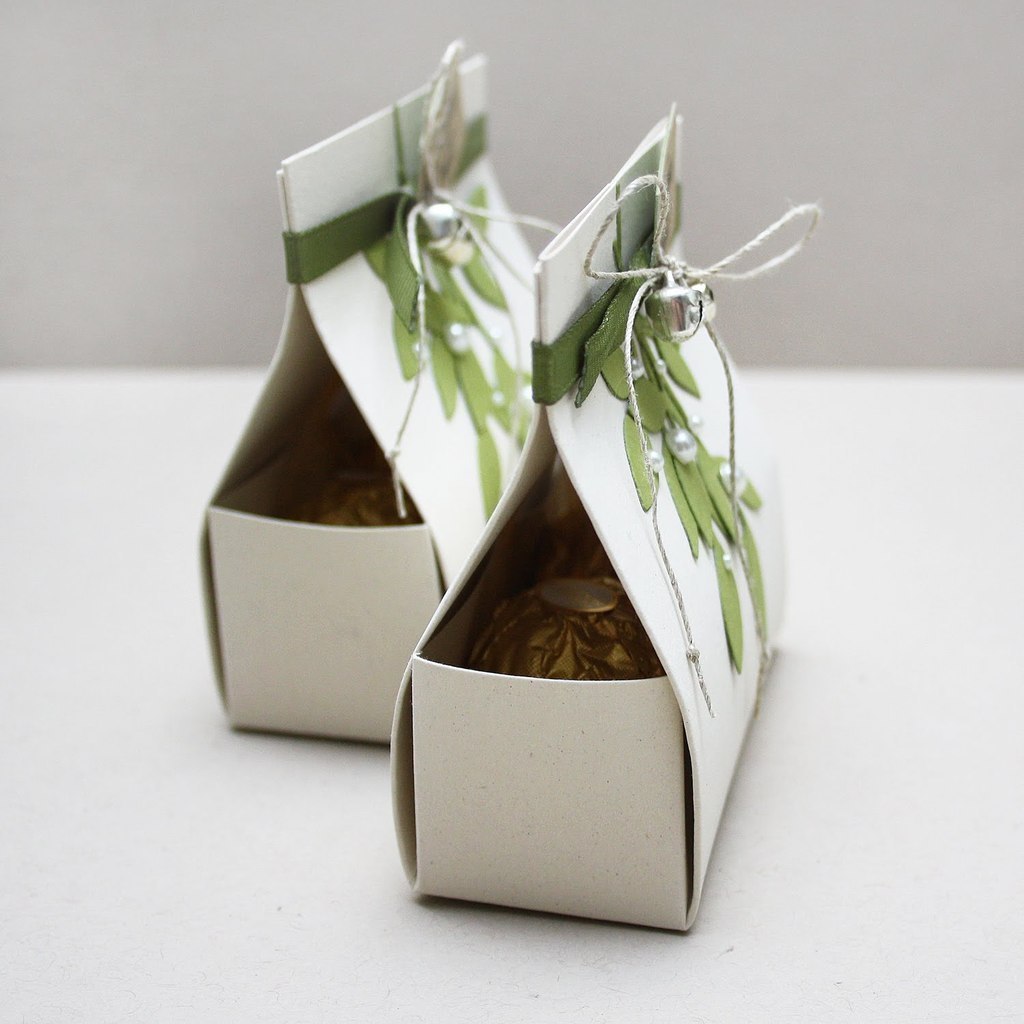
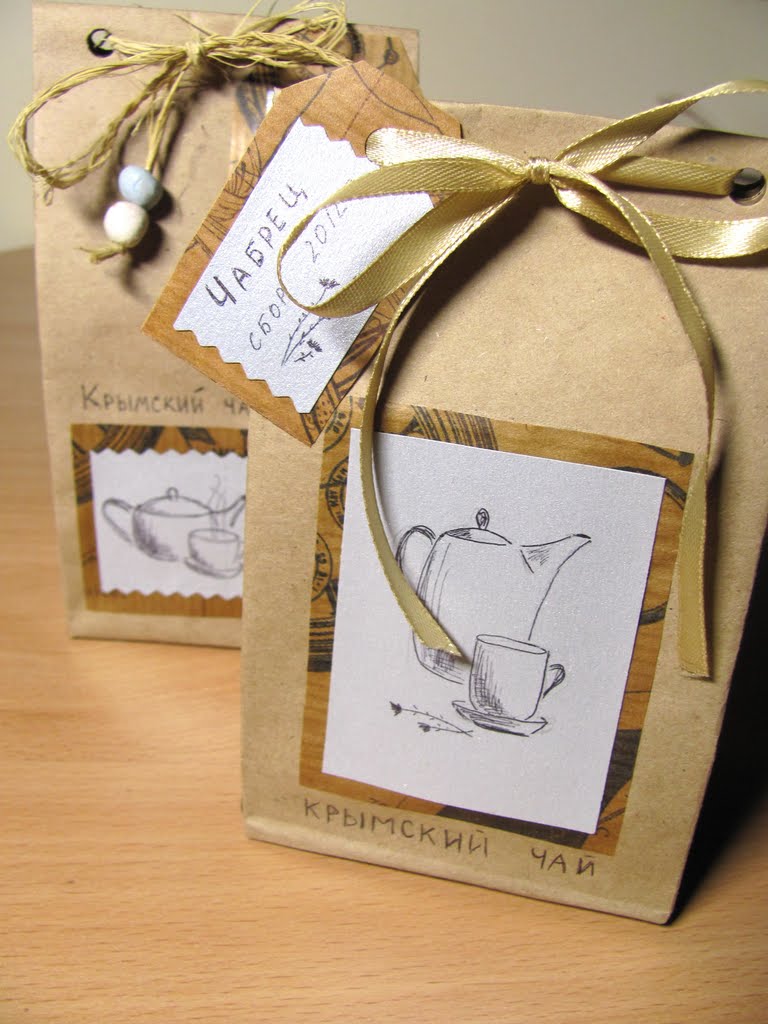
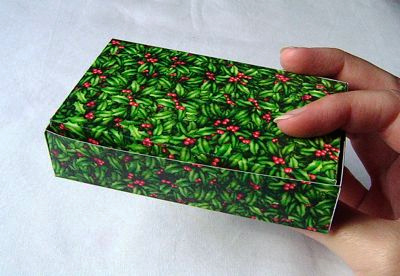
How to pack tea as a gift in an original way
In special stores that sell tea, there is a wide selection of all kinds of metal and wooden jars. But if you want to surprise the recipient, then make gift packaging for tea with your own hands.
Types of packaging:
- a bag made of transparent film (suitable for giving gourmet tea);
- Kraft paper packaging;
- original shaped box.
To pack tea, it is better to choose rigid transparent film so that it forms something like a box rather than a bag. You can use floral film: it is easy to find and the color variations are very wide.
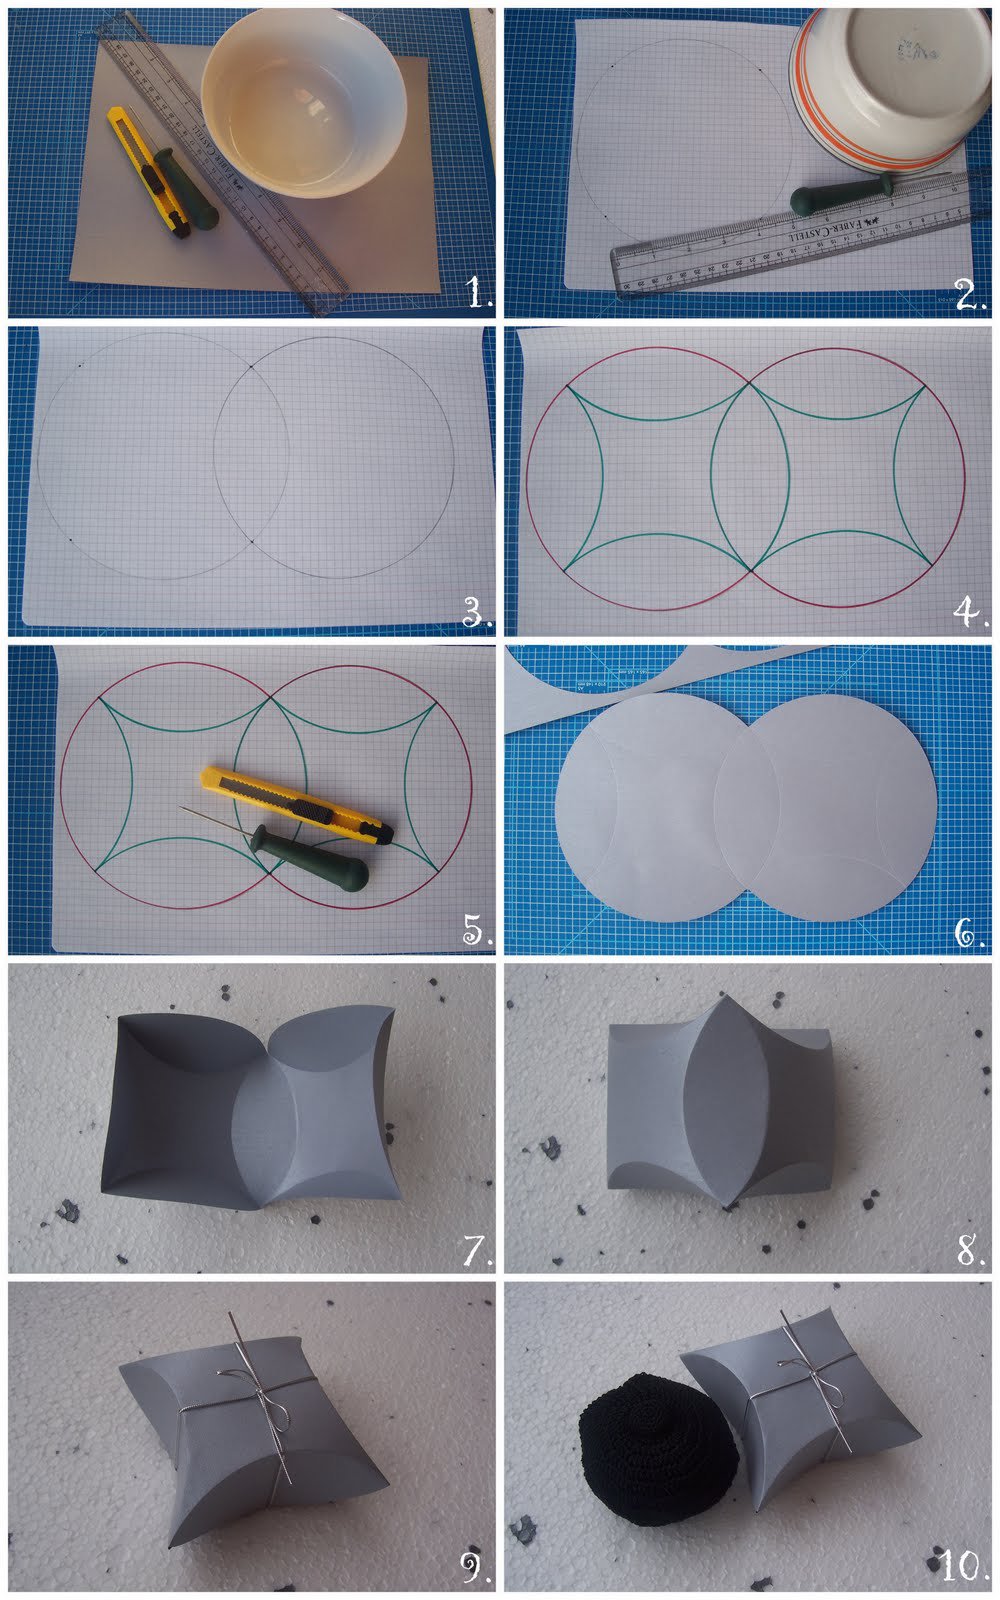
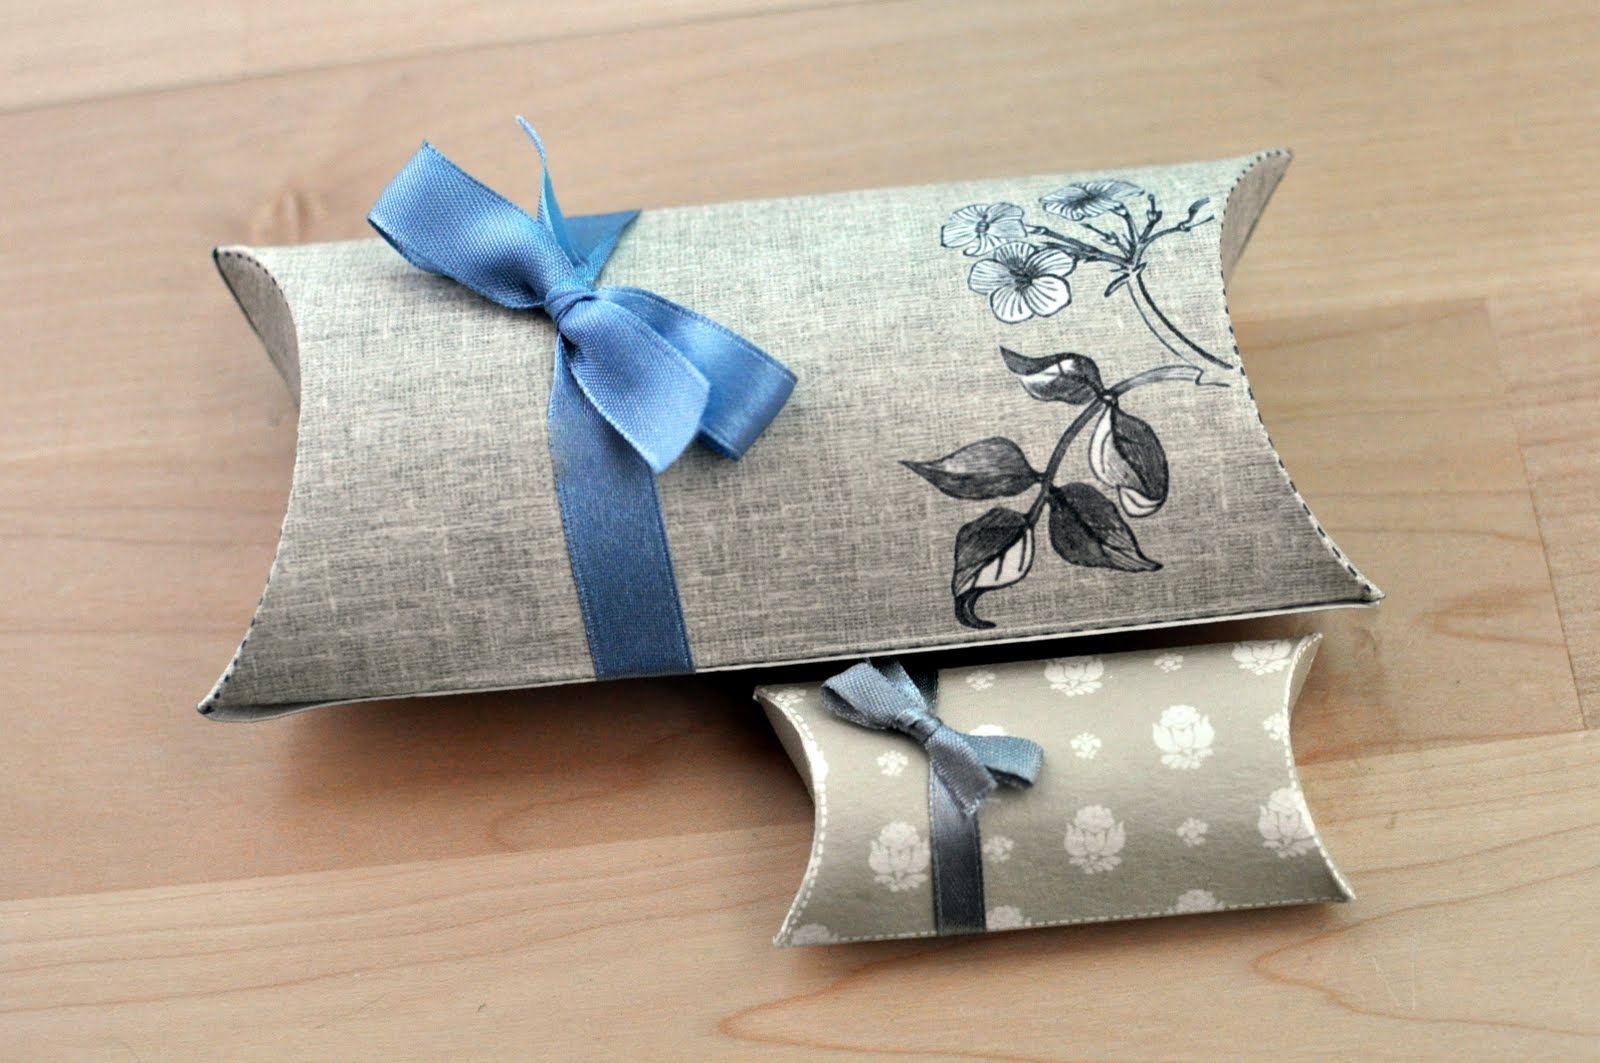
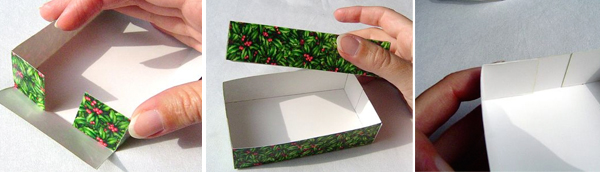
Boxes of the original shape are quite simple to make; you need a lot of cardboard and a stationery knife.
- We select a stencil and print it on plain paper in the correct actual size.
- We transfer the contours onto cardboard.
- We cut out the blank with a stationery knife.
- We make small cuts at the folds.
- Let's collect the box!
It is necessary to determine the dimensions correctly in advance; packing will be easier.

How to wrap a gift in paper. The easy way.
Girls, below you will find very detailed and interesting ways to wrap gifts, as well as how to decorate them. Be sure to take a look, you won’t regret it.
How to make a gift with your own hands
You will need:
Wrapping paper
Decorative ribbons
Scissors
Centimeter tape
Double sided tape
First you need to determine the amount of wrapping paper you need. To do this you need to cut out a rectangle.
* To find out the required width of the rectangle, measure the box around the perimeter using a measuring tape. After this you need to add 2-3 cm to the hem.
* To find out the length you just need to know that it is twice the height of the box.
Helpful tip: If this is your first time wrapping a gift, test it on regular newspaper. This way you can determine the correct sizes.
1. You cut out a rectangle from wrapping paper. required sizes. Place the gift box in the center of the paper.
2. Now you need to bend the left or right vertical edge by about 0.5-1 cm and glue double-sided tape to the fold.

3. The gift box must be wrapped tightly. Remove the film from the tape and glue the folded edge of the wrapping paper.
4. The top part of the wrapping paper needs to be folded as shown in the picture. It must be pressed tightly against the end of the box.
5. The side parts must also be bent and pressed tightly.
6. To secure the lower part neatly, you need to bend it and press it against the end of the box. After this, you need to bend this part and bend it again, but now in the middle.
7. Glue tape to this part and attach it to the end of the box.
8. Repeat the same process on the other side.
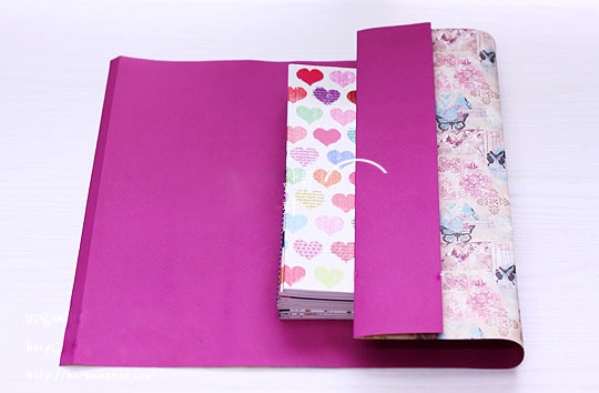
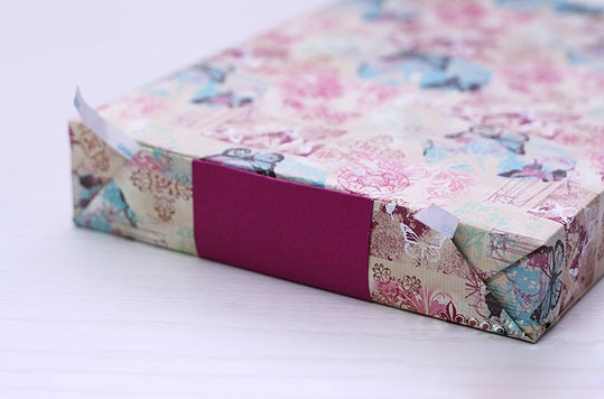
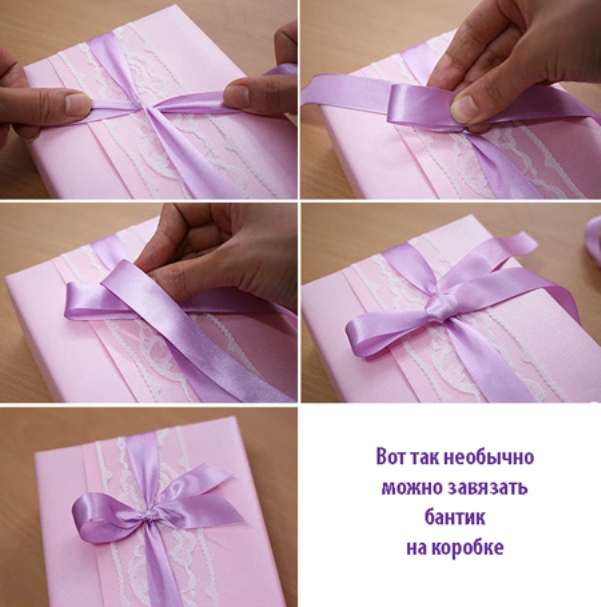
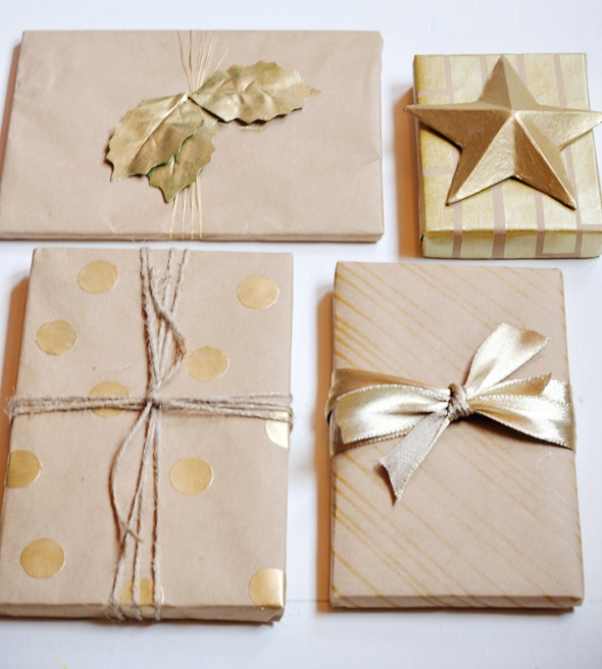
How to decorate a gift. Option 1.
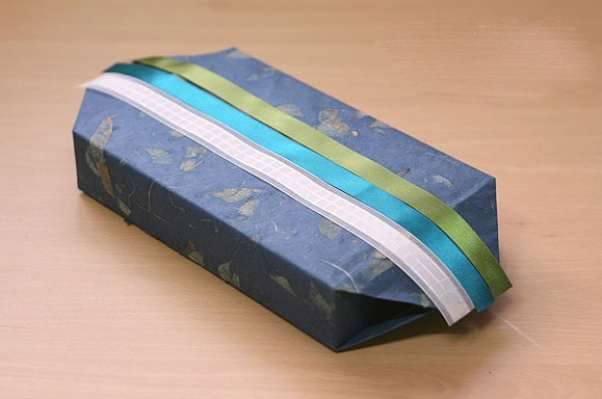
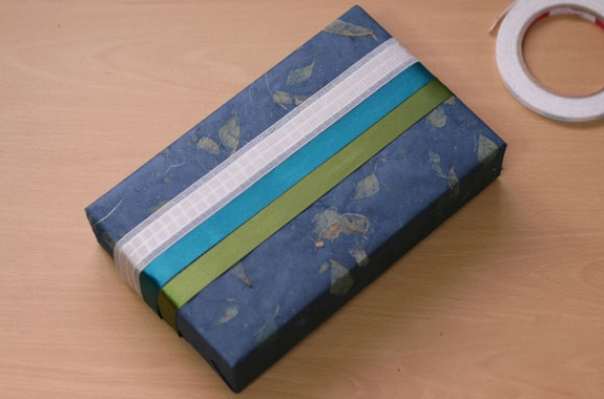
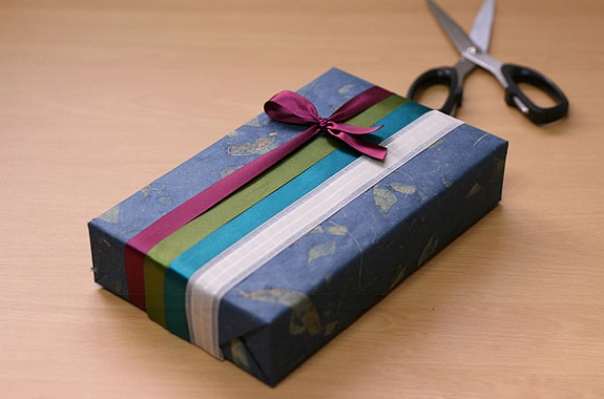
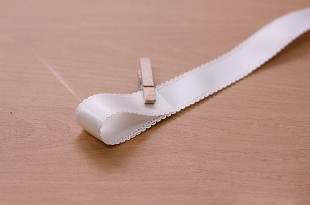
First you need to cut paper strip a different shade. Wrap this strip around the box and seal the ends with tape. You can add decorative cord.
![]()
How to decorate a gift with your own hands. Option 2.
This option can be used if you have a double-sided wrapping paper. Leave more paper width and use this part for decoration.
How to decorate a gift box. Option 3.
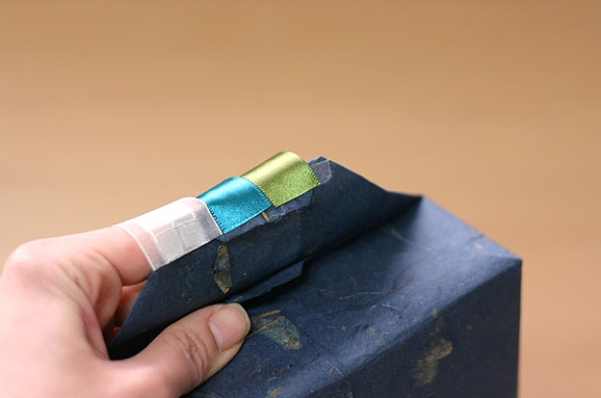
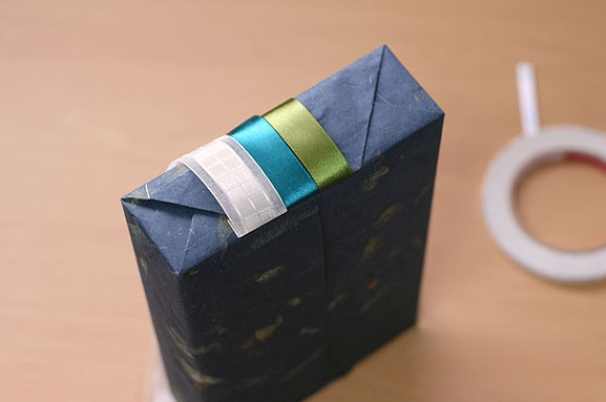
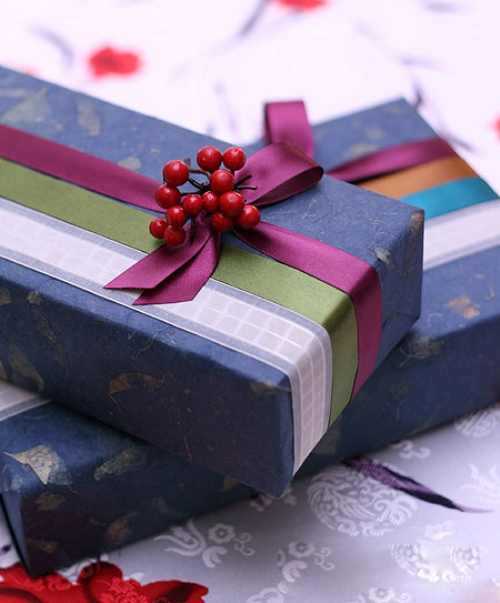
Try using several different colored satin ribbons.
How to beautifully decorate a gift. Option 4.
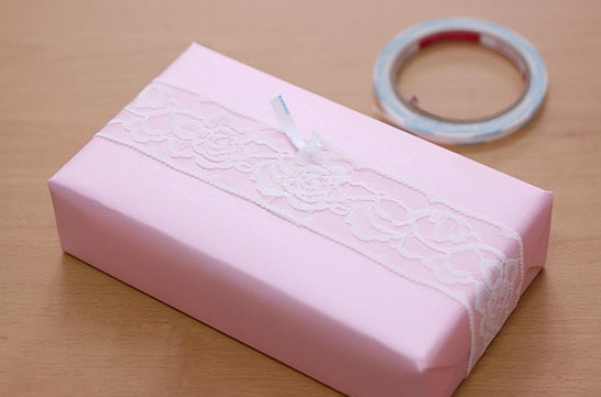
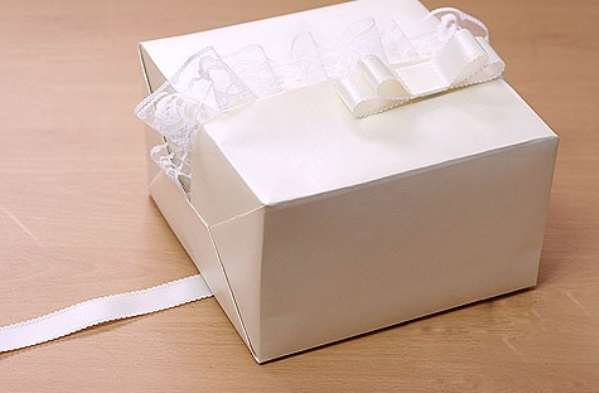
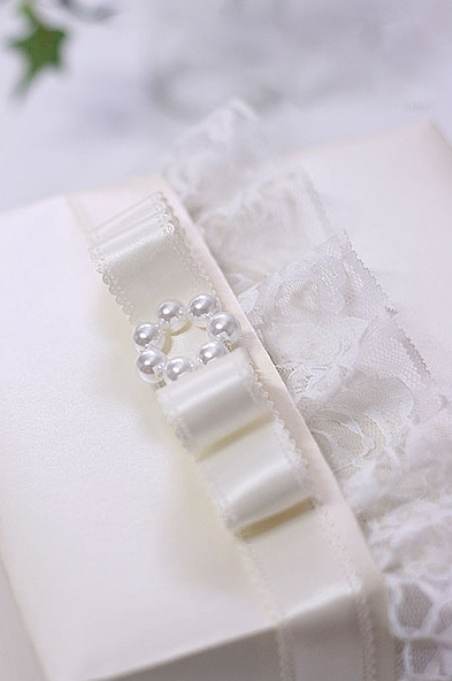
A lace ribbon can also help decorate a gift. Wrap it around the gift wrap and secure the ends with double-sided tape.

How to wrap a gift beautifully
You will need:
Roll of wrapping paper
Double sided tape
Scissors
Bright ribbon
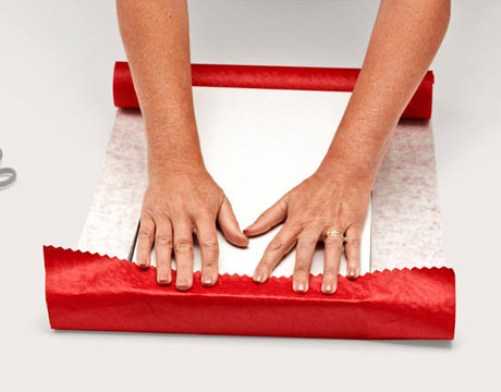
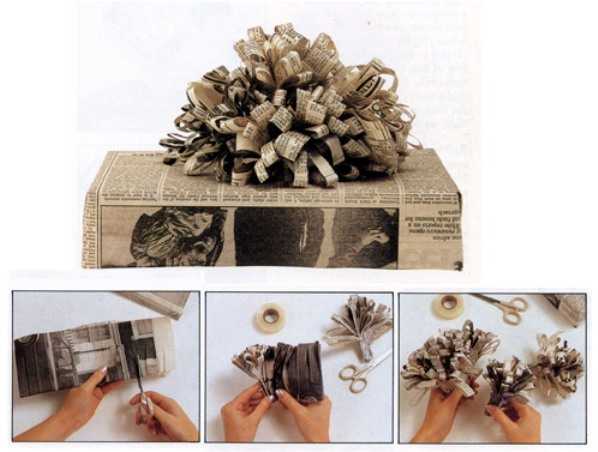
1. Prepare a roll of gift paper, unroll it on a flat surface (table) with the pattern down (wrong side up).
![]()
2. Take the gift box and turn it upside down. Next, place the box on gift paper.
3. Trim the paper, leaving a margin of approximately 2-3 cm.
4. Stand on the side where you have the roll. Stretch the paper on the opposite side and secure it with double-sided tape.
5. Unroll the wrapping paper and cover the entire box with paper. You also need to cover that part of the box that is slightly covered on the opposite side. The paper should extend beyond the edge of the box by about 2-3 cm.
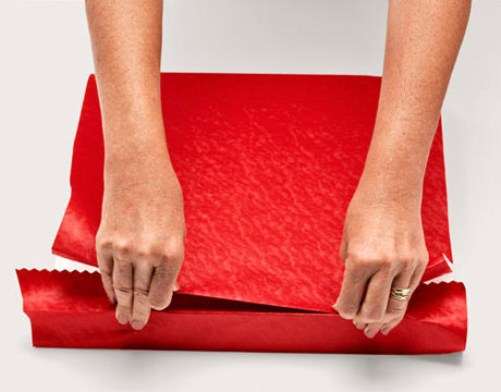
6. Bend a margin of 2-3 cm inward and secure it to the box along the fold using double-sided tape.
7. The ends of the paper sticking out from the side need to be folded inward. You need to make four sashes that bend at an angle of 45 degrees. Next, bend the paper along the flaps.

8. The top flap must be carefully bent to obtain even corners. To achieve this, you need to bend along the top edge of the gift. Next, the sashes need to be bent again to get a line along which you can cut off the excess with scissors. Once you have cut off the excess paper, glue it to the box.
9. Do the same with the bottom sash.
10. Repeat steps 7, 8 and 9 for the other side of the box.
11. Prepare a bright ribbon that should be about five times as long as the box. Place the wrapped gift upside down on the ribbon, pull it tight and wrap the gift as shown in the picture.
12. Turn the box over. The ribbon needs to be tied in a double knot and made into a bow.
13. You can cut a triangle at the ends of the ribbon.
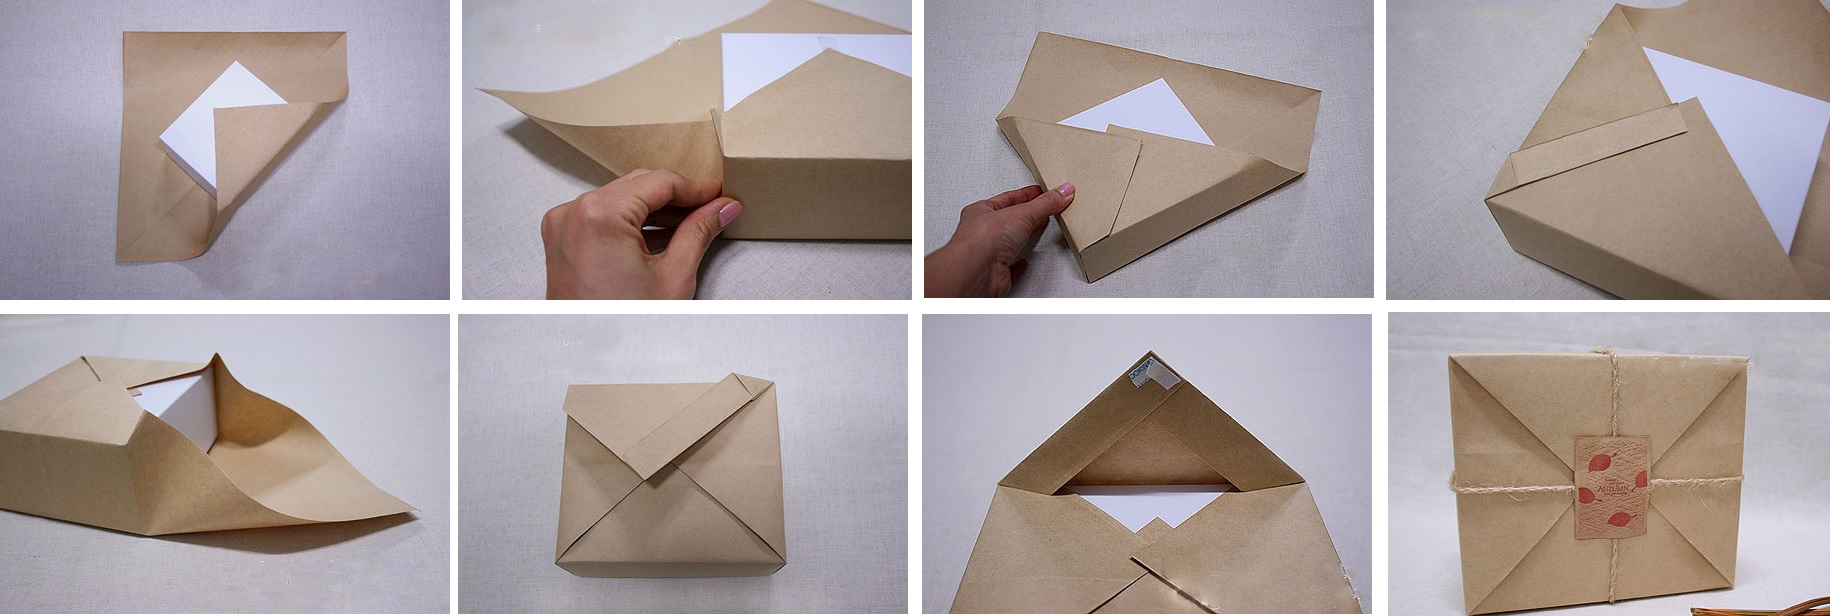
How to wrap a gift with your own hands. Wedding option.
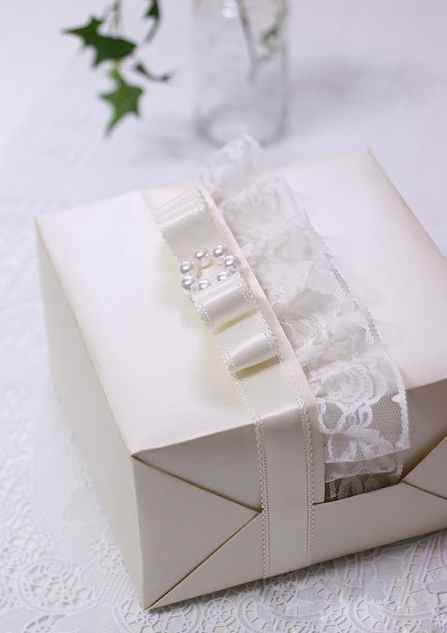
You will need:
Light-colored wrapping paper
Satin ribbons
Beads
Lace
Double sided tape
Scissors
Stapler.
1. First you need to measure out the required amount of wrapping paper - just take the necessary measurements. It is worth noting that in in this case The width of the paper must be calculated so that the gap between A and B is about 1-1.5 cm, taking into account that edge A is bent by 0.5 cm.
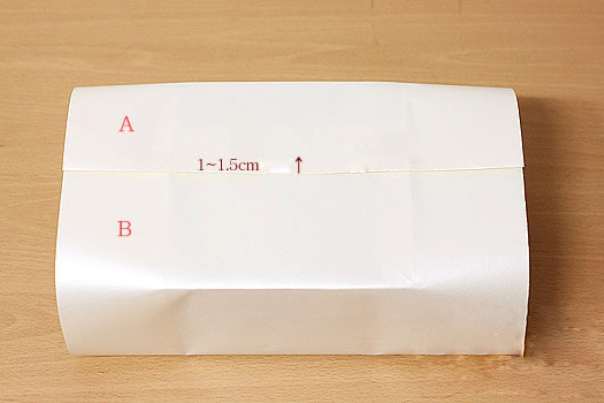
2. Place a strip of tape on edge B of the wrapping paper. This should be done from the front side and at a distance of about 1-1.5 cm from the edge.
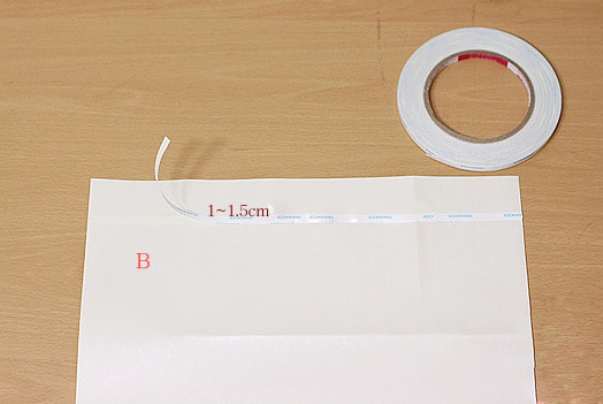
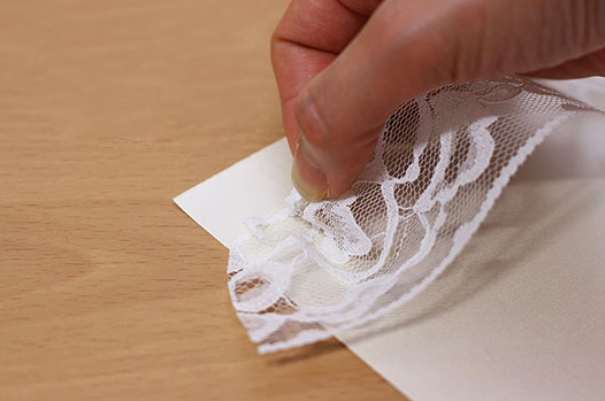
3. Prepare a lace ribbon - its length should be 2 times the length of the wrapping paper.

4. Remove the protective film from the double-sided tape and glue the lace to the paper.
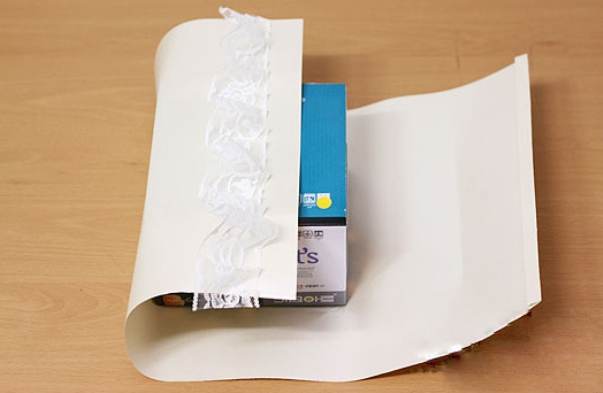
5. Now wrap the gift box with paper. It's worth noting that edge A, which is folded over 0.5 cm, is glued on top of edge B, to which you glued the lace.
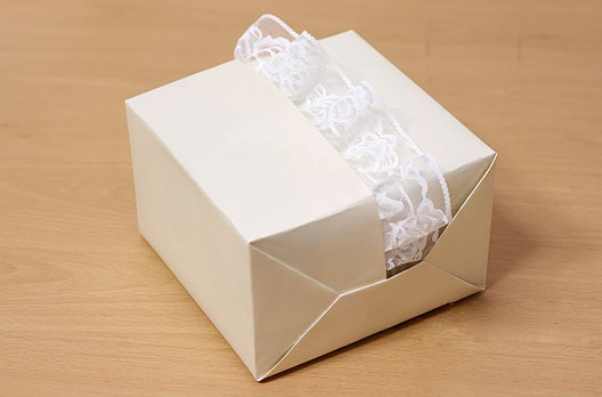
6. From the tip satin ribbon make a bow. WITH reverse side glue with double-sided tape.
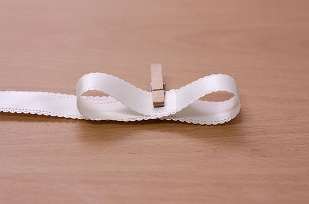

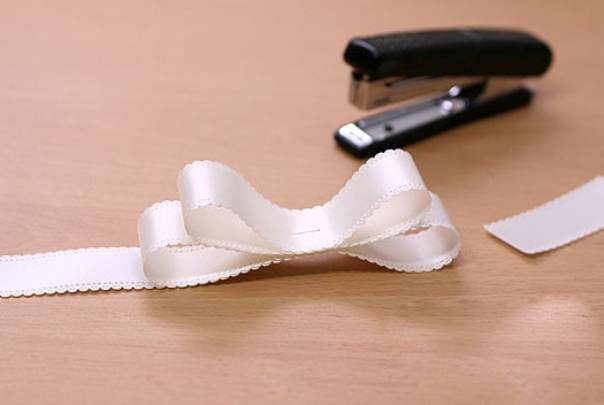
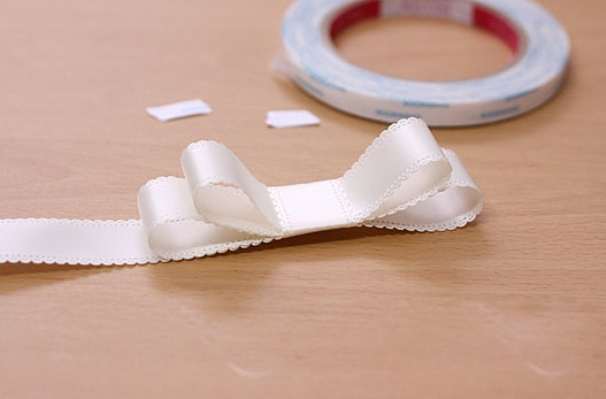
7. Apply tape to the box. You can decorate it with beads.
How to pack a gift (video)
How to pack a gift in an original way. Japanese style.
How to properly pack a gift if you don't have enough wrapping paper

Do you want to learn how to make gift boxes with your own hands?! In this review we will present to your attention as many as 25 ideas for making them.
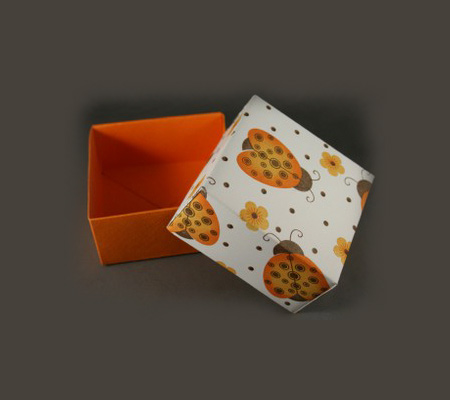
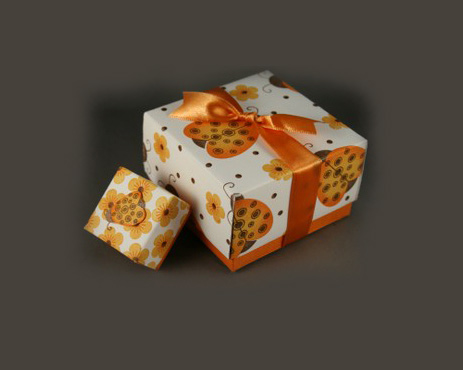
Below you will find a wide variety of examples of gift boxes that you can make yourself without any special skills. Well, the result will be an exclusive copy of the packaging for the selected gift. Moreover, even if you follow the instructions in this review step by step, your box can still be considered exclusive. Since in any case, to make it you will use your own materials (paper, cardboard, ribbons, rhinestones, buttons), which will differ in color and texture from those presented in a particular master class. Well, let's get started.
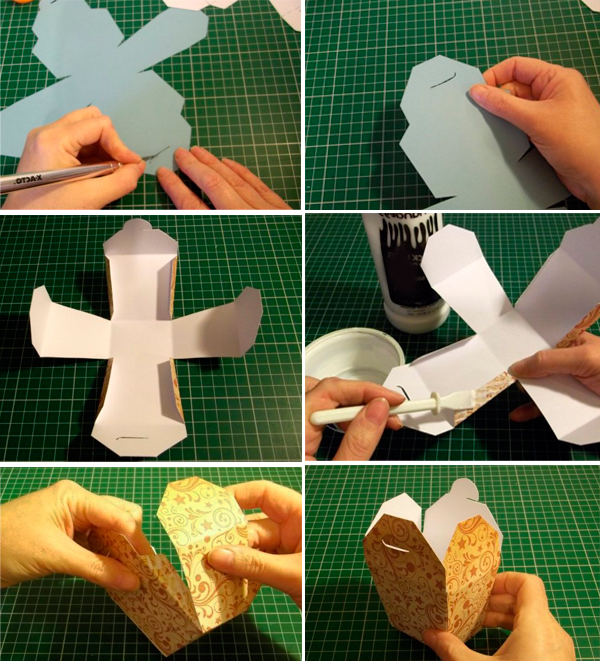
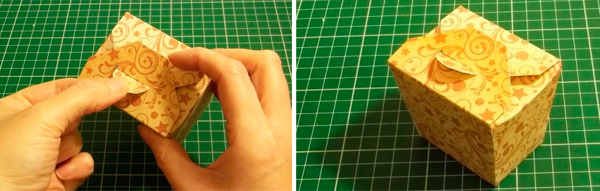
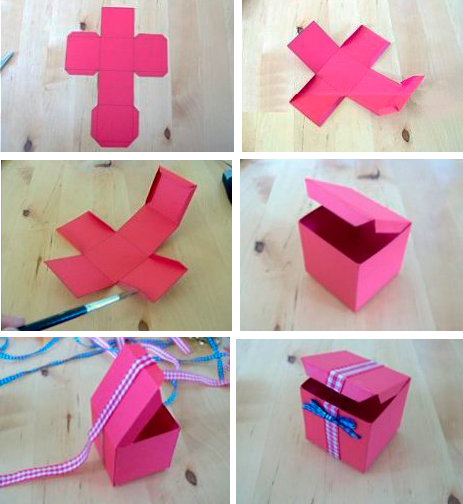
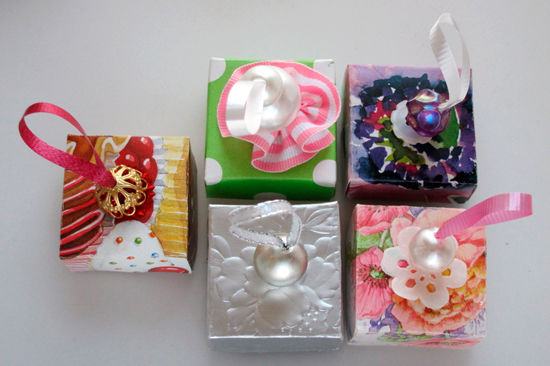
How to make a gift box with your own hands.
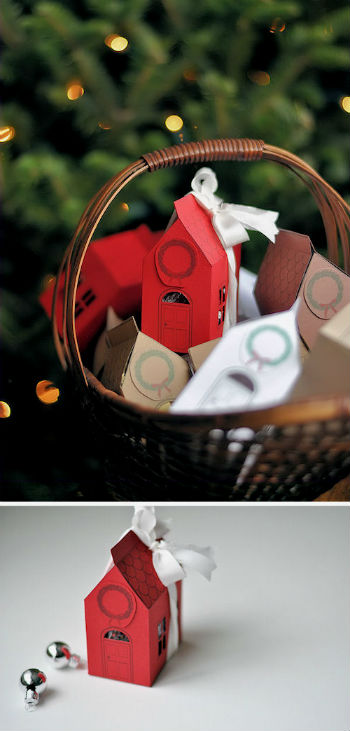
1. Box house.
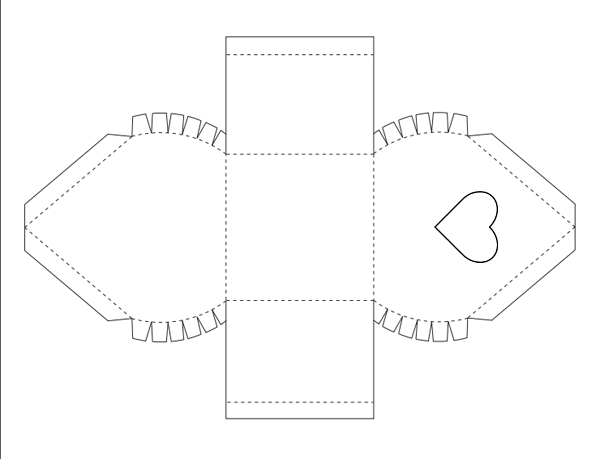
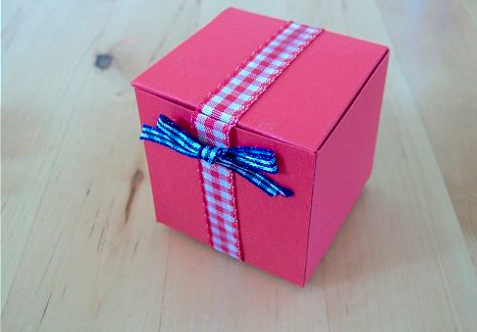
You need to print out the template below on beautiful paper. As a last resort, you can try to redraw it by hand. Then the workpiece must be cut and folded along all the dotted lines. In the bottom of the box you need to create two slits with a stationery knife into which you should insert the tape. All that remains is to glue the house, cut out two rectangles for the roof from matching paper, bend each of them 1 cm, and also make slits in each of them (see photo). Insert a ribbon into these slots, place the gift inside, and tie the ribbon on top in the form of a bow.
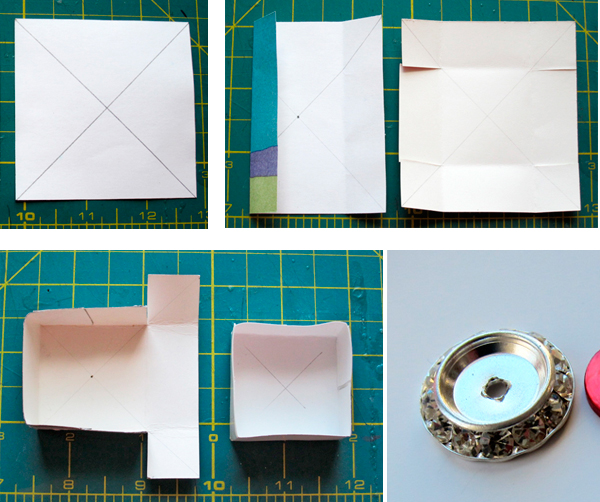
2. Round cardboard box.
You need to cut 4 circles from porous packaging cardboard, two of them should be slightly larger than the other two. From beer cardboard, cut two strips the size of the circles, with some overlap, one wide, the other narrow. Glue together 2 large circles using double-sided tape or instant glue, then glue the remaining 2 circles separately. We will create the base of the box from smaller circles; to do this, we apply a transparent moment to the sides of the circle, glue a strip of cardboard here, for strength, you can stick another one on top of this strip. We do the same with the lid, glue a narrow cardboard strip around the perimeter of the large circle. You can create a bow from a ribbon; to do this, cut the ribbon in half, glue its ends to the inside of the lid, and tie the remaining ends on top in the form of a bow.

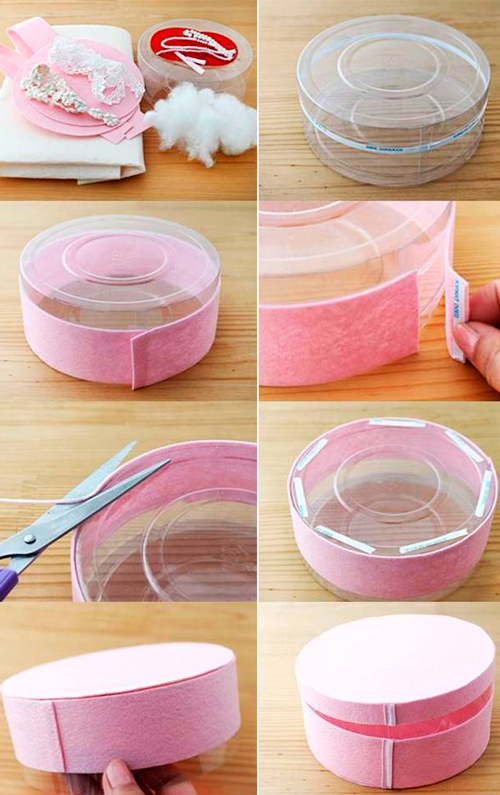
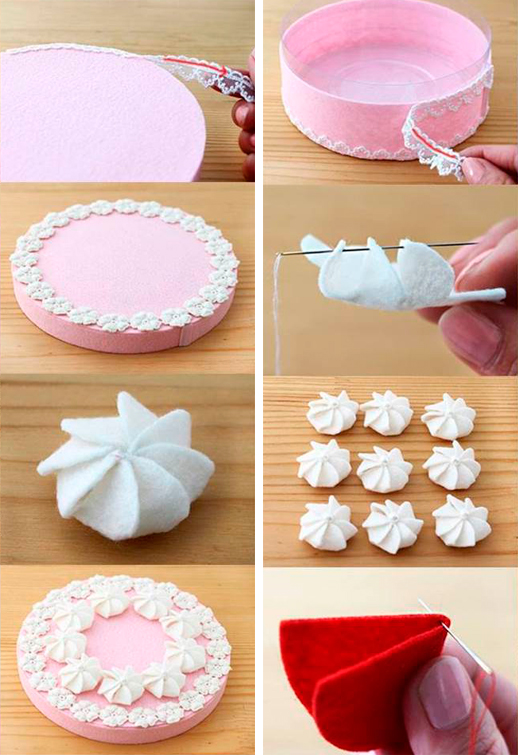
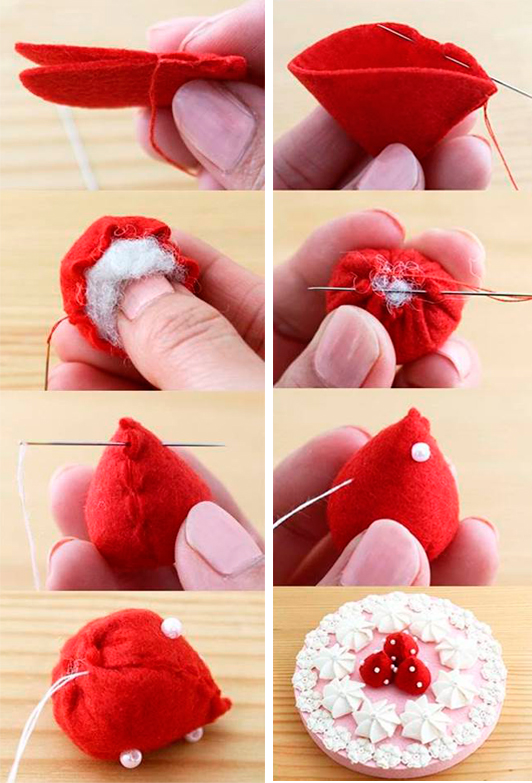
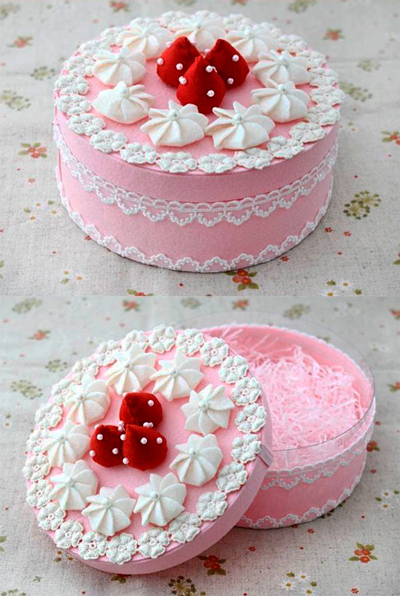
3. Cake made from felt and a plastic container.
You need to purchase a plastic container round shape with lid. We cut out strips of felt with a width and length comparable to the side of the container. Glue the felt using double-sided tape. Glue a round piece of felt fabric onto the lid. We glue openwork braid along the bottom and top of the “cake”. Glue flower-shaped ribbon to the top of the lid and create roses from cotton pads. See the photo below for how to make these. In the center of the cake you can glue two or three felt strawberries stuffed with padding polyester. All that remains is to put the gift inside and the present can be given to the recipient.
4. Box made using origami technique.
This box is quite simple to make, but looks very presentable. Especially if you take beautiful thick paper as a basis, for example from a scrapbooking kit. We described in detail how to make a gift box using this technique in.
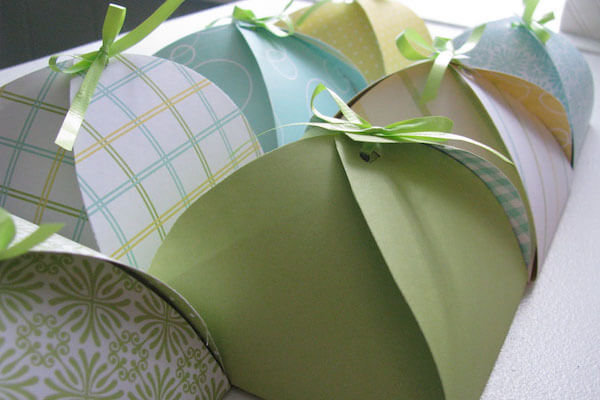
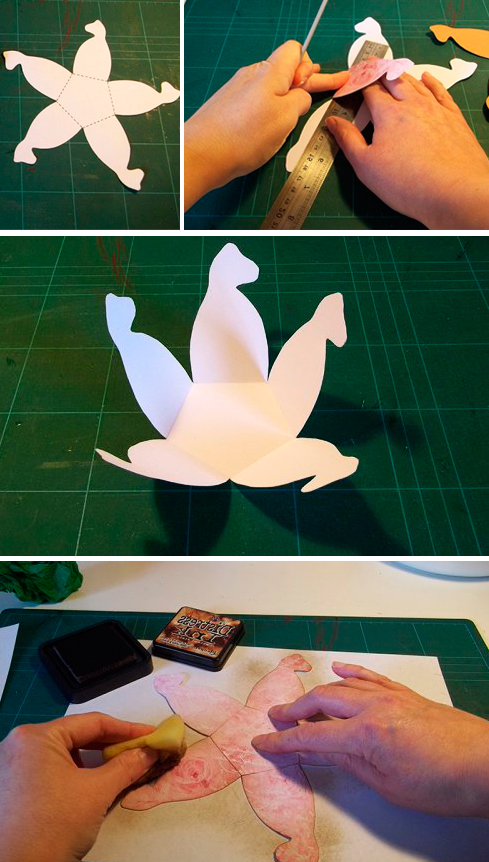
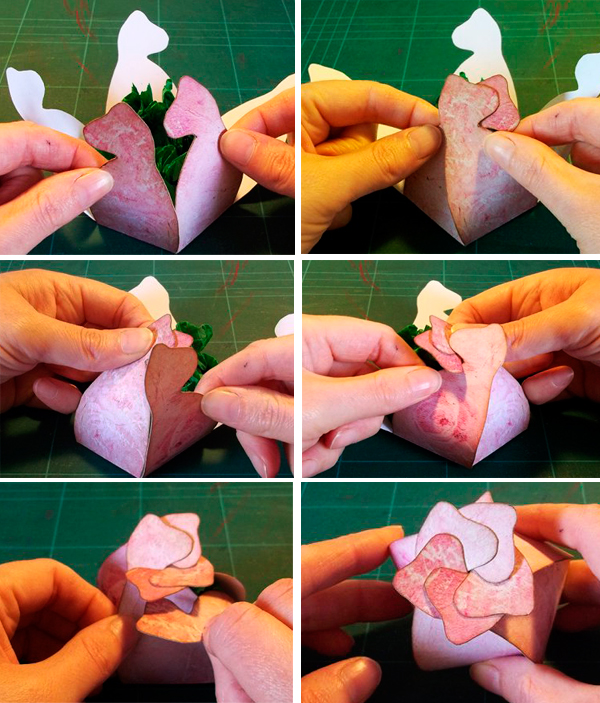
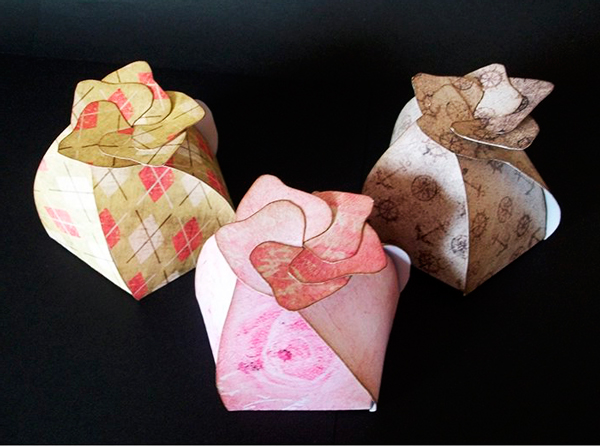
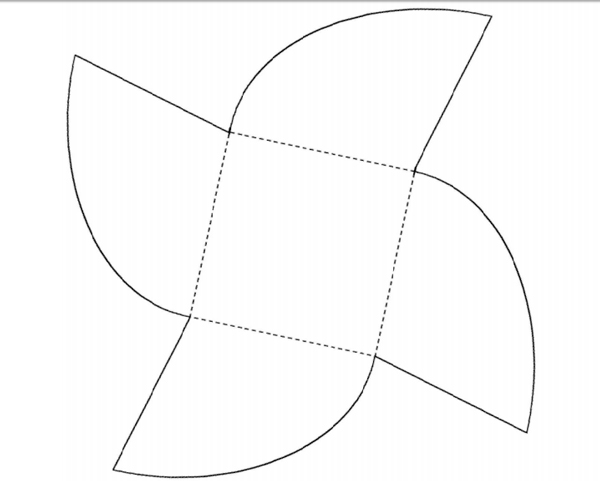
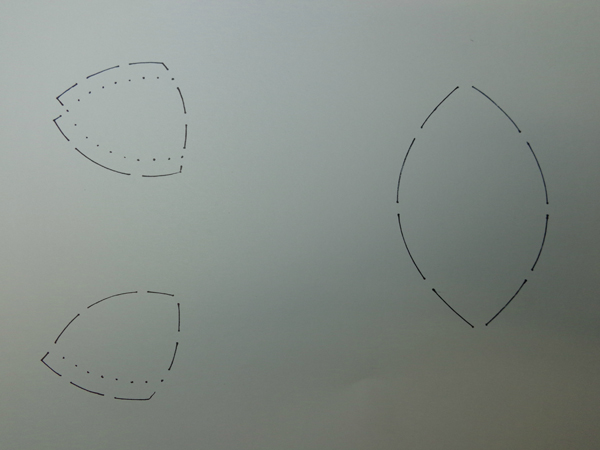
5. A box in the shape of a flower bud.
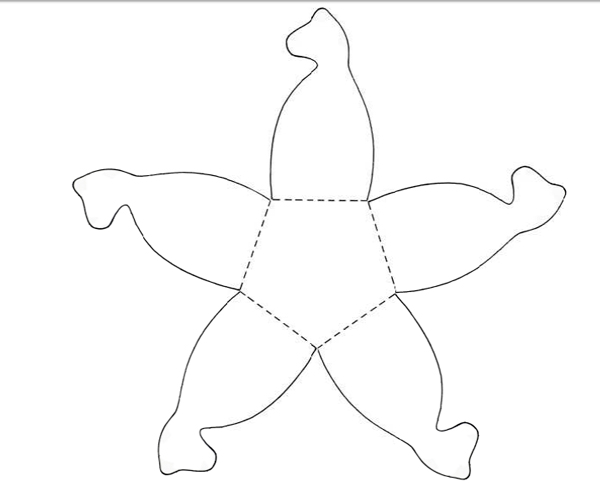
We print out the template presented below on suitable paper (although, however, it can be redrawn by hand). We cut out the workpiece and create folds along the dotted lines using a ruler. We turn the workpiece over to the front side, and lightly tint it along the edges using a foam sponge and a stamping pad (you can just use ink). We put the present inside and collect the “petals” on top (see photo).
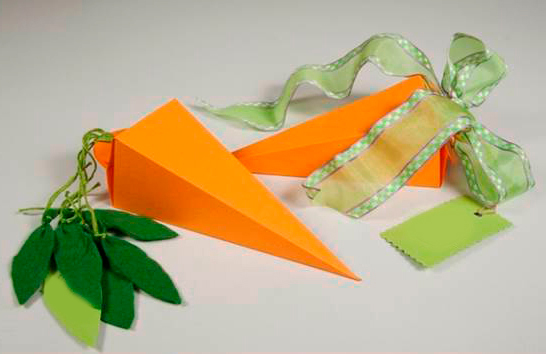
6. Box in the shape of a carrot.
This packaging is ideal for New Year and Easter celebrations. To make it, plain orange paper or one that imitates the skin of natural carrots is suitable (you can look for it in the creativity departments). We described in detail how to make such a “carrot” in.
7. A neat box with a bow.
You must print the template below on suitable paper. Not writing pen or with a running tool, you need to run the lines marked with dotted lines. You need to create folds along these lines, put the gift inside and close it. To prevent the box from “falling apart,” you need to tie it with a ribbon and tie a bow on top.
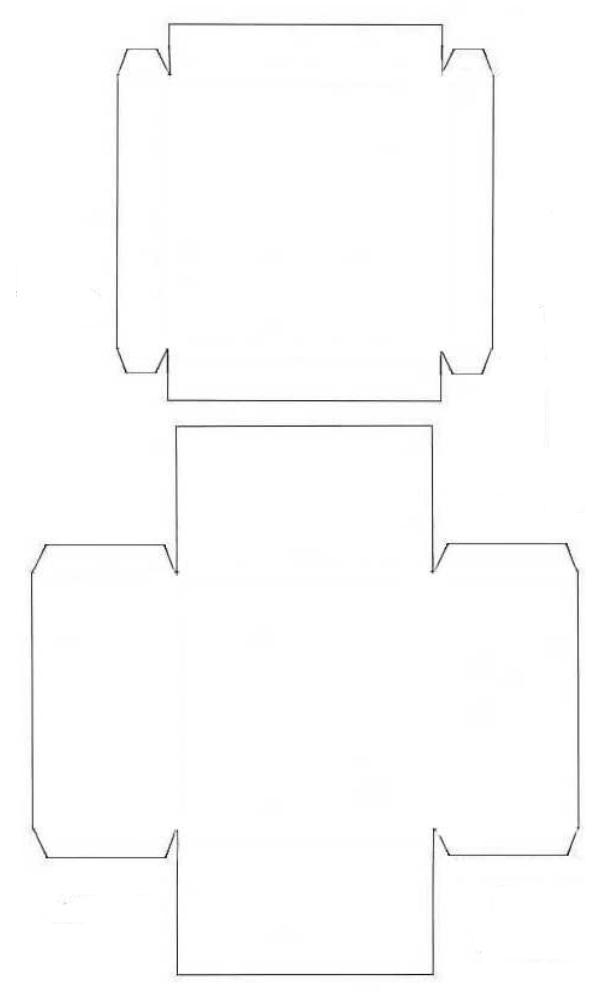
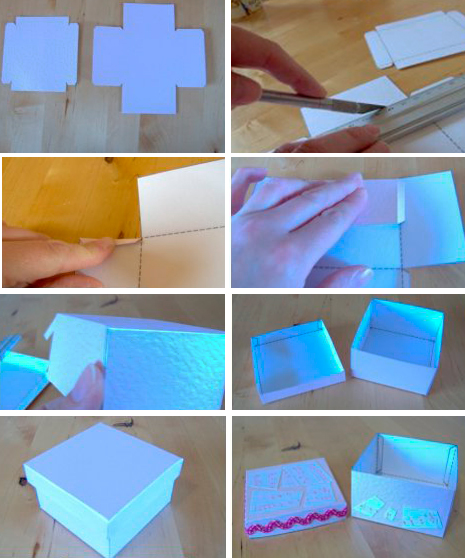
8. Square box.
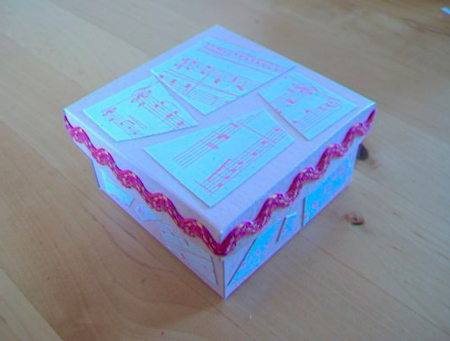
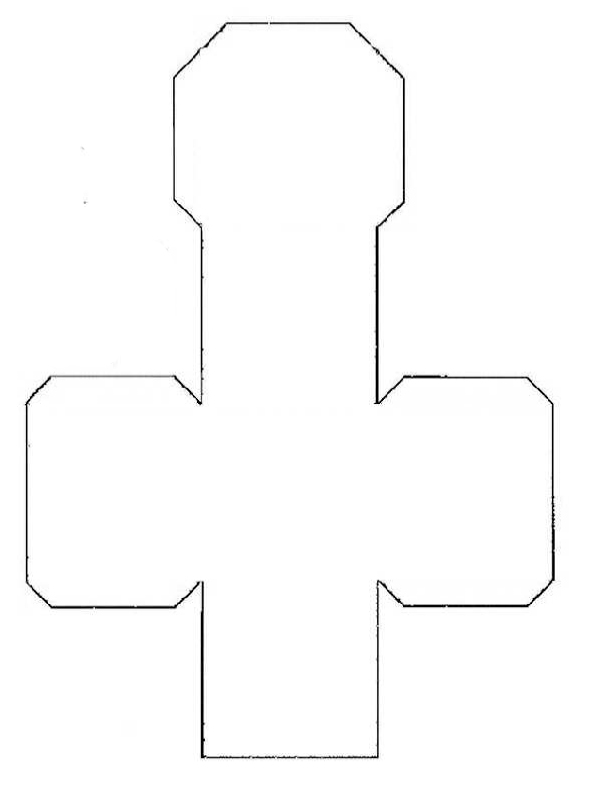
Print out the templates below. On the side parts, where the “wings” are, you can make marks with a pencil and create folds along them. Similar folds must be made in the central part of the box and lid. We glue the box and the lid separately from each other using instant glue applied to the wings. Finally, the box can be decorated with glued pieces of cute paper, as well as cute braid.
9. A box in the form of a Lego piece.
Children will definitely like this packaging. Well, we told you how to make it yourself. Or you can watch the video below.
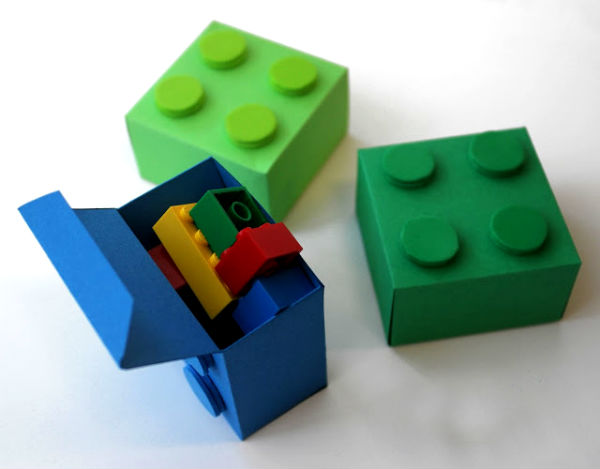
How to make a Lego box (step-by-step video):
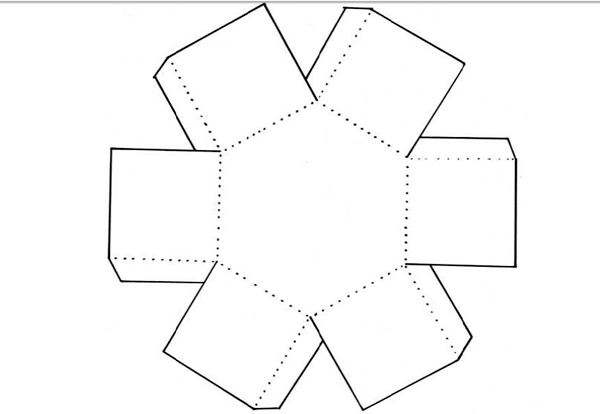
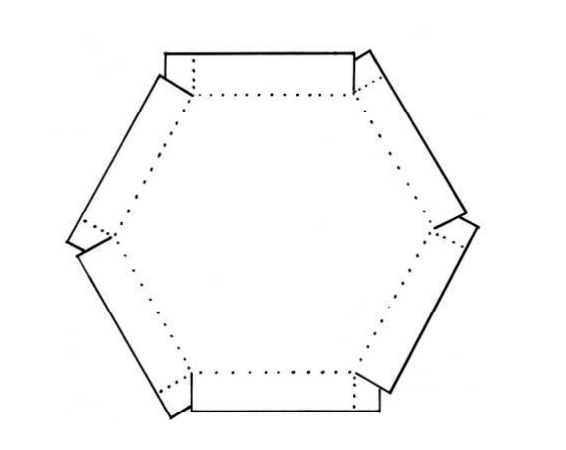
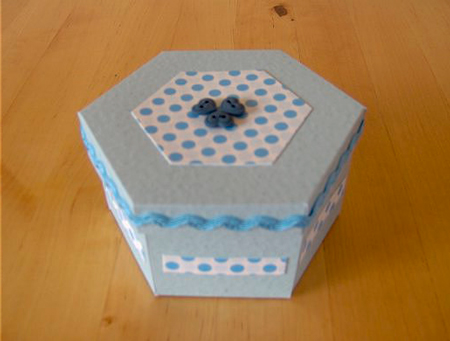
10. Hexagon box.
We print out the box and lid templates below on thick paper. We run them along the dotted lines, bend them, and glue them together. We decorate the lid and box with beautiful paper, rhinestones and ribbons. You can glue a few cute buttons on top of the lid.

11. Lockable box.
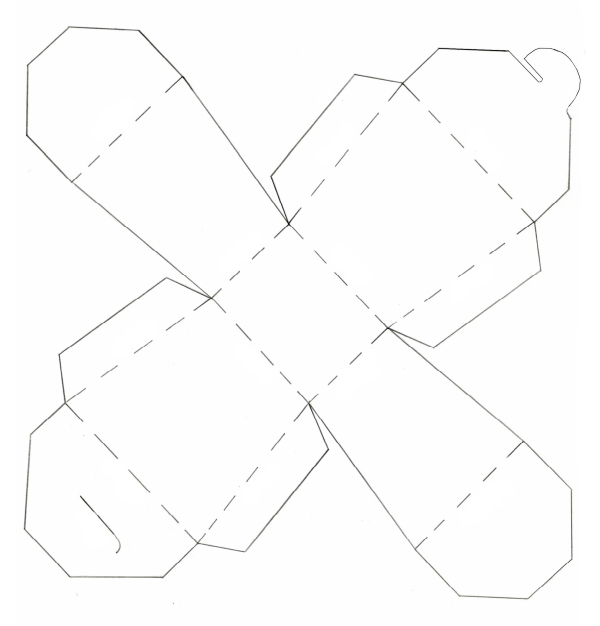
You need to print the template below or redraw it by hand. Then you need to cut it out and make cuts on the wide parts (see photo). All “wings” must be bent, glue applied to them, and the product glued together. All that remains is to put the gift inside and close the box at the top.

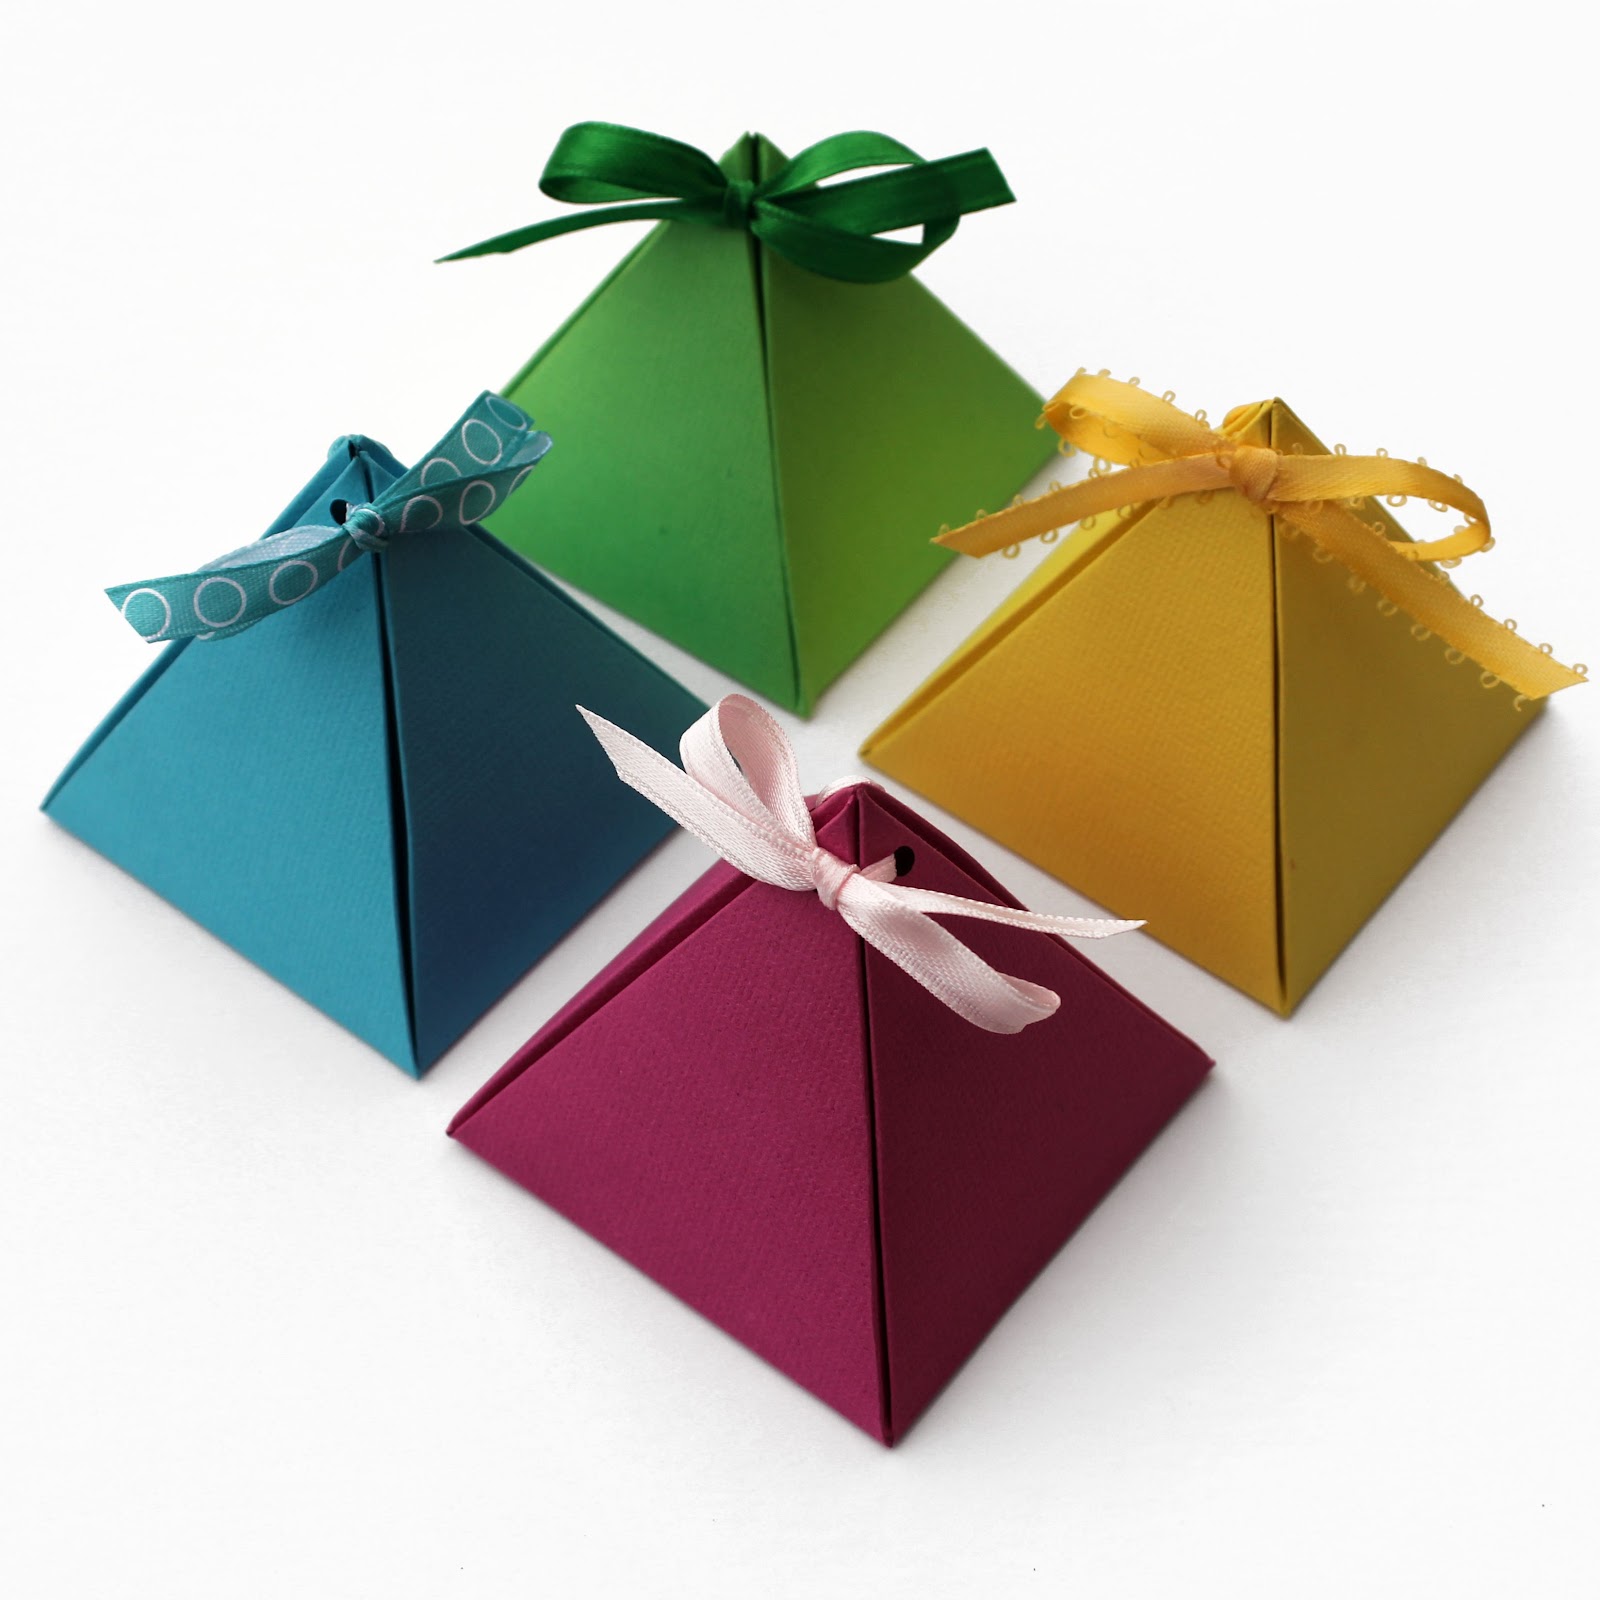
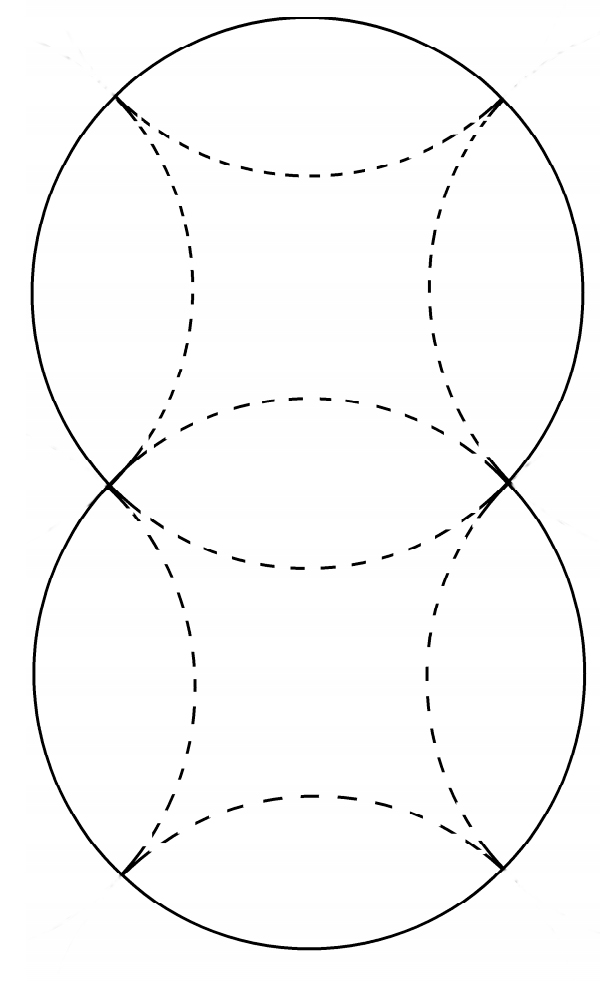
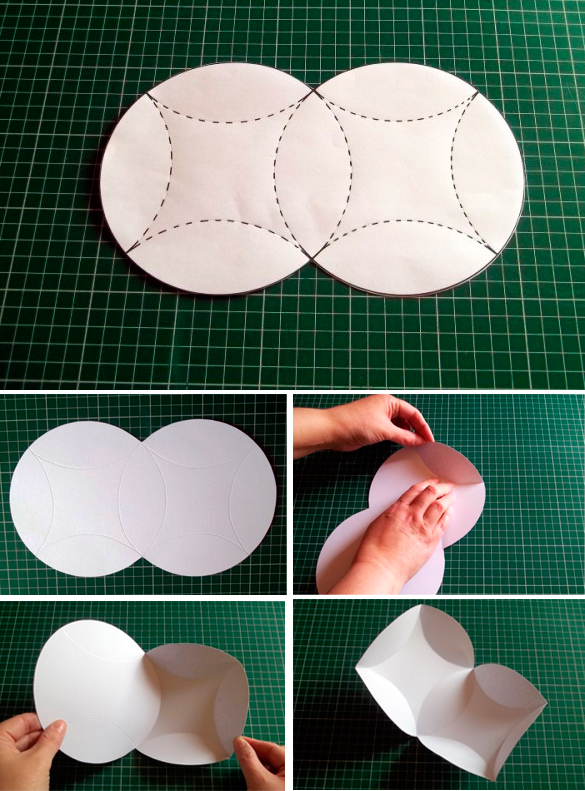
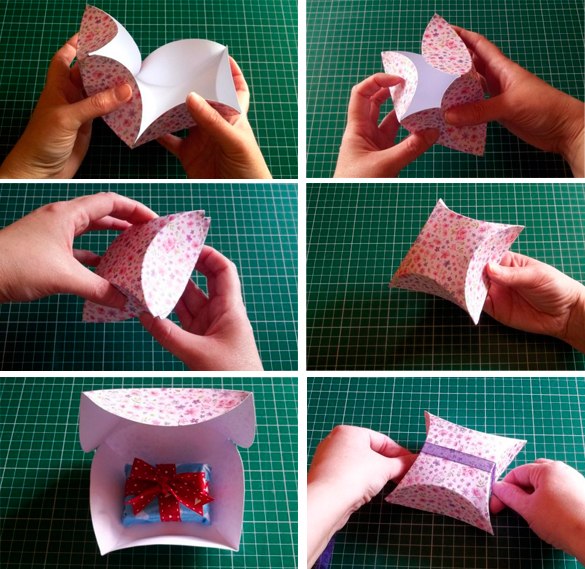
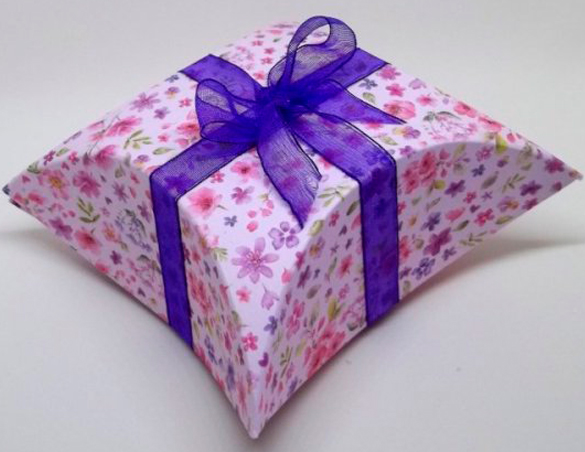
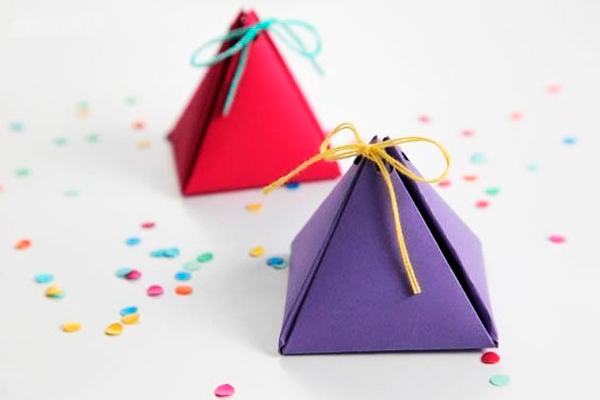
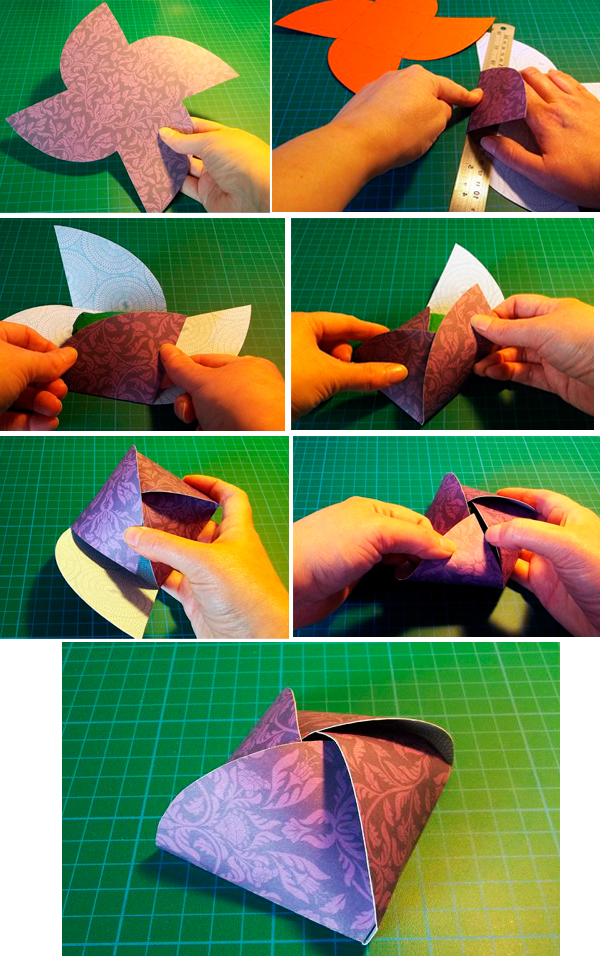
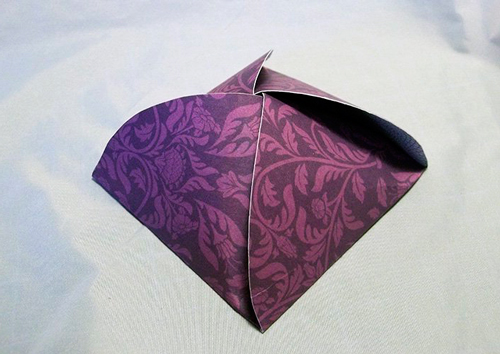
12. Pyramid box.
This box is rightfully considered one of the most interesting and beautiful. To make it, it is better to use thick, beautiful paper. You will find all the details on its production.
13. Box with basic manufacturing.
You need to print the template that you will find below. Print immediately on beautiful paper. Next, this blank needs to be cut out, folded along the central dotted lines, and closed by tucking the petals in the desired order (as in the photo below).
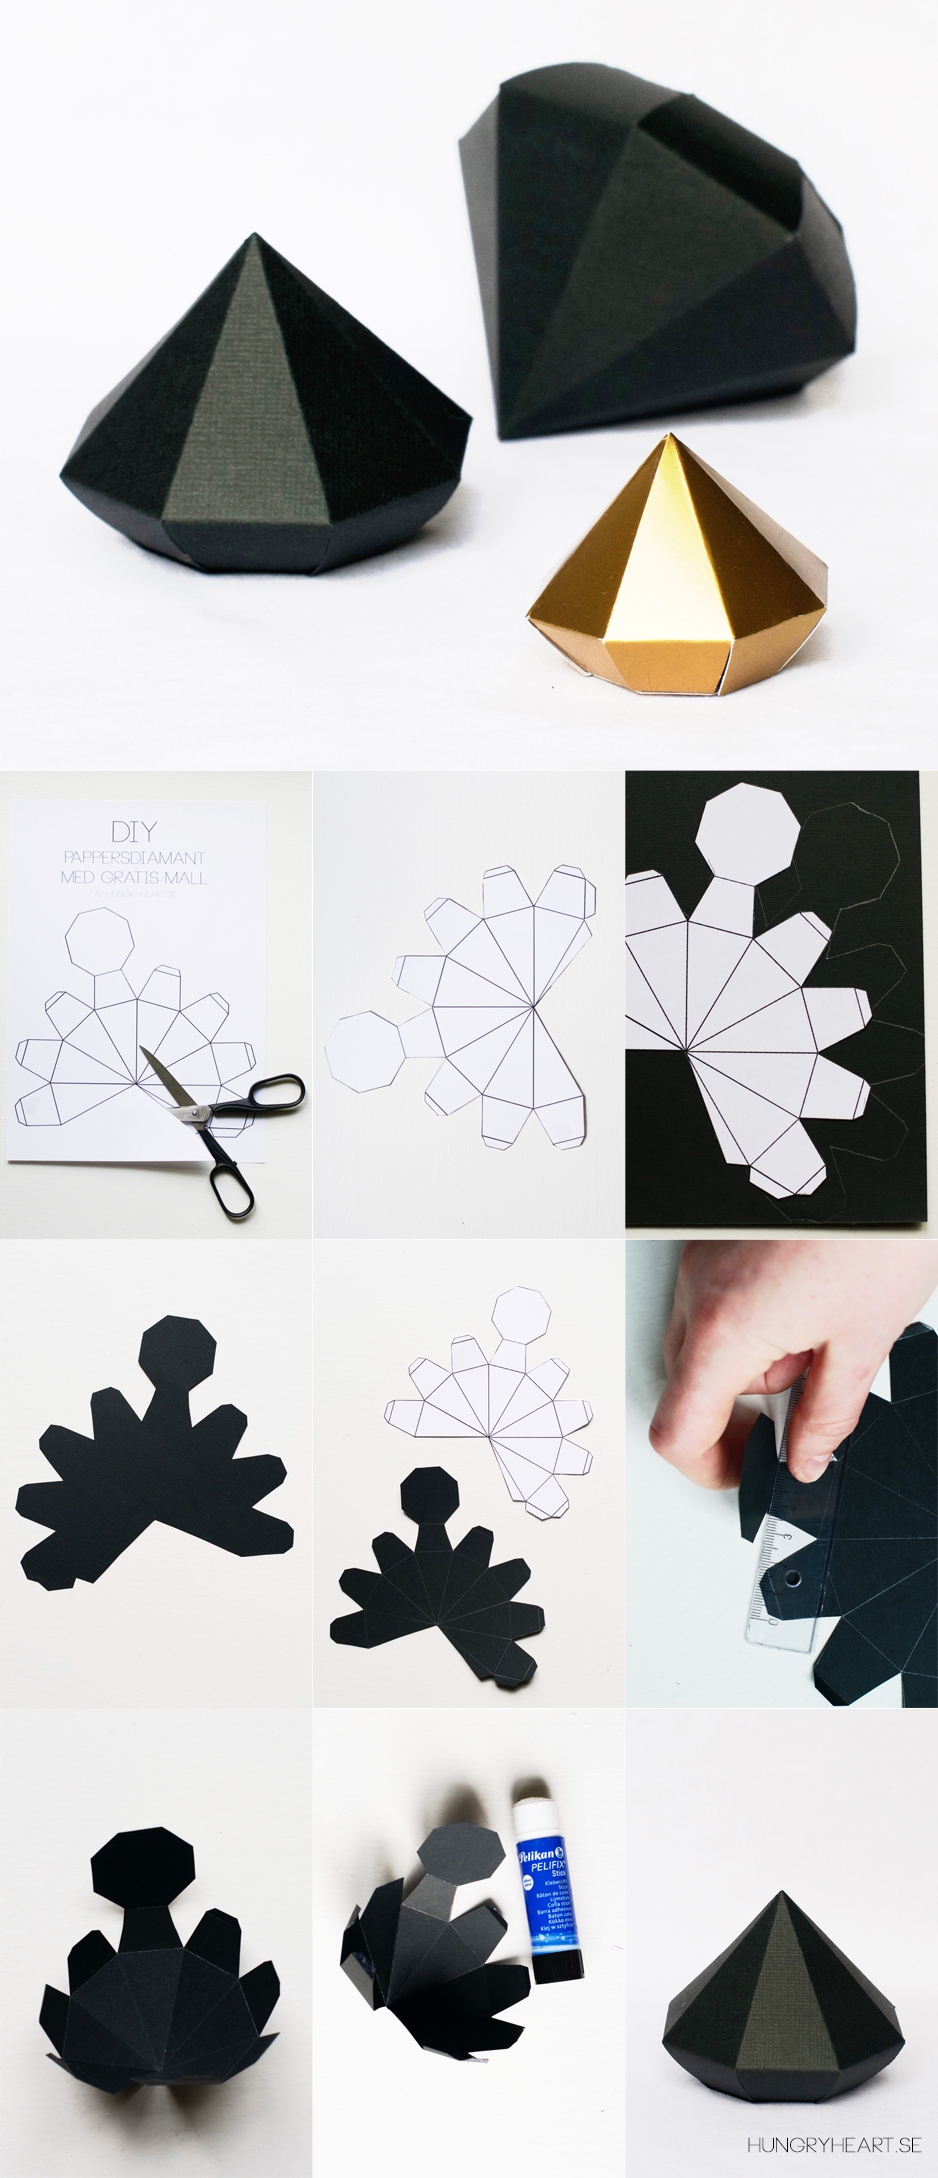
14. Box in the shape of a diamond.
Just imagine how nice it is to receive some beautiful jewelry in such a non-standard package, say a ring, earrings or pendant, or maybe cufflinks for a man or a tie clip. We told you how to make such a diamond.
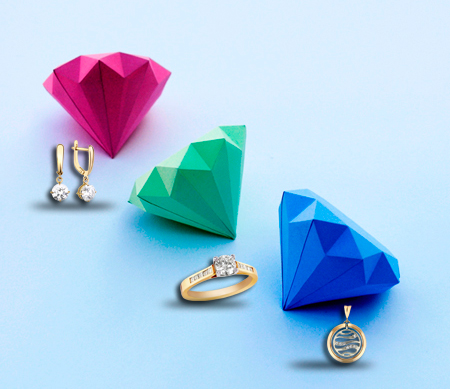
And here is another version of the diamond box + template (video):
15. Square box.
Take some nice thick paper and print out a template on it (look below). We cut it out, bend it along the “wings”, as well as into square parts. We glue the product into a single whole, and glue the tape from the back of the box, right up to the end of the lid and the beginning of the box.
16. Box of candy.
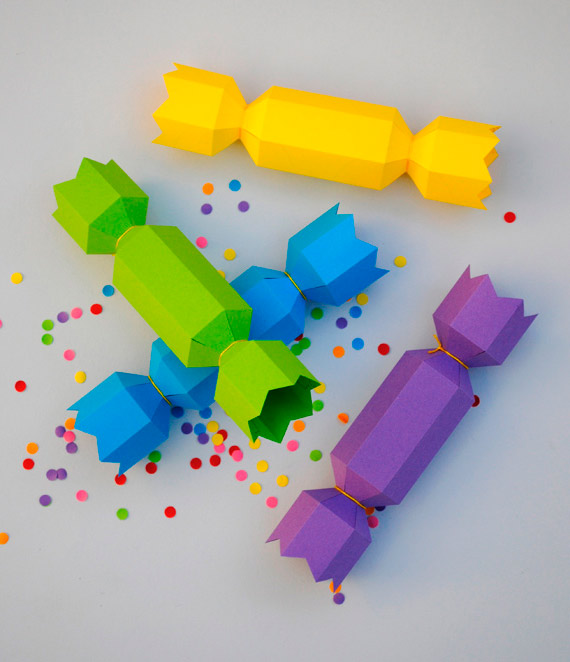
In such “sweets” it is not necessary to give any sweets; you can put jewelry, lipstick, nail polish, a small doll or a car here. We described how to make this candy.
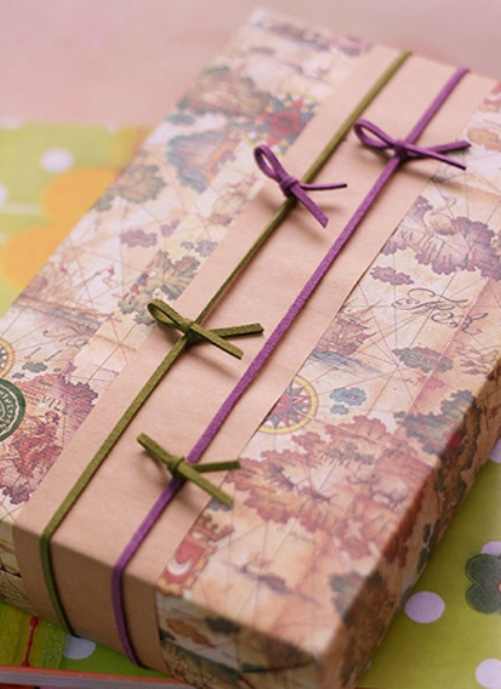
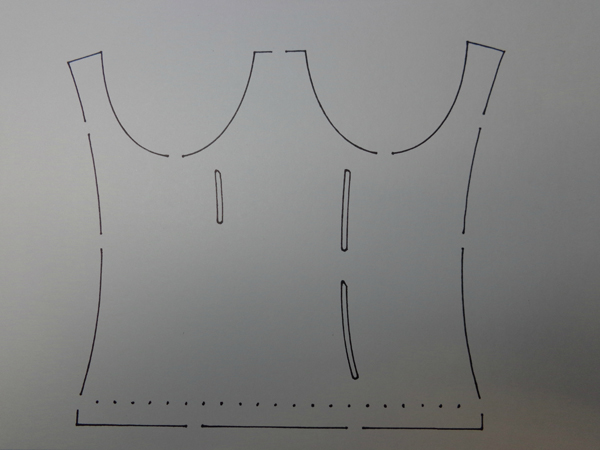
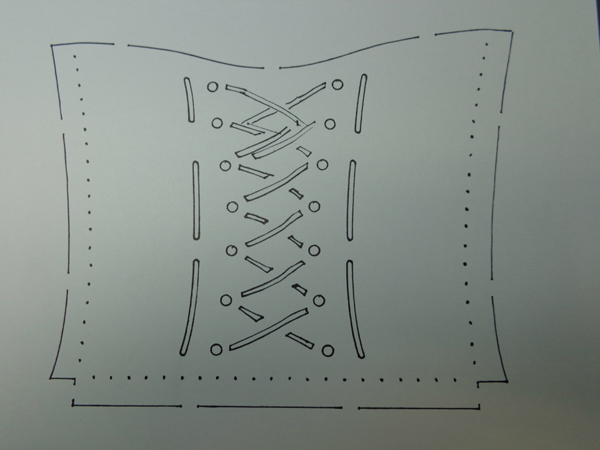
17. Box corset.
It is necessary to redraw the example templates presented below. Cut out the workpiece, create slits in the right places, glue the product, and insert a ribbon into the holes of the “corset”. If desired, decorate with paper flowers and braid.

18. Neat bonbonniere.
You can put small items in such a cute package: candy, tiny toys or jewelry. Well, you will find out how to do this.
19. Rectangular box.
Take a sheet of paper and cut it in half (you can take two sheets of paper at once). We cut 4-5 mm from one sheet, from the long edge and the short one (this will be the bottom of the box). We draw each sheet according to the example below. We create cuts from the side hems. We create folds, glue double-sided tape to these parts, and form a box. You also need to do the same with the lid.
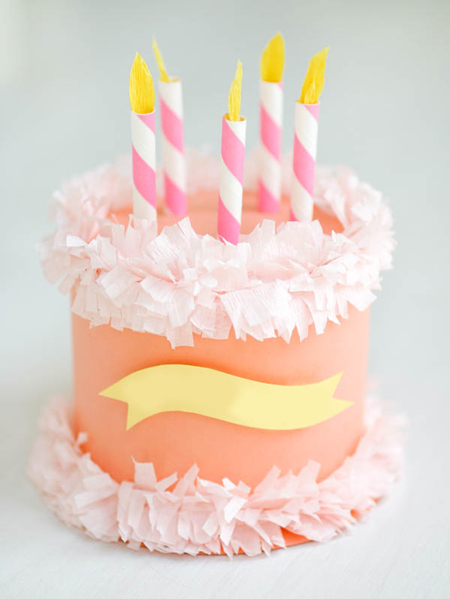
20. Box - a round cake with candles.
Very original packaging for a birthday gift. Well, you will learn how to make it by studying.
21. A quick square box.
Take a square sheet of paper. From corner to corner we draw two intersecting lines. We first bend the right side of the sheet to the center, then the left, as well as the top and bottom. You need to make cuts along the formed fold lines, according to the photo below. Using glue or double-sided tape, the box must be glued into a single whole. From a larger square sheet (about 5 mm larger) you need to make a lid according to the method described above. If desired, the finished box can be decorated with rhinestones, ribbons, and buttons.
22. Box in the shape of a house.
Such a box will definitely please the recipient. You will find a step-by-step master class on how to make it.
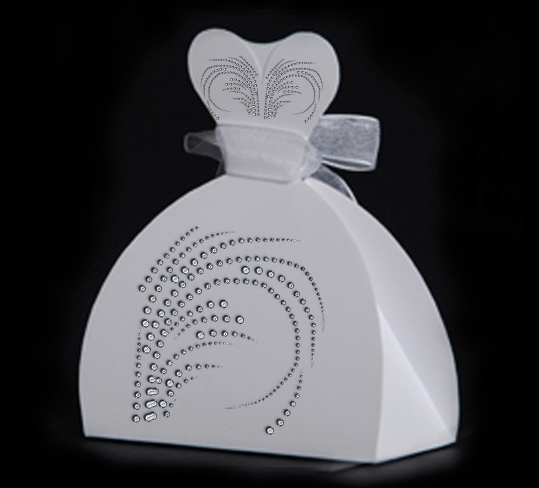
23. Box dress.
This dress is created using a template, which you will find along with step-by-step manufacturing examples. Or you can watch the video below. Such a cute box will definitely appeal to every representative of the fair sex.
Video with details on how to make a box dress:
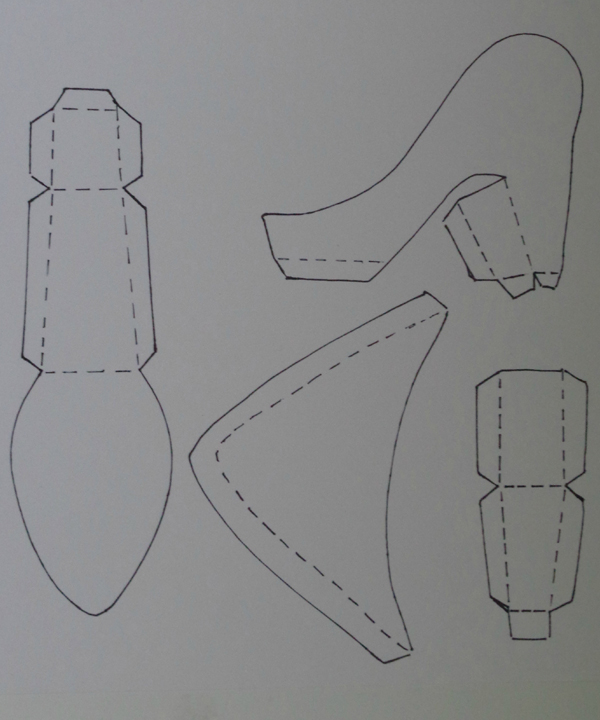
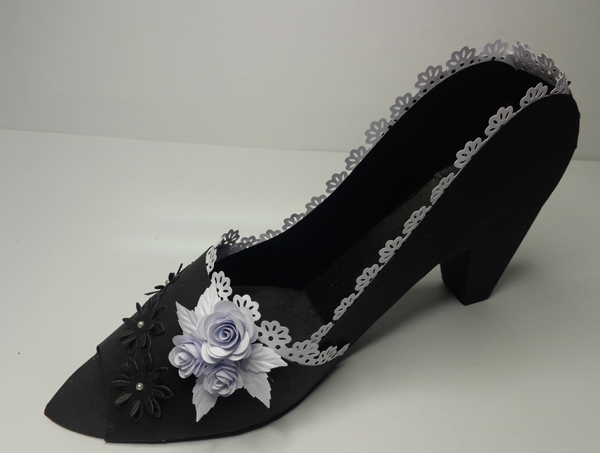
24. Box shoe.
You need to print the template below with the details. Then transfer it to thick, beautiful paper and bend it along the dotted lines. Glue the product into a single whole: the long part is the sole, the top part is the side wall, you need two of them, the triangle is the front part, and the outer part is the heel. Finally, the shoe can be decorated with ribbons, rhinestones and paper flowers.
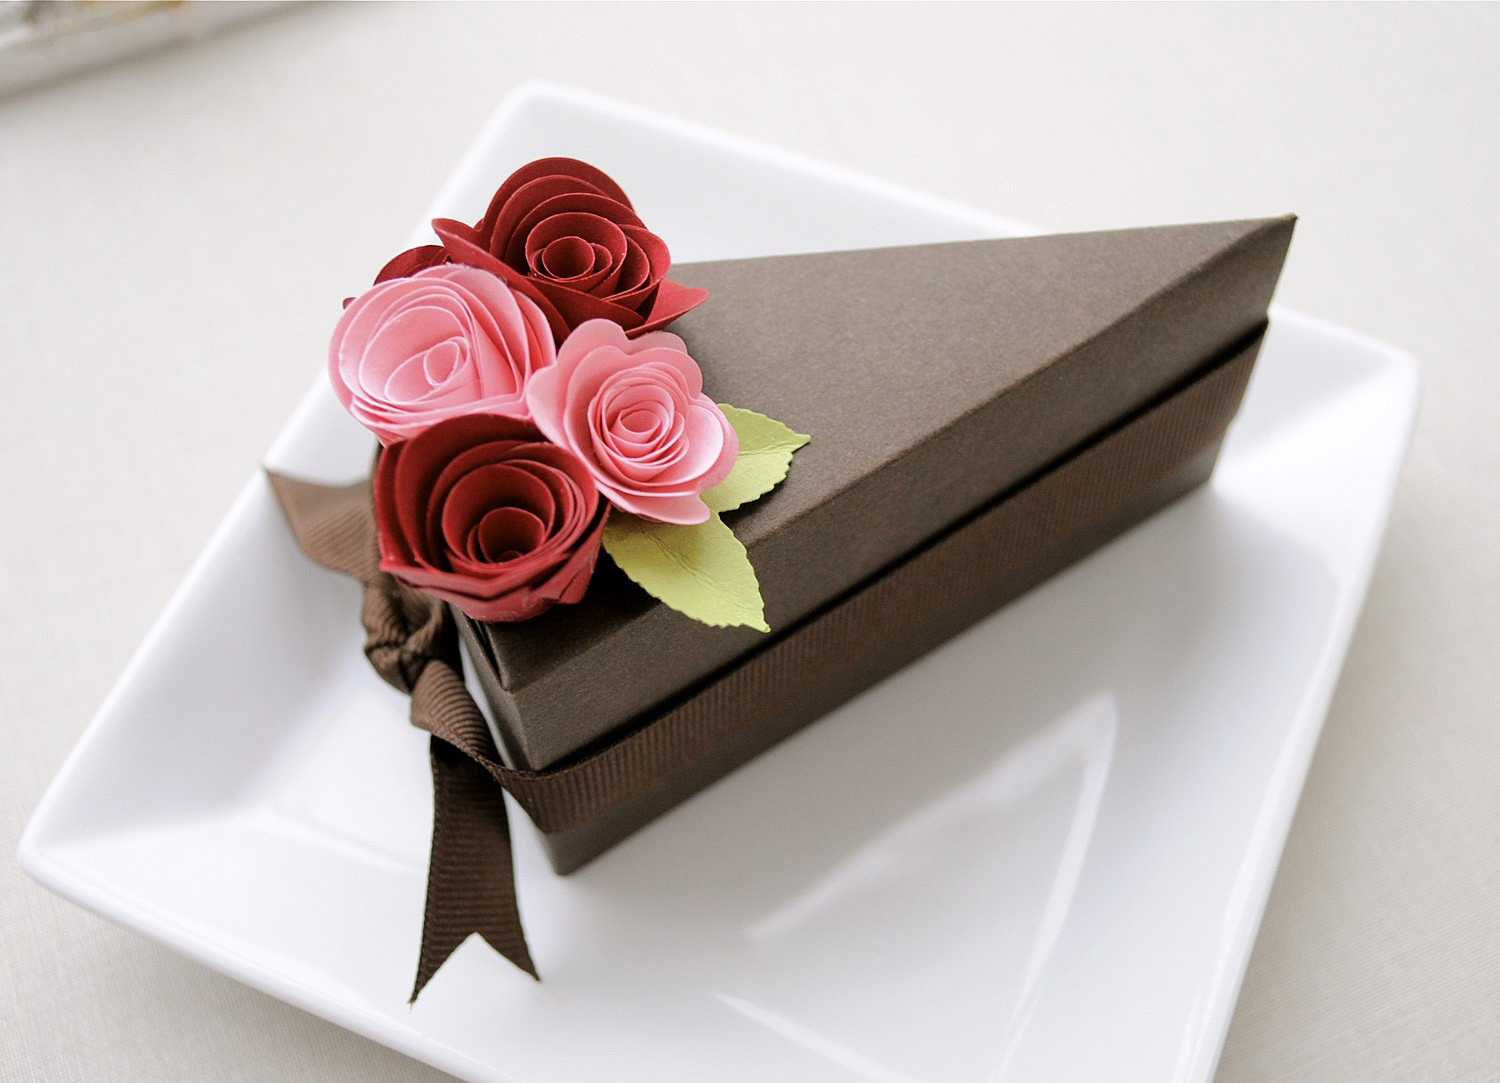
25. Box in the shape of a piece of cake.
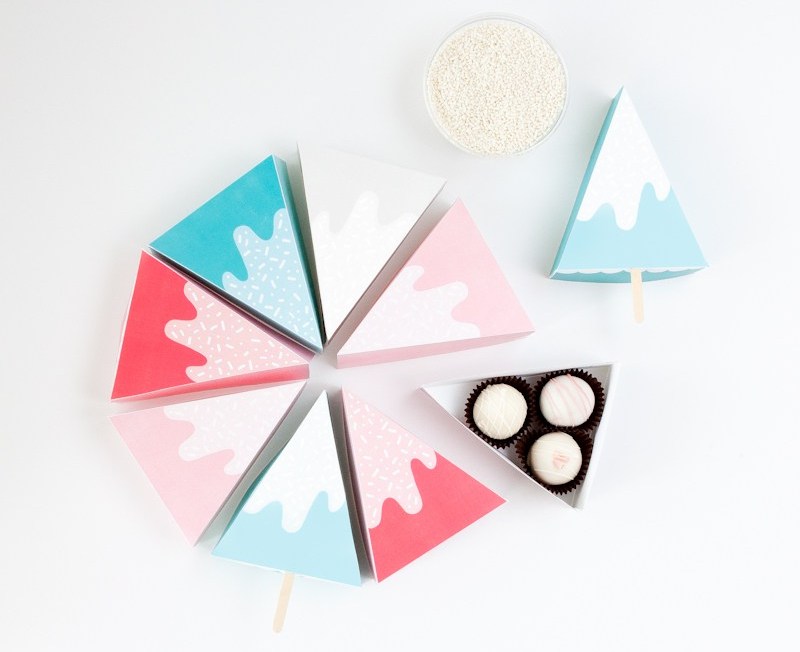
This packaging looks absolutely wonderful. In addition, it couldn’t be easier to do, see for yourself by studying. This “piece of cake” will fit sweets, small toys, some cosmetics, small mittens, a chiffon scarf, etc.
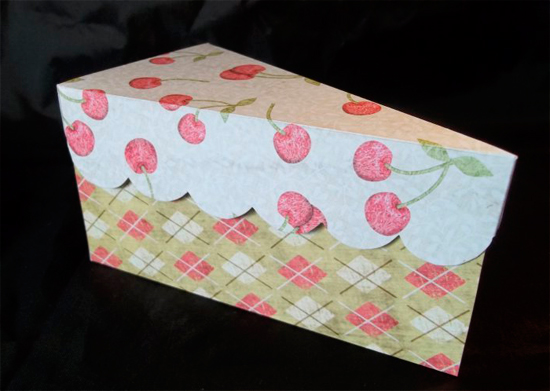
How to make a box - a piece of cake (video with details):
How to make a box for a photo album (video):
Today the Confetti.ru website showed you the best, cute, beautiful and impressive DIY gift boxes. Believe me, each of them is easy to do, but the result is a delight! Moreover, this delight will be experienced not only by you when you finish making gift wrapping, but also by the person to whom you are going to give it! Happy crafting and happy holidays! See you again on the pages of our website!
On the eve New Year's holidays Shop windows are full of gift boxes, decorative bags, and wrapping paper for every taste. Smiling sellers helpfully offer to provide packaging services New Year's gifts. And it all seems great, because you must agree, it’s much nicer to receive a New Year’s trinket in beautiful packaging. But on the other hand, the whole meaning of the gift is lost, the very gift that should be intended specifically for you.
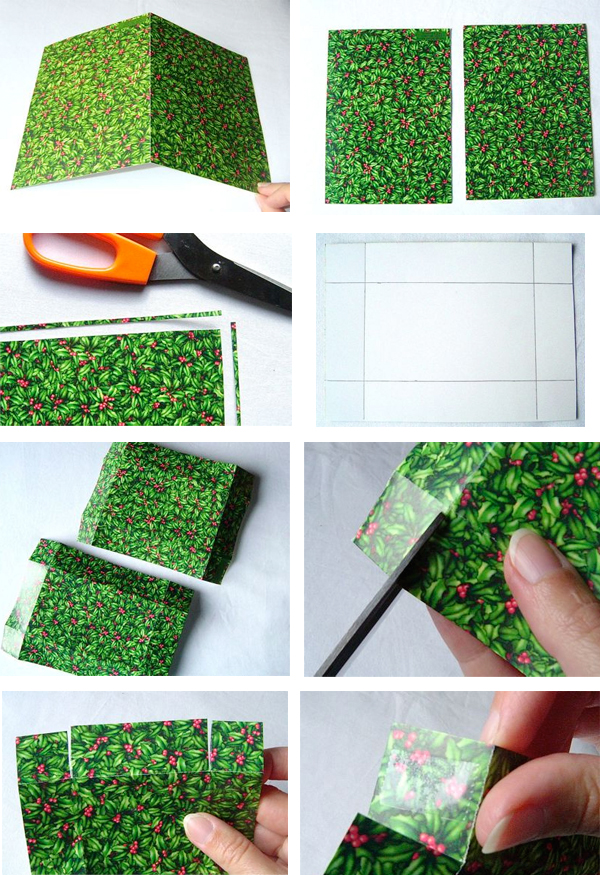
The recipient of the gift will be doubly pleased if, in addition to choosing the gift, you spend a little more time on wrapping it. In this article we will teach you how to make gift boxes from paper or cardboard with your own hands. This is not at all difficult to do, because all the crafts presented with us are accompanied by ready-made diagrams, templates and step by step wizard classes. All you have to do is choose the appropriate box option, print the diagram and glue the paper box according to the instructions. By the way, some of the boxes we present are made using the origami technique, which means that you don’t even need glue!
So, before we get started, let's check if everything is ready. For making gift box from paper with your own hands You will need: beautiful wrapping paper (you can get by with plain white paper and then decorate it), scissors, pencil, ruler, glue or double-sided tape, and a stationery knife. Is everything there? Well then, let's create!
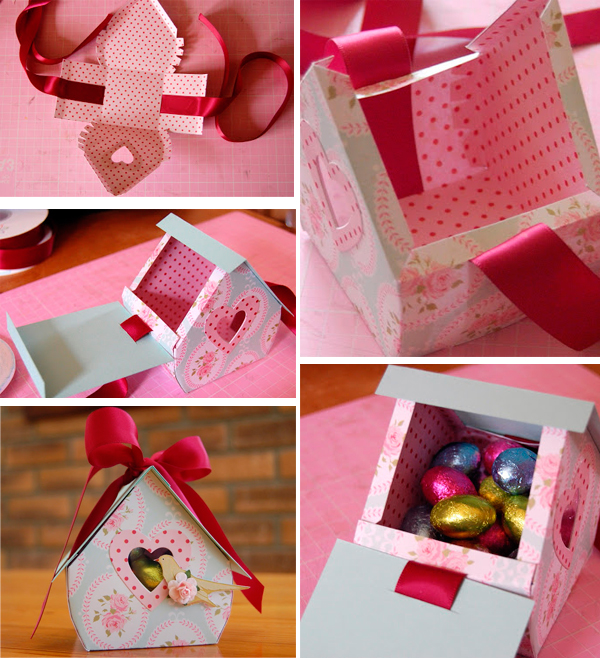
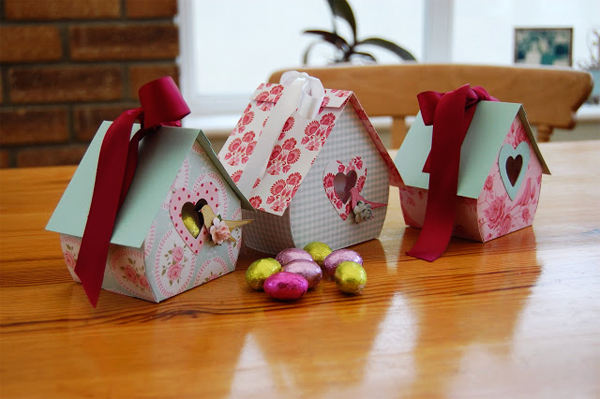
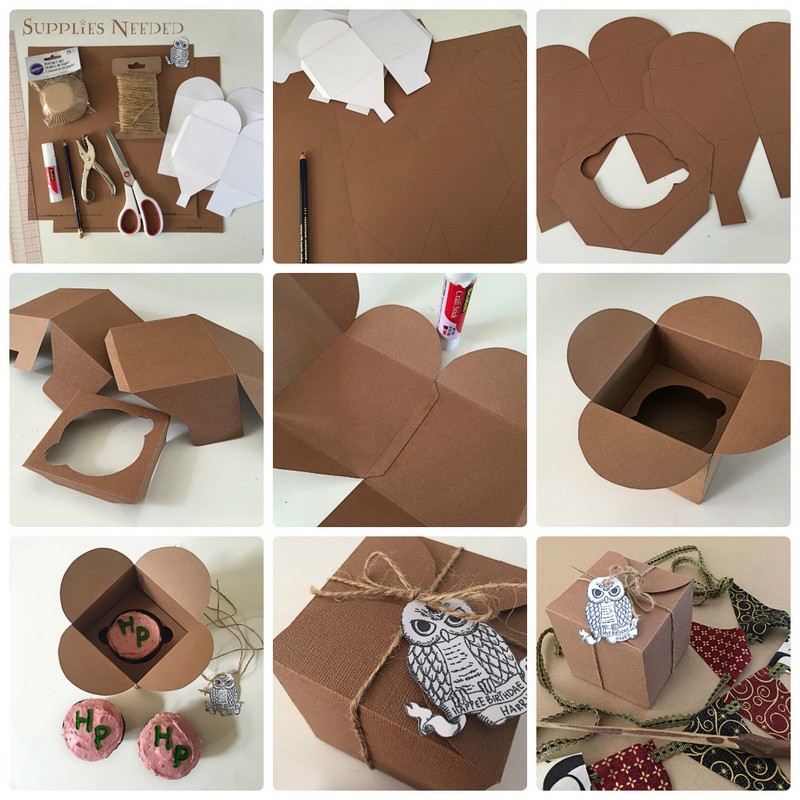
#1 DIY paper gift box “Birdhouse”. Master class and diagram
Let's start with perhaps the most unusual paper gift box. Making such a birdhouse is quite simple when you have a ready-made diagram. The diagram needs to be printed, transferred to suitable paper, cut out and glued in certain places. Complex and intricate at first glance, DIY boxes will be ready in 10-15 minutes.
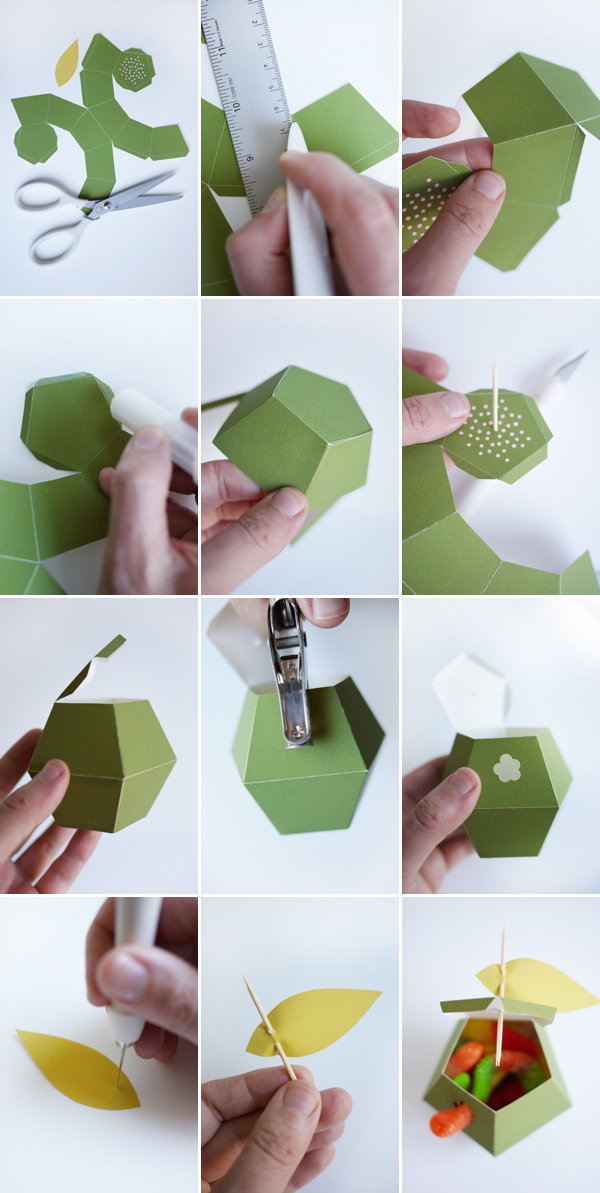
#2 DIY paper box “Apple”. Master class and diagram
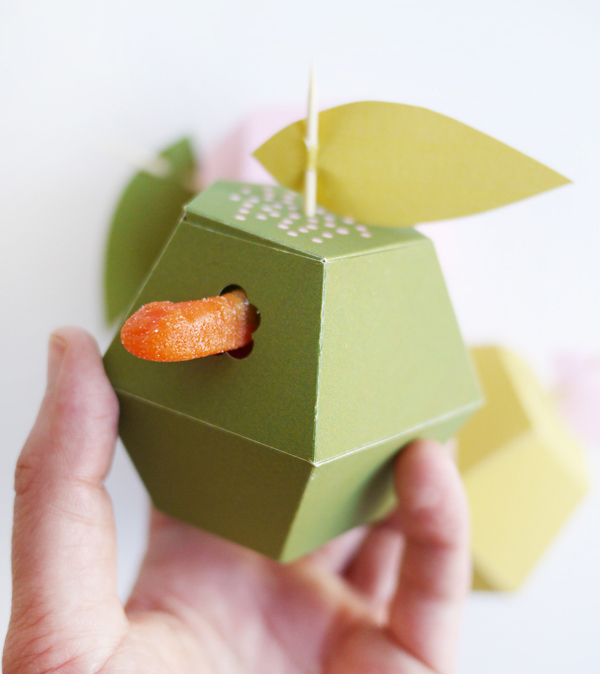
A gift in a paper box in the shape of an apple will be original. With such a box, choosing a gift is quite easy - gelatin worms will come in handy. Making such a box with your own hands with the appropriate diagram is very simple, the manufacturing process will take no more than 10 minutes!
Don't know what to give your child?
During the New Year holidays, edible gifts are quite common: various sweets and baked goods. An original gift will be a muffin prepared with your own hands in a designer gift box.
A ready-made diagram for making a cardboard box with your own hands. All you need is to use our ready-made diagram, which you need to print, cut out of cardboard, and then glue it together in accordance with the master class.
#5 DIY paper Christmas box “Diamond”. Scheme
You can pack a New Year's gift in a diamond-shaped gift box. With our scheme, making such intricate packaging will not be difficult. All you have to do is print out the box template, cut it out and glue it according to the instructions.
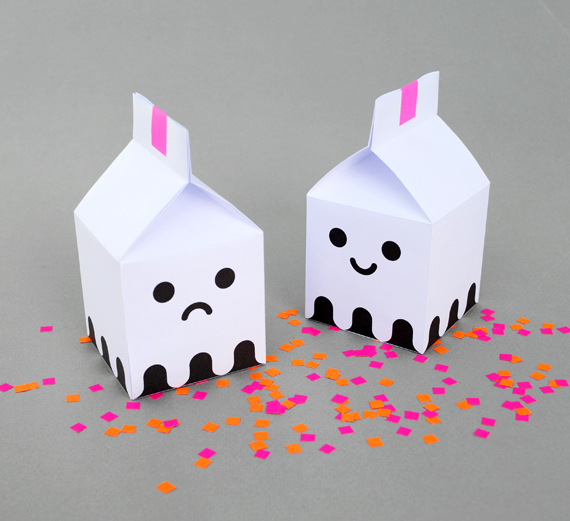
You can also pack a gift in an original way in a box made of plain white paper, adding some details on it in the form of eyes and a mouth, thus bringing the gift to life. With our ready-made diagram, making such a box is not at all difficult. Just download the diagram, print and glue.
#7 DIY gift box “Ice cream”
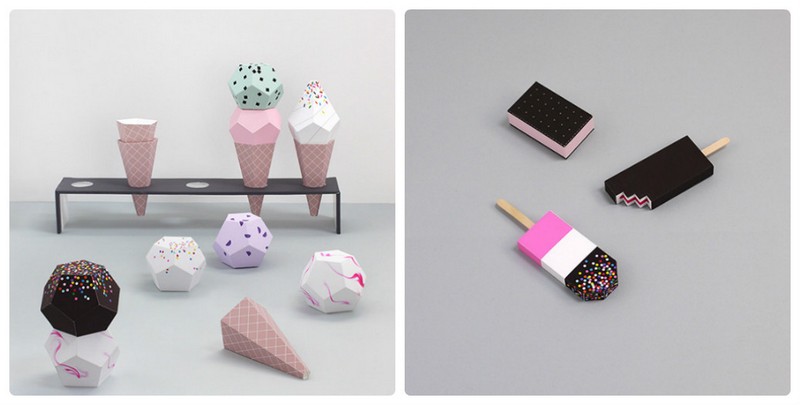
A New Year's gift should be packaged not just well, but with taste. In the “Ice Cream” gift box, your gift will be appreciated! With our scheme, making a delicious box will only bring pleasure!
#8 DIY Christmas paper box “Cake”. Scheme
If new year party planned in a large company, for example with a large family, it makes sense to pack gifts for everyone in one large composite box. A Tori packaging box consists of 8-10 pieces, each of which is a separate paper gift box.
#9 DIY cardboard packaging box “Candy”. Scheme
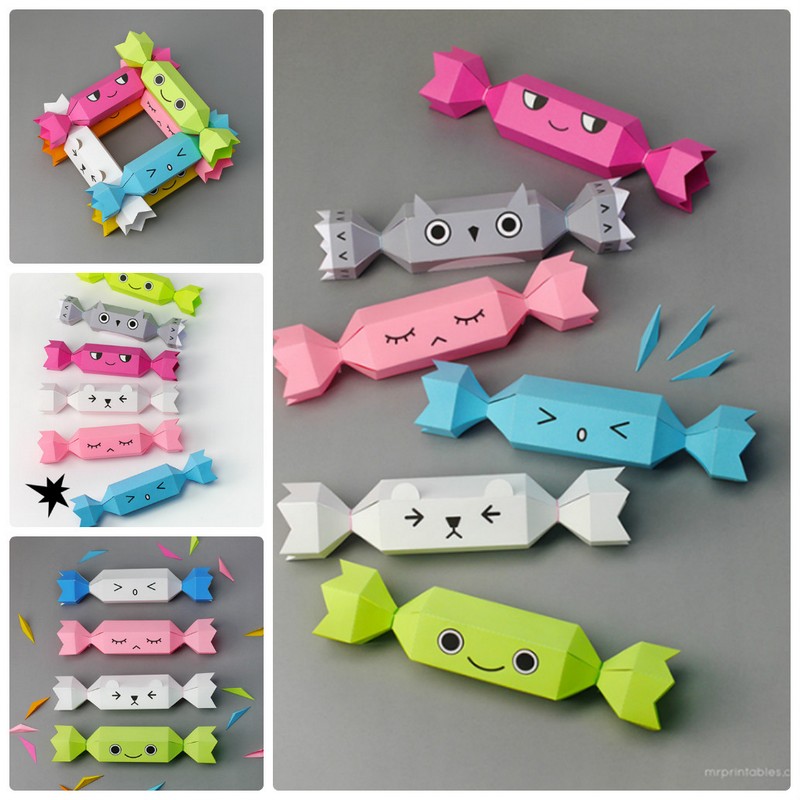
Another option for “delicious” packaging would be a candy-shaped box. To create a New Year's atmosphere, the packaging can be slightly enlivened by adding eyes and a mouth. Download the diagram, print it and glue the box in the right places.
#10 New Year's paper packaging "Santa". Scheme
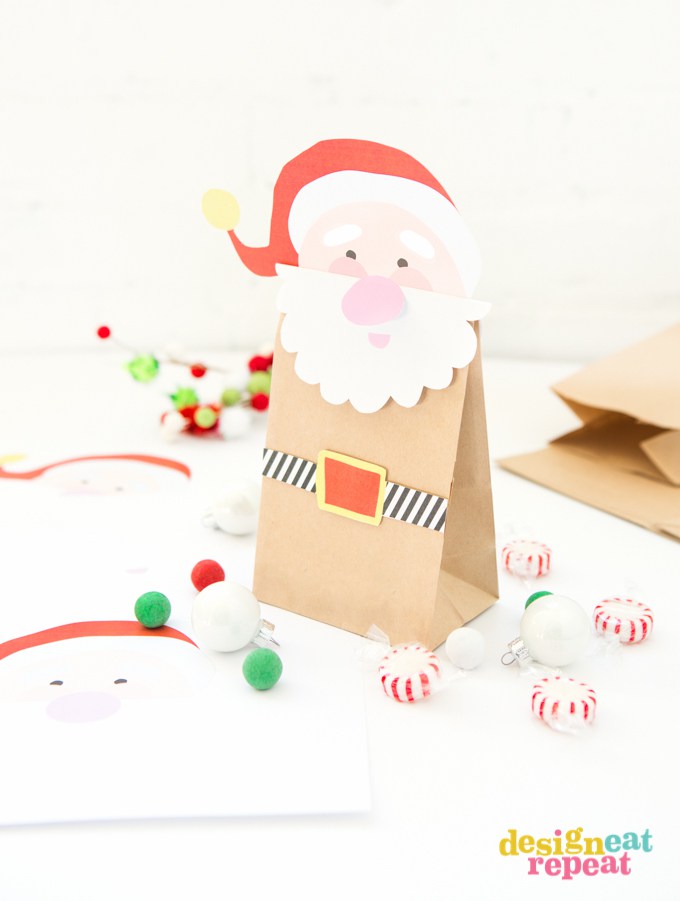
A very cute New Year's packaging will be made from a regular paper bag, decorated with a paper Santa. Download the Santa pattern, cut it out and glue it onto the bag. New Year's packaging ready with your own hands!
Truly original wrapped gifts are valued much more than gifts in a regular gift bag. Please pay special attention for this charming paper box, which you can make with your own hands using our diagram.
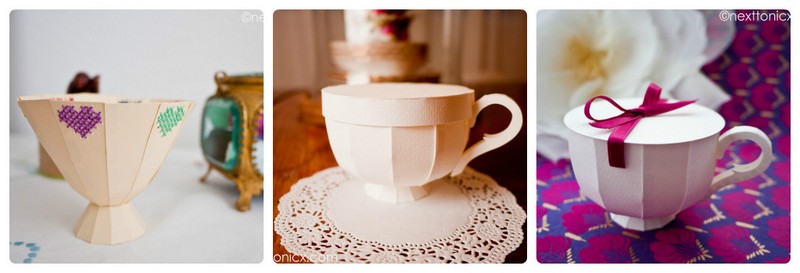
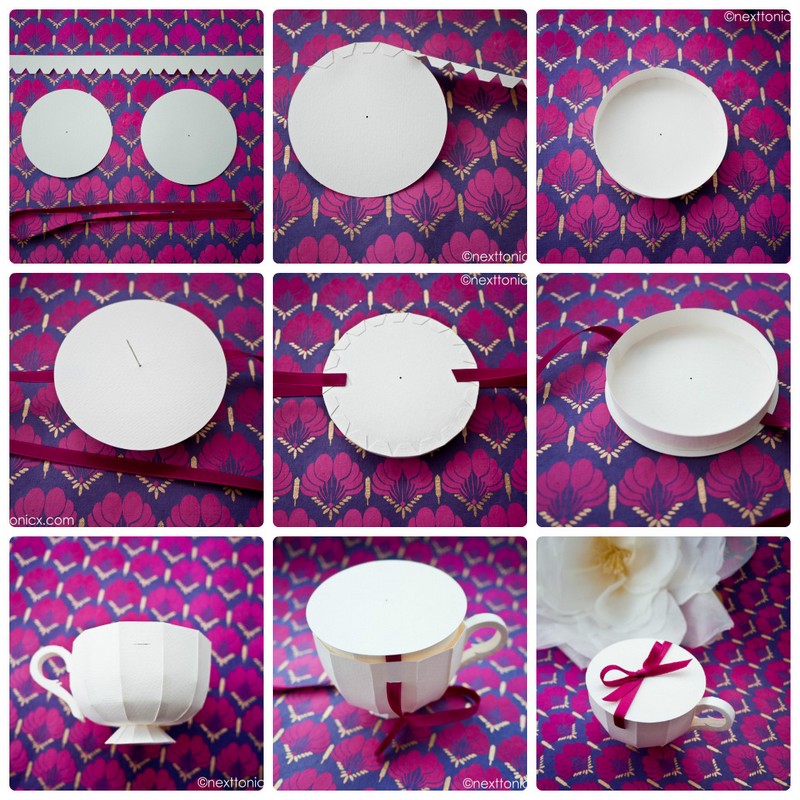
How to make a cup
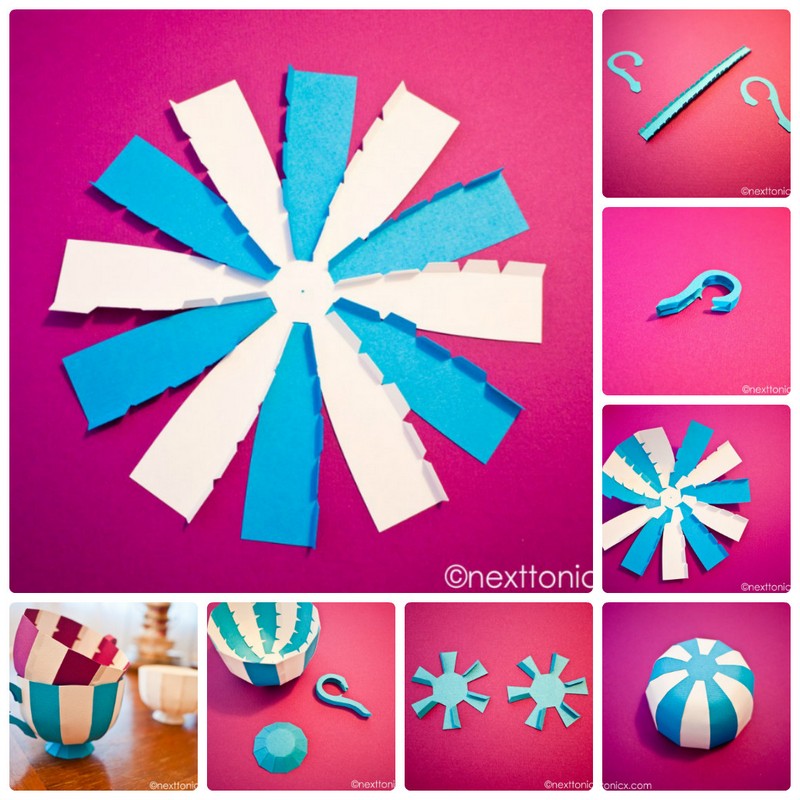
How to make a lid
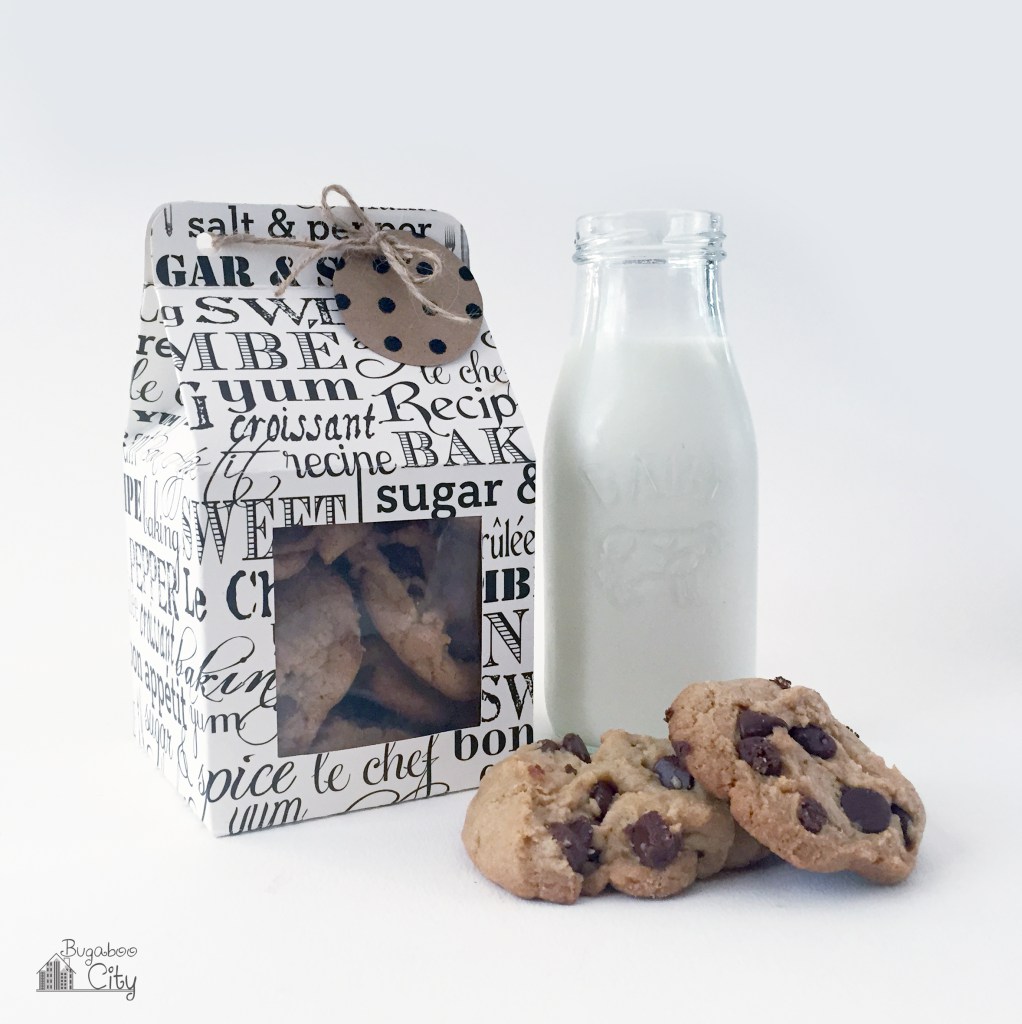
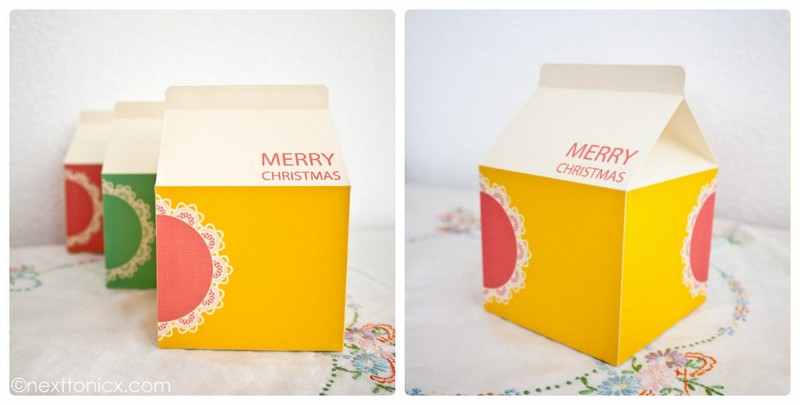
#12 Original DIY paper box “Milk Box”. Scheme
Another incredibly cool New Year's box that will amaze anyone. You can pack a simple trinket in such an unusual box. It’s quite simple to make it if you use a ready-made diagram, which you can download on our website.
#13 DIY packaging box made from paper “Cheerful Bunny”. Scheme
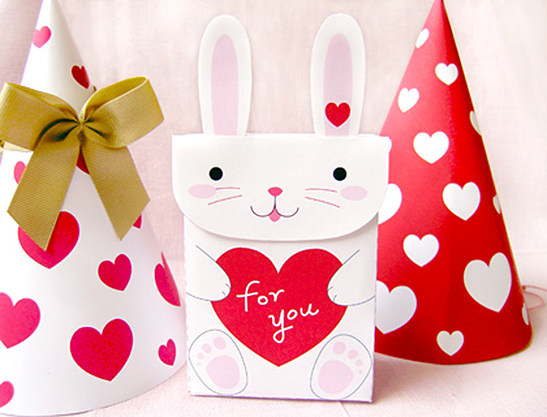
You always want to give a special gift to your dear and close people. And it’s best when this gift is not only special, but also in special packaging that emphasizes the significance of a particular person. Making such a paper box with your own hands is not difficult if you download the diagram from the link below.
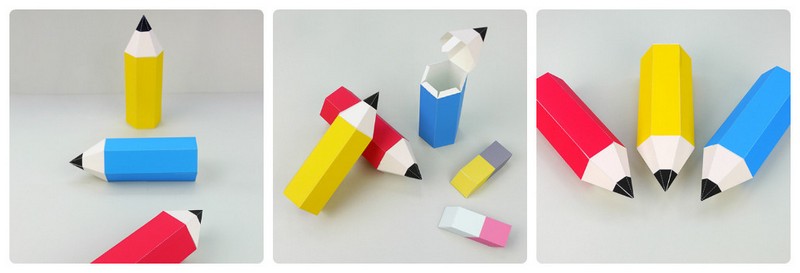
#14 DIY gift box made from paper “Pencil”. Scheme
A New Year's gift for children or people in the education sector is symbolically packaged in a pencil-shaped box. Please your loved ones with a gift in an original handmade box. You can download the diagram below.
#15 DIY paper box “Cheerful Frog”. Scheme
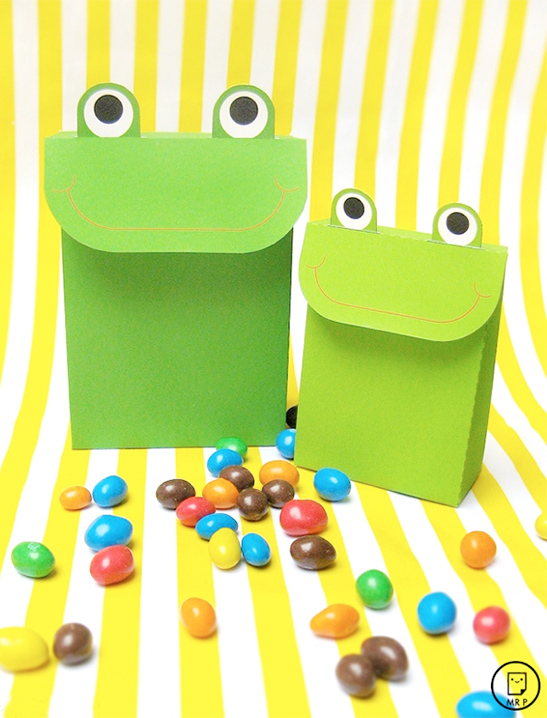
Another very cheerful and positive box for New Year's gifts is “Cheerful Frog”. It’s done quickly and gives a lot of emotions! Download the diagram and please your loved ones with a merry New Year's box.
You can put anything you want in this handmade box. And most importantly, it is done quickly and simply. You can download the box diagram from the link below.
#17 DIY gift box “New Year’s Sweater”. Scheme
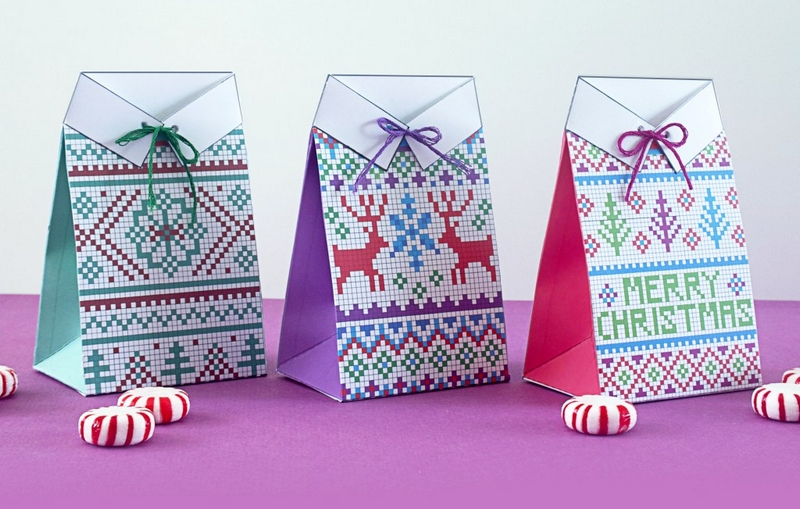
This beautiful gift box can be made with your own hands. To do this you will need a diagram, which you can download on our website, scissors, glue and a little patience.
#18 Pattern for a gift box made of cardboard “Harry Potter”: do it yourself
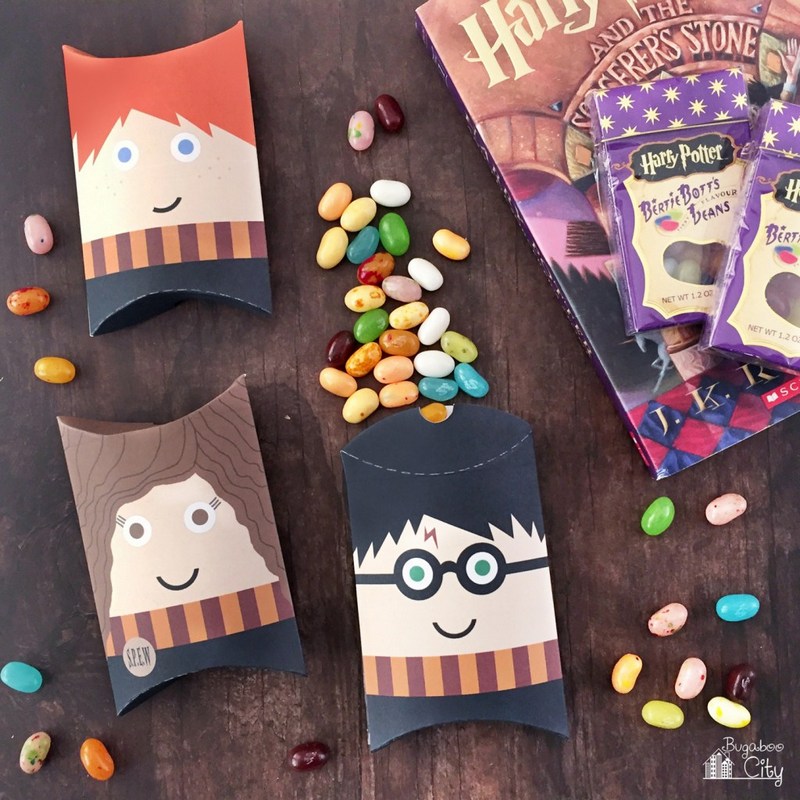
Fans of stories about Harry Potter will be indescribably delighted when they receive a piece of their favorite hero as a gift. By the way, such a box with magic sweet beans can be a wonderful addition to a set of books about the adventures of a young wizard.
You can make a very cute cardboard box with your own hands. It will turn out no worse than store bought. You can make a special bottom for the cake in the box. By placing your little delicious gift in a special stand, you don’t have to worry that all the cream will remain on the box. To make such a cardboard box with your own hands, you need to print the template and follow the instructions of the master class.
#20 DIY “Gingerbread House” gift box pattern: we pack the gifts ourselves
The symbol of the Christmas and New Year holidays, well known to everyone from Hollywood films, is the gingerbread man. You can make a paper box in the shape of a gingerbread man's house. By the way, putting the gingerbread men themselves in such a house will be very symbolic, but if you also make them with your own hands, there is no price for such a gift at all! The “Gingerbread House” box is made according to a special pattern, which you can download below. Also below is a master class on making a box with your own hands.


