Do you want your little one to feel like a sea captain? Then make boats with it. We offer you 11 different ways make boats with your own hands. You will have a whole flotilla!
These boats are made from shampoo bottles. Is it really beautiful?
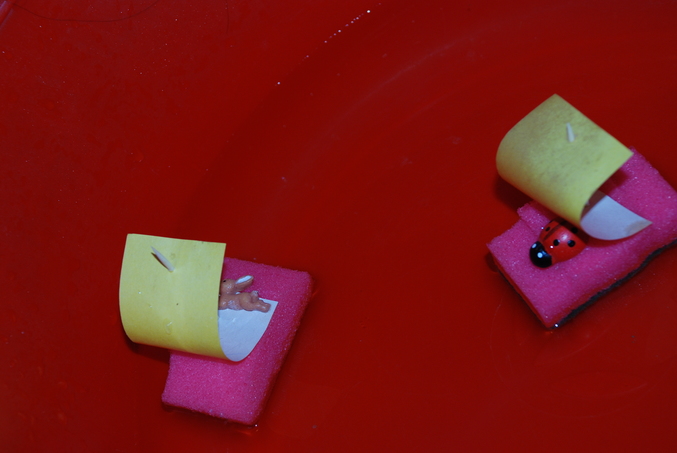
These boats are very easy to make. You will need sponges, toothpicks and pieces of cardboard for the sail.
Raft made of sticks and threads. Make a sail out of paper.

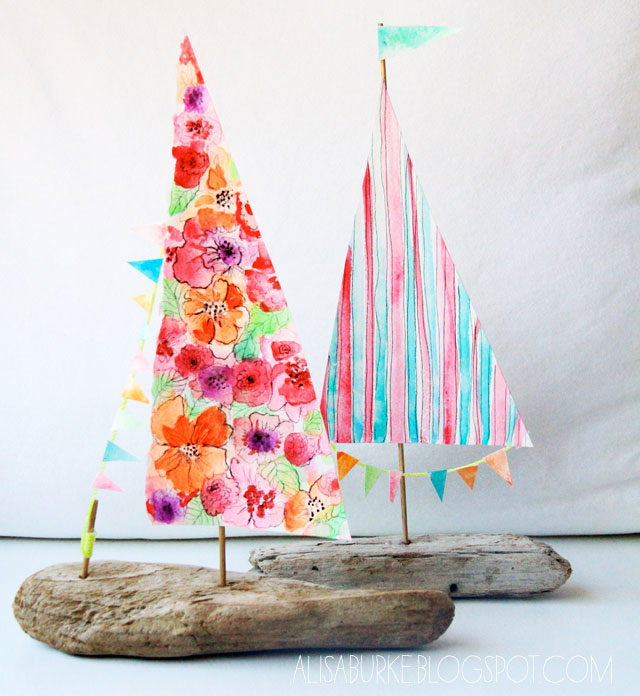
A beautiful yacht made from a piece of wood. Help your child secure the mast with the sail.
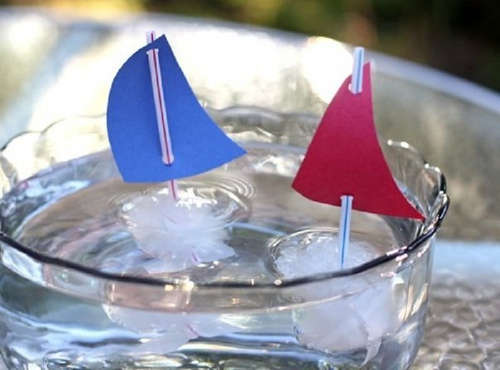
Wonderful sailboats will be made from pieces of ice. Use ice cube trays, and the mast can be made from a cocktail straw.
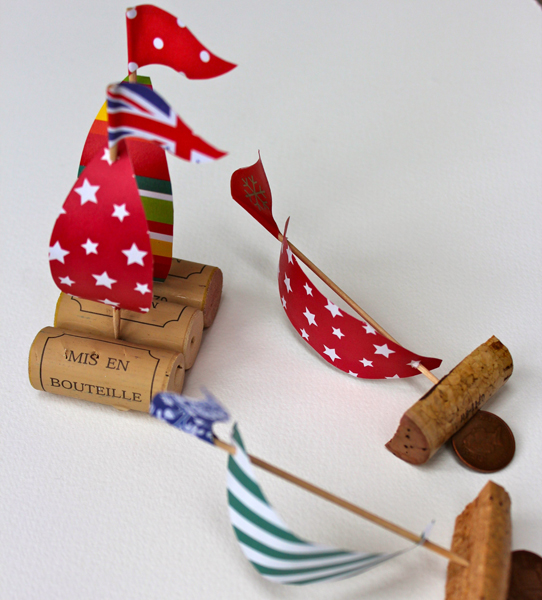
Boats made from corks. They turn out very beautiful. Take cork halves, toothpicks and paper sails.
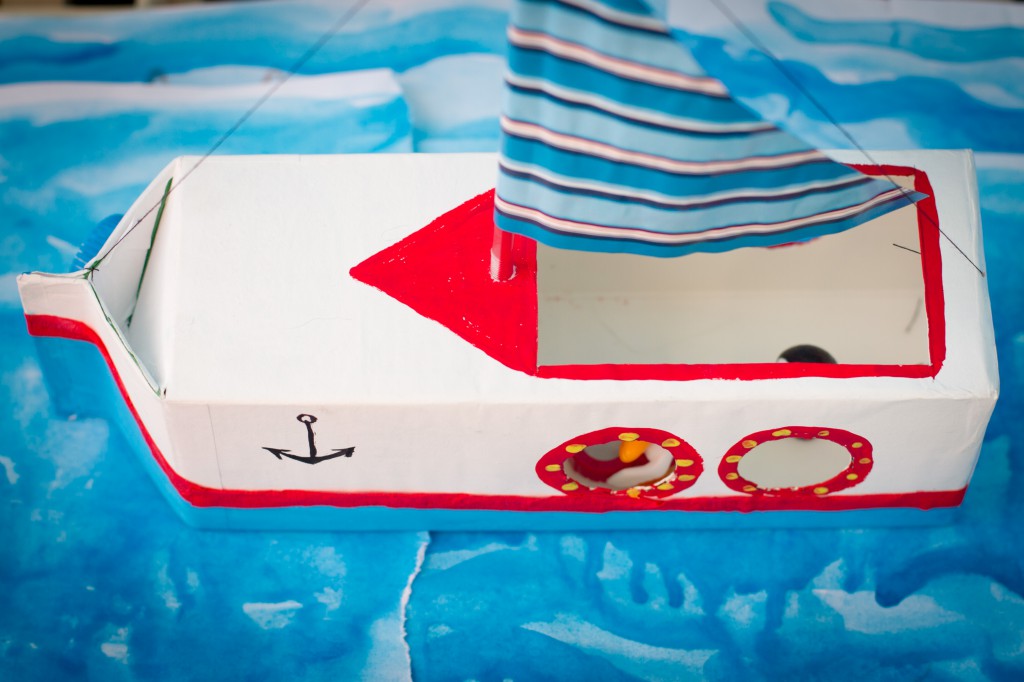
And this ship will come out of a milk carton. It will be the most stable on the water. Yes, and the biggest.
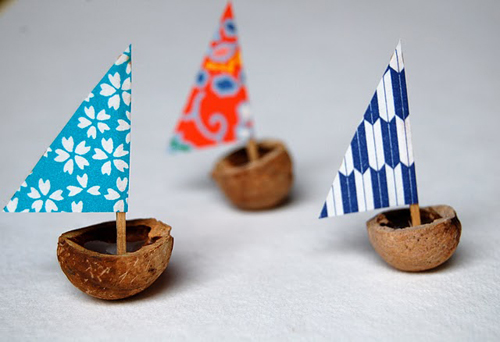
Small, light boats made from walnut shells are easy to make. Let your imagination run wild with sails.
And these paper boats- a classic of the genre. Choose paper of interesting colors to make them unusual.

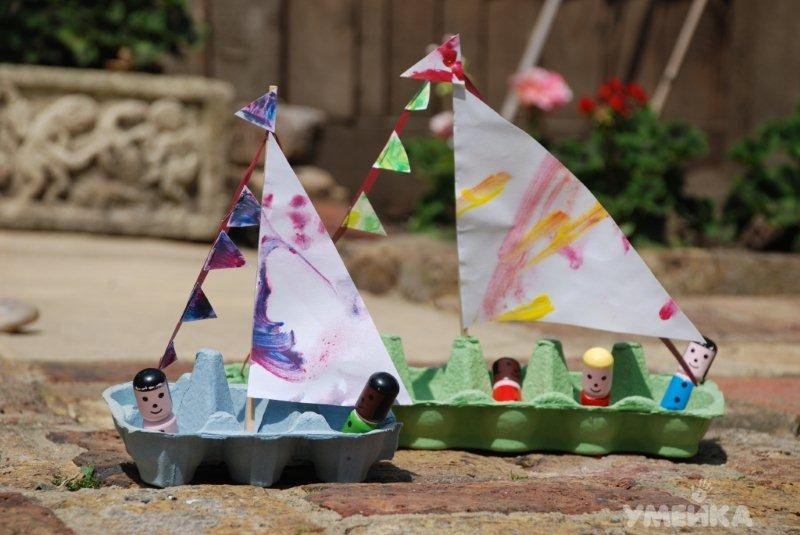
You can make great boats from egg trays.
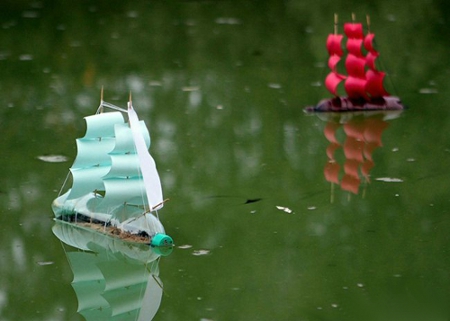
And these are wonderful boats from plastic bottles. Here you can get creative and create “Scarlet Sails”.
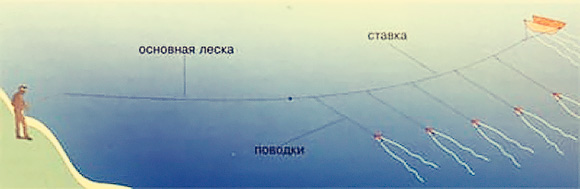
Tackle, such as a boat, allows you to fish at a considerable distance from the shore, without a boat. It is more preferable in choice, since even a boat scares away fish. A boat will help you catch such wary fish as asp, ide, chub and pike. This tackle, which was successfully used by our ancestors, is capable of delivering bait far from the shore, where cautious fish, without suspecting anything, will certainly attack it. It is impossible to buy this tackle, since it is not for sale, but making it at home is not at all difficult.
This fishing device has several names, but mainly it is called a “water kite”, and also traditionally a “boat” and this name is much more suitable. Tackle is made from any material that has positive buoyancy. Basically, it is wood or foam. It is desirable that the structure has a certain weight, otherwise it will not be stable on the water, especially in the presence of wind and waves. Drawings of such gear can be easily found on the Internet. At the same time, you should not try to repeat the first drawing you come across. It's better to start by reading the reviews.
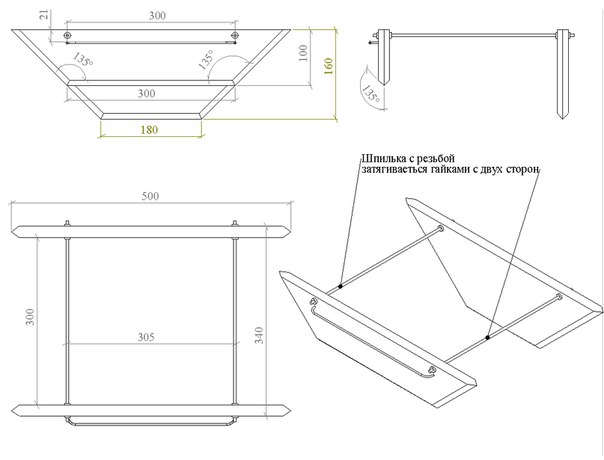
To make a simple tackle, you need to have:
- A couple of planks of arbitrary length, up to 15 mm thick.
- Drying oil.
- Waterproof paint (oil-based), soft shade.
- A couple of M6 threaded studs and four nuts for these studs.
- A regular bracket with an M4 nut and a screw to secure the structure and the main line.
- Lead weight.
- Nails or screws for fastening.
- Glue (waterproof).
- Drills of the appropriate diameter.
If all the components are prepared, then you can begin assembling the structure itself.
The order is as follows:
- The finished boards are covered with drying oil, dried and covered with soft oil paint. The tackle should remain visible from a distance, but not scare away the fish.
- Elements similar to trapezoids are cut out of wooden planks. There should be oblique cuts on the side faces. IN in this case, it is better to first prepare the boards of the desired shape, and then open them with drying oil and paint.
- Holes are drilled in wooden blanks for their fastening.
- The two workpieces are connected using studs and nuts.
- After this, the bracket is attached. Holes for attaching it should be made on both sides so that the bracket can be rearranged if necessary, since you have to fish both on the left and on the right. The bracket is attached to the side where the water flows. This allows you to launch the “boat” in any direction of the current.
- Finally, a lead weight is attached to the bottom of the structure using glue. The load will make the structure more stable.
The ship is ready for use; you just need to attach the equipment elements to it.

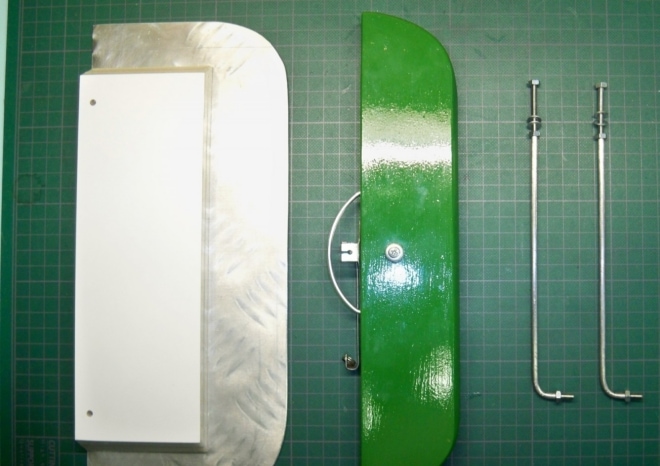
In the process of using the “boat”, experienced fishermen had an interesting idea, which led to an improvement in the design of the gear. The improved boat consists of:
- From the lead board.
- From the main float.
- Made from leaf springs.
- From a special switching device and a limiting element.
- From the towing line.
- From flies.
The springs included in the design serve as a kind of shock absorber that smoothes out strong jerks of the fish during bites. The float is included in the design of the reverse mechanism, and also gives the entire structure more stability. The safety bracket prevents the line from tangling with the controls. The switching device is designed to change the direction of movement of the “ship”.
Manufacturing stages
- For the construction of fishing gear, you should take well-dried wood. To give the structure a small lifting force, it is given the desired shape.
- To prevent the structure from floating to the surface of the water, a redan is attached to the lower end of the board.
- The wooden base is impregnated with drying oil and painted with waterproof oil paint. The underwater part is painted blue, and the surface part is painted white.
- A hole with a diameter of 8 mm is drilled in the middle of the board to attach a lead weight.
- At the upper end of the board, between the springs, a strip of cork is attached, where the flies are supposed to be stored.
- The spring is made of stainless steel strips, 0.8 mm thick, 10 mm wide and 320 mm long.
- The float is made of polystyrene foam. It, along with the switch and springs, is attached to a wooden base.
- A strip of stainless steel is taken and a switch is made from it. Strip thickness 1 mm.
- The safety bracket is made of copper wire, 2 mm thick.
Springs made of stainless steel plates are bent so that the switch rises above the waterline to the height of the underwater part of the float.
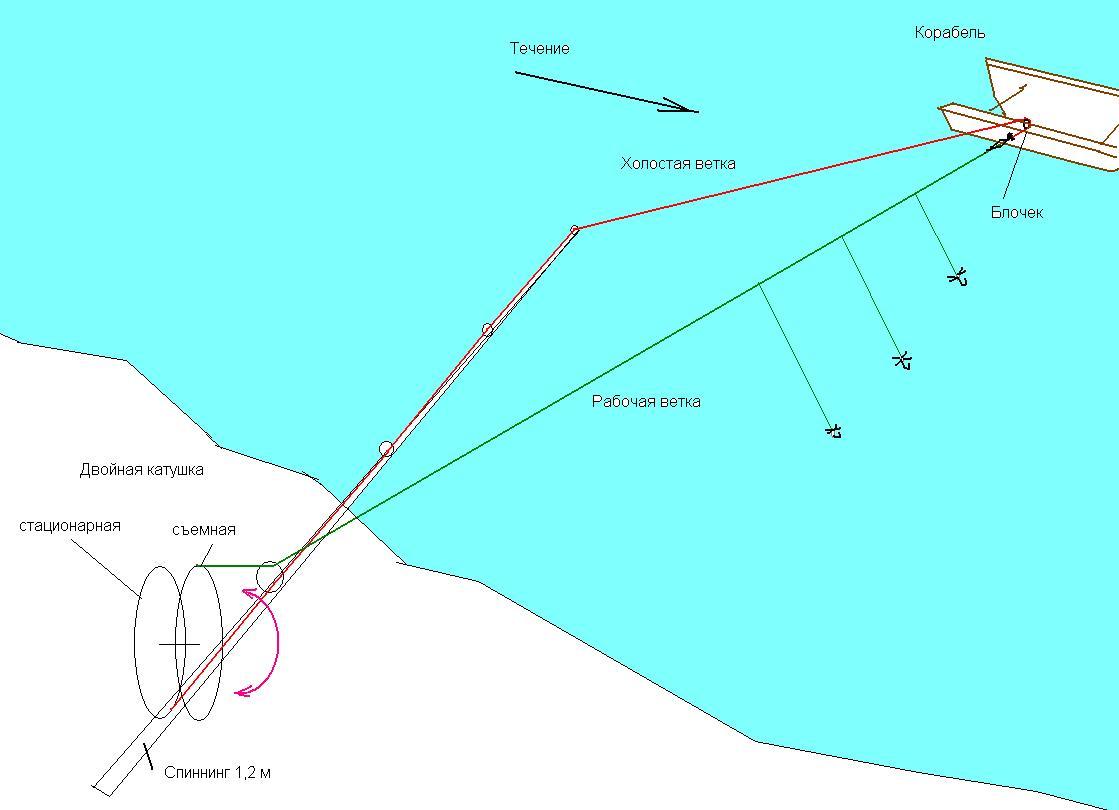
Such gear is capable of moving both in the direction from the shore and vice versa. This allows you to control the movements of the tackle. As a rule, a simple structure is always located at one point.
The “ship” must have positive buoyancy. Given the fact that there is a flow, the geometry of the device must have special shapes.
The action of the “boat” is similar to the action of the “kite”. The only difference is that such gear is driven not by air, but by water. Thanks to this operating principle, the bait always ends up in the right place. The “boat” can only be used in conditions where there is a current or a strong wave that can move the gear to the desired location.
Carrying out preparatory work
The use of a “ship” involves the use of a fairly powerful spinning rod, with a dough of 100 to 200 grams. There are times when you have to pull out fish not with a spinning rod, but with your hands.
For such fishing conditions, it is possible to use an inertial reel, dating back to Soviet times with an open drum. As a rule, fishermen use a “Neva” reel with a drum, which holds a lot of fishing line.
Any strong fishing line of appropriate diameter will be suitable as the main fishing line. The thickness of the fishing line has no effect on fishing performance. The diameter of the fishing line for leashes is selected depending on the size of the intended prey. For normal fishing conditions, it is enough to have leashes with a thickness of 0.12-0.15 mm. If you intend to catch individuals weighing up to 0.5 kg, then it is better to choose a fishing line with a thickness of 0.18-0.2 mm.
Fishing technique with a boat
Similar tackle shows good results in three cases.
Fishing on moderate rivers
The fishing technique is more suitable in cases where the depth near the shore is no more than 1 meter, and the shore is overgrown with bushes and trees. Usually, ide stands in such places, waiting for some living creatures to fall from the branches and leaves of trees and bushes.
In such cases use:
- Ship.
- Spinning rod with dough from 40 to 100 grams, up to 3.3 meters long.
- Leash, about 2 meters long.
- Hooks or small tees.
- Butterflies, grasshoppers, dragonflies, and other large insects.
Basically, all fish are shy and afraid of any movement along the shore, especially in bright clothes. Therefore, first of all, you should take care of camouflage.
As a rule, in such cases, you should count on bites closer to the surface of the water. This can be achieved by using floating artificial baits, which can be flies that imitate various insects.
If a bite is identified, a soft hook should be carried out. Given the specifics of the gear, the fish will not be able to immediately feel the resistance of the fishing line.
The use of a “boat” on wide thresholds
In conditions where the reservoir is very deep, including near the shore, a “boat” will always help out. Typically, in such cases, three or four leashes with sinking fly fishing flies are used. When using tees or double hooks the number of fish hatches is minimized.
How is the “ship” used?
- The leashes should be higher than the main line, which is done with a sharp movement of the spinning rod.
- The spinning rod must be directed in the direction of the current.
- In this case, the flies float freely on the surface of the water for about three meters. This allows you to deceive the fish, but only during periods of the presence of various insects.
Take the fish only with your hands, after all the fishing line has been wound onto the reel.
Fishing on rivers with slow currents and dense vegetation
As a rule, pike prefer to be in dense thickets of coastal vegetation. In this case, it is difficult to take pike both from the shore and from the boat. And here the “ship” can come to the rescue again.
Equipment of the "ship":
- As a rule, a predator such as pike is caught using live bait. Therefore, a live fish or frog is suitable as bait. The frog is considered the most tenacious, so it is better to give preference to it.
- It is better to take braided fishing line as leashes. If you take monofilament fishing line, then its thickness should be in the range of 0.4-0.5 mm.
- The frog clings to double or triple hooks. At the same time, you need to make sure that the tips of the hooks are slightly peeking out.
- After the “ship” leaves, leashes are attached to a considerable distance. They are connected using a loop-to-loop method, as well as using carabiners.
- The leash from the leash can be located at a distance of two to ten meters. If there is a fast current or dense vegetation, one leash is sufficient, since more leashes are more difficult to control.
If the tackle is ready for use, then you can begin fishing the planned area, rising or falling from the roll. As for the type of wiring, it can be anything. The bait (frog) can be immersed in water for several minutes, and also tapped on the surface of the water in places where there is no vegetation. If the vegetation is not very turbulent, then the frog can simply be dragged along the grass. At this time, one of the leashes should pass along the edge of the vegetation, and the other leash should catch windows of clean water. Pike can bite at any time and anywhere. In this case, much depends on the nature of the reservoir and the presence of pike.
“Boat” is an interesting piece of equipment that you need to know how to use. With its help it is possible to deceive anyone, even the most cautious predator. With the correct use of gear, a catch is always guaranteed. The main thing is to present the bait correctly and use it correctly.
As practice shows, using a “boat” requires special skills, and the gear is very unique. This is not a fishing rod that can be cast and immediately pulled out of the water in case of a single bite. You won’t be throwing in and out of the “ship” over and over again. There must be a clear calculation for catching a large specimen. Typically, the “boat” is used to catch predators with live bait. Live bait, if properly placed on a hook, can live under water for more than one hour, which suits fishermen quite well. You can launch the “boat” and wait for a bite for several hours. If it is missing, you can pull out the tackle and check it, and if necessary, replace the nozzle (live bait).
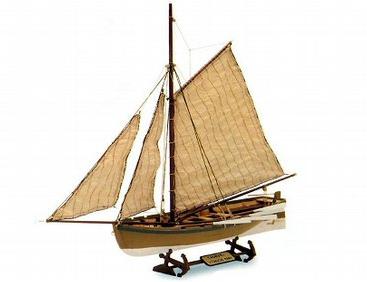
Probably many people have looked at the magnificent wooden sailboats in store windows or in the apartments of friends. How good they are! Even in the simplest boats you can feel the wind blowing, you want to look at it for a long, long time and delve into the details. And then the question arises of how to make a boat out of wood. But most people give up this idea only after imagining the complexity of this enterprise. Therefore, it is worth understanding in more detail the features of building small ships.
What models are there?
First of all, you need to decide on the purpose of creating the boat. If you need it to launch it on a river or lake, strength and driving performance will become important, and some decoration details are useless in this case. If your goal is to learn how to make a boat out of wood that will become an interior decoration, then you should think about its appearance more thoroughly. Often, enthusiasts even restore in detail ships, sailing ships and schooners that actually existed and have become almost legendary. But first, it’s worth making a simpler boat to try your hand at it.
 What is needed for a simple boat
Those who are seriously thinking about how to make a boat out of wood will need:
- the actual wooden block, the size of which depends on the desired dimensions of the product;
- several thin sticks for masts;
- fabric or soft paper for sails;
- tools: knife, chisel, drill, hammer;
- good glue, best of all - superglue;
- sandpaper;
- varnish or paint for final decoration.
How to do
First of all, you need to plan the block so that it takes the shape of the hull of the future vessel. Then a deck with a depth of 5-7 mm is hollowed out inside it and a side with a width of approximately 3-7 mm is left (you can leave 10 mm, depending on the intended model). Masts should be cut from the prepared sticks so that they are even and smooth. In the hull of the ship, you need to drill holes along the diameter of these sticks and install masts in them. Then they begin to make sails. 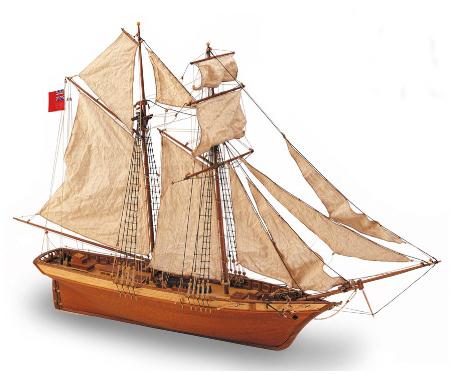
How to make sails
When deciding how to make a boat out of wood, you should imagine the future design of the sails. It can be a single sail, large and snow-white. Or you can place several of these elements on each mast, which will create the impression of a large vessel. Try cutting out several long pieces of fabric (according to the number of masts) in the shape of an isosceles trapezoid, where the upper base is slightly smaller than the lower one. The length of the blanks should be 6-7 centimeters greater than the length of the masts. Each part should be divided into three parts, toothpicks should be glued and secured, and shaped into sails.
Decoration
And the last step in making a wooden boat is its decoration. You need to sand the workpiece, draw portholes, paint and varnish. Here you can show ingenuity, for example, how to make a boat out of candies by gluing them along the edges of the workpiece.
Such a fairly easy-to-make boat will be good an original gift. He will make you smile and add good mood. If working with wood still causes too much difficulty, you can make a paper boat with your own hands. Only in order to get a truly beautiful product, you should use thick cardboard from which the body is glued. The masts can be left wooden, and painting such a creation will be much easier.
A small artificial reservoir can be decorated not only by its residents and carefully formed shores, but also by ships in the water area. Having installed the pond (the installation is described in detail on the website), within three years the first sailboat appeared, having served for several years, it was replaced with a new one. The detailed process of building a homemade sailboat with your own hands - a boat made of foam plastic - is outlined below.
How to build a sailboat with your own hands
1. Dense polystyrene foam and granular foam are used as the hull of the sailboat. won't fit under no circumstances. A good source of material is foam from net floats, from old life jackets, and colored construction foam for insulation.
2. Due to the small size of the pond - only one cubic meter of water, the sailboat is made of a modest size. The drawing is shown in the photograph.
3. We transfer the main dimensions to the foam blank and cut out the contours of the sailboat’s hull along the contour. For dense foam, it is convenient to use a jigsaw or a saw with a fine tooth.
5. To fasten the masts, the corresponding parts are installed in the hull. It's better to install something that won't corrode, like pieces of copper wire.
Stern mount
6. It greatly depends on the manufacture of sailing equipment. appearance and the attractiveness of the sailboat. To make sails and masts you will need three kebab skewers, a piece of white fabric and nylon threads.
7. Using the sharp end, stick the skewers into the foam to form an inclined mast and two straight masts. We shorten the skewers. The height of straight masts is 12-14 cm.
8. Cut the sails. For straight sails, we cut the yards from scraps of masts.
9. We sew sheets to the lower edges of the sail to attach the sails to the yards. For a long life of the thread fastening, it is better to coat the corner of the sail with colorless nitro glue.
10. It is impossible to imitate the real fastening of the sail due to the fragile edge of the sail, so the sail was partially pressed against the yard and sewn on with overlapping threads. Using a thread and a needle, we attach the finished sails to the masts by the center of the yard. We put two sails on the middle mast, three sails on the highest one, with the top sail folded.
11. We install the oblique sail by stitching along the long edge and attaching a thread - a lifeline to a straight and inclined mast.
12. After setting the sails, we stretch the masts with standing rigging. We fasten the sails and yards with threads. It is also useful to coat the thread fastenings to the body with nitro glue.
13. For seaworthiness, a small sailboat must be given stability so that in a strong wind it does not fall on its side, and if this happens, it can independently return to a vertical position. To do this, we screw a 10-12 cm long self-tapping screw in the center of the bottom body and attach a weighting material, for example a radiator for a semiconductor transistor, to its end. After installing the weighting material, we check the behavior of the boat; it should stand level on the water without noticeable rolls to the side, bow or stern.
Dead anchor
14. But it is not wise to release a small boat straight into the pond; under the influence of the wind, the sailboat will quickly wash ashore. To limit movement, the sailboat is installed on a dead anchor. A heavy stone should be used as a dead anchor. We tie a nylon thread or fishing line to the stone and tie it to a weighting agent, or better yet, using a self-tapping screw to the bottom of the stern. The length of the fishing line should be set so that the homemade boat cannot reach the shore in any wind.
In the presence of strong winds, it is good to put an elastic shock absorber on the fishing line for a smooth response of the sailboat when the fishing line is pulled. An example of the movement of a sailboat in 6 hours is shown in the video
More material on the topic of sailboat construction


