Jacket is a popular item outerwear, both for women and men. It is always relevant, and a particular model is made fashionable by details: cut, color, material or decoration. There are many types of jackets, differing from each other in both manufacture and purpose. The ability to draw it will be useful both when preparing a sketch of clothing, and for depicting a modern person, and even for children - for drawing fashionable clothes paper toys.
Step by step
First you need to figure out how to draw a jacket step by step. The most common simple model consists of a main part - a back and front, sleeves (usually with cuffs or a clasp), a collar (or hood).
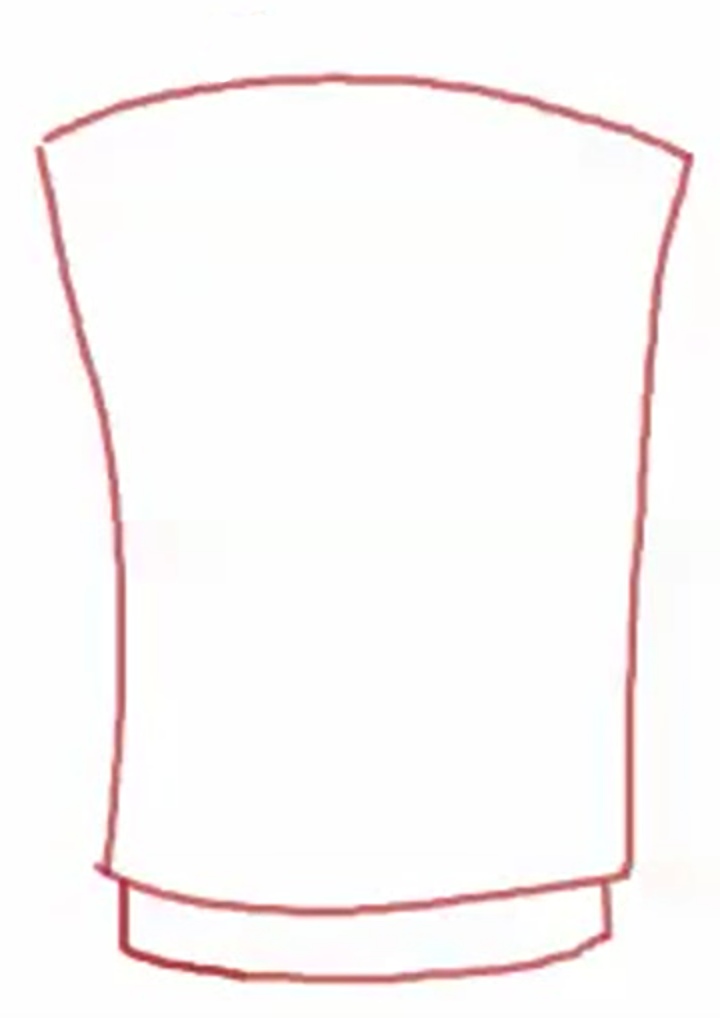
Stage 1
The main part is shown. Most often, this type of outerwear has a loose fit, so it is shaped like a rectangle with a rounded top along the shoulder line. There is a wide elastic band just below the expected waistline.
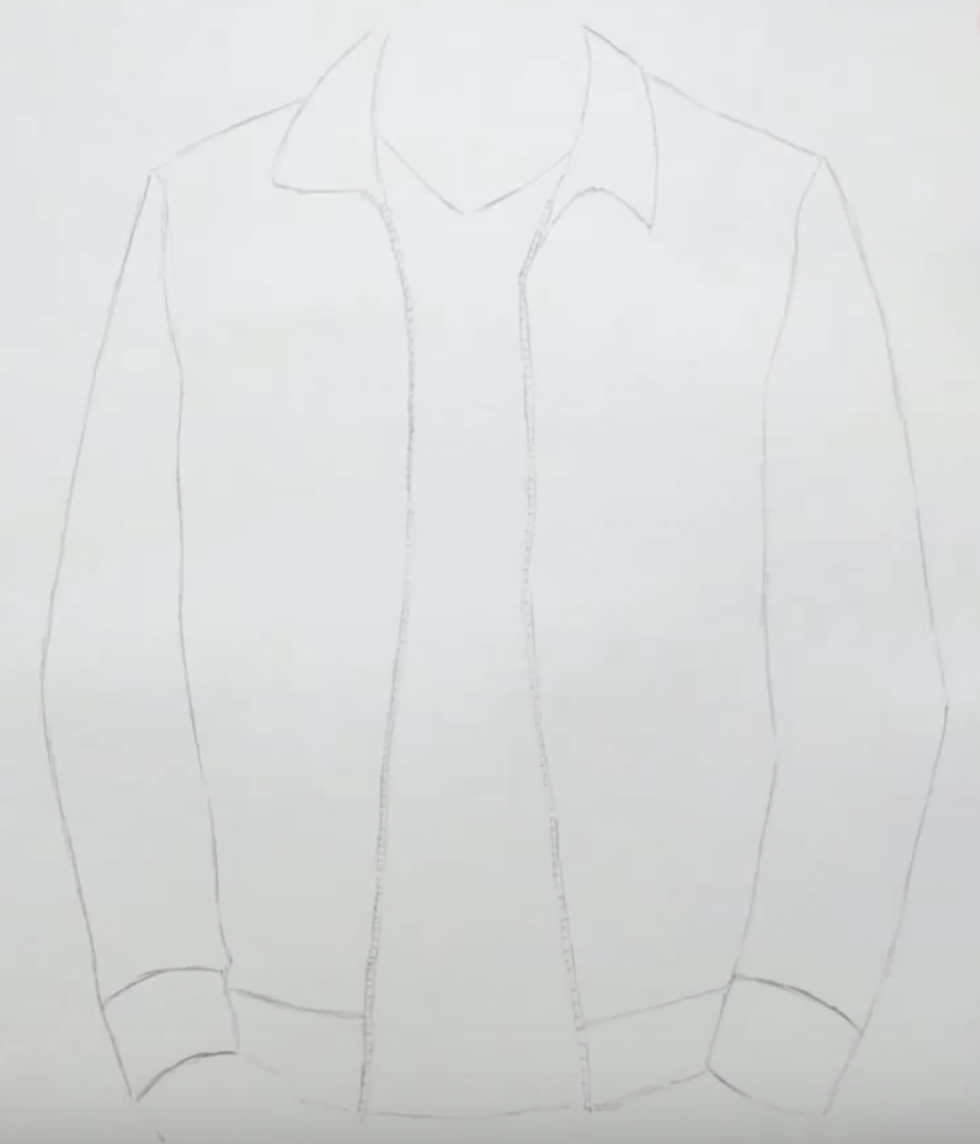
Stage 2
Sleeves, also with elastic bands or cuffs, and a collar are added to the main element. In the current simple version This is a stand-up collar. The zipper is marked.

Stage 3
At this stage, cutting details and decorations are added. For example, a chest pocket with a clasp.

Stage 4
Lastly, color is added to the picture.
Pencil
To draw a piece of clothing three-dimensionally, with all the folds and folds drawn, you can use a simple pencil. The method, at first glance, is not the simplest, but it will allow you to depict clothes the way they sit on a person. Having practiced a little in accordance with the proposed sequence, the option of how to draw a jacket with a pencil will seem quite accessible and uncomplicated.
To begin with, let's depict the thing as it is located when dressed.
Then lines are drawn schematically, showing folds in the elbow bends and possible breaks.

Along these lines, the shadows are evenly filled in with a pencil, and sewing details are worked out: elastic, seams, fasteners, and other decorative elements.

In the finale, tonal or color accents are enhanced. The clothes are ready and look very realistic.
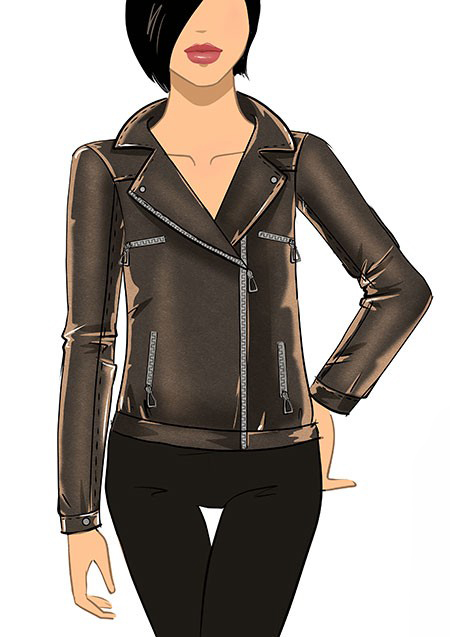
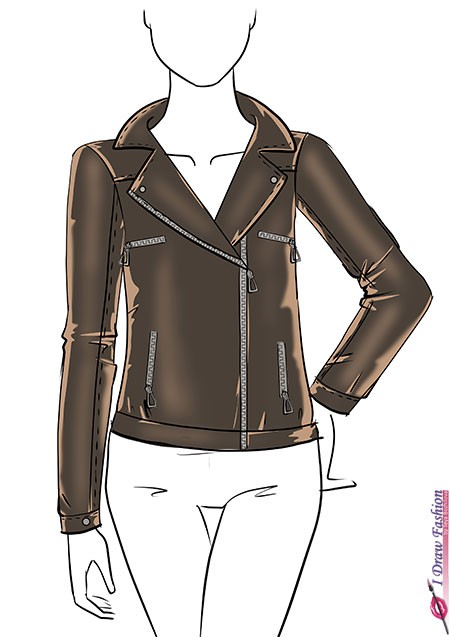
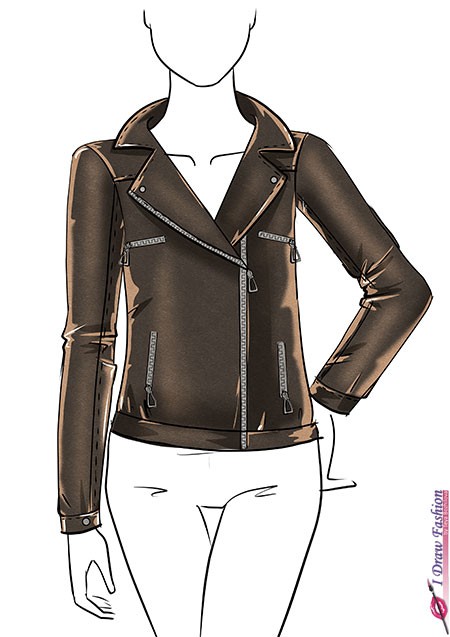
Leather jacket
The sequence of how to draw a leather jacket is similar to the usual one, but there is slight differences in the cut, which should be taken into account when depicting this item.
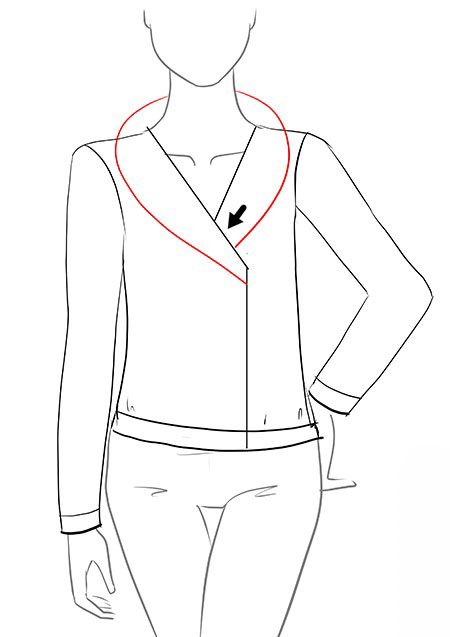
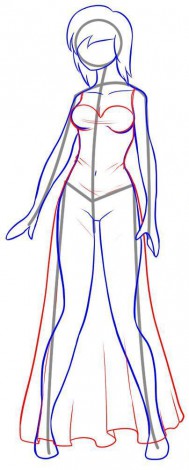
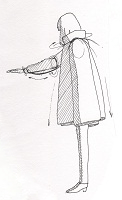
To draw a girl in a jacket, it is best to first outline the model's figure. An image of clothing is superimposed on this base, taking into account the features of the cut: not fitted, just below the waist and with fairly narrow sleeves.

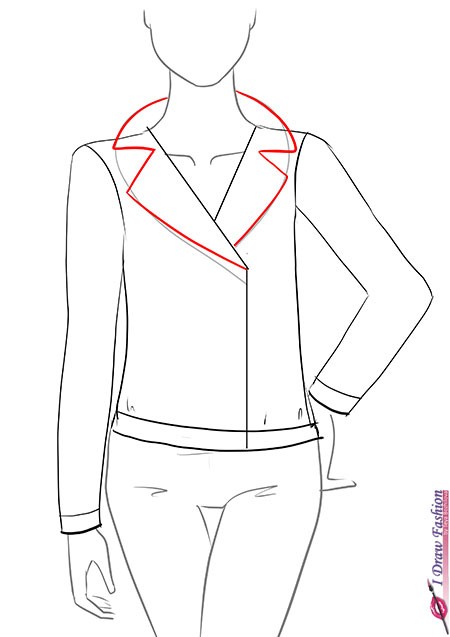
Next, the dotted line indicates the middle of the model. The jacket's clasp will be located on the right, at a distance of approximately ¼ of the width. Sleeves and cuffs are marked. Turn-down collar lines are drawn towards the clasp.


The detailed drawing of the collar begins by tracing these lines around the neck in a smooth arc, as shown in the figure. Already on this arc you should draw characteristic cutouts.
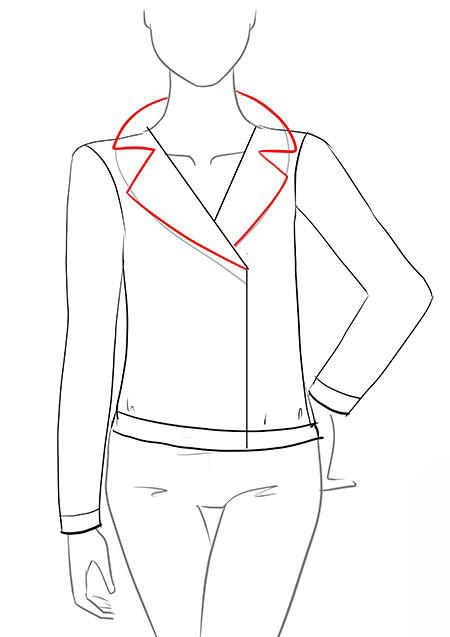
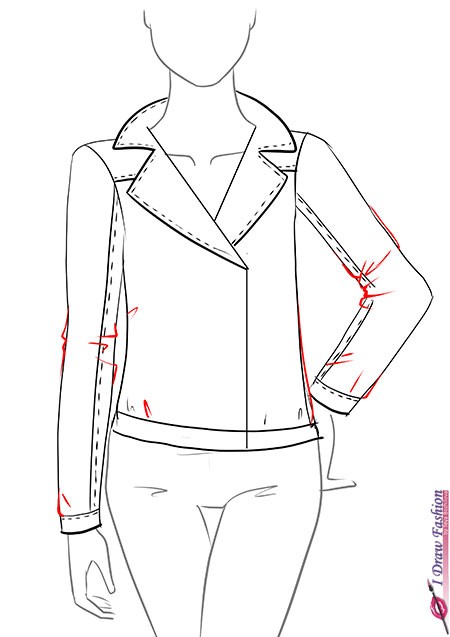
Lastly, the details of the cut and decoration are drawn: decorative seams, darts, zippers, fasteners and pockets.

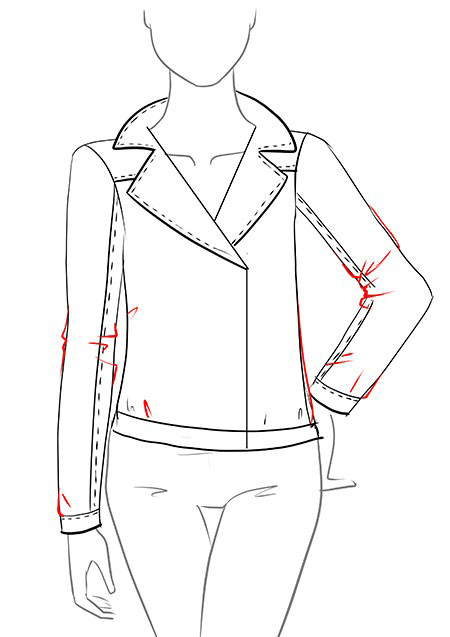

After which the finished image can be filled with color.


How to draw clothes with a pencil step by step
Step one.
First, let's draw a sketch. You can use the matchstick man technique. This time, I decided to do it like this:
Step two.
We use circles to denote the parts of the girls’ bodies.
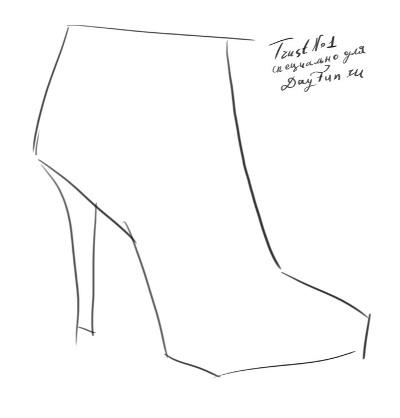
How to draw shoes with a pencil step by step
Step one
Let's draw the outline of the shoe. Still angular. First, we draw an almost horizontal line, from which we draw the heel and the top of the instep down. Next is the sole and heel.
Step two
Let's outline the resulting angular shape with a smooth line. On the shoe itself we will show the contour seam on the heel and on the toe. Let's draw a lace.

Step three
Draw a vertical line on the heel that will give it shape. Starting from the heel, draw down the line of the sole. Now we need the armhole, boot tongue and lacing.
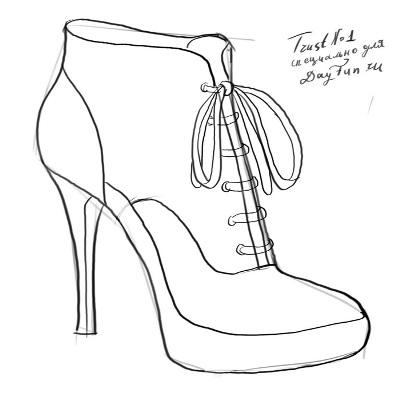
Step four
The shoes have a decorative seam. Let's draw it. Shade the darkest parts: heel, leg opening, holes for lace, tongue. There's just a little bit left. You need to shade the shoes to give them shape. Well, there you go! If you wish, you can draw a pair for the resulting shoe! Can you do it yourself?

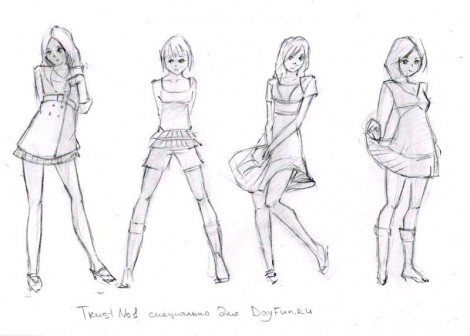
Step one. Let's identify a model, a girl. As in the saying “Stick, stick, cucumber, here comes the little man.” So we will outline a person with several main lines: the head, shoulders, support lines of the arms and legs, the position and bend of the torso.
Step two. We draw a human body around the intended skeleton. This is not an easy matter. You may even need to try several times before it turns out something like in our drawing. From the intended circumference of the head, draw the person’s pointed chin down, and draw a mop of hair on top. Here you can dream up. Maybe your princesses will short hair, maybe an unimaginable hairstyle, or maybe long below the waist.
Step three. And now we begin to dress the girl in a dress. We draw the line of the body close to the body, and the lower it is, the wider our dress becomes. And also on the other side. Below is a wavy hem line. Horizontal lines go up from the waves - these are folds. On top, almost in the shape of a heart, we draw a beautiful neckline and shoulder straps. Not the fabric itself in the waist area and just below we will mark the folds to give life to the image.
 Step four. Using an eraser, remove all auxiliary unnecessary lines. And we highlight the drawn dress and the girl more clearly.
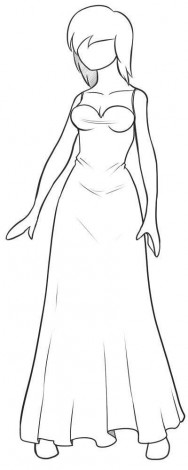
Women's clothing, of course. I didn't find anything else.

Leather jackets always look stylish. And it may seem that drawing a beautiful leather jacket is very difficult, but it is not so. Follow the tips and tricks from this tutorial and you will succeed.
Step 1: Draw the Shape
First, draw the figure of a girl on whom you are going to draw clothes and a jacket as well.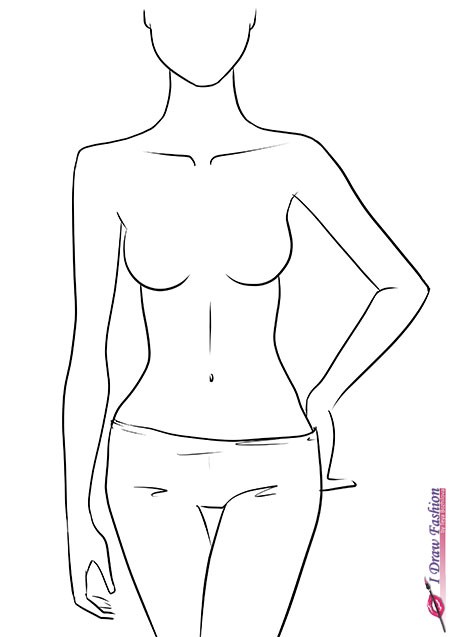
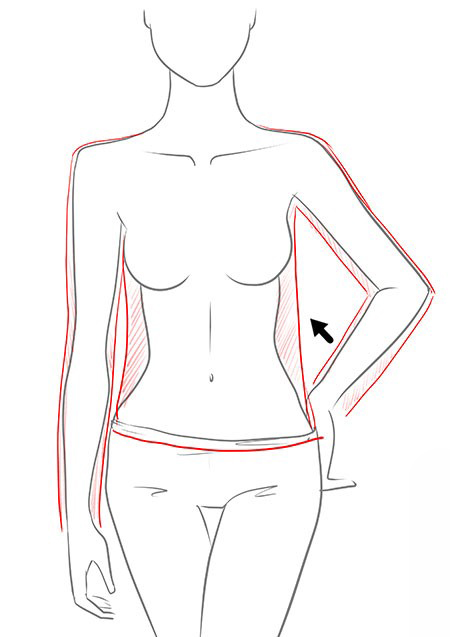
Step 2: Designate the Volume
Draw the outlines of the jacket around the girl’s figure. Please note that the jacket is not pressed tightly against the body; there should be a small space between the body and the jacket. Please note that most jackets are not very fitted, so at the waist the basic contours are similar to a box.

Step 3: Select Zipper Position
At this stage, the first thing you need to do is erase all unnecessary lines. The body under the jacket should not be visible.
A jacket with a zipper in the middle looks a little ordinary. Try drawing your leather jacket with the zipper slightly offset to the side. To do this, find the center line, and then step back a little to the right. Also mark the lines of the sleeves and the bottom of the jacket, remembering that they should be slightly rounded.

Step 4: Auxiliary Lines for the Collar
At the point where the neck and left shoulder connect, place a point and from this point draw a diagonal going towards the offset line of the lightning.
From the symmetrical point on the right, also draw a line until it intersects with the first one; it will tend to the real center line.
Use rounded lines to mark the places where the sleeves connect to the body.

Step 5: Draw the Collar
It's up to you how big you want to draw the collar. The main thing is to maintain symmetry in the relationship between the right and left sides.

Step 6: Adding Details
Now you need to “cut” two triangles on the sides from the drawn basic version of the collar. They should be located at the level of the collarbone.
Step 7: Drawing Stitches
The detail that will help your design look like a real leather jacket is the stitching. Add stitches to the collar inner part sleeves and lower sleeves. Most leather jackets also have horizontal stitch lines just below the shoulders.
![]()
Step 8: Draw the Folds
Leather clothing has sharper folds than soft fabric clothing. Be sure to draw folds in the elbow area.
Step 9: Unique Details
Draw on the details that will make your jacket unique. These could be buttons, pockets, zippers, decorations, and so on.

Step 10: Painting
The easiest way to convey the effect of leather in a drawing is to leave lighter areas near the outline of the jacket. These areas should not be simple rectangles, they should be drawn in irregular shapes. And you don’t have to use white for this; it can be a very light tone of the main color of your jacket.
Step 11: Add Shadows
Shadows can be added using a black pencil, just lightly touching it over the surface of the drawing. Be sure to darken the areas under the collar, on the right side of the jacket, under the zippers, and the areas where you drew the folds.

Step 12: Magic white
This step is optional, you can repeat it if you wish. Using thin white lines you can identify the brightest areas in the picture. The main thing here is not to overdo it, since a leather jacket should not be too shiny.
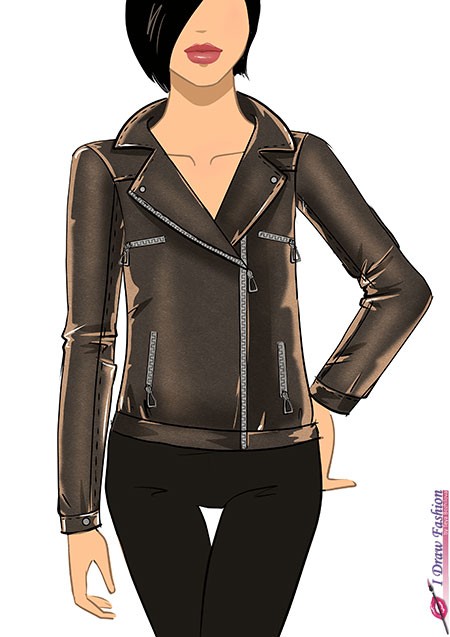
Use these tips to draw your own fashionable collection of leather outfits, or simply decorate your drawing with an interesting detail.
Happy creativity!
How to Draw Anime Clothes - in order to learn how to draw clothes in general, as an object, you need to apply the knowledge of academic drawing. Remember, from the first page of learning how to draw anime it was said, what- knowledge drawings will be very useful to you. This is where you need to include your knowledge of drawing or, at worst, have an idea of how it’s done. If after reading this page and some practice you feel that things are going badly, then this is the drawing guide for you. Well, we continue...
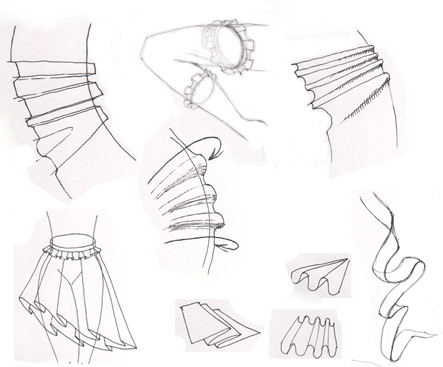
What is important here is an understanding of the formation of folds and the ability to depict them on any figure-figure a person or an anime character, it doesn’t matter.
On many sites on the topic of how to draw clothes in anime, a lot has been written about drawing folds, I don’t want to repeat myself, but whatever one may say, the ability to draw folds correctly is really important. In addition to this, we will try to add something of our own. But, for now, about the folds... The nature of the folds significantly determines certain movements of parts of the body, reveals the bending angles of forms, expresses peace, movement of the figure, air, gesture and image. The formation of folds on clothing is caused by the influence of forces on the material, causing it to move both from the inside and outside, and is subject to the general movement of the figure, emphasizing the nature of the body shape. Let's introduce the rules...
Rule 1: no crease in the form can form without a reason. So, before you mark any fold, or a line that resembles a fold, think three times whether it has a place here. If her education is justified, draw. If you don’t understand why it is needed, you draw at random - think again and outline the fold that is not formed on the form by chance. You should have an idea of how it formed on the form.
At first glance, all the folds look the same, but upon closer examination it is clear that they differ from each other primarily in the nature of their shapes. The dynamics of the formation of the nature of folds are varied and depend on the nature, properties and quality of the fabrics, the forces acting on the material, the rest of the clothing, as well as the fit of the fabrics to the form.
Classification:
Direct- folds, which are cylindrical surfaces formed by the tension force along the grain thread or by uniform sagging.
Diagonal- folds formed by the tensile force of the fabric diagonally and, as a rule, parallel.
Radial- folds extending from a fulcrum or tension point along a conical surface.
In addition to the three main ones, there is the so-called " harmonic"- diamond-shaped folds of clothing, often found at the bending points of the forms in the elbow, knee and hip joints. But everything would be fine if you really wanted to delve into the analysis of all these classifications. Even I very much doubt it. Moreover, before to get to this page, you may well have been to other sites where this has already been written about, and even more than once. So, in order to have something new for you, we will go a slightly different way and, for starters, we will launch in. move a couple more rules.
Rule 2: When drawing folds on a dressed figure, you should not reflect all the secondary folds in the drawing, but it is necessary to emphasize only the main shapes and folds characteristic of the bends, emphasizing certain movements of the figure. This way you will enhance the expressiveness of the image. You seem to lose sight of insignificant, secondary folds, generalize them without giving them any special significance. Folds should not take on too much attention and effort, distracting attention from the character. They should only beautifully complement his image.
Rule 3: When drawing clothes on a figure, you should remember that there is a shape under the clothes, especially when drawing folds. Clothes and their folds should not deform, but rather emphasize the presence of a figure under the clothes. This applies equally to drawing shoes, hats, gloves or mittens. Pay attention to the bottom (inner) part of the folds. The folds should not “cut” into the form, visually deforming it.
When drawing folds on clothes, you need to try to reveal the shape of the body, emphasizing the nature of the movement of parts of the body and the entire figure as a whole. Don't forget that folds do not exist separately from the figure.
How to Draw Anime Clothes

 So, how to learn how to draw clothes when drawing anime characters - let's move on to practice, and, probably, we'll rush into the thick of things. In short, what is the best way or what is the best way to learn to draw clothes? How do you think? Naturally, using examples, the anime characters themselves. Everything has already been there for a long time.
 Here you go clear example drawing folds. There is simply an abundance of folds in the arsenal of this anime drawing. To begin with, we will not delve into the topic - how to process folds with tone or color. Now you can simply learn to draw different folds separately, notice how they are formed, notice how they are built. No line should be superfluous in the drawing. If it exists, it is a formative fold. Try to constructively disassemble the fold, taking into account the presence of a form underneath it - a figure, taking into account its movement and position in space.
No unclear lines that will then need to be “painted over” according to the feel. Think, try to be a designer, draw a fold and think about how it is built and why this happens.
 So, once again: you take a drawing with folds that you like - an example, and try to use this example to understand the formation of this or that fold. Analyze the structure of the fold, its shape, analyze what kind of fabric it is formed with - thin or dense, whether it hangs down randomly or hugs the figure, and so on.
Dense fabric will give clearly visible “readable” folds, thin delicate fabric will give many secondary small folds, but one way or another, any line on the fold does not appear out of nowhere and does not disappear anywhere, its appearance on the fold is not accidental and forms the character of the fold itself .
The fold is at "rest" while the figure is at rest. As soon as the figure begins to move, all the folds on it begin to support its movement and begin to interact with it. Sometimes it seems that they interact somewhat in the opposite direction. Why? The figure begins to move and the folds, by inertia, gain speed gradually, somewhat delayed, but describe the direction that the figure sets. Also, when the movement stops, the folds do not immediately become static, forming new variations:

Here's something about folds, no matter what English, you can expand it to full screen mode for convenience. Let's look:
How to draw clothes for anime characters
 It's very easy to draw "CLAMP" folds. To display folds, only the main ones are used, the secondary ones are practically not used, and the movement and shape of the figure are clearly emphasized with folds. Look at how they use color: they just need to make the shaded areas—the edges of the fold—a few tones darker, and that’s it, the fold is shown. But that doesn't mean that CLAMP do it because they don't know how to draw the character's figure or creases, thus reducing the work for themselves. They still know how. You won’t be able to doubt their skill or find mistakes in their drawing.
 If you remember the rules for drawing clothes and folds, then all three are used here: all the folds are in the drawing NOT by chance, the clothes are ON the figure, and not by themselves, and the clothes and folds EMPHASIZE the shape of the figure and the movement of its parts.
When the shape moves, the folds undergo “bending” or “unbending,” let’s call it that. In this case, the static shape of the fold can be deformed, taking on new formations - bending, tightening, overlapping, stretching, sagging. This is exactly what you need to work through, think through, study, and understand using an experimental example. Depending on the “softness” of the material itself, the folds will have a different character.
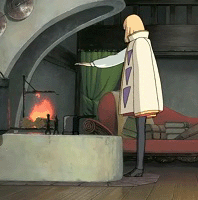
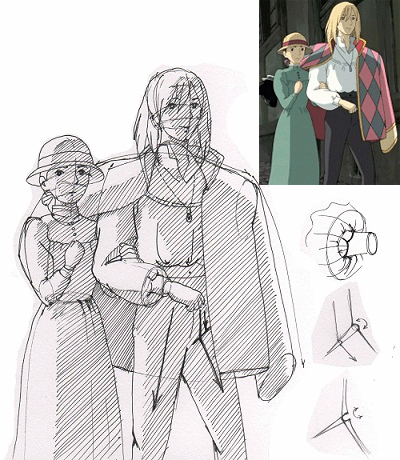
 Anime master, artist with a capital letter Miyazaki Hayao. No one will doubt that he does not know how to draw a figure and those very folds. Do you think: such lightness in his works, when he barely shows the folds on the uniform, is dictated by the fact that he does not know how to draw folds? No way. He draws everything so harmoniously and intelligently that it’s hard to notice right away that everything in his drawings is constructively thought out and the clothes only emphasize the shape of the figure. It is enough for him to outline just a few folds to emphasize the image, movement, if you like, flight.
Here is the character Howl, slim figure, calmness, youth, beauty and elegance - the same features in this drawing - straight lines, clothes hanging easily from the shoulders, slimness. Do you feel how the clothes highlight the character's image? Clothes can not only emphasize what is fat or thin underneath, but also the character’s image itself. Let's look further:
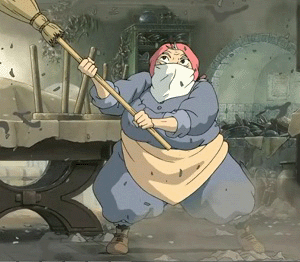
 An old woman, an almost shapeless aged body, but Miyazaki does not make the drawing shapeless. Under the clothes you can clearly “read” the figure, the volume of the figure, its design. After this, the clothes themselves take on these forms, only emphasizing them. The artist introduces light and shadow elaboration: by separating the light from the shadow, the volume of the form immediately appears.
Without understanding what is under the clothes, it is very difficult to create a shadow, and it is difficult to make the figure three-dimensional. That's why you need knowledge of drawing - you need to think through and work through everything. Otherwise, all you will get from this grandmother is a cotton doll and very sad folds.
Here's more for you:
By the way, look at how Miyazaki achieves flight in his drawing. Here are the characters walking down the street, an outwardly static sight, the clothes also do not carry any extra impressions:

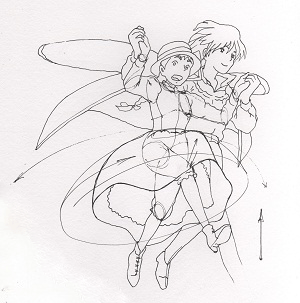 But the characters are already soaring in the clouds. See how the drawing works: the figures fly in the air, the clothes support this flight - they also soar under the influence of movement and air. The girl, moving her legs, involuntarily throws up the hem of her dress with her knees, which makes the dress look like a bell flower, and not like a hanging piece of material. Here's the connection between the movement of the character's figure and the movement of clothing. Clothes in in this case emphasizes the action that is currently taking place and enhances the expressiveness of the image.
Also, you can’t say that clothes are not present on the figure. She takes exactly her place. Where it adheres to the figure, and where it receives some freedom, it emphasizes movement.
 Naturally, you can use as many folds as you need when drawing clothes in anime, I am only showing the way in which you can definitely learn how to draw clothes after learning once. Starting with a few folds, continuing ad infinitum. The main thing is to feel the connection between clothes and your figure and do it understandingly.
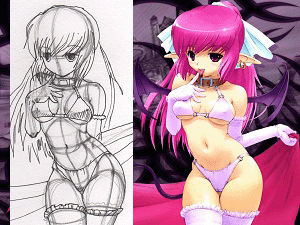
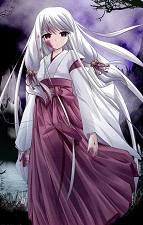
Look at the picture on the left - a beautiful anime heroine, what a multi-fold robe she is wearing, made of delicate silk fabric. But under this robe the volume of the figure is clearly visible. If you cannot achieve this, then perhaps you should draw an anime like this, for example, like in the picture on the right. And try, as best you can, to make out the shape of her body, feel its volume with your fingers, with the tip of a pencil. These are not only beautiful rounded shapes, with bulges and “bulges”, excuse the expression, this is a three-dimensional form that can be taken apart constructively. Having studied the volume of the figure of such an anime girl, it will be easier to dress her in clothes. If you have difficulty understanding the figure, then perhaps this will come in handy - how to draw an anime figure.
Well, after that, you can calmly just outline the folds on the clothes and go draw them in Photoshop :) Although, remembering the words of the amazing Miyazaki Hayao: “The hands that create a drawing on paper create fundamental animations.”, I would like to advise you to first work out the clothes in a constructive way and in color - conveying folds in tonal gradations - first on paper, with pencils and brushes, paints, in a word - learn to draw with pens. Only later, with the help of computer technology, having learned to control the mouse.
And here's more for you:
How to Draw Anime Clothes
 How to draw clothes in anime seems clear, but what kind of clothes to draw? If you stupidly sit at the table and “suck ideas out of your finger,” then it’s painfully difficult and you won’t be able to draw much this way, but you want something special, interesting, not like everyone else. In general, there are several ways to get inspiration.
 1. Learn to draw and paint even better by getting inspired and generating ideas from other artists. Enter a phrase into Google search, for example: “anime pictures” and you will get a lot of examples in Google images from which you can learn. Based on them, do something new, your own.
2. Naturally, each of us has favorite anime cartoons, favorite artists, characters. You can learn from these animated films, do as animators do, and develop practical skills. Based on this, produce your ideas. By the way, many topics for drawing clothes are like: school uniform, military uniforms and so on are standard, they can be used with some changes in individual details in your works, but preferably in such a way that they still reflect the “Japanese” spirit.
3. Watch all the cartoons in a row, persistently looking for ideas))) a very, very good way.
4. Use additional handy materials to find ideas on how and what kind of clothes to draw for anime. For example, modern computer games. Surely every computer has a favorite toy that you play with from time to time. For example - "SIMS", in common parlance - "family". Some people have different preferences. If you take the ideas of creating modern game characters (clothing for them), add elements of anime symbols, you can get some good characters.
Drawing a person seems very difficult to many people. Actually it's simple process, if you approach this issue algorithmically. From the lesson presented on this page you will learn about wearing clothes. And if you are able to draw an oval and a couple of lines, then you can also draw a human figure.
This is exactly the algorithm of action used by professionals in their field, even the most famous artists. You will be surprised how easy it is to draw a full-length person.
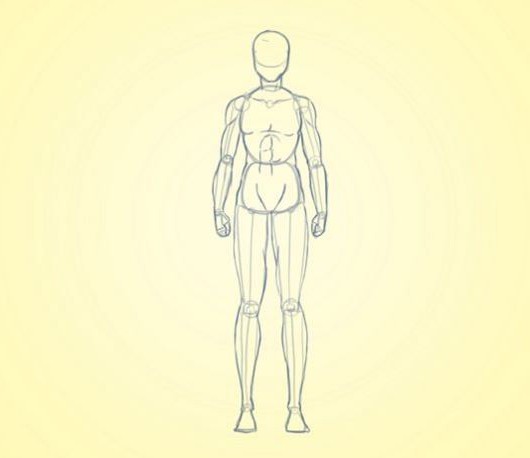
Step 1
Place a sheet of thick paper in front of you, take a soft, sharpened graphite pencil and a good eraser. Mentally divide the sheet into three zones, noting to yourself the places where the head, body and legs of a person will be depicted.
Let's start studying what's in clothes. At the top, draw a circle in an oval. In the middle there are two ellipses commensurate with each other. Draw lines for the arms and legs, marking with circles where they bend at the elbows and knees, mark the direction of the shoulders. The picture shows how it should look.
You won’t be able to draw a person with or without clothes if you don’t respect the proportions. The length of the body is approximately three times the height of the head, and the legs should be twice as long as the body. The arms need to be lower than the body, but, of course, not to the knees.
Step 2
“Grow” onto the drawn frame muscle mass, describe your hands in more detail.
Step 3
Outline the contour with soft smooth lines, give the drawing some “anatomy”.
Completed preparatory stages. There is very little left and you already know how to draw a person. There is nothing complicated about clothes either.
Step 4
On the finished base figure, “put on” a shirt, trousers and shoes. Don't forget to draw the face. Give a rugged masculine look by sketching out a short haircut.
Step 5
Using a firm pressure on the pencil, outline the main contour lines of the figure.
Step 6
One of the most enjoyable stages is to erase everything unnecessary. Auxiliary lines are no longer needed.
If you did not neglect the advice regarding the choice of paper in favor of a thick sheet, then disappointment did not affect you, because by this moment the low-quality paper would have been completely worn out and would have had an untidy appearance.
Step 7 (optional)
The task was completed 100%. But you can exceed the plan if you add color to the picture. The main thing here is to shade the most unlit areas of the body and highlight the prominent ones.
Let's complicate the task
Don't rest on your laurels and stop there, it's time to create a story composition! Tongue fine arts you can tell the whole story of one weekend day.
Step 1
Sketch the scene.
Step 2
Draw wireframes of your characters. Arrange them harmoniously in space. Some figures are in motion, others are static.

Step 3
Give the bodies shape.

Pay attention to the means by which each body is formed. Memorize them by adding to your visual experience.
Step 4
Add details of faces, clothing, and other features to your sketches. Use strokes to emphasize the direction of the folds of clothing, which will give the figures dynamics.
Step 5
Using a sharp pencil, refine the sketch and outline the outline.
Step 6
Erase the excess.

Step 7
Add some color.
The basics of fine art have been mastered. Once you try it, you will be happy to use this technique every time you need to remember how to draw a person. He will be clothed or naked - it’s up to your artistic taste.