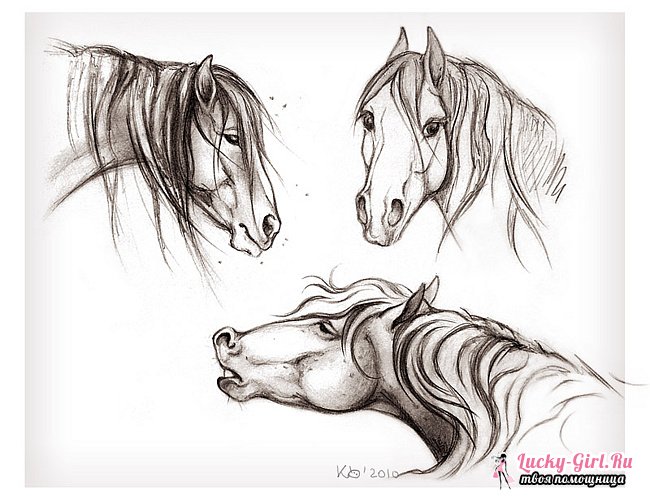
Artists who depict animals are called animalists (from the Latin word animal - animal). When drawing animals, first of all you need to determine what parts their body consists of and what shape these body parts are.
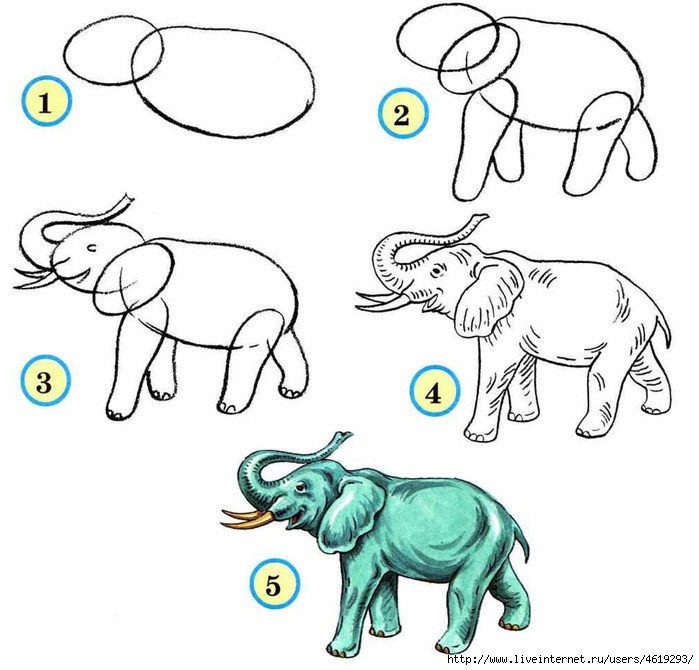
For example, consider a picture of an elephant. How is its trunk constructed? How are your legs and ears? What size is it? What color will we paint the elephant? If there are no colors gray, then how to get it?
A similar phenomenon is observed when a child leaks some parts. On the one hand, this may be due to the difficulty of graphic treatment or spontaneous “displeasure” to complete the original image. But here, too, the emotional connection with things plays a big role.
It turned out that this child was actually left-handed, but was "forbidden" from learning to use left hand, and then left his “forbidden” left hand in these self-portraits. However, such restrictions must be taken with extreme caution. Accurate examination of children's drawings and possible inferences about general relationships is an important area in education and psychoanalytic developmental psychology. It is a mirror of a child's motor and cognitive development and can cause possible delays as well as physical and psychological impairment.
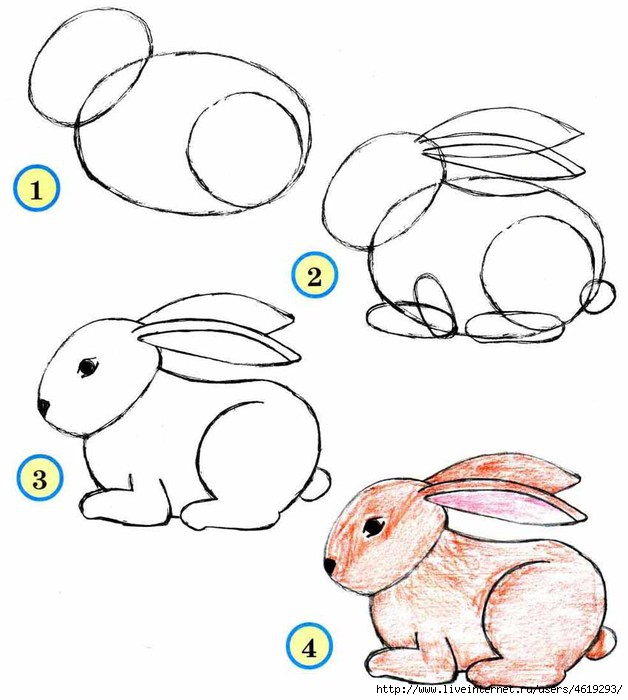
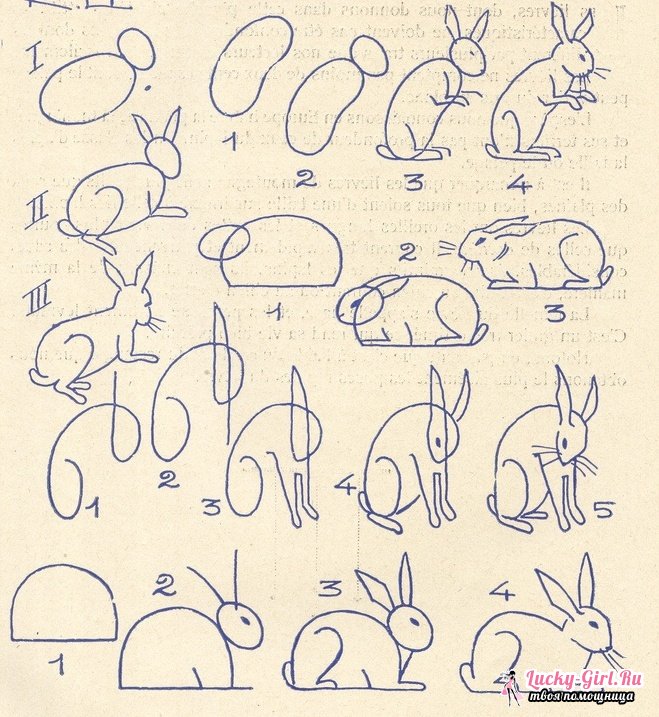
Rabbit.
Drawing a rabbit begins with large parts (torso and head). Let's pay attention to the shape of his head and body. How many ears does a rabbit have? What color is it?
Hare.
Now let's try to draw a hare step by step. First, let's see how a hare differs from a rabbit. How many paws does a hare have? Which legs are longer - front or back? What color should we paint the hare in summer, and what color in winter?
The child processes environmental influences and possible dangers or fascinations through his pictorial activities and advances the process of individuation through these processes. Therefore, the promotion of this ability through mental activity and observation is of particular importance. Likewise, care should be taken to advance children in their own development, but never to push them toward “faster” development. Adult education of “real” drawing deprives children of the opportunity to develop their own graphic language and can even lead to possible personality disorders.

You can also draw a hare like this using familiar shapes (circle, oval, etc.).

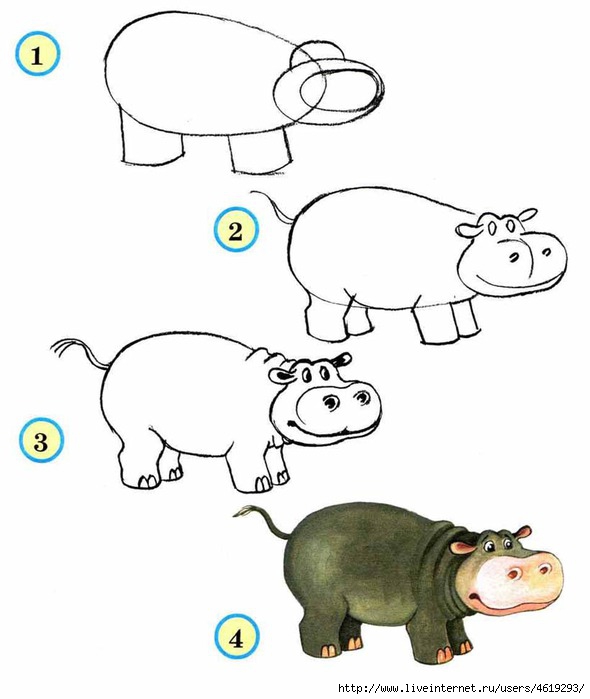
Hippopotamus.
What else? Are animals gray? This is a hippopotamus, a goat, a hedgehog. Let's look at the body of a hippopotamus: what parts does it consist of? What shape does a hippopotamus have? What is the largest body part of a hippopotamus?
If you want to promote your child, you can do so by showing him some tricks on how certain motifs are drawn. Over time, your child will learn to practice much more and more. Basically, some shapes such as circles or rectangles are used as the basis for all the motifs. We've put together some easy drawing tutorials to help you draw cute and fun motifs with your little ones.
Learn to draw step by step
Their children can simply learn to draw and create animals as motifs using ordinary ones as a basis. geometric shapes. For example, you start with a circle and then gradually add more elements to it. An ellipse can be the basis of a cow's body, a circle of an elephant's head, etc.
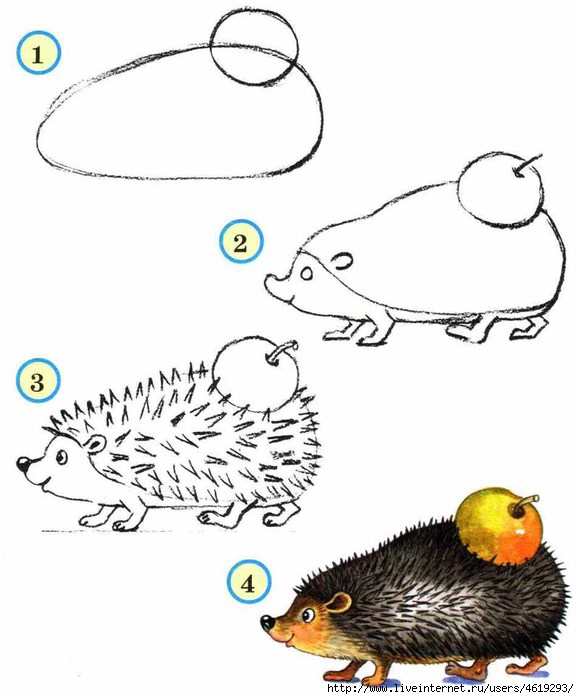
Hedgehog.
You can draw a hedgehog with an apple. Hedgehogs love apples very much, and we already know how to draw fruits.
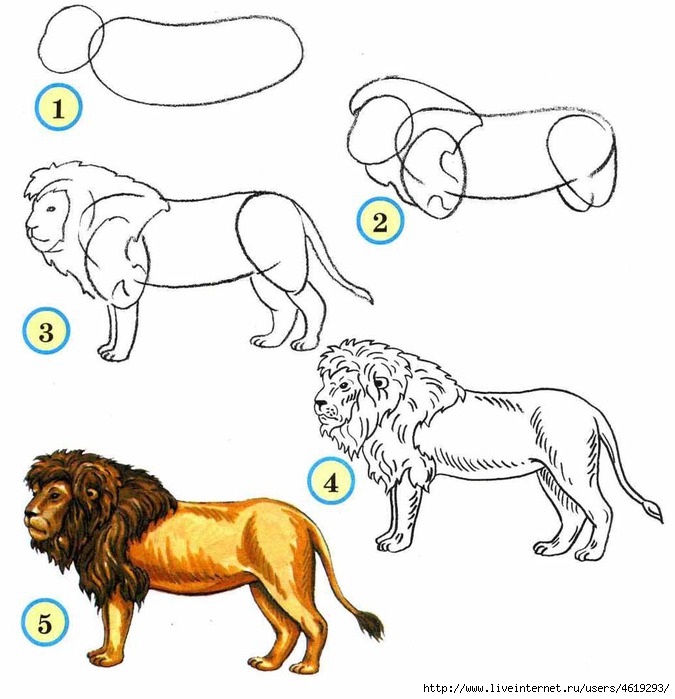
Lion.
What animals are brown or yellow? Bear, giraffe, lion, squirrel, fawn. Let's look at the drawing of a lion. It has long and thick hair on its head, called a mane. She makes the lion look so huge. By the way, lionesses do not have manes.
This ladybug consists mainly of circles. The large circle is then divided into half and supplied with smaller circles. Then there is a head with probes and six legs. In order for your child to learn to draw faster and not lose interest so quickly, you must at least help him in the beginning.
While you are learning to draw with your child, you can simultaneously use shared time to explain anatomy or the names of individual animal body parts or parts of cars, the sun, flowers, etc. so drawing is not only fun, but can also be educational.
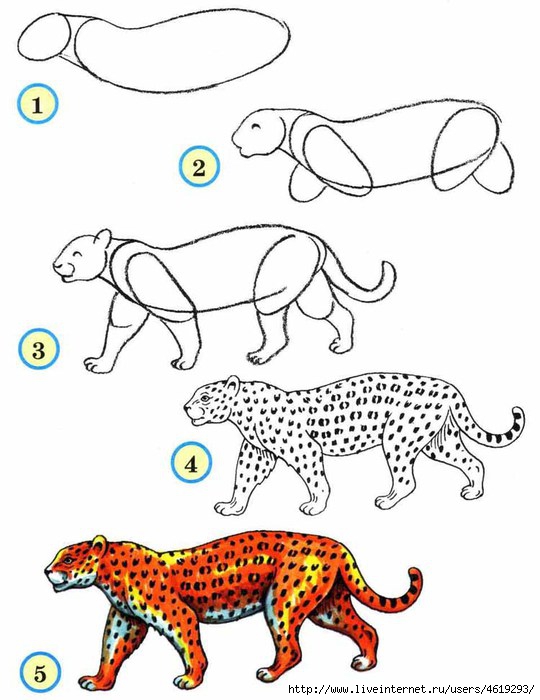
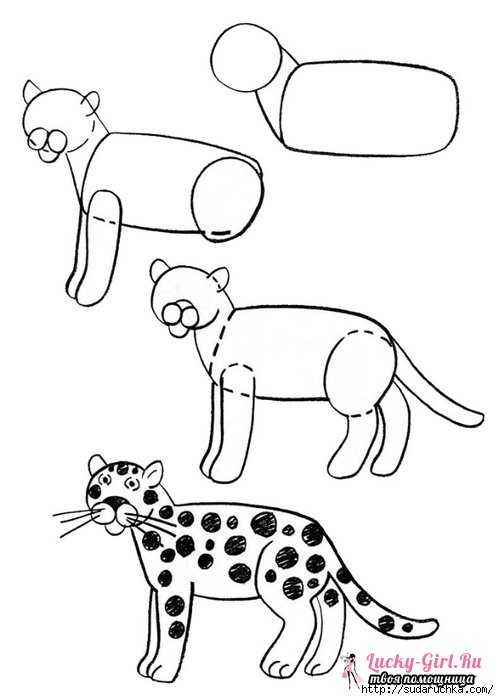
Leopard.
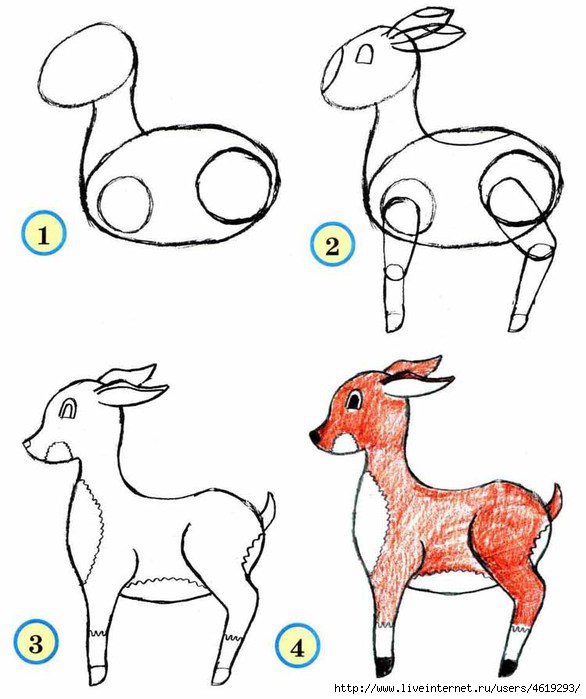
Fawn.
Let's draw a little funny deer. Let's pay attention to the structure of its legs. What shape is a fawn's head? What shape is the body?
Before you start drawing, you should have a good understanding of the appropriate numbers and instructions for the child's age. If the image is too complex, it can end up being frustrating, and that's certainly not your goal. The simpler and more classic the use of geometric shapes, the more simple the motif will fall on the child when it comes to drawing.
Anyone who knows how to draw can learn and perhaps even as an adult will also have a keen interest in learning to draw themselves. You can then spend the afternoon drawing together. It's fun and creates a deeper connection between you and your baby.
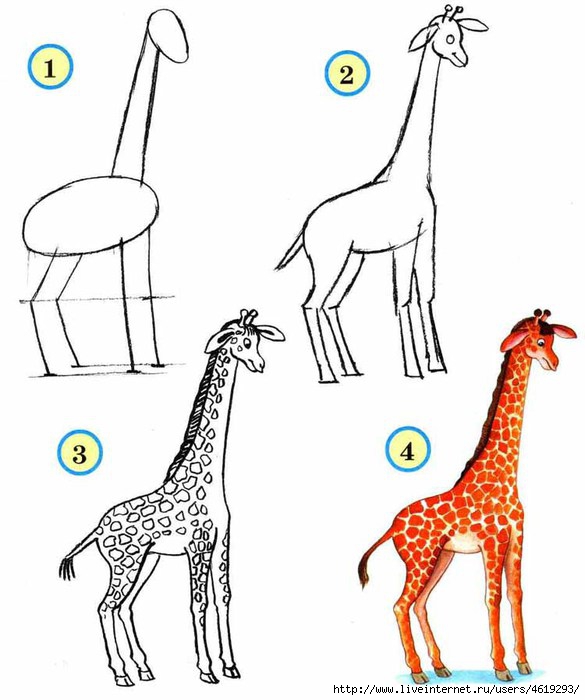
Giraffe.
Let's draw a tall giraffe. Let's pay attention to what a long neck he has and a small head with horns. The giraffe's legs are also very long, and at the ends there are small hooves.
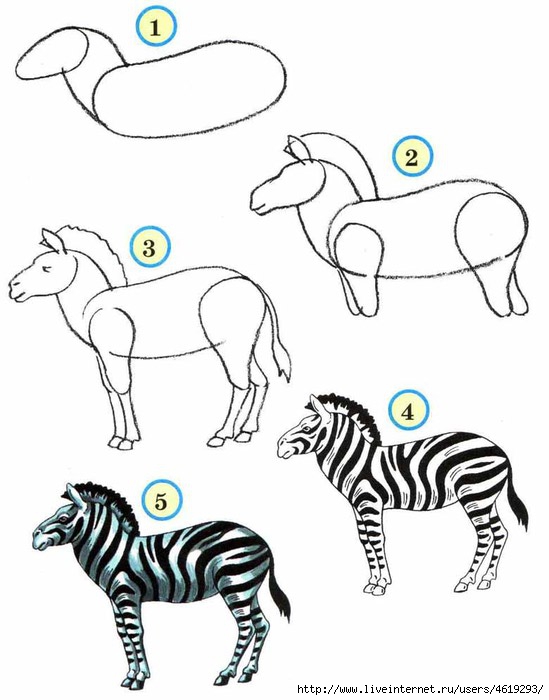
Zebra.
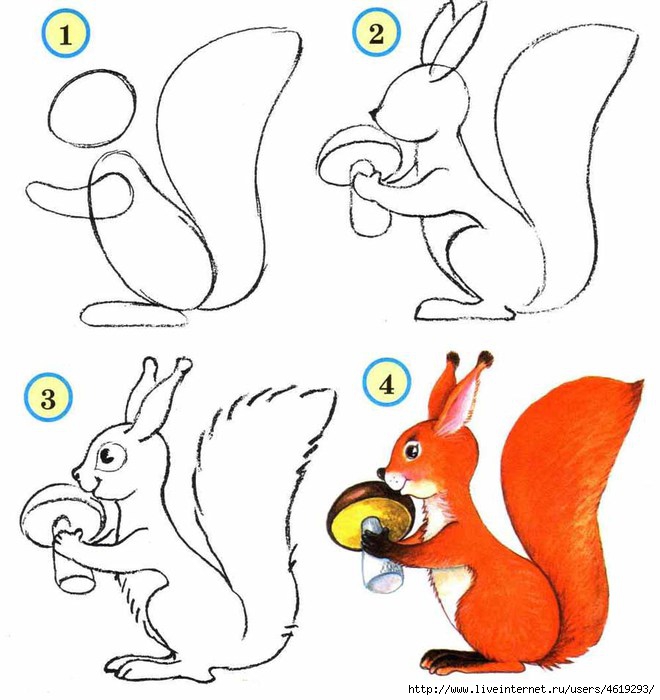
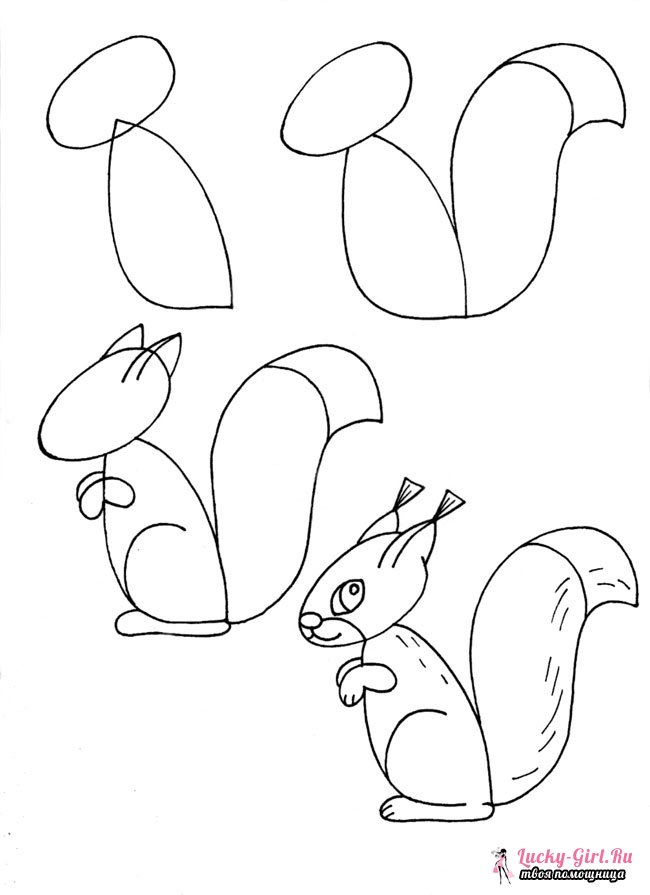
Squirrel.
Let's look carefully at the drawing. What shape is a squirrel's head? Her tail is long, wide, curling upward and raised high above her back. The ears are pointed and tufted at the tips. And the paws different lengths: the rear ones are long, and the front ones are short. Let's draw a squirrel with a fungus.
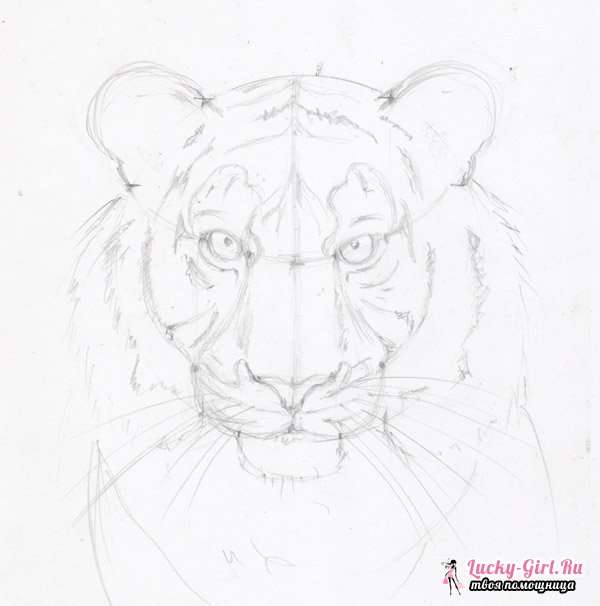
To learn how to draw a tiger, you may need a little more experience. You can evaluate this as a mother or father. Try mouse or chicken. Circles and ellipses form the base of the body, while at the end a few more elements are still painted, such as whiskers or wings.
Also, the dove may be more of an idea for the advanced. Once you learn how to draw, you can combine the finished image with other motifs. A dove, for example, can still get a cloud or a sun, which we'll show you below. If you want to draw an image, use it to create an overall image.
Monkey.
What other animals are there and what color are they? For example, a monkey. Please note that the monkey's front legs are longer than its hind legs. She uses her front paws like hands.
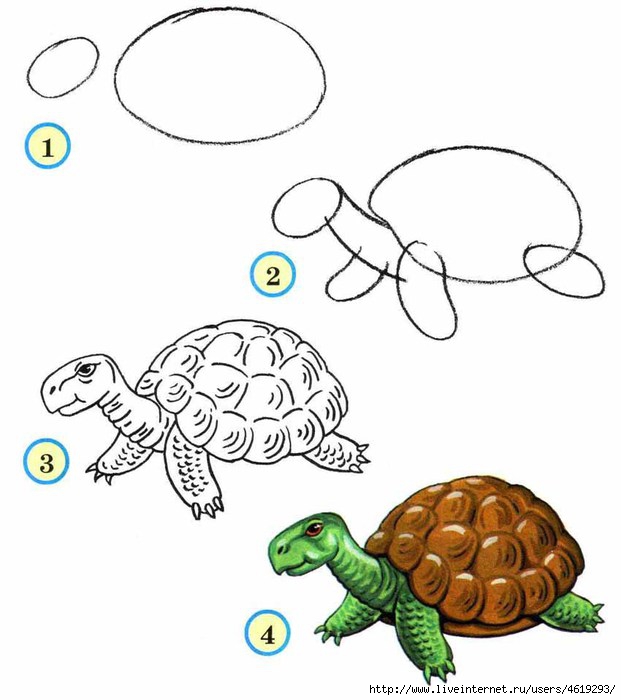
Turtle.
A turtle can be drawn from ovals similar to balloons- “sausages”. Let's pay attention to the turtle shell. It is divided, as it were, into checkers.
Start with your eyes, continue with your head and work your way to the body with wings. Above you will also see two options for ships. If different geometric shapes overlap, like with the bat, you can later erase the interior lines later. Step by step instructions for chickens and ducks are especially easy to implement and also quickly become independent from your child. When you learn to draw, you should use a pencil at the very beginning so that you can erase mistakes. Chicks can be used wonderfully for Easter photos.
If your child wants to draw a lion, you can use this tutorial. Red lines always indicate new lines at the corresponding step. Leo looks complicated at first glance. However, this is due to the fact that there are many individual elements. Otherwise, he will soon be at the mercy of your child.
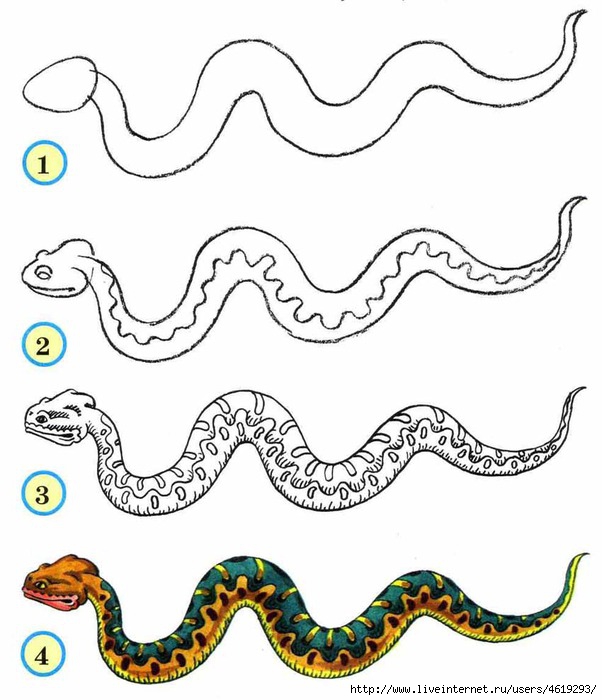
Snake.
Learning to draw a snake is very simple. Snakes have a thin, elongated body, which is drawn with wavy lines. The snake's head is very interesting: it is small and tapering, looking like a small triangle.
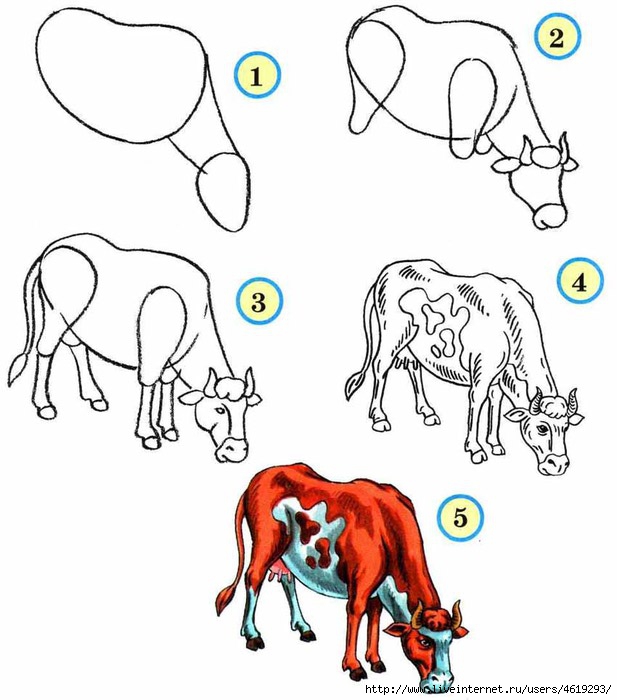
If you want to learn how to draw a cow, you will find different instructions, as well as everyone else. It depends entirely on the instructions. The funny comic cow can be seen in the instructions above. Children often want to learn how to draw dogs, which can also be done in just a few steps. Your child can then draw again at will.
Fish are especially easy to draw. While you are learning to draw a bee, you can explain to your child the benefits of bees that collect flower dust and make honey from it, and that only chicks do this. This will definitely make your child very interesting. Let yourself be inspired by stories to make the picture more interesting.
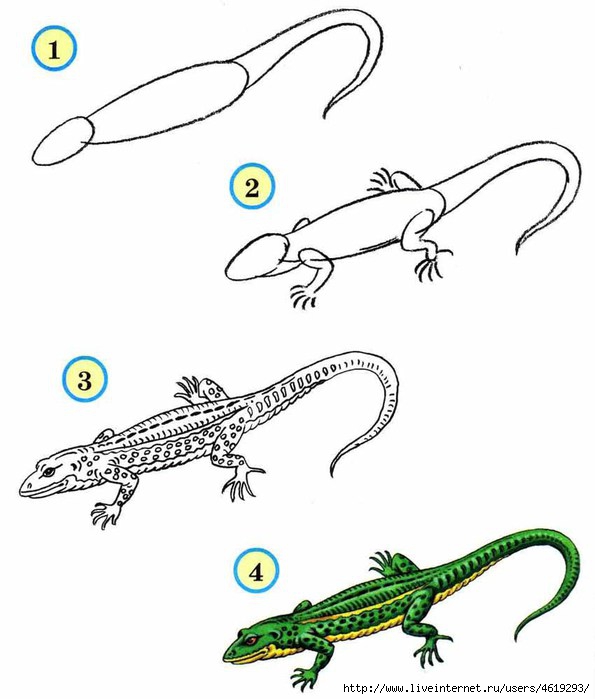
Lizard.
What animals are there? green? The lizard looks like a snake with legs. She has an elongated head, an elongated narrow body and a long, tapering tail.
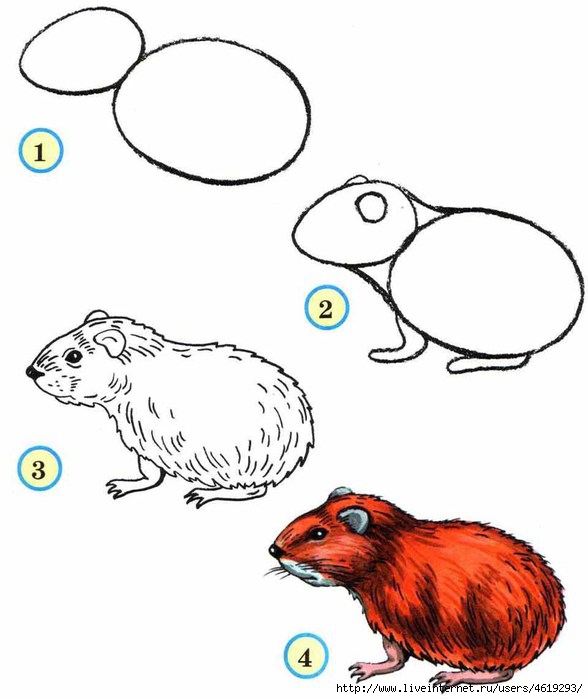
Hamster.
Let's try to draw a hamster. His body consists of two ovals.
There are many ideas for drawing lessons for kids. We find especially original the idea in which numbers or letters are used as a basis. This again gives a learning effect and helps your children remember the newly formed characters better, because the drawing is, so to speak, a bridge with an ass.
To train the bear. Ask your child to write down lowercase letter for drawing. In the circle, color the closed eye, which consists of a slightly curved line. A similar but long kick comes in a circle, including the nose and Munthe. Next, your child should learn to draw the body. The sheet can be rotated if it is easier for your child to draw.
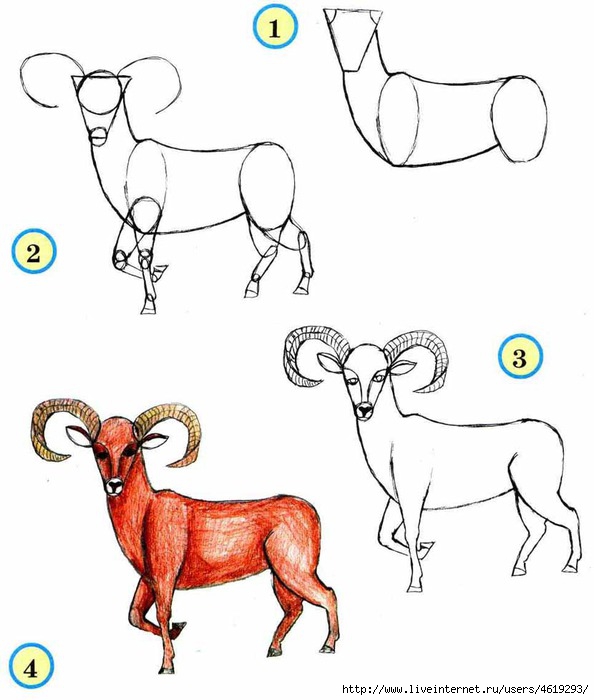
Goat.
Let's draw a goat. Let's pay attention to the shape of his head. Let's not forget to draw a beard for him. Let's pay attention to the drawing of the goat's legs. We draw the animal so that it is larger and so that it can be recognized.
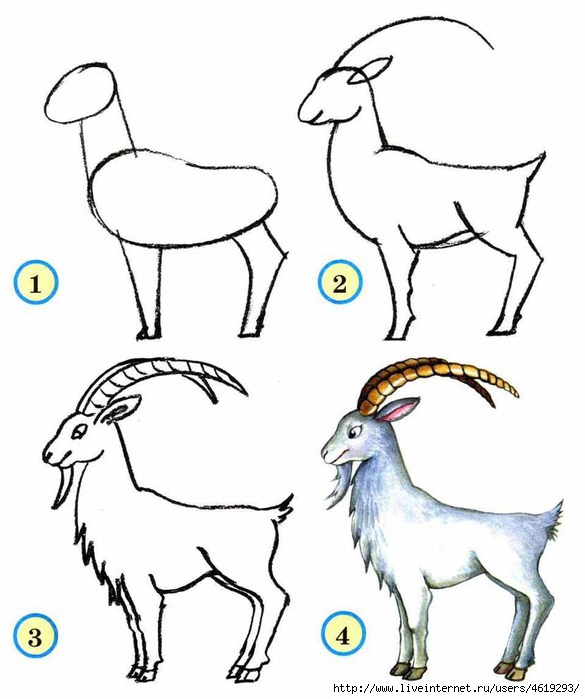
Mountain goat.
And this is a big horned goat. Such goats with branchy horns live high in the mountains. That's what they're called - mountain goats.
Then, the ear, tail and legs are lined up until the bear is ready to be drawn. The sun with simple strokes like rays will surely dominate your child. Now take it a step further and draw the teeth as sun rays. To draw, have your child form a circle again. You will see the order in which you should draw the pins. Finally, you can also draw the face.
As mentioned, letters are not the only foundation if your child needs to learn to draw. Numbers can also be practical, as in this example for the koala, which uses the number 5. The result is a koala that sticks to a tree. With all these animals, your child can draw a whole zoo.
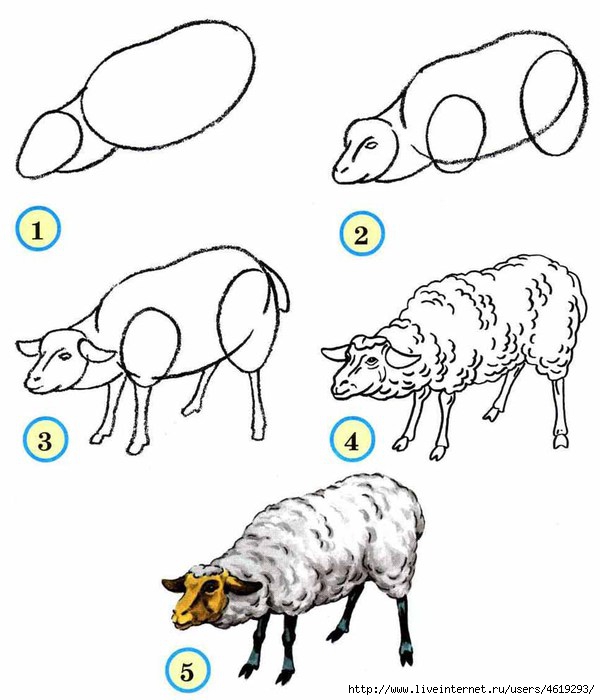
Cow.
Animals that live near humans are called domestic animals. These include a cow. A cow's head is small, but its body is very large. It is connected to the head by a wide and large neck. The cow has horns.
Learning to Draw - Cars can be simple. Cars are one of the favorite motifs when it comes to drawing for children and young children. They quickly realize that it is much easier than it might seem. The bird is again good for the Easter holiday or the spring season. Send cards and your child can decorate them with their own picture.
Knowing how to learn to draw animals step by step is an interesting task because we will find a wide range of possibilities. Many of them are animals that we can meet in this world, and the truth is that there are many species that we want to draw.
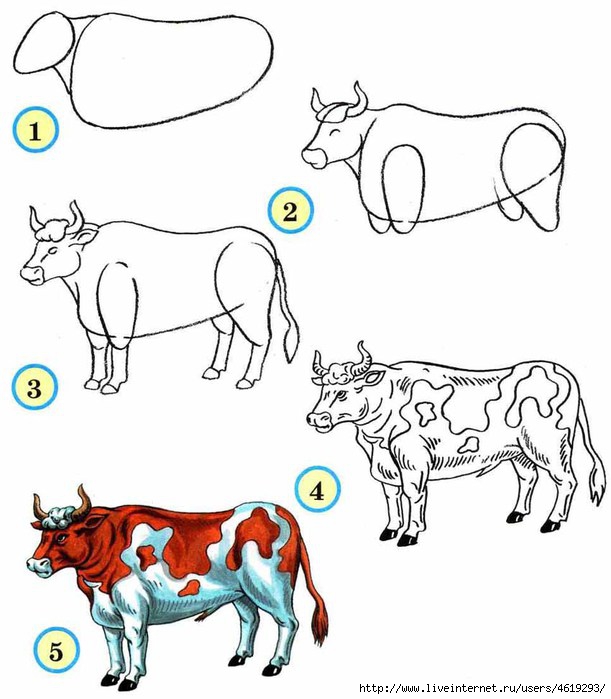
Bull.
And this is a bull. It looks like a cow, but its neck is much shorter and its horns are located at a greater distance from each other. The bull itself is more powerful, and its legs are shorter than those of a cow.
 img src=586
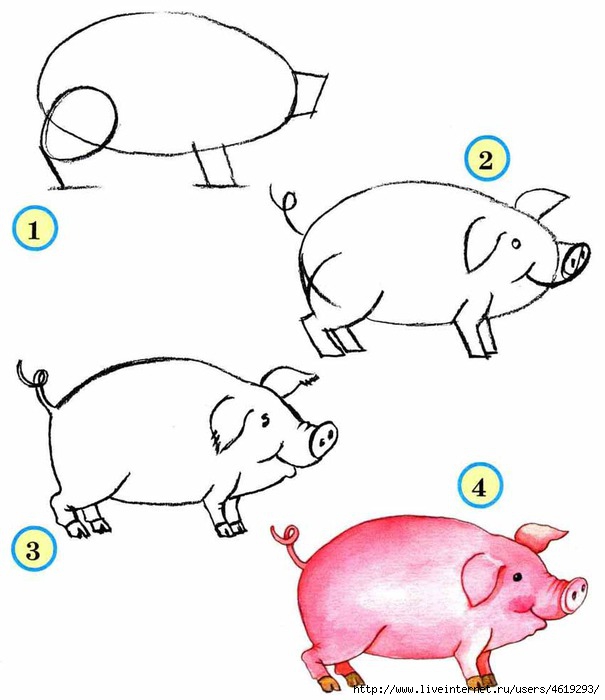
Pig.
Let's pay attention to how thick the pig's body is. It is oval, the tail is crocheted, the legs are small, and the head and body form a single whole, only the snout protrudes - the nose of the pig.
- You must draw a coat.
- It is important to know a little about the anatomy of the animal we want to draw.
If we understand that in numbers, everyone has characteristics that can be similar to those of an animal, such as the number 5. This number can easily be formed as a dog sitting with its eyes up, tail like the bottom of 5, and add a pair of legs to finish the dog's execution.
Lamb.
The head and body of this funny lamb look like two ovals: small and large. His horns are curled in a circle, and his legs are like columns.
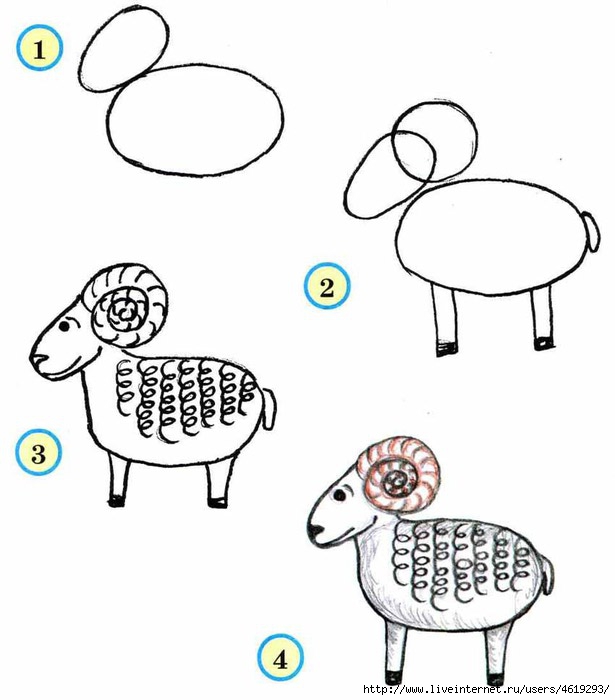
Sheep.
Let's take a close look at the sheep. What shapes can you draw it from? What color is the sheep? What lines - straight or wavy - should you draw her fur?
How to learn to draw children for children
So it will depend on your intuition and imagination. When you are a child, drawing animals is usually a common task. Or maybe you are not a child, but you would like to draw animals or for some child, it will depend on what you want to teach how to draw children's animals for children.
The point here is that it is the same training method, and the truth is that it is quite simple to do. Of course, not all the time you will need these illustrations, there will come a point when you know them by heart, you will see it simply, and you will have more opportunities to learn how to draw more animals.
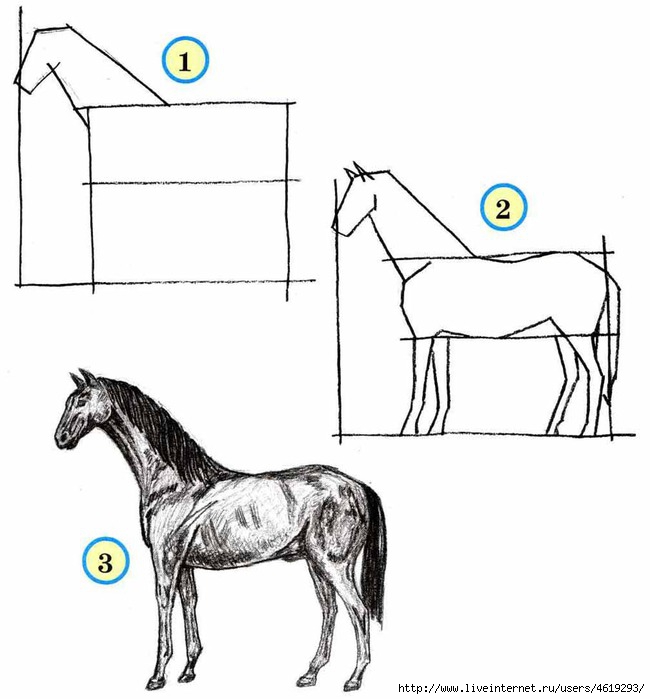
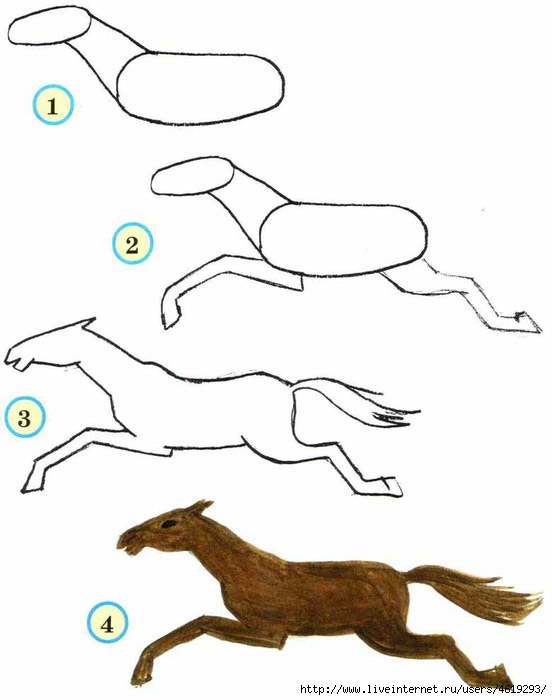
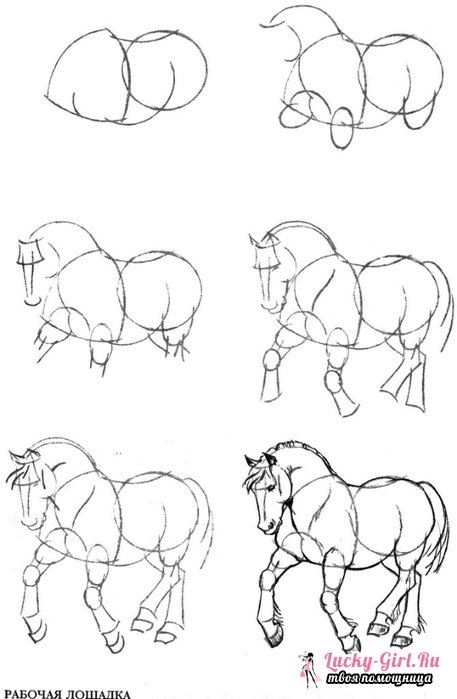
Horse.
Let's try to draw a horse. First you need to draw a piece of paper, as shown in diagram No. 1, then, according to diagram No. 2, draw out all the curves of the horse’s body, legs, ears, and tail. Scheme No. 3 already has a completed drawing of a horse.
How to learn to draw animals with numbers
My recommendation is to start with simple animals, known animals. A start here will be essential. Drawing is quite a fun task, and more so when we play with something we usually know, in this case numbers. Or you can simply match them to the animal you want to draw.
If we see number 1, it could easily be a bird with a beak and two legs to the side. And so we go with all the numbers, but of course with a little more effort we can make all the numbers have the shape that we want to fit the animal that we want.
You can draw a walking horse.
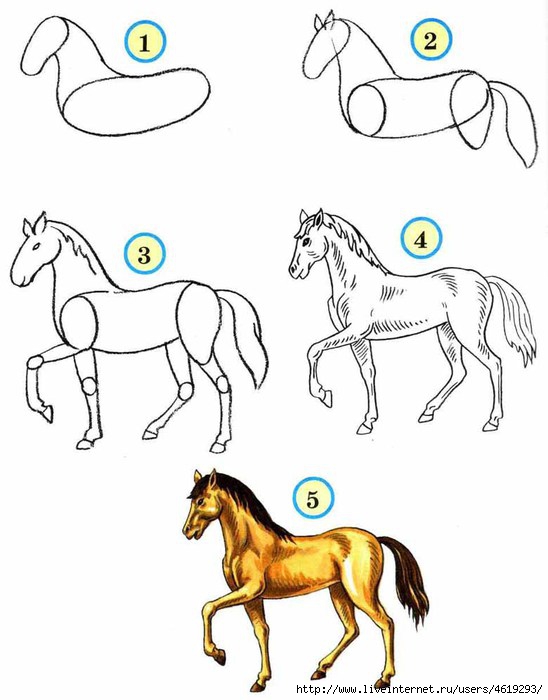
You can draw a running horse.
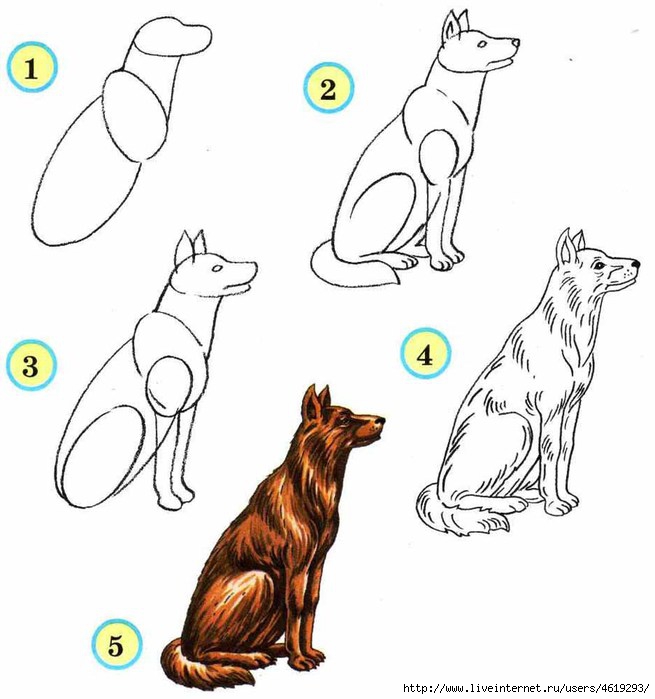
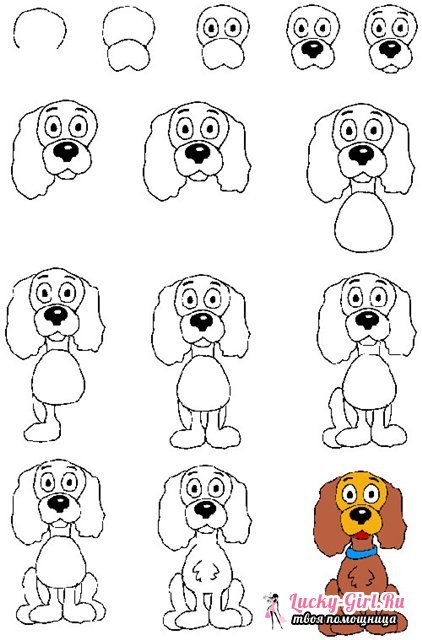
Dog.
Before drawing a dog, let's think about how to position the drawing: vertically or horizontally. Using an inclined line, you must first outline the inclination of the dog’s body. Then use three ovals to mark her body. The upper oval is the head, the lower oval is the body itself, and the middle (transverse) oval is the upper part of its paws. Next, you need to outline other parts of the dog’s body - the paws themselves and the tail. Ears are drawn with triangles. The lower part of the paws is rounded.
The truth is that if you can, we just need a little trickery and imagination, the idea is that the number can be recognized while viewing the drawing. It is necessary to study human behavior and add it to animals. Not only that, due to the nature of each animal, they tend to have different personalities, for example, a dog can be good friend, an ideal person in an ideal world.
For the lions, we have a boss who can send the rest. Giving these different personalities to animals will make the job of humanizing and rewarding them much easier. Learning about paint is another aspect that should be studied entirely separately because it is quite a vast subject.
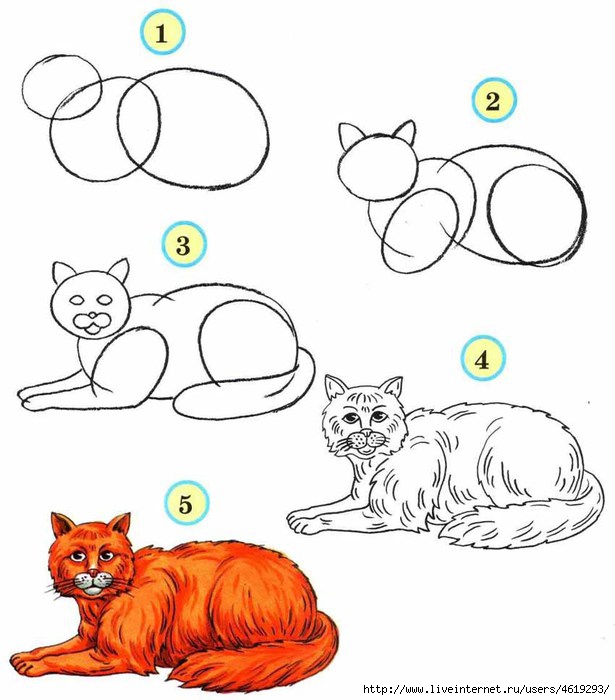
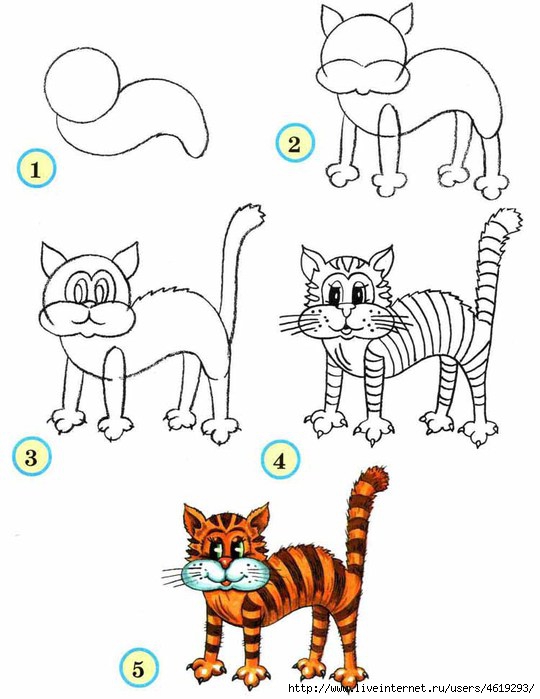
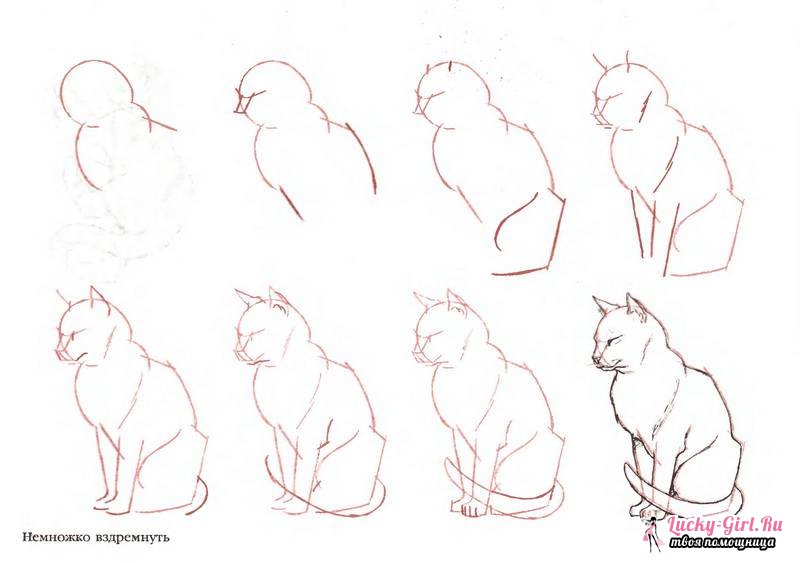
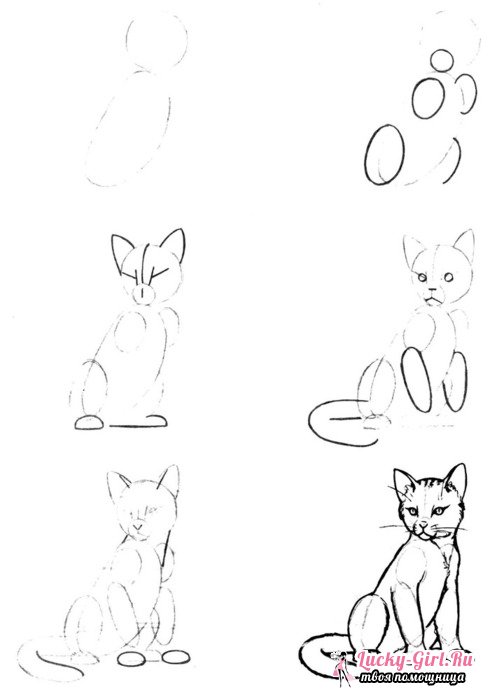
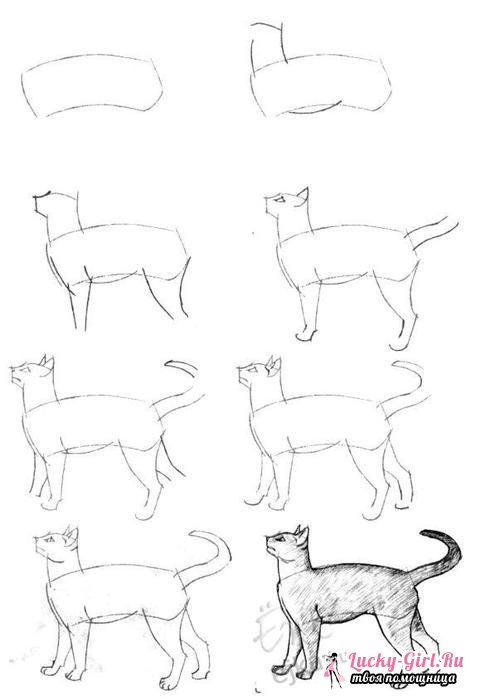
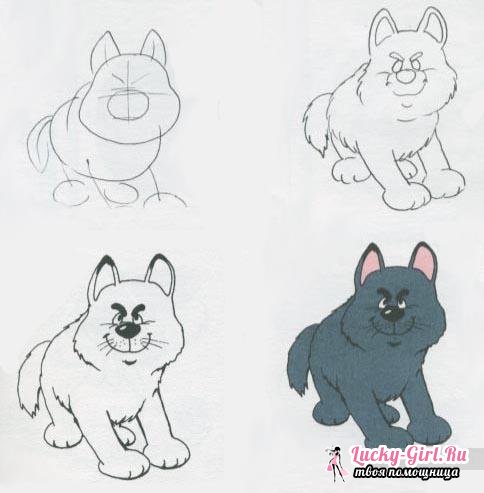
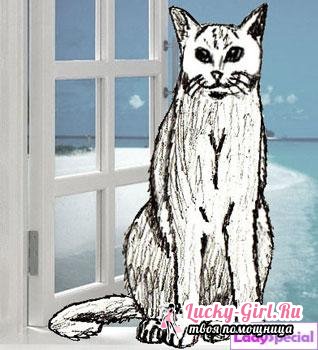
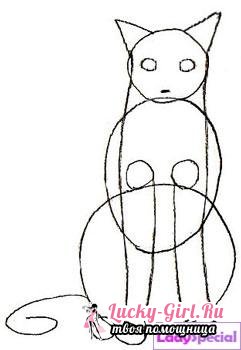
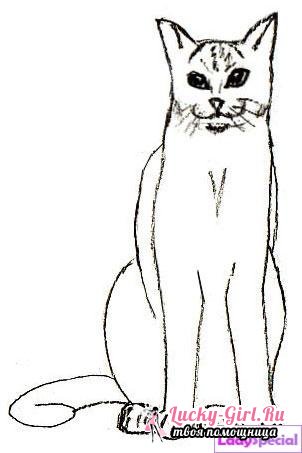
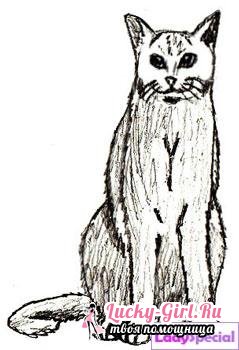
Cat.
The cat is drawn in the same way as the dog - with three ovals. Her ears are also triangular, but, unlike a dog’s, they are located further from one another.
You can draw such a funny kitten playing with balls.
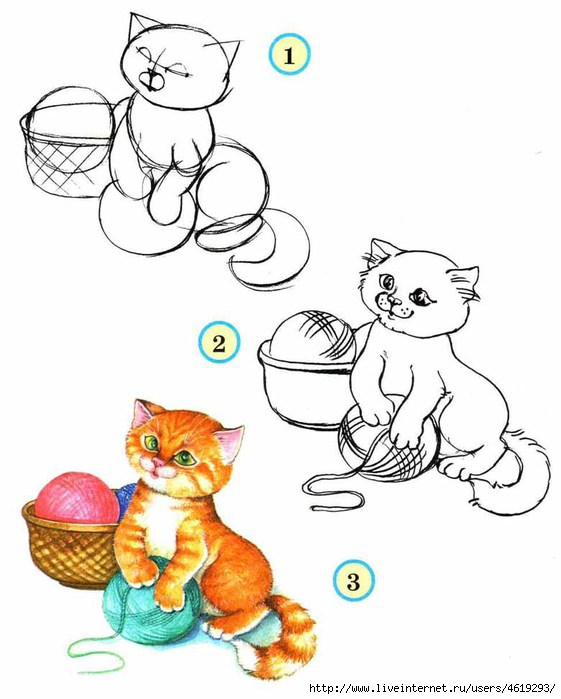
Or maybe something like this, from a cartoon.
Pencil drawing is a wonderful art. It's hard to believe that with such a simple tool you can create entire paintings on paper.
Even if you don't intend to become a professional artist, the ability to make pencil drawings can be useful to you later. For example, when you have children. The ability to draw will help in their upbringing and training. Drawings of animals in this case will come in handy. Of course, drawing beautifully is not so easy, but if you try, everyone can learn it.
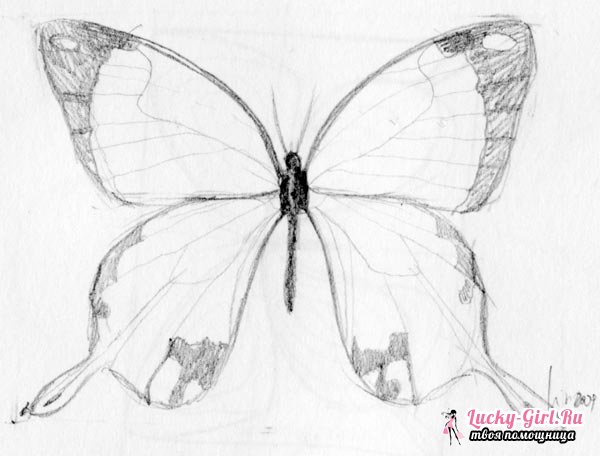
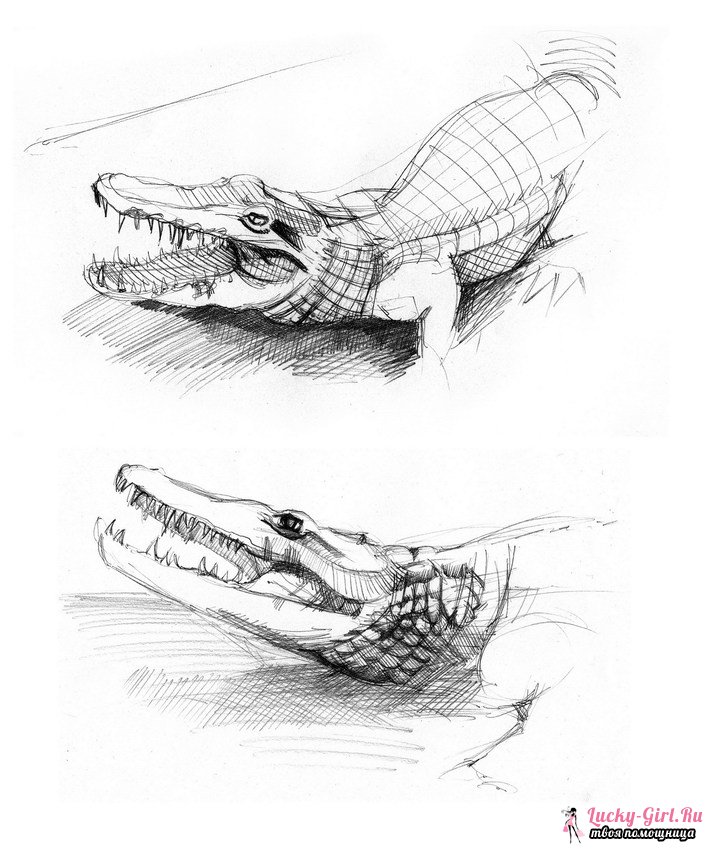
Pencil drawings of animals for beginners: photos

![]()

![]()

![]()
To finally complete the drawing, erase all the auxiliary lines and mark the shadows in the drawing.
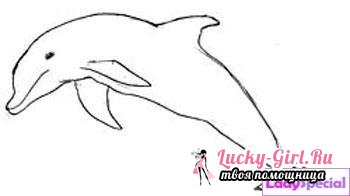
Pencil drawing of a dolphin for beginners
Drawing this amazing animal is not at all difficult. The most important condition for receiving beautiful drawing dolphin - maintaining proportions.
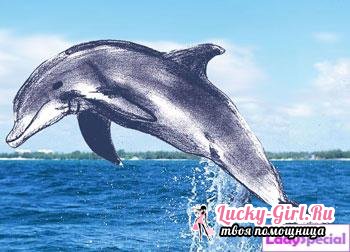
The first stage of drawing a dolphin is that right now you should incorporate its grace and plasticity into your future drawing. To do this, you will have to try to depict the arched body, elongated muzzle and fins as accurately as possible.
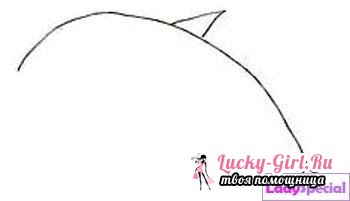
At the first stage, draw the upper line of the torso oval shape, and also mark the location of the fins and tail.
At the second stage, be careful with the proportions of the torso and head. Almost parallel to the upper contour of the body, which you drew in the first stage, draw a line for the abdomen. At first, you can use simple straight lines for this, placing them at an angle.
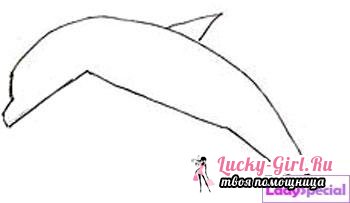
If you are sure that you have kept all the proportions correctly, you can begin to give the dolphin a streamlined shape. To do this, you have to smooth out the contour, that is, the angle formed by the two lines should become smoother, and the straight lines themselves need to be slightly curved.
Remember that the main goal of our drawing is to show the grace of the animal. This effect can be achieved by using smooth lines and maintaining proportions. First of all, we must ensure the exact proportions of the head and fins.
Speaking of fins. They should not be too large or small in relation to the size of the entire picture. Try to ensure that the fins are depicted in your drawing as accurately as possible. It will be better if you draw the fins in a certain sequence: first draw the fin that is on top, then the two side fins, and then the caudal fin should take its shape in the drawing (remember that the caudal fin is divided into two parts). Then you need to make the dolphin’s nose more rounded and draw the line of its mouth.
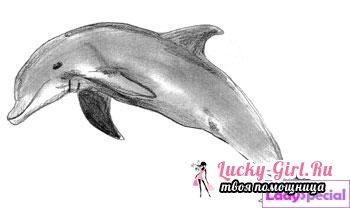
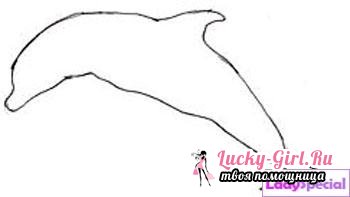
In order for the drawing to gain volume, it is necessary to apply shadows and correctly position the light. To do this, you should use shading. As soon as the dolphin acquires its visible volume, you can consider your drawing complete. If you are not satisfied with a simple drawing of a dolphin, come up with some kind of landscape that will surround it. Then you will get the whole picture.
Drawing a cat in pencil for beginners
The cat is one of the most common pets. In addition, cats can be found on the pages of many fairy tales. It is not surprising that this particular character is often found in children's drawings.
Like any animal, a cat should be drawn step by step to make the image more reliable. The structure of the drawn cat is based on three circles. You need to start the image with a circle intended for the animal’s head. You should also add a few lines to this circle to get the correct shape of the muzzle.
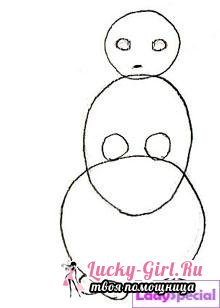
The next detail will be a large oval, which will later become the body of the purr. The last part will not be completely round in shape. You need to draw two curved lines that will be connected at the bottom, which is a line. This figure is a blank for the cat's hips.
Now start working on each detail individually. The first such detail will be the head. You need to outline the shape of the animal's head. Don't forget to draw a few lines on the front side of the neck and head that serve as visible fur. The animal must have ears and cheeks. Draw them. Using the previously drawn contours, sketch out the eyes and mouth of the cat.
![]()
On the cat’s ears, draw lines that will help directly shape the ears. You also need to add some fur and fluff on the cat's forehead. The mustache should be an integral part of the animal's design.
Start drawing the front paws. To do this, first mark the support from which they will come out. When the base of the paws is outlined, draw a small bone that comes out of the cat's chest.
To make the drawing complete, you have to outline the back of the animal’s body, its back and its front legs. Then draw the cat's tail and hind legs. Now you can delete all auxiliary lines that are no longer needed in the drawing.
When the linear drawing is completed, do not forget to add a little light and shade to it, which will make your creation more attractive.
Drawing an animal with a pencil is not so difficult. The main thing is to observe all the proportions and stages of the drawings. You will succeed!


