Not long ago, a large Kinder Surprise appeared on sale in many European countries. No one knows what is inside this gift until they decide to open it.
Gigantic mystery
Kids all over the world have long been accustomed to receiving sweet gifts in eggs from their parents. They are very convenient because they perform three functions at once:
- Unexpected pleasure (surprise).
- A treat in the form of delicious milk chocolate.
- Toy as a gift.
In addition, the packaging itself is usually very bright, which in itself is a pleasure. Not long ago there was a rumor that a big Kinder Surprise had been released. What's inside it is unknown. In commercials, the manufacturers promised that every child would definitely like it. And so it happened. Boys and girls were looking forward to Mr. Kinder's appearance. True, it did not appear in all retail outlets. But if parents wish, they still have the opportunity to find him. Some children thought, expecting the big Kinder Surprise, that there would be some huge toy inside. But everything turned out to be not quite so.
The manufacturer remained true to his idea. The novelty was a plastic package in the shape of an egg-shaped man with small legs and movable arms. Removing its upper part, you can find two trays containing seven standard eggs.
Good idea
The Italian company Ferrero produces sweet treats for children. She started doing this back in the seventies of the last century. The family of the owner of the company even received a patent for such an invention. Later, representative offices of this company appeared in different countries, including in Russia. True, our children in this case less fortunate. They were not destined to see the big Kinder Surprise in person. What's inside new toy, they only know from advertising. The reason is that, by decision of the management, the unusual new product is released only in some European countries. But don't despair. If you try hard, you can find a way out of any situation. It turns out that the giant Mr. Kinder is sold in Duty Free shops. True, there is one catch here. These outlets are only located at airports. But for loving parents nothing is impossible. They are ready to do anything for their child.
with Kinder
On the eve of the Christmas and New Year holidays, children always expect some special gifts from their family and friends. And Ferrero did not disappoint their expectations. The big New Year's Kinder Surprise is on sale. Nobody expected that there would be ordinary toys inside. Given the large size of the chocolate capsule, everyone naturally expected that the toy would also be the appropriate size. But everything turned out a little differently.

Purely externally, the egg, of course, looks very beautiful. Each package contains images fairy-tale heroes, with whom everyone associates New Year's holiday(Santa Claus, Snowman, Reindeer and others). Underneath the carefully sealed foil is a double-layer chocolate egg. Inside he has a plastic container with a toy. It is no different in size from those found inside small eggs. Some children were upset to see the usual surprise. Nevertheless, this did not make the desire to collect a collection of toys any less.
Gift set
The company's assortment also includes a large Kinder Surprise Maxi. What's inside this giant? Here everything looks a little different. The entire souvenir weighs about 220 grams. wrapped in a large piece of foil with a standard design. At the top it is gathered into a knot and resembles gift bow. There is a paper logo on the front side.

Unwrapping such packaging is a real pleasure. The container inside the egg is secured with an adhesive film, which prevents it from opening spontaneously. After opening it, you can find parts of the toy and a flyer inside, which contains complete visual assembly instructions. Usually toys are fixed on convenient stands. With their help, surprises can be placed on shelves like figurines, rather than put in a bag. In this position, toys are always at hand, which is especially popular with children. Such sets are very popular, but are not always on sale.
All children simply love it when they are given Kinder surprises. What if your child receives a huge “kinder surprise” with many gifts inside?
Do big kinder surprise with your own hands It won't be difficult for you.
To do this you need:
- An ordinary balloon
- A 4 size paper,
- PVA glue,
- Water,
- Paints,
- Printout with inscription.

First, inflate the balloon and tie it with thread to make it more convenient.

Now you need to cut or tear the paper into pieces of any size, but not too small.

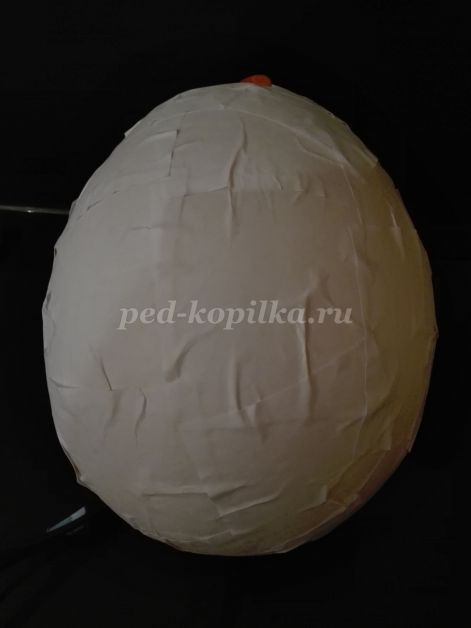
Each piece of paper needs to be soaked in water and applied to the ball. This must be done quickly, as the paper dries quickly and the paper will begin to peel off.

When the entire ball is covered with paper, you need to let it dry slightly for 5-10 minutes. This technique is called


Now let's move on to the second layer. To do this, coat the ball generously with glue and glue the same pieces of paper. After this, apply the third layer in the same way. Leave to dry overnight.


When our future kinder surprise dries, you will need to remove the balloon from it. To do this, you just need to untie the thread, the ball will deflate, and you can easily pull it out. Cover the remaining hole with paper.


We cut out the printed inscription and glue it to the egg.

And finally, paint the bottom of the Kinder Surprise with red paint.
Here the big kinder is ready. All you have to do is make a cut in the back or top and put the gifts in it.
How to invest surprise in chocolate egg, look .
If you find an error, please select a piece of text and press the keys Ctrl+Enter. Thank you for helping to make our portal better!
Envelope for a disc with photos
In continuation of our wedding theme - very detailed master class Maria Sedova, how to make a...
A charming gift for a newborn baby - a basket with flowers made from diapers
Another gift option from diapers was sent to us by Natalia Beeva - step-by-step master class with photo. ...
Envelope for money "Dreams"
A step-by-step master class on how to make an envelope for money with your own hands, from Antonina Mazur. With help...
Decoupage pen case with one-step craquelure
Decoupage pen case with one-step craquelure. The author of the master class is Olga Sosnina. Somehow I...
There are probably no children who don’t love Kinder Surprise. And, of course, there are no parents who don’t love their kids. To please your child, you can make a big kinder surprise out of paper on occasion, or even just like that.
Materials
To work you will need brushes, paints, water, a lot of newspapers and white A4 paper, a bowl, stencils with letters or a printout with the words “Kinder Surprise”. You also need PVA glue (you can use paste instead of glue, but it is inconvenient to cook and it is more difficult to work with). A large balloon will also come in handy.

It should be strong and elastic; a helium balloon works well. We will work using the papier-mâché technique, so you should prepare your workplace by covering it with newspapers or oilcloth.
Stages of work

- Inflate the balloon to the size you want to make the kinder. Tie the ponytail tightly. If you tie it too tightly, you will have to pierce the ball at the end of the work.
- We tear the paper into pieces, and after dipping it a little in water, apply it to the ball. Cover the entire first layer evenly so that there are no empty spaces left. At this stage, it is better to use regular newspapers - they are softer to work with and will not peel off immediately.
- Now take a brush and dip it in glue. We carefully brush over the first layer of paper, thoroughly coating all areas. It is worth noting that it is best to choose a brush made of artificial fibers, quite soft but elastic - this will pick up glue well, but will not tear wet paper.
- Now we again apply pieces of paper, now white, to the surface of the ball.
- We repeat the steps described above 3-4 times. Not worth it anymore. If you heavily saturate the paper with glue, it will take a long time to dry. And when it dries, it can warp and become ugly.
- We leave our workpiece to dry for the day. To do this, you can hang it by a string from a ball. We carefully check with our hands whether the outer layer of glue is dry. You should cover it with paper so that there is a small gap left at the tail of the ball, so that later you can lower the ball and take it out.
- These steps can be repeated 3-4 times. So you can make a large kinder with your own hands.
- When a sufficient number of layers have been applied, carefully untie the ball and remove it from the workpiece. Repeat the steps again to seal the hole.
- Let's start sanding. This stage can be omitted, but if you smooth out all the corners, the kinder will be just like a real one - even and smooth.
- We take the finest sandpaper and carefully work the entire surface of the toy in a circular motion. This should be done without strong pressure, so as not to tear many layers of paper. We repeat just enough to erase the existing transitions between the sheets of paper.
- Using a cloth, we wipe the dust formed during sanding from the workpiece, and cover our egg with a layer of glue. Let it dry.
- When the glue has dried, we paint our future kinder surprise in white. For work, you can use gouache paints - they are not harmful to the child. In the lower part (this is the opposite part of the part where the tail of the ball was. It is wider, like in a real egg.) We draw a pattern in red, as in a real toy. You can do this right away with paint, you can use a stencil, or first draw a wavy line with a pencil, and then carefully fill it with color.
- Let's start coloring the inscription. You can take a printed blank. In this case, simply glue it to the workpiece. It will also look good if you cut out the letters from the printout and glue the inscription. If you have a stencil, use it. Trace the letters, forming an inscription, directly on the workpiece, and color them with paints.
- The final stage. Cover the resulting egg with a layer of varnish from a can, so the paints will not flow and will not stain your hands (gouache paints are prone to crumbling and will smear when touched, and watercolors do not provide such a rich and dense covering layer).
- The toy is ready! You don't have to remove the ball, this will allow you to hang the toy. If you get the ball, just put the resulting kinder on the floor.
- To fill the toy with surprises, do not seal the hole from the ball. Instead, make a small cut to put candy or gifts inside, and then seal it.

The master class described in the article is very clear. This craft can be made by an adult, or you can involve a child in making it. It is easy to hide small gifts, sweets, and holiday souvenirs in the resulting toy.
Video tutorials on making kinder
Master class "Large Kinder egg using papier-mâché technique"
Purpose. This master class will be interesting and useful for kindergarten teachers, parents, and teachers in various fields of education. Designed for adults and preschoolers (6-7 years old). This souvenir will be an unforgettable gift for any baby, since the inside of the testicle is hollow, and a number of sweet (and other) surprises can fit there. Also, it can be used to decorate rooms in a New Year's style, or make a highlight in an ordinary interior.
Target: Creating a craft-gift “Large Kinder Egg” from paper using the papier-mâché technique.
Tasks:
1. Master the papier-mâché technique;
2. Create original gift with your own hands;
3. Train endurance, perseverance and patience;
4. Learn to be careful.
Materials:
1. White paper
2. PVA glue
3. Balloon
4. Gouache paints, multi-colored
5. Acrylic varnish, for paper products
6. Simple pencil, brush, scissors
7. White napkins

Practical work
1. To make the craft, we will need to inflate a balloon of the required volume.
2. Cut the paper into small squares or rectangles.
3. We begin to spread each piece of paper with PVA glue and carefully glue it onto the ball.

4. Continue working until the entire ball is covered with a paper shell.

5. Repeat the operation with a second layer of white paper.
6. Make a third layer of white napkins (one layer is enough). The napkins are thinner, they will disguise the paper seams and the work will look neater.

7. Leave the egg to dry. 12 hours minimum.
8. When the paper is completely dry, you can burst the ball and the egg will not lose its shape.

9. Let's start the creative process. We apply a red wave pattern to the lower part of the egg (divide the egg into 4 parts vertically, the lowest part is in order). We paint the entire lower part with red gouache.

10. Stylize the egg to match the original and add a couple of white droplets.

11. Draw or print the branded inscription “Kinder Surprise”


12. Carefully glue the inscription onto the egg. Jams may occur during the gluing process. Alternatively, you can first glue a piece of paper and write the inscription on the egg itself. We paint the entire upper part with white gouache.

13. Cover the dried product with acrylic varnish on the front.

14. C reverse side You can make a small cut in the product and put the necessary surprise gifts there. Afterwards, seal with one layer of napkins. Patch up the product (paint new areas and varnish the back).
14. Create a festive mood. We make a gift.
On the eve of Yegor's third birthday, I decided to give him a giant Kinder Surprise egg as a gift. There are many ways on the Internet to make it yourself, but all are based on the principle of papier-mâché on a balloon. Here I didn’t try to be original, but the strength of such an egg didn’t suit me, and I didn’t have time for multi-layer papier-mâché. And, as it turned out, working with balloons has its own subtleties. More about them below. How to do it huge egg Do-it-yourself Kinder Surprise? I'll tell you an example of how I did it.
I took a balloon and blew it up. I wet it and glued pieces of paper towels; paper and newspapers will do, whatever you have on hand. I left the putska, the part of the ball that is inflated, outside, so it’s easier to hold and dry it.  From experience: newspapers need to be torn smaller, and they shrink less than toilet paper, but the surface ends up looking a bit rough when taken toilet paper, then the ideal option is the cheapest gray paper, all modern ones, especially two- and three-layer ones, as well as towels, give a lot of folds, since air remains between the layers and it is very difficult to smooth it out, especially on such a moving base as a ball.
I would also like to draw attention to the mobility of the size of the ball, after gluing the paper shrinks, and you get a fairly even layer, BUT as soon as you start gluing the next layer, the previous layer gets wet, and the ball, apparently deflated from the pressure of the paper, does not stretch and folds appear. To correct this situation, I burst the balloon inside the egg, pulled it out and inserted a new balloon there and inflated it to the size I needed to smooth out the wrinkles from the inside.
Next, I primed the entire egg with self-hardening clay; you can use putty. The main goal is to apply an even layer to cover the paper mache. We are not afraid of uneven surfaces; it will all be sanded down with sandpaper.
Next, I cut the door, it will be removed.  I glued a magnet into the lid, simply sealing it with several layers of paper, and inserted cardboard into the base itself and glued it and the magnet with the same pieces of paper using PVA glue for strength.
  When the lid began to stick tightly to the magnet, I sanded the egg with coarse sandpaper.
  After I sanded the egg, pits and depressions became visible, I re-leveled the deepest of them with clay.
![]()
After everything had dried, I sanded it with fine sandpaper. And I painted it with white acrylic paint, not forgetting about the gaps between the egg and the door and the magnets. And she started painting.
Using a sponge, I applied more white paint to the top half of the egg and then dripped a drop of blue from top to bottom, dabbing with the sponge, to evenly create a blue gradient. I outlined waves on the lower part and painted it with red acrylic paint. I printed the inscription “Kinder Surprise” on a color laser printer (so that the paint would not wash out) and instead of paper I took one layer of a multi-layer napkin, which I pasted with masking tape onto a sheet of regular office paper and printed on it. This paper is very thin and stretches well when wet.

I cut out the silhouette of the inscription and glued it with diluted PVA glue. You can take this Kinder Surprise logo for printing, the image is clickable.


