There are many different types of folding boxes. The most common design is a cardboard box, the bottom and top of which are not adjacent to a common side; when assembling it, the cardboard development is bent along four parallel lines, one of which separates a narrow flap (forming a factory seam), which is glued, and the workpiece takes the shape of a sleeve. The edges are cut out in the form of valves, and scoring lines are applied to them; these flaps are then closed and secured at the edge of the sleeve, resulting in a closed package.
Rice. 6.2. The main types of folding ones shown here are cardboard boxes have many varieties. The figure shows flat blanks that are carved; Scoring lines are applied to them, and then the box is assembled and glued together. The glue flap is usually die cut along with the back of the box so that the open cut of the cardboard will face the rear after gluing (the outside side is shown, also called the die side)
A box with a glued bottom is very similar to the type described above, but both bottoms are sealed after packaging. In Fig. Figure 6.2 shows the different shapes of the bottom valves. Bottom flaps are often equipped with special locks to prevent heavy goods from falling out when the box is lifted. Parcel boxes have additional slots and tabs that prevent the package from opening during transit.
We have given only the main varieties, on the basis of which a talented designer can create many new modifications. Packaging may have various cutouts and protruding parts, which allow the consumer to better see the product or provide a certain location of the product inside the box. When additional parts are included (perforations and hinges, tongues and slots, music stands and cuffs), the cost increases slightly or does not change at all. It is this variety of design that makes the folding box so convenient.
The choice of box design and materials is determined by the type of product and marketing considerations for the specific product. If packaging performs exclusively utilitarian functions (for example, serves to store products) or is supplied to industrial enterprises or organizations, then cost is primarily taken into account when making decisions. In this case, the problem comes down to using the thinnest grade of cardboard allowed in in this case, and calculate the minimum area sweep.
The increase or decrease in the strength of cardboard depending on its thickness is given in table. 6.2, as well as on the graphs presented in Fig. 6.3, 6.4 and 6.5. Once the technical requirements have been formulated, tests must be carried out to confirm the suitability of the selected design. Drop and vibration tests are especially important; they should be carried out under conditions as close as possible to operational conditions, that is, by placing the contents for which it is intended in a box and packing as many boxes into a transport container as are planned to be transported in it in practice.
| Box volume, cubic meters inches | Contents Weight, lbs. | Cardboard thickness, inches |
| up to 20 | up to 0.25 | 0,018 |
| from 20 to 40 | from 0.25 to 0.50 | 0,020 |
| from 40 to 60 | from 0.50 to 0.75 | 0,022 |
| from 60 to 80 | from 0.75 to 1.00 | 0,024 |
| from 80 to 100 | from 1.00 to 1.25 | 0,026 |
| from 100 to 150 | from 1.25 to 1.50 | 0,028 |
| from 150 to 200 | from 1.50 to 2.00 | 0,030 |
| from 200 to 250 | from 2.00 to 2.50 | 0,032 |
| from 250 to 300 | from 2.50 to 3.75 | 0,036 |
| from 300 to 375 | from 3.75 to 5.00 | 0,040 |
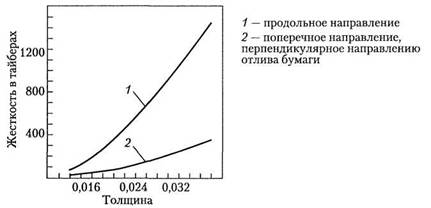
Rice. 6.3. The stiffness of cardboard is determined by the modulus of elasticity (Young's modulus), the length of the fibers and the cross-section of the sheet. Single fibers of wood pulp have an elastic modulus of about 500,000 psi (pounds per square inch) (3.448 MPa). Since most of the fibers are parallel to the paper's casting direction (longitudinal direction), the stiffness is higher in this direction. As the thickness of the sheet increases, the moment of inertia increases in proportion to the square of the distance from the center of the sheet to its outer surface. Consequently, the rigidity is determined to the greatest extent by the outer layers
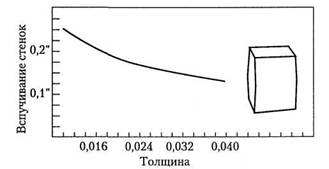
Rice. 6.4. When packaging bulk products in large boxes, their walls are deformed and swell under the internal pressure of the contents. The most important factor is the side area. The graph shows that increasing the thickness of the cardboard only slightly reduces the swelling of the walls
One of the requirements for a folding cardboard box is its attractiveness to the buyer, but there are other factors to consider. First of all, you should consider the method of displaying products. The packaging must be stable and not fall off the store shelf. The front side of the box should look good even when there are many boxes displayed on the shelves in the retail chain. It is necessary that the packaging size (compared to the size of the product) is respectable, but does not mislead the consumer. In Fig. 6.6 shows an example of a cardboard box for a soft tube, how to determine the most suitable size for it.
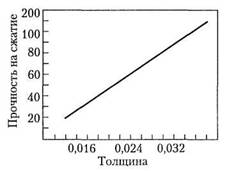
Rice. 6.5. During transportation, the cardboard box is mainly affected by compressive forces. The graph shows how the strength of cardboard increases as its thickness increases. As an example, consider the maximum load (in pounds) from top to bottom that a cardboard box measuring 210 x 76 x 279 mm can support
The size of the cardboard box should correspond to the standard height of the shelves in the store. If in a retail chain the product in question is usually hung on consoles, then the box must be equipped with a hanging loop or one of the sides must be extended and a hole of the appropriate size must be made in it. It should be easy for the consumer to pick up the packaged product from the shelf and hold it in his hands. A heavy cardboard box can be equipped with a handle cut from the same ream. Provide good level Sales can be helped by a window on the box through which its contents or a high-quality image of the packaged product can be seen.
Changes are also taking place in the placement of packaged products on store shelves. For a long time, in retail, cardboard boxes were positioned (and printed accordingly) where possible with the consumer facing outwards and upwards, thereby drawing more attention to the product on display. Sometimes the box is designed to be placed horizontally on the shelf (the reason may be that the product looks better in this case, or sometimes because the boxes can be stacked in two layers), and it even happens that savvy packaging designers use already ready-made type boxes used by some other company for vertical display of products. But at the same time, the variety of products offered in stores, especially supermarkets, is increasing, and many store managers prefer a smaller front area, as this allows for display on the shelf. larger number types of products. There is constant competition for shelf space.
The use of fifth-sided boxes should be approached with extreme caution. They are really effective in terms of drawing attention to the product on the shelf, but they require more cardboard to produce and can create problems on the production line and when packed into shipping crates. At the same time, such boxes may be absolutely necessary for packaging small items that otherwise risk simply going unnoticed.
Rice. 6.6. Bristol-Lund formula (Bristol-Lund) used to calculate the most suitable size of cardboard box for a soft tube (in this case, as a rule, the rule about the inadmissibility of packaging that creates misconceptions about the product is also observed)
In some cases, to prevent petty theft, it is necessary to make the box large enough that it cannot be hidden in the hand or placed inside another box. For the same reason, it is preferable to glue the flaps of the box, since otherwise the thief will be able to remove the product and return the empty packaging to the shelf.
The good appearance of retail packaging is determined by the strength of the box itself, the quality of the cardboard used and the type of printing. It is not advisable to save money by using lower quality material, which will quickly lose its presentation.
Once marketing considerations have been taken into account, further decisions about the choice of materials and box design should be made based on consideration of the packaging's purpose and cost requirements; the analysis of individual aspects should be carried out in stages.
Since different mills produce different types of board, it makes sense for the packaging engineer to first determine the marketing and technical requirements for the box being developed, and then select the type of board that best meets them.
Rice. 6.7. Under the influence of weather conditions and storage conditions, the strength of cardboard can be halved
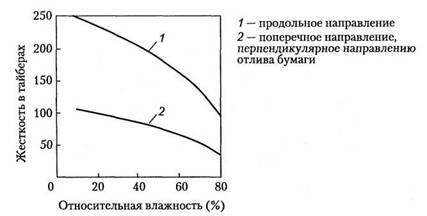
Next, you need to find out whether this material will be available in the required quantity and within a certain period of time. For example, heavy grades of waste paperboard with a thickness of more than 30 points (0.8 mm), as well as especially heavy grades of solid bleached sulphate board, are gradually being phased out. (SBS) currently used only for the production of milk cartons. Other materials, such as 10-point (0.25 mm) cardboard and corrugated profile cardboard E And F(which is sometimes used to make heavy-duty folding boxes) may be very difficult to obtain in some areas. Another factor is weather conditions. For example, the rigidity of boxboard and the strength of the box are affected by humidity (Fig. 6.7).
If recycled cardboard is selected, the packaging technologist should also consider the costs of printing the waste cardboard and making boxes out of it, and also consider the possibility that the productivity of the packaging equipment will be lower, since quality decreases at higher speeds. In addition, chipboard may not be strong enough to produce some complex designs, such as end clamps and pull-tab clamps. As a result, it may be that a thicker grade of recycled paperboard may be required to provide the required packaging performance, but this will require heavier loads to be transported and larger shipping boxes to be used.
In cases where it is expected that packaging operations will be carried out manually or using semi-automated equipment in the near future, it is advisable to evaluate the long-term prospects and determine whether a transition to automatic equipment will be made in the future. For example, a box with a locking latch on the bottom is ideal for manual loading and cannot be closed using automatic equipment. Operational cards should be developed, packaging and packaging equipment parts should be designed in such a way that when switching to more complex technologies there is no need to replace die-cutting dies and printing forms, and especially all the packaging equipment used.
Cost is always an important consideration and is largely determined by the choice of design and type of material used. Generally, any improvement in paperboard performance or improvement appearance its surface leads to increased costs. This is where a packaging technologist can help. important help the marketing department when decisions are made about product packaging. There are no immutable rules here, and the final choice is made on a compromise basis. Using the data in table. 6.3, a decision can be made as to whether to use cardboard with inner layers made from recycled materials or consisting entirely of virgin fibres.
Table 63. Comparison of the characteristics of cardboard made from virgin material and cardboard with inner layers of another (recycled) material
| Characteristics | Solid bleached sulphate board | Cardboard with inner layers of recycled fibers |
| Wall deformation (swelling) | When opening the box, the walls are deformed due to less rigidity in the longitudinal direction | Higher longitudinal rigidity |
| Rilevka | The scoring lines are held securely | Scoring lines lose shape over time |
| Creep | Low creep rates; Less fatigue when compressed | High creep rate; greater fatigue when compressed |
| Bonding | Requires expensive synthetic glue | It is acceptable to use inexpensive dextrin glue |
| Uniformity of processing | More uniform machining | Processes less evenly |
After all these issues have been considered, an important factor such as economic efficiency is taken into account. Although sustainability has received a lot of attention lately, most packaging experts agree that the choice is always made in favor of the most functional and most cost-effective option.
The packaging designer needs to collaborate with the designer of the manufacturing company that supplies the boxes. Recently, there has been a desire to determine technical characteristics by mutual agreement between the supplier and the customer; The box development plan is also made acceptable to both parties. Material suppliers and packaging manufacturers know that this takes a lot of time, but the effort is well worth it.
The main points that need to be indicated in the technical characteristics of folding cardboard boxes are:
- dimensions;
- materials used;
- scoring scheme.
Dimensions are always given in the following order: length, width, depth; they are measured from the middle of one scoring line to the middle of the other. Length is measured along the hinge joint of the lid, width is measured from the hinge joint to the fold flap, and depth is measured parallel to the adhesive flap. In the case of a complex structure, it makes sense to provide a detailed diagram.
It is necessary to accurately indicate the thickness of the cardboard, its density, coating and gloss. The characteristics of both the front and back surfaces are given, for example: white cardboard with machine coating, gray cardboard, kink-resistant box cardboard, etc. The type of printing must also be indicated. All colors and shades must be designated using standard coding systems or presented as samples; in addition, permissible deviations from established standards are indicated. If it is necessary to use glossy paints or varnish the entire surface of the box or its individual sections, this should be indicated in the technical specifications. It is necessary to specify in detail which sampling methods will be adopted, as well as the level of quality required during acceptance inspection.
When developing a specific package, first of all, you should establish the internal dimensions of the container, determined by the size of the packaged product. The length of each size is increased slightly - typically by 1/32 to 1/16 inch (0.8 to 1.6 mm) - to provide clearance between it and the box. Then the thickness of the cardboard is selected; the most commonly used material is 18 and 20 point thick (0.457 and 0.51 mm). To ensure that the selected dimensions are correct, it is advisable to make a packaging sample at this stage.
Most large carton manufacturing plants, and even some packaging plants, have a design office; Job
carried out on a computer. Using a computer-aided design system and a graphics tablet, a diagram of the critical points of the box drawing is made, which are then entered into the database. The computer then connects these points with lines. A plotter is connected to the computer, which transfers the resulting drawing onto a sheet of cardboard or vinyl plastic. If the image is applied to cardboard, then using the same plotter the scoring and cutting of the workpiece can be carried out in strict compliance with the technical conditions. The sample is then evaluated by both the packaging plant and the box supplier and receives their approval.
If the plotter plots the image on vinyl, then the layout can be printed on transparent polyester film, which is then used as a mounting sheet to ensure the correct placement of the images in relation to the box parts.
In small packaging plants, it is preferable to make samples by hand. The cardboard fibers are almost always horizontal, that is, they run around the sides of the box, perpendicular to the main scoring lines; This direction of the fibers helps avoid warping (bulging) along the top edge and helps the main sides remain flat (Fig. 6.8).
To make a sample box, the development is cut along the outline with scissors or a knife, and scoring lines are applied by laying the blank face down on a long piece of scoring ruler, which can be provided by the box supplier. This steel ruler is mounted on a wooden stand with the rounded edge facing up. The workpiece is pressed against the scoring ruler from above using a block with a split surface, which is drawn along the cardboard along the lines drawn with a pencil. The block is made from hard wood; a groove 1/16 inch wide and 1/32 inch deep (1.6 by 0.8 mm) is made on its end surface. In this way, a roller is formed along the scoring lines, breaking the rigidity of the boxboard in this area, making it possible to make neat folds (see Fig. 6.9).
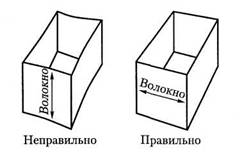
Rice. 6.8. Cardboard fibers most often run in the direction around the box, perpendicular to the main scoring lines. Thanks to this, the material has greater rigidity in the interval from one scoring line to another. Folded edges provide rigidity in the opposite direction
Rice. 6.9. The cardboard is bent in the direction from the scoring line. The roller formed using the groove of the scoring and die-cutting press breaks the bond between the layers of paper. When the sheet is folded, the cardboard at the fold line delaminates and protrudes outward in the form of a bead, thereby reducing the stress on the outer layer of cardboard. If this did not happen, the outer surface would rupture
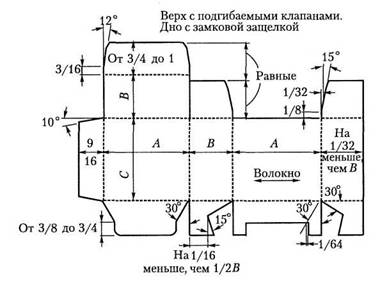
Rice. 6.10. Basic dimensions (in inches) based on the development of a typical folding box. There are no general standards, and the number of varieties produced is quite large
Further, if we are talking about a glued box, then regardless of how the sample was made, the workpiece is folded, glue is applied, and then the box is laid flat under the load and held until the glue dries. Given that correct execution The notches and scoring of the sides must be positioned exactly at right angles to each other, and the valves forming the end walls and securing them are inserted into the slots or placed in the required position without excessive friction. In rare cases, edges may need to be trimmed or new scoring lines applied to ensure a more correct fit. This sample can then be used to check whether the originally chosen dimensions of the box are suitable, that is, whether the contents are positioned as intended. The most common sizes can be found in Fig. 6.10; The exact terminology for describing the parts of a cardboard box is given in Fig. 6.11.
If the type of boxes being tested are intended to be processed on automatic equipment, then it is necessary for the box supplier to produce a die-cutting die. A minimum of 500 samples should be made, which are glued together using an industrial gluing machine; they are tested on box production equipment. Samples are not required to be printed, but they must be made from the appropriate material.
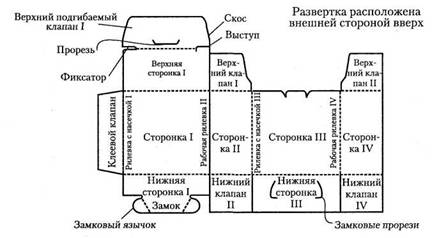
Rice. 6.11. To ensure mutual understanding with supplier companies, parts of folding cartons should be named correctly
Nowadays, a growing number of different application programs are available, and images for boxes are increasingly prepared on a computer. When using a computer-aided design system, the development of the box design can be carried out in conjunction with the work on the printed image, and thus the entire package is immediately developed in accordance with the exact specifications. However, computer printouts should not be used as a reference for color selection when printing. The proofing system used to validate the print sample and ink used should be as close as possible to the selected printing process technology, as printing methods vary widely.
In small businesses and printing houses where packaging is made by hand, a printed test sheet is prepared. This stamped sheet allows you to check whether the stamp is positioned correctly on each side of the cardboard box.
Cardboard boxes should be packed in strong shipping crates with approximately 15% free space to avoid damage to the notched folds. If the boxes are packed too tightly, the opposite sides will be pressed against each other, when it is preferable for them to curve outward slightly, as this makes it easier to open the box before packaging. It is preferable to pack small boxes on trays, but in large boxes the contents can simply be separated with sheets of cardboard. All boxes in the stack must be stacked in the same direction, which is especially important if the assembly will be carried out using automatic equipment. Transport boxes for these purposes are usually made of corrugated cardboard; they must be strong enough to withstand stacking heights of 5 to 6 feet (1.5 to 1.8 m) without deformation. It is not advisable to store glued and assembled boxes for more than 6 months, as the cardboard may warp or harden.
But what to do if there is absolutely no home empty boxes? You can make a durable and, no less important, beautiful box with your own hands!
What to make it from?
The most durable and reliable, of course, are cardboard boxes, so cardboard is most often used as the main material. But paper boxes can also be used, especially if they are not too large and not very heavy. Still, it’s better to use thick paper, otherwise you simply won’t deliver the gift to the recipient.
How to do it?
How to make a box with your own hands? There are a great many options. We offer several original, but at the same time quite simple.
Option one
Make a box with a paper lid. To do this you will need:
- 2 sheets of thick paper;
- pencil and ruler;
- scissors;
- glue.
Manufacturing method:
- First you will need to make a drawing. Draw a square. Its value will depend on the size of the gift.
- Now set aside another square from each side of the drawn square. In total you will get 5 identical figures. It is better to make the outlines of the first square, which is in the middle, dotted. These will be the fold lines.
- Then set aside 1-2 centimeters from the sides of the top square. These indentations are needed to glue the sides of the box together. Draw exactly the same protrusions for the bottom square.
- Now you can start cutting. The protrusions will also need to be cut, but cut their edges at an angle to make them easier to glue.
- Now fold all the side square parts towards the center along the dotted lines.
- Then you can start gluing the parts. To do this, bend the protrusions inward, grease them with glue and glue them to the adjacent sides of the box. The main part is ready.
- Start making the lid. To do this, draw a square again. But since you are making a lid that should fit freely on the box, its dimensions must exceed the dimensions of the main part. Add 0.3-0.5 millimeters to each side.
- Now set aside not squares from the sides, but rectangles with a width that is not too large (3-4 centimeters is enough).
- For the top and bottom rectangles, also draw protrusions.
- Cut out the blank for the lid, and also cut the protrusions at an angle.
- Glue the tabs to the adjacent sides.
How to decorate such a box? For example, you can paint it. And on the lid write wishes for the person to whom the gift is intended.
Option two
If you are planning to give something very small, such as jewelry, then you can use a matchbox as packaging. But, of course, it needs to be decorated. So, you will need:
- matchbox;
- beautiful fabric, such as velvet;
- beads or beads;
- thin ribbon;
- scissors;
- glue;
- thread and needle;
- tailor's chalk or special pencil.
Manufacturing method:
- The matchbox will serve as the base, and we will decorate it with fabric. To cover the base with it, you first need to draw a blank of the required dimensions on the material. To do this, measure the length of the box. Set this piece aside on the fabric.
- Now measure the height and width of the box. Multiply each of these values by two and add the values. Add 1 centimeter. Set aside one piece perpendicularly down from the beginning and end of the first segment. The length will be equal to the value obtained after calculations. Connect the ends of these segments to create a rectangle.
- Cut it out. Now place a rectangle on it equal to the top side of the box. This part will be the front part, it needs to be decorated. To do this, embroider it with beads or beads.
- Now cut two pieces of tape 10-15 centimeters long. It is better to singe their edges so that they do not unravel.
- Now glue one ribbon to the top of the box (closer to the edge), and the second to the bottom. The ties are ready.
- Grease the box with glue and wrap it with cut out fabric so that the decorated part is at the top.
- Now you need to cover the sides of the retractable part of the box with material. To do this, simply trace them on the fabric, cut out rectangles and glue them to the sides.
- The original small box is ready!
Option three
Make a sturdy cardboard box. To do this you will need:
- cardboard;
- ruler;
- pencil;
- scissors;
- colored or gift paper.
Manufacturing method:
- First you need to make a drawing. To do this, draw a square with a side equal to 10 centimeters. Now, from the top side, set aside a rectangle with a width equal to 8 centimeters. Place exactly the same rectangle from the bottom side of the square.
- Now, from the left side, also set aside a rectangle with the same width as the previous two. And from its left side, set aside another small rectangle. Its width will be 2-3 centimeters. This is the future flap of the box lid. And from the top and bottom sides of the same rectangle, set aside another rectangle no more than 1.5 centimeters wide. These are the tabs for gluing the box together.
- Then set aside a rectangle with a width equal to 8 centimeters from the right side of the main first square. Then, from its upper and lower parts, set aside along the protrusion (as in the previous point).
- The workpiece is ready. Draw exactly the same one on gift or colored paper. But if you want to speed up the process, first cut out the main blank, then trace it on colored paper, and then cut it out.
- Now glue the cut out wrapping paper to the base.
- Make inward bends along all the lines of the main part.
- Cut the protrusions at angles and glue them to the adjacent side parts with inside boxes.
- You can decorate such a gift box with appliqués, sparkles, sequins or other decorative elements to your liking.
Option four
You can make an original round box. Here's what you'll need:
- cardboard that is not too thick (thick cardboard will bend and break poorly);
- pencil;
- measuring tape;
- round base or compass;
- scissors.
Manufacturing method:
- First draw a circle. This will be the foundation.
- Now, using a measuring tape, measure the length of the drawn circle.
- Draw a rectangle. Its length will be equal to the length of the drawn circle plus a centimeter for gluing, and its width will be the desired height of the box.
- Now, from the length on one side, set aside a rectangle 1.5 centimeters wide. This is the allowance for gluing the bottom to the side. Now draw several triangles directly in this rectangle. The interval between them should be from 0.5 to 1 centimeter, the tops should rest towards the main large triangle, and the bases should coincide with the extreme side of the small narrow rectangle (the one that is not adjacent to the large one).
- Cut out the bottom. Then cut out the side piece and all the triangles. Bend the patterned part along the drawn line.
- Start gluing the patterned tab to the bottom (to the wrong side), while carefully folding the side. Finally, glue the ends of the side overlapping.
- To make the lid, draw the bottom and almost the same side part again. But its height will be 2-3 centimeters. Glue the bottom to the side in the same way as in the previous point.
- Ready!
Option five
If you need to do big box, then use shoe packaging. You will need:
- shoe box;
- fabric for gluing;
- lace ribbon;
- scissors;
- universal glue;
- beads, sparkles, beads for decoration.
Manufacturing method:
- Cover the box with fabric, taking measurements in advance. It is best to cover all the sides first, then the bottom. Do the same with the lid.
- Tie the lace and glue it to the lid.
- Decorate the box with beads, beads, sequins, sparkles.
- Ready!
Use your imagination and creativity to make the most beautiful and original box!
You will need
- Cardboard, ruler, pencil, scissors/utility knife, glue, colored paper (wrapping paper), decorative bow.
Instructions
Take a large sheet of cardboard. It should be dense enough and not brittle so that it does not crack at the folds. Draw a rectangle in the center. This will be the bottom of your box. The sides of the box are adjacent to its right and left sides. Their height equal to the depth of the container itself.
Adjacent to the top and bottom edges of the main rectangle are two more sides of the box - front and back. Their height is equal to the height of the sides described in the previous paragraph. On the sides of each of these pieces, add flaps to connect the box. If you intend to store light objects in it, flaps 2 cm wide will be enough, otherwise it is better to increase the width as much as possible. Trim the edges of the valves at a 45 degree angle.
Bend the cardboard along all the drawn lines. Lubricate the valves with PVA glue and bend them inward, connecting them to the sides of the box.
While this part dries, make a cover. Its length and width are 2-5 mm greater than the length and width of the bottom of the box, and the height of the sides can be any. Also add sides for fastening to the two sides of the lid.
Following this pattern, you can make a cardboard box of almost any shape. Main geometric figure repeat as many times as there are sides in the box, add the bottom and flaps and make the lid a few millimeters larger than the bottom area of the box.
Prepare all the tools and materials to create crafts. Place cardboard in front of you, coat it with glue and stick it on it colored paper (wrapping paper). Iron it well so that there are no creases and let the workpiece dry slightly.
Turn the cardboard wrong side up and use a ruler and pencil to draw the shape shown in the picture. The size of the figure may vary, but all squares The figures must be equal to each other. The allowance for gluing the box must be at least one centimeter, only in this case the box will ultimately turn out strong.
Cut out the resulting shape, bend it along the dotted lines and start gluing (the side covered with colored paper should be on the outside). Glue part A to part A", glue part B to part B", glue part C to part C", glue part D to part D". When gluing, try to press the parts together as tightly as possible so that there are no gaps.
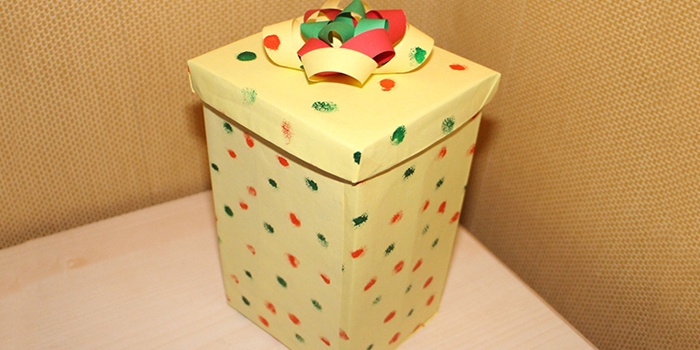
In order for the product to ultimately look more elegant, it needs to be decorated. To do this, take a decorative bow (a bow in a contrasting color with the box itself is ideal) and glue it to the outside of the box lid (in the picture, the box lid is part E). To create such a box, only thick cardboard is suitable.
To make a box, take a sheet of thick craft cardboard measuring 23*23 cm and another sheet of the same cardboard measuring 16*16. Some types of craft cardboard are quite expensive, but you can do it without wasting quality take cheaper cardboard. The gift box will have a taller bottom and a smaller lid, so will require different sized sheets of cardboard. The size can vary, as long as the lid and bottom fit together. Make slits in a piece of cardboard that matches the bottom of the box. This sheet should have dimensions 23*23. As a result, using scissors, you should get a design similar to an equilateral cross. Incisions should be do in that order. First, cut the sheet along the edges to a depth of 7.5 cm towards the center, also 7.5 cm away from the corners. Make 4 cuts on two opposite sides of the sheet. As a result, you should get 4 squares with a side of 7.5 cm at the corners of the cardboard sheet and 2 rectangles located between them. Then draw lines with a pencil on both sides of the sheet, marking the location of the cuts at the top and bottom. After cutting along the lines, you should get a shape resembling a cross or an addition sign. At a distance of 4 cm from the edge, cut the side edges diagonally towards the center. After this you will have triangles at the top and bottom. Now let's start working on the second, smaller sheet of cardboard. Cut it the same way as the first one, just keep in mind the smaller dimensions. The result is a figure that resembles a cross or an addition sign. This figure will have triangular notches at the corners. Now fold the corners where the triangular cutouts are located. There will be 4 of them: 2 below and 2 above.
Now perform the same operations with the lid. Take a smaller sheet of cardboard and fold the edges of the sheet as described above. Then fold the edges of the sheet towards its center, forming the sides of the box. Lift up all four edges. Remember to ensure that the triangular cutouts are on the inside at all times. Glue the triangular cutouts to the inside of the box walls. This way, you will have two halves of the box in your hands, which can be combined with glue. Then wait for the glue to dry by pressing the edges of the sides of the box. Then place the lid of the box onto its base. The homemade cardboard box is ready.
Beautiful homemade gift wrapping is already a wonderful gift! Therefore, it is not surprising that at a time when store shelves are bursting with various goods and, it would seem, nothing would surprise anyone, this creativity is popular. Interested in learning how to make a gift box? Once you learn, you will be able to please your loved ones and yourself. unusual ideas.
DIY gift wrapping
Only the uninitiated believe that self-wrapping gifts, a homemade origami box or designer boxes that fit into the interior of an apartment is something very difficult. Not at all, this is an easy and fun process. A few master classes - and you won’t be dragged away by the ears! You will be happy to create boxes: unusual and cheap.
How to make a gift box
Even if you are bursting with the desire to make a beautiful box, take your time. First, determine the purpose of the craft, its shape and size. Need a drawer for socks or panties to fit into your closet? Prepare thick cardboard, PVA glue, scissors and a ruler. Want to know how to wrap a gift beautifully? You will also need special paper, fabric, beads and other decor.
Made from paper with lid
The diagram of a cardboard box is easy to make, but you can “practice” on colored paper:
- Cut out two identical squares.
- Fold square No. 1 in half diagonally, “wrong side” inward. The fold line is smooth and clear. Unbend.
- Connect the other corners. The result was a square with two lines intersecting in the middle.
- Bend each corner towards the center of the workpiece - here you have a square envelope. Expand. We have already created a rhombus consisting of four identical parts, on each side of which there are two small triangles.
- On one of the sides of the quadrilateral, mark point A (exactly in the middle, at the junction of two small squares) and point B - the vertex of the original figure.
- Connect these points by bending and unbending the paper - again there is a clear line at the fold. Repeat the manipulation three times.
- Turn the sheet over to the front side and bend each corner of the original shape slightly (it should touch the nearest fold). Cut the paper on opposite sides along the dotted lines (two divisions towards the center).
- From two opposite sides, bend the edges of the part inward and glue them.
- Bend the cut corners to form side walls. Wrap the remaining parts of the structure, forming a shape into the lid of the box.
- Cut square No. 2 on each side by 3 mm, then proceed according to the template.
From cardboard
If you are going to make boxes for gifts, then in addition to cardboard, take beautiful paper or fabric. The manufacturing process is simple:
- Draw a rectangle the right size- this is the bottom.
- On each side of it, build two perpendicular lines (sides), the height of which determines the depth of the box.
- Draw 2 cm protrusions on two opposite edges, with which you will glue the figure. Trim the edges of the tabs at a 45° angle.
- Cut out the resulting shape.
- Fold it along all the lines and glue it together. The box is ready!
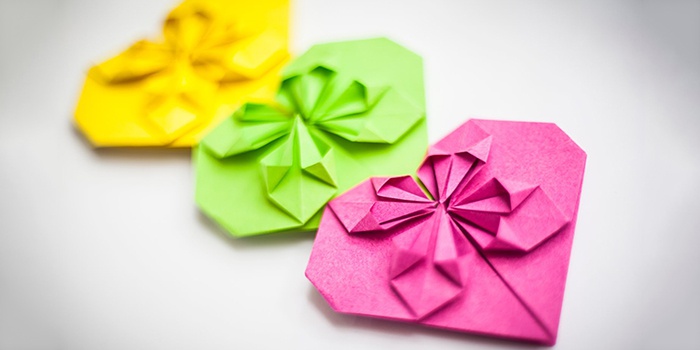
Origami “Heart”
No better supplement jewelry or jewelry as a gift than a homemade decorative box. To create a heart box using the origami technique, you will need two sheets of paper and these instructions:
- Fold a rectangular sheet with sides 25 and 12.5 cm in half. And each side is also in half.
- Align the middle first with one fold line, then with the other. It turned out paper accordion.
- Unbend the sheet, then fold it in half again, but this time lengthwise, with the sides towards the middle. After turning around, a “chessboard” emerged, which, however, had rectangles at the top and bottom instead of cubes.
- Fold in half along the second line.
- Turn it over. Along the fold you get the intended four squares. Bend the extreme ones, left and right, diagonally.
- Unfold and repeat the folding steps on the other side (step 5).
- Fold the lower right square diagonally, one side of which is in the middle of the piece. The same goes for the square on the left.
- Expand. Fold the sides towards the middle along the already marked lines.
- From the center, bend one part of the figure along the two marked diagonals.
- Fold the corner along the marked line, then bend the upper part and the lower triangle to the middle line. Make a fold along a vertical line.
- Also fold the other side - from the center diagonally. The result was a figure similar to a house, with a triangular “roof” and a square “building”.
- Fold the vertical lines that continue the square to the side. Flatten the pocket. Bend a small square diagonally and fold in a corner.
- Bend the bottom side to the middle, turn part of the part over, then the top side to the middle. Tuck the upper part into the lower part. Repeat all steps on the other side.
For money
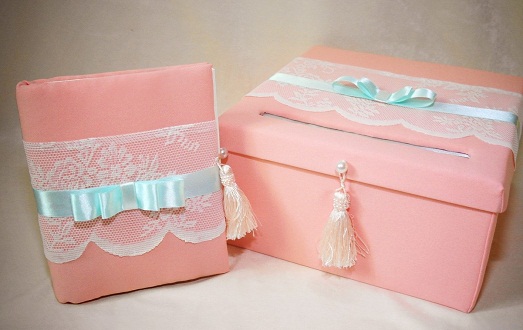
If you want to triple the joy of a gift, instead of an envelope, put the bills in a special cardboard box that will contain another gift. Fill in inner part: make an appropriate inscription and a money holder, paste in a photo of the birthday person. Attach a small card pocket to the inside of the lid. Decorate the outside of the bonbonniere with paper, fabric or beads. The result was a box with a surprise.
Cake
When creating a chocolate cake gift wrapping box you will need:
- cardboard for children's creativity, photo paper, poster or whatman paper;
- brown paper or fabric is “chocolate” for “filling” the cake;
- glue;
- simple pencil;
- ruler;
- scissors;
- compass.

Start cooking:
- Cut out a circle of suitable size from cardboard.
- Draw a rectangle, the length of which is calculated using the formula known from algebra lessons: circumference = 2*Pi*radius, do not forget to add 1 cm for allowances on the side (to connect this part into a circle) and on top. Their height is arbitrary. Cut out the shape.
- Attach a ruler to the fold line and, applying pressure, draw scissors along it to create a deep groove.
- Using scissors, cut teeth along the entire length of the rectangle from the edge of the strip to the furrow.
- Using glue, connect the rectangle into a ring, which you attach to the bottom of the box.
- Make a lid using a similar pattern (the radius is 2 mm larger).
- Start decorating the box with “chocolate” by covering it with brown paper.
- Make flowers and attach them to the outside of the box.
- After putting the gift in the package, tie it with a beautiful white ribbon and tie a bow at the top.
Small for a ring
Store box for wedding rings– it’s banal. How to make a unique gift box? With your own hands! The accessory will be in a single copy and will definitely suit wedding dresses, and after the holiday it will become a memorable place for storing family decorations. The special feature of this cardboard box is the ring holder, which is easy to make:
- Cut out the foam insert to the desired size.
- Make a cut halfway up.
- In turn, tuck two pieces of satin into the resulting slot.
- Make folds from the remaining free ends of the fabric and attach them in several places with glue. Trim off excess material.
- That's it, the podium for the ring is ready! Insert it into the box.
Gift box design
Video: how to make holiday boxes
Packaging and gifts made of paper, made independently, can become a good memory of a person or event, or an original decoration for an apartment. You don’t always get beautiful boxes the first time, and so that the desire to create does not disappear, watch the master classes below, where they will tell you how to make a gift box correctly. Interesting and fast process!
Paper without glue
Don't know where to hide love notes or where to store change? Make a box with a locking lid! To create it you need two square sheets of paper, for example, orange and yellow flowers, a little magic and no scissors! All the secrets of how to make an origami gift box will be revealed in this interesting video tutorial.
How to make a round box
Scraps of cardboard, fabric, a construction knife, PVA glue and even a nail file - everything will work in creativity. And if you add a little skill and desire to create the most beautiful thing in the world, then this will certainly work out! In this video tutorial, a cardboard specialist will tell you how to make a round gift box with a lid and give you the technology for covering it with fabric.
DIY box
A heart-shaped box made from cardboard and scrapbooking paper? And even with an opening lid? Nothing could be easier! You will find the steps for creating a wonderful gift for a wedding, Valentine's Day, or just a container for storing jewelry in this interesting master class. Watch the video and you will definitely want to surprise someone with a cute box.


