It is my deep conviction that our education, starting from Soviet times, is built on the following principle:
“If you didn’t complete the teacher’s task as a child, you will still do it when you help your child.”
So, dear mothers, since we met on this page, it means that your child was given the task to bring autumn crafts. Guessed?
I'm sure you'll breathe a sigh of relief now! I collected a bunch of ideas, and your craft from autumn leaves sure to make your teacher happy!
In order not to interfere with the whole experience of mankind in this matter, I tried to combine collages and applications that are similar in meaning.
Let's start!
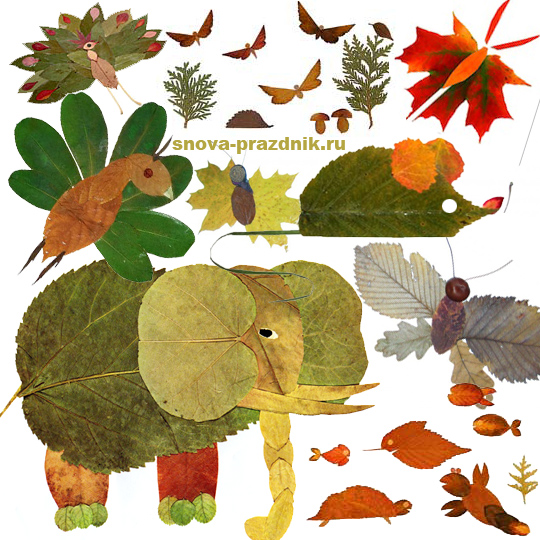
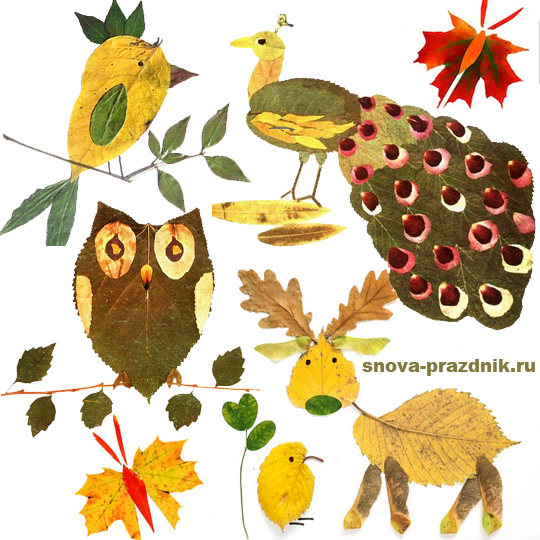
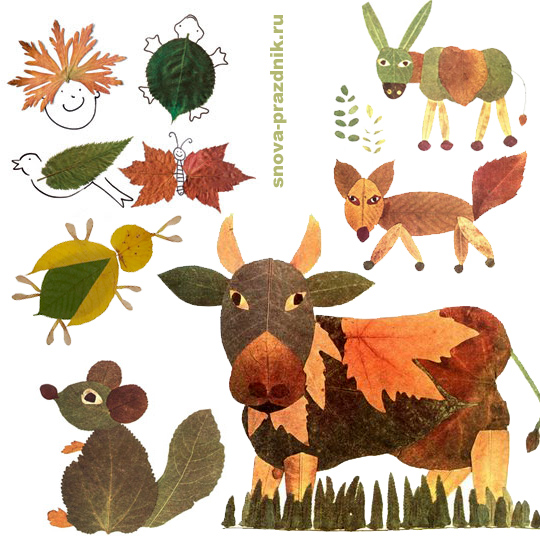
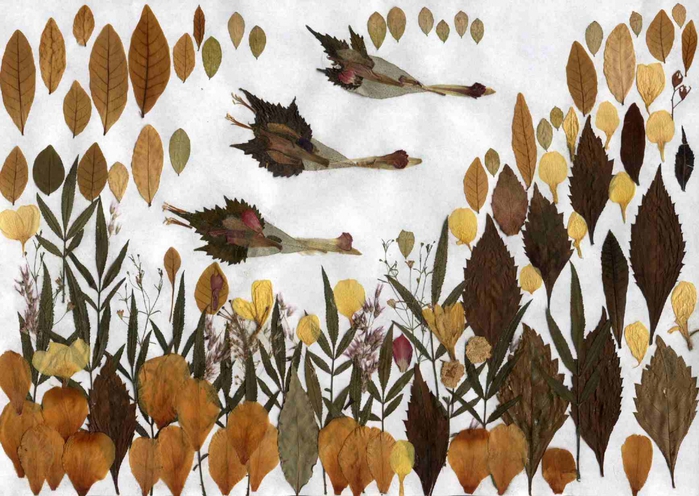
Birds-butterflies-animals
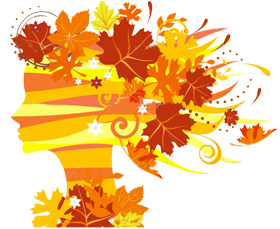
 This is the most common type of autumn creativity. Made from dried leaves different colors and shapes of cute animals (the female portrait on the left is the only image of a person that I found).
To have a choice, dry not only autumn, but also green leaves too, then the color palette will be much wider and you will definitely get something from this. By the way, dry rose petals look great on a peacock's tail, take note:
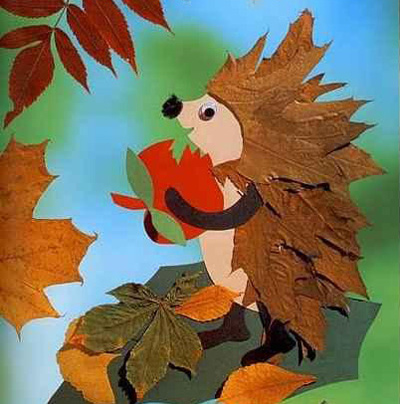
Impossible handsome ... Apple bit off. This collage is made using colored cardboard parts.
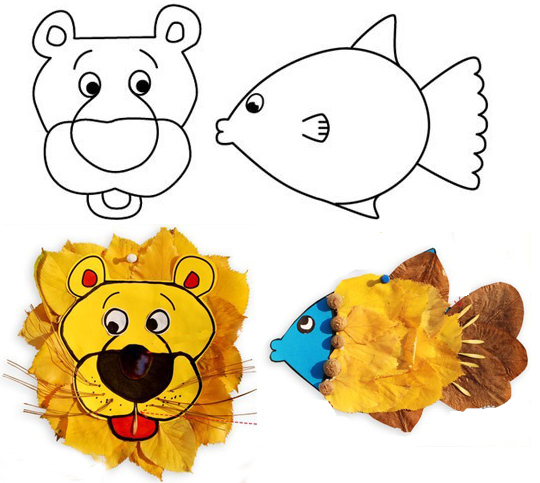
Here is another option for those who can draw these simple drawings. Draw the head of a lion and a fish large - on the entire landscape sheet. Cardboard is preferred. The rest is clear from the illustration!
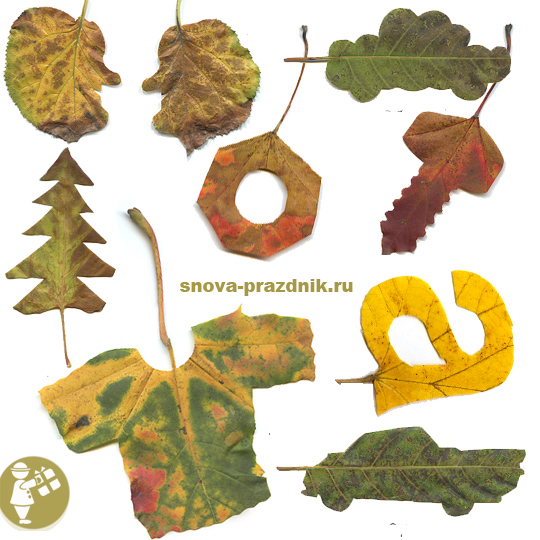
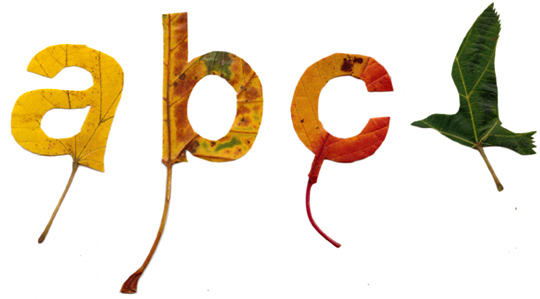
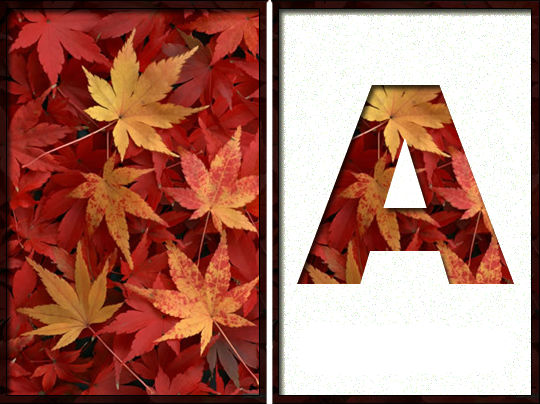
Cut out shapes from fallen leaves
I have singled out these collages separately, since autumn leaves are used a little differently - it's just a material for cutting out simple figures and letters. Need to do it BEFORE the leaf is dry, otherwise it will crumble . First we cut it out, then dry it in the usual way in an old book or between newspaper sheets. So you can cut out whole words and phrases.
In order for the letters to turn out neat, print them on a printer of the desired size.
Now we put carbon paper on the autumn sheet, on top - your printout. We circle so that the drawing remains on a yellow sheet. It remains to cut!
This way you can make not only letters of the alphabet, but also simple silhouettes (animals, houses, clouds).
colorful collages
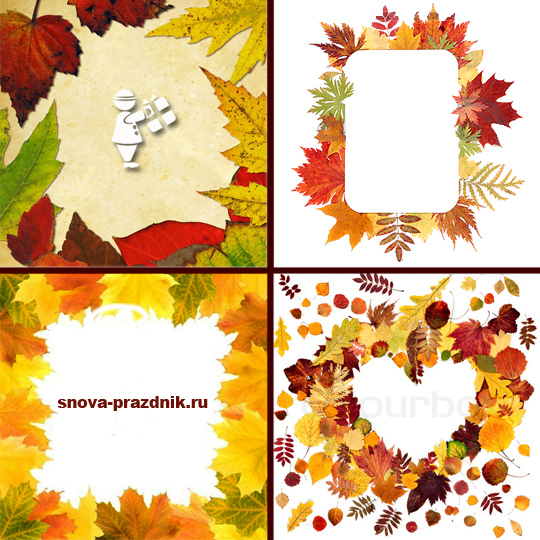
Autumn leaves are so beautiful on their own that they look great in frames and without any plot. Look how beautiful! The first layer is dark leaves, then put the contrasting and most beautiful ones, so the volume will be felt. Everything is framed.
I also liked the idea: we put a sheet of thick cardboard on a collage of leaves, in which a letter or a simple figure is cut out with a clerical knife.
Another unusual technique, which for some reason is called "iris folding"
, I found on the site “Country of Masters”. Detailed master class right here: http://stranamasterov.ru/node/99098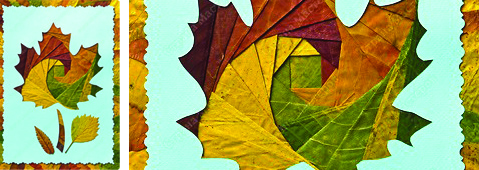
Here are two more wonderful works in muted colors. It's easier to repeat than to come up with your own! Use pieces of wallpaper or designer cardboard: 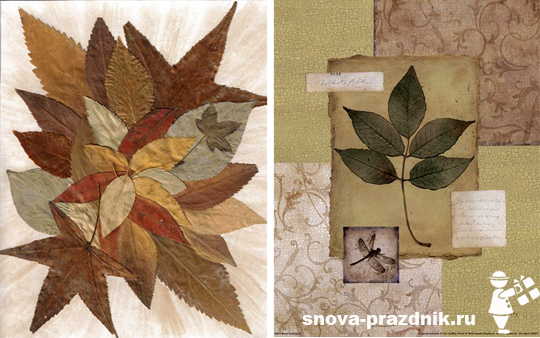
Interesting examples of paintings from autumn leaves:
It is these images that are collected on a computer monitor, but the idea is quite possible to take, it looks very nice ...

And from this picture you can take an idea. The female profile is simply drawn, but the leaves in her hair may be not paper, but real ! Is it difficult to find them in different sizes and shapes to make such a beauty?
Here are some cute owls. A silhouette is cut out of paper, then we glue the leaves, as shown in the figure, and at the end of the work we cut all the protruding excesses along the contour of the cardboard blank. We make eyes out of paper in a contrasting color.

Photo frame
For the autumn exhibition, you can make frames for photographs and for the design of essays and poems on the theme of autumn. Here are the options I found. I think it's very simple and effective.
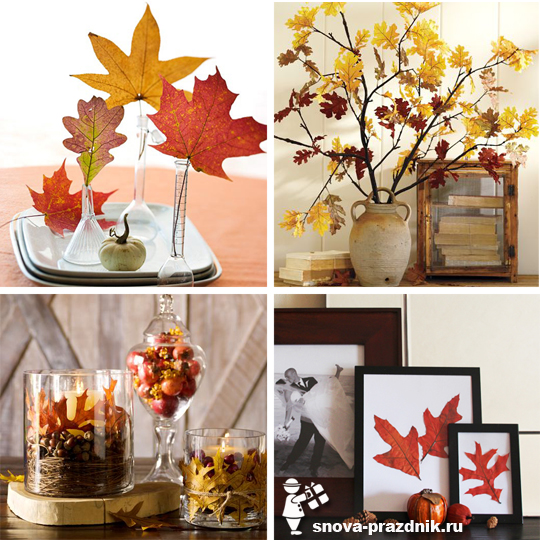
interior decoration
Autumn leaf crafts can be very romantic.
To get such a tree, you need to dry the leaves in advance, and only then reattach them to a beautiful branch with a transparent adhesive tape.
Working with a hammer...
Unusual technique. I saw on an American site, translation and. The point is that fallen leaves are placed between watercolor paper and a napkin, carefully tapped over the entire surface with a hammer so that the coloring pigment remains on the paper.

Leaf crafts are very popular with kids who love to do something special that they haven't done before.
However, if the baby has already grown up, and he has already managed to get acquainted with leaf crafts in past years, the existing skills can be developed.
Needless to say, many adults make a variety of interior decorations from this simple natural material.
Such original crafts easily original, to please children or take to an exhibition in kindergarten.
leaf painting
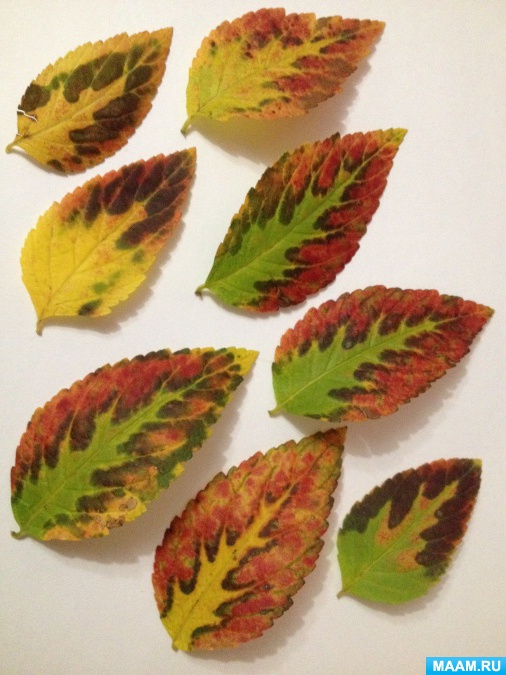
To make a big picture from the leaves, it is enough to collect a variety of leaves, dry them and develop patterns.
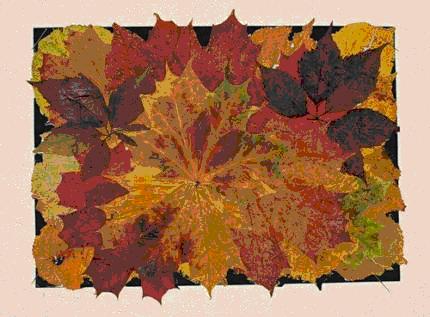
What leaves are suitable? Any.
You can choose a variety of colors, as well as color assorted. For example, a yellow maple leaf with a green speck.

Consider how to make a lion and a fish. For this, the following materials will be useful in some way:
- a sheet of cardboard of the size corresponding to the idea (however, the format cannot be overdone, otherwise the leaf framing, which we will use in the natural size of the leaves for the craft, will look small);
- a lot of yellow linden leaves for crafts (it is advisable to collect them separately so that all the leaves roughly match in color and size);
- bright colored paper, where there must be red, yellow and black colors (can be replaced with paints, but it looks more natural with paper);
- a pencil to sketch a drawing on cardboard, therefore, an elastic band to correct possible shortcomings, a black marker to complete the outlines;
- twigs of leaves for crafts, which we use as a mustache for a lion;
- glue;
- one chestnut.
How to make a leaf painting
Do-it-yourself leaf crafts will be performed in the following sequence:
- first, we glue yellow paper on a sheet of cardboard, but you can simply decorate it with yellow paints;
- draw a pattern for the main part of the lion, which will display its outline of the head;
- then we draw all the other elements - eyes, nose, eyebrows, ears;
- when the picture of the leaves is ready, cut it out;
- after we cut out the craft from the leaves, we draw a line in black with a marker, retreating from the outline of about 3 mm. It is advisable to try to maintain the same thickness. We cut out the corresponding details - the nose, tongue and all elements of the muzzle, glue it to the surface;
- the nose can be made according to the size of the chestnut by gluing it on top;
- then we glue the antennae, but you can pre-make holes in the cardboard with a needle, where the twigs will be inserted. Before this, do not forget to put a dot with a marker at the puncture sites. It is also important not only to insert the mustache, but also to fix them with glue;
- now we take linden leaves for ours, which were previously dried (you can postpone this process by gluing “fresh” leaves, but they may not hold well).
In a similar way, you can make a fish, and these crafts are used by fixing it with a needle to the wall. Excellent hold on the wallpaper, and no traces remain after removal.
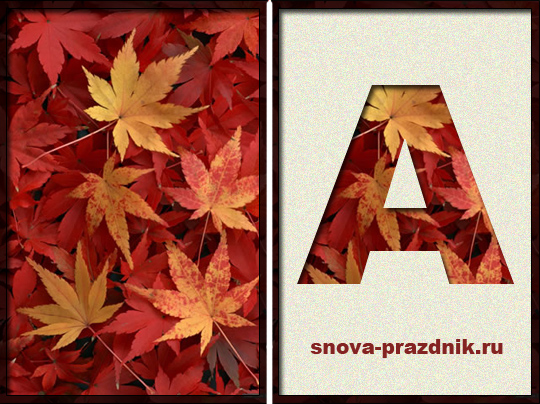
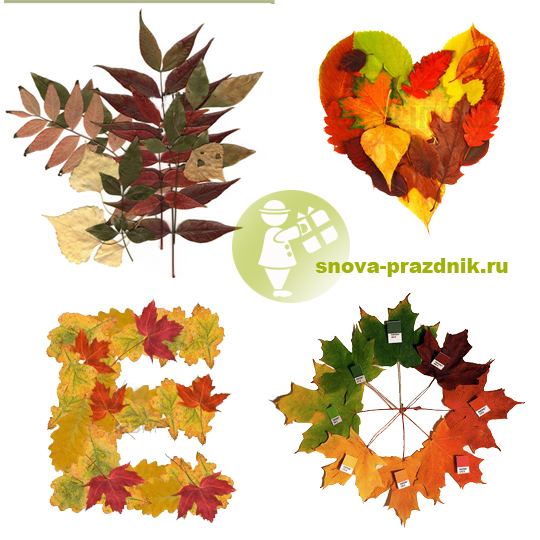
Crafts from the leaves of the letter
Many have a birthday in the fall. You can make a small gift - and crafts from autumn leaves in the form of letters.
You will need a variety of leaves, it is desirable that they combine several colors - this will give originality to the leaf craft.
Such beauty can be great.

Such leaves must be cut out while still fresh, and also strung on a thread.
If you wait for drying, it will be difficult to get high-quality cut material - there will be a lot of marriage, respectively, it will also take a lot of time.

Craft-candle from autumn leaves

Crafts from leaves can be made quite original.
Take a jar with smooth walls and a beautiful lid.

Put in it leaves of different sizes and shapes, and most importantly, different colors.
Glue the leaves inside to the surface of the jar and cover with varnish (nail polish that does not have color will do).

The inner walls of the jar can be smeared with glue and lightly sprinkled with salt - this will give the product an unusual charm. And, of course, a hot small candle will not spoil the view, but only decorate it.
These can also be placed on the street in the evening - neighbors and guests will be surprised.
Galina Shinayeva
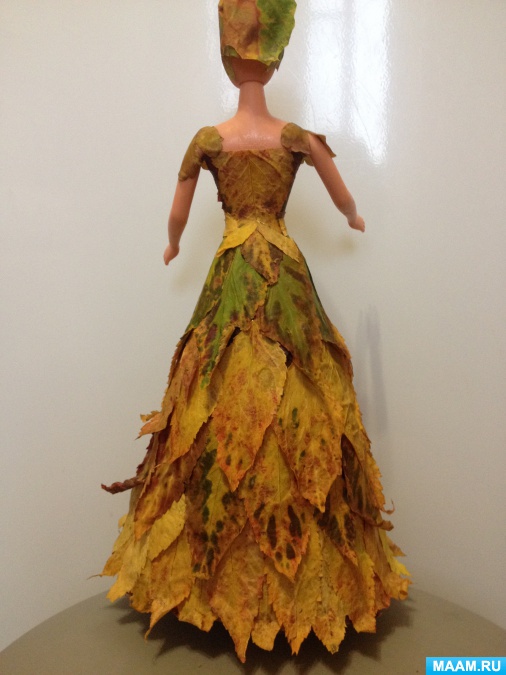
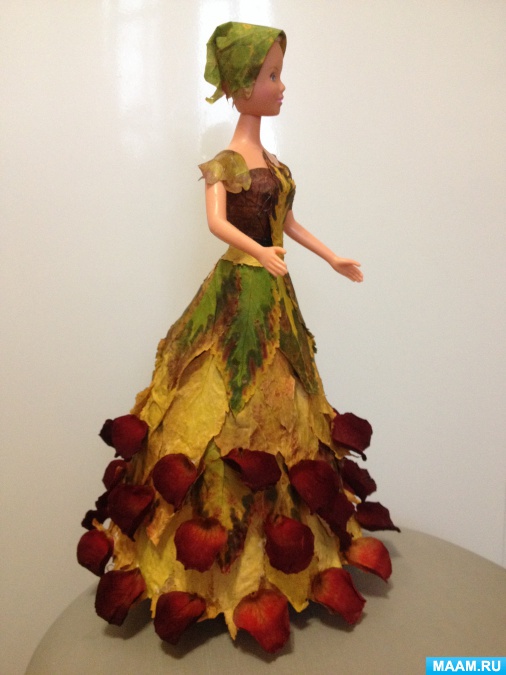
Autumn is in full swing. Autumn exhibitions held in kindergartens creative works children and adults. At the beginning of autumn, crafts made from vegetables and fruits are exhibited, but, unfortunately, they are not durable and they are replaced by crafts made from leaves, cones, and other natural materials. I bring to your attention a master class on making a dress for a Barbie doll from spiria leaves (shrub). In autumn, spiria leaves take on a wonderful color.
For the dress you will need:
1) Leaves. (I have spiria leaves).
2) Cardboard.
3) PVA glue.
4) Rose flower petals, for decoration.

Let's get started.
1) We dry the leaves of spiria with an iron, through paper.

If the leaves are not dried, they lose color very quickly in the craft.
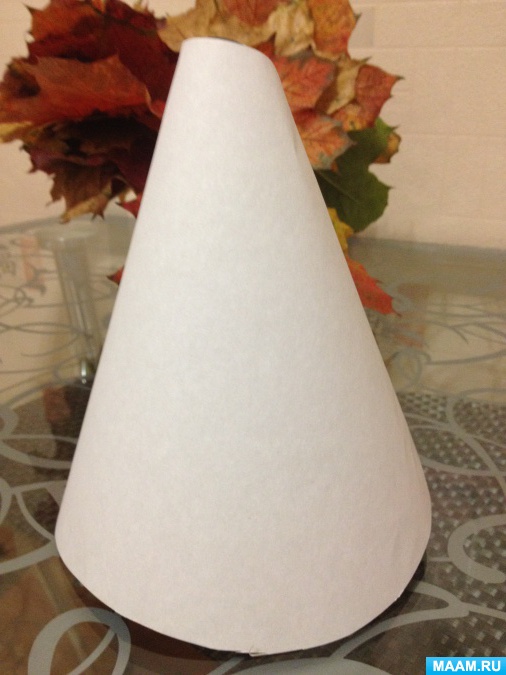
2) We make a cone out of cardboard - this is a skirt, the lower part of the dress.
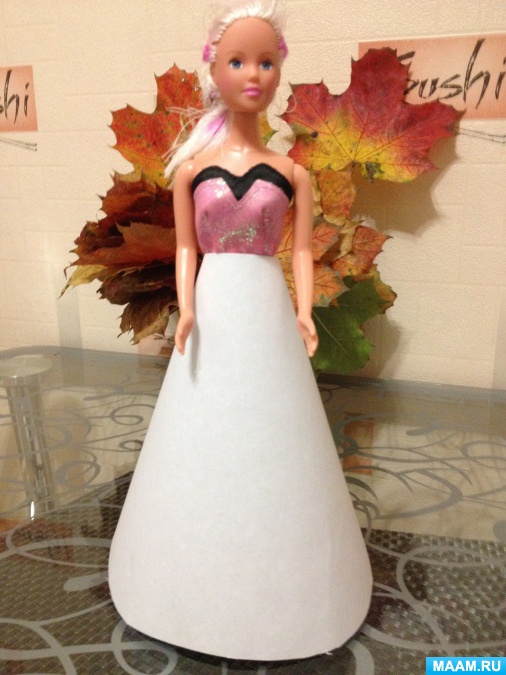
3) We cut the cone and fix it on the doll.
4) Dilute PVA glue with water 1 x 1.
5) We glue dry leaves, smeared on both sides with diluted PVA glue, on the cone, starting from the bottom. PVA glue makes the leaves elastic and retains color.

The pattern on the leaves is varied - you can think of a pattern for a dress.
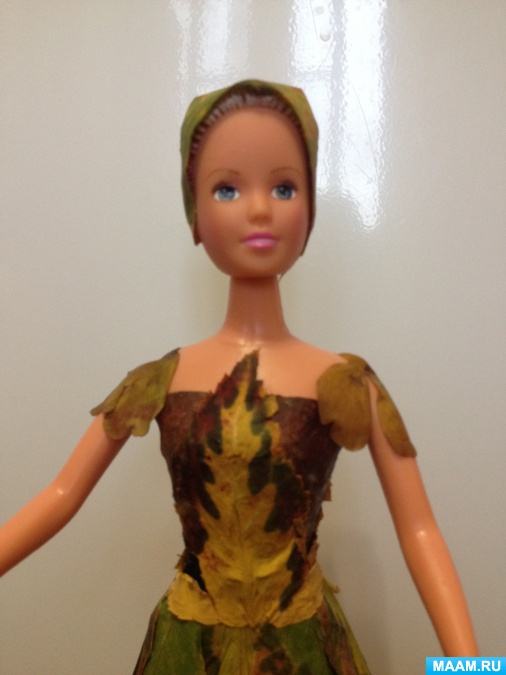
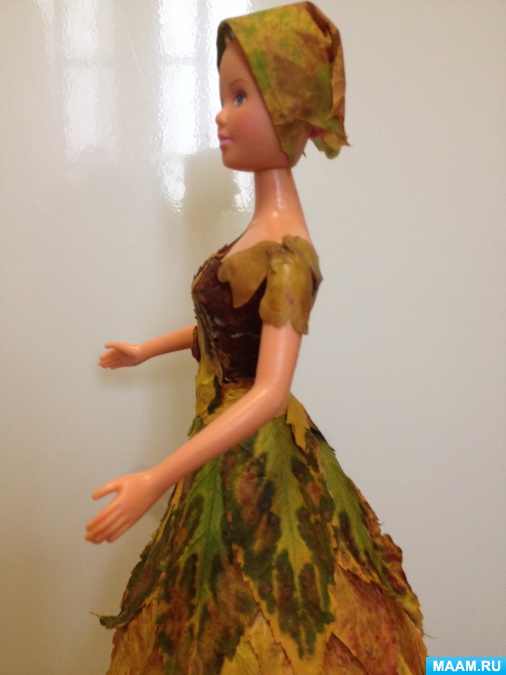
6) Headdress.
For some reason I wanted to make a scarf. The scarf is made of maple leaf.
7) Decorate the dress with rose petals. Rose petals are dried in the inflorescence.


Related publications:
Our kindergarten passed theme week called "Autumn Golden". The purpose of the week: the formation of ideas about seasonal changes.
During the walk, we collected with the guys the brightest autumn leaves for the herbarium and work with natural material. material to perform.
Today I want to bring to your attention a master class from autumn leaves "Outfit for Masha" Early autumn is a beautiful time - a time when.
Autumn is such a season. when you want to be creative. Someone composes poetry, someone writes music, artists paint pictures. I collect in the fall.
The golden time has come! Outside, everything turned golden-purple. My children and I also decided to decorate our reception room with beautiful leaf fall. Now.
Master class crafts from autumn leaves "Cheerful caterpillar" Dear colleagues! I present to your attention a master class on manufacturing.
These dolls have been around for many years. The mother of one of the pupils gave them to the children. It's been many years, of course. beautiful dresses fell into disrepair and
Do-it-yourself autumn doll
DIY quilling dress for a doll. Master Class with step by step photos.
Master class "Beauty Autumn"
Chernikova Dina Nikolaevna - teacher of MBDOU kindergarten No. 1, village of Staroe Melkovo, Tver region, Konakovo district.Material Description: This material is intended for older children. preschool age, teachers and parents.
Purpose: making gifts, participating in a competition, decorating the interior of a room.
Purpose: to create a dress for a doll using the quilling technique.
Tasks:
- to consolidate the skill of winding a strip of paper into a roll;
-develop Creative skills children, attention, imagination and fantasy;
- develop fine motor skills hands, eye;
- cultivate perseverance, accuracy, interest in working with paper.
People often talk about autumn: Golden autumn. Why, it is not difficult to guess: the leaves on the trees from green are repainted in a variety of shades of gold and golden. Yellow ocher, red copper, greenish brass, brown bronze, pale yellow and orange-yellow gold - these colors are primarily reminiscent of autumn. You look at the forest, which is all painted in such shades, and you involuntarily think: yes, golden autumn. This is indeed a very beautiful time, perhaps the most beautiful of the year. In any case, many artists especially like to write precisely autumn scenery. This theme gives them the richest selection of colors.
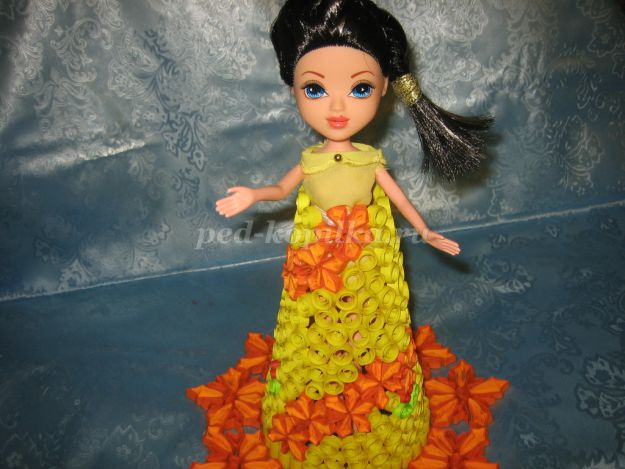
So the Autumn doll in an orange-yellow sundress appeared in my head. And I decided to make this dream come true.
Autumn turned out beautiful girl,
She came out to people sweet and playful.
Bring a palette and colored paints,
Painted solar fairy tales with a brush.
Suddenly a playful wind came,
Joked a little with autumn playful.
Beauty has fallen from the trees.
And covered the earth with leaves. (Borovik N.)
To do the job, we need:
doll; colored double-sided (yellow, orange, green) and white paper; cardboard; file; clove buttons; duct tape; gum; food film; form (lid) for making an umbrella; fishing line; beads; yellow matter; narrow tape; rulers (simple and with circles); scissors; PVA glue; simple pencil; toothpick for twisting paper.

Work order:
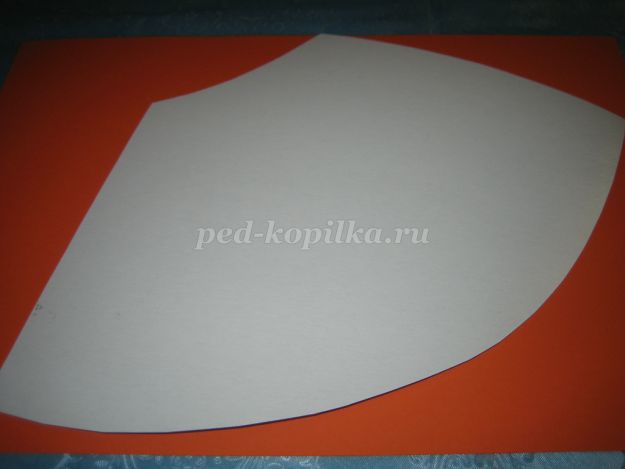
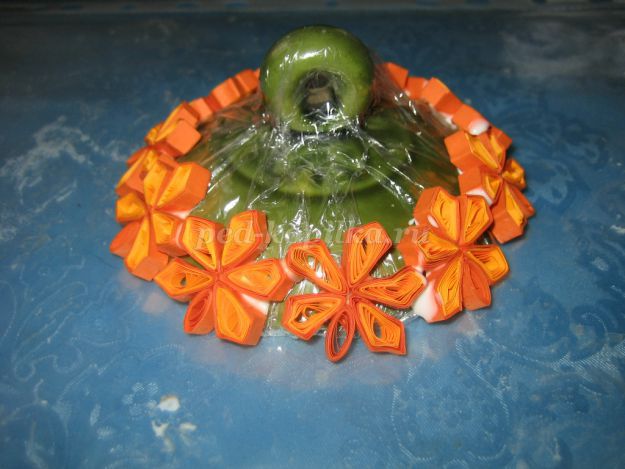
1. Cut out a template for the bottom of the dress from cardboard.
2. Twist the template and secure with adhesive tape, cover the cone with cling film so that later the parts do not stick to the paper.
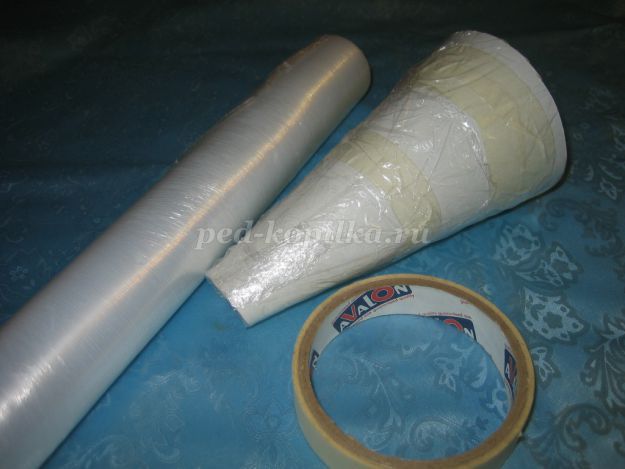
3. Insert the doll into the "skirt".

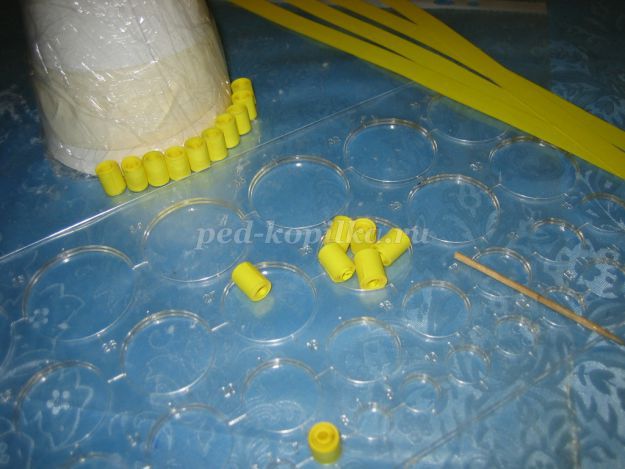
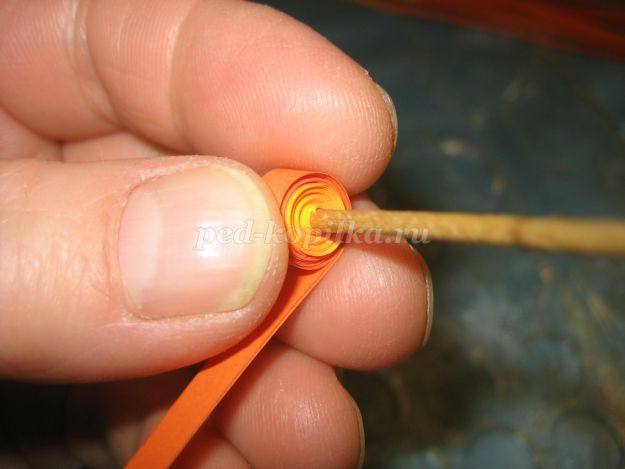
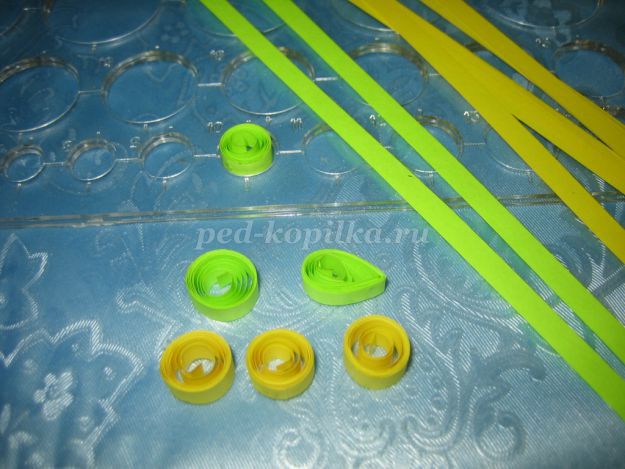
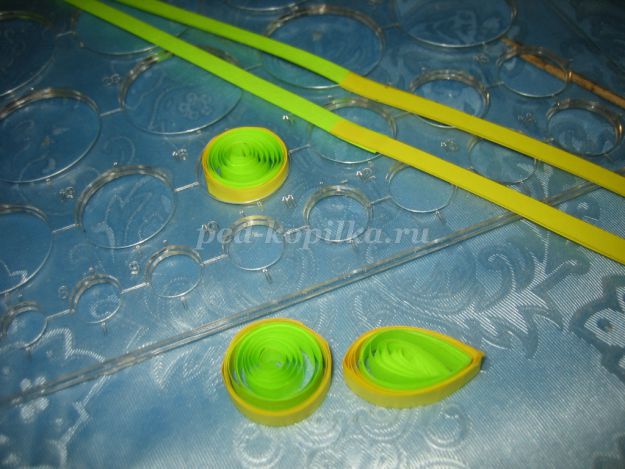
4. From yellow paper, cut into strips 10 mm wide, 30 cm long. Insert the tip of the strip into the slot of the toothpick and start winding, making rotations. The rolls of paper should fit snugly together. Having reached the end, put the ruler in a circle, remove it from the toothpick, let the spiral unfold. Each subsequent roll (spiral) will be the same size.

5. Make rolls with a diameter of 7mm. They will need 32 pcs.
6. Lay out and glue the rolls with PVA glue for the bottom row of the dress.

7. For maple leaves, cut brown and orange strips 30 cm long, 5 mm wide. Glue them together one by one. The length of each strip will be 60 cm. We twist them with a toothpick.
8. From rolls with a diameter of 12mm and 18mm we make parts that look like arrows. The smaller arrow is the stem of the leaf.

9. From strips (length 30cm, width 5mm) Brown, we make rolls with a diameter of 12 mm. They will also make arrows, but smaller in size. Make the middle of the leaf from the same strip, but the diameter of the roll is 7mm.

10. The details of the maple leaf turned out. We glue the parts with PVA glue.
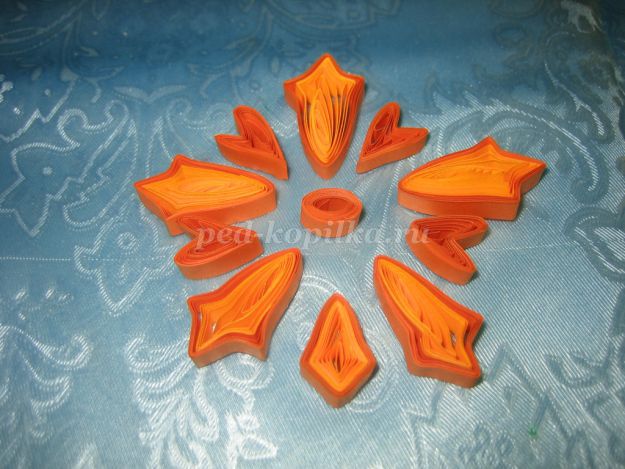
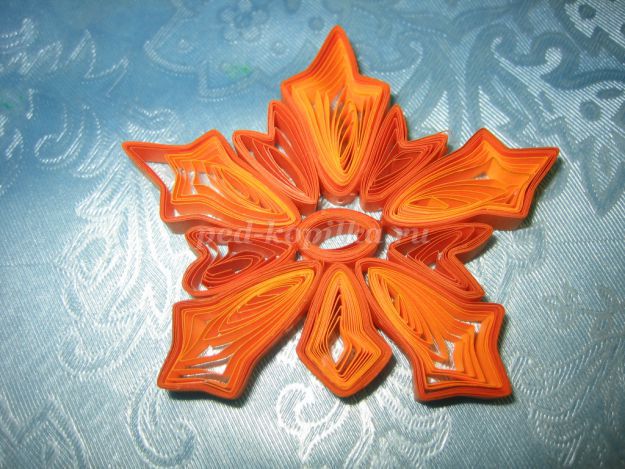
11. You will need 9 such leaves.
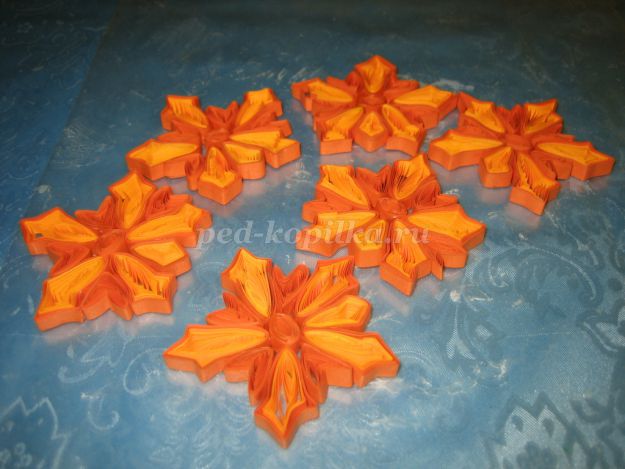
12. Glue them along the edge of the hem of the dress.

13. For the dress itself, maple leaves will be needed, but smaller. We will make them from two strips of brown and orange (length 15 cm, width 5 mm, roll diameter 10 mm). For the leg of the leaf, take a strip of brown color (length 15 cm, width 5 mm, roll diameter 7 mm).
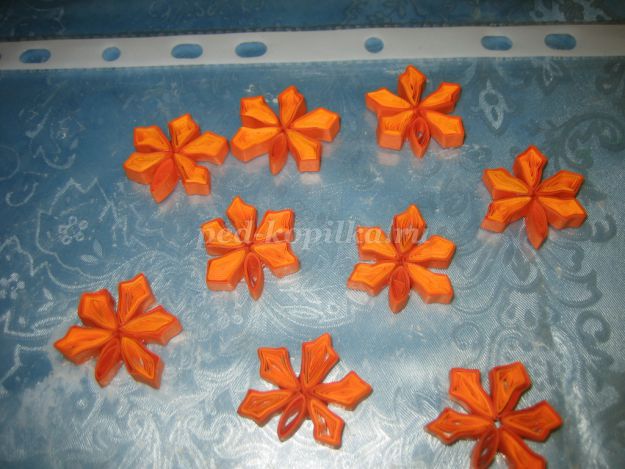
14. With the help of carnation buttons, we pin these maple leaves for the dress pattern.
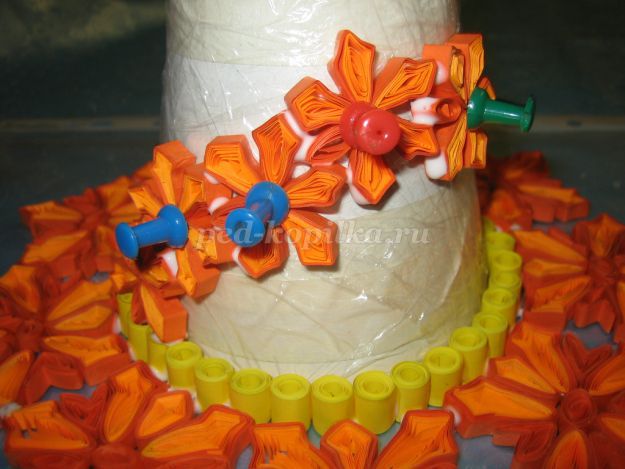
15. From the stripes of yellow and Green colour(length 30cm, width 5mm, roll diameter 10mm) make circles and leaves.
16. Carefully gluing the finished parts, close the space on the dress.

17. We use elastic bands to fasten the parts together.
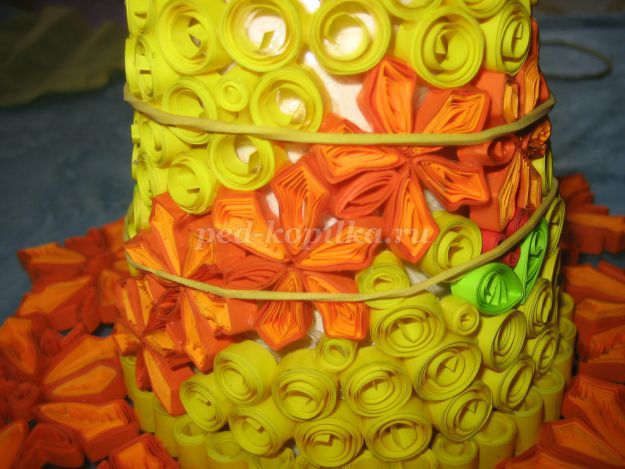
18. The bottom of the dress is ready.
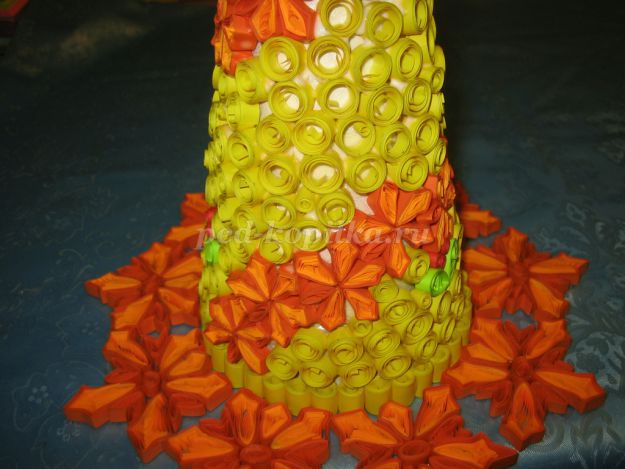
19. Remove the cone.

20. Let's make a lower dress for the doll from yellow fabric, decorate with a bead.

21. Insert the doll into a paper dress, fix everything with glue.
22. Let's pick up the shape for the umbrella. I took the lid from the sugar bowl and wrapped it in cling film.

23. From the same maple leaves glue the edge of the lid on a smaller size.

24. Glue yellow strips (length 30s m, width 5 mm) and green (length 30 cm, width 5 mm). It will turn out a strip 60 cm long, twist a roll with a diameter of 18 mm. Give the shape of a leaf.
25. Glue them together by making the second row of the umbrella.


