You always want to give your family and loved ones a special gift for their birthday, and what could be more pleasant than receiving DIY birthday gift, into which the donor invested a piece of his soul. Let's look at several options that are suitable for gifting to relatives, colleagues or friends.
DIY birthday gift master class
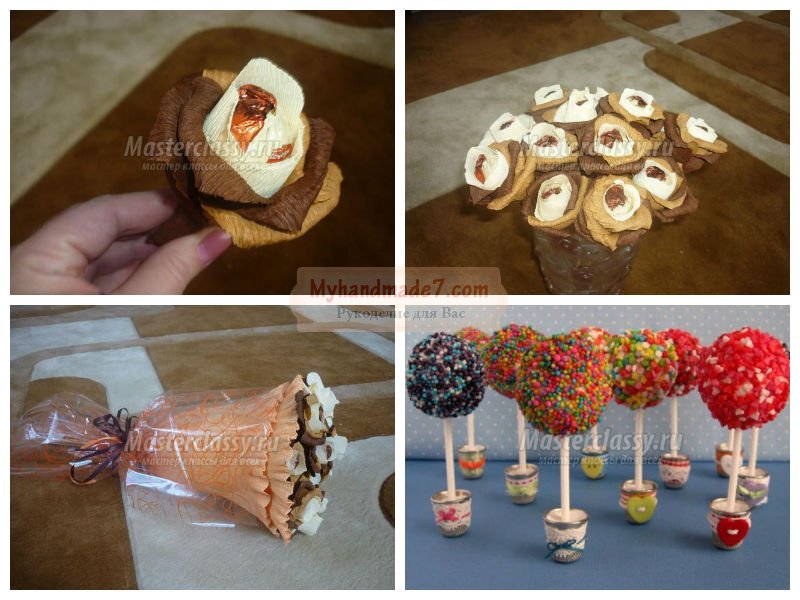
First, let's learn how to arrange a sweet bouquet from corrugated paper, this is the most versatile option; it can be given as a birthday present to a colleague, school teacher or beloved friend. It’s not at all difficult to make, but it looks very attractive, and who doesn’t like sweets.
For work we will need the following: chocolates, preferably round ones or truffles, they are easier to shape correct form buds, bamboo sticks, coffee beige, cream colored corrugation, film for wrapping bouquets or corrugation suitable color, tapes, thin tape, office glue.
If you want to make the bouquet brighter, you can take paper of any matching colors. To make a flower, you need to prepare the petals; to do this, cut out identical rectangles measuring 5.5 cm by 7.5 cm in all colors. We round the upper edges; this is easier to do with a pencil or other cylindrical object. We stretch the middle of each petal a little so that it becomes convex. Candies need to be secured on bamboo sticks. Now you can start assembling the flower: wrap the candy with the prepared petals, go from light to dark, or you can vary the position of the petals from flower to flower. We fix the bud with tape, decorate the improvised stems with a thin strip of corrugation, grease the end of the strip with glue, and begin wrapping each skewer from the bud down. All that remains is to decorate the bouquet with packaging film or corrugation, and tie the finished bouquet with ribbons. As you can see, there is nothing complicated, and the result will really please the birthday girl. If you want to congratulate your grandmother, invite your child to do greeting card, ideas on how to arrange it here.
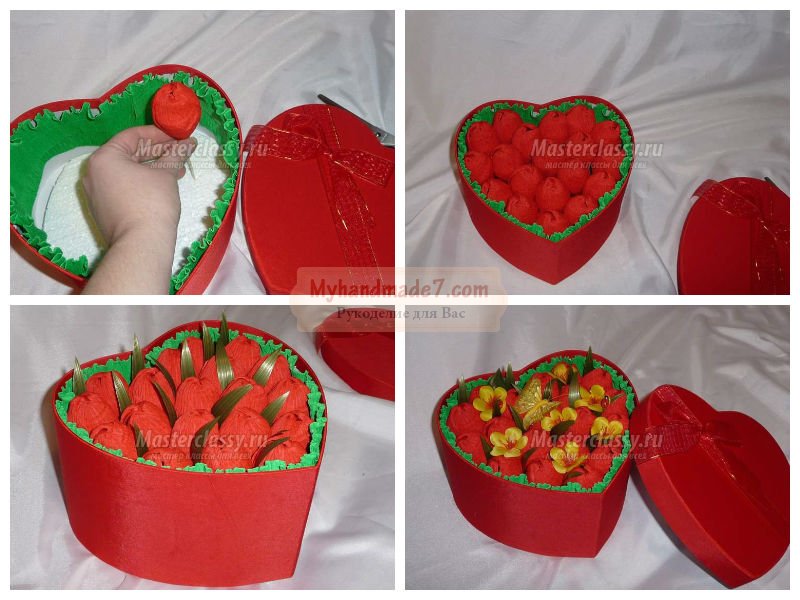
Now let's see how to design. We will need almost the same materials as in the first version; we will make a gift heart with sweet tulips. It is important to choose a beautiful box with a lid for the craft; it does not necessarily have to be in the shape of a heart; you can take a round one or any other shape. We cut out the foam to the shape of the box, put it inside, and we will insert skewers with tulips into it.
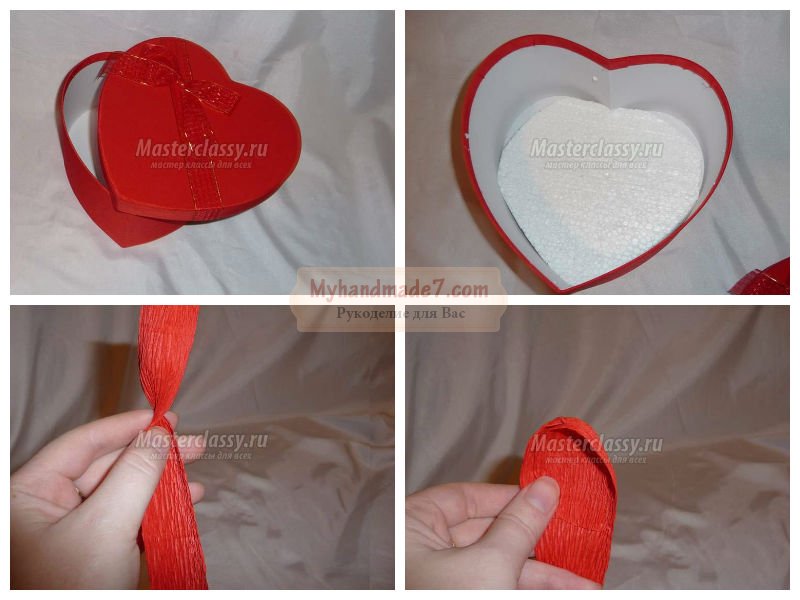
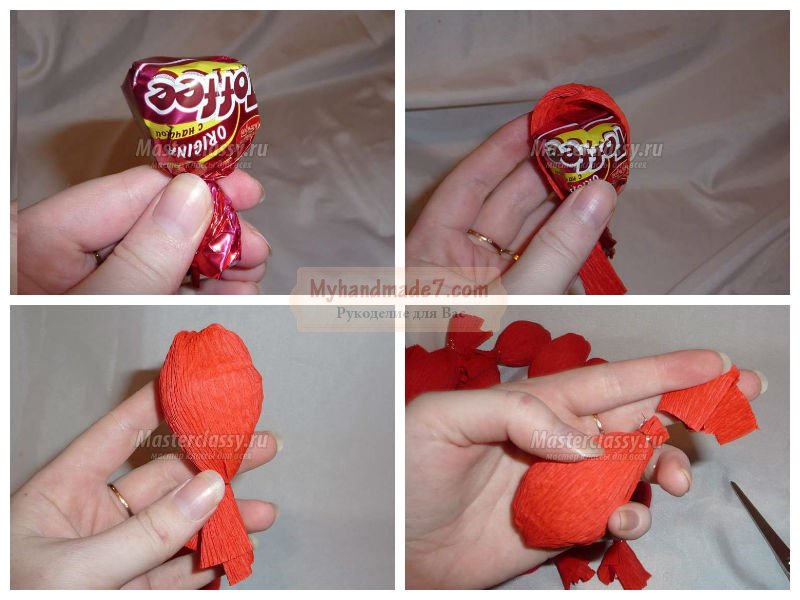
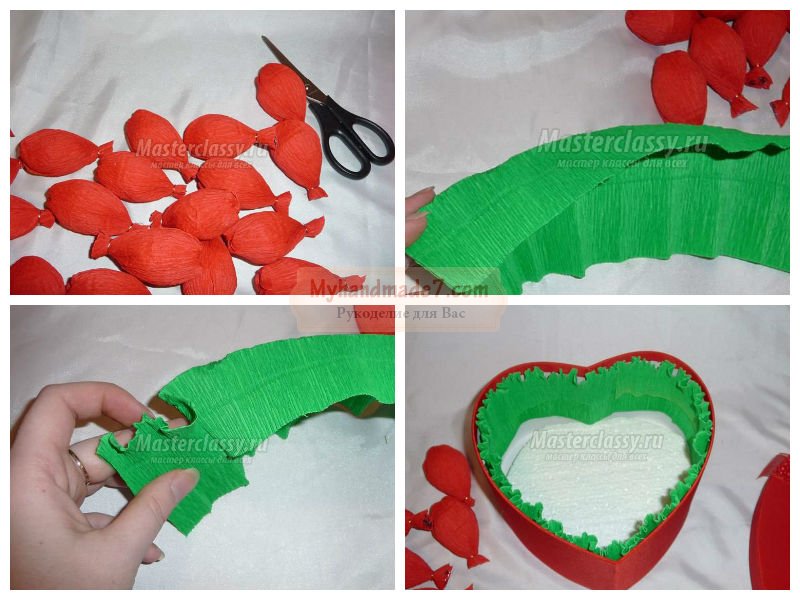
To assemble one tulip you need to make 3 petals; to do this, cut out three identical strips measuring three cm by 14 cm from scarlet corrugation. Twist each strip in the middle and bend it in half. We slightly extend the middle of the future petal so that it becomes convex. We will use candies as the basis for the bud; it is better to take large ones. We place the petals around the candy to secure it using wire or thin tape. To make the flower look neat, trim off unnecessary edges. How many tulips you need to prepare depends on the size of your box; they should be located close to each other.
Before filling the heart, you need to decorate the sides; to do this, cut a strip of contrasting corrugated paper so that it is enough to wrap the entire perimeter of the box. Fold the strip lengthwise so that its width is equal to the width of the side of the box. The fold will serve as the top edge; to make it look nicer, you need to slightly stretch the paper along the fold. Using a glue gun, fix the paper to the inside of the box. Agree, the box looks much more elegant this way.
We place each tulip on a skewer or toothpick and then stick it into the foam. Try to place the flowers as close to each other as possible so that the foam does not show through. We decorate the composition with leaves either from artificial flowers, or you can cut them out of paper. You can complete the decor by gluing a butterfly or dragonfly to one of the tulips. Co. inside lids, you can glue a card with congratulations for the hero of the occasion. The finished heart looks very cute and touching; you can give it to your beloved mother or vice versa to your daughter. If the idea of sweets doesn’t suit you, you can decorate a beautiful money tree as a gift, see how to do this in our master class.
Now let's make it sweet DIY birthday gift for a child, the bouquet will not be so interesting for a little sweet tooth. Therefore, we will make a topiary from candies. I just want to point out right away that you shouldn’t leave your child unattended so that he doesn’t overeat too much sweets. These topiaries are perfect for decorating a sweet table at a birthday party.
To prepare topiary you need the following ingredients: lollipop or other lollipops, sugar mastic, colored sugar sprinkles, ribbons and a base in which we will fix the stick, these can be thimbles and shells from walnut, perhaps you can come up with your own version.
The first thing you need to do is fix the lollipop in the base; if you have a thimble, then fill it with plasticine and simply stick the stick into the plasticine. If you have nut shells, you will have to ask dad to drill a hole in them with a diameter approximately the thickness of a stick. Then we fill the shell with the same plasticine, turn it over and stick the candy into the drilled hole.
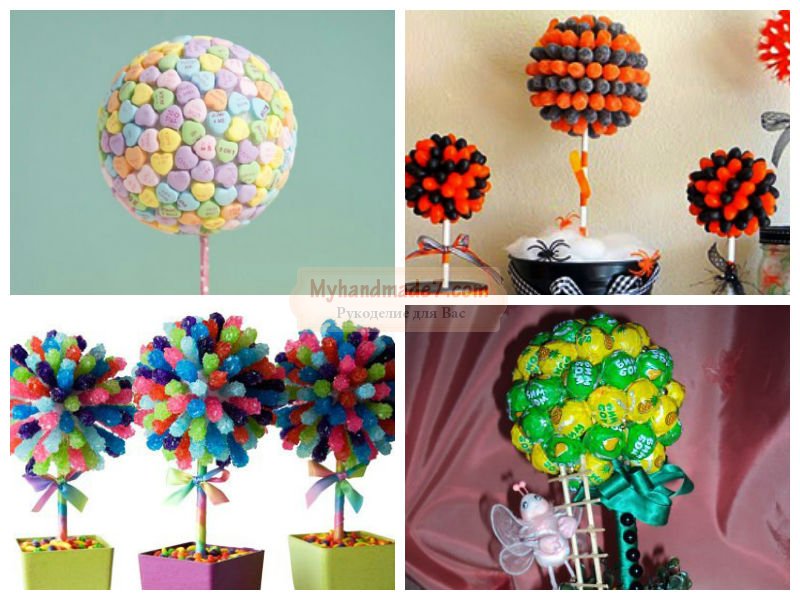
Now you can start decorating the topiary itself; you need to remove the wrapper from the candy. Roll out the mastic thinly, cut off a small piece, and wrap it completely around the entire candy. Pour the colored sugar sprinkles into a plate and carefully roll the resulting mastic ball in it, all that remains is to decorate the lollipop stick with a beautiful ribbon and the topiary is ready. Using the same principle, you can make not a ball, but sculpt funny little animals from mastic, this is also very simple to do, like this original crafts You will make the little birthday boy very happy.
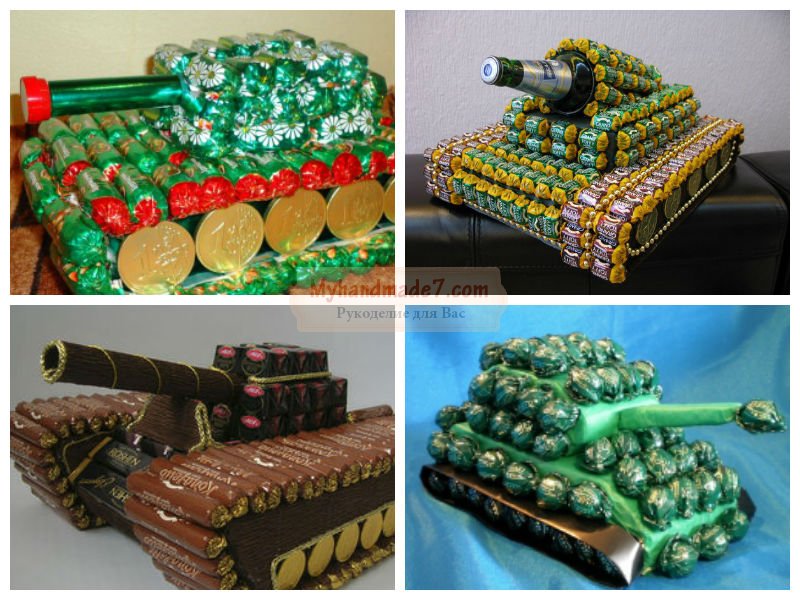
Agree that you also want to give a colleague or beloved man unusual DIY birthday gift. I'd like to introduce you to a few original options. It would be a lie to say that men don’t like sweets, but giving a cake is too banal, but if you design a gift based on the recipient’s hobbies, that’s a completely different matter. Among modern men The computer game “Tanks” is very popular, let’s surprise your man with a gift in the form of a tank. For work we will need: A couple of unnecessary boxes of different sizes, various wrapped candies, a bottle of alcohol (cognac, rum or whiskey, the choice is yours), scissors, double-sided tape, toothpicks or bamboo skewers, green or other suitable color wrapping paper.
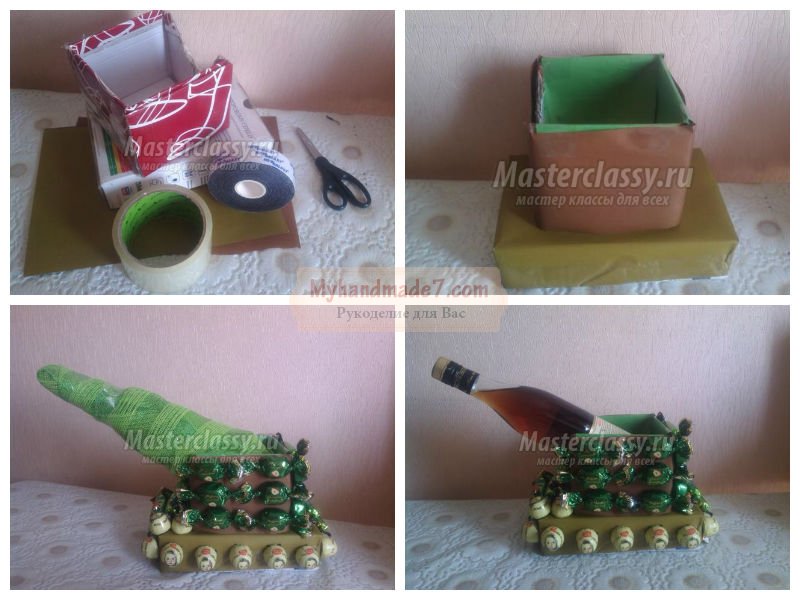
The boxes can be taken from under anything, the main thing is that in the end one is a little larger than the other. They are needed to make the basis of our tank - the tracks and the turret. I had a shoebox and a blood pressure monitor, so I cut the shoebox into two halves and inserted one into the other to make a square. On one side we need to cut a semicircular hole, where we will later insert the bottle - the barrel of our tank. Boxes need to be covered with paper on all sides. Now we glue the armor onto the tank using double-sided tape - candy. We wrap the bottle in decorative paper and place it on the tower; real or souvenir banknotes can be placed as a banner on the tank using skewers. I am sure that with such an unusual gift you will pleasantly surprise any man, even your boss.
If the birthday boy is interested in music or plays the guitar himself, we have another great option. Let's make an unusual guitar out of chocolate. In addition to chocolate (I used kinder), you will need thick cardboard and thick threads. Depending on the size of the cardboard you managed to get, you may need a different amount of chocolate, ideally it is better to make the guitar in its natural size. On a sheet of cardboard we draw the silhouette of the future guitar; we will need two such parts. The guitar should be three-dimensional, so we cut out a strip for the end from the remaining cardboard. You can make the entire guitar the same thickness, it’s much easier, but in general it’s correct to make the neck of the guitar thinner than the rest. If you do everything according to the rules, then one piece needs to be made longer in the neck area.
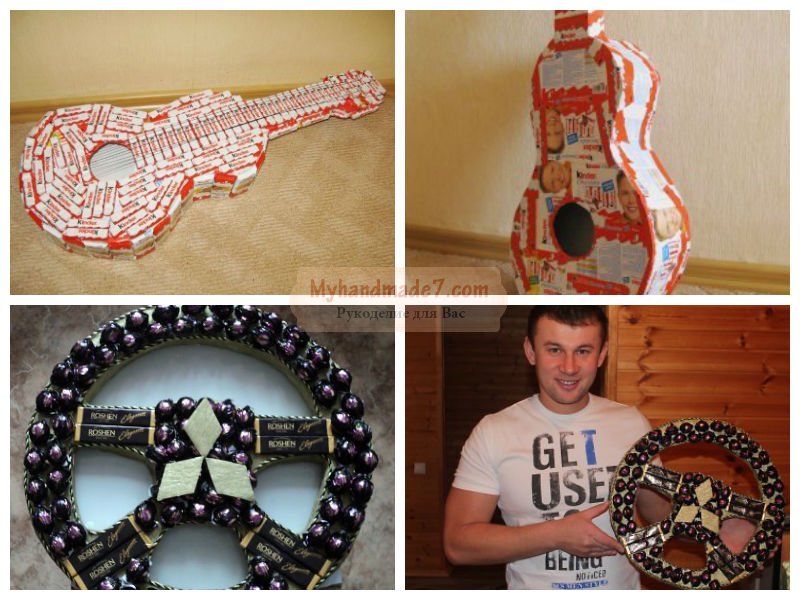
We glue the guitar box together with tape. Cover the entire surface with chocolate wrappers. The base is ready. Now we glue the chocolates themselves on top of the wrappers; it is not necessary to use a kinder, you can take any candies with a flat base. You need to pave it as tightly as possible, but even if there are gaps left, this is not critical, due to the fact that we previously covered the surface with wraps, they will be almost invisible. To make it look more like a real instrument, we stretch strings from thick threads. Having mastered this simple technique, you can make a model of any instrument and design it individually for your sweet tooth.
How to make a birthday gift with your own hands
Let's finish with sweets for today. Now let's look at how to arrange beautiful gift for a birthday with your own hands for parents of a newborn. I think that a bottle of champagne would be quite appropriate, and if it is decorated in accordance with the event, it will become an excellent souvenir. There are many ways to design, you can sew an outfit, or wrap it in beautiful paper, we use decoupage technique for decoration.
Before working, you need to remove the labels from the bottle; to do this, soak it in cold water for a while. Then remove the labels, the top one can be left, and the remaining adhesive can be easily removed with cotton wool and alcohol.
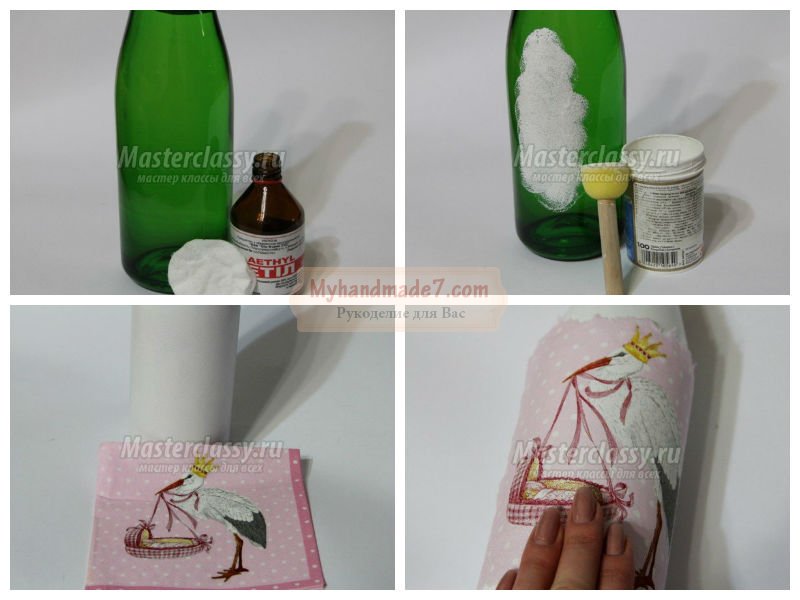
Now we tightly cover the entire glass surface of the bottle with white acrylic paint. It is convenient to work with a piece of sponge. When the paint is completely dry, apply one or two more layers so that the bottle does not show through. Choose a design that matches the occasion, I have a napkin with a stork, but you can choose any other, the main thing is that the design is suitable for congratulating a newborn. We don't need the whole napkin; cut out the necessary fragment. Next, we proceed directly to decoupage - there are several ways to glue a napkin to a surface. With the “dry method”, the place where the napkin will later be glued is coated with acrylic varnish, and left to dry a little, but not completely. Place a fragment of a napkin on top of the half-dried varnish and carefully, slowly smooth it out from the center to the edges. Apply another layer of varnish on top. So that the edges of the napkin are not visible, the remaining unsealed surface of the bottle needs to be decorated in a tone; for me it is pink, so I add a drop of red color to the white acrylic paint. Using a piece of sponge, apply paint over all surfaces, slightly extending to the edges of the napkin. When the paint dries, fix everything with a layer of varnish. If after the varnish has dried, wrinkles or roughness have formed on the bottle, they can be easily removed using fine sandpaper. I have white circles on my napkin, so to make the background the same, I use a white acrylic outline to draw droplets on the surface of the bottle.
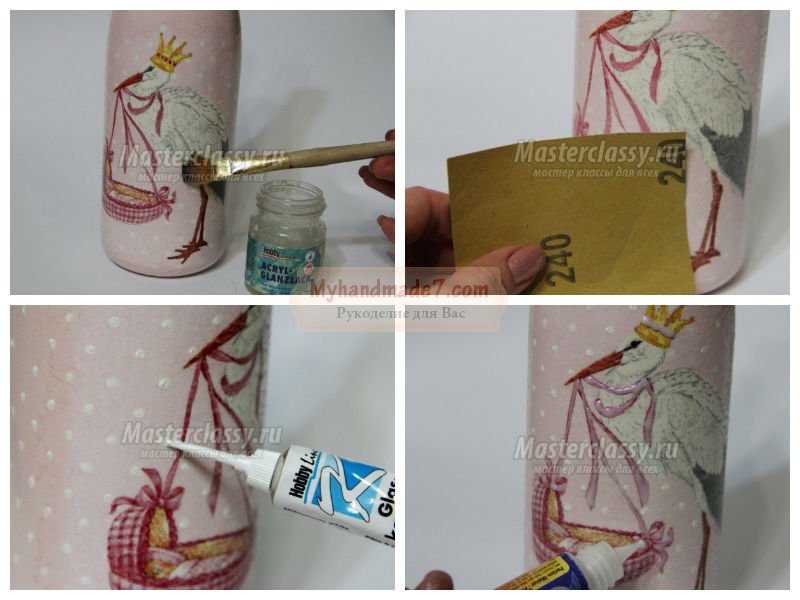
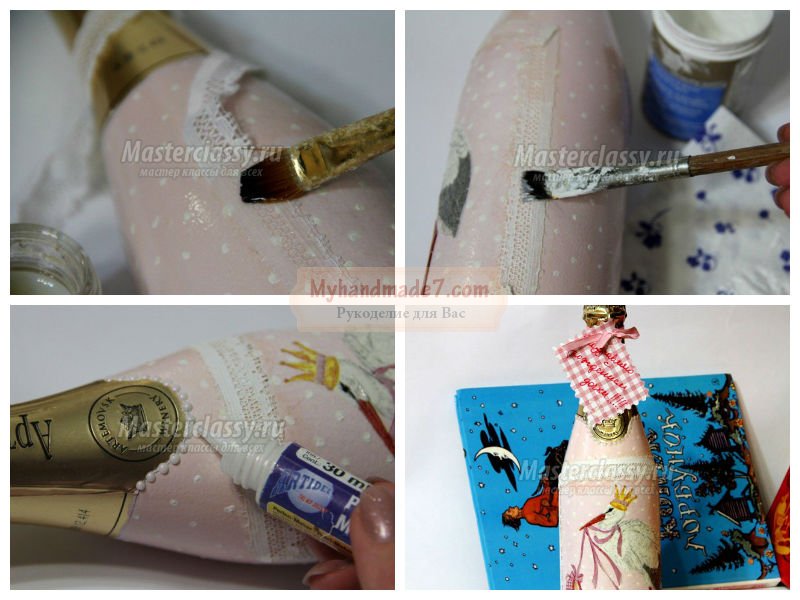
To highlight the design, outline it with acrylic paint with a pearl effect. The drawing will be beautifully framed; to do this, take openwork lace, spread a layer of varnish along the contour of the bottle, and do the same with lace. There is enough varnish to keep the lace firmly, the main thing is to let it dry thoroughly. When the lace is dry, you can tint it with paint. We put dots or draw a pattern along the contour of the foil with a pearl outline, and finally cover the entire composition with another layer of varnish. Instead of a regular postcard, we cut out a small label from scrap paper with curly scissors, write all our wishes and congratulations on it, and attach it to the neck of the bottle using a satin ribbon.
Thus, we designed a gift for the parents of a newborn; if you want to decorate the bottle for another occasion, the decoupage technique is perfect, the only nuance is in the motif of the picture. In any case, when making gifts with your own hands, you put a piece of your soul into the gift. A gift should be not only beautiful, but also useful, so we often give money; you can learn how to decorate a gift envelope in our master class.
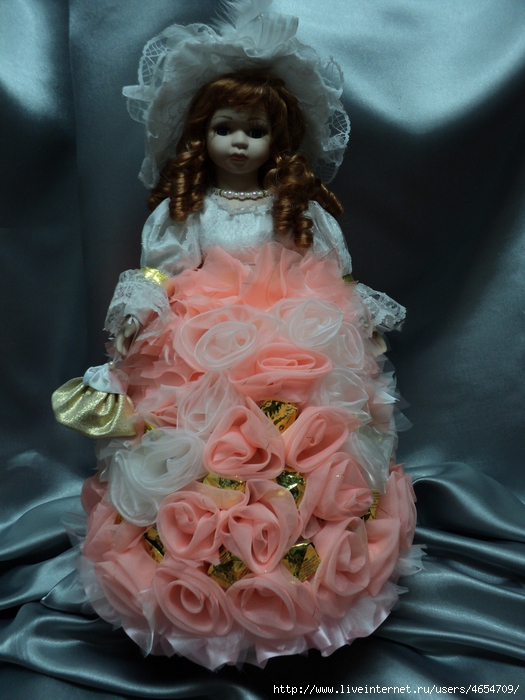
Doll in a skirt with roses and candies. MK
I glue most of the skirt to the base, then insert the doll and glue the bottom. 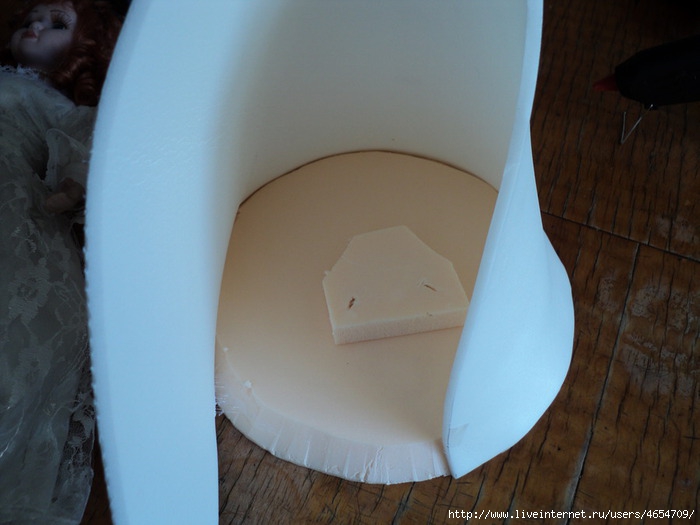
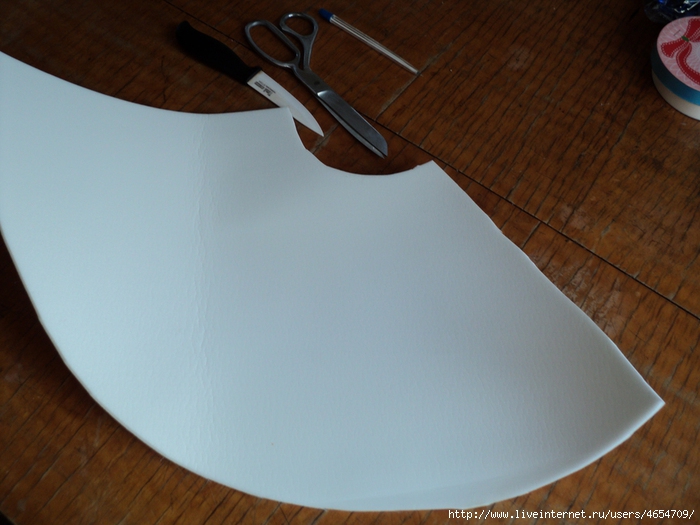
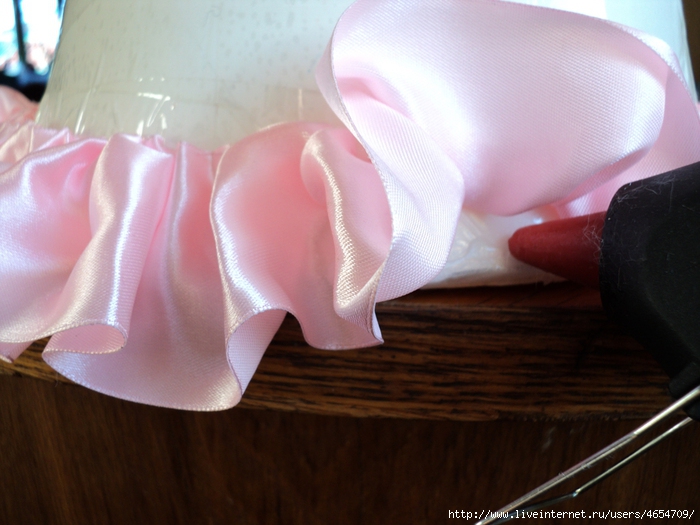
I glue the top of the skirt at the waist with tape end-to-end, slightly stretching the polyethylene foam around the doll so that the entire structure is stable. I place the seam in the back center, seal it completely with tape, also end-to-end, and trim off the excess to maintain the cone shape. ![]()
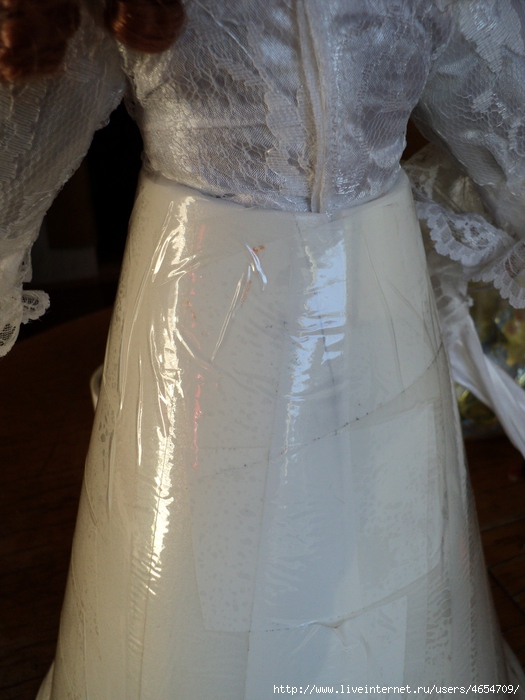
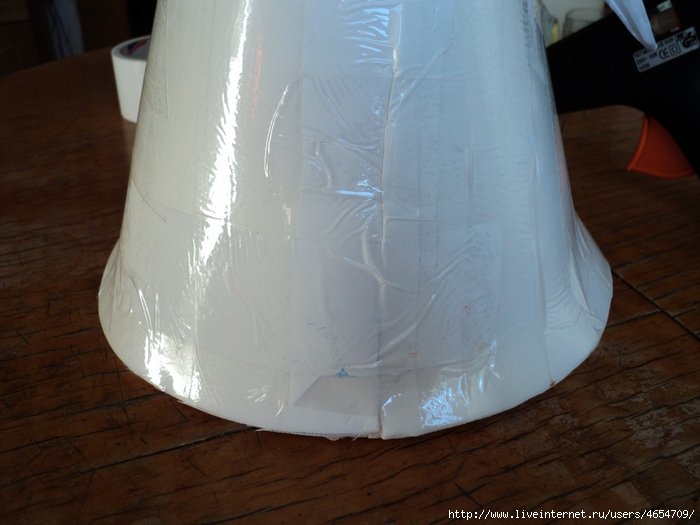
For insurance, I also wrapped tape across the entire skirt so that the main decor would hold firmly. To decorate the bottom of the skirt, I gather a wide ribbon onto a thread, sew it into a ring and glue it 2 cm above the edge, and glue some folds to the very bottom. 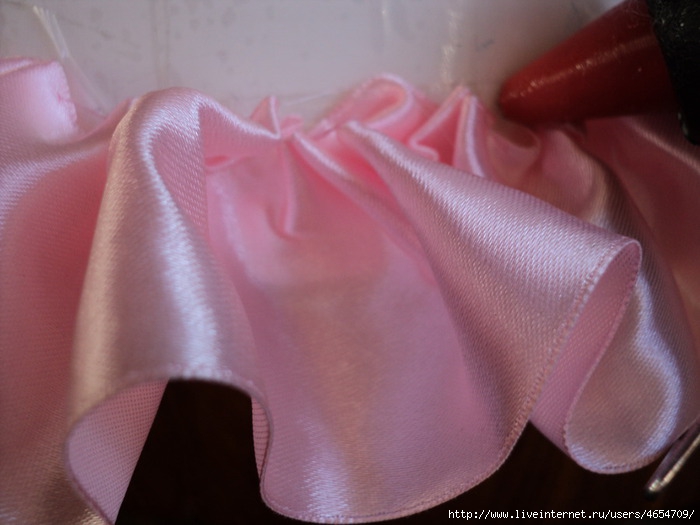
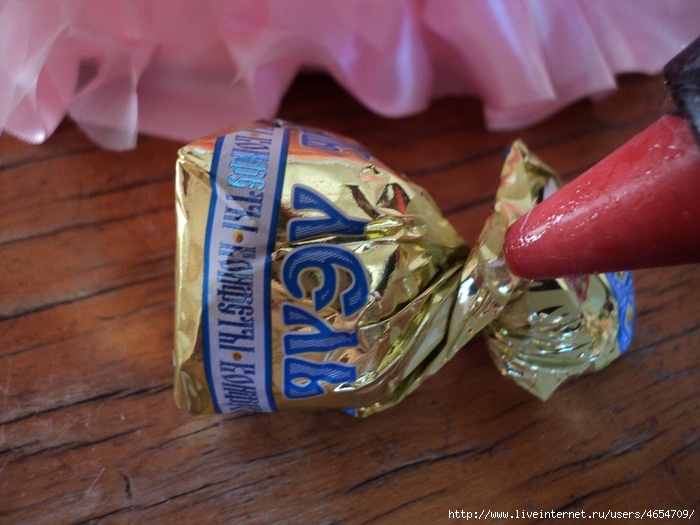
I cut the candy wrappers and glue one row directly onto the base, then roses around the entire circumference, then a row of candies by twisting the candy wrapper.
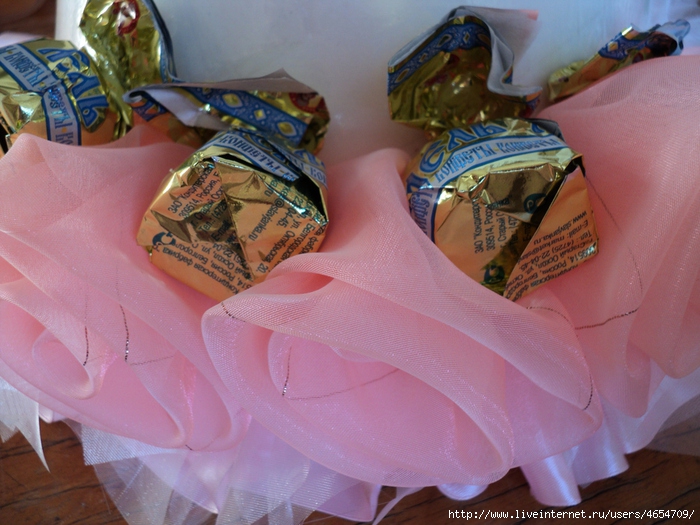
I lay out a triangle in front with roses of a different color, with pounds and candies between them.
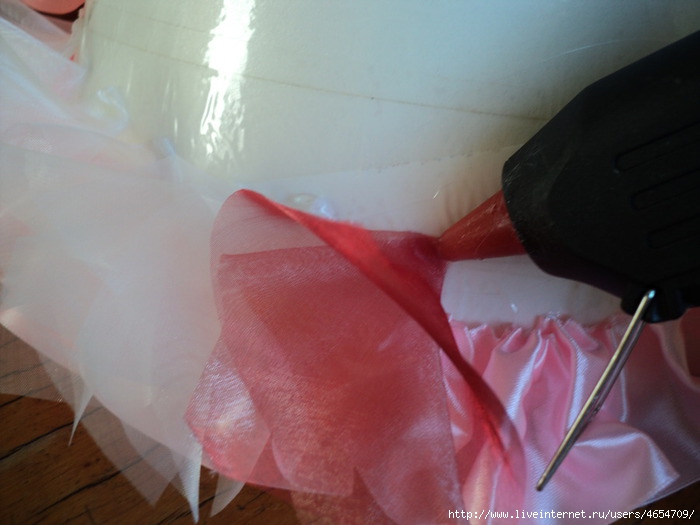
To prevent the candies from falling between the roses, I lightly glue the “petals” of the roses together in one row. Next are beads, ribbons, hat decor in the color of the skirt. Sometimes you have to tear off the rose bows that came with the kit and sew on your own to match the overall color scheme. I do the same with an umbrella or handbag - I change the decor and add candy. 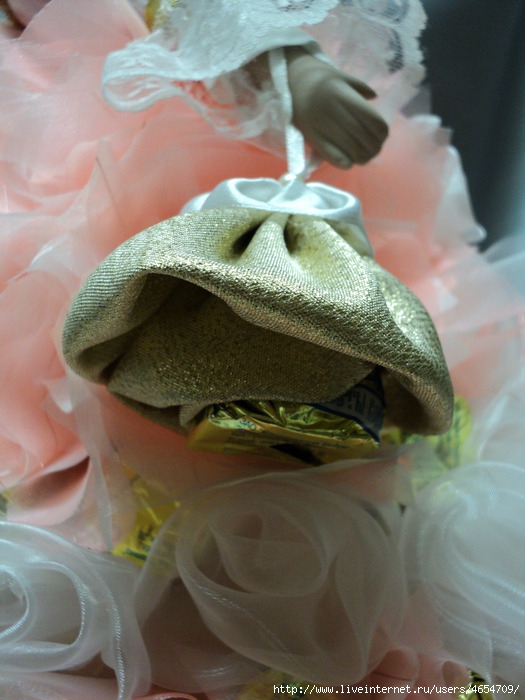
Hello, dear friends! Today I will tell you about interesting idea, which I met on the Internet. The Birthday Calendar is a great thing, by the way!
How many friends, relatives, acquaintances do you have that you need to remember to congratulate throughout the year?
If it's up to 10, then you can remember it. What if there is more? Then it’s difficult to cope without “reminders”.
For example, I have a friend. And she, the only one in my circle, has a birthday in November. So: she is already accustomed to the fact that I congratulate her every year two days after the holiday. Despite the fact that I consider myself a quite organized person, I just can’t remember this date on time! It's good that she's not the touchy type. But this trick doesn’t work for everyone...
And now I’ll tell you what sweet gifts for New Year I cooked it for my loved ones last year - my parents, sisters and aunt. That is, this present is not for children, as some of you might think. Quite the opposite, it's sweet gift for adults.
Julia Pyatnitsa
Congratulations to the family. How to quickly make a gift with your own hands?
Holidays most often take us by surprise, forcing us to think about where to find good gifts for loved ones. It is worth noting that in this case there cannot be a better idea on how to make a gift with your own hands! Such gifts will delight your family with their originality and indicate your care and love for the recipient.
Mission: gift for mom
Despite the fact that mothers appreciate any of our attention, we always want to surprise them with something special. Therefore, it is better to put standard options, such as perfumes or cosmetics from the store, aside - unless it is the very perfume she dreamed of.
A homemade gift will show how much attention you paid to its choice. For example, interesting option will be a homemade photo album, made using the scrapbooking technique and decorated with the attributes of the holiday for which you will give it. Place the most touching family photos there - it will definitely not leave mommy indifferent!
Hand-sewn bed linen will tell your mother that you have matured and are thinking practically. Decorate your pillowcases with designer embroidery with your parents’ initials, drawings, patterns that symbolize something significant only for your family.
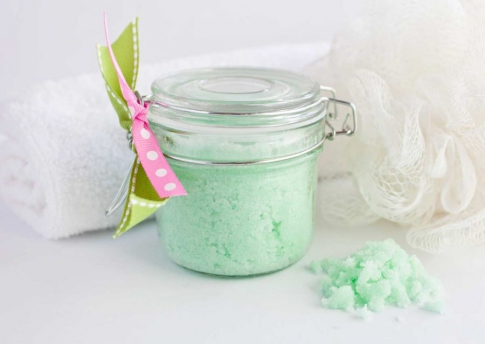
If you don't have time to do great gift, pay attention to homemade cosmetics! Thanks to 100% natural ingredients, it is very beneficial for skin, hair and nails. Change the ingredients by choosing your mother’s favorite scents, oils and natural ingredients.
For example, below you can find out how to quickly make a body scrub. Write down the recipe - you will probably need it more than once:
- scrubbing element in the form sea salt or sugar - 2 cups;
- base substance: olive, almond or coconut oil - 0.5-1 cup;
- essential oil optional - 8 drops;
- food coloring.
First of all, mix the scrubbing element well with the main oil. Add ether and 1 drop of dye, stir the mixture well again.
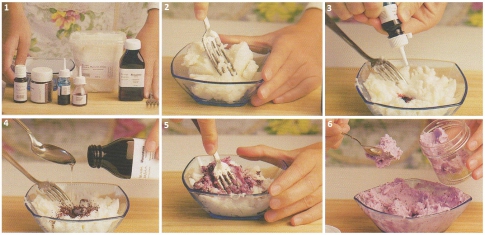
Choose an essential oil depending on your mother's aromatic preferences and the effect you want to achieve. For example, lavender oil helps make a soothing scrub, citrus aromas energize, and tea tree has a healing effect.
A gift for dad is a difficult choice
There is an opinion that it is more difficult for men to choose gifts than for women. The problem is that the strong half of humanity looks at things with a practical look, not taking cute trinkets seriously. But if a gift is created with your own hands with love and care, then the attitude towards it is completely different.
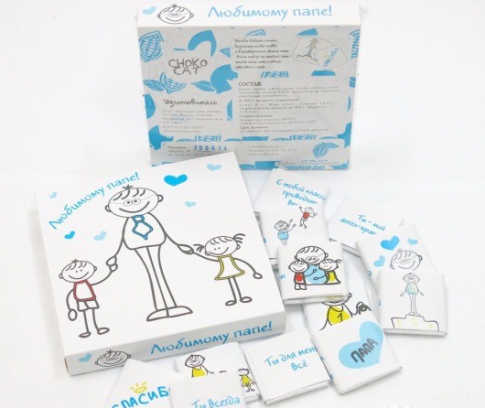
Surely your dad will like a gift in the form of chocolate, which you can make yourself by melting a store-bought bar, pouring the mixture into molds and adding nuts and dried fruits.
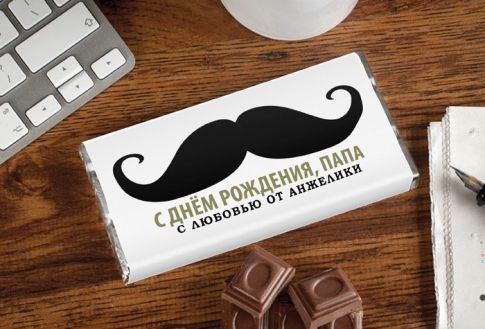
Because of stereotypes, you may think that sweets are more feminine or romantic gifts. But you still need to look for people with a sweet tooth like men! They'll love an original chocolate bar - especially if you wrap it in a fun, printed wrapper with your photos or funny messages on it.
For lovers of stylish accessories, you can offer bracelets made of leather or knitted scarves, which can be done in just a couple of hours. Dad will definitely appreciate your original idea and unique execution.
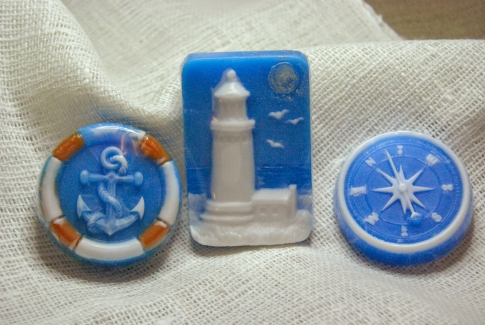
Men's skin also needs care, so you can use this gift idea for dad, how to make soap with your own hands. Complete it in blue and green colors, adding essential oils with fresh, slightly bitter odors.
Take advantage of our master class to learn how to make a stylish gift for dad in the form of a keychain tie. All you need is a carabiner with a chain and a wide ring for key rings, and an old tie.
- Thread the tie through the wide ring.
- Tie a tie.
- Cut off the excess long part of the accessory.
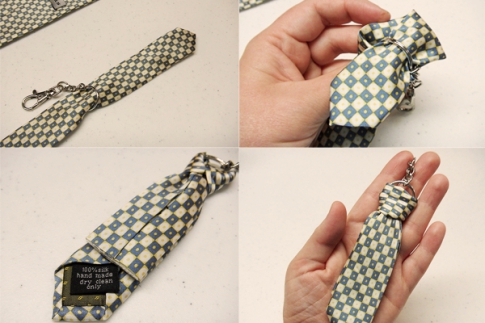
This gift will be an interesting addition to your dad's daily look. You can hang keys from your car, apartment, or office on the keychain.
Children's gifts
Younger family members always wait for a gift much more than others. Moreover, they are not as easy to surprise as you think! Use the tips below to learn how to give a gift for your children, younger brothers or sisters.
Girls can be given a hand-sewn Tilda doll - a very fashionable toy lately. If the little ones have too many dolls, sew them a whole wardrobe - dresses, blouses, trousers and shoes. Girls will definitely be delighted with such gifts!

Little gentlemen will love figurines sculpted from salt dough: cars, animals, fairy-tale characters. Make finger puppets and give your child a whole puppet theater!

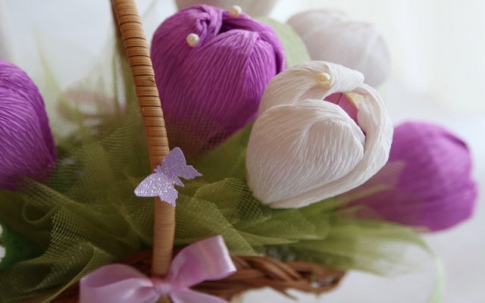
Among all the ideas, there is one gift that all children will definitely like - sweets! Wrap the chocolates in crepe paper, form flowers and make a bouquet of them to turn chocolate into a full-fledged original gift.
To make a candy bouquet of flowers you will need crepe paper in both green, white, and purple colors, wire, tape, scissors, long sticks and, in fact, sweets.
- Cut several long strips white with sides 5x20 centimeters.
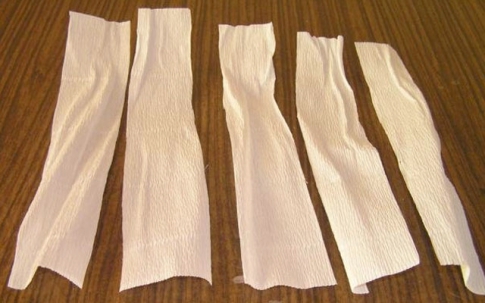
- Twist the strips 2-3 times in the middle.
- Fold the workpiece in half at the fold. Form the petals by pressing the bottom of the workpiece - the place of the fold, gluing the corners of the top and straightening them.
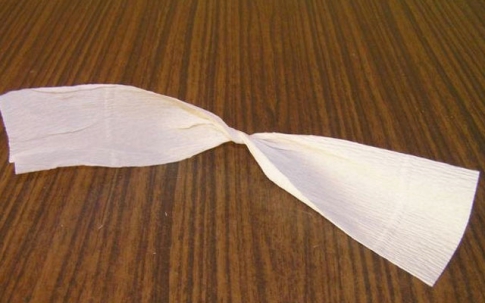
- Secure the candy onto the stick with wire.
- Start wrapping the workpiece with petals, again using the wire.
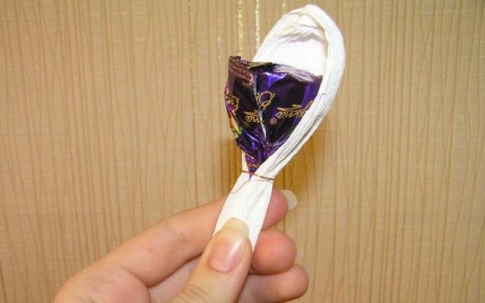
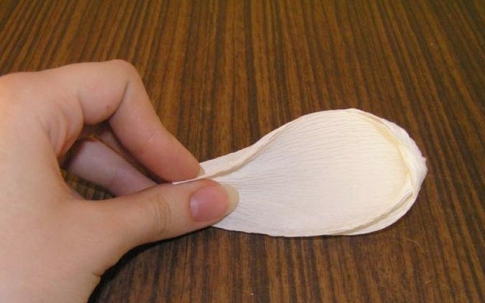
- You should end up with a bud in the shape of a crocus flower.
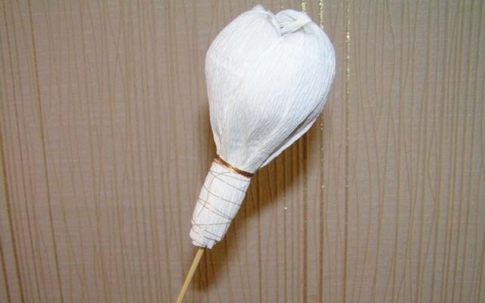
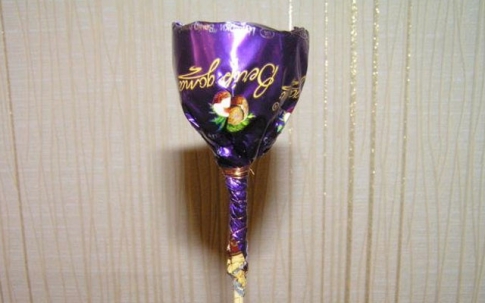
- Tie the base of the flower with green paper ribbon, masking the wire knots.
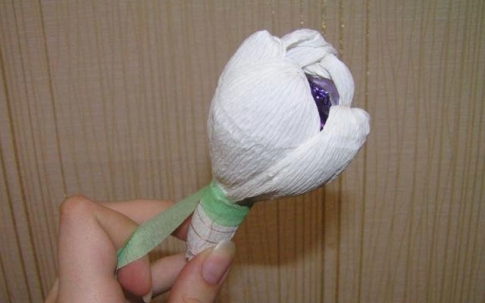
- Cut out several long triangular leaves from green paper.
![]()
- Attach the leaves to the stick - coat the lower half of the workpiece with glue and wrap it around the base.
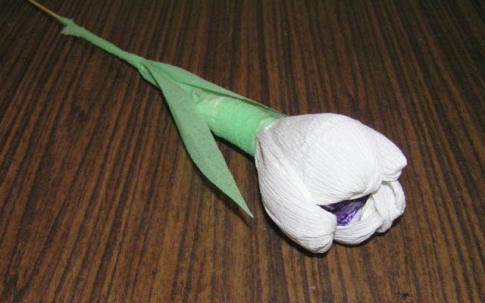
Repeat the same steps when creating purple flowers. Place the bouquet in a miniature homemade wicker basket or wrap it in gift paper.
Even if you didn’t manage to make a gift exactly as you would like the first time, remember that the most important thing for its recipient is the attention given. This attention is especially pleasant to your loved ones and family members.
Take it for yourself and tell your friends!
Read also on our website:
Show more


