A backpack is simply a universal thing. This is an excellent container for books and notebooks for schoolchildren. In its pockets you can organize fishing gear by category. It serves as a great addition to clothing. The backpack will come in handy on a hike. It is convenient to ride a bicycle, roller skates, or skateboard. We can continue to list this for a long time...
Such hand-sewn bags are especially valuable. To do this, select a suitable backpack pattern, which you need to redraw onto the fabric with your own hands and you can start sewing.
How to make a leather backpack, watch the video.
Denim satchel
Such backpacks can be sewn without a pattern. For those who have developed at least a little spatial thinking, and also have experience working in sewing machine, it won’t be difficult to sew such a backpack.
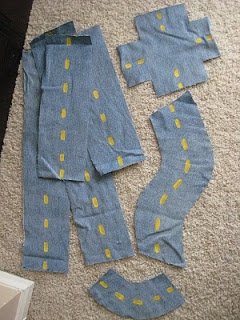
The easiest option is to cut off the legs of old jeans, leaving the top part. Sew the bottom of the future denim backpack, and insert a lock or strap at the top for tightening. Then sew on the straps - you get a simple backpack.
Another model, this time more complicated: put the trouser legs one inside the other. If you take flared jeans or with a tapered hem, use the narrow part for the bottom and stitch it. The other side is cut for a zipper and straps. The lower ends of the straps are sewn to the lower seams.
The most difficult type. Here you will already need a pattern for a backpack made from jeans.
Will come in handy:
- old jeans in 2 colors;
- non-woven fabric with adhesive base;
- plastic;
- fabric for lining;
- sewing supplies;
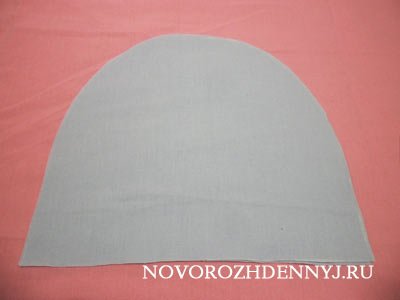
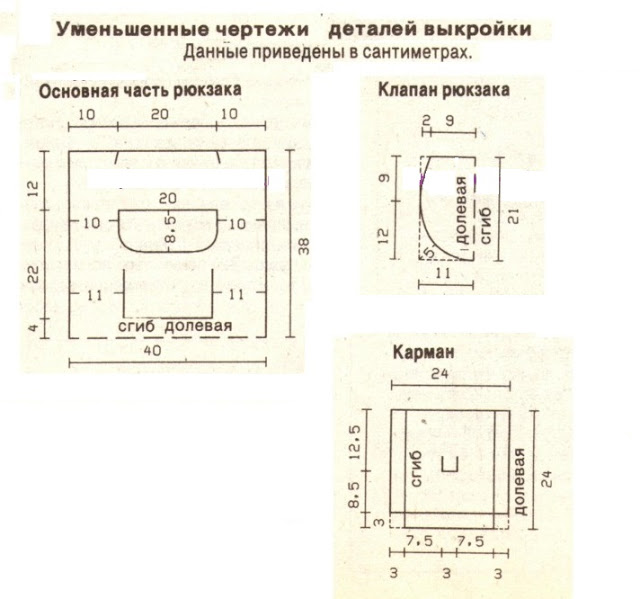
The pattern is made from the main color of the jeans. Cut out the following parts:
- bottom in the form of an oval 13x22 cm;
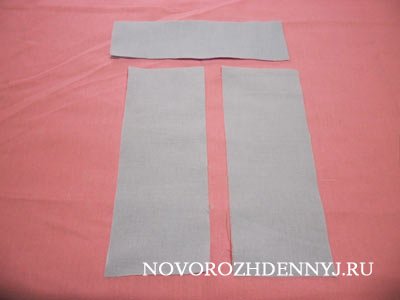
- two rectangular pieces, 25x32 cm each;
- a piece for a pocket 15x15 cm made of denim of a different color;
- two parts for straps 60×10 cm;
- pattern for a handle;
- valve section.
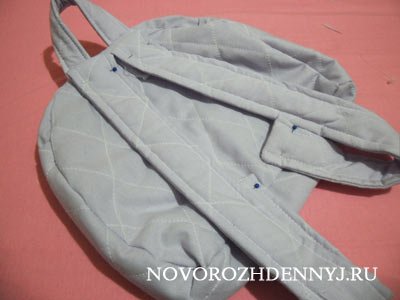
Overlap all parts of the backpack so that the edges do not unravel. You can do without processing. Then the product will have a terry edging. Now it is considered fashionable. Let's move on to stitching the parts together.
It's better to start with the straps and handle. They should be stitched lengthwise from the wrong side, ironed and turned inside out. The next step is to sew the pocket to one of the two parts intended for the main part of the bag. The pocket is reinforced with double stitching for reliability. The plastic bottom is glued to the non-woven fabric and the oval pattern. Then the walls are sewn to the bottom, after which the rectangular parts are stitched together. Lastly, the straps and handle are sewn on. To make the item look neat inside, you can make a lining from durable fabric. The work is finished.
If you make two sections inside such a “bag” and sew several additional pockets on the outside and inside, then it can also be used for fishing. Moreover, denim very durable and will withstand all tests from exposure to water, hooks, etc. A fisherman’s bag is also made from other dark-colored fabrics that are durable and waterproof.
You can see how to sew a backpack from jeans in the video below.
Backpack for a child
The backpack is generally very roomy. Children love to put their “treasures” there. It has become an integral attribute not only for schoolchildren, but also for kindergarteners. Below we will look at the pattern of a children's backpack with sewing instructions.
You need to take:
- durable material;
- padding polyester;
- lightning;
- several scraps of fabric of different colors for flowers.
We will sew a backpack for a girl.
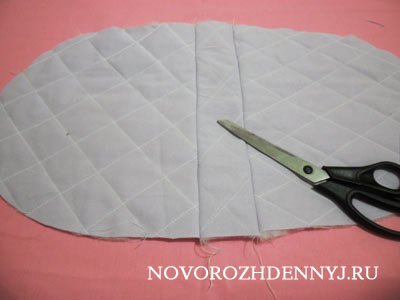
1. Cut out parts, the size of which depends on the volume of the product. Front:
 .
.
 .
.
Bottom and sides:
 .
.
Lining:
 .
.
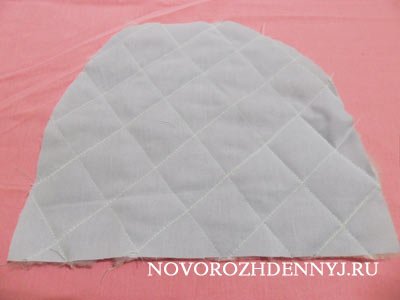
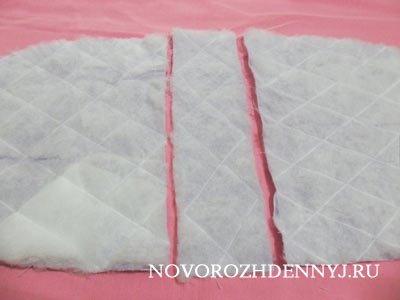
2. Line and quilt each piece with padding polyester, as shown below.
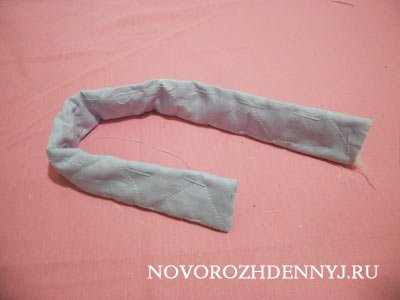
3. Sewing parts.
4. Sew the straps.
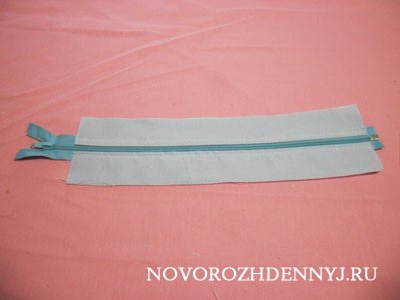
5. Sew two stripes with a bend inward (facing) to the lock. The width of the latter when folded is 2 cm.
6. Stitch the sides.

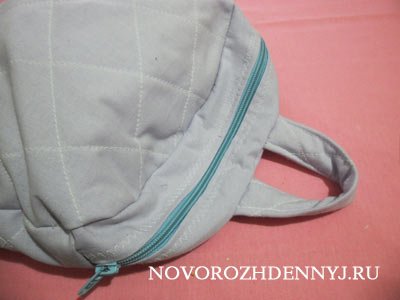
7. Then the zipper, straps and handle are sewn on.
8. Sew the lining according to the same pattern. 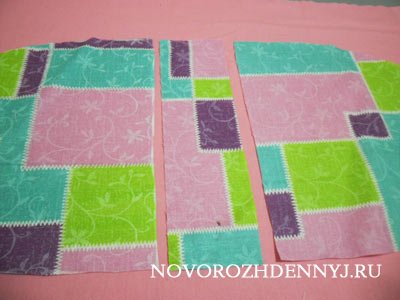
9. Then connect the lining to the outer part. 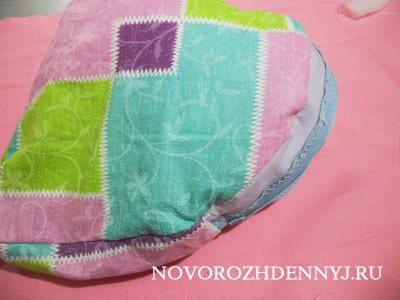
10. The backpack can be decorated with flowers.

You can view the backpack pattern for a boy here:
.
Fashionable backpack
See sewing a women's backpack below.
Using the given patterns and mk, there is a great opportunity to please your loved ones or yourself with a new bag, sewn by yourself.
Sewing a backpack with your own hands is not a difficult task at all, and this is where future dressmakers often begin to learn to sew. After studying this master class, you will be able to sew a backpack with your own hands. So, how to sew a backpack?
This master class presents a medium-sized backpack.
Perhaps this size is universal.
You can see his sketch in the picture next to it.
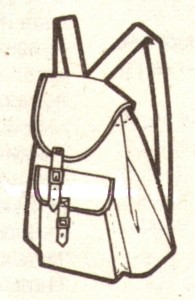
A pattern for it will be attached below.
As you can see, this will be a wonderful hiking or school backpack with your own hands!
Necessary materials for making a backpack
Before sewing a future backpack, you need to acquire the following materials:
- a piece of upholstery fabric measuring 45x160 centimeters;
- a piece of leather;
- a cord reaching 110 centimeters in length and 0.7 centimeters thick;
- copper tape, which will be needed for the backpack straps,optimal dimensions – 150x4 centimeters;
- two belt length adjusters;
- one large lobster clasp;
- eight blocks, the internal diameter of which reaches 0.7 centimeters;
- two buckles with a peg,buckle sizes - three centimeters;
- two half rings, the diameters of which reach 4 centimeters.
Pockets and flaps are often made from old, worn jeans. A children's backpack can be made from the child's favorite clothes, if he has already outgrown them, but the material is preserved in excellent condition.
However, keep in mind that a children's backpack should be smaller so that the child can carry it comfortably. But how to sew a backpack for the first time with your own hands if you don’t have a pattern?
Now we move on to the next stage and can finally get acquainted with the pattern of our backpack.
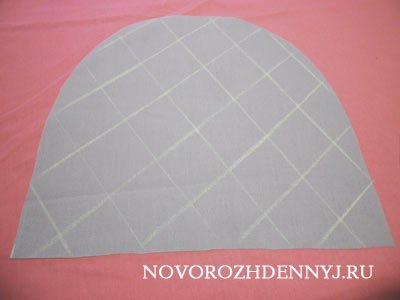
Pattern
This is what the backpack pattern looks like:
The image shows the following details:
- main part;
- valve;
- pocket.
The dimensions of all parts of the backpack, the sewing instructions for which are contained in this master class, are also indicated there.
In addition to the sizes of all parts of the backpack, we need to know the allowances.
The optimal allowance for seams and cuts should be one centimeter, leave two extra centimeters for the top cut of the pocket, and the upper cuts of the main part of the backpack should have an allowance of six centimeters.
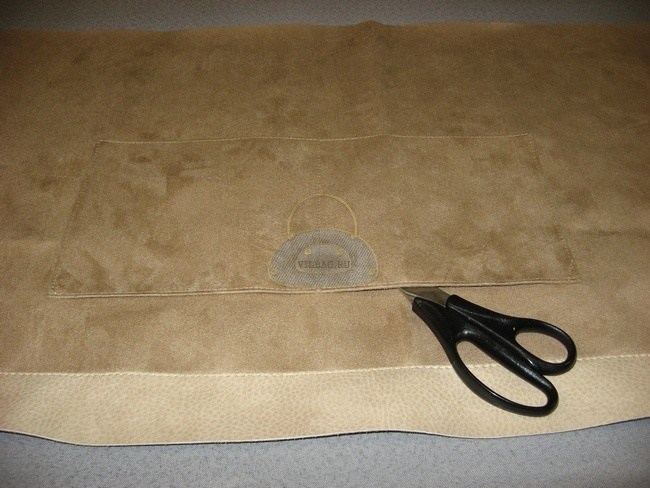
Cutting a backpack
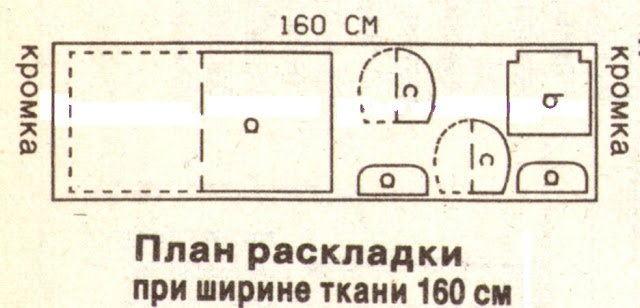
In order to start cutting out a backpack with your own hands, you need to know how many parts we have to cut out. We need one main part, we also need one pocket, but for the valve of the backpack itself and the pocket flap we need to make two identical parts with a fold so that when you open the finished backpack, the valves look beautiful on the back side.
If you decide to make valves from old jeans, then keep in mind that the material of the jeans is quite thick, so working with it is more difficult than with others. But this material never goes out of fashion, and you can sew universal backpack. You can also experiment with different colors jeans, that is, use one shade of material for the valves, and another for various decorative inserts.
You can sew a backpack entirely from old jeans, but in this case the main part will have to be made from several thin pieces.
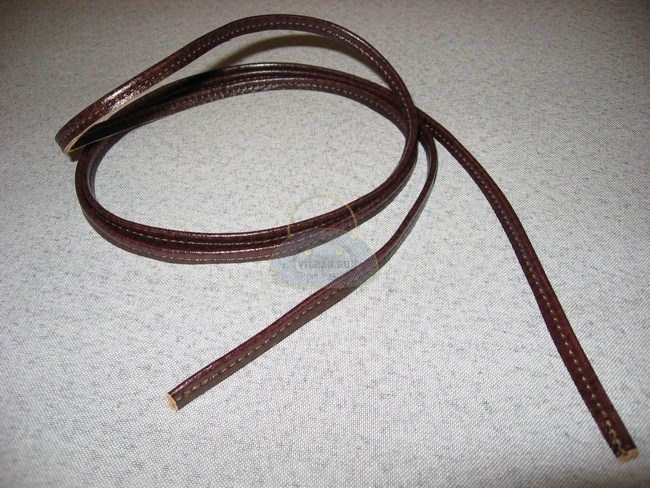
Now we move from jeans to leather. Why do we need leather? We will use leather for edging both flaps of the backpack, as well as for edging smaller parts. All necessary leather blanks are described in more detail below.
So, you need to prepare the following leather parts:
- a strip measuring 60x1.5 centimeters for the backpack flap;
- a strip measuring 40x1.5 centimeters for the pocket flap;
- two belt loops measuring 6x8x3 centimeters (dimensions are indicated in finished form);
- two patches 6x12x3 centimeters (dimensions are indicated in finished form);
- two belt loops (for half rings) measuring 8x10x4 centimeters (dimensions are indicated in finished form).
When cutting strips of leather for the valves, we do not make allowances.
Perhaps you, in principle, do not like the idea of edging with strips of leather, then you, of course, can replace the leather with any other durable material.
You can make a edging from the same fabric from old jeans.
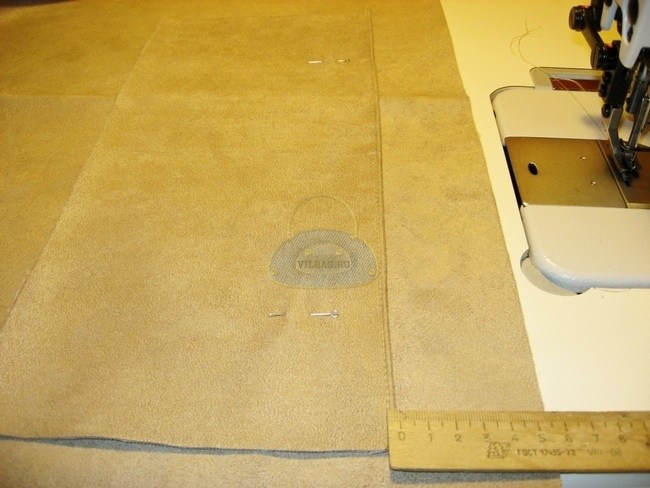
Sewing a backpack
Now that all the parts of the backpack are cut out, all that remains is to sew them correctly. So, where to start sewing a backpack with your own hands?
- First of all, we turn the allowance made for the top cut to the front side;
- carefully tuck it in and stitch it using a sewing machine;
- immediately after this, heat up the iron and thoroughly iron the allowances for the bottom and side cuts;
- allowances should be ironed inside out, leaving untouched the allowances along the short cuts located in the corners of the backpack pocket;
- next we fold the pocket;
- we place the fold lines on the previously well-smoothed edges, and then smooth the side and bottom folds;
- immediately after this we make small seams at the corners;
- As soon as the short seams are made, we smooth the folds in the corners again.
We work with belt loops
Having done all this, fold the short belt loops in half (wrong side in), while folding the allowance made for the upper part of the belt loop along the longitudinal section. As soon as the seam allowance is turned up, you need to stitch the edge of our belt loop in the right places. Immediately after this, cut off the remaining allowances.
Greetings, dear readers! Today, as promised, I will tell you how to sew for a girl. To be honest, I first made a backpack for a girl, and then I found out that it corresponds to the latest trends in the children's fashion section. Yes, sometimes it happens like that. True, in my version there were also applications in the form of two owls. After all, I still have a little girl and I chose these characters for decoration, I think they are very cute. I made the backpack from what I had at home, I didn’t buy anything special. I took measurements from an old backpack that was left over from my son. Read below how to create it all!
For comparison, I used a backpack from.


As you can see: floral design, zipper lock, quite roomy size. We needed a backpack for swimming training, there was a lot of stuff, so roominess and convenience were the deciding factors.
In order for the backpack to keep its shape, I quilted all the details. The only thing I didn’t take into account was that these parts turned out to be very thick and the machine had great difficulty coping with the places where the straps were attached. Therefore, if you are similar to mine, then take this point into account and stock up on special straps for shoulder straps, as in the photo of the backpack above. It really makes more sense. And so let's get started!
Materials, necessary to do it yourself :
- fabric for the top of the backpack (about 1 m);
- lining fabric;
- padding polyester for stitching 100 g/m2 thickness;
- webbing straps;
- zipper 50 cm;
- bright pieces of fabric for applique;
- applique pattern;
- adhesive fabric;
- underwear elastic for the outer pocket;
- threads, scissors, needles, sewing machine, decorations.
My fabric is linen with a floral pattern. It is too thin for a backpack and needs to be either reinforced or quilted with padding polyester. But, as you already understood from previous articles ( and ), I really love quilting. Therefore, I quilted parts with padding polyester with a density of 200 g/m2, but this turned out to be too much, 100 g/m2 is enough.

For appliqués, I chose pieces that were monochromatic, but bright, so that they could be clearly seen on the floral ornament.

The jeans pocket is a godsend for such things, very convenient.
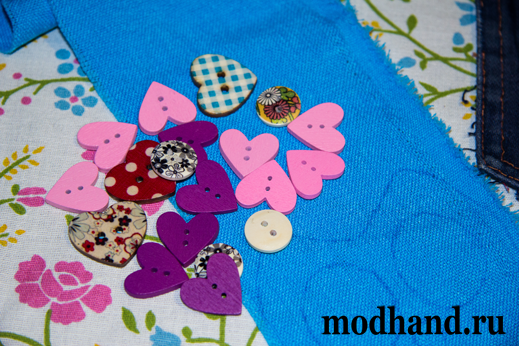
I also had wooden buttons in the shape of hearts and round ones. The round ones were perfect for the pupils of the owls, and the hearts fit the theme, since the owls seem to cast loving glances at each other.
And a backpack pattern will appear soon! Don't miss it! Subscribe to blog updates and have fun creating!
It's fashionable to save - it's easy!
See you soon, Yulia Morozova.
Take it away backpack pattern to the piggy bank.
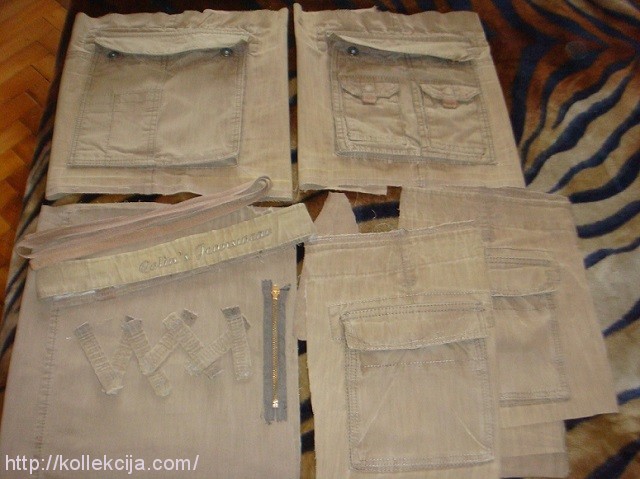
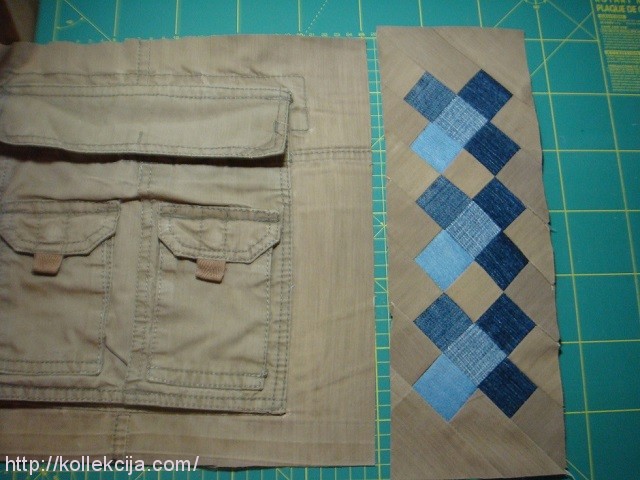
- Everyone is familiar with your favorite jeans, which are worn to the point of holes and patches. Which then turn into breeches or shorts. And even the ones that are finally worn out don’t raise their hand to throw them away. My daughter Varya brought me these, hopelessly cracked along the seam, for rags. To be fair, the jeans were branded, of high quality and with absolutely unimaginable pockets. So they inspired me to create a backpack!
To work you will need:
- remnants of your favorite jeans, preferably with large, intricate pockets:
- denim scraps of different shades - from dark blue to light blue, in different sizes;
- fabric or non-woven fabric for the base of the blocks, nine squares with a side of 10 cm;
- lining fabric - approximately 60 cm with a width of 100 cm (including pockets), I had flannel, but it was not enough - I used jeans pockets, it seemed to work out well))) ;
- padding polyester or used woolen items for quilting;
- a stiffening rib for the bottom of the bag - strips from plastic food containers came in handy;
- cord for drawstring about 90 cm long;
- half rings for handles or other accessories;
- scissors, ruler, chalk, pins;
- sewing machine, iron;
- a roller blade and a special mat make the work much easier.
Contact Alena Mushtenko: [email protected]
Master class by Alena Mushtenko "How to sew a backpack with your own hands"
- How to sew a backpack with your own hands? It’s very simple, so let’s get started!
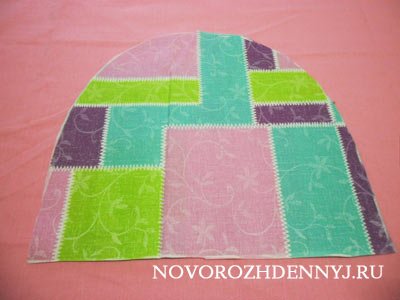
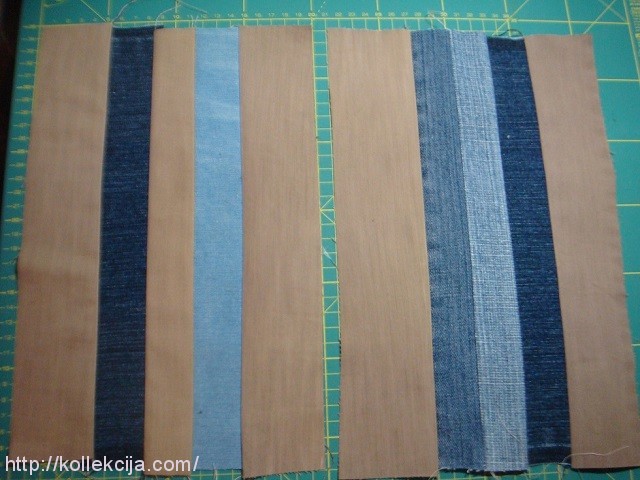
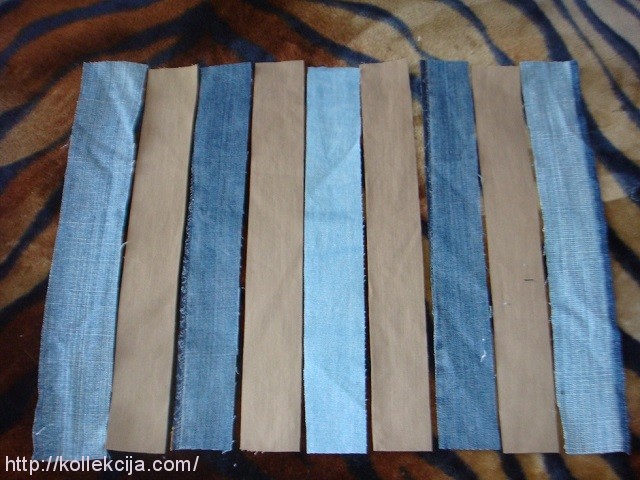
- 1. We disassemble the jeans into “spare parts”.
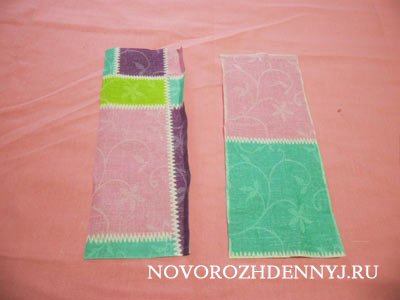
- 2. We assemble two panels and the main fabric for the side parts of the backpack in the Amish patchwork style - length about 30 cm, stripe width 4.5 cm, outer stripes 6 cm.
- 3. Cut the panels crosswise in increments of 4.5 cm, fold the pattern, alternating parts from different panels.
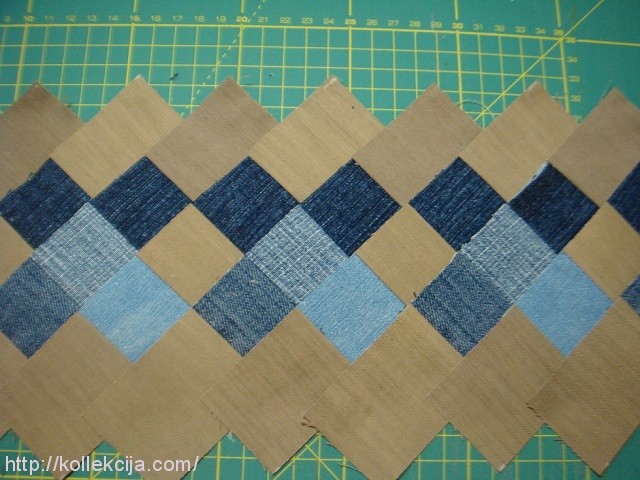
- 4. At the ends of the part, I decided to cut out blocks to complete the “crosses” - I thought it was more interesting. And the saved stripes were useful later for the straps.
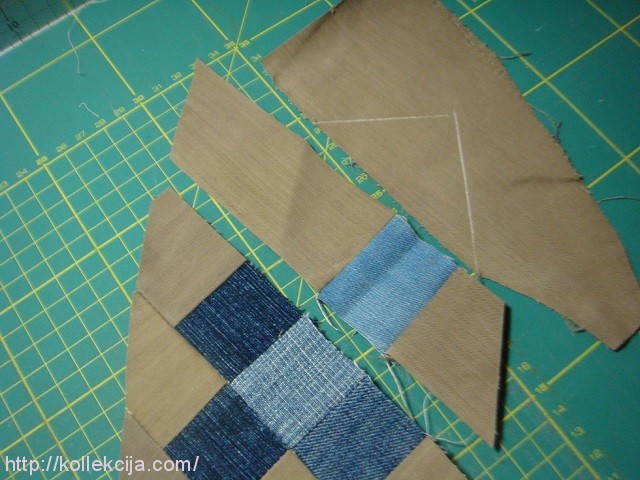
- 5. This is how the sides turned out.
- 6. Assemble the sides with the part with pockets. At the same time we sew together the blanks for the straps.
![]()
- 7. For the back side of the backpack, cut 9 strips. I chose the length and width based on the dimensions of the front part with the pocket - mine is 35 cm long, about 4 cm wide (the dimensions of the finished panel are 35x35).
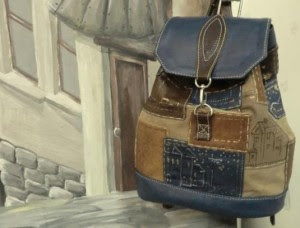
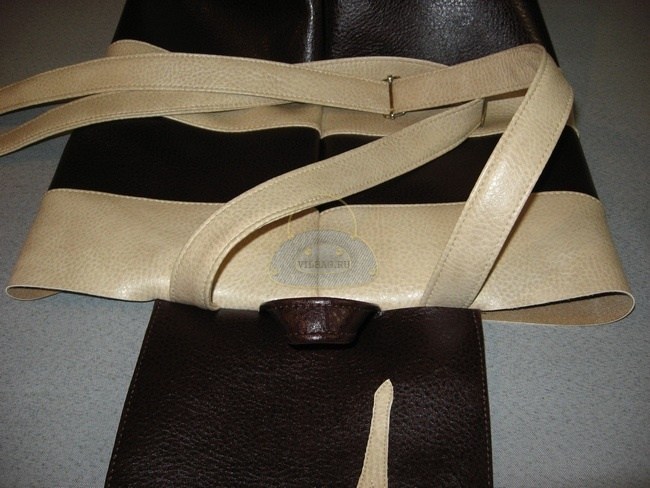
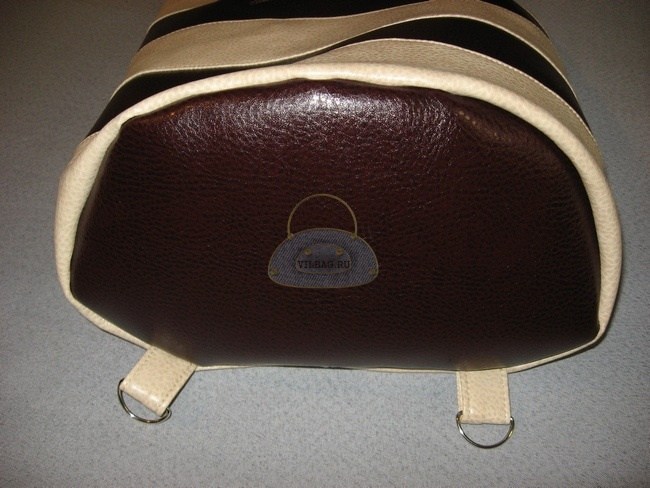
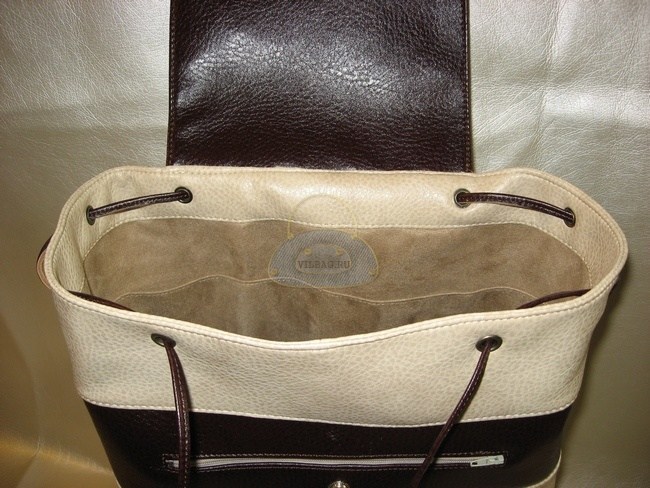
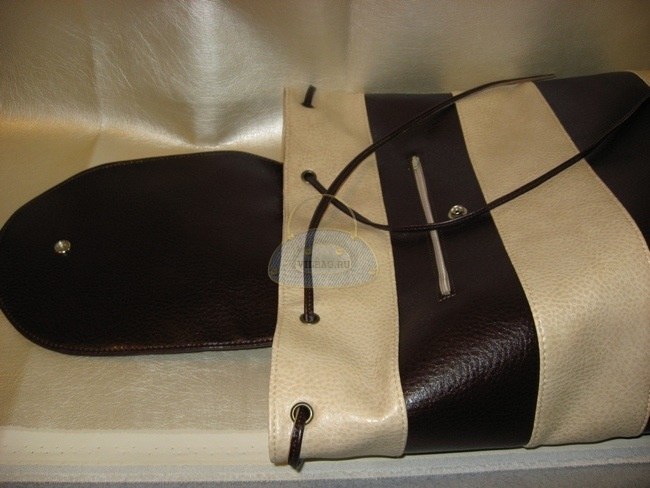
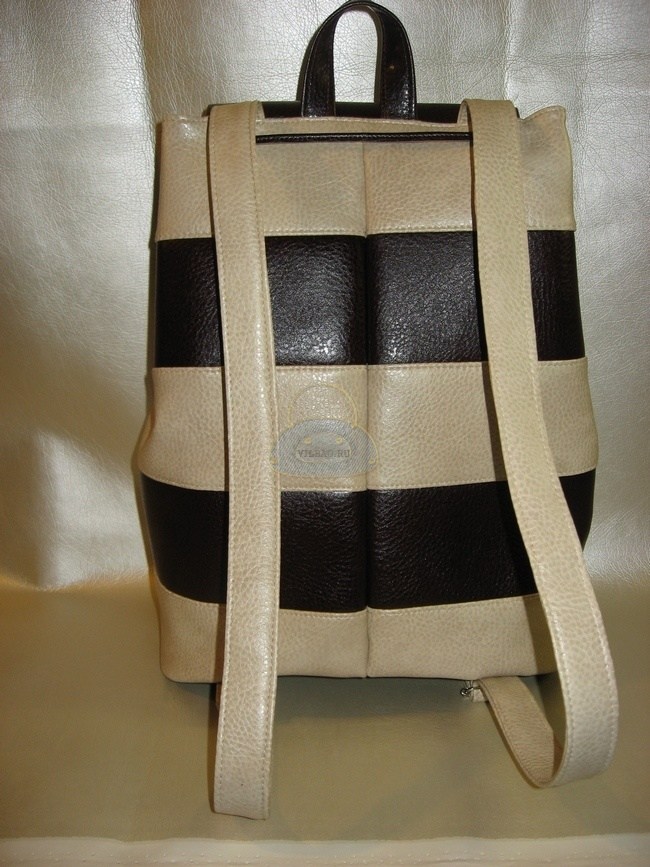
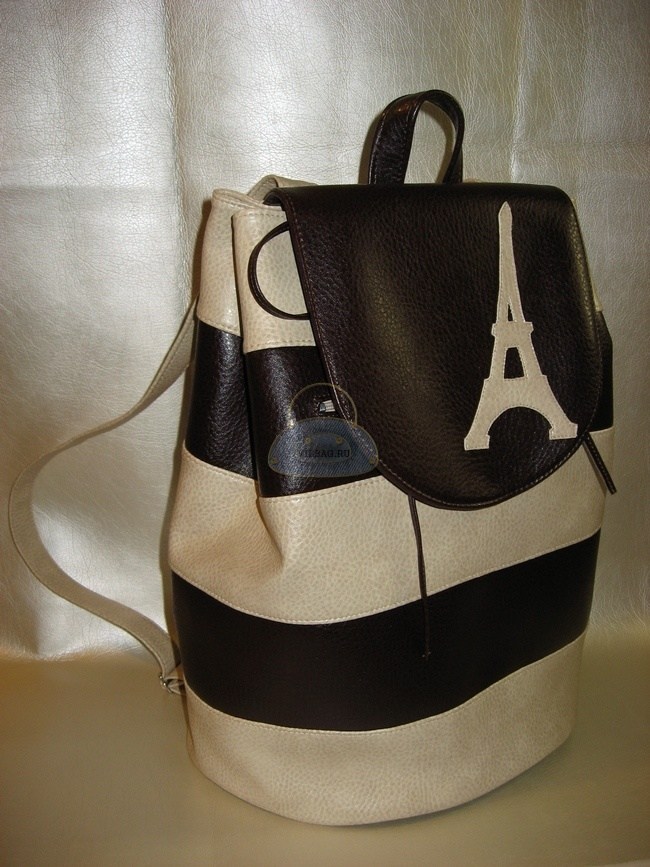
I am sharing for you the story of a striped backpack and telling you how to sew a backpack with your own hands from contrasting colors artificial leather. In my opinion, its effectiveness lies precisely in the contrast, the width of the stripes and, accordingly, the final height of the backpack.
As a prototype for this backpack, the client suggested a photo of a backpack from genuine leather. I often ask for photos to roughly understand what the client wants to get as a result. This helps to avoid mutual disappointment and makes it possible, during the discussion, to adjust the image of the future backpack or bag.
How to sew a backpack with your own hands, pattern and cut
The height of the backpack is 35 cm, and since 5 stripes were planned, each was 8 cm high (7+1 for allowances).
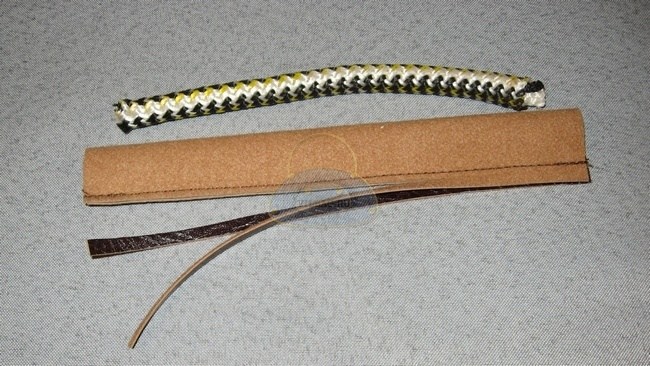
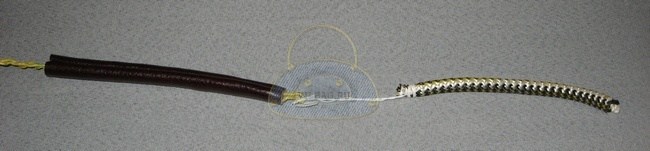
I made a blank for a small handle - loops and a cord from leatherette to match the backpack. But in the process, she changed her mind and sewed an ordinary loop. But I managed to take a photo, so I’m showing it to you.
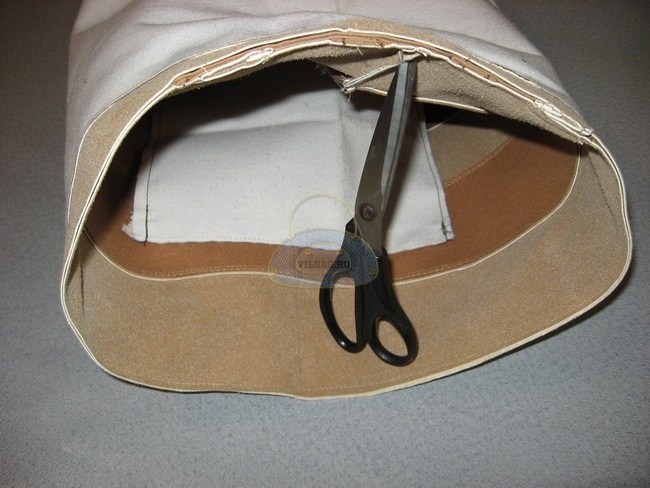
We assemble the lining. We sew on the patch pockets and the top strip - a border made of leatherette. I sewed a securing stitch over the border.
We collect the outer part of the backpack into a bag and sew all the details to it: belt loops, handles, and a flap on top of them.
We insert the bottom with loops, focusing on the markings.
We connect the lining of the backpack using the same principle. We insert the bag into the bag and sew along the top edge.
Turn it inside out through the hole left in the subframe. Also, after I tuck the lining inside, I add a finishing stitch along the top edge of the backpack.
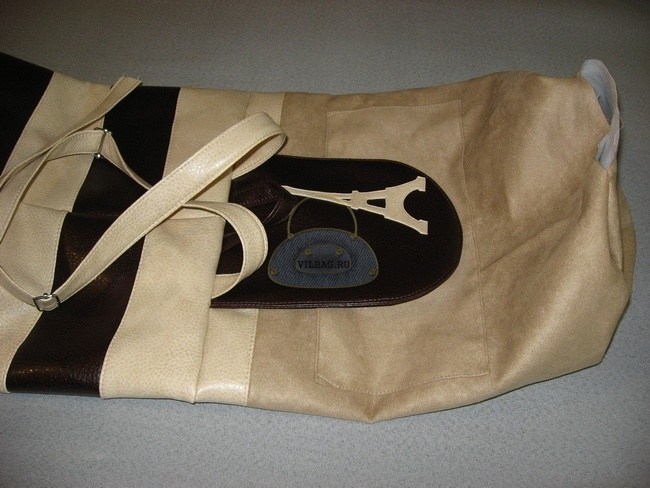
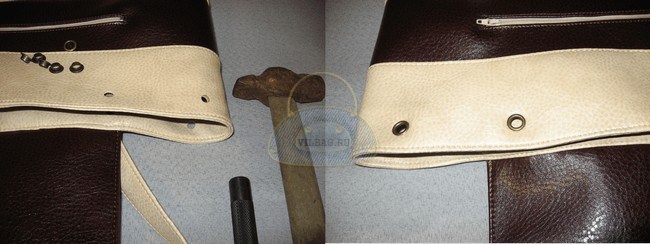
I mark the points for punching holes for the eyelets. I make holes and install accessories: eyelets and the bottom of the button under the valve.
Sew up the hole in the lining. Insert our cord and you're done!
It turns out that sewing a backpack with your own hands is not at all difficult. What do you think?
P.S. Did you like the backpack? Write your opinion below, I will be very glad!


