Crafts from pine and spruce cones are a fascinating and popular activity due to the natural decorative properties of the material. Particularly common New Year decorations from cones with your own hands.
Cones for a wreath
In principle, there’s no need to invent anything special here: crafts made from pine cones and a New Year’s tree are the most natural combination. You can simply hang pine cones on the thorny branches - it will look interesting. But it’s much better if crafts made from cones sparkle and shine: after all, the New Year’s spruce is a magical tree, which means that New Year’s decorations should match it.
If you simply collect pine cones in the forest and paint them in certain colors, it is unlikely that you will be able to achieve a special decorative effect. To make crafts made from pine cones look neat and bright, you need to do some preparatory work.
How to turn pine cones into Christmas decorations
- When collecting cones to decorate the New Year's tree, take only those that will correspond in size to it. If the Christmas tree is small, large cones will pull the branches down and the decorative effect will be lost.
- If the cones are not opened or are wet, do not worry: in a warm room they will quickly dry and open.
- Once the buds have opened to the extent you intended, stop further expansion. To do this, you need to weld wood glue, hold each lump with tweezers, dip them in the adhesive mixture and lay them on film or oilcloth.
- In order for DIY crafts made from pine cones to be well colored later, simply washing them is not enough. The cones contain a lot of resin that needs to be boiled down. Wash the cones in hot water (several times), put them in a saucepan and cook with the addition of some detergent for at least 3 hours. During this time, the water needs to be changed 5-6 times.
- Place the boiled cones on film and let the water drain. Dry well (it’s better if they lie in a warm place for about a week).
- Cones prepared in this way can begin to be turned into New Year's decorations. First, prime them with wood primer (it’s easier to just dip the pine cones into it).
- After drying, the cones can be painted: with acrylic paints or spray paint. If there are a large number of future New Year's decorations, it is more convenient and economical to use spray paint. But in any case, you first need to apply one layer of paint, and after drying, a second one.
- To enhance the decorative effect, glitter can be applied to the edges of the cones. If the crafts made from pine cones are painted with an aerosol, you can finish painting. It is advisable to coat cones painted with acrylic paints with varnish (for wood, and for Christmas decorations to sparkle, glossy).
- All that remains is to attach loops to the cones to hang them on the Christmas tree. It is more convenient to do this with a heat gun, but you can simply glue it with some kind of glue (for example, “liquid nails”, “Moment”, etc.). The loop attaches well if you first drill a small hole in the cone.
NEW YEAR'S CHRISTMAS WITH YOUR HANDS
Leave your review |
|
As I promised in the article about wreaths, I’m telling you how to paint pine cones for the New Year. I'm sure you'll love it! And also, this is a way to keep your kids busy with “socially useful work,” that is, to use their energy for a good cause!
There are working rules:
- Be sure to wash the natural material! Pour water into a bowl and add a drop of detergent.
- Fully opened fir cones look better. You can even bake them in the oven for 1-2 hours until they open.
- It is worth working with gloves. And if sprays are used, then in a respirator and in the fresh air.
It remains to figure out what and how to paint it.
What and how to paint
How can you color pine cones?
There are many tools and methods that are suitable for this purpose:
- Sprays. Any aerosol enamels will do. We put newspaper under it and paint at a distance of 15-20 cm. It is better to paint on the balcony or street, aerosols have a very strong unpleasant odor.

- Sponge. If you plan to decorate a lot of material, this method is completely justified. It's best to put the sponge in a container. Saturate it with paint. Dip the cones, press and twist on the sponge on all sides.

- Glitter and hairspray. To keep the glitter in place, you can use a strong-hold hairspray. Spray the cone and immediately sprinkle it with glitter. It's too much to chicken out. You can do this several times until you achieve an even (or desired) coating.
- Glitter on PVA glue. Glue and water are mixed in a deep container. Pine cones are lowered and dipped several times. Then let the glue drip and leave to dry. You can apply glue with a brush and apply glitter on top.

- Acrylic paint or gouache. Apply with a brush or sponge. Just keep in mind that the sponge will only touch the edges. The brush will reach much deeper.
- White. Fill the cones with white. Close the container tightly and place in a dark place. After 18 hours the material will noticeably turn white. Don't be alarmed, the cones will close; This is their reaction to moisture. But then they will open again. And one more thing I’ll warn you about. Often in the photo you can see completely white shoots. But don't expect to get these results quickly. To do this, it is worth doing the procedure several times. And each time the cones should dry well.
- Can of paint. Yes, yes, this is the simplest, but most expensive method in terms of paint. We dip the lid on a string into a can of paint, take it out, and hang it so that the excess paint can drain off.

- Palm, stearin wax or candles. But this is a special tool. I'll show you a master class on how to work with it. They do not look ordinary and pretend to be Christmas tree toys. Another advantage is that they can be flavored.

How to work with polyethylene wax
Will need:
- You can buy wax (flakes) at a craft store or buy cheap candles;
- Dye (oil or liquid food coloring works well);
- Fragrance oil;
- 2 bowls for a water bath;
- Wooden spoon.
Making an original decoration step by step:


A couple of tips:
- The wax should be neither hot nor cold. Just keep it warm, then it will lie in an even layer. When we lower the cone for the penultimate time, it is already thicker.
- To achieve shine, dip into hot wax one last time.
But there are other decorating ideas.
How to decorate pine cones for the New Year
Interestingly, escapes are possible not only with the help of paints. There are other means:

Color combinations
Yes, and you shouldn’t forget about color combinations, so that your composition of pine cones does not look like a cheap handicraft. I don’t know my way around the color wheel myself, but I refer to the useful sign below as a guide:

Well, a few combinations of the cones themselves. 
I think that with the decor that we prepared today, the holiday will become especially beautiful and elegant! Did you like the ideas? Share them with your friends and subscribe to other articles.
Walking through the forest, you are sometimes surprised at what bizarre colors nature gives to its “children.” We, of course, cannot compare with her, but it is still possible to make our modest contribution. So, for example, when creating another craft or coming up with decorations for the New Year, knowledge of how to paint natural cones can be very useful. This is what we will talk about.
How to paint pine cones white with your own hands in MK
First of all, we note that the process of choosing cones should be approached as seriously and responsibly as possible, since in the future they will have to become part of the decor in your interior. Yes, and for crafts you will need beautiful, even and neat pine cones.
So, open cones will look best, but if you are lucky enough to collect closed ones, do not be discouraged: everything can be fixed. In this case, you will simply need to dry the buds in the oven over low heat. The signal for the end of drying will be the moment when they all open.
If it's about the New Year, then for real festive look cones will appear if you paint them in white. To do this you will need the following materials:
- pine cones;
- a can of white paint (alkyd enamel is best suited for such work, since it dries quickly and has a rich color);
- a piece of steel wire;
- ordinary newspaper.
The materials have been collected, you can get started.
- First you need to prepare the wire for painting. We bend one end of it so that the bump can easily fit onto it. And we bend the second one in the shape of a hook, like on clothes hangers. With the help of such a hook, it will be convenient to hang the wire with the painted pine cone to dry.
- In the place where you will dry your pine cones, lay out the prepared newspaper. The consistency of the paint is quite liquid, so drips are guaranteed. Before opening the can, be sure to shake it well.
- Next, put the cone on the wire and slowly lower it into the paint. After total immersion, slowly remove the lump back. It’s better to hold it over the jar for a minute so that all the excess paint drips off.
- Now all that remains is to hang the cones over the newspaper until they dry completely. Then carefully remove the resulting beauty from the wire.
In order to paint pine cones gold (or silver), it is best to use spray paint. In stores offering various products for creativity, you will see a fairly wide range of such aerosols.
In general, the action plan is similar to the previous one. It is best to hang the cone on a hook and thoroughly coat it with spray paint. Try to get it into all the cracks and gaps. After complete drying, the cone can be used as a Christmas tree decoration or any other decorative option. Some interesting ideas you can learn about this from the collection of video materials we offer below.

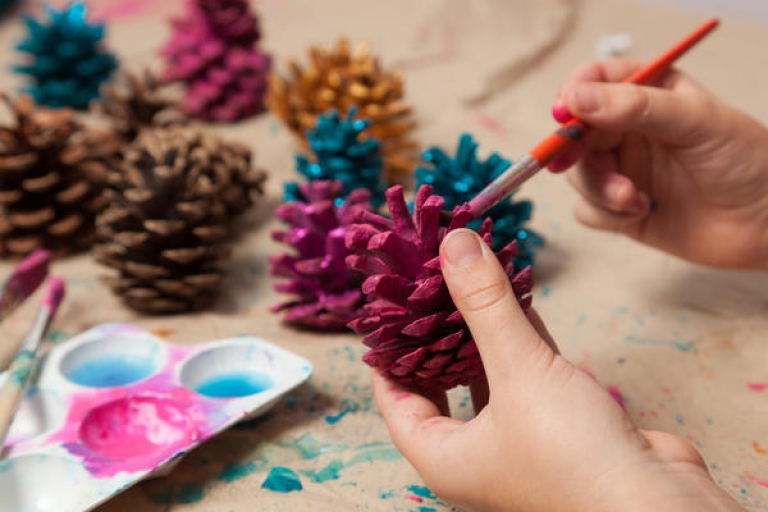
Another common option is to paint the pine cones with gouache. Yes, yes, ordinary gouache for children's creativity. In this case, you only need pine cones, paints and a brush. Moreover, it should be noted that when using a brush, you have more opportunities for creativity, because the pine cones can not be completely painted, but rather patterned or partially. For example, you can color only the tips. The result will be these funny decorations:

But, of course, you can do it simpler (or more correctly, traditionally) by painting the bump “from the heels to the top” in a strictly defined color. This way you can make a kind of colored pine “assortment”, which can become part of the decoration of the New Year tree or just a composition in a vase or wicker basket.

Multi-colored pine cones will look especially beautiful mixed with candies and tangerines placed on spruce branches on a large beautiful dish.
To summarize, we would like to give you some important tips
Today I'm going to make a fairy tale at home for my granddaughter. After all, this is the first New Year when he began to understand and remember something.
Decorative cones - perfect for decoration.
For this we need:
Gouache
Any nail polishes
Fantasy
Cones
Artificial snow or salt
Several brushes
 We get the materials ourselves: we go into the forest and with good thoughts we find beautiful, closed cones. After we have collected them, we must cook them (not to eat them for dinner, but to kill all the microbes).
You need to cook for 20-30 minutes, let them cool. You can put them on the battery or come up with other ways to make them dry faster and open beautifully. After drying, they will open up beautifully and finally remind us of the real bud look we always imagine!


But you don’t need to paint everything at once, but in stages. At the first stage, we paint with paints (one or many colors). If you are painting in several colors, we advise you to pause between paintings to allow the freshly applied paint to absorb and dry. On average, gouache dries completely in 5-10 minutes.

At the second stage, you can already paint with varnishes, glitter and any other “glitters” - it’s a very simple matter and it takes a couple of minutes to paint. Don’t forget to buy dry artificial snow in the store, but if you are short on money or all the stores are already closed, then replace the snow with salt - the effect will be the same!
Interesting usage ideas:

Option 2
 Decorating a pine cone for the New Year
with their own with my own hands you can do something wonderful Christmas tree decoration(or even a small souvenir!) for the New Year.
For work we will need: gold or silver paint (acrylic or gouache, or just nail polish with glitter will do), large thin wire, ribbon and shiny rope (although you can paint just a thick thread).
1. Let's choose a suitable cute pine cone.

2. Apply paint with a brush to the outer surface of the cone (you can also apply paint to the inner surface, but this is optional). I took gold acrylic paint. This is how the golden cone turned out:

3. Now we will need some wire and make a kind of garland out of it (see photo). The garland is made on one wire, and its length depends on the size of the cone (the larger the cone, the longer the garland).


4. Twist the garland around the pine cone.


5. We tie a rope (so that there is something to hang it from) and a ribbon (so that it is beautiful).


My cone turned out to be golden and red, but you can make it silver with white or blue, and in general use any combination of colors - there are no limits to your imagination!
Design examples
Gilded cones. To paint the pine cones gold or silver, you will need a can of spray paint, which can be purchased at any craft store. From such cones and small ones Christmas balls in a glass vase you get a nice composition for a coffee table or a mirror in the hallway.
Mini Christmas tree. A pine cone can easily turn into a miniature Christmas tree if you “hang” small ball beads made of felt on it (of course, they will have to be placed on glue). Such Christmas trees can be “planted” on festive table, and then give it to friends as a memorable New Year's souvenir.
Figurines. Best idea for New Year's leisure with children: we remember kindergarten skills - turning pine cones, acorns and twigs into dogs, forest creatures and bunnies.
Candlesticks. You can place small pine cones, nuts or acorns in a glass candlestick and place a large candle in the center.
New Year's pendant. No comments.
Basket of cones. A wicker basket filled to the brim with pine cones looks very impressive. And if you decorate it with a glowing Christmas tree garland, the basket will become simply magical!
Gift wrapping. A pine cone can easily replace a festive bow and create a winter mood.
New Year's composition. To create such a decorative group, you only need your imagination: combine candles, pine cones, spruce and pine branches, christmas balls and tangerines. So that the composition pleases the eye and lifts the mood. Just be careful with the fire: it is best to place the candles and pine cones on a flat dish.
New Year's picture. We paint the cones white using a spray can, glue them to the wreath frame and place them in the frame - the New Year's picture is ready!
Christmas medley. A traditional Christmas composition of pine cones, twigs with berries, cinnamon sticks and oranges studded with cloves (such fragrant balls are called “pomanders”).
Bring a little bit of nature into your home this amazing holiday with our easy-to-make home decorations and tableware.
 A very simple forest touch - pine cones sprinkled with snow will instantly decorate your windowsill or table.
Take the large, tall buds and trim them down to the base so they can stand upright. Lightly sprinkle them with fake snow. Hot glue beads or any small decorations to their feet.
 You can very beautifully decorate napkins laid out for guests with pine cones.
Roll the napkins into tubes. Wrap them wide first satin ribbon, and on top it is velvet, 2 times narrower. Tie a thin silver ribbon on the small cones, running it along the lower tier of the paws. Tie this ribbon on the velvet one.
 Give an ordinary window an elegant and fairy-tale look with the help of pine cone pendants.
Cut ribbons into random lengths (we alternated organza and taffeta ribbons). Using push pins, secure each pine cone to the end of the ribbon. Glue 3 small ornaments around the tip of the button. Hang the ribbons at the same distance from each other. They can be tied on the eaves or glued with tape or masking tape on the window slope.
 Gifts decorated with forest elements look very New Year's.
After wrapping the gifts in paper, attach beautiful wide ribbons to them using double-sided tape. Using hot glue, glue the pine cones in different places on the packaging.
 Lovers of romance will love large thick candles decorated with a wreath of pine cones.
Take different sized pine cones and use hot glue to glue them around the base of the candles.
 To make your guests at the table feel the atmosphere of the New Year, make nameplates for each of them. X.
Trim the buds until they are stable. Decorate their paws with beads. Attach nameplates to the pine cones using narrow silver ribbons for guests.

We offer an idea for a charming tablecloth decoration with pine cones for the New Year.
Carefully trim the base of the pine cone and insert a small hook into it with the side where the thread is. Sew the eye of the hook to the hem of the tablecloth. Attach a small round decoration to the tip of the cone using the same hook.


